
10027063 - Croque monsieur clip Klarstein - Free user manual and instructions
Find the device manual for free 10027063 Klarstein in PDF.

| Product Type | Sandwich maker / sandwich machine |
| Brand | Klarstein |
| Model | 10027063 |
| Power Supply | 220-240 V ~ 50/60 Hz |
| Power | 750 W (estimated) |
| Weight | Approximately 1.5 kg (estimated) |
| Plate Material | Non-stick coating |
| Main Functions | Grilling sandwiches, toasts, reheating |
| Indicator Lights | Standby indicator (A) and operation indicator (B) |
| Latch | Closing clip (C) |
| Heating Plates | Upper and lower plate (E) |
| Temperature | Built-in thermostat with regulation |
| Preheating | Approximately 3 minutes |
| Cooking Time | 3 to 6 minutes depending on ingredients |
| Care and Cleaning | Unplug, let cool, wipe with a slightly damp cloth. Do not immerse. |
| Safety | Do not expose to rain, do not immerse, use kitchen gloves |
| Spare Parts and Repairability | Repairs only by an authorized specialist workshop |
| Intended Use | Reheating food, grilling sandwiches |
| General Information | Compliant with EU directives 2014/30/EU, 2014/35/EU, 2011/65/EU |
| Recycling | Do not dispose of with household waste, follow local regulations |
Frequently Asked Questions - 10027063 Klarstein
User questions about 10027063 Klarstein
0 question about this device. Answer the ones you know or ask your own.
Ask a new question about this device
Download the instructions for your Croque monsieur clip in PDF format for free! Find your manual 10027063 - Klarstein and take your electronic device back in hand. On this page are published all the documents necessary for the use of your device. 10027063 by Klarstein.
USER MANUAL 10027063 Klarstein
natural_image
Row of white icons representing kitchen appliances including blender, toaster, refrigerator, oven, washing machine, lamp, fan, and microwave (no text or symbols)Zitruspresse orange

natural_image
Yellow Klarstein vacuum cleaner device with black handle and green accent (no visible text or symbols)Sandwich Maker
10027062
10027063
10027064
KLARSTEIN
Warnung
Gerät:
BANANEN-LECKEREI (2 Sandwiches)
natural_image
Symbol of a trash bin crossed out by a diagonal line, with no text or labels present.Important Safeguards
When using electrical appliances, basic safety precautions should always be followed, including the following:
- Read all instructions before using
- Do not touch hot surfaces. Use handles or knobs.
- To protect against electrical shock, do not immerse cord, plugs, or appliance in water or other liquid.
- Unplug from outlet when not in use and before cleaning. Allow to cool before putting on or taking off parts.
- Do not operate any appliance with a damaged cord or plug or after the appliance malfunctions or has been damaged in any manner. No user serviceable parts inside. Return appliance to the nearest authorized service facility or call our toll free customer service number for information on examination, repair, or adjustment.
- The use of accessory attachments not recommended by the appliance manufacturer may cause injuries.
- Do not use outdoors.
- Do not let cord hang over edge of table or counter, or touch hot surfaces.
- Do not place on or near a hot gas or electric burner, or in a heated oven.
- To preheat the unit about 2 minutes before using.
- This appliance is for household use only.
- Close supervision is necessary when any appliance is used by or near children.
- Do not use the unit near gas or other inflammable materials (such as benzene, paint thinner, sprays, etc.)
- Warning: Do not use this appliance near water.
- This product should not be used in the immediate vicinity of water, such as bathtub, washbowls, swimming pool etc. where the likelihood of immersion or splashing could occur.
- The use of attachments or accessories not recommended or sold by the product distributor may cause personal or property hazards or injuries.
- Do not leave the appliance unattended when switched on.
- Do not use appliance for other than intended use.
- Always attach plug to appliance first, then plug cord in the wall outlet.
- To disconnect, remove plug from wall outlet.
- Extreme caution must be used when moving an appliance containing hot oil or other hot liquids.
- The appliance is only to be operated in the closed position.
WARNING: To prevent electric shock, unplug before cleaning.
- If the supply cord is damaged, it must be replaced by manufacturer, its service agent or similarly qualified persons in order to avoid a hazard.
- This appliance is not intended for use by persons (including children) with reduced physical, sensory or mental capabilities, or lack of experience and knowledge, unless they have been given supervision or instruction concerning use of the appliance by a person responsible for their safety.
- Children should be supervised to ensure that they do not play with the appliance.
- The appliance is not intended to be operated by means of an external timer or separate remote-control system.
- The temperature of accessible surfaces may be high when the appliance is operating.
ADDITIONAL SAFEGUARD
THIS APPLIANCE IS INTENDED FOR INDOOR HOUSEHOLD USE ONLY.
DO NOT OPERATE APPLIANCE IF THIS LINE CORD SHOWS ANY DAMAGE, OR IF APPLIANCE WORKS INTERMITTENTLY OR STOPS WORKING ENTIRELY
SAVE THESE INSTRUCTIONS!
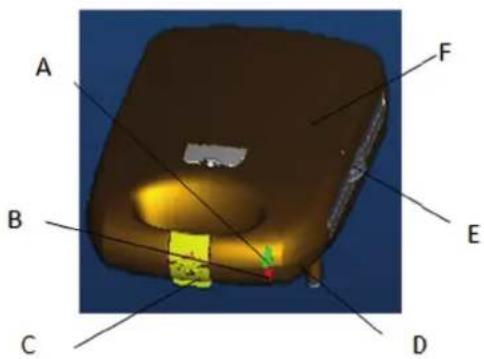
Parts
A. Ready lamp
B. Power lamp
C. Handle clip
D. Bottom housing
E. cooking plate
F. Top housing
Operating Instructions
NOTE:
When using the Sandwich Maker for the first time, after unpacking your Sandwich Maker, open the lid, clean the cooking surfaces thoroughly by whipping with a damp sponge and dry the surfaces with a paper towel. For best results, prepare the non-stick surfaces by using a paper towel to wipe a thin layer of vegetable shortening or oil onto the non-stick surfaces of the Sandwich Maker.
CAUTION:
Always use protective, heat-resistant, gloves or mitts when handing this product to avoid steam or other burns.
How to make sandwiches
-
Always preheat before use. Plug cord into a rating 220-240-volt AC power outlet while preparing the fi llings.
-
The indicator light will illuminate when the plug is connected to the main outlet; it will stay on during preheating, the indicator light shut off when appliance has preheated.
CAUTION: Always preheat before use.
-
Lightly glaze both heating plates with a small amount of vegetable oil or a non-stick spray, and close the casing for the sandwich maker to heat up.
-
Begin heating. After about 3 minutes, the red light will turn off, indicating that the sandwich maker is ready for use.
-
Prepare sandwiches by buttering bread on outer surfaces and placing desired ingredients within. Lift safety catch and open the sandwich maker. Place sandwiches on the heating plates.
CAUTION: cooking surface is hot; handle with care.
- Close the casing to ensure that the sandwich is placed evenly. Lock the safety catch. Normal cooking times will be 3\~6 minutes for each sandwich. The red light will turn on and off, as the thermostat keeps the sandwich maker at the proper baking temperature.
CAUTION: The appliance is not to be operated in the open position.
-
Remove the sandwiches from the heating plates with a plastic or wooden spatula. Be careful with your sandwiches, the fi llings will be quite hot. Allow to cool for a few minutes before enjoying.
-
Unplug the power supply cord after cooking, and allow the sandwich maker to cool down.
Sandwich Recipes
You can use your sandwich maker around the clock-breakfast, lunch, dinner, dessert and snacks. Try your own creativity and transform leftovers into tasty delights or use traditional sandwich ingredients and fillings. Fruits and pie fillings make delicious treats when toasted between slices of bread and sprinkled with powdered sugar.
BREAKFAST:
SANDWICH (Makes 2 sandwiches):
- 2 eggs
- 175ml grated cheese (cheddar, Monterey jack or Swiss)
- 65ml cooked meat or vegetables.
- 4 slices of bread of choice (butter or margarine optional)
Place two slices of bread, buttered side down, onto heating plates. Place cheese in centre of each slice. Gently pour the beaten egg over cheese and cooked meat (ham, bacon) or vegetables. Top with remaining bread slices, buttered side up. Close a latch cover. Cook for 2 minutes.
FRIED EGGS (Makes 2 servings)
- 4 eggs
- Spices (to taste)
- 2ml butter/margarine
Brush top and bottom well with butter or margarine for flavor. Crack one egg directly into each well of heating plates (1\~4 eggs can be cooked at same time) close cover but do no latch. Cook for 1\~3 minutes for desired results.
LUNCH OR SNACKS
BASIC GRILLED CHEESE SANDWICH (Makes 1 sandwich):
- 2 slices bread, any kind
- 65ml grated cheese or two slices
- Place one slice bread onto one side of heating plates. Add cheese. Top with other slice. Close cover and latch. Cook for two minutes.
MONTE CRISTO (Makes 2 sandwiches)
- 2 thin slices Swiss cheese
- 4 slices white bread
- 4 thin slices cooked ham
- 1 egg
- 65 ml milk
Preheat sandwich maker. Place one slice of ham, a slice of Swiss cheese and another of ham (all cut to fit the bread size) on each of two slices of bread. Top with remaining bread slices. Combine milk and egg; dip sandwiches on side at a time in egg mixture. Place onto heating plates. Close cover catching latch and cook for 2\~3 minutes.
DESSERTS:
BANANA TREATS (Makes 2)
- 4 slices of bread
- 1 banana peeled
- 5\~10ml sugar
Butter outsides of bread and place two slices of bread, buttered side down, into sandwich maker. Slice banana, and place half of the banana onto each slice of bread, sprinkle with sugar. Top with remaining slices bread, and toast for 1\~2 minutes.
APPLE TURNOVERS (Makes 4)
- 30ml apple or 30ml canned apple-pie fl lling
- 5ml castor (icing) sugar
- 2ml cinnamon
- optional: 15ml sultanas raisins, raisin bread
Place a slice of bread (buttered side down) onto the sandwich maker. Form a hollow and add apple. Sprinkle with (icing) sugar and cinnamon. Top with a slice bread (buttered side up) lower lid and toast for 1 minute, serve immediately.
MAINTENANCE
This appliance requires little maintenance. It contains no user serviceable parts. Do not try to repair it yourself. Refer it to qualified personnel if servicing needed.
Cleaning
• Always unplug this sandwich maker from power source and wait until it cool down before cleaning.
- There is no need to take your sandwich maker apart for cleaning. Dry with a paper towel to absorb excess oil. Brush crumbs from the grooves, and wipe with damp cloth and mild soap.
- Never immerse in water. Avoid using scratching or sharp utensils, as they will scratch the non-stick surface.
- Do not use cleansers or oven cleaners on the heating plates.
- To clean handles and other parts, use a damp cloth with mild soap.
- Should any fi lling be diffi cult to remove, pour a little cooking oil onto the plate and wipe off after 5 minutes, when the fi lling has softened.
CAUTION: DO NOT IMMERSE IN WATER
Hints on Disposal

natural_image
Symbol of a trash bin crossed with a diagonal line, representing no waste or discharge (no text or labels)According to the European waste regulation 2012/19/EU this symbol on the product or on its packaging indicates that this product may not be treated as household waste. Instead it should be taken to the appropriate collection point for the recycling of electrical and electronic equipment. By ensuring this product is disposed of correctly, you will help prevent potential negative consequences for the environment and human health, which could otherwise be caused by inappropriate waste handling of this product. For more detailed information about recycling of this product, please contact your local council or your household waste disposal service.
Declaration of Conformity
CE
Producer: Chal-Tec GmbH, Wallstraße 16, 10179 Berlin, Germany.
This product is conform to the following European Directives:
2014/30/EU (EMC)
2014/35/EU (LVD)
2011/65/EU (ROHS)
Avertissement
Appareil :
ŒUFS AU PLAT (2 portions)
SANDWICH GRILLÉ AU FROMAGE (1 sandwich)
natural_image
Symbol of a trash bin crossed out by a diagonal line, with no text or labels present.
- Sandwich Maker
- KLARSTEIN
- Warnung
- Gerät:
- BANANEN-LECKEREI (2 Sandwiches)
- Important Safeguards
- WARNING: To prevent electric shock, unplug before cleaning.
- ADDITIONAL SAFEGUARD
- THIS APPLIANCE IS INTENDED FOR INDOOR HOUSEHOLD USE ONLY.
- DO NOT OPERATE APPLIANCE IF THIS LINE CORD SHOWS ANY DAMAGE, OR IF APPLIANCE WORKS INTERMITTENTLY OR STOPS WORKING ENTIRELY
- SAVE THESE INSTRUCTIONS!
- Parts
- Operating Instructions
- NOTE:
- CAUTION:
- How to make sandwiches
- CAUTION: Always preheat before use.
- CAUTION: cooking surface is hot; handle with care.
- CAUTION: The appliance is not to be operated in the open position.
- Sandwich Recipes
- BREAKFAST:
- SANDWICH (Makes 2 sandwiches):
- FRIED EGGS (Makes 2 servings)
- LUNCH OR SNACKS
- BASIC GRILLED CHEESE SANDWICH (Makes 1 sandwich):
- MONTE CRISTO (Makes 2 sandwiches)
- DESSERTS:
- BANANA TREATS (Makes 2)
- APPLE TURNOVERS (Makes 4)
- MAINTENANCE
- Cleaning
- CAUTION: DO NOT IMMERSE IN WATER
- Hints on Disposal
- Declaration of Conformity
- Avertissement
- Appareil :
- ŒUFS AU PLAT (2 portions)
- SANDWICH GRILLÉ AU FROMAGE (1 sandwich)
Brand : Klarstein
Model : 10027063
Category : Croque monsieur clip