
Mister Eco 10032947 - Vacuum Cleaner Klarstein - Free user manual and instructions
Find the device manual for free Mister Eco 10032947 Klarstein in PDF.

| Product type | Bagless vacuum cleaner |
| Brand | Klarstein |
| Model | Mister Eco 10032947 |
| Power supply | 220-240 V, 50/60 Hz |
| Rated power | 450 W |
| Dust collection type | Dust bag |
| Dust bag reference | SWIRL PH96 (large) |
| Power adjustment | Mechanical speed control |
| Included accessories | Floor/carpet dual-function brush, crevice tool, small brush, upholstery brush, extension tube |
| Cable length | Approx. 5 m (with yellow and red markers) |
| Cable rewind | Automatic by button |
| Bag full indicator | Yes, visual on the device |
| Motor filter | Washable, shake or brush clean |
| Exhaust filter | Replace every 2-3 months depending on use |
| Maintenance | Clean brushes regularly |
| Safety | Automatic shut-off? Not specified, unplug before maintenance |
| Compliance | EU directives EMC, LVD, RoHS, ErP |
| Recycling | Do not dispose of with household waste (WEEE) |
Frequently Asked Questions - Mister Eco 10032947 Klarstein
User questions about Mister Eco 10032947 Klarstein
0 question about this device. Answer the ones you know or ask your own.
Ask a new question about this device
Download the instructions for your Vacuum Cleaner in PDF format for free! Find your manual Mister Eco 10032947 - Klarstein and take your electronic device back in hand. On this page are published all the documents necessary for the use of your device. Mister Eco 10032947 by Klarstein.
USER MANUAL Mister Eco 10032947 Klarstein
Vacuum cleaner Mister Eco
bar
| Category | Value | |---|---| | Category 1 | 100 | | Category 2 | 100 | | Category 3 | 100 | | Category 4 | 100 | | Category 5 | 100 | | Category 6 | 100 | | Category 7 | 100 | | Category 8 | 100 | | Category 9 | 100 | | Category 10 | 100 | | Category 11 | 100 | | Category 12 | 100 | | Category 13 | 100 | | Category 14 | 100 | | Category 15 | 100 | | Category 16 | 100 | | Category 17 | 100 | | Category 18 | 100 | | Category 19 | 100 | | Category 20 | 100 | | Category 21 | 100 | | Category 22 | 100 | | Category 23 | 100 | | Category 24 | 100 | | Category 25 | 100 | | Category 26 | 100 | | Category 27 | 100 | | Category 28 | 100 | | Category 29 | 100 | | Category 30 | 100 | | Category 31 | 100 | | Category 32 | 100 | | Category 33 | 100 | | Category 34 | 100 | | Category 35 | 100 | | Category 36 | 100 | | Category 37 | 100 | | Category 38 | 100 | | Category 39 | 100 | | Category 40 | 100 | | Category 41 | 100 | | Category 42 | 100 | | Category 43 | 100 | | Category 44 | 100 | | Category 45 | 100 | | Category 46 | 100 | | Category 47 | 100 | | Category 48 | 100 | | Category 49 | 100 | | Category 50 | 100 | | Category 51 | 100 | | Category 52 | 100 | | Category 53 | 100 | | Category 54 | 100 | | Category 55 | 100 | | Category 56 | 100 | | Category 57 | 100 | | Category 58 | 100 | | Category 59 | 100 | | Category 60 | 100 | | Category 61 | 100 | | Category 62 | 100 | | Category 63 | 100 | | Category 64 | 100 | | Category 65 | 100 | | Category 66 | 100 | | Category 67 | 100 | | Category 68 | 100 | | Category 69 | 100 | | Category 70 | 100 | | Category 71 | 100 | | Category 72 | 100 | | Category 73 | 100 | | Category 74 | 100 | | Category 75 | 100 | | Category 76 | 100 | | Category 77 | 100 | | Category 78 | 100 | | Category 79 | 100 | | Category 80 | 100 | | Category 81 | 100 | | Category 82 | 100 | | Category 83 | 100 | | Category 84 | 100 | | Category 85 | 100 | | Category 86 | 100 | | Category 87 | 100 | | Category 88 | 100 | | Category 89 | 100 | | Category 90 | 100 | | Category 91 | 100 | | Category 92 | 100 | | Category 93 | 100 | | Category 94 | 100 | | Category 95 | 100 | | Category 96 | 100 | | Category 97 | 100 | | Category 98 | 100 | | Category 99 | 100 | | Total (Total) = [sum of two separate bars] * [sum of the bars] * [values from the 'bar' in the 'box' table] * [values from the 'box' table] * [values from the 'box' table] * [values from the 'box' table] * [values from the 'box' table] * [values from the 'box' table]. The sum of the bars is calculated by subtracting the sum of the bars from the 'box' table. Note: The total bar length is based on the sum of the bars. The sum of the bars is calculated as the sum of the bars. The sum of the bars is derived from adding the sum of the bars to the total bar length. The sum of the bars is derived from adding the sum of the bars to the total bar length. The sum of the bars is derived from adding the sum of the bars to the total bar length. The sum of the bars is derived from adding the sum of the bars to the total bar length. The sum of the bars is derived from adding the sum of the bars to the total bar length. The sum of the bars is derived from adding the sum of the bars to the total bar lengths. The sum of the bars is derived from adding the sum of the bars to the total bar lengths. The sum of the bars is derived from adding the sum of the bars to the total bar lengths. The sum of the bars is derived from adding the sum of the bars to the total bar lengths. The sum of the bars is derived from adding the sum of the bars to the total bar lengths. The sum of the bars is derived from adding the sum of the bars to the total bar length. The sum of the bars is derived from adding the sum of the bars to the total bar length. The sum of the bars is derived from adding the sum of the bars to the total bar length. The sum of the bars is derived from adding the sum of the bars to the total bar length. The sum of the bars is derived from adding the sum of the bars to the total bar value. The sum of the bars is derived from adding the sum of the bars to the total bar value. The sum of the bars is derived from adding the sum of the bars to the total bar value. The sum of the bars is derived from adding the sum of the bars to the total bar value. The sum of the bars is derived from adding the sum of the bars to the total bar value. The sum of the bars is derived from adding the sum of the bars to the total bar values. The sum of the bars is derived from adding the sum of the bars to the total bar values. The sum of the bars is derived from adding the sum of the bars to the total bar values. The sum of the bars is derived from adding the sum of the bars to the total bar values. The sum of the bars is derived from adding the sum of the bars to the total bar values. The sum of the bars is derived from adding the sum of the bars to the total bar value. The sum of the bars is derived from adding the sum of the bars to the total bar value. The sum of the bars is derived from adding the sum of the bars to the total bar value.INHALT
Technische Daten 3
natural_image
Technical line drawing of a vacuum cleaner with a mounted sensor and control panel (no text or symbols)natural_image
Line drawing of a car with visible engine compartment and dashboard (no text or symbols)natural_image
Line drawing of a hand operating a vacuum cleaner on a wheeled vehicle (no text or symbols visible)natural_image
Line drawing of a hand inserting a component into a vacuum cleaner's air vent (no text or symbols)natural_image
Technical line drawing of a mechanical device with open lid and internal components (no text or symbols)natural_image
Two-panel image showing a device being processed into a hexagonal grid array (no text or symbols visible)natural_image
Diagram of a mechanical component interacting with layered structures (no text or symbols)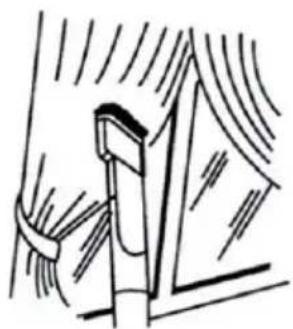
natural_image
Simple line drawing of a window with curtains and a handle (no text or symbols)natural_image
Symbol of a trash bin with no text or labels, featuring a crossed-out wheel and diagonal lines (no readable text or numbers)Congratulations on purchasing this equipment. Please read this manual carefully and take care of the following hints on installation and use to avoid technical damages. Any failure caused by ignoring the items and cautions mentioned in the operation and installation instructions are not covered by our warranty and any liability. Scan the QR code to get access to the latest user manual and other information about the product.

CONTENT
Technical data 11
Declaration of Conformity 11
Safety Instructions 12
Device Description 13
Assembly 14
Operation 15
Maintenance and cleaning 16
Disposal Considerations 18
TECHNICAL DATA
| Item number 10032946 10032947 | |
| Power supply 220-240V~50/60Hz, 450 W | |
| Accessories dust bag (size) SWIRL PH96 | |
DECLARATION OF CONFORMITY

Producer:
This product is conform to the following European Directives:
2014/30/EU (EMV)
2014/35/EU (LVD)
2011/65/EU (RoHS)
2009/125/EG (ErP)
SAFETY INSTRUCTIONS
- Read this instruction booklet carefully.
- Before using the appliance, check that the mains power voltage corresponds to the voltage shown on the rating plate.
- Always remove the plug from the power socket when the appliance is not in use and before carrying out any cleaning or maintenance operation.
• Always remove the plug from the power socket before opening the appliance. - Never use mentholated spirits or other solvents to clean the appliance.
- Do not use appliance to vacuum liquids.
- This appliance is for domestic use only. Use as described in this instruction booklet.
- Do not switch the appliance on if it appears to be faulty in any way.
- For repairs or accessories, contact your dealer or an authorized Service Center.
- If the supply cord is damaged, it must be replaced by the manufacture or its service agent or a similarly qualified person in order to avoid a hazard.
- This appliance is not intended for use by persons (including children) with reduced physical, sensory or mental capabilities, or lack of experience and knowledge, unless they have been given supervision or instruction concerning use of the appliance by a person responsible for their safety.
• Children should be supervised to ensure that they do not play with the appliance.
DEVICE DESCRIPTION
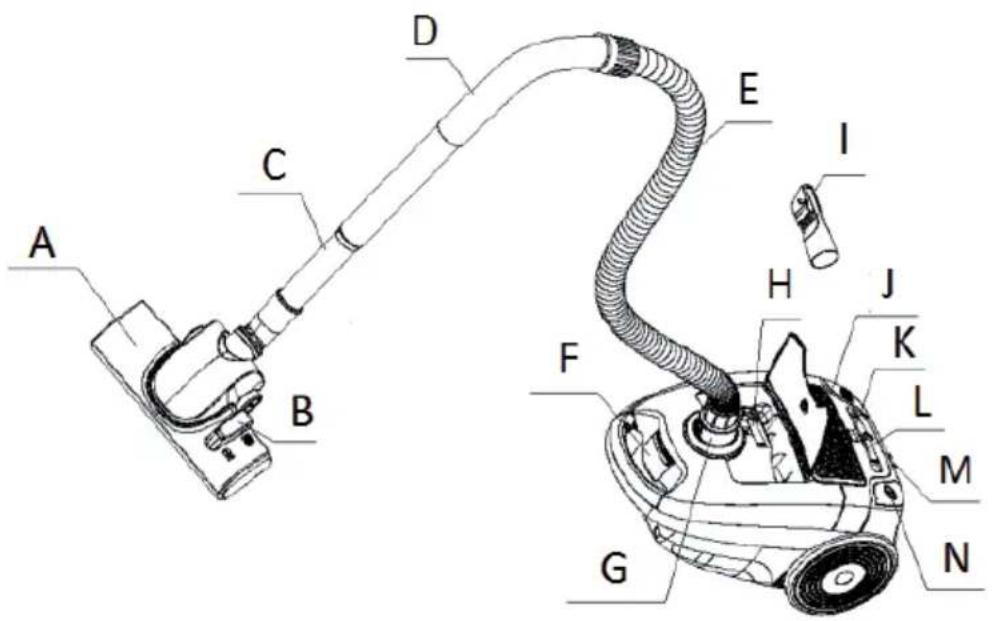
A. Nozzle
B. Pedal for changing functions
C. Extention tube
D. Handle
E. Hose
F. Front cover button
G. Plug tube
H. Suction automatic controller
I. Sofa brush
J. Cord rewind button
K. Filter button
L. Speed control button
M. Nozzle Holder
N. On/Off switch
ASSEMBLY
Assembling the Vacuum Cleaner
Always remove the plug from the power socket before fitting or removing accessories.

natural_image
Line drawing of a vacuum cleaner with a mounted sensor and mechanical components (no text or symbols)Fitting the flexible tube
Insert the flexible tube into the air intake duct on the appliance. To do this, slide the intake duct cover insert the tube and press until it clicks into position.
Removing the flexible tube
Remove the plug from the power socket. To release the flexible tube, press the button on the end of the tube firmly the air intake duct.
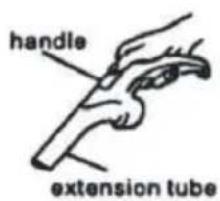
Fitting the extension tubes and accessories
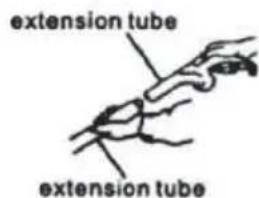
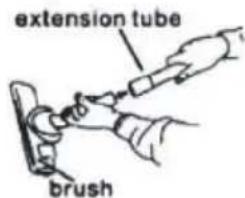
Removing the extension tubes and accessories.
To remove the accessories, pull firmly apart.
OPERATION
Before use
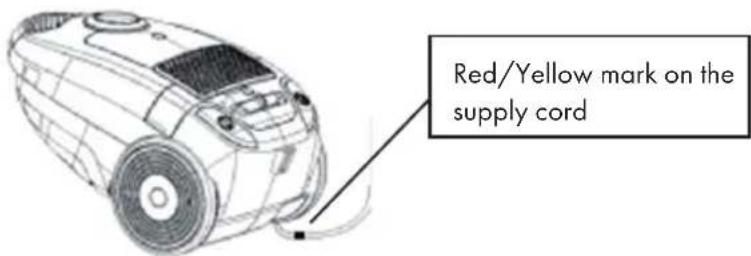
- Unwind length of cable and insert the plug into the power socket. A YELLOW mane on the power cable shows the ideal cable length. Do not extend the cable beyond the RED mark.
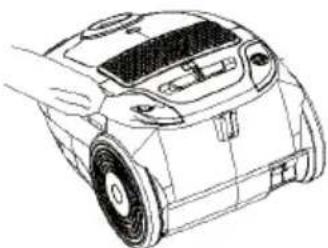
- To rewind the power cable, press the rewind button with hand and guide the other hand to ensure that it does not whip causing damage. If the power cable can't rewinded completely, please pull out the power cable a little bit and press the rewinder button again. You can repeat the rewinding steps until the cable is rewinded completely.
Use
- Press the ON/OFF button to switch the appliance on.
natural_image
Line drawing of a car's front view showing dashboard and wheel (no text or symbols)- Variable power: A Variable power switch L varies the suction power as required. For example, maximum suction can be used for cleaning carpets, hard floors etc. and reduced suction for cleaning upholstery and curtains.
natural_image
Line drawing of a hand holding a vacuum cleaner's device (no text or symbols)MAINTANANCE AND CLEANING
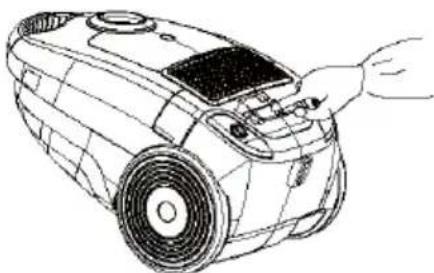
Replacing the dust bag
- After removing the flexible tube, open front cover by pressing the button and pulling upwards.
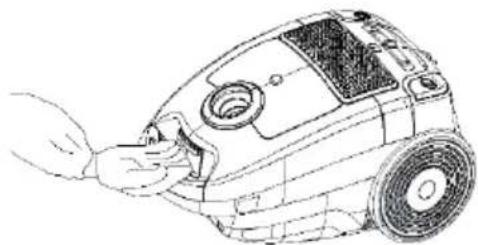
natural_image
Line drawing of a hand inserting a component into a vacuum cleaner's air vent (no text or symbols)- Remove the dust bag.
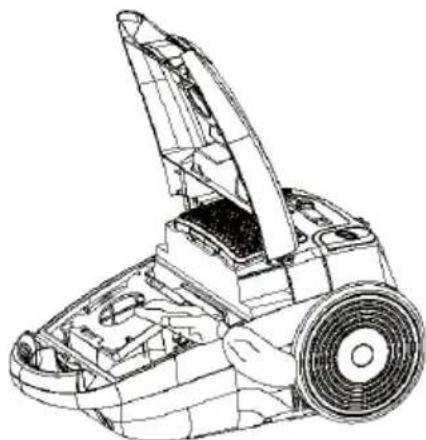
natural_image
Technical line drawing of a mechanical device with open lid and fan (no text or symbols)- Insert a new dust bag (dust bag size: SWIRL PH96).
Replacing the filter
-
The motor filter protects the motor against dust residue. It is located between the paper filter and the motor, and is removed after first opening the vacuum cleaner. The filter must be replaced, if it is obviously damaged. Otherwise simply shake or blow the dust out. Replace the filter in its housing. Ensure that the filter is sitting straight in its housing and closes evenly. The exhaust air tiller ensures clean air during the vacuuming process. The filter should be replaced regularly whenever it becomes dirty.
-
To remove the exhaust air filter, open the vacuum cleaner and remove the filter grill. Now remove the filter from the grill. Insert the new filter into the grill and refit it to the rear side of the unit. Ensure that the filter is sitting straight in its housing and closes flush.
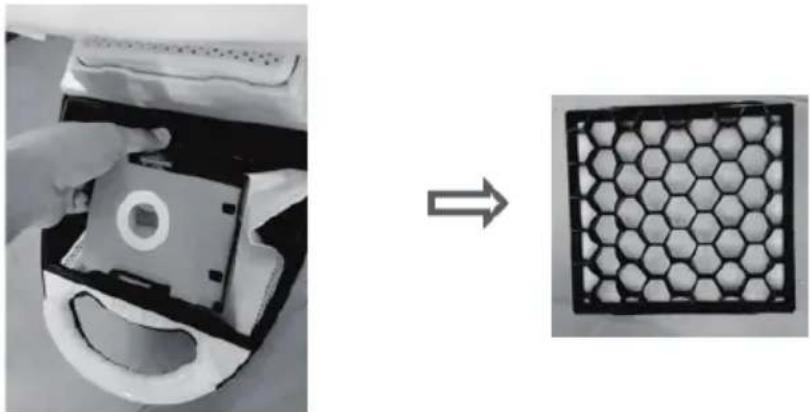
natural_image
Two-panel image showing a device being placed on a hard disk and its hexagonal patterned inset (no text or symbols)- Replace the filter every 2-3 months, depending on how frequently it is used.
Using the cleaning accessories
Dual-position floor/carpet brush
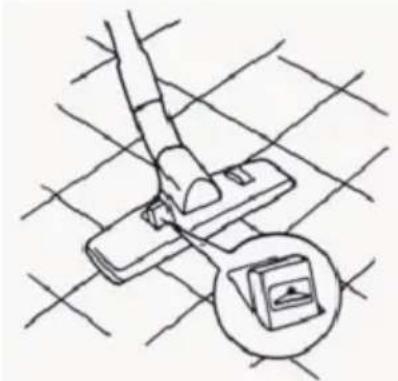
natural_image
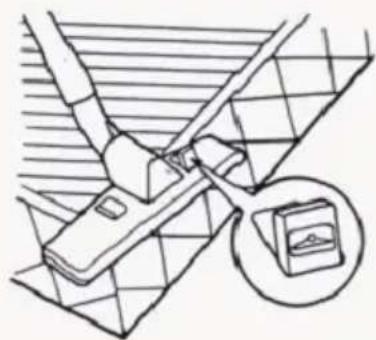
Line drawing of a hand using a tool to lift a component, with a magnified inset showing a small device (no text or symbols)Narrow nozzle for cleaning radiators, corners edges, drawers etc.
natural_image
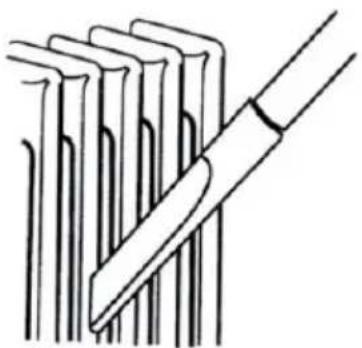
Technical line drawing of a mechanical assembly with a magnified inset showing a component (no text or symbols)Small brush for cleaning curtains, shelves, books, lamps and other delicate objects.
natural_image
Diagram of a mechanical component interacting with layered vertical rods (no text or symbols)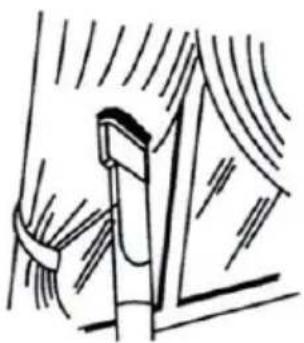
natural_image
Simple line drawing of a window with curtains and a handle (no text or symbols)Note: In order to reach high-level efficiency ashile cleaning, please clean the floor brusch regularly
DISPOSAL CONSIDERATIONS
natural_image
Symbol of a trash bin with crossed lines and a blank rectangular base (no text or labels)According to the European waste regulation 2012/19/EU this symbol on the product or on its packaging indicates that this product may not be treated as household waste. Instead it should be taken to the appropriate collection point for the recycling of electrical and electronic equipment. By ensuring this product is disposed of correctly, you will help prevent potential negative consequences for the environment and human health, which could otherwise be caused by inappropriate waste handling of this product. For more detailed information about recycling of this product, please contact your local council or your household waste disposal service.
Your product contains batteries covered by the European Directive. 2006/66/EC, which cannot be disposed of with normal household waste. Please check local rules on separate collection of batteries. The correct disposal of batteries helps prevent potentially negative consequences on the environment and human health.
Chère cliente, cher client,,
SOMMAIRE
Fiche technique 19
DÉCLARATION DE CONFORMITÉ
Fabricant :
Chal-Tec GmbH, Wallstraße 16, 10179 Berlin, Allemagne.

natural_image
Line drawing of a car's front view showing the engine compartment and wheel (no text or symbols)natural_image
Line drawing of a car with visible engine compartment and dashboard (no text or symbols)natural_image
Line drawing of a hand operating a vacuum cleaner on a wheeled vehicle (no text or symbols visible)MAINTENANCE ET NETTOYAGE
natural_image
Line drawing of a hand inserting a component into a vacuum cleaner's air vent (no text or symbols)natural_image
Technical line drawing of a mechanical device with open lid and internal components (no text or symbols)natural_image
Two-panel image showing a device being placed into a housing and then processed into a hexagonal grid pattern (no text or symbols visible)natural_image
Diagram of a mechanical component interacting with layered vertical rods (no text or symbols)
natural_image
Simple line drawing of a window with curtains and a handle (no text or symbols)natural_image
Symbol of a trash bin with crossed lines indicating no waste or restriction, and a solid black rectangle below (no text or labels)ÍNDICE
Datos técnicos 27
natural_image
Line drawing of a small robotic vacuum cleaner with a mounted sensor and control panel (no text or symbols)Conectar el tubo
natural_image
Line drawing of a car with visible engine compartment and dashboard (no text or symbols)natural_image
Line drawing of a hand operating a vacuum cleaner on a wheeled vehicle (no text or symbols visible)MANTENIMIENTO Y LIMPIEZA
natural_image
Line drawing of a hand inserting a component into a vacuum cleaner's air vent (no text or symbols)natural_image
Technical line drawing of a mechanical device with open lid and internal components (no text or symbols)natural_image
Two-panel image showing a device being placed on a case and its hexagonal grid pattern displayed in a square (no text or symbols)natural_image
Diagram of a mechanical assembly with a tool inserted into a row of vertical rods (no text or symbols present)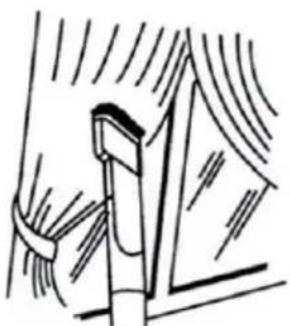
natural_image
Simple line drawing of a window with curtains and a handle (no text or symbols)natural_image
Symbol of a trash bin with crossed lines indicating no waste, and a solid black rectangle below (no text or labels)INDICE
Dati tecnici 35
natural_image
Line drawing of a car's front view showing the engine compartment and wheel (no text or symbols)natural_image
Line drawing of a car with visible engine compartment and dashboard (no text or symbols)natural_image
Line drawing of a hand operating a vacuum cleaner on a wheeled vehicle (no text or symbols visible)natural_image
Line drawing of a hand inserting a component into a vacuum cleaner's air vent (no text or symbols)natural_image
Technical line drawing of a mechanical device with open lid and internal components (no text or symbols)natural_image
Two-panel image showing a device being placed on a case and its hexagonal grid pattern displayed in a square (no text or symbols)natural_image
Technical line drawing showing a mechanical component and its close-up view of a window (no text or symbols)natural_image
Symbol of a trash bin with crossed lines indicating no waste or restriction, and a solid black rectangle below (no text or symbols)
- INHALT
- CONTENT
- TECHNICAL DATA
- DECLARATION OF CONFORMITY
- SAFETY INSTRUCTIONS
- DEVICE DESCRIPTION
- ASSEMBLY
- Assembling the Vacuum Cleaner
- Fitting the flexible tube
- Removing the flexible tube
- Fitting the extension tubes and accessories
- Removing the extension tubes and accessories.
- OPERATION
- Before use
- Use
- MAINTANANCE AND CLEANING
- Replacing the dust bag
- Replacing the filter
- Using the cleaning accessories
- DISPOSAL CONSIDERATIONS
- SOMMAIRE
- DÉCLARATION DE CONFORMITÉ
- MAINTENANCE ET NETTOYAGE
- ÍNDICE
- Conectar el tubo
- MANTENIMIENTO Y LIMPIEZA
- INDICE
Brand : Klarstein
Model : Mister Eco 10032947
Category : Vacuum Cleaner