
RID 633 DC - Cooker ROSIERES - Free user manual and instructions
Find the device manual for free RID 633 DC ROSIERES in PDF.
| Product type | Built-in induction hob |
| Brand | Rosieres |
| Model | RID 633 DC |
| Number of cooking zones | 3 cooking zones (including a dual zone) |
| Control type | Electronic touch with touch controls |
| Main functions | Timer, child lock, pause, boost, power setting (P1 to P5), automatic shut-off |
| Power supply | 220-240 V~ or 380-415 V 3N~, 50/60 Hz |
| Maximum power | 7.1 kW (adjustable) |
| Surface material | Vitroceramic |
| Cut-out dimensions (W x D) | 560 x 490 mm (approximate) |
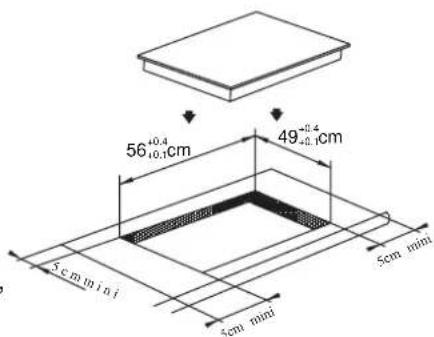
| Minimum worktop thickness | 30 mm |
| Minimum distance from walls | 50 mm |
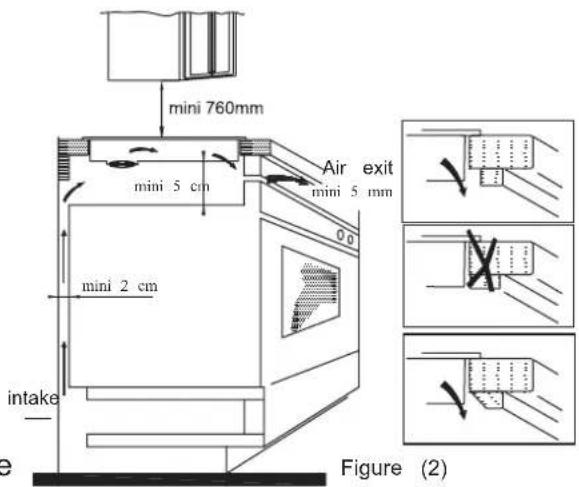
| Minimum distance below suspended cabinets | 760 mm |
| Safety | Object detection, automatic shut-off safety, lock, residual heat indicator (H), temperature sensor |
| Cleaning | Hot water and special vitroceramic sponge; scraper for stubborn residues |
| Compatible cookware type | Ferromagnetic bottom (steel, cast iron, enameled); min. diameter 14 cm |
| Dual zone | Adjustable diameter from 160 to 290 mm |
| Weight | Approximately 8 kg (estimate) |
| Reparability | Spare parts available from after-sales service |
| Warranty | 2 years (according to legislation) |
Frequently Asked Questions - RID 633 DC ROSIERES
User questions about RID 633 DC ROSIERES
0 question about this device. Answer the ones you know or ask your own.
Ask a new question about this device
Download the instructions for your Cooker in PDF format for free! Find your manual RID 633 DC - ROSIERES and take your electronic device back in hand. On this page are published all the documents necessary for the use of your device. RID 633 DC by ROSIERES.
USER MANUAL RID 633 DC ROSIERES
Thank you for purchasing the ROSIERES induction hob. Please read this instruction manual carefully before using the hob and keep it in a safe place for future reference.
By placing the CE CE marking on this product, we declare, on our own responsibility, compliance to all the European safety, health and environmental requirements stated in the legislation for this product. As applicable, the parts of this appliance are compliant to:
REGULATION (EC) No 1935/2004 on materials and articles intended to come into contact with food.
Safety Reminding and Maintenance:
- WARNING: The appliance and its accessible parts become hot during use. Care should be taken to avoid touching heating elements.
• Children under 8 Year of age must be kept away from the appliance unless they are continuously supervised.
- This appliance can be used by children aged from 8 years and above and persons with reduced physical, sensory or mental capabilities or lack of experience and knowledge if they have been given supervision or instruction concerning use of the
- appliance in a safe way and understand the hazards involved. Children must not play with the appliance.
- Cleaning and user maintenance shall not be made by children without supervision
- WARNING: Unattended cooking on a hob with fat or oil can be dangerous and may result in fire.
- NEVER try to extinguish a fire with water, but switch off the appliance and then cover flame e.g. with a lid or a fire blanket.
- WARNING: Danger of fire: do not store items on the cooking surfaces.
- WARNING: If the surface is cracked, switch off the appliance to avoid the possibility of electric shock.
- Do not use a steam cleaner for cleaning operations
- Metallic objects such as knives, forks, spoons and sauce pan lids must not be placed on the hob surface as they can get hot. Any spillage should be removed from the lid before opening.
- The hob surface must be allowed to cool down before closing the lid.
- After use, switch off the hob element by its control. Do not rely on the pan detector.
- This appliance is not intended to be operated by means of an external timer or separate remote - control system.
- The means for disconnection must be incorporated in the fixed wiring in accordance with the wiring rules.
- The instructions state the type of cord to be used, taking into account the temperature of the rear surface of the appliance.
- If the supply cord is damaged, it must be replaced by the manufacturer, its service agent or similarly qualified persons in order to avoid a hazard.
- CAUTION: In order to avoid a hazard due to inadvertent resetting of the thermal cutout, this appliance must not be supplied through an external switching device, such as a timer, or connected to a circuit that is regularly switched on and off by the utility.
WARNING: Use oly hob guards designed by manufacturer of the cooking appliance or indicated by the manufacturer of the appliance in the instructions for use as suitable or hob guards incorporated in the appliance. The use of inappropriate guards can cause accidents.
- Always use the appropriate cookware.
- Always place the pan in the center of the unit that you are cooking on.
- Do not place anything on control panel.
- Do not use the surface as a cutting board.
- The means for disconnection must be incorporated in the fi ed wiring in accordance with the wiring rules.- The instructions state the type of cord to be used, taking into account the temperature of the rear surface of the applicance.
- The hob surface must be allowed to cool down before closing the lid.- CAUTION: the cooking process must be supervised. A short term cooking process has to be supervised continuously
Dear Customer:
Thank you for purchasing the CANDY induction hob. We hope it will give many year service.
Please read this instruction manual carefully before using the hob and keep it in a for future reference.
Product Introduction
The induction hob caters for all kind of cooking, with magnetic cooking zones, and its micro-computerised controls and multi-functions, making ideal choice todays family.
Manufactured with specially imported materials, the CANDY induction hob is extremely friendly, durable and safe.
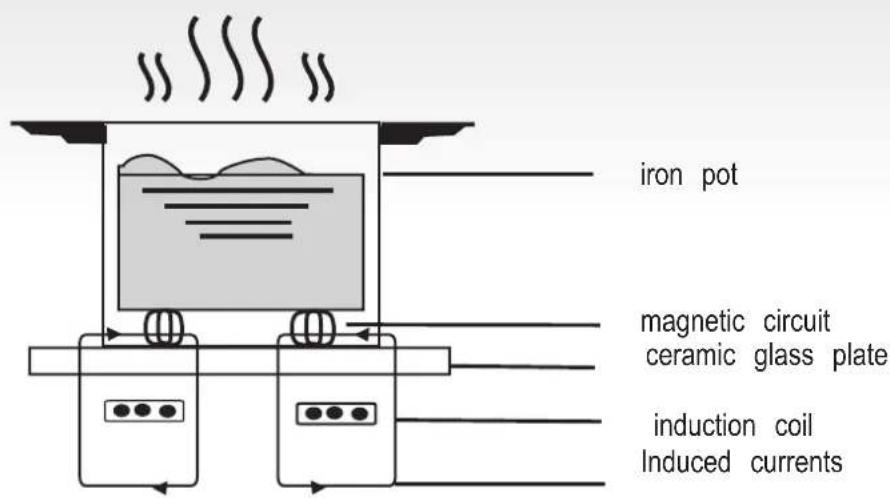
Working Principle
The induction hob comprises a coil, a hotplate made of ferromagnetic material and a system. Electrical current generates a powerful magnetic field through the coil. This provides a large number of vortices which in turn generate heat which is then transmitted through cookingzone to the cooking vessel.
text_image
iron pot magnetic circuit ceramic glass plate induction coil Induced currentsSafety
Installation
This hob was specially designed for domestic use.
Cut a hole in the worktop of the dimension shown in the diagram below. A minimum of 50 mm space should be left around the hole. The worktop should be at least 30 mm that and made of heat-resistant material.
As shown in Figure (1)
In its constant search to improve its product CANDY reserves the right to modify any technical, programme or aesthetic aspects of the appliance at any time.
● Protection from over-heating
A sensor monitors the temperature in the cooking zones. When the temperature exceeds a safe level, the cooking zone is automatically switched off.
- Detection of small or non-magnetic items
When a pan with a diameter of less than 80 mm, or some other small item (e.g. knife, fork, key) or a non-magnetic pan (e.g. aluminium) has been left on the hob, a buzzer sounds for approximately one minute, after which the hob goes automatically on to standby.
- Residual heat warning
When the hob has been operating for some time, there will be some residual heat. The letter 2'H"It appears to warn you to keep away from her
“It is essential that the induction hob is w ventilated and that the air intake and exit not blocked.
Auto shutdown
Make sure the hob is correctly installed as auto shown in Figure 2.
Another safety feature of the induction hob is a shutdown. This occurs whenever you forget to switch off a cooking zone. The default shutdown times are shown in the table below:
Figure (2)
| Power level | The heating zone shut down automatically after |
| 1~3 | 8 hours |
| 4~6 | 4 hours |
| 7~9 | 2 hours |
When the pan is removed from the cooking air in zone, it stops heating immediately and switches itself off after the buzzer has sounded for one minute.
Warning: Anyone who has been fitted with NB: For safety, the gap between the hob a heart pacemaker should consult a doctor before any cupboard above it should be at least 7 using the induction hotplate. mm.
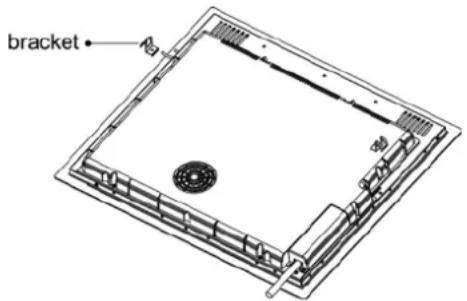
- Fix the hob to the worktop using the iffothe appliance is being connected directly brackets on the base of the hob. The positimains supply, an omnipolar circuit break of the brackets can be adjusted according to must be installed with a minimum gap of the thickness of the top.
text_image
bracket Abetween the contacts.
The installer must ensure that the correct electrical connection has been made and that it complies with safety regulations.
The cable must not be bent or compressed.
The cable must be checked regularly and only replaced by a properly qualified person.
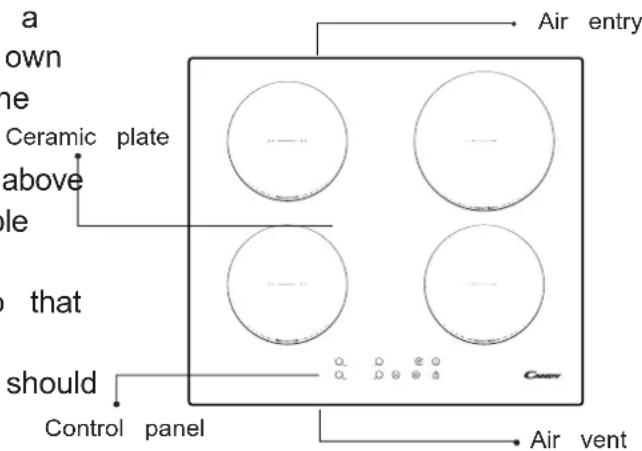
Diagram of induction hob:
Warnings:
(1) The induction hob must be installed by a properly qualified person. We have our own qualified installers. Never try to install the appliance yourself. Ceran
(2) The induction hob must not be installed above refrigerators, freezers, dishwashers or tumble dryers.
(3) The induction hob should be installed so that optimum radiation of heat is possible.
(4) The wall and the area above the hob should be able to withstand heat. Cont
(5) To avoid any damage, the sandwich layer and adhesive should be heat-resistant.
text_image
a own ne Ceramic plate above ole that should Control panel Air entry Air ventSchematic diagram of the control panel
4. Connection to power supply
The socket should be connected in complia with the relevant standard, to a single-pole circuit breaker. The method of connection shown in Figure 3.
| Voltage | Wire connection | ||
| 380-415V 3N~ | 1 2 L1 L2 Black Brown | 3 4 N Blue | 5 Yellow/Green |
| 220-240V~ | 1 2 L Black & Brown | 3 4 N Blue | 5 Yellow/Green |
text_image
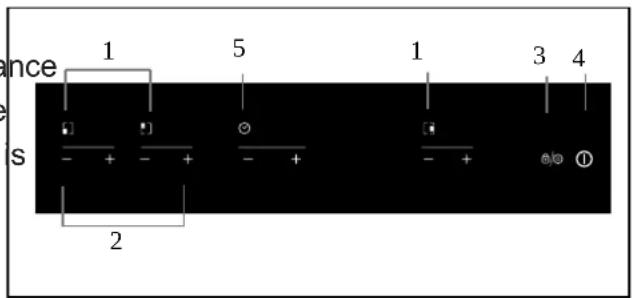
ance s 1 5 1 3 4 2- Heating zone selection controls
- Keylock/Pause control
-
Timer control
-
Power / Timer regulating key
- ON/OFF control
Figure (3)
If the cable is damaged or needs replacing, this should be done by an after-sales technician using the proper tools, so as to avoid any accidents.
Instructions for Use
Preparation before using:
When the power is switched on, the buzzes sound once and all the indicators will come for one second and then go out. The hob in standby mode.
Place the pan in the centre of the cooking zone.
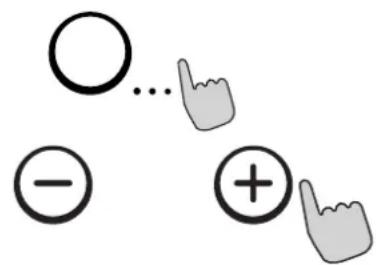
decreases the time by one minute. When the set time exceeds 99 minutes, it will automatically return to0" minutes. If the" and "+" keys are is now pressed simultaneously, the indicator will display
"0".

Timer confirmation
Operating instructions
When the ON/OFF key is pressed, all the indicators show'-". Select the power level by pressing the'+" or "-" key for the relevant hotplate. To begin with the indicator "Shows
Adjust up or down by pressing "the" key. If you press the and "-" keys simultaneously, the power setting returns 0 "tand the cooking zone switches off.
See the table on Page for the power speci selected zone. "to each cooking zone. Timer cancellatio
NB: When the ON/OFF key is pressed, the induction hob returns to standby mode if other operation is carried out within onemin
- Select the power level of the cooking zon and then press "Timer" key. The timer can now be set.
by. When the timing indicator has been flashin for 5 seconds, the settimewillbe automatically confirmed. - After selecting a set time, confirm by press the "Timer" key.
- Once the "Timer" is confirmed, a dot appears on the bottom right of the power level of the selected zone.
Timer cancellation
"After setting the time again, hold down the timer" key for 5 seconds. This will cancel the timer and the indicator will reveal. to
text_image
○... - +Timing function
Press the timing key and the indicator will flashing. Then set the time for between 199 minutes, by pressing "th" and "-" keys.
Pressing the"+"key once increases the time by one minute; pressing "-th" key once
Safety mode
To ensure the safety of children, the induction hob is fitted with an interlock device.
To lock: hold down "Interlock"; the hob then goes in "Interlock" mode, the timer shows "Lo" and the rest of the keys is enabled except the "ON/OFF" key.
Ustart Unlocking
and down the Interlock" key for 2 seconds and the hob will return to normal working.

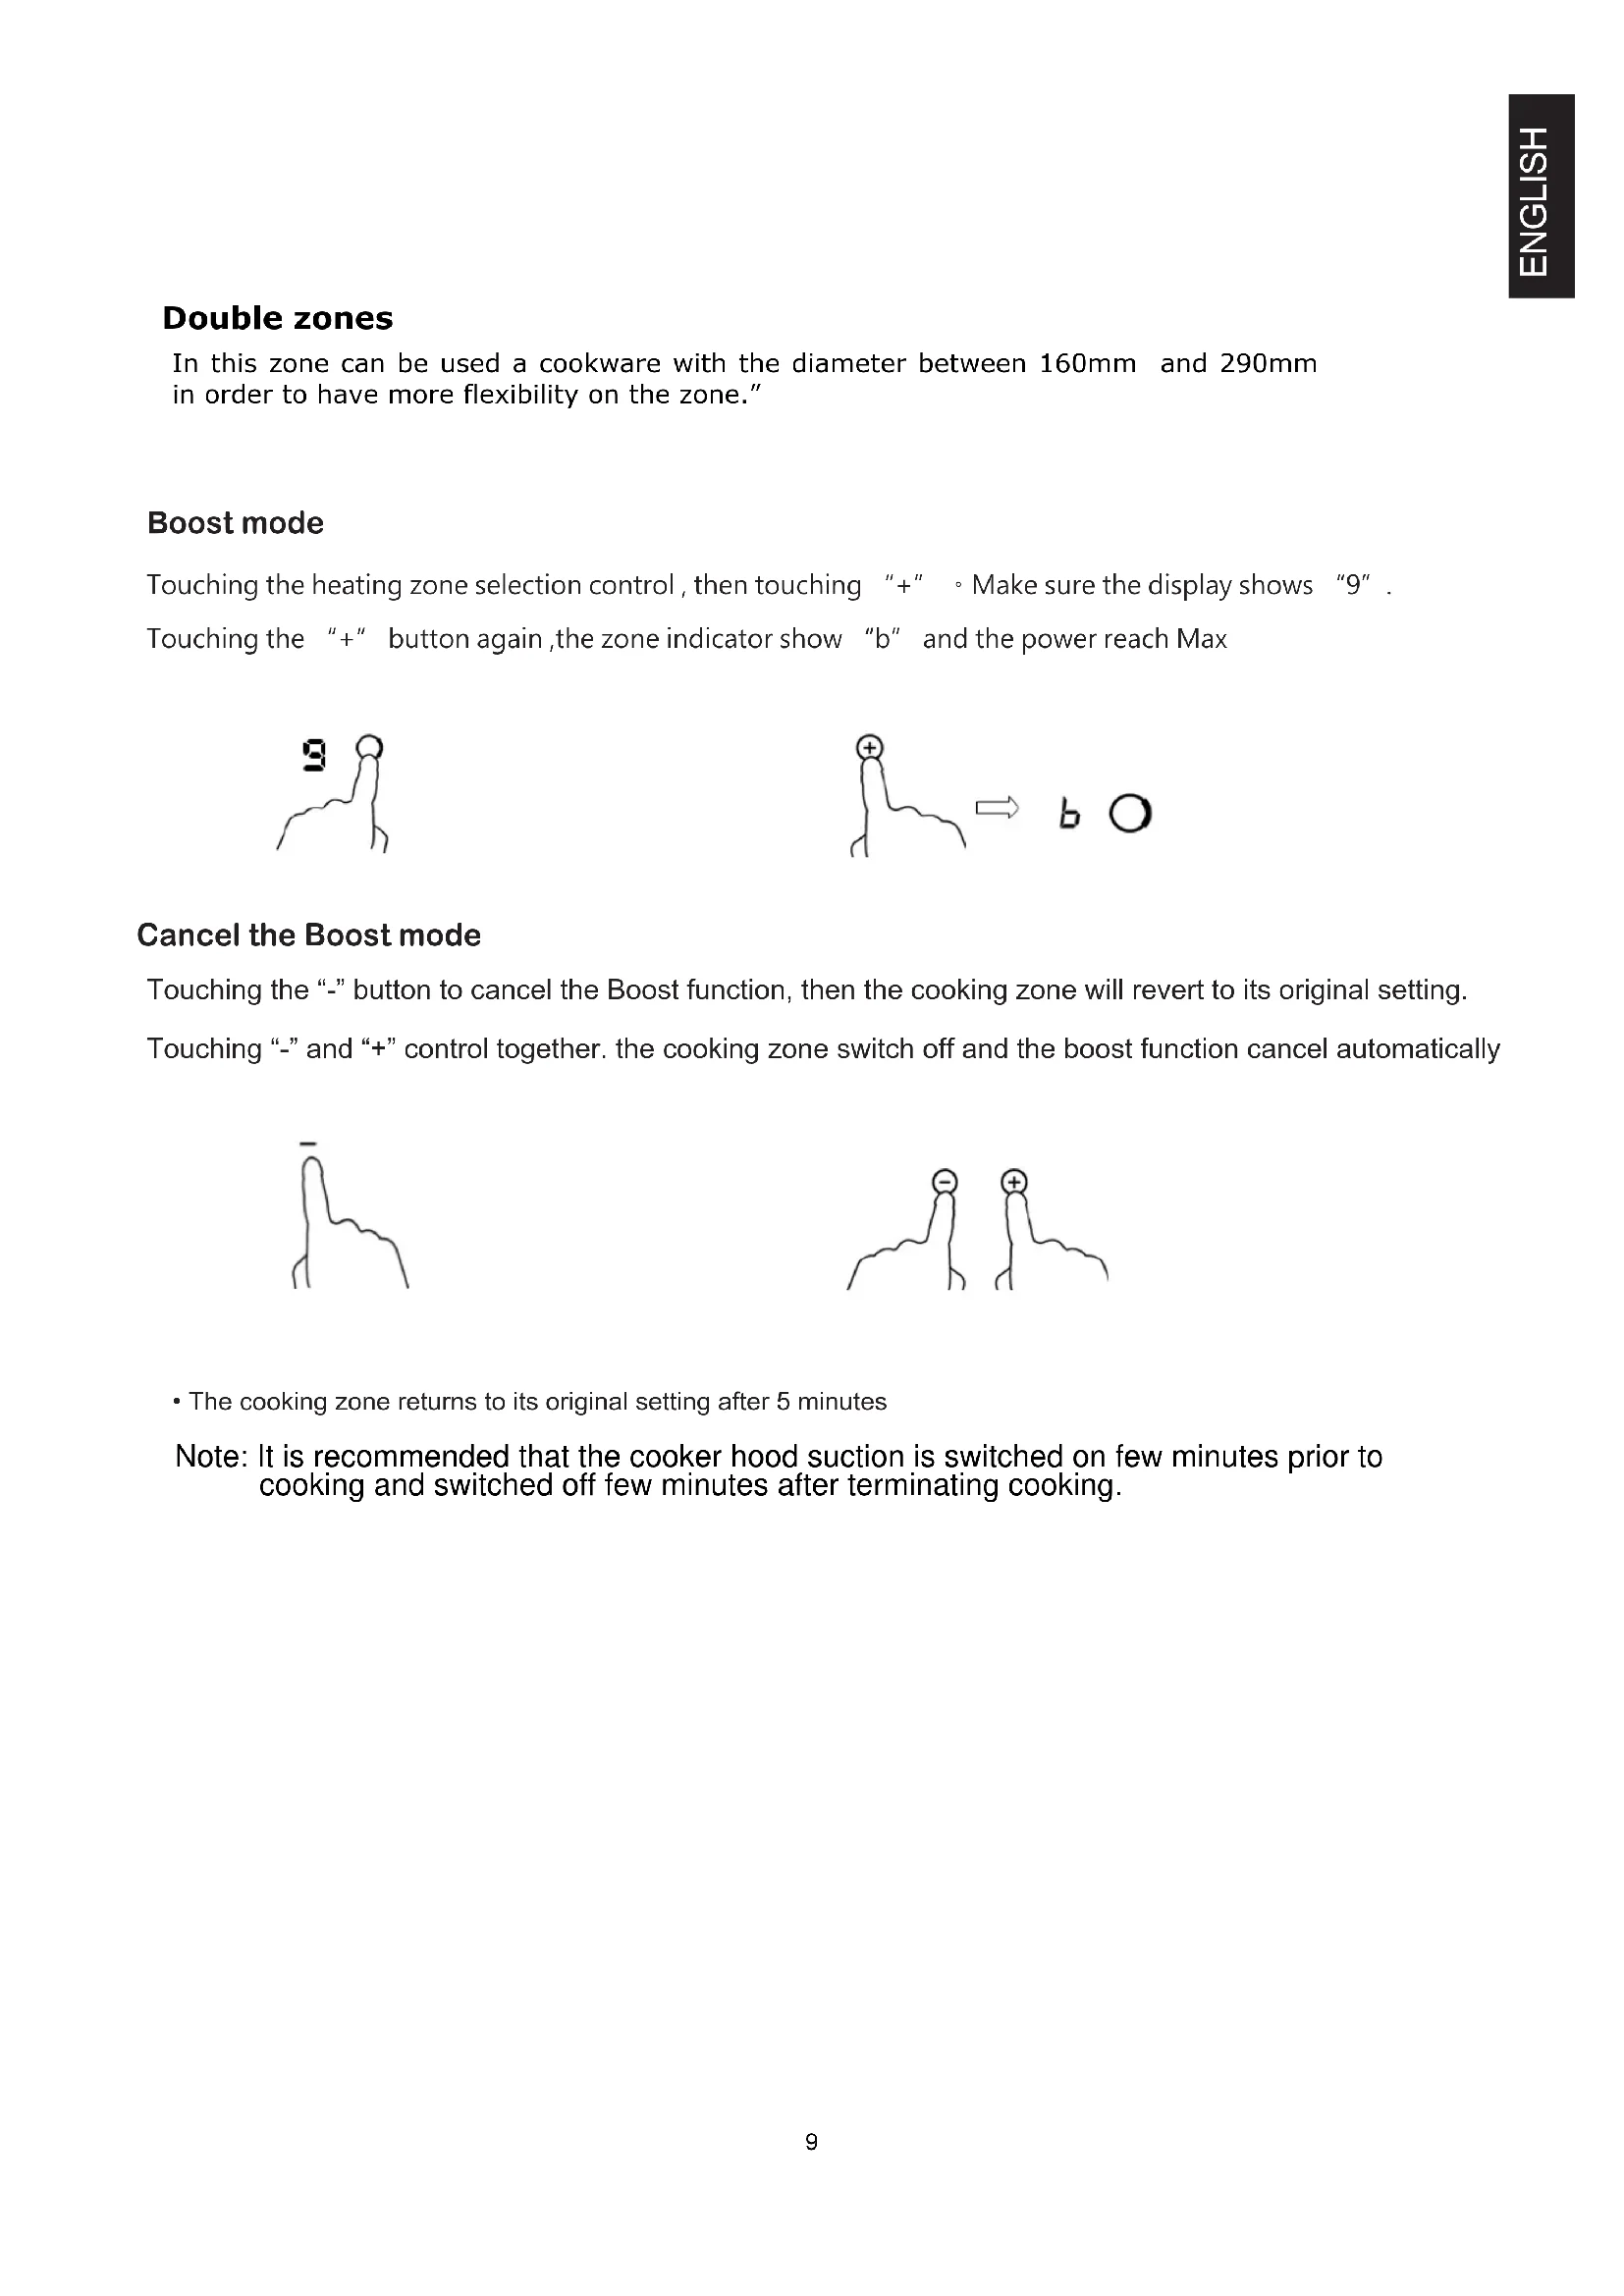
Double zones
In this zone can be used a cookware with the diameter between 160mm and 290mm in order to have more flexibility on the zone."
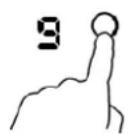
Boost mode
Touching the heating zone selection control, then touching "+" 。Make sure the display shows "9". Touching the "+" button again, the zone indicator show "b" and the power reach Max

text_image
+ → b OCancel the Boost mode
Touching the “-” button to cancel the Boost function, then the cooking zone will revert to its original setting. Touching “-” and “+” control together. the cooking zone switch off and the boost function cancel automatically

- The cooking zone returns to its original setting after 5 minutes
Note: It is recommended that the cooker hood suction is switched on few minutes prior to cooking and switched off few minutes after terminating cooking.
Pause Mode
- You can pause the heating instead of shutting the hob off.
- When entering the Pause mode, all the controls except the ON/OFF control are disabled.
| To enter pause mode | |
| Touch the lock/pause control. | All the indicator will show "11" |
| To unlock the controls | |
| Touch the lock/pause control. | |

When the hob is in the pause mode, all the controls are disable except the ON/OFF ① , you can always turn the induction hob off with the ON/OFF ① control in an emergency.
Power Management Function
- it is possible to set a maximum power absorption level for the induction hob, choosing up to different power ranges.
- induction hobs are able to limit themselves automatically in order to work at lower power level, to avoid the risk of overloading.
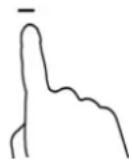
To enter Power Management Function
Turn on the hob, then Press at the same time the "+" (timer) and key lock.

text_image
Diagram showing two finger-like structures with circular symbols indicating '⊕' and '⊕' respectively, possibly representing a conceptual or logical concept.The timer indicator will show "P5" which means power level 5. The default mode is on 7.0Kw/ 7.1Kw.
To switch to another level
press +/- from the timer There are 5 power levels, from "P1" to "p5". The timer indicator will show one of them.
"P1": the maximum power is 2.5Kw.
"P2": the maximum power is 3.5Kw.
"P3": the maximum power is 4.5Kw.
"P4": the maximum power is 5.5Kw.
"P5": the maximum power is 7.0Kw/ 7.1Kw.

text_image
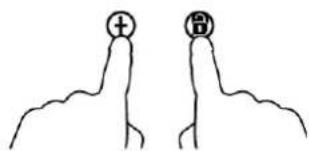
orConfirmation and Exit Power Management Function
Press at the same time + (timer) and key lock for Then the hob will be turned off. confirmation.
text_image
Diagram showing two hand gestures with icons for positive and negative signs, likely illustrating a correct or incorrect visual pattern.Selection of cooking vessels
Iron oil frying pan
Stainless steel pot Iron pan
Iron kettle

Enamel stainless steel kettle

Enamel cooking utensil
Iron plate
You may have a number of different cooking vessels
1 This induction hob can identify a variety of cooking vessels, which you can take one of the following methods:
Place the vessel on the cooking zone. If the corresponding cooking zone disp a power level, then the vessel is suitable, then the vessel is not suitable for use with the induction hob.
2 Hold a magnet to the vessel. If the magnet is attracted to the vessel, it is for use with the induction hob.
NB: The base of the vessel must contain magnetic material.
It must have a flat bottom with a diameter of more than 14 cm.
3 Use pans whose diameter is as large as the graphic of the zone selected.
Using a pot a slightly wider energy will be used at its maximum efficiency. If you use smaller pot efficiency could be less than expected. Pot less than 140 mm could be undetected by the hob.
Cleanness and Maintenance
The surface of the induction hob may be easily cleaned in the following way:
| Type of contamination | Method of cleaning | Cleaning materials |
| Light Immersion | in hot water and wipe dry Cleaning sponge | |
| Rings and lime scale | Apply white vinegar to the area, wipe a soft cloth or use a commercially available product | Special adhesive for ceramic glass |
| Sweetmeat, melted aluminium or plastics | Use a special scraper for ceramic glass to remove residue (a silicon product best) | Special adhesive for ceramic glass |
NB: Disconnect the power supply before cleaning.
Failure Display and Inspection
If any abnormality occurs, the induction hob will automatically go into protective mode and one of the following codes:
| Fault Possible cause Solutions | ||
| F0/F1/F2 | Fan failure | Contact the supplier |
| F3-F8 | Temperature sensor failure | Contact the supplier |
| E1/E2 | Abnormal voltage in power supply | Check if power supply is normal.Power on after power sup returns to normal. |
| E3/E4 | Abnormal temperature | Check the pan |
| E5/E6 | Poor heat radiation in cooking zone | Restart when cooking zone cools down |
The above table shows how to assess and check common faults. Do not dismantle the appliance yourself, otherwise you may damage the induction hob.
Customer Care Service
If a fault should occur, before calling After Sales Service, please do the following:
-Check that the appliance is correctly plugged in
-Read the failure and display table above
If you are still unable to resolve the problem, switch off the appliance, do not try to and call
After Sales Service.
Special Declaration
The contents of this manual have been carefully checked. However, the company cannot be held responsible for any misprints or omissions. Also, any technical modifications may be included in a revised version of the manual without notice. The appearance and colour of the appliance in this manual may differ from the actual one.
DISPOSAL: Do not dispose this product as unsorted municipal waste. Collection of such waste separately for special treatment is necessary.
This appliance is labelled in compliance with European directive 2012/19C for Waste Electrical and Electronic Equipment (WEEE).
By ensuring that this appliance is disposed of correctly, you will help prevent any possible damage to the environment and to human health, which might otherwise be caused if it were disposed of in the wrong way.
The symbol on the product indicates that it may not be treated as normal household waste. It should be taken to a collection point for the recycling of electrical and electronic goods.
This appliance requires specialist waste disposal. For further information regarding the treatment, recovery and recycling of this product please contact your local council, your household waste disposal service, or the shop where you purchased it.
For more detailed information about treatment, recovery and recycling of this product, please contact your local city office, your household waste disposal service or the shop where you purchased the product.
natural_image
Diagram of a machine with heat dissipation and cooling system, showing motion arrows (no text or symbols)ustensile compatible
circuit magnétique
● Protection anti-surchauffe
natural_image
Two hand gestures with circular symbols, no text or labels presenttext_image
Diagram showing two hand gestures with circular symbols indicating positive and negative signs, likely illustrating a physical or anatomical concept.text_image
Diagram showing two finger-like shapes with negative and positive signs, likely illustrating a basic electrical or mechanical concept.natural_image
Simple line drawing of two abstract shapes resembling stylized figures or arrows, with no text or symbols present.natural_image
Simple line drawing of two abstract shapes resembling stylized peaks or callouts, with no text or symbols present.Varná deska se vypne.
natural_image
Two abstract line drawings resembling stylized figures or symbols, with no text or labels present.text_image
Two hand-drawn diagrams showing a figure with a plus sign and a circled number 6, possibly indicating a symbol or label.text_image
○... ⊖ ⊕Funzione TIMER
natural_image
Simple line drawing of two abstract shapes resembling stylized peaks or callouts, with no text or symbols present.natural_image
Simple line drawing of two abstract shapes resembling stylized figures or symbols (no text or labels)text_image
Hand-drawn diagram showing two stick figures with positive and negative signs, connected by wavy lines and a circle labeled 'O'natural_image
Simple line drawing of two abstract shapes resembling stylized peaks or callouts, with no text or symbols present.La placa se apaga.
natural_image
Two identical line drawings of a stylized plant or flower with circular symbols (no text or labels)natural_image
Two stylized human figures with circular symbols (plus and minus) above their stems, no text or labels present.text_image
Diagram showing three circles with minus and plus signs, connected by arrows pointing to circles of circle.TIMER-Funktion
natural_image
Two abstract line drawings resembling stylized figures or symbols, with no readable text or labels.text_image
Hand-drawn diagram showing two identical figures with circular symbols labeled '⊕' and '⊕', connected by a wavy line.text_image
Diagram showing two labeled figures with circular symbols, possibly indicating positions or features in a diagrammatic or schematic.natural_image
Two stylized plant stems with circular symbols (plus and minus) emerging from the peaks, no text or labels present.Platetoppen vil da slås av.