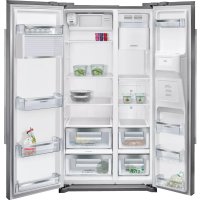
USER MANUAL KA90DVI30 SIEMENS
siemens-home.bsh-group.com/welcome
en Instructions for use and installation
Register your product online
Safety and warning information 33
Directions for disposal 34
Specifications supplied 34
Installing the appliance 34
Installation dimensions 36
Door opening angle 36
Connecting the appliance 37
Fitting the doors 40
Getting to know the appliance 41
Switching on the appliance 43
Setting the temperature 43
Fast cooling function 43
Fast freezing function 44
Button lock (childproof lock) 44
Alarm functions 44
Temperature units 45
Energy-saving mode 45
Water filter symbol 45
Usable capacity 46
Fridge compartment 46
Cold storage container 46
Freezer compartment 47
Max. freezing capacity 47
Freezing and storing 47
Freezing fresh food 47
Defrosting frozen food 48
Ice and water dispenser 48
Water filter 50
Performance Data Sheet 52
Fittings 53
Switching off and shutting down the appliance 54
Defrosting 54
Cleaning the appliance 55
Smells 55
Lighting (LED) 55
Saving energy 56
Operation noises 56
Rectifying minor faults yourself 57
After-sales Service 58
Note
en
Note
1 Keys "freeze/super"
Switch off
Switch off
Note
Tip
en
Note
Note
Performance data sheet
Model 9000 7775078
3M Purification Inc.
400 Research Parkway
Meriden, CT 06450
USA
Tel. (800) 222-7880
(203) 237-5541
Equipment
Glass shelves
Inserting
Door shelves
Ice cube tray
Drawers
Shelf
en
Egg tray

Switching on the appliance:
Before you put the appliance into operation
Carefully read through the instructions for use and assembly instructions. They contain important information on setting up, using and maintaining the appliance.
The manufacturer is not liable for any damage caused by failure to follow the guidance and warnings contained in the instructions for use. Retain all documents for later use or for subsequent owners.
Technical safety
The appliance contains a small quantity of the environmentally-friendly, though flammable, refrigerant R600a. Make sure that the pipes of the refrigerant circuit are not damaged during transport or installation. If refrigerant squirts out, it may cause eye injuries or ignite.
In the event of damage:
- Keep naked flames or sources of ignition away from the appliance, ventilate the room well for a few minutes, switch off the appliance and unplug it from the mains,
Inform After-sales Service.
The more refrigerant an appliance contains, the larger the room must be in which it stands. If there is a leak and the room is too small, a flammable gas-air mixture may form.
The room must be at least 1 m³ in size for each 8 g of refrigerant. The quantity of refrigerant in your appliance is stated on the rating plate inside the appliance.
If the mains power lead of this appliance is damaged, it must be replaced by the manufacturer, After-sales Service or an equally qualified person. Incorrect installation or repairs may result in significant risks to the user.
Repairs may only be carried out by the manufacturer, After-sales Service or an equally qualified person.
Only genuine replacement parts from the manufacturer may be used. Only such parts are guaranteed by the manufacturer to meet the safety requirements.
Any mains power lead extension may only be obtained from After-sales Service.
During use
Never use electrical appliances inside the appliance (e.g. heaters, electric ice-makers). Risk of explosion! Never defrost or clean the appliance with a steam-cleaning device. The steam may come into contact with electrical components and cause a short circuit. Risk of electric shock! Do not use pointed or sharp objects to remove layers of ice and frost! You could damage the refrigerant pipes. If refrigerant shoots out, it may ignite or cause eye injuries.
- Do not store products with flammable propellant gases (e.g. spray cans) or explosive substances inside the appliance. Risk of explosion!
- Do not use the base, rails, doors, etc. as a step or support. For defrosting and cleaning, unplug the appliance from the mains or switch off the circuit-breaker. When unplugging the mains plug, always take hold of the plug itself, never pull on the connecting lead. High-proof alcohol must always be tightly sealed and stored in an upright position.
- Do not contaminate plastic parts or door seals with oil or grease. Plastic parts and door seals will otherwise become porous. Never cover or block ventilation openings for the appliance. This appliance may only be used by persons (including children) with impaired physical, sensory, or mental abilities or insufficient knowledge of the appliance if they are supervised by a person responsible for their safety or have been instructed by such a person on how to use the appliance.
- Do not store liquids in bottles or tins in the freezer compartment (in particular carbonated drinks). Bottles and tins may burst. Never eat frozen foods immediately after they have been taken out of the freezer compartment. Risk of freezer burn!
- Avoid prolonged hand contact with frozen foods, ice, and the evaporator tubes, etc. Risk of freezer burn!
Avoiding risks to children and other at-risk persons
Persons at risk are:
Children. Persons whose powers of perception are physically or psychologically limited. Persons who do not have sufficient knowledge about how to use the appliance safely.
Action required:
Make sure that children and other at-risk persons have understood the dangers. A person responsible for safety must supervise or instruct children and other at-risk persons when they are using the appliance. Do not allow children under 8 years old to use the appliance. Supervise children when cleaning and servicing. Never let children play with the appliance.
General requirements
The appliance is suitable for the following tasks:
Chilling and freezing food, making ice cubes.
This appliance is intended for use up to a maximum height of 2000 metres above sea level.
This appliance is intended for domestic use in private households and for a domestic environment.
The appliance is fitted with interference suppression in accordance with EU Directive 2004/108/EC.
The refrigeration circuit has been checked for leak tightness.
This product complies with the applicable safety requirements for electrical appliances (EN 60335-2-24).
Directions for disposal
Disposing of packaging.
The packaging protects your appliance from damage during transport. All the materials used are environmentally friendly and can be recycled. Please help by disposing of the packaging in an environmentally responsible manner.
Information about the available disposal methods and sites can be obtained from your appliance retailer or your local authority.
Disposing of your old appliance
Used appliances are not valueless waste. Valuable raw materials can be recovered through environmentally responsible disposal.

This appliance is labelled in accordance with European Directive 2012/19/EU concerning used electrical and electronic appliances (waste electrical and electronic equipment - WEEE).
The Directive determines the framework for the return and recycling of used appliances as applicable throughout the EU.

Warning
Appliances at the end of their useful life:
- Unplug the mains plug.
- Cut the power cord and remove it along with the mains plug.
- Do not remove the shelves and containers. Leaving them intact makes it more difficult for children to climb in.
- Never let children play with a disused appliance. Risk of asphyxiation!
Refrigerators contain refrigerant as well as gases in the insulation material. Refrigerant and gases must be disposed of properly. Do not damage the refrigerant circuit pipes before disposing of them properly.
Specifications supplied
After unpacking the appliance, check all parts for transport damage.
If you find any defects, contact the retailer from whom you purchased the appliance or our After-sales Service.
The appliance supplied consists of the following components:
■ Free-standing appliance ■ Features (vary depending on the model) ■ Bag of assembly materials ■ Instructions for use and installation ■ Service record - Guarantee slip ■ Information on energy consumption and noise
Installing the appliance
Transport
The appliance is heavy and must be securely fixed when being transported and installed.
Because of the weight and size of the appliance, and in order to minimise the risk of personal injury or damage to the appliance, at least two persons are required for moving and positioning the appliance safely.
The castors are provided for installation purposes only. Do not use the castors for transporting the appliance.
Do not move the appliance over uneven or soft ground on its castors.
Installation site
The ideal installation site is a dry, well ventilated room. The appliance should not be installed in a position that is exposed to direct sunlight or close to a source of heat, such as a cooker or radiator. If installation near to a source of heat is unavoidable, use a suitable insulating panel or keep to the following minimum distances from the source of heat:
■ 3 cm from an electric or gas cooker. ■ 30 cm from oil or solid fuel cookers.
Floor surface
The floor at the installation site must not give. Reinforce the floor if necessary.
The appliance is very heavy. The weight when empty is detailed in the table below.
| Version with ice and water dispenser | 107 kg |
| Version with ice and water dispenser and cold storage container | 109 kg |
| Version with ice and water dispenser, cold storage container and mini-bar | 111 kg |
Wall clearance
If the appliance is positioned in the corner of a room or a recess, minimum clearances (see the section headed Installation dimensions) at the sides must be maintained so that the appliance doors can be fully opened.
If the depth of the adjacent kitchen fittings exceeds 65 cm, minimum clearances at the sides must be maintained so that the full opening width of the doors can be utilised (see section headed Door opening angle).
Minimum clearance at rear
Fix the spacers supplied to the holes provided on the rear of the appliance using the screws.

The spacers maintain the minimum clearance of 22 mm from the wall, thus providing adequate ventilation.
Observe the room temperature and ventilation requirements
Room temperature
The appliance is designed for a certain climate class. Depending on the climate class, the appliance can be operated at the following ambient temperatures. The climate class is specified on the rating plate.
| Climate class Permissible room temperature |
| SN +10 °C to 32 °C |
| N +16 °C to 32 °C |
| ST +16 °C to 38 °C |
| T +16 °C to 43 °C |
Note
The appliance is fully functional within the room temperature limits of the specified climate class. If an appliance in the SN climate class is operated at lower ambient temperatures, damage to the appliance can be excluded up to a temperature of +5 °C.
Ventilation
The heated air must be able to escape unimpeded. Otherwise, the refrigerating unit has to work harder, which increases the appliance's power consumption. Therefore, never cover over or block the air vent.
Installation dimensions

Door opening angle
Drawers can be pulled out fully at door opening of 145°
Connecting the appliance
After setting up the appliance, wait for at least 1 hour before starting the appliance up. The oil contained in the compressor may have been displaced into the refrigeration system during transport.
Before starting the appliance up for the first time, clean its interior (see section "Cleaning the appliance").
It is imperative to connect the appliance to the water supply before establishing the electrical connections.
Do not remove the transit locks from the shelves and trays until the appliance has been installed.
Water connection

Warning
Risk of electric shock and damage to property.
Disconnect the appliance from the electricity mains before carrying out any work on the water connection.
The water connection must only be installed by a qualified plumber and in accordance with local legislation and regulations governing water quality.
A 3/4-inch water connection is required to connect the appliance.
Connect the appliance to a domestic water supply with the following specifications:
Minimum pressure: 1.0 bar
Maximum pressure: 8.0 bar
Contact a plumbing professional if you are uncertain how to check the current water pressure.

Caution
If the water pressure is more than 5.5 bar, a pressure-reducing valve must be fitted; otherwise there is a risk of water damage. If the water pressure is below 1.0 bar, the ice-maker will not function.
The water tap to which the connecting hose supplied is connected should be easily accessible.
The appliance may only be connected to a cold water pipe.
The taste and smell of the water can be improved by installing the filter cartridge supplied. If doing so, take note of the different connection specifications (see section headed Water filter).
Note
After the appliance has been switched on, water can drip from the water dispenser. After approx. 24 hours, when the appliance has reached its operating temperature, the dripping stops.
Connecting

Caution
Risk of leaks and water damage.
Observe the following points:
Do not bend the connecting hose. Cut off the connecting hose evenly. Do not cut off the connection hose with pliers. Put the connection hose all the way onto the screw socket and the return stop valve. Tighten the screw socket by hand. Do not use pliers. Check the flow direction of the return stop valve. Arrows on the return stop valve indicate the flow direction.
- Insert the connecting hose all the way into the return stop valve.

- Close the sleeve at the return stop valve and fasten with a screw.
- Insert the sieve into the reducing piece.

Note
Clean the sieve every year. If there are many particles in the water, clean the sieve more frequently.
- Connect the screw socket to the water tap.

- Insert the connecting hose all the way into the screw socket.
- Loop or coil the connecting hose so that the appliance can be moved away from the wall.
The connecting hose can be attached to the wall with the enclosed clamp.

Caution
Never bore or screw into the appliance!
Checking the water connection for leaks

Warning
Risk of electric shock and damage to property.
Disconnect the appliance from the electricity mains before carrying out any work on the water connection.
- Turn on the water tap and wait a moment for the water pipes in the appliance to fill with water.
- Check the connecting hose and joints for leaks.
- Open the appliance doors.
- Unscrew the 3 screws holding the base panel and remove it.
- Check the connections to the freezer compartment door for leaks.

- Put the base panel back in place and secure it with the 3 screws.

Electrical connection
The socket must be near to the appliance and easily accessible after the appliance has been installed.
The appliance conforms to protection class I. Connect the appliance to a 220-240 V/50 Hz alternating current supply using a socket with protective earthing conductor which has been correctly installed. The socket must be protected by a fuse with a rating of 10 A to 16 A.
In the case of appliances operated outside of Europe, check whether the voltage and type of current specified conform to the values of your electricity grid. You will find this information on the rating plate.

The appliance must never be connected up to an electronic energy-saving socket.
Sinusoidal-commutated and line-commutated inverters can be used with our appliances. Line-commutated inverters are used with photovoltaic systems that are connected directly to the national grid. Sinusoidal-communicated inverters must be used with standalone applications (e.g. on ships or mountain huts) that do not have a direct connection to the national grid.
Levelling the appliance
Note
To ensure that it functions properly, the appliance must be set level using a spirit level.
If the appliance is not level, it could cause the water to run out of the ice-maker, produce unevenly sized ice cubes or prevent the doors closing properly.
- Move the appliance into its intended installation position.
- So that the appliance cannot move, unscrew the two front feet until they are standing firmly on the floor.

- Screw the feet in/out until the appliance is exactly level. Use the appliance doors as a reference point.
- If the freezer compartment door is lower:

- If the fridge compartment door is lower:

If the appliance is exactly level but one of the doors is lower than the other:
- Open the appliance doors.
- Unscrew the 3 screws holding the base panel and remove it.
- Undo the nut.

- Turn the adjusting nut until the appliance doors are aligned.

- If the freezer compartment door is lower: Turn the adjusting nut anti-clockwise.
- If the fridge compartment door is lower: Turn the adjusting nut clockwise.
- Tighten the nut.
- Put the base panel back in place and secure it with the 3 screws.

Note
Due to its own weight or when the door is filled with foodstuffs, it is possible that the fridge compartment door leans even when the appliance is standing up vertically. The door gap at the top and at the bottom is not identical.

If the door gap at the top and at the bottom is not identical:
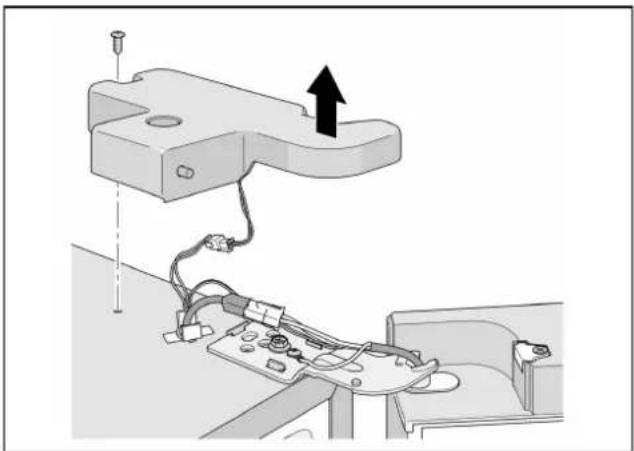
- Unscrew 2 screws and remove the top hinged cover.

- Slacken the hinge screw. Do not unscrew the screw completely!
- Adjust the fridge compartment door's vertical alignment.
- Tighten the hinge screw.
- Apply the hinged cover and fasten with 2 screws.
Fitting the doors
If the appliance is too big to fit through the doors of your home, the door handles or the appliance doors can be unscrewed.
Note
The door handles or the appliance doors may only be removed by an After-sales Service technician. Your local After-sales Service centre will advise you of the cost.
Getting to know the appliance
Appliance
The features of the models may vary.
The illustrations may differ from your particular model.

A Fridge compartment
B Freezer compartment (4 stars)
1 Door pockets (2-star compartment)
Note
Only the door pockets are rated as 2 stars, the rest of the freezer compartment is 4-star rated.
2 Operating controls
3 Ice and water dispenser
4 Door pockets
5 Ice-cube tray
6 Ice maker
7 Freezer compartment glass shelves
8 Freezer compartment drawers
9 Shelf
10 Water filter
11 Egg tray
12 Fridge compartment glass shelves
13 Glass shelf
14 Vegetable drawer
15 Fruit drawer
16 Cold storage container (not available on all models)
17 Butter and cheese compartment
18 Door pocket with lid
19 Mini-bar (not available on all models)
Operating controls

■ For setting the temperature in the freezer compartment. ■ For switching fast freezing function on and off.
■ Switches the light for the ice/water dispenser on or off. ■ Resets the filter indicator.
■ Switches off the display of the temperature alarm. ■ Switches the button lock (childproof lock) on or off.
■ For setting the temperature in the fridge compartment. ■ For switching the fast cooling function on and off.
7 Fridge compartment display panel
■ Fridge compartment temperature. ■ "super" symbol shown when fast cooling function is active. ■ "alarm" symbol shown when fridge compartment alarm is active.
8 Freezer compartment display panel
■ Freezer compartment temperature. ■ "super" symbol shown when fast freezing function is active. ■ "alarm" symbol shown when freezer compartment alarm is active.
9 Symbols on the display panel

Water filter
Condition of filter cartridge.

Lighting
Ice and water dispenser light is switched on.

Water
Water dispenser function is switched on.

Ice cubes
Ice-cube dispenser function is switched on.

Crushed ice
Crushed ice dispenser function is switched on.

Button lock is switched on.
Switching on the appliance
Plug the mains plug into the mains outlet socket. The appliance will start cooling.
When the appliance is switched on for the first time, the alarm function is deactivated until the appliance has reached the set temperature. If the appliance is switched off for an extended period, the temperature alarm may be triggered when it is first switched on again.
The temperatures flash and the display panels show the "alarm" symbol until the appliance has reached the set temperatures.
By pressing the "alarm/lock" button the temperature warning is switched off.
The lights come on when the appliance doors are opened.
The following temperatures are recommended by the manufacturer and pre-set at the factory:
■ Fridge compartment +4 °C
■ Freezer compartment -18 °C
Notes on using the appliance
■ After switching on the appliance, it may be several hours before the set temperatures are reached. Do not put any food in the appliance before then. Thanks to the fully automatic NoFrost system, the freezer compartment remains free of ice. Defrosting is not required. ■ Some of the casing end faces are slightly heated to prevent condensation forming in the door seal area. If you cannot open the freezer compartment door again immediately after closing it, wait a moment for the low pressure created to equalise.
Setting the temperature
Fridge compartment
The temperature can be set from +2 °C up to +8 °C. Repeatedly press the "cool/super +" or "cool/super -" button until the desired fridge compartment temperature is set.

The temperature last set is saved. The set temperature is shown on the fridge compartment display panel.
Freezer compartment
The temperature can be set to between -16 °C and -22 °C.
Repeatedly press the "freeze/super +" or "freeze/super -" button until the desired freezer compartment temperature is set.

The temperature last set is saved. The set temperature is shown on the freezer compartment display panel.
Fast cooling function
The fast cooling function cools the fridge compartment to the coldest possible temperature for approximately 40 minutes. After that, the temperature setting automatically reverts to +4 °C.
Switch on fast cooling, for example
■ before putting a large amount of food in the fridge compartment. ■ to cool drinks quickly.
Note
When fast cooling is switched on, the appliance may make more noise.
Switching on
Press the "cool/super -" button repeatedly until the fridge compartment display panel shows "super".

Switching off
Press the "cool/super +" button.
Note
The display panel no longer shows "super". The temperature setting automatically reverts to +4 °C.
Fast freezing function
Food should be frozen thoroughly as quickly as possible. This ensures that vitamins, nutritional values, the look and the taste of the food is retained.
Switch on fast freezing a few hours before placing fresh food in the freezer in order to prevent a drop in temperature.
In general, 4 - 6 hours is sufficient.
When the function is switched on, the appliance operates continuously. As a result, a very cold temperature in the freezer compartment is achieved.
Fast freezing automatically switches off after about 48 hours.
If the maximum freezing capacity is to be used, fast freezing should be switched on 24 hours before placing the fresh food in the freezer.
Small quantities of food for freezing (up to 2 kg) can be frozen without using the fast freezing function.
Note
When fast freezing is switched on, the appliance may make more noise.
Switching on
Press the "freeze/super -" button repeatedly until the freezer compartment display panel shows "super".

Switching off
Press the "freeze/super +" button.
Note
The display panel no longer shows "super". The temperature automatically switches back to the temperature set before the "Fast freezing" function was activated.
When the button lock is switched on, all buttons are locked.
When the button lock is switched on, the "alarm/lock" button can be used to switch off the audible warning signal.
Switching on
Press the "alarm/lock" button.

The display panel shows the "Button lock" symbol.
Switching off
Press and hold the "alarm/lock" button for 3 seconds.
Alarm functions
Door alarm
The door alarm switches on if one of the appliance doors is open for longer than one minute. The warning sound repeats every 60 seconds for a period of 5 minutes. Closing the door switches off the warning sound.
The door alarm also switches on if the mini-bar is open for longer than one minute.
Temperature alarm
The display panel shows the temperature alarm if the fridge or freezer compartment becomes too warm and the food is at risk.
The relevant display panel shows the highest temperature and "alarm".
Fridge compartment
If the temperature in the fridge compartment has become too high, before eating any food that has got warm, make sure you heat it through properly. In in doubt, do not use raw food.
Freezer compartment
Do not refreeze defrosted food. It can only be refrozen after it has been made into a ready-to-eat meal (cooked or roasted).
Do not then leave the food in the freezer for the maximum storage period.
Without any risk to the frozen food, the alarm may be triggered:
■ when the appliance is first used. ■ when putting large quantities of fresh food in the freezer. ■ if the freezer compartment door is left open for too long.
Switching off the alarm
Press the "alarm/lock" button.

Note
As soon as the set temperature is reached again, the display stops showing "alarm".
Temperature units
The temperature can be displayed in degrees Celsius (°C) or Fahrenheit (°F).
When the appliance is first switched on, the display panel shows the temperature in degrees Celsius (°C).
Setting
- Press the "alarm/lock" button.

The display panel shows the "Button lock" symbol.
- Simultaneously press and hold the "light/filter" and "water" buttons for 10 seconds.

The temperature units change.
Energy-saving mode
20 seconds after the doors are closed or the last button is pressed, the display panel switches to energy-saving mode. The display panel switches off and leaves only the words "freeze" and "cool" and the symbol for the selected dispenser mode (water, ice cubes or crushed ice) dimly illuminated.
As soon as a door is opened or a button pressed, the display panel switches on and returns to the normal brightness.
Water filter symbol
This symbol indicates how long the filter cartridge can still be used.

Up to six months

Up to four months

Up to two months

Up to 10 days:
the three bars of the symbol start flashing. Change the filter cartridge.
Note
If the appliance is switched off, the water filter indicator is reset.
After changing the filter cartridge, reset the water filter indicator as follows:
Press and hold the "light/filter" button for 3 seconds.

The symbol will then stop flashing.
Usable capacity
You will find the details of the usable capacity on the rating plate inside the appliance.
Using the entire freezing capacity
To accommodate the maximum quantity of frozen food, you can remove all of the fittings from inside the appliance. You can then stack the food directly on the shelves and the bottom of the freezer compartment.
How to remove and refit the fittings is described in the section headed Fittings.
Fridge compartment
The fridge compartment is the perfect place for keeping ready meals, bread and pastries, jams and preserves, condensed milk and hard cheeses.
When placing food in the fridge, follow these guidelines:
- Keep fresh, untouched food in the fridge. In that way it will keep longer and stay fresher. In the case of ready-made products and packaged foods and liquids, pay attention to the manufacturer's specified best-before or use-by date. In order to maintain flavour, colour and freshness, keep food well packed or covered over. That also prevents flavours from mixing and the plastic parts from becoming discoloured in the fridge compartment.
- Allow warm food and beverages to cool before putting them into the appliance.
Note
Keep food from coming into contact with the rear panel. Otherwise, the air circulation will be impaired.
Food or packaging could also become frozen to the rear panel.
Pay attention to the temperature zones in the fridge compartment
The air circulation produces different temperature zones in the fridge compartment:
■ The coldest zones are close to the rear panel. ■ The warmest zone is at the very top of the door.
Note
Keep items such as hard cheese and butter in the warmest zone. That will allow the cheese to continue developing its flavour and the butter will remain spreadable.
Cold storage container
Food can be kept in the cold storage container up to two times longer than in the normal fridge compartment – to keep it fresher for longer and retain its nutritional value and taste.
The temperature can be individually adjusted to suit the food placed inside. Setting the optimum temperature and air humidity ensures the ideal storage conditions for fresh food.
Setting the temperature
Using the selector button, select the type of food that is in the cold storage container.

The LED lights up to show the selection made.
The following foods are unsuitable for keeping in the cold storage container:
- Fruit and vegetables that are sensitive to the cold (e.g. pineapples, bananas, papaya and citrus fruits, aubergines, cucumbers, zucchini, peppers, tomatoes and potatoes) should be stored outside the refrigerator at temperatures between about +8 °C and +12 °C in order to keep their flavour and condition at their best.
The following foods are suitable for keeping in the cold storage container:
■ Fish, seafood, meat, sausage and cold meats, dairy products, ready meals ■ Vegetables (e.g. carrots, asparagus, celery, leeks, beetroot, mushrooms, cabbage, broccoli, cauliflower, sprouts, kohlrabi) ■ Lettuce varieties (e.g. lamb's lettuce, iceberg, chicory, round lettuce) ■ Herbs (e.g. dill, parsley, chives, basil) ■ Fruit (varieties not sensitive to cold, e.g. apples, peaches, berries, grapes).
Caution
After a power failure or disconnection of the appliance from the mains, the temperature of the cold storage container must be readjusted.
Storage times (at 0 °C)
Depending on initial quality
| Fresh fish, seafood meat Up to 3 days |
| Poultry, meat (cooked) Up to 5 days |
| Beef, pork, lamb, sausage and cold cuts Up to 7 days |
| Smoked fish, broccoli Up to 14 days |
| Lettuce, fennel, apricots, plums Up to 21 days |
| Soft cheese, yoghurt, quark, buttermilk, cauliflower Up to 30 days |
Freezer compartment
Use the freezer compartment for the following:
■ Storing deep-frozen food. ■ Making ice cubes. ■ Freezing food.
Note
Make sure that the freezer compartment door is always closed. When the door is open, the frozen foods defrost and the freezer compartment ices up heavily. In addition, energy is wasted due to power consumption.
Note
The 2-star door pockets can be used to store ice and food at -12 °C for short periods.
The rest of the freezer compartment is 4-star rated.
Max. freezing capacity
You will find information on the maximum freezing capacity in 24 hours on the rating plate.
Conditions for use of max. freezing capacity
■ Switch on the fast freezing function before placing the food in the freezer (see section headed 'Fast freezing'). ■ Remove the freezer compartment fittings. - Stack the food directly on the shelves and the bottom of the freezer compartment.
Note
Do not cover over the ventilation slots in the rear panel with the food you are freezing.
Preferably, large quantities of food for freezing should be placed in the top compartment. There it will freeze quickly and, therefore, without adversely affecting the food quality.
Freezing and storing
Purchasing frozen foods
Packaging must not be damaged. Observe the best before date. The temperature in the commercial chest freezer must be -18 °C or colder. As far as possible, frozen food must be transported in an insulated container and quickly placed in the freezer compartment.
When arranging the food, note the following:
Preferably, large quantities of food for freezing should be placed in the top compartment. There it will freeze quickly and, therefore, without adversely affecting the food quality. Spread the items out well in the compartments/trays.
Note
Food that is already frozen must not come into contact with the food that is to be freshly frozen. If necessary, move already frozen items to other freezer trays.
Storing frozen food
Push the freezer trays in as far as they will go so as to ensure perfect air circulation.
Freezing fresh food
Only use fresh, undamaged food for freezing.
In order to retain the nutritional value, aroma and colour of the food as much as possible, blanch vegetables before they are frozen.
Blanching is not required for aubergines, peppers, courgettes and asparagus.
You can find literature about freezing and blanching in bookshops.
Note
Do not allow food that is to be frozen to sit right next to food that has already been frozen.
The following are suitable for freezing: Baked goods, fish and seafood, meat, game, poultry, vegetables, fruit, herbs, eggs without their shells, dairy products such as cheese, butter and curd cheese, prepared dishes and leftovers such as soups, stews, cooked meat and fish, potato dishes, baked casseroles and sweet foods. The following are not suitable for freezing: types of vegetable that are usually eaten raw, such as lettuces or radishes, eggs in their shells, grapes, whole apples, pears and peaches, hard-boiled eggs, yoghurt, curds, soured cream, crème fraîche and mayonnaise.
Packing frozen food
Pack food so that it is airtight to prevent it from losing its flavour or drying out.
- Store food in its packaging.
- Press out any air.
- Close the packaging tightly.
- Label packaging with its contents and date of freezing.
The following are suitable as packaging:
Plastic film, polyethylene hose film, aluminium foil, freezer bags.
You will find these products at your specialist dealer.
The following are not suitable as packaging:
Wrapping paper, greaseproof paper, cellophane, rubbish bags and used shopping bags.
The following are suitable for sealing packaging:
Rubber bands, plastic clips, pack-twines, cold-resistant scotch tape, or similar.
Polyethylene bags and hose film can be fused closed using a bag sealer.
Storage life of frozen foods
The storage life depends on the type of food.
At a temperature of -18 °C:
■ Fish, sausages, prepared dishes, baked goods: Up to 6 months. ■ Cheese, poultry, meat: Up to 8 months. ■ Vegetables, fruit: Up to 12 months.
Defrosting frozen food
You can choose between the following options, depending on the type of food and its intended use:
■ at ambient temperature in the fridge ■ in an electric oven, with/without hot air convection In the microwave oven.
Caution
Do not refreeze defrosted food. It can only be refrozen after it has been made into a ready-to-eat meal (cooked or roasted).
Do not continue to use the complete max. storage time for the frozen food.
Ice and water dispenser
Any of the following can be dispensed, as required:
- chilled water, crushed ice, ice cubes
Warning
Never reach into the ice cube dispenser spout.
There is a risk of injury.
Caution
Never place bottles or food in the ice cube container in an attempt to cool them quickly. You could block and/or damage the ice-maker.
Points to observe when switching on for the first time
The ice and water dispenser only functions when the appliance is connected to the water supply.
After the appliance is first switched on, it takes roughly 24 hours for the first portion of ice cubes to be produced.
When the water supply is first connected, there are still air bubbles in the pipes.
Draw off and throw away the drinking water until there are no longer any air bubbles in the water dispensed. Discard the first 5 glasses of water.
When the ice-cube maker is used for the first time, for hygiene reasons the first 30 - 40 ice cubes should not be used.
Notes on using the ice-maker
Once the freezer compartment has reached its freezing temperature, water is fed into the ice-maker and freezes into ice cubes inside. When ready, the ice cubes are automatically discharged into the ice-cube container.
After the appliance is first switched on, it takes roughly 24 hours for the first portion of ice cubes to be produced.
Sometimes, the ice cubes may stick together. They usually come apart of their own accord when fed to the dispenser spout.
When the ice-cube container is full, the ice-maker switches off automatically.
The ice-maker can make roughly 140 ice cubes in a period of 24 hours depending on the ambient temperature and the appliance setting.
When ice cubes are being made, the sound of the water valve humming, the water running into the ice tray and the ice cubes dropping into the container can be heard.
Observing the drinking water quality
All materials used to manufacture the water dispenser are odourless and tasteless.
If the water has an after-taste, this may be caused by the following:
■ The mineral and chlorine content of the drinking water. ■ The material that the household plumbing or water mains are made of. The freshness of the drinking water. If water has not been dispensed for a long period of time, the water may taste "stale". In such cases, draw off and throw away about 15 glasses of water.
We recommend that you regularly draw off a certain amount of water from the water dispenser and do not switch the appliance off. This will maintain the best water quality.
Note
The water filter supplied only filters particles out of the water supply; it does not remove bacteria or microbes.
Dispensing water
- Press the "water" button. The display panel shows the "Water" symbol.

- Press a glass against the dispenser lever until the glass is filled with the desired amount of water.

Tip
The water from the water dispenser is cooled to a pleasant temperature for drinking. If you prefer the water to be colder, dispense some ice cubes into the glass before drawing the water.
Dispensing ice
Only hold the container against the dispenser lever until the container is half full of ice. Otherwise, the ice in the ice-cube dispenser spout may cause the container to overflow or block the ice cube dispenser spout.
If crushed ice was dispensed before dispensing ice cubes, there may still be some crushed ice in the dispenser spout. It will come out together with the first few ice cubes.
- Press the "crushed ice/ice cubes" button until the display shows the "Ice cubes" or "Crushed ice" symbol.

- Press a suitable vessel against the dispenser lever until it is filled with the desired amount of ice.

Switching off the ice-maker
Note
It is imperative to turn off the water supply to the appliance several hours before switching off the ice-maker.
If you do not expect to be using the ice-maker for longer than 1 week (e.g. when going on holiday), the ice-maker should be temporarily switched off to stop the ice cubes freezing together.
- Press and hold the "crushed ice/ice cubes" button for 3 seconds.

In the display, the symbols "Ice cubes", "Crushed ice" and "Lock" flash for approx. 3 seconds.
Then the water dispensing is switched on and the symbol "Water" lights up.
Note
When the "crushed ice/ice cubes" button is pressed, when the ice-maker is switched off, an alarm sounds and the symbols "Ice cubes", "Crushed ice" and "Lock" flash for approx. 3 seconds.
- Pull out the ice-cube container.

- Empty the ice-cube container and clean it.
- Push the ice-cube container all the way back on the runners until it snaps into place.
Switching on the ice-maker
Press and hold the "crushed ice/ice cubes" button for 3 seconds.
An alarm sounds as soon as the ice-maker is switched on.
Water filter
Warning
In localities where the water quality is not ideal or not known, do not use the appliance without suitable means of disinfection on the inlet and outlet side of the filter.
Filter cartridges for the water filter can be obtained from After-sales Service.
Caution
■ After fitting a new filter cartridge, always throw away the first 24 hours' worth of ice produced after switching on the ice-maker. If the ice has not been used for an extended period, throw away all the ice cubes in the ice-cube container as well as the ice produced over the next 24 hours. If the appliance has not been used or no ice has actually been dispensed for several weeks or months, or if the ice cubes have an unpleasant taste or smell, change the filter cartridge. Air trapped in the system can cause water to spurt out and eject the filter cartridge. Take care when removing it. ■ The filter cartridge must be replaced at least every 6 months.
Important notes on the water filter
After use, the water system is slightly under pressure. Take care when removing the filter cartridge. If the appliance has not been used for an extended period or the water has an unpleasant taste or smell, flush the water system through. To do so, draw water from the dispenser continuously for several minutes. If the unpleasant taste or smell persists, change the filter cartridge.
Changing the filter cartridge
After six months has elapsed, the water filter symbol starts flashing as a prompt to change the filter cartridge (see section headed Water filter symbol).
The filter cartridge must be replaced after six months at the latest.
- Caution! Unplug the appliance from the mains or switch off the circuit-breaker.
- Turn off the water supply to the appliance.
- Press the button and remove the lid.

Note
Take care when removing the filter cartridge.
The water system is slightly under pressure after use.
- Carefully turn the filter cartridge 90° anti-clockwise e.g. with a spoon and pull it out.

- Take the new filter cartridge out of its packaging and remove the safety cap.
- Insert the new filter cartridge and carefully turn it 90° clockwise as far as the stop e.g. with a spoon.
Note
The filter cartridge must be tightened by hand so that no leaks are created and that the appliance is correctly supplied with water.
- Refit the lid and snap it into place.

- Turn on the water supply to the appliance.
- Switch on the appliance.
- Draw off several litres of water from the water dispenser. This will remove any air from the water system.
- Pour the water out of the old filter cartridge. The filter cartridge can be disposed of together with the normal household waste.
- Press and hold the "light/filter" button for 3 seconds. That resets the water filter indicator. The symbol will then stop flashing. The new filter has now been activated.

Note
The ice and water dispenser can also be used without a water filter. In that case, fit the cover cap.

Model 9000 7775078
Use Replacement Cartridge 9000 674655.
The concentration of the indicated substances in water entering the system was reduced to a concentration less than or equal to the permissible limit for water leaving the system as specified in NSF/ANSI Standard 42 and Standard 53.

System tested and certified by NSF International against NSF/ANSI Standard 42 and Standard 53 for the reduction of the claims specified on the Performance Data Sheet.
Capacity 739.68 Gallons (2800 Liters)
Contaminant Reduction Determined by NSF testing.
| Contaminant Reduction | Average Influent | NSF specified Challenge Concentration | Avg % Reduction | Average Product Water Concentration | Max Permissible Product Water Concentration | NSF Reduction Requirements | NSF Test Report |
| Chlorine Taste and Odor | 2,1 mg/l | 2,0 mg/l ± 10 % | 97,6 % | 0,05 mg/l | N/A | ≥ 50 % | J-00121313 |
| Nominal Particulate Class I, ≥ 0,5 to < 1,0 μm | 9.100.000 particles/ml | Mind. 10.000 particles/ml | 98,8 % 111.817 | particles/ml | N/A ≥ 85 % J-00099871 | | |
| Cyst* 170.00 cysts/l | Minimum | 50.000 cysts/l | 99,99 % 0,001 cyst/IN/A ≥ 99,95 % | J-00109715 | | |
| Turbidity | 11 NTU | 11 ± 1 NTU | 98,1 % | < 1 NTU | 0,5 NTU | ≥ 95,5 % | J-00099885 |
* Based on the use of Cryptosporidium parvum oocysts
| Application Guidelines/Water Supply Parameters |
| Service Flow | 0,75 gpm (2,83 lpm) |
| Water Supply | Potable Water |
| Water Pressure 30 - 120 psi (207 - 827 kPa) |
| Water Temperature | 0,6 °C - 38 °C (33 °F - 100 °F) |
It is essential that the manufacturer's recommended installation, maintenance and filter replacement requirements be carried out for the product to perform as advertised. See Installation Manual for Warranty information.
Note: While the testing was performed under standard laboratory conditions, actual performance may vary.
Replacement Cartridge: 9000 674655. For estimated costs of replacement elements please contact your local dealer or call 1-800-578-6890.
Warning
To reduce the risk associated with ingestion of contaminants:
Do not use with water that is microbiologically unsafe or of unknown quality without adequate disinfection before and after the system. Systems certified for cyst reduction may be used on disinfected water that may contain filterable cysts.
EPA Establishment Number 10350-MN-005
3M is a trademark of 3M Company used under license.
NSF is a trademark of NSF International.
© 2013 3M Company. All rights reserved.
Caution
To reduce the risk associated with property damage due to water leakage:
- Read and follow Use Instructions before installation and use of this system. Installation and use MUST comply with all state and local plumbing codes. Do not install if water pressure exceeds 120 psi (827 kPa). If your water pressure exceeds 80 psi, you must install a pressure limiting valve. Contact a plumbing professional if you are uncertain how to check your water pressure. Do not install where water hammer conditions may occur. If water hammer conditions exist you must install a water hammer arrester. Contact a plumbing professional if you are uncertain how to check for this condition.
- Do not install on hot water supply lines. The maximum operating water temperature of this filter system is 100 °F (38 °C). Protect filter from freezing. Drain filter when temperatures drop below 33 °F (0.6 °C). The disposable filter cartridge must be replaced every 6 months, at the rated capacity or if a noticeable reduction in flow rate occurs.
Manufactured by:
3M Purification Inc.
400 Research Parkway
Meriden, CT 06450
USA
Tel. (800) 222-7880
(203) 237-5541
Fittings
Glass shelves
The glass shelves can be removed and fitted at different heights.
Removing
Lift the glass shelf at the back and pull it out.

Inserting
Slide the glass shelf backwards on the guide rails until it snaps downwards into place.
Glass shelves over the drawers
The glass shelves can be removed.
Pull the shelf out and lift it upwards to remove it.

Door pockets
The door pockets can be removed.
Pull the door pockets upwards to remove.

Ice-cube tray
The ice-cube tray is for keeping ice cubes in.
Lift the ice-cube tray slightly at the front and unhook it.

Drawers
The drawers can be removed.
Pull the drawer out as far as the stop, lift it at the front and remove it completely.

Shelf
For holding drinks cans.

en
Egg tray

Door pocket with lid
This compartment can be removed.
Pull the compartment upwards to remove.

Mini-bar (not available on all models)
This compartment is for quick access to drinks in the fridge compartment. When the compartment is opened, the lights switch on.
To open, carefully press the top of the mini-bar.

Switching off and shutting down the appliance
Switch off the appliance
Unplug the appliance from the mains or switch off the circuit-breaker.
The refrigeration system and lights switch off.
If the appliance is to be switched off but not unplugged (e.g. while you are on holiday):
Press and hold the "freeze/super+" and "cool/super+" buttons for 5 seconds. When the appliance is off, the temperature displays will show "- -". The rest of the display panel is off.

Switching on the appliance:
Press and hold the "freeze/super +" and "cool/super +" buttons for 5 seconds.
Putting the appliance out of service
If you do not use the appliance for long periods:
- It is imperative to turn off the water supply to the appliance several hours before switching off the ice-maker.
- Remove all food from the appliance.
- Switch off the appliance.
- Empty the ice-cube container and clean it.
- Clean the appliance.
- Leave the appliance doors open.
Defrosting
Fridge compartment
While the appliance is in use, drops of condensation or frost form on the back of the fridge compartment. As the rear panel defrosts automatically, it is not necessary to remove the frost or the condensation.
Freezer compartment
Thanks to the fully automatic NoFrost system, the freezer compartment remains free of ice. There is no longer any need to defrost it.
Cleaning the appliance

Caution
■ Do not use gritty, acidic or chlorine-based cleaning agents or solvents. - Do not use abrasive cleaning pads or sponges that may scratch surfaces. This may lead to corrosion of the metallic surfaces. ■ Never clean the shelves or containers in the dishwasher. The parts may warp.
Proceed as follows:
- Switch off the appliance before cleaning.
- Unplug the appliance from the mains or switch off the circuit-breaker.
- Take out the food and store it in a cool place. Place an ice block (if you have one) on the food.
- Wait until the layer of frost has thawed out.
- Clean the appliance with a soft cloth, lukewarm water, and a little pH-neutral washing-up liquid. The washing-up liquid solution must not be allowed to get into the lights or run into the evaporation tray through the drain hole.
- Only wipe the door seal with clean water and then rub it until it is dry.
- After cleaning, reconnect the appliance to the mains and switch it on.
- Put the food back in.
Fittings
All the variable components of the appliance can be removed for cleaning (see section headed Fittings).
Ice-cube container
If no ice-cubes are dispensed for an extended period, the ice cubes in the container shrink, taste stale and stick together. Therefore, the ice-cube container should be cleaned regularly.

Caution
The ice-cube container is heavy when it is full.
- Press and hold the "crushed ice/ice cubes" button for 3 seconds.
- Pull out the ice-cube container.
- Empty the ice-cube container and clean it.
- Push the ice-cube container all the way back on the runners until it snaps into place.
Water spillage tray
Spilt water collects in the water spillage tray.
- To empty and clean it, remove the strainer.

- Clean the water spillage tray with a sponge or absorbent cloth.
- Refit the strainer.
Smells
If you notice unpleasant smells:
- Unplug the appliance from the mains or switch off the circuit-breaker.
- Remove all food from the appliance.
- Clean the inside of the appliance (see section headed Cleaning the appliance).
- Clean all packaging.
- Pack strongly smelling food in air-tight containers to prevent odours.
- Switch on the appliance again.
- Arrange the food.
- After 24 hours, check again to see if the smells have reappeared.
Lighting (LED)
Your appliance is equipped with a maintenance-free LED light.
Any repair work on the lighting must only be carried out by the after-sales service or authorised experts.
Saving energy
■ Install the appliance in a dry, well ventilated room. The appliance must be installed out of direct sunlight and away from heat sources (e.g. heating elements, cooker). Use an insulating plate if necessary. - Allow hot food and drinks to cool before placing them in the appliance. - Place frozen food in the fridge compartment to defrost and utilise the low temperature of the frozen food to cool other food. ■ Only open the appliance doors for as short a time as possible. ■ To prevent the food warming up quickly in the event of a power cut or a fault, place blocks of ice in the top compartment directly on top of the food. ■ Make sure that the freezer compartment door is always closed. ■ The arrangement of the fittings has no effect on the energy consumption of the appliance. ■ To prevent increased power consumption, occasionally clean the air vent with a soft brush or vacuum cleaner.
Operating noises
Completely normal noises
Humming
Motors running (e.g. refrigeration units, ventilator).
Bubbling, whirring or gurgling noises
Refrigerant circulating through the pipes or water running into the ice-maker.
Clicking
Motors, switches or solenoid valves are switching on/off.
Rattling
Ice cubes dropping into the ice-cube container from the ice-cube maker.
Preventing noises
The appliance is not standing straight
Make sure the appliance is exactly level by using a spirit level. To adjust the position of the appliance, use the adjustable feet or place something underneath.
The appliance is touching adjacent units or appliances
Move the appliance away from adjacent furniture or appliances.
Containers or shelves are wobbling or sticking
Check the removable parts and re-insert them if necessary.
Containers are touching
Move the containers apart slightly.
Rectifying minor faults yourself
Before calling After-sales Service:
Check whether you can rectify the fault yourself by using the notes below.
You must pay the cost of the After-sales Service call out – even during the guarantee period.
Appliance
| Problem Possible cause Remedy |
| Appliance is not cooling/ freezing. | Power cut. Check whether there is power to the appliance. |
| The lighting is not working. | Circuit-breaker is switched off. Check circuit-breaker. |
| The display does not light up. | Power plug not properly plugged in. Check whether power plug is properly plugged in. |
| The refrigeration unit switches on with increasing frequency and for longer periods. | The appliance door is being opened frequently. | Do not open the appliance door unnecessarily. |
| The ventilation openings are covered. | Remove any obstructions. |
| Placing large quantities of food in the appliance. | Switch on fast cooling/fast freezing function. |
| The fridge compartment/ freezer compartment is too cold. | The temperature setting is too low. Set a higher temperature. |
| The (LED) lighting does not work. | The LED lighting is faulty. See section headed Lighting (LED). |
| Light switch is sticking. Check whether you can move the light switch. |
| The appliance door was opened for too long. The lighting switches off after approx. 10 minutes. | After closing and opening the appliance door, the lighting is switched on again. |
| Unpleasant smells are noticeable. | Strongly smelling food not packed in air-tight containers. | Clean the appliance. Pack strongly smelling food in air-tight containers (see section headed Smells). |
| Warning beeper sounds or temperature indicator flashes. It is too warm in the fridge or freezer compartment. Food is at risk. | Appliance door is open. See section headed Alarm functions. |
| Too much food was stored at once. |
| Cold storage container (if existing) does not cool. | Disconnect the appliance from the mains (power failure or power plug pulled). | Reset the desired temperature. |
Ice-maker
| Problem Possible cause Remedy |
| Ice-maker not working. Ice-maker is not connected to the power supply. | Call After-sales Service. |
| Ice-maker is not receiving a supply of water. | Make sure that the water supply is properly connected. |
| The temperature in the freezer compartment is too high. | Check the freezer compartment temperature setting and set it slightly colder if necessary. |
| Ice-maker is not making enough ice or the ice is misshapen. | Appliance or ice-maker has only been switched on for a short time. | It takes roughly 24 hours for ice production to start. |
| A large quantity of ice has been dispensed. | It takes roughly 24 hours for the ice-cube container to be refilled. |
| Low water pressure. The appliance should only be connected to a water supply with the specified pressure (see section headed Connecting the appliance, subheading Water connection). |
| Water filter clogged or used up. Replace water filter. |
Problem Possible cause Remedy
| Ice-maker not making any ice. | Ice-maker is switched off. Switch on the ice-maker. |
| Appliance not being supplied with water. | Contact your installer or water company. |
| Kinks in the water supply hose. Turn off the water supply at the isolating valve. Straighten out any kinks or have hose replaced if necessary. |
| Low water pressure. The appliance should only be connected to a water supply with the specified pressure (see section headed Connecting the appliance, subheading Water connection). |
| Freezer compartment temperature too high. | Set a slightly colder temperature for the freezer compartment. |
| Ice-cube container not inserted properly. | Check the position, re-insert if necessary. |
| Incorrect isolating valve fitted. Unsuitable valves can reduce the water pressure and cause damage to the appliance. |
| Ice forms in the feeder hose to the ice-maker. | Low water pressure. Turn off the water supply at the isolating valve. Straighten out any kinks or have hose replaced if necessary. |
| Isolating valve not fully open. Fully open isolating valve. |
| Water runs out of the appliance. | Water connecting hose is leaking. Have hose replaced with a genuine replacement hose from the manufacturer. |
| Incorrect isolating valve fitted. Unsuitable valves can reduce the water pressure and cause damage to the appliance. |
| No water comes out of the water dispenser. | The return stop valve has been installed incorrectly | Check the flow direction, Arrows on the return stop valve indicate the flow direction. |
| Sieve is clogged. Turn off the water supply at the isolating valve. Remove and clean the sieve. |
After-sales Service
You can find your local After-sales Service centre in the phone book or the After-sales Service directory. Please quote the product number (E no.) and production number (FD no.) of your appliance.
You will find this information on the rating plate.

Please help us to avoid unnecessary journeys by quoting the appliance and production number. By doing so, you will save any associated additional charges.
Booking a repair call-out and advice on faults
The After-sales Service contact details for all countries are listed in the attached After-sales Service directory.
GB 0344 892 8999 Calls charged at local or mobile rate.
IE 01450 2655 0.03 € per minute at peak. Off peak 0.0088 € per minute.
US 866 447 4363 toll-free
Note
fr
Note
Deactivation
Deactivation
Note
A tip
Note
Note
3M Purification Inc.
400 Research Parkway
Meriden, CT 06450
USA
Tel. (800) 222-7880
(203) 237-5541
Equipment
Glass shelves
Installation
Door bins
Ice cube tray
Drawer
Storage bin
Egg compartment

Warning
it
Warning
1 "freeze/super" button
4 "crushed ice/ice cubes" button
5 "alarm/lock" button
6 "cool/super" buttons
Shutdown
Shutdown
Warning
Advice
Warning
Warning
3M Purification Inc.
400 Research Parkway
Meriden, CT 06450
USA
Tel. (800) 222-7880
(203) 237-5541
Equipment
Glass shelves
How to insert them
Ice cube tray
Drawers
Door shelf
Note
- The refrigerator door is lower:

Note
1 "freeze/super" buttons
Switching off
Press the "cool/super +" button.
Note
Switching off
Press the "freeze/super +" button.
Note
Note
Suitable packaging:
Plastic wrap, polyethylene film, aluminum foil, freezer boxes.
Tip
nl
The symbols "Ice cubes", "Crushed ice" and "Key lock" flash on the display for approx. 3 seconds.
Note
Note
Specification sheet
Model 9000 7775078
3M Purification Inc.
400 Research Parkway
Meriden, CT 06450
USA
Tel. (800) 222-7880
(203) 237-5541
Equipment
Glass shelves
Placement
Door bins
Ice cube tray
Drawers
Compartment
nl
Egg holder

Door bin with cover
siemens-home.bsh-group.com