
SBCSC368-86U - Headphones PHILIPS - Free user manual and instructions
Find the device manual for free SBCSC368-86U PHILIPS in PDF.
| Product Type | Babyphone (audio monitor for baby) |
| Brand | PHILIPS |
| Model | SBCSC368-86U |
| Baby unit power supply | 4 AA 1.5 V batteries (not included) or 9 V DC / 200 mA mains adapter |
| Parent unit power supply | Rechargeable NiMH battery (included) or 9 V DC / 200 mA mains adapter |
| Supplied mains adapters | 2 adapters 230 V AC, 50 Hz, output 9 V DC / 200 mA |
| Maximum range | Up to 250 meters outdoors (reduced by obstacles) |
| Transmission channels | 2 channels (A and B) |
| Baby unit battery life | More than 30 hours with new batteries |
| Parent unit battery life | Approximately 12 hours on charged battery |
| Main functions | Sound monitoring, link indicator, adjustable microphone sensitivity, belt clip |
| Operating temperature | 10 °C to 40 °C |
| Care and cleaning | Clean with a soft, dry cloth |
| Safety | Do not place the baby unit in the crib or playpen; keep the cable out of reach of the child |
| Recommended batteries for baby unit | Philips alkaline batteries (non-rechargeable) |
Frequently Asked Questions - SBCSC368-86U PHILIPS
User questions about SBCSC368-86U PHILIPS
0 question about this device. Answer the ones you know or ask your own.
Ask a new question about this device
Download the instructions for your Headphones in PDF format for free! Find your manual SBCSC368-86U - PHILIPS and take your electronic device back in hand. On this page are published all the documents necessary for the use of your device. SBCSC368-86U by PHILIPS.
USER MANUAL SBCSC368-86U PHILIPS
6 month guarantee on rechargeable batteries
This document is printed on chlorine free produced paper
Data subject to change without notice
Printed in China
OvouaTeiWvUo, 8ieuovon kai uoypaTou eT. TPOUMeUT
Instructions for use
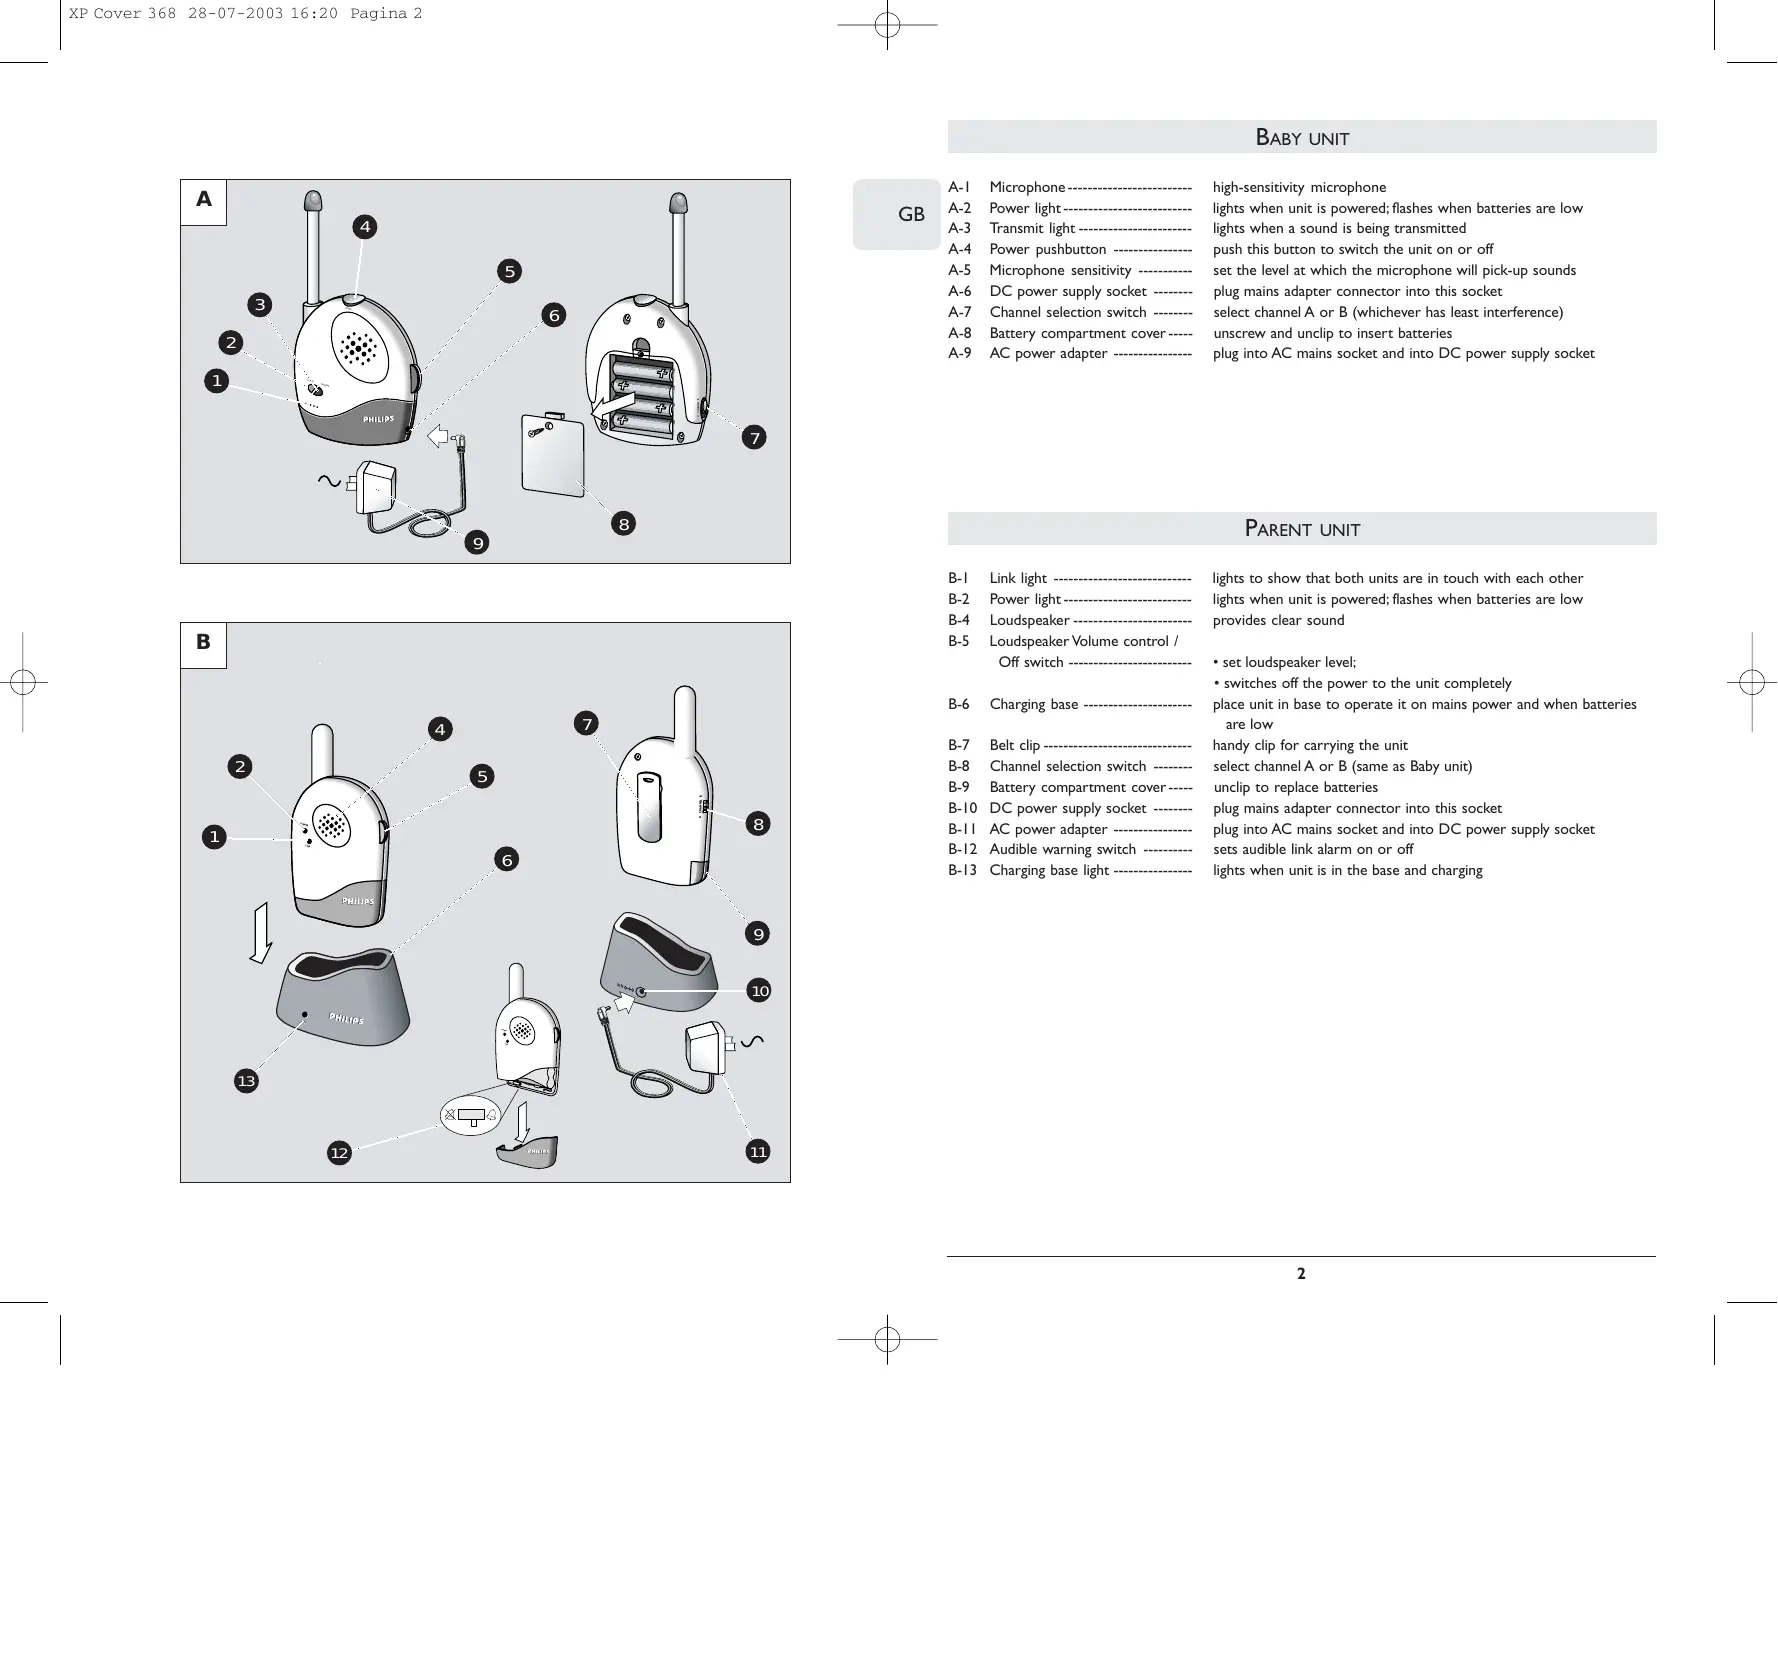
A-1 Microphone high-sensitivity microphone
A-2 Power light - lights when unit is powered; flashes when batteries are low
A-3 Transmit light - lights when a sound is being transmitted
A-4 Power pushbutton push this button to switch the unit on or off
A-5 Microphone sensitivity set the level at which the microphone will pick-up sounds
A-6 DC power supply socket ---- plug mains adapter connector into this socket
A-7 Channel selection switch --- select channel A or B (whichever has least interference)
A-8 Battery compartment cover---- unscrew and unclip to insert batteries
A-9 AC power adapter plug into AC mains socket and into DC power supply socket
PARENT UNIT
B-1 Link light - lights to show that both units are in touch with each other
B-2 Power light - lights when unit is powered; flashes when batteries are low
B-4 Loudspeaker provides clear sound
B-5 Loudspeaker Volume control /
Off switch set loudspeaker level;
- switches off the power to the unit completely
B-6 Charging base place unit in base to operate it on mains power and when batteries are low
B-7 Belt clip handy clip for carrying the unit
B-8 Channel selection switch select channel A or B (same as Baby unit)
B-9 Battery compartment cover----- unclip to replace batteries
B-10 DC power supply socket ---- plug mains adapter connector into this socket
B-11 AC power adapter plug into AC mains socket and into DC power supply socket
B-12 Audible warning switch sets audible link alarm on or off
B-13 Charging base light - lights when unit is in the base and charging
CONGRATULATIONS
You have just purchased a high-performance, cordless Baby Monitor that lets you listen to your child from wherever you are in and around the house. Please read this guide carefully before using the monitor, and keep it for future reference.
IMPORTANT!
This Baby Monitor is intended as an aid. It is not a substitute for responsible and proper adult supervision and should not be used as such.
Make sure the Baby unit and adapter cable are always out of reach of the baby, at least I metre away.
Never place the Baby unit inside the baby's bed or playpen!
The antennas on the Parent and Baby units are fixed; do not try to extend them.
Never cover the Baby unit (with a towel, blanket, etc.)
GETTING THE UNITS READY FOR USE
Baby unit
Connect the AC power adapter (A-9) to an AC mains socket, and then connect the cord to the DC power supply socket (A-6) of the Baby unit.
If you want to use batteries, remove the battery compartment cover (A-8) using a screwdriver. Insert four 1.5V, AA batteries (not included; we recommend non-chargeable Philips Alkaline batteries), noting the + and - configuration inside the battery compartment. Put the cover back in place and tighten screw.
The Baby unit operates cordlessly for up to 30 hours on fresh batteries. The red POWER light (A-2) flashes when battery power is low. If this happens install new batteries.
Note: To switch off the Baby unit completely push the POWER button (A-4).
Parent unit
The Parent unit uses a rechargeable battery pack. This is already installed, but first it must be charged for at least 14 hours as follows before using the unit outside the charging base:
- Connect the AC power adapter (B-11) to an AC mains socket, and then connect the cord to the DC power supply socket (B-10) of the charging base (B-6).
- Place the Parent unit inside the charging base. The red charging light (B-13) lights.
The Parent unit can be operated now but you should leave it in the charging base until the batteries are fully charged (at least 14 hours). When the batteries are fully charged, take the Parent unit out of the charging base and use cordlessly for up to 12 hours.
When the red POWER light (B-2) on the Parent unit flashes, the battery power is low. Place the Parent unit inside the charging base to recharge the batteries.
Monitoring baby's sounds
To use the units to listen to your baby:
- Position the Baby unit at least 1 metre away from the baby so that the microphone (A-1) can pick up baby's sounds.
- Set the channel switch to the same position on both units.
- Push the POWER switch on the baby unit (A-4) to switch it on.
- Set the SENSITIVITY control (A-5) on the Baby unit to about mid-range (5).
- The green TRANSMIT light (A-3) lights when a sound is picked up.
- Move away from the Baby unit with the Parent unit.
- Switch on the Parent unit using the Volume control/Off (B-5) and adjust the volume to the level you prefer.
- If required, re-adjust the SENSITIVITY control (A-5) on the Baby unit to set the level at which the microphone will start to pick up sounds.
When the SENSITIVITY control (A-5) is set to 9, the microphone picks up even the softest sounds. Experiment with different levels until you find the setting that suits you and your baby best.
The green LINK light (B-1) lights continuously when the Parent unit and the Baby unit are in touch with each other.
Avoiding interference
Both units use anti-interference technology to reduce the chance of interference from other signals. If interference does occur or if sound reception is poor, try switching both units to the other channel to improve the sound quality.
Note: Always make sure that the channel selection switches (A-7, B-8) on both units are set to the same position.
Checking that the units are in touch
The green LINK light (B-1) of the Parent unit lights continuously to show that the Parent unit and the Baby unit are in touch with each other. This light flashes if the Baby unit is out of range for more than 30 seconds or if the signal is blocked.
When the units are no longer in touch, try one of the following:
- Move the Parent unit closer to the Baby unit. (The maximum operating distance is 250m in ideal conditions. Walls and floors can limit this distance.)
- Switch both units to the other channel.
- Check that both units are powered correctly (low batteries?).
Switching on the audible warning
If you wish, you can switch on a special feature that lets you hear an audible warning on the Parent unit when the units are not in touch. The Parent unit is delivered with this beep switched off to avoid intermittent disturbances that can occur when the connection is interrupted for a short period.
To switch on the audible warning, open the Parent unit's battery compartment cover (B-9) and set the switch (B-12) inside to the On position ( ).
Note: The LINK light (B-1) continues to operate even if the audible warning is switched off.
Belt clip
When the batteries of the Parent unit are charged, the unit can be carried around giving you freedom of movement while still monitoring your baby. Use the belt clip (B-7) to attach the unit to your clothing and so keep your hands free.
PROBLEM SOLVING
| Problem | Possible Cause | Solution |
| Power light does not light (Parent unit). | Unit is not turned on. | Turn Volume control/Off switch clockwise (B-5). |
| Batteries are low. | Recharge batteries. | |
| Power light does not light (Baby unit). | Unit is not turned on. | Push the Power switch (A-4) to switch on the unit. |
| AC adapter is not plugged in or Batteries are exhausted. | Plug in AC adapter or replace batteries. | |
| AC adapter plugged into an outlet that is not working. | If the power socket has a switch, turn it on. | |
| High pitched noise. | Units are too close together. | Move Parent unit away from Baby unit. |
| Volume too high. | Turn volume control on Parent unit counter-clockwise. | |
| No sound. | Volume control on Parent unit is set too low. | Turn volume control/Off switch clockwise (B-5). |
| Units are out of range. | Move Parent unit closer to Baby unit. | |
| Power light blinking. | Batteries are low or empty. | Parent unit:- recharge batteries. Baby unit:- replace batteries or connect to mains power. |
| Interference or poor reception. | Mobile or cordless phones too close to the baby monitor can cause interference. | Move the phones away from the units. |
TECHNICAL SPECIFICATIONS
Power supply
- Battery pack; rechargeable NiMH for Parent Unit (included);
- Optional batteries 4 × 1.5V ; AA alkaline for Baby Unit (not included);
- AC power adapter 230V AC, 50Hz (two included): - Output voltage 9V DC, 200mA .
Only use the AC power adapter included or a type that complies with safety standard EN60950 and that has the following specification: 9 Volt DC / 200mA.
Operating range
- up to 250 metres in ideal conditions
- 10^ to 40^
Pilot tone
- Continuous communication link (hidden signal ensures a continuous link between both units so you only hear your baby's sounds).
Transmission frequencies
Channel A Channel B
SBC SC368/00Y:40.695 MHz 40.675 MHz
UNITE BÉBÉ
SBC SC368/00Y 40.695 MHz 40.675 MHz
UNIDAD DEL BEBÉ
SBC SC368/00Y: 40.695 MHz 40.675 MHz
BABYGERAT
A-1 Mikrophon
SBC SC368/00Y: 40.695 MHz 40.675 MHz
GARANTIE
A-8 Deksel batterijcompartment
B-9 Deksel batterijcompartment
SBC SC368/00Y: 40.695 MHz 40.675 MHz
UNITA BAMBINO
SBC SC368/00Y: 40.695 MHz 40.675 MHz
UNIDADE DO BEBÉ
SBC SC368/00Y: 40.695 MHz 40.675 MHz
MONAΔAMΩPOY
A-1 Mkrp0oov mkrp0oovvynlnc evaio
A-2 1oXoos -avabot otav n ovaia tropoodotieta; avaaboivt otav ou a a e ivai
A-3 -avaeotavekπεμπeαiEvasno
A-4 Koupi o0n6 evpeiaa - 10 nto koupi yva avaye i na 6h
A-5 Evaiognoia Mkpoovou -pOoio to epiEso sto oio to kpoov o npoei va oaae ta tov xo
A-6 Ipica tropopoobosiaic 1oxboc DC-- baltro souvdeltaa tov npoapuoyea tov nEeKtpiokou diktroou ^ avtn tn pici
A-7 1aikoTn8 eiooync kavlaioB-- euiEeKauVAl A n B (ekivno oov exTa laiyotepa npapətata)
A-8 KaTakai duaepipsoaos paataipov- 1 0 te kai aonovdoe ia va bale atapies
A-9 Ipoosapmuoyeaic AC --aalte stnvpiica tou nlektpkoov duktbov AC kai stnv npiae tropoooiaac DC
MONAΔA ΓONIOY
B-1 - avaia va dεiδισι oι σóu movadες επικονωνουν μεταδό τούς
B-2 10xioos -avabetovn movadotopodotietai; avaboosnvotav otav oataipiesivaaumnaes
B-4 Meyapovoo -aepexka0aopn
B-5 州 /
B-6 Bao npoprtiog
B-7 Suovdtipac iavta -paktkoc suvdtnpa ia va kovbaatae a i sa tmova
B-8 i k επλογής καναλιοῦ -- επλέγει καναλιΑ ἡ B (iodoς με τον αντίστοχο διακόπητης Mωρού)
B-9 Kaiaki diuapeipsoaoc mataapov-anosovdeote yva avtikataohtoe tic mataapiies
B-10 Ipica tropoosoiac 1oxoC DC-- baltet oovvctnpa tov npoosapoyea tov nEeKtpioudeltaktoou O'avtn Tnv pici
B-11 Ipoosapmuoyeaic 1oXooc AC -aalte stnv npia tou nektpikov diktov AC kai stnv npia tpoosodiosiac 1oXooc DC
B-12 i k i
Iapakokovtheta touc youc tou wpo
Tia va xpnouonoi8e Tc movadec npokéivouvaakoutoopoc
SBC SC368/00Y: 40.695 MHz
40.675 MHz
BABYENHET
SBC SC368/00Y: 40.695 MHz 40.675 MHz
BABY- ENHED
SBC SC368/00Y: 40.695 MHz
40.675 MHz
BABY-ENHET
A-1 Mikrofon meget folsom mikrofon
A-2 På-lampe (POWER) lyser när encheten er pä; blinker när batteriene er svake
A-3 Send-lampe (TRANSMIT) lyser nár en lyd sendes
A-4 På/av-trykknapp (POWER) ----- trykk på dette knappen for Å slå encheten på eller av
A-5 Folsomhet mikrofon -innstilling av nivat for när mikrofonen registerer lyder
A-6 Batterieliminator-inngang for tlikoping av batterieliminator
A-7 Kanalvelger valg av kanal A eller B (kanalen med minst stoy)
A-8 Batterilokk skrus 1s og tas av for a sette i batterier
A-9 Batterieliminator - settes i stikkontakten og kuples til enhetens inntak
FORELDRE-ENHET
SBC SC368/00Y: 40.695 MHz
40.675 MHz
LAPSEN YKSIKKO
SBC SC368/00Y: 40.695 MHz 40.675 MHz

Helpline
BELGIE & LUXEMBURG/ BELGIEN & LUXEMBURG / BELGIQUE & LUXEMBOURG Tel: 070-222303
DANMARK
Tlf: 32 88 32 00
FRANCE
Phone: 0825 889 789
DEUTSCHLAND
Phone:0180-5356767
GREECE
Phone:0080031221280
IRELAND
Phone:01-7640292
ITALIA
Phone:800820026
NEDERLAND
Phone:0900-8406
NORGE
Phone:22748250
ÖSTERREICH
Phone:0810 00 1203
PORTUGAL
Phone:0214163063
ESPANA
Phone: 902-113384
SCHWEIZ/SUISSE/SVIZZERA
Tel.:0844800544
SUOMI
puh. 0961580250
SVERIGE
Phone:08-59852250
UK
Phone:0181-665-6350
SBC SC368/00Y
R&TTE Directive 1999/5/EC
| BE | ✓ | DK | ✓ | GR | ✓ | ES | ✓ | FR | ✓ |
| IRE | IT | ✓ | LU | ✓ | NL | ✓ | AT | ✓ | |
| PT | ✓ | FI | ✓ | SE | ✓ | UK | NO | ✓ | |
| DE | ✓ | CH | ✓ | ||||||
| English | Hereby, Philips Consumer Electronics, B.U. Peripherals & Accessories, declares that this SBC SC368 is in compliance with the essential requirements and other relevant provisions of Directive 1999/5/EC. |
| François | Par la présente, Philips Consumer Electronics, B.U. Peripherals & Accessories, déclare que l'appareil SBC SC368 est conforme aux exigences essentielles et aux autres dispositions pertinentes de la directive 1999/5/CE |
| Espanol | Por medio de la presente, Philips Consumer Electronics, B.U. Peripherals & Accessories, Declare que el SBC SC368 compte con los requisitos esencias y cualesquiera除外as disposiciones aplicables o exigibles de la Directiva 1999/5/CE |
| Deutsch | Hiermit erklärrt Philips Consumer Electronics, B.U. Peripherals & Accessories die Übereinstimmung des Gerätes SBC SC368 mit den grundlegenden Anforderungen und den anderen relevanten Festlegungen der Richtlinie 1999/5/EG. |
| Nederlands | Hierbij verklaart, Philips Consumer Electronics, B.U. Peripherals & Accessories dat het toestel SBC SC368 in overeenstemming is met de essentièle eisen en de andere relevante bepalingen vanrichtlijn 1999/5/EG. |
| Italiano | Con la presente Philips Consumer Electronics, B.U. Peripherals & Accessories dichiarare che dato SBC SC368 è conforme ai requisiti essenziali ed alle altre disposizioni pertinenti stabilite dalla direttiva 1999/5/CE. |
| Portugués | Philips Consumer Electronics, B.U. Peripherals & Accessories declara que este SBC SC368 está conforme com os requisitos essenciais e'autres disposções da Directiva 1999/5/CE. |
| Éλληνία | ME THN ΠΑΡΟΥΣA Philips Consumer Electronics, B.U. Peripherals & Accessories ΔΗλΩNEI OTI SBC SC368 ΣΥΜΜΟΦΩNETAI ΠΙΝΟ ΠΙΥΣΟΔΩΕΙΣ ΑΠΑΙΤΗΣΕΙΣ KAI TΙΣ ΑΟΙΝΕΣ ΣΧΕΤΙΚΕΣ ΔΙΑΤΑΞΕΙΣ ΘΗ ΕΔΗΓΙΑΣ 1999/5/ΕK |
| Svenska | Härmed intygar, Philips Consumer Electronics, B.U. Peripherals & Accessories, attenna SBC SC368/Står I överensstämmlse med de väsentliga egenskapskrav och övriga relevanta bestämmlser som framgår av direktiv 1999/5/EG. |
| Dansk | Undertegnede Philips Consumer Electronics, B.U. Peripherals & Accessories erklærer herved, at følgende udstyr SBC SC368 overholder de væsentlige krav og øvrige relevante krav i direktiv 1999/5/EF |
| Norsk | Philips Consumer Electronics, B.U. Peripherals & Accessories erklærer at SBC SC368 apparatene tilfredsstiller de vesentligste kravene og andre relevante standarder i henhold til direktivet 1995/5/EC. |
| Suomi | Philips Consumer Electronics, B.U. Peripherals & Accessories vakuutta täten etta SBC SC368 typpinen laite on direktiivin 1999/5/EY olellisten vaatimusten ja sitä koskevien direktiivin muiden ehtojen mukainen. |
- PARENT UNIT
- CONGRATULATIONS
- IMPORTANT!
- GETTING THE UNITS READY FOR USE
- Baby unit
- Monitoring baby's sounds
- Avoiding interference
- Checking that the units are in touch
- Switching on the audible warning
- Belt clip
- TECHNICAL SPECIFICATIONS
- Power supply
- Operating range
- Pilot tone
- Transmission frequencies
- UNITE BÉBÉ
- UNIDAD DEL BEBÉ
- BABYGERAT
- GARANTIE
- UNITA BAMBINO
- UNIDADE DO BEBÉ
- MONAΔAMΩPOY
- MONAΔA ΓONIOY
- Iapakokovtheta touc youc tou wpo
- BABYENHET
- BABY- ENHED
- BABY-ENHET
- FORELDRE-ENHET
- LAPSEN YKSIKKO
- Helpline
Brand : PHILIPS
Model : SBCSC368-86U
Category : Headphones