
DO9043W Pro - Waffle Maker DOMO - Free user manual and instructions
Find the device manual for free DO9043W Pro DOMO in PDF.
| Product type | Waffle maker |
| Brand | DOMO |
| Model | DO9043W Pro |
| Power supply | 220-240 V ~ 50/60 Hz |
| Power | Approximately 1200 W (estimate) |
| Dimensions (L x W x H) | Approximately 30 x 20 x 15 cm (estimate) |
| Weight | Approximately 2.5 kg (estimate) |
| Plate material | Non-stick coating |
| Capacity | 1 waffle at a time |
| Cooking time adjustment | From 1 to 4 minutes in 30-second increments |
| Crisp mode | For crispier waffles |
| Preheating indicator | Ready light indicator + audible signal (4 beeps) |
| Automatic shut-off | Switches to standby after 45 minutes of inactivity |
| Plate inverter | Automatic rotation of cooking plates |
| Safety | Shut-off in case of fault (OP or CL display) |
| Care and cleaning | Clean with a damp cloth; do not immerse |
| Spare parts and repairability | Contact authorized after-sales service |
| Warranty | 2 years |
| Intended use | Domestic and similar (staff kitchens, farms, hotels, etc.) |
Frequently Asked Questions - DO9043W Pro DOMO
User questions about DO9043W Pro DOMO
0 question about this device. Answer the ones you know or ask your own.
Ask a new question about this device
Download the instructions for your Waffle Maker in PDF format for free! Find your manual DO9043W Pro - DOMO and take your electronic device back in hand. On this page are published all the documents necessary for the use of your device. DO9043W Pro by DOMO.
USER MANUAL DO9043W Pro DOMO
PRODUCT OF LINEA 2000
GARANTIEVOORWAARDEN
CONDITIONS DE GARANTIE
This appliance has a two year warranty period. During this period the manufacturer is responsible for any failures which are the direct result of construction failure. When these failures occur the appliance will be repaired or replaced if necessary. The warranty will not be valid when the damage to the appliance is caused by wrong use, not following the instructions or repairs executed by a third party. The warranty will only be valid if the warranty application has been completed by the dealer at the time of purchase. All parts, which are subject to wear, are excluded from the warranty.
Type nr. Apparaat
N^ de modulo de 1'appareil DO9043W
Type nr des Gerätes
Type nr. of appliance
Naam
Nom
Name
Name
Adres
Adresse
Adresse
Address
Aankoopdatum
Date d'achat
Kaufdatum
Date of purchase
ZARUCNI LIST
RECYCLING INFORMATIONEN
RECYCLING INFORMATION
The symbol on the product or on its packaging indicates that this product may not be treated as household waste. Instead it shall be brought to the applicable collection point for recycling of electrical and electronic equipment. By ensuring this product is disposed of correctly, you will help prevent potential negative consequences for the environment and human health, which could otherwise be caused by inappropriate waste handling of this product. For more detailed information about recycling of this product, please contact your local city office, your household waste disposal service or the shop where you purchased the product.
INFORMACE O RECYKLACI ODPADU
If the supply cord is damaged, it must be replaced by manufacturer of its service agent or a similarly qualified person in order to avoid a hazard.
Please be sure your electricity supply is 220 - 240V 50 / 60Hz
Unplug the appliance from the outlet when not in use. Make sure the appliance cools down before assembling, disassembling, moving or cleaning any part of the appliance.
Always unplug the power from the house mains. Before disconnect the power cord from the unit.
Use this unit only as described in this manual. Other uses are not recommended and may cause fire or electric shock.
Do not immerse unit, plug or cord in water, or splash with liquids.
Do not place the unit or any parts near an open flame, or any heating/cooking appliances.
Close supervision is necessary when the appliance is used by or near children.
Always use on a dry flat surface to avoid overturning.
When in use, do not move and touch the surfaces, to avoid burns and injury.
When in use, do not cover the appliance. Keep combustible materials, at least 1.5m from the appliance.
Indoor household use only.
Always keep it away from flammable, explosive, chemicals or water vapor-laden air. Never drag the cord. To unplug, grasp the plug only.
Do not use extension cords to avoid overheating and risk of fire.
Handle the unit with care and. Do not put/heat it on other stoves.
This appliance is not intended for use by persons (including children) with reduced physical, sensory or mental capabilities, or lack of experience and knowledge, unless they have been given supervision or instruction concerning use of the appliance by a person responsible for their safety.
Children should be supervised to ensure that they do not play with the appliance.
This appliance is only for household use or environments of a similar character such as:
- kitchens that are used by personnel of shops, office or other similar professional environments.
Farms - Hotel rooms and motel rooms and other similar environments with a residential character.
- Bed and breakfast or similar.
Attention : this appliance may not be used with an external timer or seperate remote control.
FUNCTION BUTTONS
- On & off switch. (ON-OFF)
- The crispy button. (CRISP) With the crispy button you can adjust the amount of crispiness of the wafer. Press the button in and the button's indicator light will automatically light up. By pressing the button once again the function will be reset to the normal mode. This button is for use after the preheating phase and before u begin baking.
- Time switch. (TIME) Adjust baking time manually, from minimum 1 to maximum 4 minutes
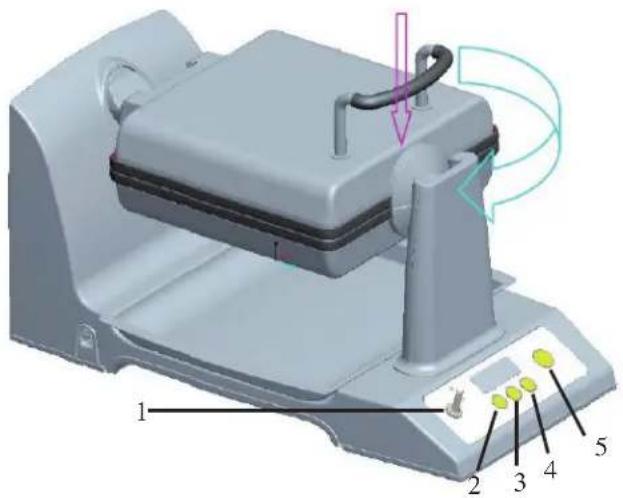
with a 30 second interval. The standard baking time begins at 2:00. This button is for use after the preheating phase and before you begin baking.
- Stop button. (STOP) Use this to stop the baking process manually.
- Starting button. (START) Start the baking time. This is to be used after preheating or any possible manual adjustment of the baking time.
INSTRUCTIONS FOR USE
After you have connected the appliance and turned the switch 'ON', the display will light up, showing "2:00". This is the pre-set baking time. If the baking tray is not placed in the correct position the appliance will correct this automatically before the baking tray is heated.
At the end of the preheating phase, if the baking tray has reached the correct temperature, the 'READY light will go on and you will hear an acoustic signal 4-times.
Only the ON/OFF button will work during the preheating phase.
Normal Mode
Switch the appliance 'ON'. After the preheating phase you will see the time indicator (TIME) light up on the display. The Crispy option (CRISP) is not selected.
The time is indicated according to the following cycle: 2:00 - 2:30 - 3:00 - 4:00 - 1:00 - 1:30.
If you use the pre-set baking time of 2 minutes or have set the desired time length, press on (START). After 10 seconds the baking tray will start to rotate and baking will begin. Meanwhile the time you set will run back to 0:00. After baking time has finished you will hear an acoustic signal and see the previous baking time settings on the display. The (Ready) light will switch on.
Crispy Mode (CRISP)
If you want to bake your wafers so that they are more crunchy and crispy, press on the [CRISP] button after the preheating phase and the button's indicator light will automatically switch on.
If you use the pre-set baking time of 2 minutes or have set the desired time length manually, press on (START). After 10 seconds the baking tray will start to rotate and baking will begin. Meanwhile the time you set will run back to 0:00. After baking time has finished you will hear an acoustic signal 4-times and see the previous baking time settings on the display. The (Ready) light will switch on.
The Stop Button (STOP)
During the baking time you can interrupt the process by pressing on STOP. After this you can adjust the baking time by pressing on the timer button (TIME), setting a different time and then pressing on START to continue the baking process.
Standby
If none of the buttons are used during ± 45 minutes, the appliance will go into standby. The temperature of the baking trays will fall; the display will show the last time setting used. Pressing on any button will be enough to activate the preheating phase. You will hear the acoustic signal 1-time.
ERRORMESSAGE
If you see "FINISHED" on the display: There is a break in the wiring.
If you see "SC" on the display: There is a short circuit.
In both cases switch the appliance off and remove the plug from the socket. Allow only the manufacturer, its after sales service point personnel or an equally qualified person to inspect the appliance in order to prevent accidents.
The baking trays do not rotate
If you fill the wafer iron after preheating and it expands too quickly or if you use self-raising flour or yeast, the baking tray may turn slightly upwards. After 10 seconds baking time the appliance will try to rotate the baking tray. As a result of the top baking tray not closing properly, the axle will not be able to turn.
Pressing the baking tray down lightly by holding the insulated handles to close the baking trays so that the appliance can rotate the baking trays is sufficient. Touch only the insulated handles and not the baking trays, they can become very hot.
Acoustic Signal
If you have not done this within 1 minute, the appliance switches the motor off automatically and you will hear the acoustic signal 4-times. Press the top baking tray as described above by holding the insulated handles and pressing downwards until the baking trays are closed and then press on START to begin the baking process again.
BEZPECNOSTNI POKNY


- GARANTIEVOORWAARDEN
- CONDITIONS DE GARANTIE
- ZARUCNI LIST
- RECYCLING INFORMATIONEN
- RECYCLING INFORMATION
- INFORMACE O RECYKLACI ODPADU
- FUNCTION BUTTONS
- INSTRUCTIONS FOR USE
- Normal Mode
- Crispy Mode (CRISP)
- The Stop Button (STOP)
- Standby
- ERRORMESSAGE
- The baking trays do not rotate
- Acoustic Signal
- BEZPECNOSTNI POKNY
Brand : DOMO
Model : DO9043W Pro
Category : Waffle Maker