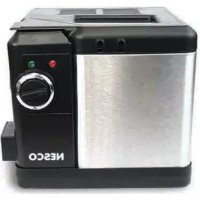
DF25 - Deep fryer Nesco - Free user manual and instructions
Find the device manual for free DF25 Nesco in PDF.


| Product Type | Deep Fryer |
| Brand | Nesco |
| Model | DF25 |
| Oil Tank Capacity | 2.5 L (84 oz) |
| Power Supply | 120 V, 60 Hz |
| Temperature Range | 300°F to 385°F (approx. 150°C to 195°C) |
| Cord Type | Magnetic power cord with grounded plug |
| Tank Material | Stainless steel |
| Recommended Oil Type | Vegetable, peanut, or soybean oil |
| Indicator Lights | Red light (power on), green light (heating) |
| Steam Filter | Non-removable filter, cleanable with hot water |
| Pouring Spout | Rear left corner of tank for drainage |
| Basket Type | Metal basket with removable handle |
| Cord Attachment | Magnetic connector |
| Intended Use | Home food frying |
| Included Accessories | Basket, lid, integrated filter, handle |
| Care and Cleaning | Removable parts dishwasher safe; wipe base with damp cloth |
| Safety | Detachable magnetic cord, grounded plug |
| Warranty | 1 year limited |
Frequently Asked Questions - DF25 Nesco
User questions about DF25 Nesco
0 question about this device. Answer the ones you know or ask your own.
Ask a new question about this device
Download the instructions for your Deep fryer in PDF format for free! Find your manual DF25 - Nesco and take your electronic device back in hand. On this page are published all the documents necessary for the use of your device. DF25 by Nesco.
USER MANUAL DF25 Nesco
2.5L Deep Fryer (Model DF-25)
Instruction Manual
Important Safeguards ....1
Parts, Operation....2
Cooking Guide 3
Instructions for Care and Cleaning ....4
One Year Limited Warranty 5
Table des Matières
Mesures de Précaution Importantes ....6
Technical Specifications
Specification / Caractéristiques / Especificaciones: 1700W, 120 VAC, 60Hz
For accessories and additional products, go to
www.nesco.com
- This product is designed for household use only -
When using electrical appliances, basic safety precautions should always be followed, including the following:
IMPORTANT SAFEGUARDS
- READ ALL INSTRUCTIONS.
- Do not touch hot surfaces. Use handles or knobs.
- To protect against electrical shock and personal injury, do not immerse this appliance, including cord and plug, in water or other liquid.
- This appliance is not intended for use by persons (including children) with reduced physical, sensory or mental capabilities, or lack of experience and knowledge, unless they have been given supervision or instruction concerning use of the appliance by a person responsible for their safety.
- Close supervision is necessary when any appliance is used by or near children.
- Unplug from outlet when not in use and before cleaning. Allow to cool completely before putting on or taking off parts, and before cleaning.
- Do not operate any appliance with a damaged cord or plug or after the appliance malfunctions or has been damaged in any manner. To avoid hazards, return appliance to NESCO® Factory Service Department for examination, repair or adjustment.
- The use of accessory attachments not recommended by the manufacturer may result in fire, electric shock or injury to persons.
- Do not use outdoors.
- Do not let cord hang over edge of table or counter, or touch hot surfaces.
- Do not place on or near a hot gas or electrical burner or in a heated oven.
- Do not use appliance for other than its intended use, as described in this manual.
- Operate appliance only when all parts are fully engaged and secured.
- It is recommended that appliance not be moved when it contains hot oil or other hot liquid. If it must be moved, use extreme caution.
SAVE THESE INSTRUCTIONS
Safety Release Power Cord: The Safety Release power cord attaches to the appliance with a magnetic connector. This magnetic connector will detach from the appliance if the cord is pulled on accidentally. DO NOT allow the cord to hang over the edge of the counter. DO NOT use this appliance with an extension cord.
The magnetic end fits into the socket of the fryer in only one direction. The small black tabs must be placed on the left side of the socket. Always attach the magnetic end of the cord directly to the fryer socket prior to plugging into a wall outlet. When disconnecting, always remove the plug from the wall outlet first.
If the magnetic power cord becomes damaged in any way, contact The Metal Ware Corporation customer service at the address listed in the Warranty for a replacement. DO NOT attempt to permanently attach the power cord to this appliance. DO NOT use any other power cord on this appliance.
Grounded Plug: To reduce the risk of electric shock this appliance has a grounded plug. (2 blades and 1 pin) If the plug does not fit fully into the electrical outlet contact a qualified electrician. Do not modify the plug in any way or use an adaptor.
Short Cord Instructions: A short power supply cord is provided to reduce the risk of serious injury resulting from becoming entangled in or tripping over a longer cord.
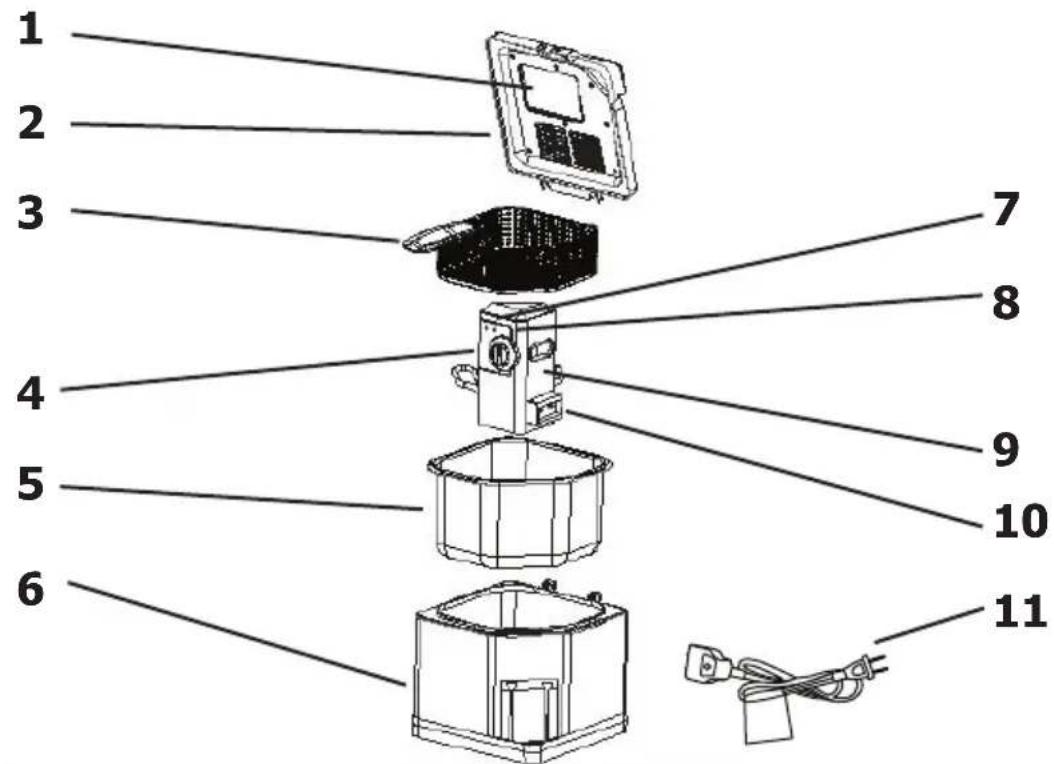
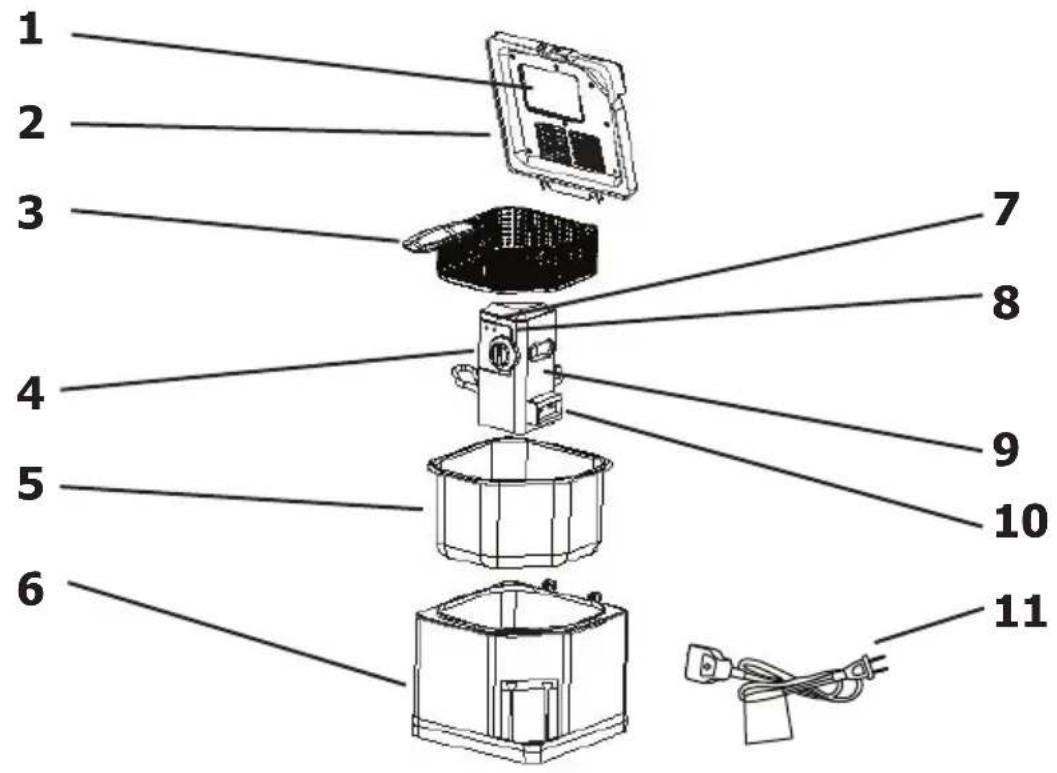
Parts
| 1 Lid Viewing Window 7 Power Light (Red) | ||
| 2 Lid 8 Working Light (Green) | ||
| 3 Basket and Basket Handle 9 Control Box | ||
| 4 Temperature Control 10 Cord Connector In et | ||
| 5 Oil Reservoir 11 Safety Release Power Cord | ||
| 6 Base |
Before first use
- Read and follow all instructions and save for reference. Remove all packaging and labels.
- Clean oil reservoir by wiping with a damp cloth or sponge and dry thoroughly.
- Clean all parts following instructions in the 'Care and Cleaning' section.
- Wipe the base with a damp cloth and dry completely. Never use abrasive cleaners or scouring pads to clean parts of this appliance.
- TO REDUCE RISK OF SHOCK HAZARD NEVER IMMERSE THE CONTROL BOX OR CORD IN WATER OR ANY OTHER LIQUID.
- Assemble basket handle to basket. To assemble basket handle, squeeze end of handle together and insert between brackets on the basket.
Operation
- Place the appliance on a flat, heat resistant and stable surface near a 120V electrical outlet.
- Place empty oil reservoir into the base. Add 84 oz. (2,5 L) of oil into oil reservoir. Use quality vegetable, peanut or soy oil. Ensure the oil level is between the MIN and MAX markings of the oil reservoir.
NEVER USE THE FRYER WITHOUT OIL. THE HEATER WILL BE DAMAGED AND THE WARRANTY WILL BE VOIDED, IF HEATED DRY.
- Wipe the inside surface of viewing window with vegetable oil to reduce condensation and allow the cooking process to be monitored.
-
Insert control box into the base by aligning the slot of the base with control box and press down firmly to lock control box into position. Heater rods should be in the oil reservoir.
-
Close the lid on the fryer and set control to MIN dial setting.
-
Connect the magnetic end of the cord into the fryer socket (see the instructions on page 1 "Safety Release Power Cord").
-
Connect cord plug into the wall outlet. The RED light will turn on indicating unit is ready to cook.
-
Adjust the temperature control to the desired setting. The GREEN indicator light will turn on. Preheat until the light goes out and begins to turn on and off, this will show the oil is maintained at the set temperature.
-
Prepare the food to be cooked. Cut food into uniform size pieces for even cooking. Pat food dry before cooking. NOTE: To avoid possible burn injury, do not add wet food or food with ice crystals to cooking oil, this may cause oil to splatter or foam.
-
Open the lid by lifting the front right corner. Use caution from escaping steam when opening lid.
-
Place food to be cooked in the basket. NOTE: Do not exceed 2/3 of the basket capacity. If using frozen food, do not use more than 1/2 the basket capacity.
-
Using handle, lower the basket slowly into the oil.
-
Close the lid. The basket handle will fit into the grooves of the lid. Lid will stay closed if basket handle is in proper position.
-
When cooking is finished, turn the control knob to the 'MIN' position and remove plug from wall outlet. Carefully open the lid. Lift basket and place the support hooks of basket onto the edge of the oil reservoir and allow food to drain.
-
Turn temperature control to minimum setting. Remove cord from outlet.
-
Remove food from basket and place onto several layers of absorbent paper.
| Frying Time TablePlease note that these cooking times are only a guide and the exact cooking time will depend on the size of pieces being cooked and starting temperature of the food. | ||
| Food Type Time (mins) Temperature | ||
| Chicken Fingers, frozen 3 to 4 355°F | ||
| Chicken Wings 7 to 10 350°F | ||
| Cheese Sticks 1 to 3 370°F | ||
| Donuts / Fritters 3 to 4 375°F | ||
| Fish Fillets, fresh or thawed, breaded | 3 to 5 385°F | |
| Fries, frozen | 3 to 5 350°F | |
| Mushrooms | 10 to 12 | 300°F |
| Onion Rings | 3 to 4 325°F | |
| Shrimp, breaded | 3 to 5 350°F | |
Care and Cleaning Instructions
- Unplug cord from wall outlet. Allow oil to cool. NOTE: Oil retains its temperature for a long time after use, about 2 hours. Do not attempt to empty the Reservoir until the oil has cooled completely. Do not attempt to move or carry the appliance while it is in use or hot.
- After oil has cooled, remove lid, basket and control box. To remove control box, open lid and use your left hand to hold the base steady, grasp control box with right hand and lift upwards to remove from base.
- Lift oil reservoir from base and pour the oil into a container that has a wide mouth and deep enough so that oil does not splash over the sides. Pour quickly and make sure that the reservoir is completely empty before turning upright.
- Wipe excess oil with paper towel. Clean oil reservoir in dishwasher or with soap and water. Dry thoroughly.
- The lid, basket and handle can be removed and washed in the dishwasher or hot soapy water. Rinse and dry thoroughly. To remove lid, open and lift to remove from base.
- Assemble lid to base by inserting tabs of lid into the slots at the back of the base and push down to lock. The basket and handle can be disassembled and stored in the reservoir.
- Close lid and store appliance in a dry place.
- HINT - To clean oil, filter through several layers of cheesecloth or a large coffee filter into another container. Oil should retain its properties for another 8 - 12 uses. NOTE: If oil has been used for cooking seafood or smells spoiled, it should not be used again.
ATTENTION!
- DO NOT IMMERSE CONTROL BOX OR CORD IN WATER OR ANY OTHER LIQUID.
- DO NOT USE STEEL WOOL OR ABRASIVE CLEANERS ON ANY PART OF THE APPLIANCE.
ONE YEAR LIMITED WARRANTY
This appliance is warranted for one year from date of original purchase against defects in material and workmanship. This warranty does not cover transportation damage, misuse, accident or similar incident. This warranty gives you specific legal rights and you may have other rights, which vary from state to state. This product is intended for household use only, not for commercial use. Warranty does not cover commercial use.
Your new NESCO® appliance comes equipped with numerous safety features. Any attempt to interfere with the operation of these safety features makes this warranty null and void. In the event we receive an appliance for service that has been tampered with, we reserve the right to restore it to its original state and charge for the repair.
For service in warranty - Defective products may be returned, postage prepaid, with a description of the defect to: The Metal Ware Corporation, 1700 Monroe Street, Two Rivers, Wisconsin 54241, for no-charge repair or replacement at our option.
Must include proof of purchase or copy of original bill of sale when returning product for warranty service.
Please call Customer Satisfaction at 1-800-288-4545 to obtain a Return Authorization before shipping.
- For service in warranty, follow instructions set forth in warranty. When ordering new parts, make sure that you always mention the model number of the product.
- Call us on our toll free number, 1-800-288-4545 and tell us about your problem.
- If we instruct you to send all or part of your appliance to us for repair or replacement, our Customer Satisfaction representative will provide a Return Authorization number (this number notifies our receiving department to expedite your repair). Pack your unit carefully in a sturdy carton with sufficient padding to prevent damage because any damage caused in shipping is not covered by the warranty.
- Print your name, address and Return Authorization number on the carton.
- Write a letter explaining the problem. Include the following: your name, address and telephone number and a copy of the original bill of sale.
- Attach the sealed envelope containing the letter inside the carton. Insure the package for the value of the NESCO® appliance and ship prepaid to:
Attn: Factory Service Dept.
The Metal Ware Corporation
1700 Monroe Street
Two Rivers, WI 54241
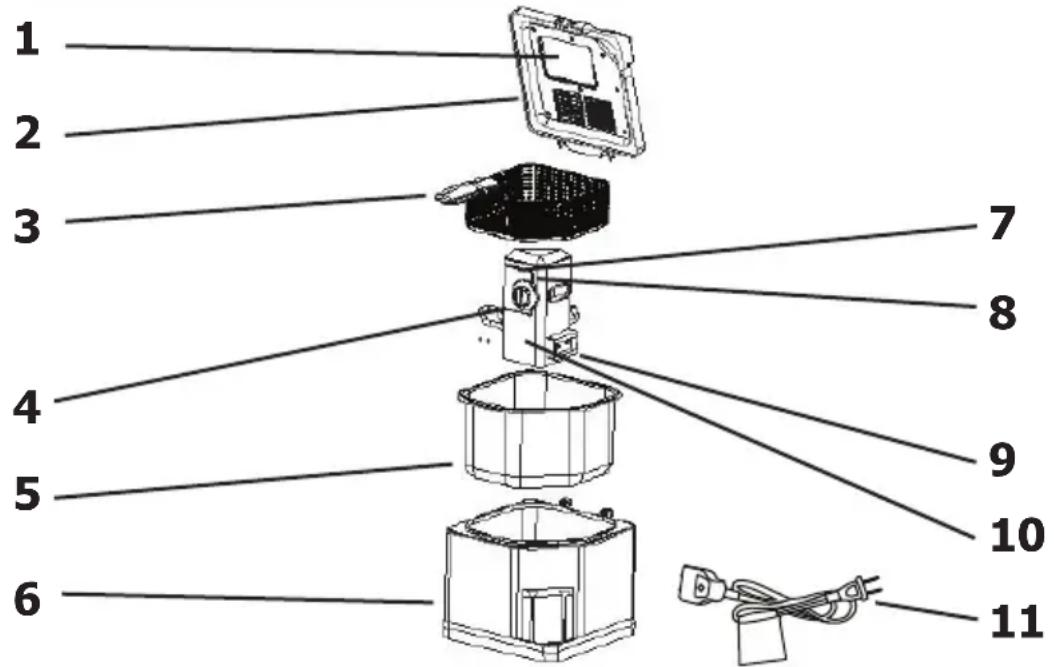
| 1 Lid Viewing Window 7 Power Light (Red) | ||
| 2 Lid 8 Working Light (Green) | ||
| 3 Basket and Basket Handle 9 Control Box | ||
| 4 Temperature Control 10 Cord Connector Inlet | ||
| 5 Oil Reservoir 11 Safety Release Power Cord | ||
| 6 Base |
Attn: Factory Service Dept.
The Metal Ware Corporation
1700 Monroe Street
Two Rivers, WI 54241
| Parts | |||
| 1 | Lid Viewing Window 7 Power Light (Red) | ||
| 2 | Lid 8 Working Light (Green) | ||
| 3 | Basket and Basket Handle 9 Control Box | ||
| 4 | Temperature Control 10 Cord Connector In et | ||
| 5 | Oil Reservoir 11 Safety Release Power Cord | ||
| 6 | Base | ||
1 - 800 - 288 - 4545



Brand : Nesco
Model : DF25
Category : Deep fryer