Europiccola EN - Coffee machine LA PAVONI - Free user manual and instructions
Find the device manual for free Europiccola EN LA PAVONI in PDF.
Download the instructions for your Coffee machine in PDF format for free! Find your manual Europiccola EN - LA PAVONI and take your electronic device back in hand. On this page are published all the documents necessary for the use of your device. Europiccola EN by LA PAVONI.
USER MANUAL Europiccola EN LA PAVONI
11.1 – THE, CAMOMILLA
14.3 – CASING CLEANING 62
ANOMALIES (TROUBLESHOOTING) 64 GB1 – INTRODUCTION This instruction manual is an integral part of the machine, it should be read care- fully and should always be available for consultation; it should be kept for the whole life of the machine. In case of lost or deterioration, you can ask for a new manual from an authorised SERVICE CENTRE. The manual contains the information regarding the proper use of the machine, to its cleaning and maintenance, and it supplies important indications for carrying out operations requiring special attention and for possible residual risks. The manual reflects the technological innovations at the time of its publishing; the manufacturer reserves the right to introduce all the technical modifications required on its products and to update the manuals with no obligation to also review the previous versions. LA PAVONI S.p.A. declines any liability for damages that may be directly or indi- rectly caused to people or things caused by the following reasons: - failure to comply with all the prescriptions of the current safety regulations; - improper installation; - improper voltage; - illegitimate or incorrect use of the machine; - incorrect use as specified in this manual; - serious maintenance shortcomings; - alterations on the machine or any unauthorised intervention; - non original use of spare parts which are not especially meant for the model; - total or partial failure with the instructions; - exceptional events. 2 – MACHINE FUNCTION This machine is suitable for home preparation of espresso coffee using a blend of coffee, for the withdrawal and delivery of hot water and/or steam, and of hot milk. The user must read carefully and clearly understand the directions contained in the manual, in order to use the machine properly.
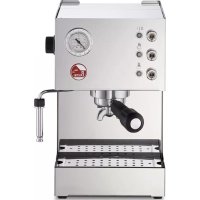
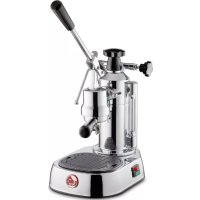
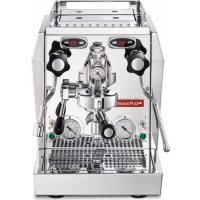
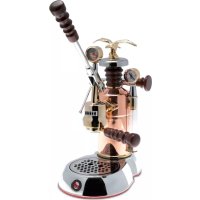
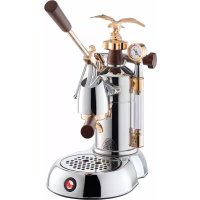
The EUROPICCOLA - PROFESSIONAL - STRADIVARI - STRADIVARI PROFESSIO- NAL models deliver: - drinks made out of ground coffee beans - hot water and steam for the preparation and warming of drinks - hot milk - beverages based on coffee and warm / hot milk. 3 – SAFETY WARNINGS This appliance is not intended for use by young children or infirm persons unless they have been adequately supervi- sed by a responsible person to ensure that they can use the appliance safely. Young children shold be supervised to ensure that they do not play with the appliance. The user has to follow the safety regulations in force in the country where the machine is used, in addition to the rules suggested by common sense and the directions contained in this manual. In order to guarantee proper operation of the machine and preservation in time of its features, the user is advised to check the right environmental conditions (room temperature must range between 5° and 35° C). To avoid the use of the machine in places where jets of water are used in outdoor environments exposed to the action of the weather (sun, rain, etc.). After removing the machine from its packaging, make sure that it is intact and it is not damaged. The packaging must be delivered to the proper waste disposal centres and in no case left unattended or to the reach of children or animals. Before starting the machine, make sure that the power supply voltage specified in the data plate placed under the base of the machine is used in the country. Put the machine in a safe place, on a solid base, away from heat sources and out of the reach of children. Before using the machine, make sure that the amount of water in the boiler is not below the minimum level required and that the steam tap knob is closed. Before connecting and disconnecting the machine, make sure that the ON/OFF switch is on the OFF position.
EnglishEnglish Unplug the machine from the power socket when it is not in use and before clean- ing it, without pulling the main cable. Do not use the machine if it is not working properly or if the main cable or the plug are damaged; the user is advised to replace the main cable or to have the machine checked by an authorised SERVICE CENTRE. Do not touch the hot surfaces (boiler, unit, filter holder, steam supply nozzle) to avoid burns. Do not remove the filter-holder during coffee delivery, to avoid possible burns. Do not remove the boiler cap when the machine is working or still under pressure, to avoid possible burns; first you must switch the machine off, then slowly unscrew the steam tap knob and wait for all the steam to have been discharged from the relevant tube; sub- sequently remove the cap. Under no circumstances you must put your hands under the unit and the steam supply nozzle, since the liquids or steam delivered are overheated and may cause burns. After coffee delivery, do not remove the filter holder immediately, but wait for a few seconds to allow the possible residual pressure to be released, to avoid possible burns. Make sure you do not operate the machine without water, to avoid damages to the heating element. To avoid damages, use only accessories and spare parts that have been approved by the manufacturer. In case of machine failure or faulty operation, switch it off. Do not try to repair it yourself but refer to an authorised SERVICE CENTRE to have any worn or dama- ged parts replaced with original spare parts. In case of unauthorised repairs carried out on the machine, or the use of non original spare parts, the guarantee is not valid anymore and the manufacturer will reserve the right to no longer acknowledge its validity. Do not use the machine outdoors. Do not use the machine for any use different from the one for which it has been manufactured. To avoid fires, electric shocks and personal damage, never immerse the machine, the main cable or other electrical components in water.46 47 EnglishEnglish In case of fire, use carbon dioxide (CO2) fire extinguishers. Do not use water or steam extinguishers. Before any cleaning or maintenance operation, switch the machine off by placing the ON/OFF switch on the OFF position and remove the plug from the power socket without pulling the main cable. This appliance is for household use. Any repairs or servicing operations, with the exception of normal cleaning and maintenance operations must be undertaken by an authorized service centre. Check voltage to be sure that the voltage indicated on the plate agrees with your voltage. Never use warm or hot water to fill the water tank. Use cold water only. Keep your hands and the cord away from hot parts of the appliance during operation. Never clean with scouring powders or hard implements. To avoid your machine scaling up, use purified or bottled water. Do not immerse base in water.
In case of misuse any form of guarantee is not valid and the manufacturer declines any liability for damages to people and/or things. Will be regarded as misuse: - any different use from the one declared; - any intervention on the machine that is not in line with the indications listed in this manual; - any use of the machine that has been tampered with components or safety devices; - use of the machine outdoors.
3.2 – RESIDUAL RISKS
The user cannot be protected against direct jets of steam or hot water; therefore he should be extremely careful in handling the machine to avoid burns or scalds. The manufacturer declines any liability for damages to things, people or animals, caused by any intervention on the machine by non qualified people or who have not been authorised to carry out for these functions.
3.3 –INSTRUCTIONS FOR THE POWER SUPPLY CORD
A short power-supply cord is provided to reduce risks of getting tangled up or tripping over a longer cord. Longer extension cords are available and may be used if care is exercised in their use. If a long extension cord is used : - the marked electrical rating of the extension cord should be at least as great as the electrical rating of the appliance. - the appliance is of the grounded type, the extension cord should be a grounding type - the cable does not hang from the table to avoid the risk of getting caught up in it.48 49
2. Safety valve – condensation basin
8. Grid and drip tray
15. Coffee spoon for a one-cup of coffee dose
120V 60Hz 230V 50Hz 240V 50Hz Weight: Kg. Capacity: number of cups of espresso coffee Uninterrupted delivery of steam in minutes: Pressure in the boiler: atm Resistence: W Average warning up time: minutes Power supply: EUROP. PROFES.
When using electrical appliances, basic safety precautions should always be fol- lowed to reduce the risk of fire, electric shock, and/or injury to persons, including the following: 1 Read all instructions and information in this instruction book and any other literature included in this packaging referring to this product before operating or using this appliance. 2 Do not touch hot surface. Use handles or knobs. 3 To protect against fire, electric shock and personal injury do not immerse cord, plugs, or appliance in water or other liquid. 4 Close supervision is necessary when any appliance is used by or near chil- dren. 5 Unplug from outlet when not in use and before cleaning. Allow to cool before putting on or taking off parts and before cleaning the appliance. 6 Do not operate any appliance with a damaged cord or plug or in the event of appliance faults or damages, Return appliance to the nearest authorized service centre for examination, repair or adjustment. 7 The use of accessory attachments not raccomended by the appliance manu- factorer may results in fire, electric shock or personal injury. 8 Do not use outdoors. 9 Do not let cord hang over edge of table or counter, or touch hot surface. 10 Do not place on or near hot gas or electric burner, or in a heated oven. 11 Always turn appliance to "0", then plug cord into the wall outlet. To disconnect, turn switch to "0", then remove plug from wall outlet. 12 Do not use appliance for other than intended household use. 13Use extreme caution when using hot steam.
16aWarning! Before making the electric connection, make sure that the main power voltage corresponds to the specifications indicated on the data plate placed under the base of the machine. - Unscrew the cap (3) of the boiler anti- clockwise, picture A. - Prepare a water solution with two teaspoons of bicarbonate in a container and wait for the bicarbonate to dissolve completely; then pour the solution into the boiler (9). Alternatively, instead of using bicarbonate, prepare in a container a solution of water with a tablespoon of white vinegar and pour it into the boiler. - Make sure that the lever (1) is down; eventual- ly pull it down completely, picture C. - Screw the cap (3) into the boiler by turning it clockwise and make sure that the cap and the steam tap knob (4) are properly closed (turn clockwise), picture B. - Fit the filter-holder (10) into the unit (11) and fix it by moving it from right to left, picture H. 5 – ELECTRIC CONNECTION 6 – COMMISSIONING
2. Safety valve – condensation basin
8. Grid and drip tray
15. Coffee spoon for a one-cup of coffee dose
120V 60Hz 230V 50Hz 240V 50Hz STRAD. STRAD. PROFES. EnglishEnglish Dimensions: height mm. width mm. depth mm. Weight: Kg. Capacity: number of cups of espresso coffee Uninterrupted delivery of steam in minutes: Pressure in the boiler: atm Resistence: W Average warning up time: minutes Power supply: picture A picture B
16a6.1 – GENERAL SAFETY RULE If the pressure inside the boiler exceeds the maximum pressure, for any anomaly, the system will activate the safety valve (2) which it will start whistling and, by opening, will start to abundantly discharge steam through the condensation basin, picture D. Switch the machine off, avoid any manipulation and refer to the authorised SERVICE CENTRE. picture C - Insert the main cable plug into an electric socket with adequate voltage (please refer to the plate under the base of the machine), picture C. - Place the switch (6) on the ON position and wait for the machine to reach the required pressure (about 5 minutes), place a container under the unit (11), slowly lift the lever (1) completely and hold it in this position so as to fully discharge the water contained in the boiler. Subsequently switch the machine off and remove the plug from the power socket, open the steam tap knob (4) anticlockwise and wait until all the steam has been discharged from the steam pipe (12) provided, open the boiler cap (3) anticlockwise and turn the machine upside-down to eliminate all the remaining water from the boiler. Fill the boiler again with fresh water and use it to rinse of the machine inside to eliminate any residues of the solution. picture D The amount of water will not have to exceed the top part of the level glass (5) and will not have to drop below the visible lower part of the same, picture
EUROPICCOLA MODEL - Press the switch (6) which, by lighting up, will indicate that the machine is on; at the same time the warning light (7) will also switch on indicating that the heating element is activated, picture E. - Wait for the warning light (7) to switch off; turn the steam tap knob (4) slowly, by turning it anticlockwise, and discharge the “false pressure” due to the air that is left in the boiler; then close it again by turning it clockwise. The warning light will switch on again; wait for it to switch off. Now the machine has reached the correct pressure and is ready to deliver coffee and steam. When the green lamp starts blinking alternatively it is due to the normal functioning of the machine, which automatically regulates the pressure in the boiler. PROFESSIONAL MODEL - Place the switch (6) on the on position; lighting it up, will indicate that the machine is on, picture E. - When the pointer of the pressure gauge (13) will have reached the green zone, turn slowly the steam tap knob (4) by turning it anticlokwise, to discharge the “false pressure” due to the air left in the boiler; then close it again by turning it clockwise and wait for the pointer of the pressure gauge to reach the green zone. Now the machine has reached the correct pressure and is ready to deliver coffee and steam. The pressure will be automa- tically regulated and maintained by the pressure switch which acts on the heating element. picture E picture E
7 – STARTING THE MACHINE
Fill the boiler (9) with an amount of water that is proportional to the amount of coffee you wish to make (the capacity of the machine is equivalent to 8 cups of espresso coffee for the Europiccola and Stradivari models and to 16 cups of espresso coffee for the Professional and Stradivari Professional models).
7picture E1 picture E1 - Choose the correct filter (16 or 16a) and put it into the filter holder (10). Use the small filter for 1 cup (or for pods use) and the big filter for 2 cups. Wait till the machine reach the correct temperature with the filter holder fitted up. In the meantime prepare cups, coffee, milk ect. Besides we suggest to warm the cups. - After the heating take away the filter holder (10) and fill the filter (16 or 16a), with ground coffee using the measure of the machine (15). Please consider a measure for each cup of coffee. Photo F. - Press the coffee using the coffee press (14) pro- vided and clean the edge of the filter basket from any coffee powder left, picture G. N.B. One cup filter (16a) is suitable for pods use. The pod must be put into the filter taking care that the filter paper doesn’t extend beyond the edge of the filter holder. Photo R. - Holding the machine firm by the lever handgrip (1), insert the filter-holder (10) in the place provided in the unit (11) and fix it in place through a brief rotation from right to left, picture H. - Lift the lever (1) (with your left hand hold the filter-holder han- dgrip, and make sure that the machine remains firm) and hold it in this position for a few seconds; as the first drops of coffee come through, pull it down as much as possible. This operation will have to be repeated depending on the desired amount of coffee, picture I. If during the operation the machine is left without water, the safety thermostat will intervene by interrupting the machine power supply. In this case the thermostat will have to be reset (see
section 18 – Causes for Operating Failures).
8 – COFFEE DELIVERY To obtain a good cup of coffee it's important to use a good quality coffee, well roasted and correctly grinded. The coffee espresso machine needs the use of a thin mixture grinded; if the grinding is too coarse we will obtain light and pale coffees and without cream. If the grinding is too thin we will obtain dark and strong coffees with little cream. The grinding is optimal when the espresso is black and “creamy”. To obtain a good cup of coffee you should follow these rules: with the machine under pressure put the filter-basket (16), with grinded coffee, inside the filter-holder (n. 10), and together under the group; pull up the lever (1) and after few seconds the coffee starts dripping from the filter holder. The machine will be in the best condition for coffee deliver. We suggest to grind the coffee, with a coffee-grinder, at the moment of its use, because once grinded, it looses its fragrance in a short time. Please do not use a blade-type grinder because it makes too much coffee dust and produces an irregular grind. STRADIVARI MODEL - Press the switch (6) which, by lighting up, will indicate that the machine is on and that the hea- ting element is activated, picture E1. - Wait for the warning light (7) to switch on; turn the steam tap knob (4) slowly, by turning it anti- clockwise and discharge the “false pressure” due to the air that is left in the boiler, then close it again by turning it clockwise.The warning light turn off and wait for it to switch on again. Now the machine has reached the correct pressure and is ready to deliver coffee and steam. When the green lamp starts blinking alternatively it is due to the normal functioning of the machine, which automatically regulates the pressure in the boiler.
STRADIVARI PROFESSIONAL MODEL
- Place the switch (6) on the on position; lighting it up, will indicate that the machine is on, picture
- When the pointer of the pressure gauge (13) will have reached the green zone, turn slowly the steam tap knob (4) by turning it anticlokwise, to discharge the “false pressure” due to the air left in the boiler; then close it again by turning it clockwise and wait for the pointer of the pressure gauge to reach the green zone. Now the machi- ne has reached the correct pressure and is ready to deliver coffee and steam. The pressure will be automatically regulated and maintained by the pressure switch which acts on the heating ele- ment. The alternation of the warning light (6) is normal because it means that the pressure switch adjusts automatically the pressure in the boiler.
Warning: the user is not protected against the direct jet of steam or hot water; please
pay maximum attention during these operations.
10 – PREPARATION OF CAPPUCCINO
The operations to be carried out are the following: - Make sure that the steam tap knob (4) is closed, picture
- Turn the steam pipe (12) clockwise until it stops and slip the steam pipe out of its seat, pulling it rightwards, picture N. - Slip in its seat the device with the Cappuccino Automatic (17), pushing it leftwards, picture O. Turn the device with the Cappuccino Automatic (17) anticlockwise until it stops. - After having checked that the right quantity of water is contained in the boiler and having followed all the required steps to reach the correct pressure, make sure that the lever (1) is facing down (resting position) and leave it in this position. - Before heating any drink, carefully allow a small amount of steam to be delivered from the pipe (12) operating on the handwheel of the steam tap (4) anticlockwise, so as to eliminate any condensation that may form inside the boiler; subsequently open the steam tap further, to allow the desired amount of steam to come out, picture M. Once this operation is completed, close the steam tap knob clockwise. - To obtain a great amount of steam, the level of the water in the boiler should be about halfway the level glass (5). The advice is to carry out steam for two minutes maxi- mum, to obtain a better performance of the steam supply.
Warning: the temperature of the steam delivers
at around 100° C; carry out this operation with great care, to avoid possible scalds. picture M
EnglishEnglish - To obtain a uniform delivery of coffee, the pressure exerted on the lever will have to be proportional to the resistance met by the lever itself during the delivery. - Repeat the same operations depending on the desired number of cups of coffee. - When you have to make the first cup of coffee, once the machine is ready, we suggest to lift the lever (1) halfway up and then pull it down again for four or five times, so as to allow the unit (11), the filter-holder (10) and the filter basket (16) to heat up; doing this you are sure that the first cup of coffee will be at the proper temperature and with a good cream, picture L.
Warning: before pouring out one or
several cups of coffee, make sure that the level of the water in the boiler does not fall below the minimum level. - After having prepared the coffee, leave the lever (1) facing down (resting position) so that the water left in the boiler does not leak out of the unit (11), and switch the machine off. - It is very normal the occasionally water drip after coffee delivery.
Warning: after the pouring out of each
cup of coffee do not remove the filter- holder immediately but wait a few seconds, so that no residual pressure is left between the filter basket and the perforated filter plate; this pres- sure may cause the rubber gasket of the unit to come off, or squirts of liquid mixed with coffee powder contained in the filter basket. The filter-holder (10) should be remo- ved from the unit (11) slowly, moving from left to right, exerting a light pres- sure downwards, to aid the release of any residual pressure and avoid pos- sible burns. picture O picture N
picture H picture I picture L
The replacement of the traditional steam pipe (12) with the Cappuccino Automatic (17) (an optional part on the models with black base) must take place before starting the machine.Cappuccino Preparation Once the machine has reached the required pressure, as illu- strated in chapter 7 – STARTING THE MACHINE, proceed as follows: - insert the silicon tube (20) in the milk container, placed next to the machine, picture P. - place the cup containing the previously prepared coffee under the nozzle of the Cappuccino Automatic, and open the steam tap knob (4) by turning it anticlockwise; this will start the deli- very of emulsified hot milk, with abundant froth. To stop the delivery, close the steam tap knob (4), by turning it clockwise. It is possible to regulate the thickness of the froth delivered with the milk by operating the regulation bar (19) of the Cappuccino Automatic (17); for a thick cream turn clockwise, for a frothy cream turn anticlockwise. After each delivery, you need to clean the Cappuccino Automatic from any residual milk. - Place next to the machine a glass full of water, and dip the silicon tube in it (20). - Proceed with the preparation of the cappuccino according to the standard procedure, and empty the dirty water into a suitable container. To put the steam pipe (12) back in its place, turn the Cappuccino Automatic device (17) clockwise until it stops, slip it off by pulling it rightwards, slip in the steam pipe and turn it anticlockwise until it stops. The cappuccino can also be prepared by using the steam pipe (12). To obtain the milk froth for the cappuccino, pour the milk to be prepared in a tall and narrow container until it is half full, immerse the steam pipe (12) until it touches the bottom of the contai- ner, slowly turn the steam tap knob (4) anticlockwise and bring the milk almost to the boiling. Move the container up and down under the open tap, and allow the steam jet to touch the surface of the milk for a few seconds and obtain the froth. To obtain the cappuccino, add the hot and frothed milk in the coffee prepared in the cappuccino cup.
11 – PREPARATION OF OTHER HOT DRINKS
Before heating any drink, allow carefully a small amount of steam to be delivered from the pipe (12), by operating the steam tap knob (4) anticlockwise, to eliminate any condensation that may have formed inside the boiler.
11.1 – TEA, CAMOMILE
Pour into a container the amount of water required to obtain the desired drink, immerse the steam pipe (12) into the liquid and slowly turn the steam tap knob (4) anticlockwise; then open the knob completely to allow the delivery of a great amount of steam, which will bring the liquid to the boiling temperature. Now add the bag required for the desired drink
11.2 – CHOCOLATE DRINK
Pour the drink contents of the sachet, already measured out, into a container and add a cup of milk slowly, whilst mixing carefully; then immerse the steam pipe (12) until it touches the bottom of the container, turn slowly the steam tap knob (4) anticlockwise and bring it to the boiling temperature. To increase the thickness of the drink, let it boil longer.
Warning: the temperature of the steam delivered around 100° C; do not
absolutely put your hands under the steam pipe, but carry out this operation with great care, to avoid possible scalds.
12 – HOT WATER DELIVERY
When the machine has reached the correct pressure, besides using the steam pipe (12), as described in section 11.1, the hot water can also be obtained using of the Cappuccino Auto- matic device (17). After having assembled this part into the unit, as described in section 10, it is enought to insert the silicon tube (20) into a jug containing water, place the container under the nozzle of the Cappuccino Automatic and open the steam tap knob (4) by turning it clockwise. Once the desired dose has been obtained, close the steam knob.
English picture PThe base-mat is fixed to the machine with a special Torx type screw, to avoid tampering with electrical parts; therefore, for any type of intervention and in case of replacement of the power supply cable, please refer to the authorised SERVICE CENTRES.
14 – MAINTENANCE AND CLEANING OPERATIONS
Before conducting any kind of cleaning operation, unplug the main cable from the power socket without pulling the cable. Clean regularly the filter holder (10), the filter basket (16), and the perforated filter plate pla- ced under the group (11) to avoid incrustations, and keep dry the drip tray (8) and the drain well on the base to avoid water infiltration inside the base.
14.1 – STEAM TUBE CLEANING
To avoid altering the taste of the drinks to be heated and the clogging of the holes of the steam pipe ending, clean carefully the steam pipe after every use.
14.2 –CAPPUCCINO AUTOMATIC CLEANING
Clean the Cappuccino Automatic after each use. Once in a while it should be cleaned more accurately.
Warning: don’t put your hands under the Cappuccino Automatic, because the
overheated liquid may cause scalds. 13 – IMPORTANT DIRECTIONS Place the machine on a stable and dry surface, away from heat sources and to the reach of children. Regularly check the level of water contained in the boiler through the glass level (5); the lack of water when the machine is working may cause the heating element to burn out, even if the machine is equipped with a safety thermostat. When the machine is on, heats the water and produces steam, which remains compressed inside the boiler. For safety reasons, it is recommended to take the machine out of reach of children and not to touch hot parts such as the boiler (9), the unit (11) and the filter-holder (10), to avoid burns and possible scalds. Do not remove the filter-holder and do not absolutely put your hands under the unit during the delivery, to avoid possible scalds. Do not open the boiler cap (3) when the machine is working or still under pressure, to avoid possible burns. To screw the cap off and refill the boiler, place the switch (6) on the OFF position, slowly turn the steam tap knob (4) anticlockwise to open it, and wait for all the steam contained in the boiler to be discharged by the pipe provided (12); in case the steam does not come out pro- perly, remove the filter-holder (10) and slowly lift the lever (1); hold the lever up to allow the steam and water contained in the boiler to be discharged through the unit. In both cases, it is advisable to use a container for steam and water collection, paying attention since the steam and water discharged are overheated and may cause scalds. When the steam and water stop discharging, unscrew the boiler cap slowly. When the machine is off, during the process of cooling down, it may happen that the lever moves upward by itself. This phenomenon is caused by the depression forming inside the boiler itself. If the machine is not used often, switch it off, placing the ON/OFF switch on the OFF position and removing the main cable plug from the socket without pulling it. picture Q After having slipped the device out of its seat, as described in section 10, remove the Cappuccino Automatic from its metal support (18) by unscrewing the ring nut (26), which should be turned anti- clockwise, and removing the silicon tube (20) from the suction tap (25), picture Q. - Disconnect the spout-breaker (23) from the milk-frother unit (24). - Slip the milk suction tap (25) from the milk-frother unit (24). - Slip the regulation bar (19) out of the tap (25). Wash carefully everything under running water and reassemble the components.
English English14.3 – CASING CLEANING Clean the outside of the machine with a damp cloth and then dry it. Do not use alcohol or solvents, abrasives or detergents, to avoid damaging the treated outside surfaces. Do not place the machine in water, not even part of it. 15 – DECALCIFICATION We recommend you to decalcify the machine depending on how often you use it and on the hardness of the water, using a specific softeners that can be found on sale. Prepare in a container a solution of water and softener and dissolve it in the water; subsequen- tly pour the solution into the boiler (9) and close the boiler cap (3). Insert the filter-holder (5) into the unit (11) without any coffee and place the Cappuccino Auto- matic device (17) in its site; then switch the machine on. Place a container under the filter-holder and under the Cappuccino Automatic. Once the machine has reached the operating pressure, turn the steam tap knob (4) anticlockwise and allow the water to flow out of the Cappuccino Automatic for approximately 10-15 seconds; then close the tap again. Subsequently lift the lever (1) upward and allow the water to flow out of the nozzles of the filter-holder for approximately 10-15 seconds; then interrupt delivery. Let act the solution to act for approximately 15 minutes and repeat the operations until the water has been entirely finished. Place the ON/OFF switch on the OFF position again and unplug the main cable from the power socket without pulling it. Open slowly the steam tap knob (4) by turning it anticlockwise and wait for all the steam contained in the boiler to be discharged from the Cappuccino Automatic. Remove the boiler cap and rinse out with clean water several times. After having filled the boiler with fresh and clean water, having closed the boiler cap and the steam knob, switch again the machine on and wait for it to reach the correct pressure; then allow plenty of water to flow both out of the filter-holder nozzles, and out of the Cappuccino Automatic, to eliminate any residual softener solution, before switching the machine off. To remove the scale deposits from the heating element and inside the boiler, it is also possible to use a water and vinegar solution, which should be brought to the boiling inside the boiler itself. . Once the machine has reached the correct pressure, let work the solution for approximately 15 minutes. Place the switch on the OFF position again and unplug the main cable from the socket without pulling it. Subsequently empty the boiler and follow the above mentioned steps to remove any residual solution. 16 – ACCESSORIES Drip tray with grid 1 cup filter ( or pods) 2 cups filter Coffee spoon for one dose of coffee Coffee press Cappuccino Automatic (optional in models with black base)
English English64 65 English English
PROBLEMS CAUSE SOLUTION
1. Replace the coffee
2. Adjust the coffee grinding
3. Increase the amount of
coffee The froth does not form on the coffee
1. The coffee blend is not
suitable for this type of machine
2. The grinding is inadequate
3. There is not enough coffee
1. Comply with the directions
2. The filter-holder needs to be
heated up at the same time as the water
3. Carry out decalcification
4. Refer to the SERVICE CENTRE
5. Refer to the SERVICE CENTRE
The coffee delivered is too cold 1.The machine had not reached the correct temperature
2. The filter-holder had not been
3. Scale present on the resistor
4. Partially burnt out resistor
5. The pressure switch does not
work within optimal values
1. Refer to the SERVICE
CENTRE The coffee delivered is too hot 1. The pressure switch does not work within optimal values
1. Refer to the SERVICE
2. Refer to the SERVICE
CENTRE The safety valve hisses and there is steam coming out of the valve or from the condensation basin
1. The spring regulating into the
safety valve is blocked
2. The pressure switch does not
work within optimal values
1. Refer to the directions listed
2. Clean the holes with a
3. Add water in the boiler
5. Carry out decalcification
The machine does not deliver steam
1. The machine has not reached
the correct pressure
2. The holes of the steam pipe
3. There is no water in the boiler
4. The steam pipe has not been
5. There are scale deposits on
1. Refer to the SERVICE
2. Carry out decalcification
The machine is noisy (vibrations) 1.The coils of the heating element are too close
2. There are scale deposits on
the heating element 17 – CAUSES FOR OPERATING FAILURES OR ANOMALIES (TROUBLESHOOTING)
PROBLEMS CAUSE SOLUTION
1. Switch the power on
3. Refer to the SERVICE
CENTRE for replacement The machine does not work and the light ON/OFF switch does not turn on
1. There is no power
2. The main cable is not
plugged in correctly
3. The main cable is damaged
2. Refer to the SERVICE
CENTRE. The light ON/OFF switch is lit and the water does not heat up
1. The safety thermostat needs to
2. The heating element is
interrupted or burnt out
1. Add water in the boiler
2. Replace with a coarser
3. Reduce the amount of coffee
in the filter basket
4. Press the coffee less
During the delivery no coffee comes through
1. There is no water in the
2. The coffee is too fine-grained
3. There is too much coffee
4. The coffee has been pressed
1. Replace with a finer coffee
2. Increase the amount of
3. Press the coffee more
4. Replace the coffee
The coffee is delivered too fast 1. The coffee is too coarse- grained
2. There is not enough coffee
3. The coffee is not pressed
4. The coffee is stale or not
1. Replace with a coarser
2. Reduce the amount of coffee
3. Press the coffee less
The coffee is delivered in drops
1. The coffee is too fine-grained
2. There is too much coffee
3. The coffee has been pressed
2. Reduce the amount of coffee
3. Remove the coffee powder
from the edge of the filter- holder
4. Refer to the SERVICE
CENTRE Coffee leaks from between the boiler unit and the filter-holder
1. The filter-holder is not inserted
2. There is too much coffee in
3. The filter-holder edge has not
4. The gasket of the boiler unit
18. Support Cappuccino Automatic.
18. Support Cappuccino Automatic.
photo H photo I photo L