CSB42YP2NS1 - Fridge Café - Free user manual and instructions
Find the device manual for free CSB42YP2NS1 Café in PDF.
| Technical Features | CSB42YP2NS1 refrigerator with advanced cooling technology. |
|---|---|
| Total Capacity | Generous storage capacity suitable for family needs. |
| Energy Consumption | Energy class A+, ensuring low energy consumption. |
| Dimensions | Compact dimensions for optimal kitchen arrangement. |
| Usage | Ease of use with an intuitive control panel. |
| Special Features | Automatic defrost system for simplified maintenance. |
| Maintenance | Regular cleaning of interior surfaces recommended. |
| Repair | After-sales service available for repairs and spare parts. |
| Safety | Door lock system to prevent accidental openings. |
| General Information | 2-year warranty on parts and labor. |
Frequently Asked Questions - CSB42YP2NS1 Café
User questions about CSB42YP2NS1 Café
0 question about this device. Answer the ones you know or ask your own.
Ask a new question about this device
Download the instructions for your Fridge in PDF format for free! Find your manual CSB42YP2NS1 - Café and take your electronic device back in hand. On this page are published all the documents necessary for the use of your device. CSB42YP2NS1 by Café.
USER MANUAL CSB42YP2NS1 Café
natural_image
Top-down view of a festive dining table setup with plates, cutlery, and decorative floral arrangements (no text or symbols visible)
natural_image
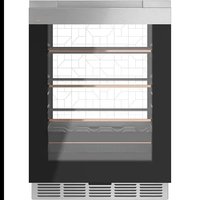
Solid dark green rectangle with no visible text, symbols, or features.CAFE
DISTINCT BY DESIGN
Owner's Manual

natural_image
Solid red rectangular background with no text, symbols, or discernible features.
natural_image
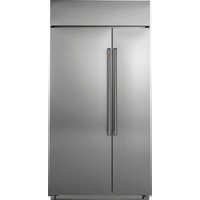
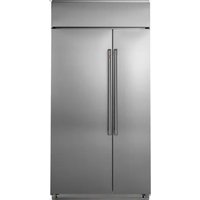
Top-down view of fresh mushrooms on a wooden cutting board with garlic and herbs (no text or symbols visible)CAFE
DISTINCT BY DESIGN™
Owner's Manual & Installation Instructions
Side by Side Refrigerators
Models: CSB42, CSB48
Contents
Safety Information....3
Using the Refrigerator
Controls 9
Dispenser 12
Automatic Icemaker ....
Sabbath 14
Water Filter 15
Climate Controlled Drawer 16
TurboCool™ 16
TurboFreeze™ 16
Storage Drawers 17
Shelves 18
Bins and Baskets 19
WiFi 19
Care And Cleaning 20
Installation Instructions 22
Preparing to Install the Refrigerator 24
Installing the Refrigerator 27
Troubleshooting
Normal Operating Conditions 33
Troubleshooting Tips 34
Limited Warranty 37
Consumer Support
MWF Performance Data Sheet 38
MWF Water Filter Cartridge Limited Warranty ..... 3 9
Consumer Support 40
Write the model and serial numbers here:
Model # ____
Serial #
Find these numbers on a label on the bottom of the refrigerator compartment under the lowest pan.
Française
THANK YOU FOR MAKING CAFÉ A PART OF YOUR HOME.
We take pride in the craftsmanship, innovation and design that goes into every Café product, and we think you will too. Among other things, registration of your appliance ensures that we can deliver important product information and warranty details when you need them.
Register your Café appliance now online. Helpful websites are available in the Consumer Support section of this Owner's Manual. You may also mail in the pre-printed registration card included in the packing material.
CAFÉ
DISTINCT BY DESIGN™
IMPORTANT SAFETY INFORMATION READ ALL INSTRUCTIONS BEFORE USING THE APPLIANCE
WARNING
To reduce the risk of fire, explosion, electric shock, or injury when using your refrigerator, follow these basic safety precautions:
■ This refrigerator must be properly installed and located in accordance with the Installation Instructions before it is used.
■ Unplug the refrigerator before making repairs, or cleaning.
NOTE: Power to the refrigerator cannot be disconnected by any setting on the control panel.
NOTE: Repairs must be performed by a qualified Service Professional.
■ Replace all parts and panels before operating.
■ Do not use an extension cord.
- Keep flammable materials and vapors away from the refrigerator.
■ Do not store explosive substances such as aerosol cans with a flammable propellant in this appliance.
■ To prevent suffocation and entrapment hazards to children, remove the refrigerator and freezer doors from any refrigerator before disposing of it or discontinuing its use.
■ To avoid serious injury or death, children should not stand on, or play in or with the appliance.
■ Children and persons with reduced physical, sensory or mental capabilities or lack of experience and knowledge can use this appliance only if they are supervised or have been given instructions on safe use and understand the hazards involved.
This appliance is intended to be used in household and similar applications such as: staff kitchen areas in shops, offices and other working environments; farm houses; by clients in hotels, motels, bed & breakfast and other residential environments; catering and similar non-retail applications.
■ Connect to potable water supply only. A cold water supply is required for automatic icemaker operation. The water pressure must be between 40 and 120 psi (275-827 kilopascals).
- Do not apply harsh cleaners to the refrigerator. Certain cleaners will damage plastic which may cause parts such as the door or door handles to detach unexpectedly. See the Care and Cleaning section for detailed instructions.
CAUTION
To reduce the risk of injury when using your refrigerator, follow these basic safety precautions.
- Do not clean glass shelves or covers with warm water when they are cold. Glass shelves and covers may break if exposed to sudden temperature changes or impact, such as bumping or dropping. Tempered glass is designed to shatter into many small pieces if it breaks.
- Keep fingers out of the “pinch point” areas; clearances between the doors and between the doors and cabinet are necessarily small. Be careful closing doors when children are in the area.
■ Do not touch the cold surfaces in the freezer compartment when hands are damp or wet, skin may stick to these extremely cold surfaces.
■ Do not refreeze frozen foods which have thawed completely.
In refrigerators with automatic ice makers, avoid contact with the moving parts of the ejector mechanism, or with the heating element that releases the cubes. Do not place fingers or hands on the automatic ice making mechanism while the freezer is plugged in.
WARNING

RE OR EXPLOSION HAZARD
Flammable Refrigerant
This appliance contains isobutane refrigerant, also known as R600a, a natural gas with high environmental compatibility. However, it is also combustible. Adhere to the warnings below to reduce the risk of injury or property damage.
- When handling, installing and operating the appliance, care should be taken to avoid damage to the refrigerant tubing.
- Service shall only be performed by authorized service personnel. Use only manufacturer-authorized service parts.
- Dispose of refrigerator in accordance with the Federal and Local Regulations. The flammable refrigerant and insulation material used in this product require special disposal procedures. Contact
your local authorities for the environmentally safe disposal of your refrigerator.
- Keep ventilation openings in the appliance enclosures or in the built-in structure clear of obstruction.
- To remove frost, scrape with a plastic or wood spatula or scraper. Do not use an ice pick or a metal or sharp-edged instrument as it may puncture the freezer liner and then the flammable refrigerant tubing behind it.
- Do not use electrical appliances inside the food storage compartment of the appliance.
- Do not use any electrical device to defrost your freezer.
READ AND SAVE THESE INSTRUCTIONS
IMPORTANT SAFETY INFORMATION READ ALL INSTRUCTIONS BEFORE USING THE APPLIANCE
INSTALLATION
WARNING

RE OR EXPLOSION HAZARD
Keep flammable materials and vapors away from refrigerator. Failure to do so can result in fire, explosion, or death.
WARNING

Over Hazard.
These appliances are top heavy, especially with any doors open, and must be secured to prevent tipping forward which could result in death or serious injury. Read and follow the entire installation instructions for securing the appliance with the anti-tip system.
CONNECTING ELECTRICITY
▲WARNING

LECTRICAL SHOCK HAZARD
Plug into a grounded 3-prong outlet
Do not remove the ground prong
Do not use an adapter
Failure to follow these instructions can result in death,
fire, or electrical shock.
This appliance must be installed with a means in the fixed house wiring or circuit breaker for disconnecting the appliance from the electrical supply after installation.
Do not, under any circumstances, cut or remove the third (ground) prong from the power cord. For personal safety, this appliance must be properly grounded.
The power cord of this appliance is equipped with a 3-prong (grounding) plug which mates with a standard 3-prong (grounding) wall outlet to minimize the possibility of electric shock hazard from this appliance.
Have the wall outlet and circuit checked by a qualified electrician to make sure the outlet is properly grounded.
Where a standard 2-prong wall outlet is encountered, it is your personal responsibility and obligation to have it replaced with a properly grounded 3-prong wall outlet. Do not use an adapter.
The refrigerator should always be plugged into its own individual electrical outlet which has a voltage rating that matches the rating plate.
A 115 Volt AC, 60 Hz, 15- or 20-amp fused, grounded electrical supply is required. This provides the best performance and also prevents overloading house wiring circuits which could cause a fire hazard from overheated wires.
Never unplug your refrigerator by pulling on the power cord. Always grip plug firmly and pull straight out from the outlet.
Immediately discontinue use of a damaged supply cord. If the supply cord is damaged, it must be replaced by a qualified service professional with an authorized service part from the manufacturer.
When moving the refrigerator away from the wall, be careful not to roll over or damage the power cord.
PROPER DISPOSAL OF YOUR OLD REFRIGERATOR
WARNING
SUFFOCATION AND ENTRAPMENT HAZARD
Failure to follow these disposal instructions can result in death or serious injury
IMPORTANT: Child entrapment and suffocation are not problems of the past. Junked or abandoned refrigerators are still dangerous even if they will sit for “just a few days.” If you are getting rid of your old refrigerator, please follow the instructions below to help prevent accidents.
Before You Throw Away Your Old Appliance
■ Take off the refrigerator and freezer doors.
■ Leave the shelves in place so that children may not easily climb inside.
Refrigerant and Foam Disposal:
Dispose of appliance in accordance with Federal and Local Regulations. Flammable refrigerant used requires special disposal procedures. Contact your local authorities for the environmentally safe disposal of your appliance.
READ AND SAVE THESE INSTRUCTIONS
RENSEIGNEMENTS IMPORTANTS CONCERNANT LA SÉCURITÉ LISEZ TOUTES LES INSTRUCTIONS AVANT D'UTILISER LE RÉFRIGÉRATEUR
AVERTISSEMENT
Non- Dispense Models

text_image
Wi-Fi Connect Freezer - + □ - + Refrigerator Reset Filter Hold 3 Sec Door AlarmNOTE: The refrigerator is shipped with protective film covering the temperature controls. If this film was not removed during installation, remove it now.
The temperature controls are preset in the factory at 37^ F ( 3^ C) for the refrigerator compartment and 0^ F ( -18^ C) for the freezer compartment. Allow 24 hours for the temperature to stabilize to the preset recommended settings.
Changing the Temperature for Non-dispense Models
To change the temperature, press and release the (+) or (-) pad to the desired temperature set point for refrigerator and freezer separately. Allow 24 hours for the refrigerator to reach the temperature you have set.
To turn OFF cooling system, press and hold either (+) pad until both displays show OFF.
Icemaker for Non-dispense Models
To turn OFF or ON the icemaker, press and hold the Refrigerator + and - pads at the same time and hold for 5 seconds. The temperature display will show ICE OFF or ICE ON based on the mode and then return to normal display after 5 seconds.
Sabbath Mode
To set Sabbath Mode, press and hold the FREEZER + and - pads at the same time and hold for 5 seconds. The temperature display will show SA for 5 seconds and then the display and lights turn off. The lights and display
will be off until Sabbath Mode is turned off. Repeat the process to turn off Sabbath Mode. Sabbath Mode will also automatically exit this feature state after 4 calendar days or 96 hours. Temperature set point will be displayed.
Controls
Dispenser Models
We are continuously updating our software. Please reference the full owner's manual online for the latest functionality at cafeappliances.com. In Canada, visit cafeappliances.ca.
The recommended temperature settings, preset from the factory, are 37^ F ( 3^ C) for the refrigerator and 0^ F (-18°C) for the freezer.
NOTE: The refrigerator is shipped with protective film covering the temperature controls.
If this film was not removed during installation, remove it now.
The temperature controls are preset in the factory at 37^ F ( 3^ C) for the refrigerator compartment and 0^ F (-18°C) for the freezer compartment. Allow 24 hours for the temperature to stabilize to the preset recommended settings.
To Change the Refrigerator Temperature:
Press the Settings button (💡) until "Fridge" is highlighted. Press the Up or Down arrow buttons to increase or decrease temperature settings.
To Change the Freezer Temperature:
Press the Settings button (💡) until "Freezer" is highlighted. Press the Up or Down arrow buttons to increase or decrease temperature settings.
The cooling system can be turned off by pressing the Settings button (until either "Fridge" or "Freezer" is highlighted. Press and hold both the Up and Down arrow buttons for 3 seconds. "-" will be displayed when the system is off. Turning the cooling system off stops the cooling to the refrigerator, but it does not shut off the electrical power. The cooling system can be turned on by returning to the "Fridge" or "Freezer" setting and pressing the On button.
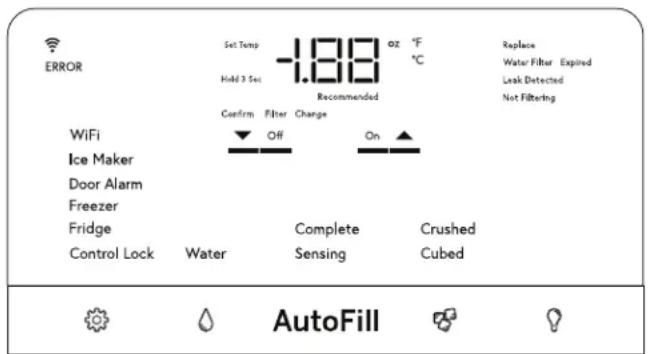
Control Settings
Settings (☐ Press the Settings symbol ( ) to scroll through the refrigerator functions.
- Control Lock - Press ON to lock out ice and water dispenser and all feature and temperature buttons. Press and hold OFF for 3 seconds to deactivate.
- Fridge - Press Up or Down button to increase or decrease temperature from 34^ F ( 1^ C) to 42^ F ( 6^ C).
- Freezer - Press Up or Down button to increase or decrease temperature from -6^ (-21°C) to 5^ (-15°C).
- Door Alarm - Sounds an alert when the freezer or refrigerator doors have been left open. Snooze the alert by pressing any key. Press On or Off to activate or deactivate Door Alarm while an alert is not active.
text_image
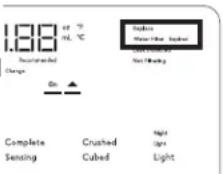
ERROR Set Temp -1.88 oz °F Hold 3 Set Recommended °C Replace Water Filter Expired Leak Detected Not Filtering WiFi Ice Maker Door Alarm Freezer Fridge Control Lock Confirm Filter Change On Off Complete Crushed Water Sensing Cubed AutoFill- Icemaker - Press On or Off to start/stop Icemaker.
- WiFi - Press On to start the WiFi connection process per the instructions on Page 13. Press Off to disable WiFi. Note that restarting WiFi requires repeating the WiFi connection process.
Water (Ø - Press to select Ice or Water to dispense when the paddle is pressed.
AutoFill - Press to initiate automatic sensing to fill from dispenser.
Ice (✗ Press to select crushed or cubed ice when the paddle is pressed.
Light ( )- Press to illuminate dispenser. Chime will accompany each press.
Temperature display can be switched between Fahrenheit and Celsius. Press Settings button (☐) to navigate to "Fridge" or "Freezer", then press and hold the Ice button and Light button for three seconds.
Volume Control:
Alert volume can be adjusted from High to Low and Off. Press Settings button (💡) to navigate to "Icemaker", then press and hold the Ice button and Light button for three seconds.
Sabbath Mode:
Simultaneously hold the Settings (💡), Water, and Light buttons for three seconds to enter and exit Sabbath mode. Display will show "SA" and mode will automatically exit this feature state after 4 calendar days or 96 hours. Temperature set point will be displayed.
Presence Sense:
The Café has a presence detect wake up feature that detects when you walk up to the fridge. It turns on the recess light and wakes up the quick control bar (lights it up). To enable/disable the presence detect wake up feature, Navigate to "Ice Maker" in SETTINGS menu, Press & Hold 3-Sec: [WATER + LIGHT]. PS will be displayed for "Presence Sense". Press On to turn on or Off to turn off.
Not all features available on all models.
text_image
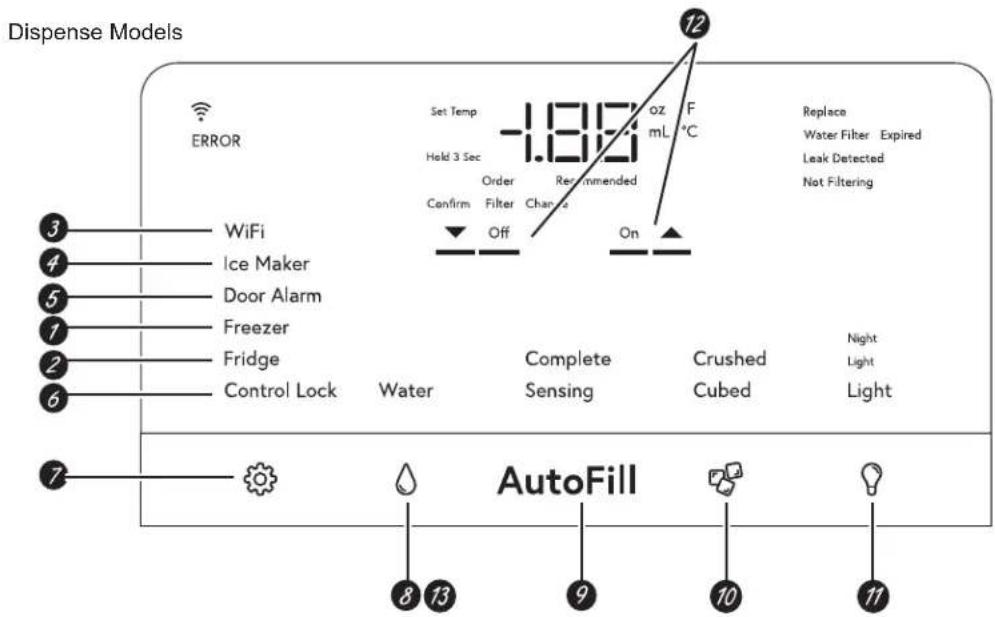
Dispense Models ERROR Set Temp Hold 3 Sec Order Filter Recommended Change -1.80°F mL °C Replace Water Filter Expired Leak Detected Not Filtering 3 WiFi 4 Ice Maker 5 Door Alarm 1 Freezer 2 Fridge Control Lock Water Complete Crushed Night Light Light 7 AutoFillNon-dispense Models

text_image
Wi-Fi Connect Freezer + - + Refrigerator Reset Filter Hold 3 Sec Door Alarm 1 2 3 51 Freezer temp control
Adjust freezer compartment temperature.
2 Refrigerator temp control
Adjust refrigerator compartment temperature.
3 WiFi
Turn the WiFi ON and OFF.
4 Icemaker
Turn your icemaker ON and OFF
5 Door Alarm
Sounds to alert when the freezer or refrigerator doors have been open for more than 2 minutes. Press Door Alarm and then select ON or OFF.
6 Lock controls
Lock out ice and water dispenser and all feature and temperature buttons.
7 Settings
Allows changing of the unit's settings.
8 Water
Dispenses water when the paddle is actuated.
9 AutoFill
Activates AutoFill and automatically fills your tainer.
10 Ice
Dispenses ice when the paddle is actuated.
11 LED dispenser light
LED lighting that can be turned on/off to light your dispenser.
12 ON/OFF
To be used to toggle settings ON and OFF.
13 Reset water filter
Press and hold the RESET FILTER Button for non-dispense models or press and hold the WATER button for dispense models to reset the filter indicator.
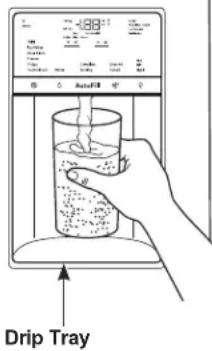
Ice and Water Dispenser (On some models.)
To dispense water or ice: select
Water, Crushed, or Cubed.
Press the glass gently against the top of the dispenser cradle.
The drip tray is not self-draining. To reduce water spotting, the shelf and its grille should be cleaned regularly.
If no water is dispensed when the refrigerator is first installed, there may be air in the water line system. Press the dispenser cradle for at least two minutes to remove trapped air from the water line and to fill the water system. To flush out impurities in the water line, throw away the first gallon (3.8 liters) of water.
text_image
-188°C Drip TrayCAUTION
Never put fingers or any other ice crusher discharge opening.
objects into the ice crusher discharge opening.
ATTENTION
Locking the Dispenser:
Touch Lock for 3 seconds to lock the dispenser and control pad. To unlock, touch Lock again for 3 seconds.
Light:
This feature turns the light on and off. The light also comes on when the dispenser cradle is pressed. If this light burns out, contact factory service.
AutoFill (On some models)
To Use HANDS FREE AutoFill:
■ Center container on Recess Dispenser Tray without activating paddle and remove hand from container
■ Press AutoFill.
To Stop AutoFill
■ Press ANY key, including AutoFill, to stop.
Important Facts about AutoFill
■ For optimum results, use a uniform container between 4-8" (10-20 cm) tall and 2-6" (5-15 cm) wide.
- Fill level and functionality may vary on containers taller than 8" (20 cm) or wider than 6" (15 cm).
- Container volumes may vary. If "ERROR" message is given, try a different container.
■ AutoFill will time out.
■ Handles, straws, and garnishes on the rim of the container my cause overfilling or variation in fill volumes.
■ Splashing may occur depending on the location of the container, water flow rate, container shape, and ice cubes.
- Keep sensors clean with a clean damp cloth, and do not spray liquid or cleaners directly on sensors
■ AutoFill works best with household water pressure of 60 to 100 psi (414 to 689 kPa).
■ Ice in container may affect fill volume. If issues are experienced, use less ice.
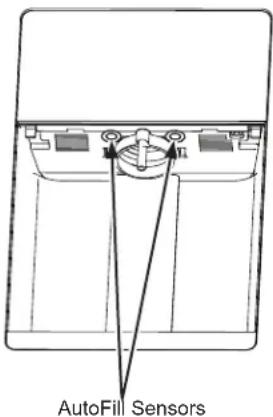
text_image
AutoFill SensorsIce Storage Drawer on Dispenser Models
To remove (Dispenser and non-dispenser models):
Lift up the access door to reach the icemaker. Set the icemaker power switch to the OFF position. With the access door closed, support the storage bin at the bottom while slightly lifting. Pull bin straight out.
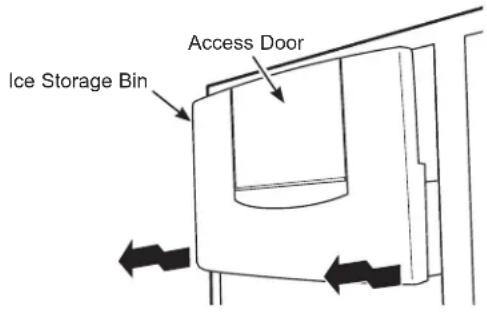
text_image
Access Door Ice Storage BinTo replace (Dispenser models only):
Slide the bin back until the tab on the bin locks into the slot on the shelf. If the bin does not go all the way back, remove it and rotate the drive mechanism 1/4 turn. Then push the bin back again.

text_image
Rotate Drive MechanismImportant Facts About Your Dispenser
■ Do not add ice from trays or bags to the storage bin. It may not crush or dispense well.
■ Avoid overfilling glass with ice and use of narrow glasses. Backed-up ice can jam the chute or cause the door in the chute to freeze shut. If ice is blocking the chute, poke it through with a wooden spoon.
■ Beverages and foods should not be quick-chilled in the ice storage bin. Cans, bottles or food packages in the storage bin may cause the icemaker or auger to jam.
■ To keep dispensed ice from missing the glass, put the glass close to, but not touching, the dispenser opening.
■ Some crushed ice may be dispensed even though you selected Cubed. This happens occasionally when a few cubes have been left in the crusher.
■ After crushed ice is dispensed, some water may drip from the chute.
■ Sometimes a small mound of snow will form on the door in the ice chute. This condition is normal and usually occurs when you have dispensed crushed ice repeatedly. The snow will eventually evaporate.
■ The first glass of water dispensed may be warmer than the following ones. This is normal.
■ Dispensed water is not ice cold. For colder water, simply add crushed ice or cubes before dispensing water.
■ To eliminate drips on the drip tray, tilt the glass in slightly when dispensing water.
Automatic Icemaker
A newly-installed refrigerator may take 12–24 hours to begin making ice.

natural_image
Technical line drawing of a mechanical component with no visible text or symbolsThe icemaker will produce seven cubes per cycle—approximately 15 cycles in a 24-hour period, depending on freezer compartment temperature, room temperature, number of door openings and other use conditions.
If the refrigerator is operated before the water connection is made to the ice maker, set the ice maker to OFF with the control panel settings.
When the refrigerator has been connected to the water supply, set the ice maker to ON with the control panel.
For dispense models, the ice maker can be turned on and off using the ice maker option under settings on the control panel.
CAUTION
To minimize the risk of personal injury,
avoid contact with the moving parts of the ejector mechanism, or with the heating element that releases the cubes. Do not place fingers or hands on the automatic ice making mechanism while the refrigerator is plugged in.
ATTENTION
■ You may hear a buzzing sound each time the icemaker fills with water.
■ Throw away the first few batches of ice to allow the water line to clear.
■ Be sure nothing interferes with the sweep of the feeler arm.
■ When the bin fills to the level of the feeler arm, the icemaker will stop producing ice. It is normal for several cubes to be joined together.
■ If ice is not used frequently, old ice cubes will become cloudy, taste stale and shrink.
NOTE: In homes with lower-than-average water pressure, you may hear the icemaker cycle multiple times when making one batch of ice. Icemaker works best between 40 and 120 psi (275-827 kPa).
Sabbath Mode (On some models - see Controls Section)
Sabbath Mode was designed for use on the Jewish Sabbath and Holidays. The Sabbath Mode feature makes it possible for observant Jews to refrigerate and freeze food during the duration of the holiday.
The Sabbath Mode feature can be set to override typical reactions to actions in your appliance. While in the Sabbath Mode, your appliance will still operate normally. However, the appliance will not respond to your actions.
While in the Sabbath Mode, you may notice the fan running when the door is opened; however, this is not a result of your actions. The fan will operate at random times. The defrost heater will continue to defrost the appliance and freezer and will be activated on a timer. The defrost heater will not defrost as a result of door openings or any consumer actions.
SABBATH MODE — Simultaneously hold the Settings (Water, and Light buttons for three seconds to enter and exit Sabbath mode. Display will show "SA" and mode will automatically exit this feature state after 4 calendar days or 96 hours. Temperature set point will be displayed.
DISPLAYS, ALARMS and LIGHTS—The main temperature control, door alarms and lights will be disabled.
ICEMAKER—The icemaker will be disabled.
Water filter cartridge
The water filter cartridge is located behind the upper cover at the top of the refrigerator.

natural_image
Technical line drawing of a mechanical or electrical enclosure with internal components and no visible text or symbolsWhen to replace the filter on models with a replacement indicator light
There is a replacement indicator light for the water filter cartridge on the dispenser. This light will turn orange to tell you that you need to replace the filter soon. Dispense Models
The filter cartridge should be replaced when the replacement indicator light turns red or if the flow of water to the dispenser or icemaker decreases.
Removing the filter cartridge
If you are replacing the cartridge, first remove the old one by slowly turning it to the left. Do not pull down on the cartridge. A small amount of water ma
Non-Dispense Models
NOTE: To reduce the risk associated with property damage due to water leakage, read and follow instructions before installation and use of this system. Installation and use MUST comply with all state and local plumbing codes.
Installing the filter cartridge
1 Fill the replacement cartridge with water from the tap to allow for better flow from the dispenser immediately after installation.
2 Line up the arrow on the cartridge and the cartridge holder. Place the top of the new cartridge up inside the holder. Do not push it up into the holder.
3 Slowly turn it to the right until the filter cartridge stops. DO NOT OVERTIGHTEN. As you turn the cartridge it will automatically raise itself into position. The cartridge will move about a 1/2 turn.
4 Run water from the dispenser for 3 gallons (11.35 liters) (about 6 minutes) to clear the system and prevent sputtering.
5 To reset the water filter indicator, press and hold the RESET FILTER button for non-dispense models. For dispense models, navigate the Settings menu to Ice Maker and then press and hold WATER and ICE for 3 seconds.
NOTE: A newly installed water filter cartridge may cause water to spurt from the dispenser.
Filter bypass plug
To reduce the risk of water damage due to water leakage, you MUST use the filter bypass plug in the following conditions:
a) If you have a household reverse osmosis water system and / or another form of home water filtration system
b) If a replacement filter is not available
To obtain a free MWF bypass plug WR17X22070, visit cafeappliances.com. In Canada, visit cafeappliances.ca. The bypass plug is installed in the same way as a filter cartridge.
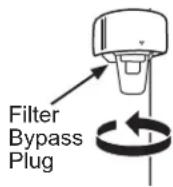
The icemaker will not operate without the filter or filter bypass plug.
Application Guidelines/Water Supply
| Service Flow 0.5 gpm (1.9 lpm) | |
| Water Supply Potable Water | |
| Water Pressure 40-1 | 20 psi (2.8-8.2 bar) |
| Water Temperature | 33°F-100°F (0.6°C-38°C) |
WARNING
To reduce the risk associated with choking, do not allow children under 3 years of age to have access to small parts during the installation of this product. The disposable filter cartridge should be replaced every 6 months at the rated capacity, or sooner if a noticeable reduction in flow rate occurs.
AVERTISSEMENT
For the maximum benefit of your filtration system, GE Appliances, a Haier company, recommends the use of GE Appliances-branded filters only. Using GE Appliances-branded filters in Café refrigerators provides optimal performance and reliability. Our filters meet rigorous industry NSF standards for safety and quality that are important for products that are filtering your water. There is no assurance that brands other than GE Appliances filters meet our standards for quality, performance and reliability.
If you have questions, or to order additional filter cartridges, visit gewaterfilters.com. In Canada, visit cafeappliances.ca or consult the yellow pages for the nearest Camco Service Center.
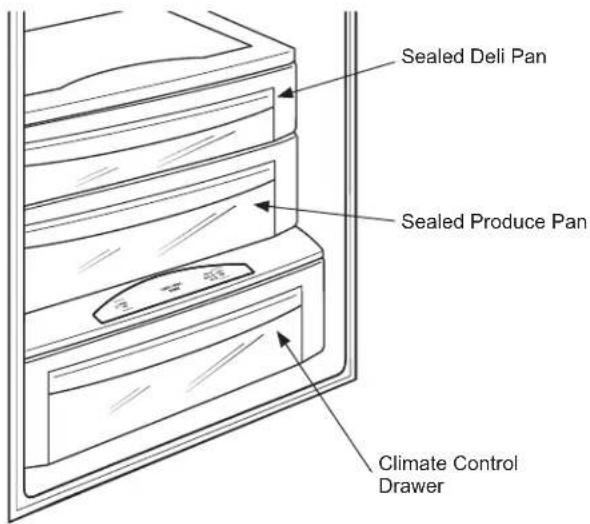
Climate Control Drawer
The Climate Control feature is a system of dampers, a fan, a temperature thermistor, and a heater. The Climate Control drawer can be used to store items at their optimum temperatures.
The drawer is tightly sealed to prevent the drawer's temperature from causing temperature fluctuations in the rest of the refrigerator.

text_image
CONTROL LOCK CLIMATE CONTROL DRAWER CTRL PRODUCT BEAT SELECT TEMPSELECT TEMP—Use this feature to store items at their optimum temperatures. See Climate Control Chart below.
CONTROL LOCK—Use this feature to lock the temperature controls.
NOTE: When the controls on the Climate Control drawer are turned off, the drawer will maintain temperatures at 42-48°F (5.6-8.9°C).
Climate Control Chart
NOTE: Results may vary depending on packaging, starting temperature and other food traits.

Control Lock
Press and hold this pad for 3 seconds to lock the settings for the Climate Control drawer. To unlock, press and hold for another 3 seconds.

| Citrus Setting (39–47°F) (3.9-8.3°C) |
| Oranges, Lemons, Limes, Pineapple, Cantaloupe |
| Beans, Cucumbers, Tomatoes, Peppers, Eggplant, Squash |
| Produce Setting (31–38°F) (-0.6 - 3.3°C) |
| Strawberries, Raspberries, Kiwifruit, Pears, Cherries, Blackberries, Grapes, Plums, Nectarines, Apples |
| Asparagus, Broccoli, Corn, Mushrooms, Spinach, Cauliflower, Kale, Green Onions, Beets, Onions |
| Meat Setting (27–37°F) (-2.8 - 2.8°C) |
| Raw Meat, Fish and Poultry |
Refrigerator TurboCool™ Setting
TurboCool™ setting (on some models)
Activate TurboCool ^™ to quickly restore refrigerator temperature after frequent door openings.
TurboCool™ and TurboFreeze™ are APP only enabled settings that can be controlled from a tablet or smart phone using the SmartHQ App.
Refrigerator TurboFreeze™ Setting
TurboFreeze™ setting (on some models)
Activate TurboFreeze ^TM to quickly restore freezer temperature after frequent door openings.
TurboCool ^TM and TurboFreeze ^TM are APP only enabled settings that can be controlled from a tablet or smart phone using the SmartHQ App.
Storage Drawers
Sealed Deli Pan
Use the Sealed Deli Pan for the convenient storage of lunch meats and cheese, hors d'oeuvres, spreads and snacks.
Excess water that may accumulate in the bottom of the drawers should be emptied and the drawers wiped dry.
Sealed Produce Pan
The top pan is designed to provide constant high humidity levels.
Make sure the drawers are closed completely to maintain the correct humidity level.
Excess water that may accumulate in the bottom of the drawers should be emptied and the drawers wiped dry.
text_image
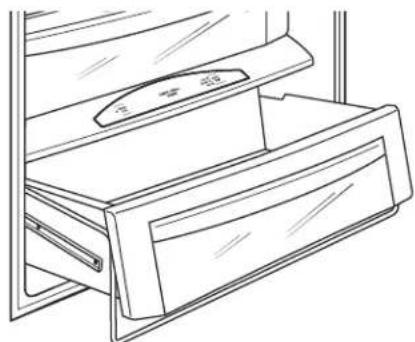
Sealed Deli Pan Sealed Produce Pan Climate Control DrawerDrawer/Pan Removal
To remove a drawer/pan:
- Pull the drawer/pan out to the stop position.
- Lift the front of the drawer/pan up and out of the wire holder.
- Lift the back of the drawer/pan up and out.
natural_image
Line drawing of a refrigerator with a handle and drawer (no text or symbols)To replace a drawer/pan:
- Place the back of the drawer/pan in the wire holder, making sure the wire holder fits into the grooves on the back of the drawer/pan.
- Lower the front of the drawer/pan into the wire holder.
- Press firmly on the top of the drawer/pan to snap it into the wire holder.
Shelves
Lighted Vegetable Drawer Shelf
The lighted vegetable drawer shelf provides lighting for the lower compartments. The lights are recessed into the shelf to illuminate the drawers below.
To remove shelf:
- Remove the top drawer (see Drawer/pan removal section).
- Push down gently on the back center of the climate control drawer top surface to release the bottom of the water tank cover. Pull out and down to remove the water tank cover and expose the wire harness.
- Lift the shelf and carefully pull forward to expose the wires.
- Unplug the shelf and carefully remove it from the refrigerator.

text_image
Water Tank Cover Climate Control Drawer Top SurfaceTo replace shelf:
- Carefully set the shelf onto the side rails, leaving the plug exposed.
- Plug the shelf into the refrigerator.
- Carefully slide the shelf into place.
- Insert the water tank cover top first so that it goes up behind the gasket hanging down from the vegetable drawer shelf. Gently push the bottom of the water tank cover until the bottom snaps into the top of the Climate Control Drawer cover.
- Replace the drawer (see Drawer/Pan Removal section).

text_image
Water Tank Cover Lighted Vegetable Drawer ShelfTo rearrange shelves
Tempered glass shelves in the refrigerator compartment and wire shelves in the freezer compartment are adjustable, enabling you to make efficient shelf arrangements to fit your family's food storage needs.
To remove shelves:
Tilt shelf up at front, then lift it up and out of tracks on rear wall of refrigerator. Do not move side to side to avoid any potential scratching to the wall.

natural_image
Diagram of hands holding a rectangular object with arrows indicating motion or force direction (no text or symbols)To replace shelves:
Select desired shelf height. With shelf front raised slightly, engage top lugs in tracks at rear of cabinet. Then lower front of shelf until it locks into position.
CAUTION
Handle glass shelves carefully. Glass
shelves and covers may break if exposed to impact, such as bumping or dropping. Tempered glass is designed to shatter into many small pieces if it breaks.
ATTENTION
All door bins, except for the deep gallon door bin, are adjustable using one of 2 tabs on each end of the bin. They can be moved up and down to many different positions to meet your storage needs. The deep gallon door bin can be removed for cleaning.
To remove any bin:
Lift the bin up and slide it toward you.

text_image
Adjustable Door Bin Gallon Door BinFreezer baskets
Wire slide-out freezer baskets can be pulled out for easy access to frozen foods.
To remove:
Pull basket out. Lift the front of the basket up and then take it out.

natural_image
Line drawing of a cabinet interior with a shelf and drawer (no text or symbols)WiFi (for customers in the United States, its territories, and Canada)
WiFi Connect Enabled\*
Your refrigerator is WiFi Connect Enabled. A WiFi communication card is built into the product allowing it to communicate with your Smart Phone for remote monitoring, control, and notifications. Please visit cafeappliances.com/connect to learn more about connected appliance features, and to learn what connected appliance App's will work with your Smart Phone.
WiFi Connectivity: For assistance with the appliance or the network connectivity (for models that are WiFi enable), please visit cafeappliances.com/connect.
REGULATORY INFORMATION
FCC/IC Compliance Statement:
This device complies with Part 15 of the FCC Rules. Operation is subject to the following two conditions:
- This device may not cause harmful interference, and
-
This device must accept any interference received, including interference that may cause undesired operation.
This equipment has been tested and found to comply with the limits for a Class B digital device, pursuant to Part 15 of the FCC Rules. These limits are designed to provide reasonable protection against harmful interference in a residential installation. This equipment generates uses and can radiate radio frequency energy and, if not installed and used in accordance with the instructions, may cause harmful interference to radio communications. However, there is no guarantee that interference will not occur in a particular installation. If this equipment does cause harmful interference to radio or television reception, which can be determined by turning the equipment off and on, the user is encouraged to try to correct the interference by one or more of the following measures: -
Reorient or relocate the receiving antenna.
- Increase the separation between the equipment and receiver.
- Connect the equipment into an outlet on a circuit different from that to which the receiver is connected.
- Consult the dealer or an experienced radio/television technician for help.
Labelling: Changes or modifications to this unit not expressly approved by the manufacturer could void the user's authority to operate the equipment.
Cleaning the Outside
Directions for Cleaning Outside Surfaces, Door Handles, and Trim
| DO USE DO NOT USE | |
| Soft, clean cloth or sponge Abrasive cloths, scrubbing sponges (with or without soap), scouring or steel wool pads | |
| Mild detergent mixed with warm waterApproved stainless steel cleaners; Visit the CaféAppliances parts store for approved stainless steel cleaners:cafeappliances.com/partsCleaners with oxalic acid such as Bar Keepers Friend Soft CleanserTM can be used to remove surface rust, tarnish and small blemishes on stainless steel surfaces only. | Abrasive powders or spraysWindow Sprays or AmmoniaCitrus or plant oil-based cleanersAcidic or vinegar-based cleanersOven cleanersCleaners containing acetone (propanone)Any cleaner with WARNING about plastic contact |
NOTE: DO NOT allow stainless steel cleaner to come in contact with any plastic parts such as trim pieces, handle hardware and liners. If unintentional contact of cleaners with plastic parts does occur, clean plastic part with a sponge and mild detergent mixed with warm water.
Cleaning the Inside
To help prevent odors, leave an open box of baking soda in the refrigerator and freezer compartments.
Unplug the refrigerator before cleaning.
If this is not practical, wring excess moisture out of sponge or cloth when cleaning around switches, lights or controls.
Use an appliance wax polish on the inside surface between the doors.
Use warm water and baking soda solution—about a tablespoon (15 ml) of baking soda to a quart (1 liter) of water. This both cleans and neutralizes odors. Rinse and wipe dry.
CAUTION
Do not clean glass shelves or covers
with warm water when they are cold. Glass shelves and covers may break if exposed to sudden temperature changes or impact such as bumping or dropping.
Tempered glass is designed to shatter into many small pieces if it breaks.
ATTENTION
Do not wash any plastic refrigerator parts in the dishwasher.
Behind the Refrigerator
Be careful when moving the refrigerator away from the wall. All types of floor coverings can be damaged, particularly cushioned coverings and those with embossed surfaces.
Raise the leveling legs located at the bottom front of the refrigerator.
Pull the refrigerator straight out and return it to position by pushing it straight in. Moving the refrigerator in a side direction may result in damage to the floor covering or refrigerator.
Lower the leveling legs until they touch the floor.
When pushing the refrigerator back, make sure you don't roll over the power cord or water supply line.
Preparing for Vacation
Set the ice maker to OFF with the control panel, and be sure to shut off the water supply to the refrigerator.
For long vacations or absences, remove food from the refrigerator/freezer. Set the ice maker to OFF with the control panel, and clean the interior with a baking soda solution of one tablespoon (15 ml) of baking soda to one
quart (1 liter) of water. Leave the door open.
For shorter vacations, remove perishable foods and leave controls at regular settings. However, if the room temperature is expected to drop below 60^ F ( 16^ C), follow the same instructions as for long vacations.
Replacing the Lights
The columns along the back wall of the refrigerator and freezer compartments are lit up by LED lights located behind the top pan in the refrigerator compartment and the bottom basket in the freezer compartment.
An authorized technician will need to replace the LED light.
If this assembly needs to be replaced, schedule service on-line at cafeappliances.com/service.
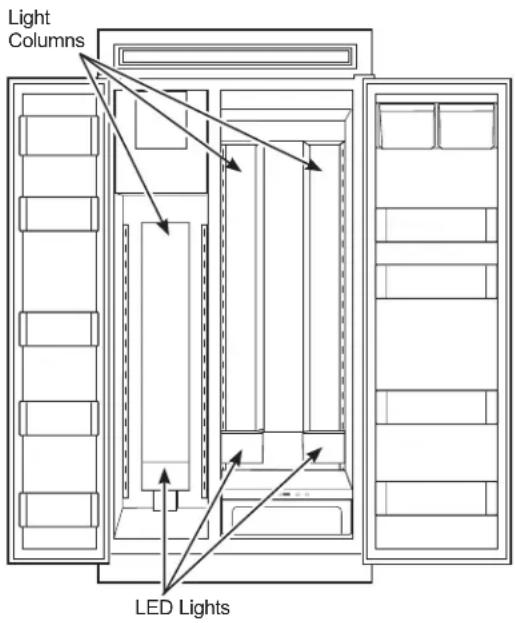
text_image
Light Columns LED LightsInstallation Instructions
Side by Side Refrigerators
Questions? Visit our Website at: cafeappliances.com
In Canada, visit cafeappliances.ca
BEFORE YOU BEGIN
Read these instructions completely and carefully.
- IMPORTANT — Save these instructions for local inspector's use.
- IMPORTANT — Observe all governing codes and ordinances.
- Note to Installer – Be sure to leave these instructions with the Consumer.
- Note to Consumer – Keep these instructions for future reference.
- Skill level – Installation of this appliance requires basic mechanical skills.
- Completion time – Refrigerator Installation 15 minutes
- Proper installation is the responsibility of the installer.
- Product failure due to improper installation is not covered under the Warranty.
WARNING

Electrical Shock Hazard.
Plug into a grounded 3-prong outlet.
Do not remove the ground prong.
Do not use an adapter.
Immediately discontinue use of a damaged supply cord. If the supply cord is damaged it must be replaced by a qualified service professional with an authorized service part from the manufacturer.
Do not use an extension cord with this appliance.
Failure to follow these instructions can result in death, fire, or electrical shock.
Follow the instructions in the section Grounding the Refrigerator.
This appliance must be installed with a means in the fixed house wiring or circuit breaker for disconnecting the appliance from the electrical supply after installation.
WARNING

or Explosion
Hazard. Keep flammable materials and vapors away from appliance. Failure to do so can result in fire, explosion, or death.
WARNING

ver Hazard.
These appliances are top heavy, especially with any doors open, and must be secured to prevent tipping forward which could result in death or serious injury. Read and follow the entire installation instructions for securing the appliance with the anti-tip system.
WARNING
To reduce the risk associated with
choking, do not allow children under 3 years of age to have access to small parts during the installation of this product.
CAUTION
Lifting Hazard
This unit is very heavy. To reduce the risk of person injury during maneuvering and installing this appliance, 4 people are required for proper installation.
CAUTION
Keep fingers out of the "pinch point"
areas; clearances between the doors and between the doors and cabinet are necessarily small. Be careful closing doors when children are in the area.
REFRIGERATOR LOCATION
- Do not install the refrigerator where the temperature will go below 55^ F ( 13^ C) because it will not run often enough to maintain proper temperatures.
- Do not install the refrigerator where the temperature will go above 100^ (37°C) because it will not perform properly.
- Do not install the refrigerator in a location exposed to water (rain, etc.) or direct sunlight.
- Install it on a floor strong enough to support it fully loaded.
For proper installation, the refrigerator/freezer must be placed on a level surface of hard material the same height as the rest of the flooring. This surface should be strong enough to support a fully loaded refrigerator, or approximately 1,500 lbs. (680.39 kg) each.
text_image
84 ±1/2" max Finished Opening *Finished Width 6 3/4" Electrical Area 6 3/4" 24" 5" Water Supply 5" 3-1/2" 3-1/2" 42" Models 18" 48" Models 20" 75" From Floor to Bottom of Electrical Area*The finished cutout width must be: 41-1/2" (105.41 cm) for 42" models 47-1/2" (120.65 cm) for 48" models
Water And Electrical Locations
The opening must be prepared with the electrical and the cold water supply located as shown.
The Cutout Depth Must Be 24" (60.96 cm)
The refrigerator will project forward, slightly beyond adjacent cabinetry for standard installation.
Additional Specifications
- A 115 volt 60Hz., 15 or 20 amp power supply is required. An individual properly grounded branch circuit or circuit breaker is recommended. Install a properly grounded 3-prong electrical receptacle recessed into the back wall. Electrical must be located on the rear wall as shown.
- The water line can enter the opening through the floor or back wall. The water line should be 1/4" O.D. copper tubing or SmartConnect™ kit between the cold water line and water connection location, long enough to extend to the front of the refrigerator. Installation of an easily accessible shut-off valve in the water line is required.
DIMENSIONS AND CLEARANCES
text_image
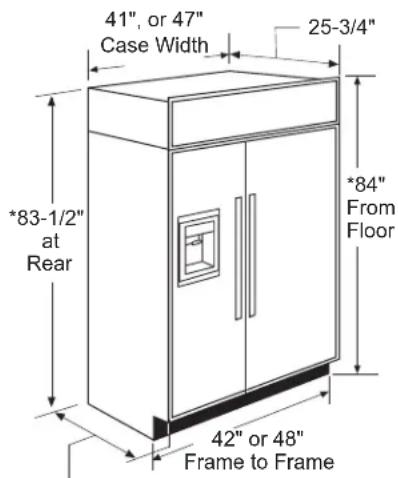
41", or 47" Case Width 25-3/4" *83-1/2" at Rear *84" From Floor 42" or 48" Frame to FrameDepth Including Handles: 28-7/8"
* Shipping height. The refrigerator can be adjusted to fit into a cutout that is 84-1/2" (214.63 cm) in height. Use leveling legs and wheels for a maximum 1" (2.54 cm) height adjustment.
Product Clearances
These refrigerators are equipped with a 3-position door stop. The factory-set 115° door swing can be adjusted to 90° if clearance to adjacent cabinets or walls is restricted.
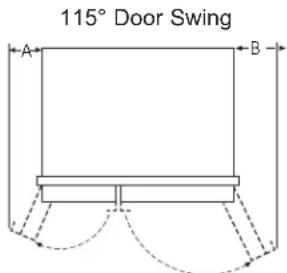
text_image
115° Door Swing A B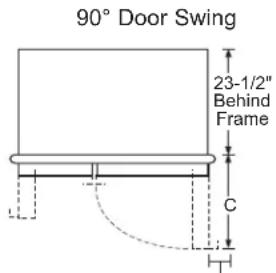
text_image
90° Door Swing 23-1/2" Behind Frame C| Models | A B C | ||
| 42" | 1-1/4"(28.58cm) | 17-5/8"(44.77cm) | 26-9/16"(67.47cm) |
| 48" | 3-13/16"(33.5cm) | 18-15/16"(48.10cm) | 28-5/8"(72.71cm) |
*Min. Distance to Wall
For a 90^ door swing, allow 4-5/8" (11.75 cm) min. clearance to a wall, for framed and stainless steel models. If the 90^ door stop position is used, pan access is maintained, but pan removal is restricted.
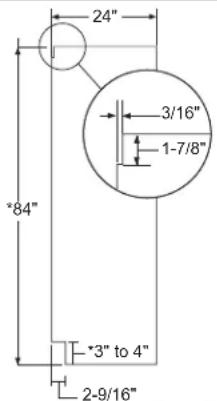
SIDE PANELS
Side panels must be used whenever the sides of the refrigerator will be exposed. The 1/4" (0.63 cm) side panels will slip into the side case trim. Secure the panels to the refrigerator with stick-on hook and loop fastener strips. Order the side panels from the cabinet manufacturer.
- Cut a notch in the top front corner as shown to allow clearance for corner keys in the front side trim.
text_image
24" 3/16" 1-7/8" *84" *3" to 4" 2-9/16"* Depending on installation height.
Installation Instructions

text_image
Refrigerator Case Trim 23-9/16" From Rear of Refrigerator 1/4" 1/2" 3/4" 1" 1-1/4" 1-1/2" Stainless Steel 3/4" Top View 90° DOOR SWING Scale 1:1INSTALLATION INSTRUCTIONS
TOOLS AND MATERIALS REQUIRED
• Tinsnips to cut banding
- Stepladder
- 1" Bit extension
- Tape measure
- Gloves
- 1/4" Drywall screws
• 5-Gal. Bucket with cover
- 6" Spirit level
• Appliance hand truck
- Tubing cutter
- 7/16" open-end wrench
• #2 Phillips screwdriver
- Drill and appropriate bits
- 5/16", 7/16" socket
- Safety glasses
• 1-1/8" open end wrench
- Pliers
• 1/4", 5/16" Combo Rachet
• Water shut-off valve
- 35" long 2x4 for Anti-Tip support
- 1/4" copper water line tubing or SmartConnect® Refrigerator Tubing kits
- Custom panels for doors and grille panel (on some models)
- Screws to secure refrigerator to cabinetry
- Stick-on hook and loop fastener strips for 1/4" side panels
HARDWARE SUPPLIED
• Water filter bypass plug (on some models)
- Toekick
- 1/4" nut and ferrule
FLOORING
For proper installation, this refrigerator must be placed on a level surface of hard material that is at the same height as the rest of the flooring. This surface should be strong enough to support a fully loaded refrigerator, or approximately 1,500 lbs. (680.39 kg).
NOTE: Protect the finish of the flooring. Cut a large section of the cardboard carton and place under the refrigerator where you are working.
GROUNDING THE REFRIGERATOR
▲WARNING

Electrical Shock
Hazard.
AVERTISSEMENT

Risque
d'électrocution
ADVERTENCIA

Riesgo de
Descarga Eléctrica.
Failure to follow these instructions can result in death, fire, or electrical shock.
The power cord of this appliance is equipped with a 3-prong (grounding) plug which mates with a standard 3-prong (grounding) wall receptacle to minimize the possibility of electric shock hazard from this appliance.
Have the wall outlet and circuit checked by a qualified electrician to make sure the outlet is properly grounded.
Where a standard 2-prong wall outlet is encountered, it is your personal responsibility and obligation to have it replaced with a properly grounded 3-prong wall outlet.
DO NOT, UNDER ANY
CIRCUMSTANCES, CUT OR
REMOVE THE THIRD (GROUND)
PRONG FROM THE POWER CORD.
DO NOT USE AN ADAPTER PLUG TO CONNECT THE REFRIGERATOR TO A 2-PRONG OUTLET.
DO NOT USE AN EXTENSION CORD WITH THIS APPLIANCE.

REFRIGERATOR LOCATION
■ Do not install the refrigerator where the temperature will go below 55^ F ( 13^ C). It will not run often enough to maintain proper temperatures.
■ Do not install the refrigerator where the temperature will go above 100^ F ( 37^ C). It will not perform properly.
■ Do not install the refrigerator in a location exposed to water (rain, etc.) or direct sunlight.
■ Install it on a floor strong enough to support it fully loaded.
STEP 1 REMOVE PACKAGING
WARNING

ver Hazard.
The refrigerator is much heavier at the top than at the bottom—be careful when moving. When using a hand truck, handle from the side only.
AVERTISSEMENT

- Carefully cut banding at the top and bottom, remove the outer carton.
- Slide out the back corner posts (2).
- Slide the carton off the top of the cabinet.
NOTE: IT IS NOT NECESSARY TO LAY THE CABINET DOWN IN ORDER TO REMOVE THE SKID!
- The unit is secured to the skid with 4 slotted tie-down straps. Remove the six 7/16" bolts from the base channels in the tie-downs.
- Remove the six 7/16" bolts securing the straps to the skid.
NOTE: DO NOT ATTEMPT TO ROLL UNIT OFF SKID.
- The support blocks on the bottom of the refrigeration
case must be removed before the refrigerator is taken off the skid or damage will occur. Carefully tilt the refrigerator and slide the blocks out from beneath.
- Remove the toekick and set aside for final installation.
- Lift the refrigerator off the skid with an appliance dolly. Handle from the sides.

text_image
t Toekick Remove Tie DownsSTEP 2 MOVE THE REFRIGERATOR INTO THE HOUSE
- Re-use the corner posts from the packaging to protect stainless steel models. Run the appliance dolly straps over the posts and under the handles.
- Leave the protective film on the refrigerator until installation is complete. IMPORTANT: Never lift the refrigerator by the handle or push against the grille panel; this could cause damage or misalignment.
- Avoid laying the unit on its back or side to prevent sealed system restrictions.
STEP 3 INSTALL WATER LINE
WARNING
Connect to potable water supply
only. A cold water supply is required for automatic icemaker operation. The water pressure must be between 40 and 120 psi (275-827 kilopascals).
WARNING

LECTRIC SHOCK HAZARD
Attach tubing clamp using existing hole only. DO NOT drill into the refrigerator.
AVERTISSEMENT
- A cold water supply is required for automatic icemaker operation. The water pressure must be between 40 and 120 p.s.i. (275-827 kPa).
- Route 1/4" OD copper or SmartConnect™ plastic tubing between house cold water line and the water connection location.
- The tubing should be long enough to extend to the front of the refrigerator. Allow enough tubing to accommodate the ber leading into the water

text_image
Floor Cold Water LineNOTE: The only Café approved plastic tubing is supplied in the SmartConnect™ Refrigerator Tubing kits. Do not use any other plastic water supply line because the line is under pressure at all times. Other types of plastic may crack or rupture with age and cause water damage to your home.
SmartConnect™ Refrigerator Tubing Kits are available in the following lengths:
2' (.6 m) WX08X10002
8' (2.4 m) WX08X10006
15' (4.6 m) WX08X10015
25' (7.6 m) WX08X10025
Installation Instructions
STEP 3 INSTALL WATER LINE (Cont.)
Shut off the main water supply.
Turn on the nearest faucet long enough to clear the line of water.
- Install a shut-off valve between the icemaker water valve and cold water pipe in a basement or cabinet. The shut-off valve should be located where it will be easily accessible.
- Turn on the main water supply and flush debris. Run about a quart of water through the tubing into a bucket. Shut off the water supply at the shut-off valve.
NOTE: Saddle type shut-off valves are included in many water supply kits. Before purchasing, make sure a saddle type valve complies with your local plumbing codes.
NOTE: Commonwealth of Massachusetts Plumbing Codes 248CMR shall be adhered to. Saddle valves are illegal and use is not permitted in Massachusetts. Consult with your licensed plumber.
STEP 4 WATER LINE INSTALLATION WITH A REVERSE OSMOSIS SYSTEM OR OTHER HOUSEHOLD FILTRATION SYSTEM
Skip this step when not using an RO System or other household filtration system.
If the water supply to the refrigerator is from a household filtration system, use the refrigerator's filter bypass plug. Using the refrigerator's water filtration cartridge with the RO filter can result in hollow ice cubes.
Rotate Counterclockwise to Remove

Filter Bypass
Plug
STEP 5 INSTALL SIDE PANELS
Skip this step when not using side panels. If you are using 1/4" (0.63 cm) side panels, they should be inserted into the case trim. Fasten the panels to the refrigerator with stick-on hook and loop fastener strips before setting the refrigerator in place.
STEP 6 ANTI-TIP PROCEDURE
WARNING

Over Hazard.
These refrigerators are top heavy, especially with any doors open, and must be secured to prevent tipping forward which could result in death or serious injury. Read and follow the entire installation instructions for securing the refrigerator with the anti-tip system.
AVERTISSEMENT

ie de
basculement
- Cut a 2" x 4" block, 35" (88.9 cm)long and secure the block to the mounting brackets provided using #12 or #14 wood screws.
- Secure the bracket with wood block to the back wall so that it is 84" (213.36 cm) from the finished floor. Use #12 or #14 wood screws. See the illustration.

text_image
2 x 4 Cut 35" Length Installation Height From Floor Mounting Bracket Screws Mounted into Vertical Wall Studs- The screws must penetrate at least one inch into the vertical wall studs.
- If metal wall studs, use self-tapping sheet metal screws in place of wood screws.
STEP 6 ANTI-TIP PROCEDURE (Cont.)
IMPORTANT: When the refrigerator is installed under a soffit or if there is not enough height for this method of security, brackets cannot be used. Proceed to step 7 to level the refrigerator and then to step 8 to secure refrigerator to cabinets. The refrigerator must be secured to prevent tipping.

text_image
Brackets Required Block Height From Floor to Bottom of Wood Block Soffit Side View Brackets Not Required Beneath a SoffitConnect power cord:
- Before pushing the refrigerator into the opening, plug the power cord into the receptacle. The water filter guard will need to be removed for access (some models). Remove the 3 screws holding it in place. If access is still too tight, remove the 2 screws holding the water filter bracket and move aside. Open the grille panel and reach into the opening at the back to grasp the power cord. Pull the power cord into the opening as you push the refrigerator back. Secure the bracket and guard with the original screws.
- Gently push refrigerator into the opening with hands against front corners.
STEP 7 LEVEL REFRIGERATOR
All models have 4-point leveling. The front is supported by leveling legs, the rear is supported by adjustable wheels. Both are accessible from the front of the refrigerator.
- To level the back of the refrigerator, turn the 7/16"
hex nut located above the front wheels. Turn clockwise to raise or counterclockwise to lower the refrigerator.
- For front leveling, use a 1-1/4" open-end wrench.
- Adjust height of refrigerator to match installation cutout opening 84-1/2" (214.63 cm). The refrigerator should cabinetry.
NOTICE: The rear leveling wheels and front leveling legs are limited to a maximum height adjustment of 1" (2.54 cm). If the installation requires more than 84-1/2" (214.63 cm) height, the installer should elevate the refrigerator on a sheet of plywood or runners. Cabinetry trim could also be added across the top of the opening to shorten the opening. If you attempt to raise the refrigerator more than 1" (2.54 cm), you will damage the front leveling legs and the rear leveling wheels. Make adjustments in small increments.

text_image
Hex Nut Adjusts Rear Wheels Leveling LegSTEP 8 ALTERNATE ANTI-TIP PROCEDURE
The refrigerator must be secured to prevent tipping.
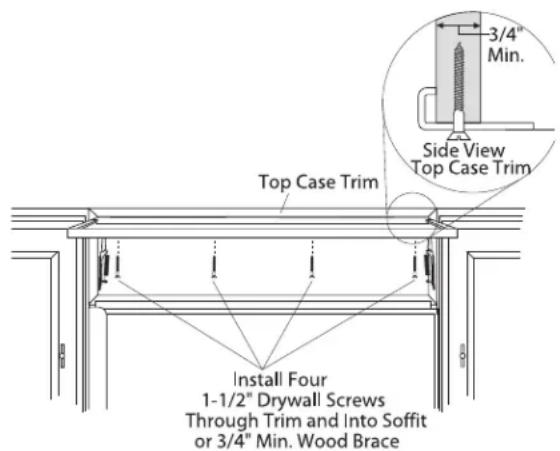
text_image
Top Case Trim 3/4" Min. Side View Top Case Trim Install Four 1-1/2" Drywall Screws Through Trim and Into Soffit or 3/4" Min. Wood Brace- Raise the grille panel to access case trim.
- Use a 3/16" bit to drill four evenly spaced clearance holes through the metal top case trim.
STEP 8 ALTERNATE ANTI-TIP PROCEDURE (Cont.)
- Use a 1/16" bit to drill to pilot holes through the metal clearance holes and into the wood soffit. The holes should be centered in the soffit or a 3/4" (1.91 cm) min. wood brace. The brace spanning the enclosure must be securely fastened to cabinets on both sides.
- Install four, 1-1/2" drywall screws into the pilot holes.
- Drill screws into adjacent cabinets through side case trim.

text_image
Raise Grille Panel to Stop Position Drive Screws Through Case Trim Into Adjacent CabinetsSTEP 9 ADJUST DOOR SWING
NOTE: This refrigerator has a 2-position door stop. When space does not allow the door to swing open fully to 115°, you may change the door swing to a 90° opening. The 130°, door swing option is not to be used for the SxS 42" and 48" models. Skip this step if door opening is satisfactory for your installation situation.
- Open the door to view the bottom hinge. Note the door stop pin locations. The pin is factory installed in the 115° position.
- Close the door. From below, use pliers to unscrew the door stop and reinstall into the 90^ position.
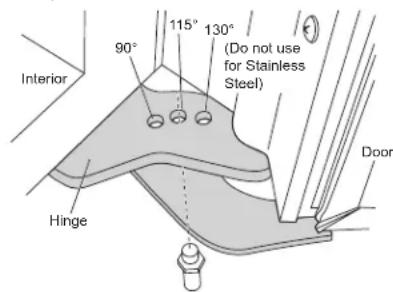
text_image
Interior 90° 115° 130° (Do not use for Stainless Steel) Hinge DoorWARNING

Door Trim Pinch Point Hazard
Improper installation can lead to a finger pinch point hazard between the side door trim and the cabinets when operating the door, especially with children. To minimize this risk you must follow the installation instructions for cabinet dimensions, trim assembly, and door stop angle.
STEP 9 ADJUST DOOR SWING (Cont.)
AVERTISSEMENT

STEP 10 CONNECT WATER SUPPLY
⚠ WARNING
Connect to potable water supply
only. A cold water supply is required for automatic icemaker operation. The water pressure must be between 40 and 120 psi (275-827 kilopascals).
⚠ WARNING

LECTRIC SHOCK HAZARD
Attach tubing clamp using existing hole only. DO NOT drill into the refrigerator.
▲AVERTISSEMENT
- Locate and bring the tubing to the front of the cabinet.
- Turn the water on to flush debris from the line. Run about a quart of water through the tubing into a bucket, then shut off the water.
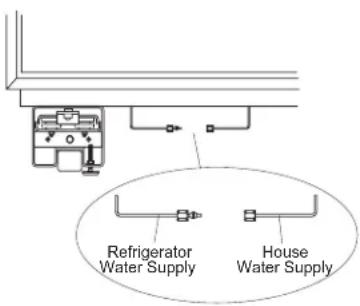
text_image
Refrigerator Water Supply House Water SupplyCopper Tubing:
- Slip a 1/4" nut and ferrule (provided) over both ends of the copper tubing. Insert the tube into the union fitting on the unit and tighten the nut to the union.
- Turn on the water to check for leaks.
SmartConnect™ Tubing:
NOTE: The only Café-approved plastic tubing is supplied in the SmartConnect™ Refrigerator Tubing kits. Do not use any other plastic water supply line because the line is under pressure at all times. Other types of plastic may crack or rupture with age and cause water damage to your home.
STEP 10 CONNECT WATER SUPPLY (Cont.)
SmartConnect™ Refrigerator Tubing Kits are available in the following lengths:
2' (.6 m) WX08X10002
8' (2.4 m) WX08X10006
15' (4.6 m) WX08X10015
25' (7.6 m) WX08X10025
- Insert the molded end of the tubing into the refrigerator connection. Tighten the compression nut until it is just hand tight.
- Tighten one additional turn with a wrench.
Overtightening can cause leaks! - Turn on the water to check for leaks.
- Run dispenser, if available, for 2 minutes or 1 gallon of water. It is normal for the dispenser to sputter for the first few cups
NOTE: Make sure excess tubing length does not interfere with the toekick installation.
STEP 11 CONNECT POWER, CLOSE GRILLE PANEL
- Open the grille panel.
- Plug in the power cord (if necessary) by reaching into the opening next to the water filter. The water filter guard will need to be removed for access (some models). Remove the 3 screws holding it in place. If access is still too tight, remove the 2 screws holding the water filter bracket and move aside. Plug in the power cord. Secure the bracket and guard with the original screws.
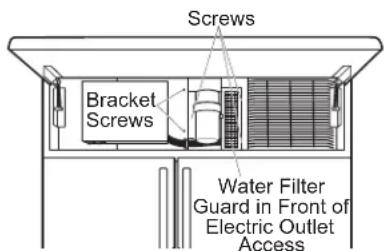
text_image
Screws Bracket Screws Water Filter Guard in Front of Electric Outlet Access- Check to make sure power to refrigerator is on by opening refrigerator door to see if interior lights are on.
- The temperature controls are preset at 37^ ( 3^ ) for the refrigerator section and 0^ (-18°C) for the freezer.
- Allow 24 hours to stabilize before making adjustments.
STEP 12 START ICEMAKER
CAUTION
To minimize the risk of personal injury, avoid contact with the moving parts of the ejector mechanism, or with the heating element that releases the cubes. Do not place fingers or hands on the automatic ice making mechanism while the appliance is plugged in.
ATTENTION
natural_image
Technical line drawing of a mechanical component with no visible text or symbols- Set the ice maker to ON with the control panel.
- The icemaker will begin operation automatically.
- Be sure nothing interferes with the sweep of the feeler arm.
- Discard the first full bucket of ice cubes.
- Use the control panel to set the ice maker to OFF.
STEP 13 INSTALL TOEKICKS
- Locate the supplied toekicks (shipped taped to the side of the refrigerator.
- Attach the LARGER toekick to the refrigerator using ONLY the top center hole (1).
- Attach the toekick skirt to the refrigerator using the three lower slots (2).
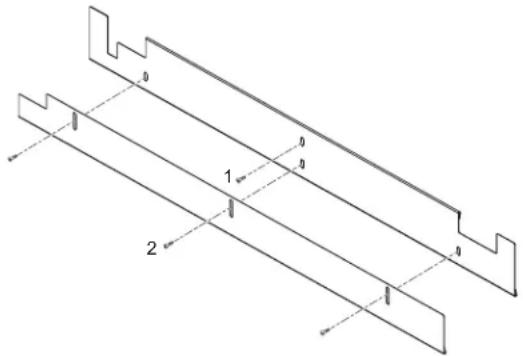
natural_image
Technical line drawing of two parallel metal profiles with labeled dimensions (no text or symbols)- A custom toekick can be installed to match or complement the surrounding cabinetry. Use the supplied toekick as a template to cut the shape.
INSPECT FINAL INSTALLATION
Check door alignment. Stand back away from the refrigerator to inspect the final installation.
- Check to be sure the handles are evenly aligned with each other at the top. To adjust, loosen the handle screws and slide up or down. Tighten the screws.
- Shipping or the addition of heavy door panels may have caused the doors to move slightly out of alignment.
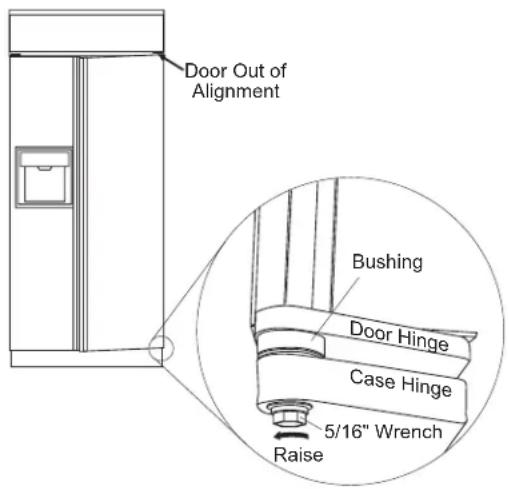
text_image
Door Out of Alignment Bushing Door Hinge Case Hinge 5/16" Wrench Raise- If necessary, the refrigerator door may be adjusted up or down to align with the freezer door.
- Use a 5/16" wrench to adjust the hinge pin as shown.
Newer refrigerators sound different from older refrigerators. Modern refrigerators have more features and use newer technology.
Do you hear what I hear? These sounds are normal.
HUMMM...
WHOOSH...
■ The new high efficiency compressor may run faster and longer than your old refrigerator and you may hear a high-pitched hum or pulsating sound while it is operating.
■ Sometimes the refrigerator runs for an extended period, especially when the doors are opened frequently. This means that the Frost Guard™ feature is working to prevent freezer burn and improve food preservation.
- You may hear a whooshing sound when the doors close. This is due to pressure equalizing within the refrigerator.
WHIR!

- You may hear the fans spinning at high speeds. This happens when the refrigerator is first plugged in, when the doors are opened frequently or when a large amount of food is added to the refrigerator or freezer compartments. The fans are helping to maintain the correct temperatures.
■ If either door is open for over 3 minutes, you may hear the fans come on in order to cool the light bulbs.
■ The fans change speeds in order to provide optimal cooling and energy savings.
CLICKS, POPS, CRACKS and CHIRPS
■ You may hear cracking or popping sounds when the refrigerator is first plugged in. This happens as the refrigerator cools to the correct temperature.
■ Electronic dampers click open and closed to provide optimal cooling and energy savings.
■ The compressor may cause a clicking or chirping sound when attempting to restart (this could take up to 5 minutes).
■ The electronic control board may cause a clicking sound when relays activate to control refrigerator components.
■ Expansion and contraction of cooling coils during and after defrost can cause a cracking or popping sound.
- On models with an icemaker, after an icemaking cycle, you may hear the ice cubes dropping into the ice bucket.
WATER SOUNDS

■ The flow of refrigerant through the freezer cooling coils may make a gurgling noise like boiling water.
■ Water dropping on the defrost heater can cause a sizzling, popping or buzzing sound during the defrost cycle.
■ A water dripping noise may occur during the defrost cycle as ice melts from the evaporator and flows into the drain pan.
■ Closing the door may cause a gurgling sound due to pressure equalization.
Troubleshooting Tips... Before you schedule service
Save time and money! Review the charts on the following pages first and you may not need to schedule service.
| Problem Possible Causes | What To Do | |
| Refrigerator does not operate | Refrigerator in defrost cycle. Wait | about 30 minutes for defrost cycle to end. |
| Freezer control in 0 (off) position. | Move the freezer control to a lower temperature setting. | |
| Refrigerator is unplugged. Push the plug completely into the outlet. | ||
| The fuse is blown/circuit breaker is tripped. | Replace fuse or reset the breaker. | |
| Energy SmartTM feature is altering refrigerator performance | Wait about 2 hours for normal operation to continue. | |
| Refrigerator or freezer compartment too warm | Temperature control not set cold enough. | See About the controls. |
| Warm weather or frequent door openings. | Set the temperature control one step colder. See About the controls. | |
| Door left open. Check to see if package is holding door open. | ||
| Energy SmartTM feature is altering refrigerator performance | See About Energy SmartTM Models. | |
| Vibration or rattling Front rollers need adjusting. See Rollers. Slight vibration is normal. | ||
| Motor operates for long periods or cycles on and off frequently. (Modern refrigerators with more storage space and a larger freezer require more operating time. They start and stop often to maintain even temperatures.) | Normal when refrigerator is first plugged in. | Wait 24 hours for the refrigerator to completely cool down. |
| Often occurs when large amounts of food are placed in refrigerator. | This is normal. | |
| Door left open. Check to see if package is holding door open. | ||
| Hot weather or frequent door openings. | This is normal. | |
| Temperature controls set at the coldest setting. | See About the controls. | |
| Frost or ice crystals on frozen food (frost within package is normal) | Door left open. Check to see if package is holding door open. | |
| Too frequent or too long door openings. | ||
| Divider between refrigerator and freezer compartments feels warm | Automatic energy saver system circulates warm liquid around front edge of freezer compartment. | This helps prevent condensation on the outside. |
| Automatic icemaker does not work (on some models) | Icemaker is set to OFF. | Set the ice maker to ON with the control panel. |
| Water supply turned off or not connected. | See Installing the water line. | |
| Freezer compartment too warm. | Wait 24 hours for the refrigerator to completely cool down. | |
| Piled up cubes in the storage bin cause icemaker to shut off. | Level cubes by hand. | |
| Ice cubes stuck in icemaker. Turn off the icemaker, remove cubes and turn the icemaker back on. | ||
Troubleshooting Tips... Before you schedule service
| Problem Possible Causes | What To Do | |
| Ice cubes have odor/taste | Ice storage bin needs cleaning. | Empty and wash bin. Discard old cubes. |
| Food transmitting odor/taste to ice cubes. | Wrap foods well. | |
| Interior of refrigerator needs cleaning. | See Care and cleaning. | |
| Small or hollow cubes | Water filter clogged. | Replace filter cartridge with new cartridge or with plug. |
| Slow ice cube freezing | Door left open. | Check to see if package is holding door open. |
| Temperature control not set cold enough. | See About the controls. | |
| Energy SmartTM feature is altering refrigerator performance | See About Energy SmartTM Models | |
| Irregular ice cube size, larger bridging between ice cubes, Loss of icemaker water containment | Unlevel Icemaker Verify proper icemaker level by using level indicator and make any necessary adjustments- Verify the level of the unit, See installation instructions-Turn off icemaker- Use bubble level indicator to level icemakerHold bubble level indicator up against bottom of the icemaker.Loosen side screws for icemaker.Note: Screws may need to be backed out of liner enough to allow icemaker bracket to clear liner bumpsIcemaker to be level and re-tighten the screwRepeat the step as needed | |
| Door not closing properly Door gasket on hinge side sticking or folding over. | Apply petroleum jelly on face of gasket | |
| Orange glow in freezer Defrost heater is on. This is normal. | ||
| Cube dispenser does not work (on some models) | Icemaker or water supply turned off. | Turn on icemaker or water supply. |
| Ice cubes are frozen to icemaker feeler arm. | Remove cubes. | |
| Irregular ice clumps in storage container. | Break up with fingertip pressure and discard remaining clumps. | |
| Freezer may be too warm. Adjust the freezer control to a colder setting, one position at a time, until clumps do not form. | ||
| Dispenser is LOCKED. | Press and hold the Lock pad for 3 seconds. | |
| Water has poor taste/odor (on some models) | Water dispenser has not been used for a long time. | Dispense water until all water in system is replenished. |
| Water in first glass is warm (on some models) | Normal when refrigerator | Wait 24 hours for the refrigerator to completely cool down. |
| Water dispenser has not been used for a long time. | Dispense water until all water in system is replenished. | |
| Water system has been drained. | Allow several hours for replenished supply to chill. | |
Troubleshooting Tips... Before you schedule service
| Problem Possible Causes | What To Do | |
| Water dispenser does not work (on some models) | Water supply line turned off or not connected. | See Installing the water line. |
| Water filter clogged. Replace filter cartridge or remove filter and install plug. | ||
| Air may be trapped in the water system. | Press the dispenser arm for at least two minutes. | |
| Dispenser is LOCKED. | Press and hold the Lock pad for 3 seconds. | |
| Water spurting from dispenser | Newly-installed filter cartridge. | Schedule service on-line at cafeappliances.com/service |
| Water is not dispensed | Water in reservoir is frozen. | Schedule service on-line at cafeappliances.com/service |
| No water or ice cube production | Supply line or shutoff valve is clogged. | Call a plumber. |
| Water filter clogged. Replace filter cartridge or remove filter and install plug. | ||
| Dispenser is LOCKED. | Press and hold the Lock pad for 3 seconds. | |
| Refrigerator has odor Foods | transmitting odor to refrigerator. | Foods with strong odors should be tightly wrapped. |
| Keep an open box of baking soda in the refrigerator; replace every three months. | ||
| Interior needs cleaning. See Care and cleaning. | ||
| Defrost water drainage system needs cleaning. | See Care and cleaning. | |
| Moisture forms on outside of refrigerator | Not unusual during periods of high humidity. | Wipe surface dry. |
| Moisture collects inside | Too frequent or too long door openings. | See instruction to exit sabbath mode |
| Interior light does not work | No power at outlet. Replace fuse or reset the breaker. | |
| Light bulb burned out. See Replacing the light bulbs. | ||
| SABBATH MODE may be active | See instruction to exit SABBATH MODE | |
| Water on kitchen floor or on bottom of freezer | Drain in the bottom of the freezer clogged. | See Care and cleaning. |
| Cubes jammed in chute. | Poke ice through with a wooden spoon. | |
| Hot air from bottom of refrigerator | Normal air flow cooling motor. In the refrigeration process, it is normal that heat be expelled in the area under the refrigerator. Some floor coverings are sensitive and will discolor at these normal and safe temperatures. | |
| Cubed Ice was selected but Crushed Ice was dispensed (on some models) | Last setting was Crushed Ice. | A few cubes were left in the crusher from the previous setting. This is normal. |
| Frequent “buzzing” sound | Icemaker is set to ON. | Turn the ice maker to OFF with the control panel. Keeping the ice maker ON will damage the water valve. |
Café Refrigerator Limited Warranty
cafeappliances.com
All warranty service is provided by our Factory Service Centers, or an authorized service technician. To schedule service online, visit us at cafeappliances.com/service. Please have your serial number and your model number available when scheduling service.
| For the Period of: Café Will Replace | |
| One YearFrom the date of the original purchase | Any part of the refrigerator which fails due to a defect in materials or workmanship. During the limited one-year warranty, Café will also provide, free of charge, all labor and related service to replace the defective part. |
| Thirty Days(Water filter, if included)From the original purchase date of the refrigerator | Any part of the water filter cartridge which fails due to a defect in materials or workmanship. During this limited thirty-day warranty, Café will also provide, free of charge, a replacement water filter cartridge. |
| Five YearsFrom the date of the purchase | Any part of the sealed refrigerating system (the compressor, condenser, evaporator an all connecting tubing) which fails due to a defect in materials or workmanship. During this limited five-year sealed refrigerating system warranty, Café will also provide, free of charge, all labor and related service to replace the defective part in the sealed refrigerating system. |
What Café will not cover:
■ Service trips to your home to teach you how to use the product.
■ Improper installation, delivery or maintenance.
■ Failure of the product if it is abused, misused, or used for other than the intended purpose or used commercially.
■ Loss of food due to spoilage.
■ Replacement of house fuses or resetting of circuit breakers.
■ Damage caused after delivery.
■ Replacement of the water filter cartridge, if included, due to water pressure that is outside the specified operating range or due to excessive sediment in the water supply.
■ Replacement of the light bulbs, if included, or water filter cartridge, if included, other than as noted above.
■ Damage to the product caused by accident, fire, floods or acts of God.
■ Incidental or consequential damage caused by possible defects with this appliance.
■ Product not accessible to provide required service.
■ Damage caused by a non-GE Appliances Brand water filter.
■ Damage to finish, such as surface rust, tarnish, or small blemishes not reported within 48 hours of delivery.
EXCLUSION OF IMPLIED WARRANTIES
Your sole and exclusive remedy is product repair as provided in this Limited Warranty. Any implied warranties, including the implied warranties of merchantability or fitness for a particular purpose, are limited to one year or the shortest period allowed by law.
For US Customers: This limited warranty is extended to the original purchaser and any succeeding owner for products purchased for home use within the USA. If the product is located in an area where service by a Café Authorized Servicer is not available, you may be responsible for a trip charge or you may be required to bring the product to an Authorized Café Service location for service. In Alaska, the limited warranty excludes the cost of shipping or service calls to your home.
Some states do not allow the exclusion or limitation of incidental or consequential damages. This limited warranty gives you specific legal rights, and you may also have other rights which vary from state to state. To know what your legal rights are, consult your local or state consumer affairs office or your state's Attorney General.
Warrantor: GE Appliances, a Haier company Louisville, KY 40225
For Customers in Canada: This limited warranty is extended to the original purchaser and any succeeding owner for products purchased in Canada for home use within Canada. In-home warrant service will be provided in areas where it is available and deemed reasonable by Mabe to provide.
Warrantor Canada: MC Commercial, Burlington, Ontario, L7R 5B6
Performance Data Sheet
SmartWater™ Filtration System—MWF Cartridge
Please scan the QR code below for the Performance data sheet – MWF Cartridge

text_image
QR code image containing encoded data, no visible human-readable textMWF Water Filter Cartridge Limited Warranty
Contact us at cafeappliances.com/parts
| For the period of GE Appliances will replace | |
| Thirty DaysFrom the dateof the originalpurchase | Any part of the water filter cartridge which fails due to a defect in materialsor workmanship during this limited thirty-day warranty.* |
What GE Appliances will not cover:
■ Service trips to your home to teach you how to use the product.
■ Improper installation.
■ Failure of the product if it is abused, misused, used for other than the intended purpose or used commercially.
■ Replacement of house fuses or resetting of circuit breakers.
■ Damage to the product caused by accident, fire, floods, or acts of God.
■ Incidental or consequential damage caused by possible defects with this appliance.
EXCLUSION OF IMPLIED WARRANTIES
Your sole and exclusive remedy is part exchange as provided in this Limited Warranty. Any implied warranties, including the implied warranties of merchantability or fitness for a particular purpose, are limited to six months or the shortest period allowed by law.
This warranty is extended to the original purchaser and any succeeding owner for products purchased for home use within the USA. In Alaska, the warranty excludes the cost of shipping or service calls to your home.
Some states do not allow the exclusion or limitation of incidental or consequential damages. This warranty gives you specific legal rights, and you may also have other rights which vary from state to state. To know what your legal rights are, consult your local or state consumer affairs office or your state's Attorney General.
For Purchases Made In Iowa: This form must be signed and dated by the buyer and seller prior to the consummation of this sale.
This form should be retained on file by the seller for a minimum of two years.
| Buyer: | Seller: |
| Name | Name |
| Address | Address |
| City State Zip | City State Zip |
| Signature Date | Signature Date |
*If your GE Appliances part fails because of a manufacturing defect within thirty days from the date of original purchase for use, we will give you a new or, at our option, a rebuilt part without charge. Return the defective part to the parts supplier from whom it was purchased together with a copy of the "proof of purchase" for the part. If the part is defective and shows no signs of abuse, it will be exchanged. The warranty does not cover the failure of parts which are damaged while in your possession, are abused, or have been installed improperly. It does not cover the cost of returning the part to the supplier from whom it was purchased nor does it cover the cost of labor to remove or install it to diagnose the fault. It does not cover parts used in products in commercial use except in the case of air conditioning equipment. In no event shall GE Appliances be liable for consequential damages.
Warrantor: GE Appliances, a Haier company Louisville, KY 40225
Consumer Support
Café Website
Have a question or need assistance with your appliance? Try the Café website 24 hours a day, any day of the year! You can also shop for more great Café products and take advantage of all our on-line support services designed for your convenience. In the US: cafeappliances.com In Canada: cafeappliances.ca
Register Your Appliance
Register your new appliance on-line at your convenience! Timely product registration will allow for enhanced communication and prompt service under the terms of your warranty, should the need arise. You may also mail in the pre-printed registration card included in the packing material. In the US: cafeappliances.com/register In Canada: cafeappliances.ca
Schedule Service
Expert Café repair service is only one step away from your door. Get on-line and schedule your service at your convenience any day of the year. In the US: cafeappliances.com/service In Canada: cafeappliances.ca
Extended Warranties
Purchase a Café extended warranty and learn about special discounts that are available while your warranty is still in effect. You can purchase it on-line anytime. Café Service will still be there after your warranty expires. In the US: cafeappliances.com/extended-warranty In Canada: cafeappliances.ca
Parts and Accessories
Individuals qualified to service their own appliances can have parts or accessories sent directly to their homes (VISA, MasterCard and Discover cards are accepted). Order on-line today 24 hours every day. In the US: cafeappliances.com/parts
Instructions contained in this manual cover procedures to be performed by any user. Other servicing generally should be referred to qualified service personnel. Caution must be exercised, since improper servicing may cause unsafe operation.
Customers in Canada should consult the yellow pages for the nearest Mabe service center, visit our website at cafeappliances.com/parts
Contact Us
If you are not satisfied with the service you receive from Café, contact us on our website with all the details including your phone number, or write to:
In the US: General Manager, Customer Relations | Café Appliances, Appliance Park | Louisville, KY 40225 cafeappliances.com/contact
In Canada: Director, Consumer Relations, Mabe Canada Inc. | Suite 310, 1 Factory Lane | Moncton, N.B. E1C 9M3 cafeappliances.ca
CAFE
DISTINCT BY DESIGN™
Modèles : CSB42, CSB48
Contents
text_image
ERROR Set Temp Hold 3 Sec -1.818 oz °F °C Recommended Confirm Filter Change WiFi Ice Maker Door Alarm Freezer Fridge Control Lock Water Complete Sensing Crushed Cubed Replace Water Filter Expired Leak Detected Not Filtering AutoFilltext_image
Diagram showing a hand pouring liquid into a beaker with a digital display labeled 'AutoFill', indicating a chemical or chemical process.Plateau d'égouttage
ATTENTION
natural_image
Diagram of a device rear panel with labeled ports and arrows indicating assembly or connection (no text or symbols present)AutoFill Sensors
natural_image
Technical line drawing of a mechanical component with no visible text or symbolsnatural_image
Technical line drawing of a mechanical or electrical enclosure with internal components and no visible text or symbolsnatural_image
Line drawing of a refrigerator drawer with handle and lid (no text or symbols)natural_image
Diagram of hands holding a rectangular object with arrows indicating upward motion (no text or symbols)natural_image
Line drawing of a cabinet interior with a shelf and drawer (no text or symbols)| Models | A B C | ||
| 42 po 1 | 1-1/4" (28.58cm) | 17-5/8" (44.77cm) | 26-9/16" (67.47cm) |
| 48 po 1 | 3-13/16" (33.5cm) | 18-15/16" (48.10cm) | 28-5/8" (72.71cm) |
text_image
244p0 3216p0 1-7/8p0 *84 p0 *3-4 p04" 2-9/16 p0 *Senatural_image
Technical line drawing of a mechanical component with no visible text or symbolsATTENTION
natural_image
Technical line drawing of two parallel metal profiles with labeled components (no text or symbols)Garant Canada: MC Commercial, Inc., Burlington, Ontario, L7R 5B6
text_image
QR code image containing encoded data, no visible human-readable textAu Canada : cafeappliances.ca
Au Canada : cafeappliances.ca
Au Canada : cafeappliances.ca
Prolongation de garantie
Au Canada : cafeappliances.ca
Au Canada : cafeappliances.ca
cafeappliances.com/contact
Au Canada : Director, Consumer Relations, Mabe Canada Inc. | Suite 310, 1 Factory Lane | Moncton, N.B. E1C 9M3 cafeappliances.ca
CAFE
DISTINCT BY DESIGN™
Models: CSB42, CSB48
Contents
text_image
ERROR Set Temp -1.88 oz °F Hold 3 Set Recommended Recommended Confirm Filter Change WiFi Off On Ice Maker Door Alarm Freezer Fridge Complete Crushed Control Lock Water Sensing Cubed AutoFillnatural_image
Technical line drawing of a mechanical device with no visible text or symbolsAutoFill Sensors
natural_image
Technical line drawing of a mechanical component with no visible text or symbolsnatural_image
Technical line drawing of a mechanical or electrical enclosure with internal components and no visible text or symbolstext_image
1.88 at °F pL °C Reconvered Charge Gx ▲ Replace Water Filter: Open Not Binding Complete Crushed Light Sensing Cubed Lightnatural_image
Line drawing of a refrigerator drawer with handle and side panel (no text or symbols)natural_image
Diagram of hands holding a rectangular object with arrows indicating upward motion (no text or symbols)natural_image
Line drawing of a cabinet with an open drawer and a lid, showing internal structure (no text or symbols)text_image
24" 3/16" 1-7/8" *84" *3" to 4" 2-9/16" *Depernatural_image
Technical line drawing of a mechanical component with no visible text or symbolsnatural_image
Technical line drawing of two parallel metal profiles with labeled dimensions (no text or symbols)Warrantor: GE Appliances, a Haier company
Louisville, KY 40225
text_image
QR code image containing encoded data, no visible human-readable textLouisville, KY 40225
GEAppliances.com/contact