XOGVIL48S - Basket XO - Free user manual and instructions
Find the device manual for free XOGVIL48S XO in PDF.

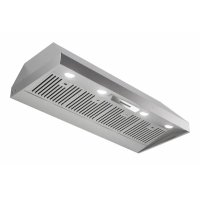
| Technical features | XO XOGVIL48S extractor hood, wall-mounted type, 48 cm width, powerful motor, 3 power levels, integrated LED lighting. |
|---|---|
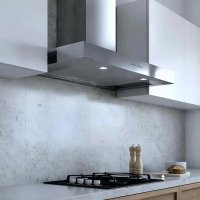
| Usage | Designed to eliminate cooking odors and steam, ideal for modern kitchens, wall installation recommended. |
| Maintenance and repair | Machine-washable grease filters, regular cleaning recommended for optimal operation, spare parts available. |
| Safety | Overheat protection, compliant with electrical safety standards, professional installation recommended. |
| General information | Elegant design, stainless steel finish, manufacturer warranty, optimized energy consumption. |
Frequently Asked Questions - XOGVIL48S XO
Download the instructions for your Basket in PDF format for free! Find your manual XOGVIL48S - XO and take your electronic device back in hand. On this page are published all the documents necessary for the use of your device. XOGVIL48S by XO.
USER MANUAL XOGVIL48S XO
I worked really hard on this manual - so please read it...
XO OUTDOOR EXHAUST HOODS
MODELS XOGVIL36S, XOGVIL42S, XOGVIL48S- 3 - When buying any XO appliance you can be confident you have chosen a high quality, innovative and stylish product from a company that cares about you! If you require service or have questions, there are 2 ways to contact our ventilation experts; Online @ https://xoappliance.com/priority-service-for-your-xo-product/ Or by phone 973-403-8900 CONGRATULATIONS on purchasing your XO. Before you proceed, take just a moment to register your XO at: www.xoappliance.com/register-your-product/
REGISTRATION HELPS YOU BY -
Ensuring warranty coverage should you need service Providing ownership verification for insurance purposes Let’s XO notify you in the event of product changes or recalls. Or simply scan here to be taken to the registration page...- 4 - It’s for your own good... Honest. please read and follow all safety instructions where things are GETTING READY Safety and Precautions Planning Ductwork Install Examples Dimensions THE INSTALL Mounting Height Top or Rear Exhaust Installing Electrical Connections MAINTENANCE Filters Cleaning Recirculation Oil collector tray Light Replacement OPERATING Control with knobs PARTS & WARRANTY
READ AND SAVE THESE INSTRUCTIONS
PLEASE READ ENTIRE INSTRUCTIONS BEFORE PROCEEDING. IMPORTANT: Save these Instructions for the Local Electrical Inspectors use. INSTALLER: Please leave these Instructions with this unit for the owner. OWNER: Please retain these instructions for future reference. Take care when using cleaning agents or detergents. Suitable for use in household cooking area. WARNING - To reduce the risk of re or electric shock, do not use this fan with any Solid-State Speed Control Device. CAUTION - To reduce risk of re and to properly exhaust air, be sure to duct air out- side – Do not vent exhaust air into spaces within walls or ceilings or into attics, crawl spaces, or garages. CAUTION - For general ventilating use only. Do not use to exhaust hazardous or ex- plosive materials and vapors. CAUTION - To avoid motor bearing damage and noisy and/or unbalanced impellers, keep drywall spray, construction dust, etc. o power unit. CAUTION - Please read specication label on product for further information and requirements. CAUTION - Accessible parts may become hot when used with cooking appliances. WARNING – TO REDUCE THE RISK OF FIRE, ELECTRIC SHOCK, OR INJURY TO PERSONS, OBSERVE THE FOLLOWING: A. Use this unit only in the manner intended by the manufacturer. If you have questions, contact the manufacturer. B. Before servicing or cleaning unit, switch power o at service panel and lock the ser- vice disconnecting means to prevent power from being switched on accidentally. When the service disconnecting means cannot be locked, securely fasten a promi- nent warning device, such as a tag, to the service panel. C. To reduce the risk of re, electric shock or injury to persons, do not use replacement parts that have not been recommended by the manufacturer (e.g. parts made at- 6 - home using a 3D printer). WARNING - TO REDUCE THE RISK OF A RANGE TOP GREASE FIRE: A. Never leave surface units unattended at high settings. Boilovers cause smoking and greasy spillovers that may ignite. Heat oils slowly on low or medium settings. B. Always turn hood ON when cooking at high heat or when ambeing foods ( i.e. Crepes Suzette, Cherries Jubilee, Peppercorn Beef Flambè ). C. Clean ventilating fans frequently. Grease should not be allowed to accumulate on fan or lter. D. Use proper pan size. Always use cookware appropriate for the size of the surface element. E. Keep fan, lters and grease laden surface clean. F. Use high range setting on range only when necessary. Heat oil slowly on low to me- dium setting. G. Don’ t leave range unattended when cooking. H. Always use cookware and utensils appropriate for the type and amount o food be- ing prepared. WARNING – TO REDUCE THE RISK OF INJURY TO PERSONS IN THE EVENT OF A RANGE
A. SMOTHER FLAMES with a close-tting lid, cookie sheet, or metal tray, then turn o the burner. BE CAREFUL TO PREVENT BURNS. If the ames do not go out immediately, EVACUATE AND CALL THE FIRE DEPARTMENT. B. NEVER PICK UP A FLAMING PAN – You may be burned. C. DO NOT USE WATER, including wet dishcloths or towels – a violent steam explosion will result. D. Use an extinguisher ONLY if:
1. You know you have a Class ABC extinguisher, and you already know how to operate it.
2. The re is small and contained in the area where it started.
3. The re department is being called.
4. You can ght the re with your back to an exit.
Based on “kitchen resafety tips” published by NFPA Proper maintenance of the Range Hood will assure proper performance of the unit. INSTALLATION INSTRUCTIONS WARNING – TO REDUCE THE RISK OF FIRE, ELECTRIC SHOCK, OR INJURY TO PERSONS, OBSERVE THE FOLLOWING: A. Installation work and electrical wiring must be done by qualied person(s) in accord- ance with all applicable codes and standards, including re-rated construction. B. Sucient air is needed for proper combustion and exhausting of gases through the ue (chimney) of fuel burning equipment to prevent back drafting. Follow the heat- ing equipment manufacturer’s guideline and safety standards such as those pub-- 7 - lished by the National Fire Protection Association (NFPA), and the American Society for Heating, Refrigeration and Air Conditioning Engineers (ASHRAE), and the local code authorities. C. When cutting or drilling into wall or ceiling, do not damage electrical wiring and other hidden utilities. D. Ducted fans must always be vented to the outdoors. E. This unit must be grounded. WARNING - TO REDUCE THE RISK OF FIRE, USE ONLY METAL DUCTWORK. WARNING - UNDER CERTAIN CIRCUMSTANCES DOMESTIC APPLIANCES MAY BE DAN- GEROUS. A. Do not check lters with hood working. B. Do not touch the lamps after a prolonged use of the appliance. C. No food must be cooked ambè underneath the hood. D. The use of an unprotected ame is dangerous for the lters and could cause res. E. Watch constantly the fried food in order to avoid the cooking oil ares up. F. Before performing any mainteinance operation, disconnect the hood from the elec- trical service. The manufacturers will not to accept any responsibility for eventual damages, be- cause of failure to observe the above instructions. Electrical Requirements Important: - Observe all governing codes and ordinances. - It is the customer’s responsibility to be aware of these below: - To contact a qualied electrical installer. - To assure that the electrical installation is adequate and in conformance with Natio- nal Electrical Code, ANSI/NFPA 70 latest edition* or CSA standards C22.1-94, Canadian Electrical Code, Part 1 and C22.2 No.0-M91 - latest edition** and all local codes and ordinances. - If codes permit and a separate ground wire is used, it is recommended that a qualied electrician determine that the ground path is adequate. - Do not ground to a gas pipe. - Check with a qualied electrician if you are not sure the range hood is properly grounded. - Do not have a fuse in the neutral or ground circuit. - This appliance requires a 120V 60Hz electrical supply and connected to an individual properly grounded branch circuit protected by a 15 or 20 ampere circuit breaker or time delay fuse. Wiring must be 2 wire with ground. Please also refer to Electrical Diagram on product. - A cable locking connector (not supplied) might also be required by local codes. Check with local requirements, purchase and install appropriate connector if necessary.
- National Fire Protection Association Batterymarch Park, Quincy, Massachusetts 02269- 8 - ** CSA International 8501 East Pleasant Valley Road, Cleveland, Ohio 44131-5575 Federal Communication Commission Interface Statement - This equipment has been tested and found to comply with the limits for a Class B digital device, pursuant to Part 15 of the FCC Rules. These limits are designed to provide reasonable protection against harmful interference in a residential installation. - This equipment generates, uses and can radiate radio frequency energy and, if not installed and used in accordance with the instructions, may cause harmful interference to radio communications. However, there is no guarantee that interference will not occur in a particular installation. If this equipment does cause harmful interference to radio or television reception, which can be determined by turning the equipment o and on, the user is encouraged to try to correct the interference by one of the following measures: - Reorient or relocate the receiving antenna. - Increase the separation between the equipment and receiver. - Connect the equipment into an outlet on a circuit dierent from that to which the receiver is connected. - Consult the dealer or an experienced radio/TV technician for help. SAFETY PRECAUTION
1. Take care when the cooker hood is operating simultaneously with an open fireplace or
burner that depend on the air in the environment and are supplied by other than electri- cal energy, as the cooker hood removes the air from the environment which a burner or fireplace need for combustion. The negative pressure in the environment must not exceed 4Pa (4x10⁻⁵ bar). Provide adequate ventilation in the environment for a safe operation of the cooker hood. Follow the local laws applicable for external air evacuation. Before connecting the model to the electricity network: - Control the data plate (positioned inside the appliance) to ascertain that the voltage and power correspond to the network and the socket is suitable. If in doubt ask a qualified electrician. - If a STATIONARY APPLIANCE is not fitted with a SUPPLY CORD and a plug, or with other means for disconnection from the supply mains having a contact separation in all poles that provide full disconnection under overvoltage category III conditions, the instructions shall state that means for disconnection must be incorporated in the fixed wiring in ac- cordance with the wiring rules. - For appliances with TYPE Y ATTACHMENT, the instructions shall contain the substance of the following. If the SUPPLY CORD is damaged, it must be replaced by the manufacturer, its service agent or similarly qualified persons in order to avoid a hazard.
In certain circumstances electrical appliances may be a danger hazard. A) Do not check the status of the filters while the cooker hood is operating. B) Do not touch bulbs or adjacent areas, during or straight after prolonged use of the lighting installation.- 9 - C) Flambè cooking is prohibited underneath the cooker hood. D) Avoid free flame, as it is damaging for the filters and a fire hazard. E) Constantly check food frying to avoid that the overheated oil may become a fire hazard. F) Disconnect the electrical plug prior to any maintenance. G) This appliance can be used by children aged from 8 years and above and persons with reduced physical, sensory or mental capabilities or lack of experience and knowledge if they have been given supervision or instruction concerning use of the appliance in a safe way and understand the hazards involved. Children shall not play with the appliance. Cleaning and user maintenance shall not be made by children w thout supervision. H) Young children should be supervised to ensure they do not play with the appliance.
I) There shall be adequate ventilation of the room when the rangehood is used at
the same time as appliances burning gas or other fuels. L) The air must not be discharged into a flue that is used for exhausting fumes from appliances burning gas or other fuels (not applicable to appliances that only dis- charge the air back into the room). M) Regulations concerning the discharge of air have to be fulfilled. N) There is a risk of fire if cleaning is not carried out in accordance with the instruc- tions. INSTALLATION INSTRUCTIONS
- Assembly and electrical connections must be carried out by specialised personnel.
- Wear protective gloves before proceeding with the installation. WARNING Prop. 65 Warning for California Residents: This product may contain chemicals known to the State of California to cause cancer, birth defects, or other reproductive harm.- 10 - THIS HOOD IS DESIGNED TO USE AN 10” ROUND DUCT. NEVER REDUCE DUCT SIZE. UNDERSIZED DUCTING SEVERELY RESTRICTS AIR FLOW AND HARMS PERFORMANCE. (Example: the area of an 8” Duct is more than 75% larger than a 6” Duct) KEEP DUCT RUNS AS SHORT AND STRAIGHT AS POSSIBLE. AVOID USING FLEXIBLE METAL DUCTING IF RUN IS LONGER THAN 6’. NEVER USE PLASTIC DUCTING. USE SMOOTH BORE METAL DUCTING. MINIMIZE THE NUMBER OF FITTINGS (see chart). WHEN YOU MUST USE FITTINGS, TRY TO SEPARATE THEM WITH SECTIONS OF 4’ OR MORE OF STRAIGHT DUCT. ALWAYS FOLLOW THE MANUFACTURER’S GUIDELINES FOR THE COOKING EQUIPMENT YOU ARE VENTING. ADHERE TO ALL LOCAL BUILDING CODES AND ORDINANCES. USE THE WORKSHEET THAT FOLLOWS TO HELP CALCULATE THE TOTAL EQUIVILENT FEET OF YOUR DUCT RUN. TOTAL EQUIVILENT FEET SHOULD BE LESS THAN 100’. a few simple rules to plan your ductwork- 11 -
› Front of hood › Side of hood › Top of hood dimensions MODEL A Gross weight Kg XOGVIL36S 34 3/8” 36 XOGVIL42S 40 3/8” 38 XOGVIL48S 46 3/8” 42- 14 - WIDTH 22 3/4” the cut out To install the hood into a custom canopy or cabinet, refer to the cutout dimensions above for your particular model. Gap around the unit should be minimized (~ 1/16”) to ensure a snug fit. MODEL XOGVIL36S XOGVIL42S XOGVIL48S WIDTH 34 5/8” 40 5/8” 46 5/8”- 15 - highs and lows All range hoods have a recommended range of installation height over the cooking surface. It is important to install the hood at the proper mounting height. Hoods mounted too low could result in heat damage and fire hazard; while hoods mounted too high will be hard to reach and will lose its performance and efficiency. IMPORTANT: This range hood is intended for covered patios or terraces. This unit must protected from the effects of weather. The roof cap and the wall cap must be considered to prevent the entering from the water. Once installed, it must be sealed to prevent leaks. We recommend oversizing the hood by 3” on each side to maximize efficiency and capture space For example; A 36” Grill would require a 42” Hood 60” Minimum above cooking surface to non-combustible overhead. 30” to 42” NON-COMBUSTIBLE REAR WALL OVERHEAD CONSTRUCTION- 16 -
1. Unplug the quick disconnect coupling that supplies power to the motor.
2. Remove screws “X” (8) of motor mount “E”. Unhook the motor assembly, rotate it and place
it in the back of the hood. Secure the motor mount with the screws. switching top and rear venting- 17 -
3. Reverse the position of air flange “F” by unscrewing screws “Y” (10) and positioning it at
the rear of the unit.
4. Also reverse the position of the plugs “C” by unscrewing the screws “Z” (4)
5. Reconnect the quick release connector
Z- 18 - installation
1. Remove the two (2) knobs holding the oil
drain pan (B) in place. Remove the pan and set it aside.
2. Remove the four (4) screws holding the
bracket (H) in place. Remove the bracket and set aside.- 19 - installation continued 1/4”
Using four (4) screws along the inside front edge and four (4) screws in the back corners as shown- 20 -
1. Route the power cord to the junction box inside the hood.
2. Using listed conduit fittings and connectors, connect the power supply to the box and each
line to the appropriate wire following this color convention:
Polarity must be observed. Unit must be properly grounded. Use a double throw disconnect switch.
3. Replace the box cover
4. Replace the Anti-grease Baffles.
All wiring must be in compliance with national electrical code, ANSI/NFPA 70-1999 and all local codes and regulations. WARNING - Suitable for use in damp location when installed in a GFCI protected branch circuit. electrical connection- 21 - maintenance Regular cleaning and maintenance is the key to long life and peak performance of any equipment. ANTI-GREASE BAFFLE FILTERS: Your XO hood is equipped with stainless steel pro-style baffle filters designed to capture grease from cooking. The baffles are easily removed for cleaning either by soaking in a warm, mild dish detergent solution, rinsing thoroughly and drying - or - by washing in your dishwasher. TO REMOVE THE BAFFLES:
1. Pull down on the release latch (shown left)
2. Lower the front edge of the baffle
3. Pull forward and remove
4. To replace, insert the rear of the baffle,
holding the latch open, swing the the front up into place and release the latch. The importance of this simple process is essential for two reasons. First to help keep your kitchen clean and healthy, but it is also critical to minimize the risk of fire. Baffle filters should be cleaned at least once every 2 months, more frequently depending on the type of cooking performed and the build up of grease. CLEANING STAINLESS STEEL: Do not use corrosive detergents, abrasive detergents or oven cleaners. Do not use any product containing chlorine bleach or any product containing chloride. Do not use steel wool or abrasive scrubbing pads which will scratch and damage surface. Cleaning Stainless Steel Clean periodically with warm soapy water and clean cotton cloth or micro fiber cloth. Always rub in the direction of the stainless steel grain. To remove heavier grease build up use a liquid degreaser detergent. After cleaning use a non-abrasive stainless steel polish/cleaners, to polish and buff out the stainless luster and grain. Always rub lightly, with a clean cotton cloth or a micro fiber cloth and buff in the direction of the stainless steel grain. Any painted surfaces should be cleaned with warm water and detergent only.- 22 -
maintenance To remove the oil collector tray “H”, unscrew the three knobs “G” and pull downwards. Clean the tank and reassemble it by performing the reverse operation. XOPSPK6509
LED LIGHT REPLACEMENT
To replace the bulbs, rotate the lamp anticlo- ckwise as shown in Figure. Replace the bulbs with new ones of the same type.- 23 - A. B. C. KNOB A. Starts the rst motor; 0 : motor o 1 : rst speed 2 : second speed 3 : third speed 4 : fourth speed KNOB B. Turns the hood lights on and o; 0 : lights o 1 : lights on KNOB C. Operates the second motor; 0 : motor o 1 : rst speed 2 : second speed 3 : third speed 4 : fourth speed The two motors can switch on at the same time. Your XO range hood is controlled by these knobs easy to operate- 24 - REPLACEMENT LIGHTS DUCT COVERS REPLACEMENT SWITCHES BLOWER MOTORS FAN WHEELS ALL OF THESE PARTS AND MORE ARE AVAILABLE, SIMPLY VISIT WWW.XOAPPLIANCE.COM and click on PARTS STORE
OR CALL US AT 973-403-8900
parts & accessories- 25 - YEAR WARRANTY
PARTS + LABOR 90 DAY LOVE IT or LEAVE IT. For 90 Days all our products are backed by our unique Love it or Leave it Guarantee. TWO-YEAR PARTS & LABOR LIMITED WARRANTY. XO warrants to the original purchaser of every new XO ventilation unit, the cabinet and all parts thereof, to be free from defects in material or workmanship under normal and proper use and maintenance as specified by XO and upon proper installation and start-up in accordance with the instruction packet supplied with each XO unit. XO’s obligation under this warranty is limited to a period of two (2) years from the date of original purchase. WARRANTY CLAIMS. All claims for labor or parts must be made directly through XO. All claims should include: model number and serial number of cabinet, proof of purchase, and date of installation. In case of warranted compressor, the compressor model tag must be returned to XO along with the above listed information. WHAT IS NOT COVERED BY THIS WARRANTY. XO’s sole obligation under this warranty is limited to either repair or replacement of parts, subject to the additional limitations below. This warranty neither assumes nor authorizes any person to assume obligations other than those expressly covered by this warranty. Open box, factory seconds, scratch and dent, floor models and commercial applications are excluded from these warranties. WARRANTY IS NOT TRANSFERABLE. This warranty is not assignable and applies only in favor of the original purchaser/ user at the original installation location. Any such assignment or transfer shall void the warranties herein made and shall void all warranties, express or implied, including any warranty or merchantability or fitness for a particular purpose. IMPROPER USAGE. XO assumes no liability for parts or labor coverage for component failure or other damages resulting from improper usage or installation or failure to clean and/or maintain product as set forth in the warranty packet provided with the unit. ALTERATION OR NEGLECT. XO is not responsible for the repair or replacement of any parts that XO determines have been subjected after the date of manufacture to alteration, neglect, abuse, misuse, accident, damage during transit or installation, fire, flood, or act of God. IMPROPER ELECTRICAL CONNECTIONS. XO is not responsible for the repair or replacement of failed or damaged components resulting from electrical power failure, high or low voltage, use of extension cords, or improper grounding of the unit. YOUR RIGHTS UNDER STATE LAW. This warranty gives you specific legal rights and you may have other rights that vary from state to state. Some states do not allow the exclusion or limitation of consequential damages or a limitation on how long an implied warranty lasts, so the above exclusion or limitation may not apply to you. OUTSIDE U.S. This warranty does not apply to, and XO is not responsible for, any warranty claims made on products sold or used outside the 48 continental United States. To obtain service: Call 973-403-8900 |email service@xoappliance.com | or submit a request on our website www.xoappliance.com we’ve got your backJ’ai travaillé très dur sur ce manuel - veuillez donc le lire...