
SmartRack SRW9U - Desktop Computer Tripp Lite - Free user manual and instructions
Find the device manual for free SmartRack SRW9U Tripp Lite in PDF.

| Product Type | Non-swinging wall-mount rack enclosure for 19-inch equipment |
| Brand | Tripp Lite |
| Model | SmartRack SRW9U |
| Rack Height | 9U (9 rack units) |
| Mounting | Wall-mount, includes mounting plate |
| Mounting Depth | Adjustable in 6 mm increments |
| Front Door | Reversible, lockable, with transparent panel (not specified but typical) |
| Side Panels | Removable and lockable with L-shaped lever |
| Cable Management | Rectangular opening at top of enclosure with removable panel |
| Grounding | Front/rear grounding point, M6 screw included, 8 AWG cable recommended |
| Material | Heavy-duty steel with finish |
| Load Capacity | Approximately 90 kg (200 lb) (estimate for 9U wall-mount enclosure) |
| Approximate Weight | Approximately 25 kg (55 lb) |
| Dimensions (W x H x D) | 48 cm x 40 cm x 60 cm (estimate for 9U wall-mount) |
| Power | Not applicable (passive, requires grounding) |
| Key Functions | Rugged enclosure for servers, network equipment, mounts standard 19-inch rack equipment |
| Maintenance and Cleaning | Clean with a dry cloth, avoid liquids. Store away from moisture. |
| Safety | Locks on door and side panels, mandatory grounding |
| Spare Parts and Repairability | Screws, cage nuts, keys included. Spare parts available through Tripp Lite |
| General Information | Limited 5-year warranty. Manufactured to quality standards. Indoor use only. |
Frequently Asked Questions - SmartRack SRW9U Tripp Lite
User questions about SmartRack SRW9U Tripp Lite
0 question about this device. Answer the ones you know or ask your own.
Ask a new question about this device
Download the instructions for your Desktop Computer in PDF format for free! Find your manual SmartRack SRW9U - Tripp Lite and take your electronic device back in hand. On this page are published all the documents necessary for the use of your device. SmartRack SRW9U by Tripp Lite.
USER MANUAL SmartRack SRW9U Tripp Lite
Non-Swinging Wall-Mounted SmartRack® Enclosures
Applies to Model Series: SRWxxU
(Agency Series Number: AG-00E9)
Table of Contents
- Important Safety Instructions 2
- Overview 2
- Feature Identification 3
- Enclosure Installation 4
4.1 Preparation 4
4.2 Unpacking 4
4.3 Ground Connection 4
- Enclosure Configuration 5
5.1 Door Locks 5
5.2 Cable Access & Management 5
5.3 Reversing the Enclosure 5
5.4 Mounting Rails 6
5.5 Adjusting Mounting Rail Depth 6
- Wall Mounting the Enclosure 6
- Equipment Installation 7
7.1 Installing or Removing Cage Nuts 7
7.2 Alternate Mounting: 8 Tapped Hole Mounting Rail
8.Storage and Service 9
9. Warranty and Product Registration 9
Espanol 10
Français 19
Pycckn 28
PROTECT YOUR INVESTMENT!
Register your product for quicker service and ultimate peace of mind.
You could also win an ISOBAR6ULTRA surge protector—a $50 value!
www.triplite.com/warranty


1111 W. 35th Street, Chicago, IL 60609 USA · www.triplite.com/support
Copyright © 2015 Tripp Lite. All trademarks are the sole property of their respective owners.
1. Important Safety Instructions
SAVE THESE INSTRUCTIONS
This manual contains instructions and warnings that must be followed during the installation and operation of the product described in this manual. Failure to comply may invalidate the warranty and cause property damage or personal injury.
- Keep the enclosure in a controlled indoor environment, away from moisture, temperature extremes, flammable liquids and gasses, conductive contaminants, dust and direct sunlight.
- Leave adequate space at the front and rear of the enclosure for proper ventilation. Do not block, cover or insert objects into the external ventilation openings of the enclosure.
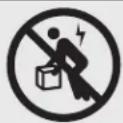
- The enclosure is extremely heavy. Use caution when handling the enclosure. Do not attempt to unpack, move or install it unassisted. Use a mechanical device such as a forklift or pallet jack to move the enclosure in the shipping container.
- Do not place any object on the enclosure, especially containers of liquid, and do not attempt to stack the enclosures.
- Inspect the shipping container and the enclosure for shipping damage. Do not use the enclosure if it is damaged.
- Leave the enclosure in the shipping container until it has been moved as close to the final installation location as possible.
- Install the enclosure in a structurally sound area capable of handling the load, or on a level floor that is able to bear the weight of the enclosure, all equipment that will be installed in the enclosure and any other enclosures and/or equipment that will be installed nearby.
- For permanent wall mounting, be sure to securely fasten the enclosure to the building structure before operation.
- Use caution when cutting packing materials. The enclosure could be scratched, causing damage not covered by the warranty.
- Save all packing materials for later use. Repacking and shipping the enclosure without the original packing materials may cause product damage that will void the warranty.
- Do not reship the enclosure with additional equipment unless the enclosure was shipped with a special shock pallet ("SP1" models only). The combined weight of the enclosure and installed equipment must not exceed the load capacity of the pallet. Tripp Lite is not responsible for any damage that occurs during reshipment.
- Use of this equipment in life support applications where failure of this equipment can reasonably be expected to cause the failure of the life support equipment or to significantly affect its safety or effectiveness is not recommended. Do not use this equipment in the presence of a flammable anesthetic mixture with air, oxygen or nitrous oxide.
2. Overview
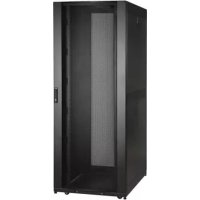
Non-swinging wall-mounted SmartRack enclosures accommodate all standard 19-inch rackmount equipment, regardless of vendor, and ship fully assembled for quick and easy deployment. They feature adaptable, heavy-duty cabinets in various heights.
Non-swinging wall-mounted SmartRack enclosures have variable mounting depths, ideal for servers. The cabinets include quick-release doors and side panels for convenient maintenance. Front access doors are reversible for installation flexibility. Front door and side panels are lockable. An optional rolling caster kit (SRCASTER) is available for easy maneuvering of enclosures.
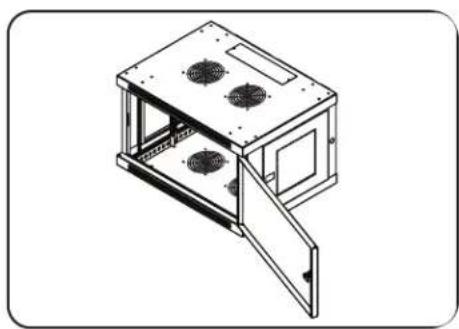
3. Feature Identification
Model SRW6U is shown. The other models have similar features, with the only differences being rack height and depth.
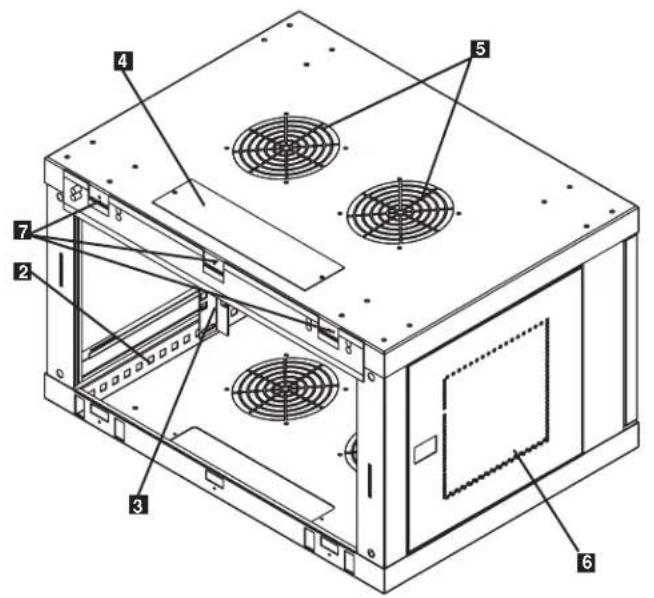

1 Front Door
2 Horizontal Rails
Vertical Mounting Rails
4 Removable Cable Access Hole Cover
5 Vents
6 Locking/Removable Side Panels
7 Mounting Notches (found on the enclosure's back panel)
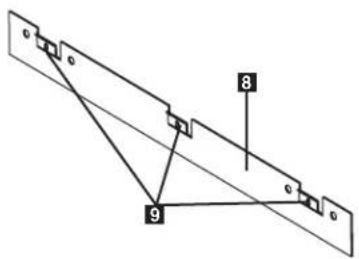
8 Mounting Plate (separate piece)
9 Mounting Plate Hooks
4. Enclosure Installation

Caution! Read All Instructions andWarnings Before Installation!

Warning: Rack enclosures can be extremely heavy. Do not attempt to unpack, move or install the enclosure without assistance. Use extreme caution when handling the enclosure and be sure to follow all handling and installation instructions. Do not attempt to install equipment without first stabilizing the enclosure.
4.1 Preparation
The enclosure must be installed in a structurally sound area that is able to bear the weight of the enclosure, all the equipment that will be installed in the enclosure and any other enclosures and/or equipment that will be installed nearby. Before unpacking the enclosure, you should transport the shipping container closer to the final installation location to minimize the distance you will need to move the unit after the protective packaging has been removed. If you plan to store the enclosure for an extended period before installation, follow the instructions in the Storage and Service section.
You need several tools:
You also need the following hardware:
- Level
- Appropriate hardware for wall mounting (not included)
- Phillips-head screwdriver
- Appropriate tools for wall mounting
4.2 Unpacking

Use at least two people to unpack the enclosure.
1 Move shipping pallet to a firm, level surface.
2 Open box and remove the four foam corner protectors. Save all packing materials for later use unless you are certain they will not be required. Packing materials are recyclable.
3 With one person on each side, carefully lift the enclosure out of the box and place on a firm, level surface.
Examine the enclosure for any damage or loose parts. Confirm all parts are present. If anything is missing or damaged, contact Tripp Lite for assistance. Do not attempt to use the enclosure if it has been damaged.

Never extend more than one component from the enclosure at a time.


Warning: Never attempt to lift or install without adequate help. Do not try lifting the enclosure alone.
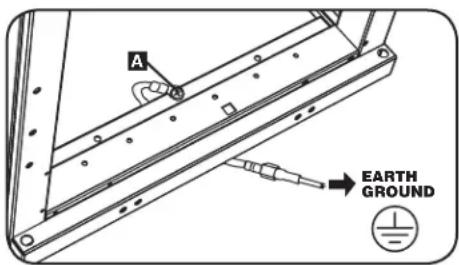
4.3 Ground Connection
All parts of the enclosure are grounded to the frame of the enclosure. Use the enclosure's front or rear threaded grounding point A and an M6 screw (included) to connect the frame of the enclosure directly to your facility's earth ground connection with an 8 AWG (3.264 mm) wire. Route the ground wire under the enclosure's frame to ensure unhindered door operation. Warning: Attach each enclosure to earth ground separately. Do not use the enclosure without an earth ground connection.
5. Enclosure Configuration
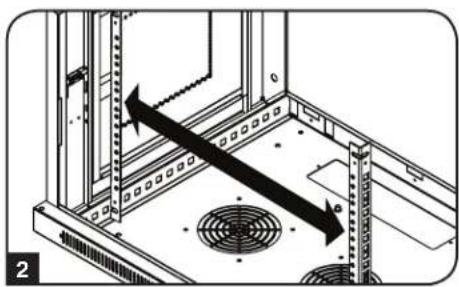
Before installation, be sure to plan the location and arrangement of components within the enclosure. Be sure all mounting rails are reversed or adjusted for depth, depending on your equipment configuration.
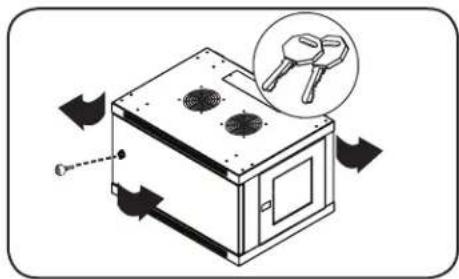
5.1 Door Locks
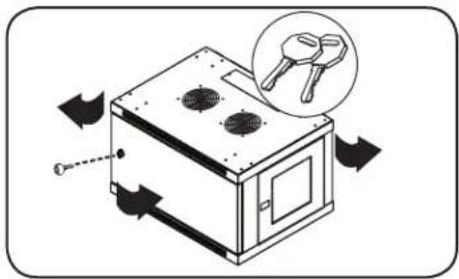
The front and back doors have locks that are accessible by the included keys.
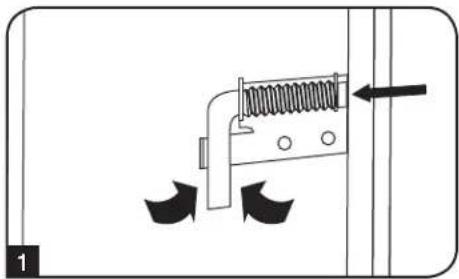
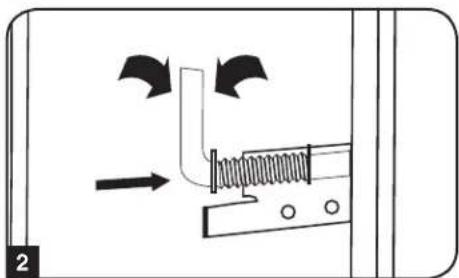
Each side panel locks using an L-shaped lever on the inside of the enclosure.
1 To unlock and remove the side panels, lift the shorter leg of the "L" up and pull it away from the side panel. Pull the tab on the side panel and remove it from the enclosure.
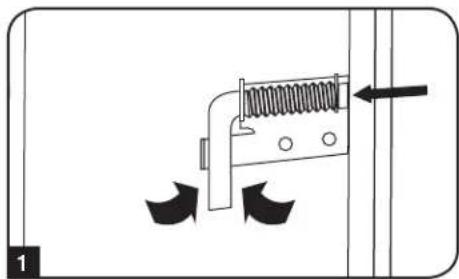
To re-lock the side panels, secure it in the proper position, lift the shorter leg of the "L" up and push it toward the side panel, back into the hole that it was in initially. Once it is in place, push the shorter leg of the "L" down to lock it. Note: To lock and unlock the side panels, you will need to have access to the interior of the enclosure.
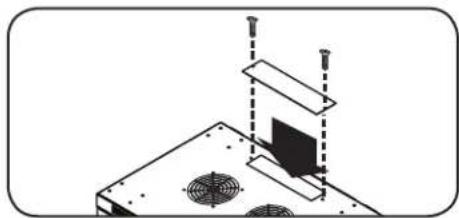
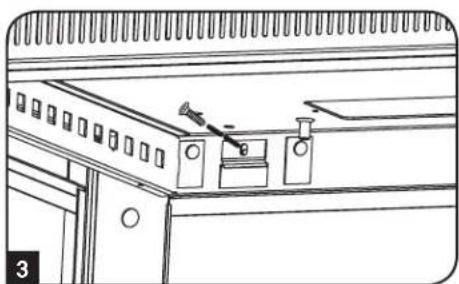
5.2 Cable Access and Management
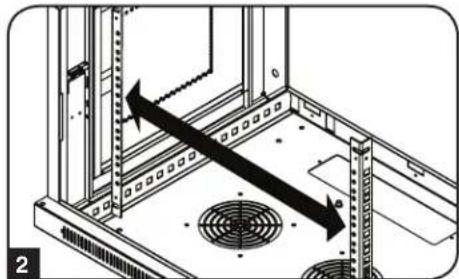
The top of the cabinet has a rectangular opening for cable access and management. This opening can be opened or closed by unscrewing or screwing in the removable cable access panel.
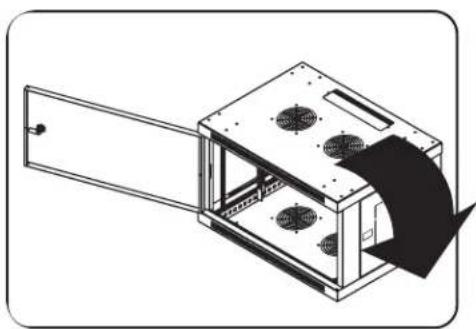
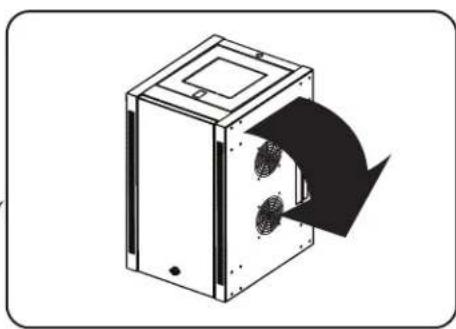
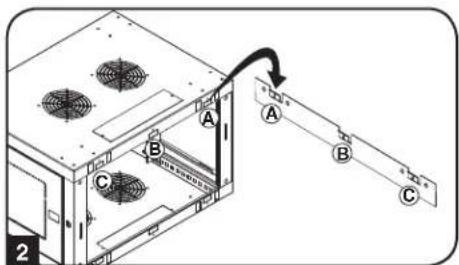
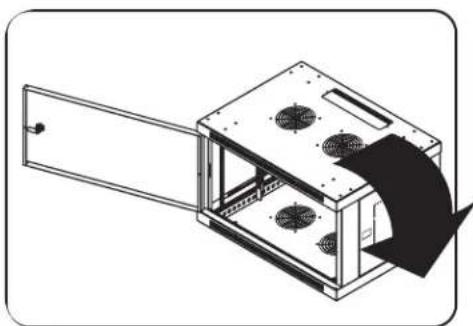
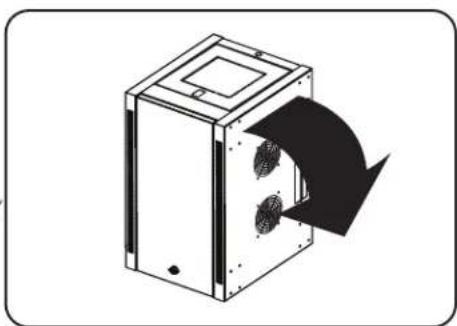
5.3 Reversing the Enclosure
In order to accommodate various rack configurations, the enclosure can be reversed. To do so, simply turn the enclosure over so that the doors open in the opposite direction.
5. Enclosure Configuration continued
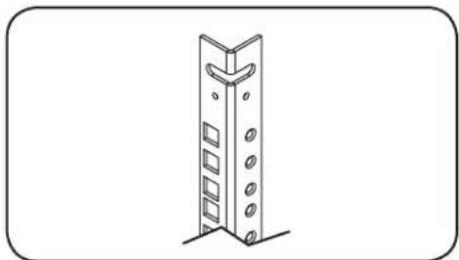
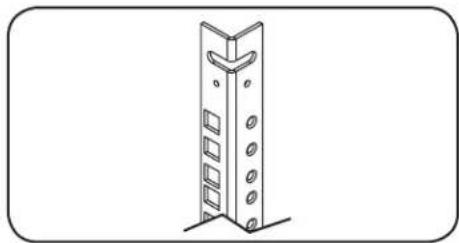
5.4 Mounting Rails
The enclosure comes with mounting rails that have both square and tapped holes for mounting rack equipment. To install equipment, use the included cage nuts and other hardware. (section 7.1 for installation of cage nuts.) Warning: Be sure to have the enclosure securely mounted to the wall, or in its final position on the floor, before mounting any equipment inside. Also be sure to have all the right adjustments on your rails before mounting equipment. (See below for Adjusting Mounting Rail Depth.)
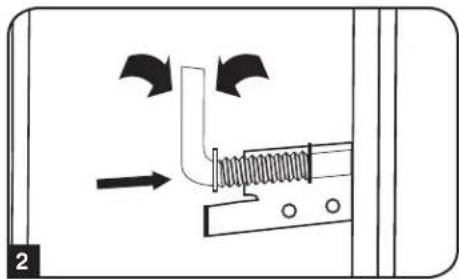
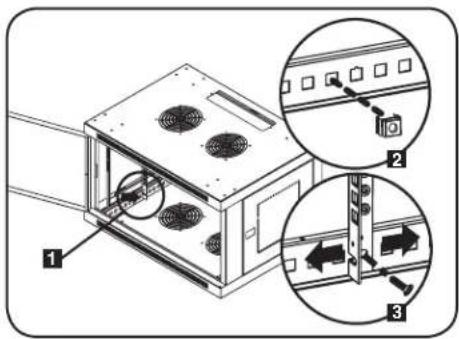
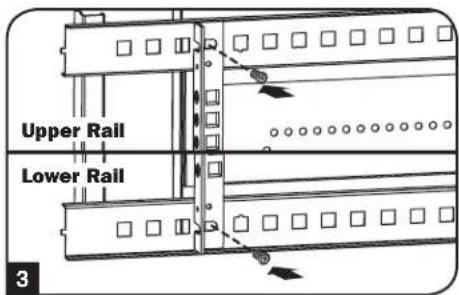
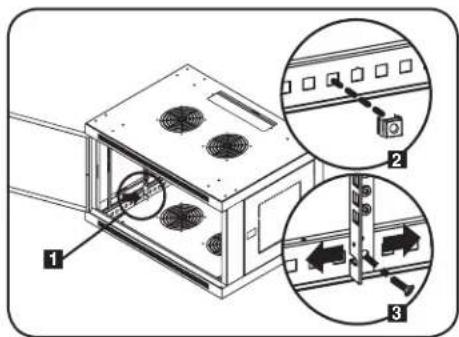
5.5 Adjusting Mounting Rail Depth
Warning: Do not attempt to adjust rails while equipment is installed in the enclosure. Do not attempt to use rails without screws installed. (2 per rail.)
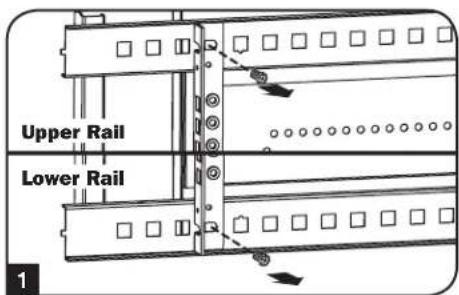
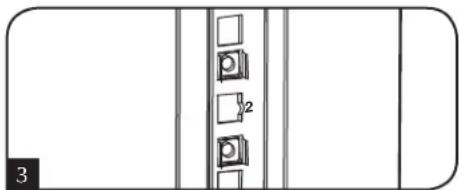
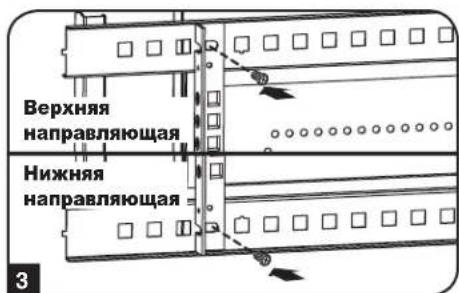
The 2 mounting rails are pre-installed to accommodate different mounting depths, depending on the model. Do not adjust the mounting rails unless your equipment requires a different mounting depth. The front and rear sets of rails can be adjusted independently in 1/4-inch (6mm) increments.
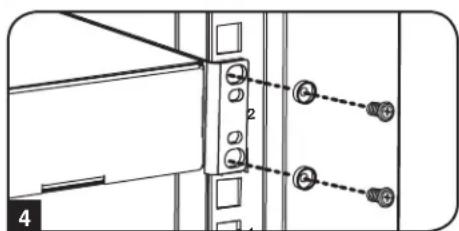
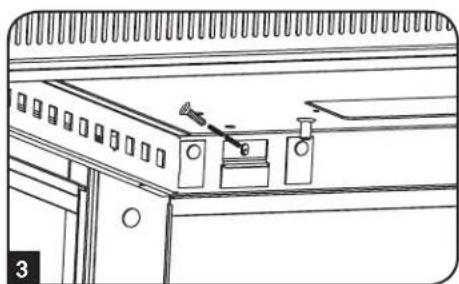
1 Each rail is connected to the enclosure with 2 screws and 2 cage nuts: 1 set in the upper corner and another in the lower corner. Using a Phillips-head screwdriver, remove the screws that fasten the rails to the enclosure.
2 Move cage nuts to the desired depth and reinstall.
3 Slide the mounting rails to the desired depth and reattach them using the screws you removed in Step 1.
6. Wall Mounting the Enclosure
Warning: Do not attempt to mount the enclosure to the wall with equipment in the enclosure.
Note: Enclosure must be installed by a qualified technician. Before mounting, use a level and tape measure to position your mounting area precisely. Use appropriate fasteners (not included) to secure the enclosure to the wall. Use suitable mounting means when installing to cinder block, concrete, drywall or wood studs. Warning: The supporting surface must be able to safely support the combined load of the equipment and all attached hardware and components. For the actual weight, size and load capacity of the enclosure, view the product specifications and other support resources at www.triplite.com/support.
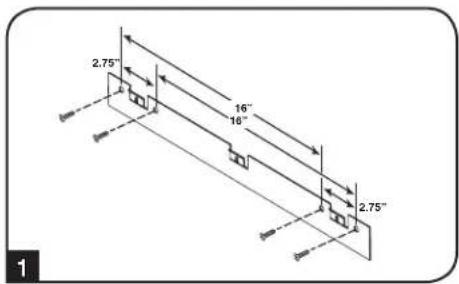
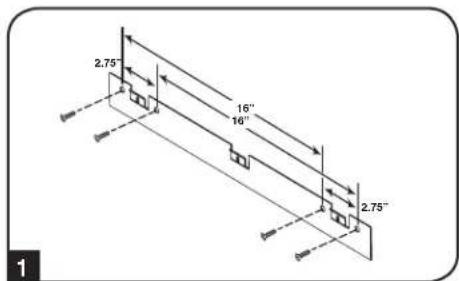
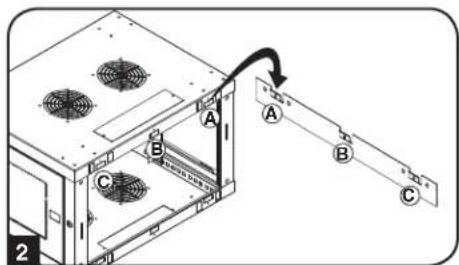
1 Using user-supplied hardware, attach the mounting plate to a wall or other suitable mounting surface. Each mounting hole can accommodate an M8 or 5/16" bolt and the holes are spaced 16" apart to accommodate standard stud placement as reflected in the diagram. Note: When mounting the mounting plate to the wall, be sure the three mounting hooks are facing outwards and away from the wall.
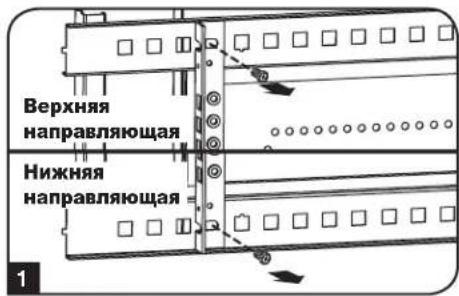
2 After the mounting plate has been securely attached to the mounting surface, hang the enclosure's three mounting notches onto the three mounting hooks on the plate attached to the wall. The notches will fit over the hooks and the enclosure should slide down onto the hooks until secure. Note: Mounting notches exist on both the upper and lower rails of the back panel. This allows for mounting in the standard or reversed positions.
After the mounting plate has been secured and the enclosure hung properly, secure the enclosure to the mounting plate by installing the three supplied screws in the holes on the mounting hooks as shown.
7. Equipment Installation
Warning: Do not install equipment until you have stabilized the enclosure. Install heavier equipment first towards the bottom of the enclosure. Install equipment starting from the bottom of the enclosure and proceed toward the top of the enclosure - never the reverse. If using sliding equipment rails, be careful when extending the rails. Do not extend more than one set of sliding equipment rails at one time. Avoid extending sliding equipment rails near the top of the enclosure.
Note: The unit comes with two different kinds of screws for equipment installation, black and silver. Use the black mounting screws if you are securing your equipment to the square hole side of the mounting rail. Use the silver screws if you are securing your equipment to the tapped hole side of the mounting rail.
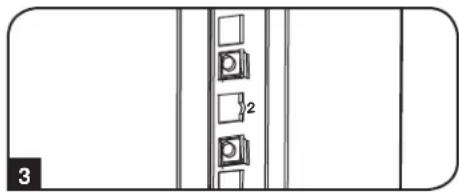
Note: The square holes in the middle of each rack unit are numbered and also include a small notch to aid identification. A single rack unit includes the space occupied by the numbered hole and the holes directly above and below.

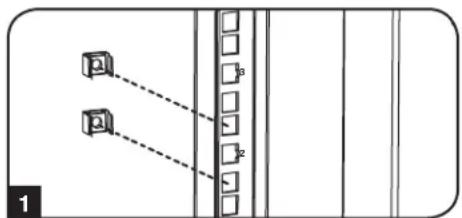
7.1 Installing or Removing Cage Nuts
WARNING: The flanges of the cage nuts should engage the sides of the square opening in the rail, not the top and bottom. Follow the instructions in your equipment documentation to ensure proper installation of your equipment.
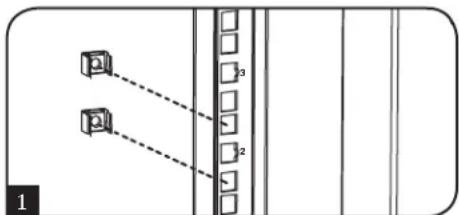
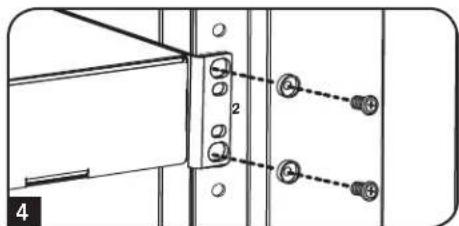
1 Locate the numbered square openings in the mounting rails where you plan to install your equipment. You will install cage nuts (included) into the square openings in order to provide an attachment point for the mounting screws (included). Note: Consult your equipment documentation to determine how many cage nuts will be required and where they will need to be installed.
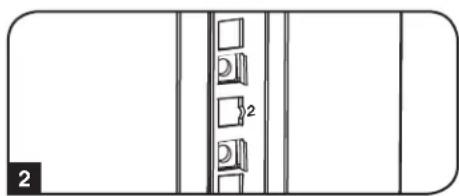
2 From the inside of the mounting rail, insert one of the flanges of the cage nut through the square opening. Press it against the side of the square opening. Each flange should engage one side of the square opening, not the top or bottom.
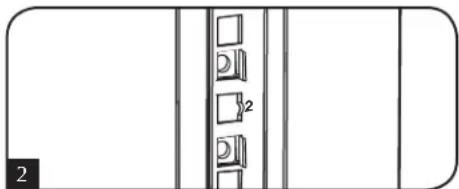
3 Compress the cage nut at the sides slightly to allow the remaining flange to fit through the square opening. When the cage nut is properly installed, both flanges will protrude through the square opening and will be visible on the outer surface of the mounting rail. Repeat steps 1-3 until all required cage nuts are installed.
4 After installing the required cage nuts, use the included black mounting screws and cup washers to secure your equipment to the rack rail. Place the cup washers between the screws and the equipment mounting brackets.
Note: Your equipment may also include mounting hardware. Read the mounting instructions that came with your equipment before installing your equipment.
To Remove Cage Nuts, Reverse Steps 1-3
Note: You may wish to use a cage nut tool (user-supplied) to aid cage nut installation and removal.
7. Equipment Installation continued
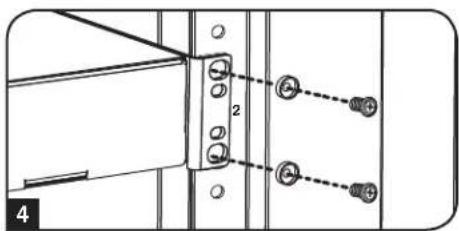
7.2 Alternate Mounting: Tapped Hole Mounting Rail
Warning: Do not attempt to adjust rails while equipment is installed in the enclosure. Do not attempt to use rails without screws installed. (2 per rail.)
The 2 mounting rails are pre-installed for securing equipment using the square hole side of the mounting rail. To switch to the tapped hole side of the mounting rail, follow the steps below:
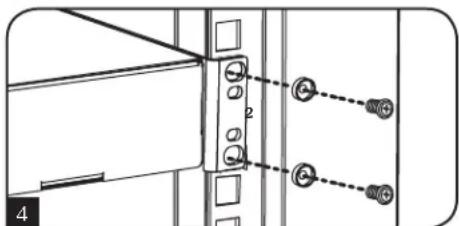
Each rail is connected to the enclosure with 2 screws: 1 in the upper corner and another in the lower corner. Using a Phillips-head screwdriver, remove the screws that fasten the rails to the enclosure.
2 Switch the rail locations. Ensure the tapped hole side of each rail is facing the front door.
3 Reattach the mounting rails.
Use the included silver mounting screws to secure your equipment to the rack rail. Place the cup washers between the screws and the equipment mounting brackets.
Note: Your equipment may also include mounting hardware. Read the mounting instructions that came with your equipment before installing.
8. Storage and Service
Storage
The enclosure should be stored in a controlled indoor environment, away from moisture, temperature extremes, flammable liquids and gasses, conductive contaminants, dust and direct sunlight. Store the enclosure in its original shipping container if possible.
Service
Your Tripp Lite product is covered by the warranty described in this manual. A variety of Extended Warranty and On-Site Service Programs are also available from Tripp Lite. For more information on service, visit www.triplite.com/support. Before returning your product for service, follow these steps:
- Review the installation and operation procedures in this manual to insure that the service problem does not originate from a misreading of the instructions.
- If the problem continues, do not contact or return the product to the dealer. Instead, visit www.triplite.com/support.
- If the problem requires service, visit www.triplite.com/support and click the "Request Return (RMA)" link. From here you can request a Returned Material Authorization (RMA) number, which is required for service. This simple on-line form will ask for your unit's model and serial numbers, along with other general purchaser information. The RMA number, along with shipping instructions will be emailed to you. Any damages (direct, indirect, special or consequential) to the product incurred during shipment to Tripp Lite or an authorized Tripp Lite service center are not covered under warranty. Products shipped to Tripp Lite or an authorized Tripp Lite service center must have transportation charges prepaid. Mark the RMA number on the outside of the package. If the product is within its warranty period, enclose a copy of your sales receipt. Return the product for service using an insured carrier to the address given to you when you request the RMA.
9. Warranty and Product Registration
5-Year Limited Warranty
Seller warrants this product, if used in accordance with all applicable instructions, to be free from original defects in material and workmanship for a period of 5 years from the date of initial purchase. If the product should prove defective in material or workmanship within that period, Seller will repair or replace the product, at its sole discretion.
THIS WARRANTY DOES NOT APPLY TO NORMAL WEAR OR TO DAMAGE RESULTING FROM ACCIDENT, MISUSE, ABUSE OR NEGLECT. SELLER MAKES NO EXPRESS WARRANTIES OTHER THAN THE WARRANTY EXPRESSLY SET FORTH HEREIN. EXCEPT TO THE EXTENT PROHIBITED BY APPLICABLE LAW, ALL IMPLIED WARRANTYES, INCLUDING ALL WARRANTYES OF MERCHANTABILITY OR FITNESS, ARE LIMITED IN DURATION TO THE WARRANTY PERIOD SET FORTH ABOVE; AND THIS WARRANTY EXPRESSLY EXCUSES ALL INCIDENTAL AND CONSEQUENTIAL DAMAGES. (Some states do not allow limitations on how long an implied warranty lasts, and some states do not allow the exclusion or limitation of incidental or consequential damages, so the above limitations or exclusions may not apply to you. This warranty gives you specific legal rights, and you may have other rights which vary from jurisdiction to jurisdiction).
WARNING: The individual user should take care to determine prior to use whether this device is suitable, adequate or safe for the use intended. Since individual applications are subject to great variation, the manufacturer makes no representation or warranty as to the suitability or fitness of these devices for any specific application.
Product Registration
Visit www.triplite.com/warranty today to register your new Tripp Lite product. You'll be automatically entered into a drawing for a chance to win a FREE Tripp Lite product!*
- No purchase necessary. Void where prohibited. Some restrictions apply. See website for details.
Tripp Lite has a policy of continuous improvement. Specifications are subject to change without notice.


1111 W. 35th Street, Chicago, IL 60609 USA • www.triplite.com/support
1111 W. 35th Street, Chicago, IL 60609 USA • www.triplite.com/support

1111 W. 35th Street, Chicago, IL 60609 USA • www.triplite.com/support
1111 W. 35th Street, Chicago, IL 60609 USA • www.triplite.com/support
PykoBODCTBO NOJIb3OBaTeJIA
Bam notpebyotc HecKoJIbKO INHCTpyMeHTOB:
Kpome toro, Bam notpe6yETc cneDyoUaOchactka:
- YpoBeHb
KpeToo6pa3HaHa OTBePtKa - INHCTpymEHTbl, HcNoJIb3yEmble dIra HaCteHHOro MOHTaxa
-Ппспocбнгдпнспснго мотха (ВКOMПЕКТ NOCTaBKN He BXOДТ)
4.2 PacnaKobka

IpaacnakOBbBaHnHaKaopaTpe6yetcHe MeHee DByx Yenobek.
I IepemecntTe TpaHcnpTnpoBouHyk KOHTeHep Ha npOpyHy IOBHyIOBepxHOCTb.
OTKpoTKe Kopo6ky H3BNEknte YeTbpe yIIOBBx AMOpTN3aTopa H3 NeHONnacta. Bce yNakOBuHbte MaTePnaJIb cNeyET CoXPaHNTb dIraocneDyoUero mOnNoB3OBAHH, eCNI Bb He y6EckDeHb TOM, qTO OHN 6oJee He Notpe6yOTc. YNakOBuHbte MaTePnaJIb NOIeKAT BToPnHOr nepepa60Tke.
PacnoJoxBunbc no ONDMyeJeIOBekcKaKdoCTopoHbI,AKKpaTHo BbInbTe WkaΦn3 KOp6Kn NOMeCTHTe Ero Ha npOHyIO pOBHyIO NOBepxHOCTb.
OcmoTnTe 1kAHa npEmHnUy KaKx-NbO nobpeKeHn Hn He3akpenHeBix DeTanei. Y6eNTecb B HauuM BCex DeTanei. B cnyae OTCYCTBnN NOBpeKdHnKaKx-NbO Detanei o6paTntcB 3a nomouB b KOMnHIO Tripp lte. He nolbyTeCb 1kAqPom B cnyae ero nobpeKeHn.

Hn B Koem cnyae He n3Bnekaite n3 ukaΦa 6onee ODHORO KOMNOHEHTa ODHOBpeMeHHo.


BHMaHHe! Hn B KOem cnyae He nbTaIaTeCb n3BNeKaTb WkaΦ m3 yNaKOBKn mnn yctaHaBJIbBaTb ero 6e3 nonHoceHHo nOmoU. He nbTaIaTeCb noDHMaTb WkaΦ B ODNHOuyk.
4.3 3a3eMJIeHne
Bce detanu ukaopa 3a3emnnoTcpee3 eropkapac. nnpmoro coednneHnKapkaca ukaopa c uho H 3a3emneneBaWero o6bekTa C nOmoIbI npoBoaKaN6pom 8 AWG (3,264 MM) cneJeT nCnlo3oBaTb nepeHIO uH 3aDHO TOky 3a3emnHnA u BNHT M6 (noCTabrrnEMy B KOMNIKeTe). IIN
obecneueHHN 6ecPepenrCTBeHHoro OTKpbIBAHnI 3akpbIBAHnI DBepUbI npOBeNTe 3a3emnIOu npoBO nO kapkacom ukaopa. BHMaHHe! KaXdbu kuaF donKeHnNoCoeHNrbcK uHHe 3a3emnHn no
OTdJIbHoCTn. NOnb3oBAHHe He3a3emnHbIM ukaFOM He DonyckaeTcR.

5. KomnohoBka wkaqpa
Ipeed yctahOBKO kkaopa 6ra3aTeJIbHO cneJeT coCTaBnTB IhaH erO pa3MeUeHnN CXeMy paCIOJIOKeHn KOMIOHETOB BVHTpH Hero. Heo6xOIMo y6eHITbcB TOM, UTO BCE MOHTaXHbIe HAnpaBIAHcIe NOBepHyTb HaDnEkaUm Oba3om NIN OTpeYInPObAHi I IO Iy6HHe B 3aBNCIMocTn OT KOMIOHOBKn BaWero o6OpoyOBAHn.
5.1Дверныезамки
IpeenHn 3aHnra DBePbO OChAuEhbl 3aMKAMN, OTnnpaembIMN C NOMoUBO BXODAUX B KOMnTeKT KIOHcH.
KaJdaI360Kobix nahEn 3aHpaTc npn NOMOu I-6pa3HOro pbuaKc C BVHTpeHHe CTOpOBhI uka.
1 TnO TnnpaHn H ChTnB 60KOBbix NaHeNe CnEduyTe NoDnTb BBepx KopoTkoe PnEyo F-6pa3Horo pbMaXka N OCTpaHHTb erO OT 60KOoBn NaHeN. BbHyTB 60Koby NaHeNb n3 WkaFa, NotryHB ee 3a R3bl4OK.
2Дя NOBTOHOFФИKCAUH6OKOBONAHENHACBOEMeCTCNEyETYCTAHOBHTeB HxKHOI NOJXHEME,NOHHTB BEPX KOPOTKOE NPEOΓ-OBpa3HORO pbyaKKa HADABNTb HA HERO B CTOPHY6OKOBONAHENICUEHIO NOMECTHTBEROOBATBO TO OTBepCTNe,Γe OHHXoUNcNepBOHaJIbHO.10cne TOrO kAK OPOTKOE NPEOΓ-OBpa3HORO pbyaKKa OKaXetcH a CBOeM MeCT,CNEyET3aФнICUPOBATb ERO HAKATNEM BHN.IPumeyAue.ДЯ 3aIupaHua U omnpaHua 6OKobix naHeneu He6xodumo umemb docmyn bHympb ukaFa.
5.2 OTBepCTne IJI BBOda Ka6eJeN OONHM3aunrKa6eJbHbIX CoednHeHH
B BepxHn naHEn IkaFpa NmEeTc npMoyroIbHoe OTBepCTne Dn BABoDA KaBeJIe N IN ONTMaIbHOra pa3MeueHHN. 3TO OTBepCTne MOKeT 6bITb OTKpbIto NIN CKpbIto NyTeM BBHNuBAHn B Hero CbeMHOn naHeJI NaBeJIbHO r BOda.

5.3ПepebopaunBaHneшkaфa
Ipeaun3aun paanhix bapnantob paameehna kopa donyckaetra nepebopnbahe ero Kopnyca. Ira 3r0c npocto nepebephyb Kopnyc kkaqtaakm obaom, yobj ero dberpblkntpoTUBONIOXHOM HanpaBneHN.

5. KomnoHOBka ukaΦa npodonjxene
5.4 MoHTaXHbIe HAppaBnIoUne
山kaФ noCTabJIeTcS c MOHTaXbHIMn HAnpaBnIOUmM, KOtOpIe IMeOT KAK KBaDpaTHbIe, TAK IN pe3b6ObIe OTBepCTnI dNMOHTaXa CToeHOro o6OpyOBAHnA. IINr yCTaHOBKn O6OpYDoBaHnCneDyET nCNOIb3OaTb NOCTABJNeMbE B KOMIIKeTe 3aKNaDbIe raIKN INpOHyO OChAcTky (npraDOK YCTaHOBKn 3aKaNDbIX Raek CM. B pa3dene7). BHMmaHne! Npeed yCTaHOBKn KAKoro-Ni6o 6OpbyOBOAHn BHYtpb WkaFa Heo6XoHMo y6eMntbcr B TOM, qTO OH NaExHo 3aKpenHn Ha CTHe MIn B Dpyrom KoHeuHOM nOnoxEHn. Kpme Toro, nepeD MoHTaXkOM O6OpYOBaHn HEO6XoHMo DoJnxHbIM o6pa3Om OTpeRyIpopoBaTb BCE HAnpaBnIOUhe. (CM. npDeCTabJIeHHbI Hxke pa3den "PerynpobKa rIy6nbHb MOHTaXbIX HAnpaBJIIOUx").
5.5 Perynnpobka rny6HHb MoHTaXHbIX HapablaIOxN
BnmaHHe: He nbTaeTecb perynnpoBaTb HappabJIOUne npu yctaHOBNHOM B wkaOp 60bpydoBaHH. He nbTaTecb nCnoJIb3OBAt b HappabJIOUne 6e3 yctaHOBNBTOB (no 2 Ha KaKdyu HApPabJIOUyO).
2MOHTaXHbIe HAnpaBnIOUne yCTaHabNBAIOCTHa 3aBOe-NTROBtTeIe n paCCHTaHbI Ha pa3MeueHHe
obOpyOBaHnCpa3NIuHO MOHTaXHOb HO MOnTAtXHO HmTOBHO B3aBcIMOCTN O KOHKpeTHoM MoEN. He
peYnpyTe MOHTaXHbIe HApBaBnIOUne 3a NCKJIQUEHmE TM ClyuaEB, KOrDa IINy cTaHabNBAEMORO
BAMn OBopyOBaHn Tpe6yETc npyra MOHTaXHAR nTyBuHa. PepeHra n 3adHra rpynnb HapBaNIOUxN
MOrYT peYnpoBaTbCn He3aBcIMMo Dpyr OT dpyra C warom 6 MM.
KackdahnpaBnnaq npkpenHeKa Kopnyc ukaFa npn nmoOn 2 BHTOB 2 3aknaHbIX raeK OHa npa TakaX DeTanePacnoNaraetcB BepxHem yIy, aDpyra-B HxHem. C nOMObHO KpeToo6baHoi OTBepTKBbEpHnTe BHTbl, KOtOpble Kpenr HapBaNHOuie K Kopnyc ukaFa.
IpeMeCTIe 3aKnaHbIe raIKn Ha XeNaEMyIO rny6HHy UcTaHOBtBE BnHTbHa MeCTo.
3 Cdbnhtbe MOHTaxhBHe HAnpaBnIouuH He XeNaemyIO rnybHy n ChOba 3akpenite nx c NOMOsbIO BnHTOB, BBBepytbix Ha lare 1.
6. Nopraok HacteHHoro MOHTaKa shka
BHHMaHHe! He nbItaTeCb KpeNHTb WkaΦ K CTHe C HaxOJaUIMc BHyTpH Hero 06OpyDoBaHNem.
Ppumueaue. Ycmahoekka ukaopa donkna npou3oobumc monbko kbaunuupoeaHbIM mexhucckm cneuaancmom. Npeo hauanom mohmaka cnedyem mohy haemumb mecmo 6dyuee0 pacnonoxehura ukaopa c nomoouy oyeha u pyemku. Dn Kpennenur ukaopa K cmene uocnobyume noxdogueae dner 3mou eenu Kpenexkhe bdeamaru (e komnnekm nocmaeku he exodam). Ppu Kpennenhu K demohy, wanaokemohy, unockapmohy unu cmoikam depehnhoo zapkaca uocnoibuyume coombeemcyoue MOHMxHBie npucnocobhenu Bhumane! Onopnna noepxhcmb doonkha c 3anacom ebidepkueamb cymmaphyo haay3ky, co3daeaemyo obopydoahuen u bcemu 6xodoumuu b Komnnekm demanmu ochamku u dpyaumu komnoehmamu. Cm. mexnueeque xapaekpucmuu usdenui u dpzue ecnomoamenbhe piepcypbcic yemom fakmuceckoe eeca, pa3mepa u donycmuoi Haay3ku ukaopa hcmpauue www.triplite.com/support.
1 C nomoubio co6ctBeHHo KpeJXHO OCHACTKN npKpeINTE MOHTaXHy IJaCTnHy K cTeHe NIN Dpyro IOxOJaIeI MOnTxAka NOBepXHOCTN. KaKDoe MOHTaXHOE OTBepCTne pacCHTaHO Ha 60NT M8, a paccToHHe MeJy HmM COCTABIET 40,5 cm, YTO oEocneYBaet BO3MOXHOCTb pa3MeueHnHa CTehax CO TAnapTHbIM KApKacOM, KaK NOKaHO HA CXEM. PpumeyHue. Ppu KpenHuu MOHmaxHo IIacMuHb I Cme He CJeDyem y6eumbcra e mom, Ymo mpu MoHmaKbIX Kpoka HanpaJIeHbI HApKy om cmeHbl.
2 Pocne HadeKHOrO npKpeHnMoTHaXHOI pNactHbIK NOBepxHOCTMOHTaKaHaBeCbTe KOpNyc 1kaTAKIM O6pa3OM, YTO6bl TpM MOtAaKbIX KpOKA npKpeHnHOI K CTHe NlactHbI BOUIN B TPN MOHTaKbIX OTBepCTNA B Kopnyce. Ppi 3OM OTBepCTNA HacaknBAOTCA HA KPOKN, a Kopync DOJKeH CNOJ3TN Ha KpOKN Do ynpa. Ipumeahue. MohmaXhIE oMeBepmua UMeKOMc KaH eepxHe, maK u Ha HuxHe HapBaJIouoix 3adHe naHenu. 3mo ObecneuBaem 803MOXHOcm b MOHMAkE O6bIyHOM U nepeBepHymom NonoKeHux.
3 Nocne HAdexKHOrnpnKpeIeHm MOHTaxHOHnnPabBnHOr HabeuBaHmKopnyCa 1kaΦa npKpeNTe KOpTc KMOHTaxHOIIactHNE, BBePHyB TPN BXOJxN B KOMJIeKT BNHTA B OTBepCTM MoHTaxHbIX KpOKOB, KaK NOKa3aHO Ha pcyHke.
7. yctaHObKa o6OpyDoBaHnIa
BHHMaHHe! He yctaHaBnBaIte o6OpyDobAHne do o6ecneueHn yctoynBOcTH uKaΦa. ChaNa cJeMyet yctaHaBnBaTb 6Oone TjKeJeoe o6OpyDobAHne, pa3MeIaer erO B HxKHe qAcTH uKaΦa. YcTaHaBnBaIte o6OpyDobAHne HaunHar C Hn3a uKaΦa No HAnpaBJIeHNIO BBepx - Hn B Koem cnyae He HaOBopot. PpN nCnoIb3ObaHm HAnpaBraIOux dIy yCTaHOBKn O6OpyDobAHn co6JIoAaTe octopoxhocTB npN IX BblBHXKeHN. He BblBraIte 6Oone ODHor rpynnbI HanpaBraIOux OHOBpeMeHNo.
CTapaTecb He BbIDBnraTb HnpaBnIoune dny yctaHOBKn O6OpydoBaHH, pacnoNoXeHHbIe B BepxHe YacTHu KaFa.
Ppumeyaue. TaHbMnOcmaenmec E KOMPnkeMe c BuHMaMu dey pa3nUhBx munoe dna MoHmka o6pyoaeHua. MoHmKbIe bHmbuepHOaema cnedyem uonb3oaeMb e mom cnyae, ecbu kpenume c0e o6opyoaeHue K mo cmopone MOHmKHO Hapraenoue, komopar cah6xena KeadpamHbIMU omepcmmu. MoHmKbIe buHmbi cepe6puom2o 8ema cnedyem uonb3oaeMb e mom cnyae, ecbu kpenume c0e o6opyoaeHue K mo cmopone MoHmKHO HapraJIOue, komopar cah6xena pe3b6oBuMu omeepcmmu.
Pumuehue.Keadpamhie omepcmue cepedune kao doo zkaopa npohmepoeahu u meom heonbwyho haceky dny yodcmepaon3aehua B kao doom omdehoh mkafty meemc mecm, 2e paonanaemc hymepoeahnoe omeepcmue u omeepmua, haxoayuece herocpecmehno had u noHUM.

7.1 YctaHOBka NJI CHrTne 3aknaIbIX raeK
BHIMAHHE! OTRn6bI KpOMOK 3aKnadhblx rae kdoJXHbI 3auenPbcr 3a 6okobbe, a He BepxHm HnxHm Kpa KaBpaTHoro OTBepCTN B HanpaBnHOse. IIn oBeCneueHH npabHbOcTH yctahOBKn Baewero obopyoBaHH cneyte yka3aHHM, N3IOKeHHbIM B conpoBODntelHoDokymeHTaunK Hemy.
HaHnIte HymepoBaHHbkeBapthbte OBePCTN BMOHTaXhHX HanpaBnHOxN, KOTOpbe Bbl PnHpyTe nONb3ObaTb dny yTaHOBKn CBOero o6OpyDoAHn. BcTabtze 3aknaHbIe raKu (n3 KOMnEKA) B KBaPaTHbte OBePCTN C cEnbIO o6ceNeHn TOKn KpeNHeHn Dn MOHTaXhBX BNTOB (NoCTABnREMbIX B KomnKeTe). PnPmeuHue. dny onpeDeneHn HeobxOduMo20 KOluueCmBa 3aKaNaDbHex 2aek U Meem ux YcmaHoBku O3HaKoMbmcB c conpoBodumbHou DokyMeHmaueu K eauemy o6OpyOdoaHuo.
IpoeHbTe OIN H3 OTRn6OB KpOMK 3aKnadHO raKN Ype3 KBaDpaTHOE OTBepCTNE C BHyTpHeH CTOpObMoTAtkHoH HanPabJIHOSe. BdABITE ee IIO HanPabJIeHIO K60KOBMy KpaO KBaDpaTHORO OTBepCTN.OTr6bI KpOMK 3aKnadHbIX Raek DoJNKbI 3auePiYbcra 3a 60KobBe, a He BepxHm NHHKnn KpaR KBaDpaTHORO OTBepCTN.
CnErKa Hauabnte Ha 3aknadhyraky No6okam, YTO No3BOHNT dpyROMy OTN6y KpOMKn npOHTupe3 KBaDpaTHoe OTBepCTne. Pn PpaBnblHOY yCTaHOBKe 3akLnHOr raKNo 0ba OTN6a ee KpOMK BbIaHOTc C o6paTHOH CTOpHOb KBaDpaTHORO OTBepCTNA BnHbHa BHeUHe NOBepXHOCTM MOHTaKHOH HapBaBnIOUe. NObTOpAte 1-3 Do Tex nop, noka He 6byt YcTaHOBHeBb BCE Heo6xOIMbIe 3aknAdhbe raiKn.
1 Pocne yctahOBKn Heo6xOdbMbix 3aKnadHbIX Raek npKpenTe CBOe oBopyDobAHne K CToeHoi HnpaBnHOue C NOMOsbIO NOCTaBnREbIX B KOMNKeTE MOHTaXHbIX BNHTOB UEPHOUBeTa N aWeo6bpa3HbIX Wai6. IomeCTte aWeo6bpa3HbIe Wai6bI MeJy BnHTAMN MONTaXHBIM KPOHtEHNAMN DnA KpeJIeHnA O6pOyDobAHnR.
Pnmueyue.Baue obopyoohue makke mojem noCmaenbce E KOMNIeKe M c MOHmaku npucno6neHmu. Ipepe ycmaHOKou caoezo obopyoohua O3hakommbec c yka3AHmu NO MOHmky, nocmaenbEmbu e KOMNIeKe C HUM.
IIN3BneHn 3aKnapHbIX raeK nobTOPte warn 1-3 B o6paTHOM npAke
PpumueaHue. Ppu keaHaHu ycmaHo8ky u 3aBeneHue 3aknaDhix 2aek Moxho npou3eOoDumb c nomoubocuunbHO20 UHcmpymHma (E KOMnKeM nocmaKU He exOoM).
7. YctaHOBka o6OpydoBaHn npoDoJIxKeHne
7.2 AInbTePhaTHBbI CNOCo6 MOHTaXa: MOHTaXHa HAnpaBJIouaJc pe3b6OBbIMN OTBepCTnA M
BnMaHHe: He nItaTaeCb perynnpoBaTb HappaBnaIOuOne npy uCTaHOBJIeHHOM B WkaF o6OpydoBaHH. He nbTaIteCb HCNoIb3OBaTb HappaBnaIOUcne 6e3 yCTaHOBKn BHTOB (no 2 Ha KaKdyo HappaBnaIOUyO).
Ha 3aBoe-3nroBntene 2 MoHTaxhble Happabnlouye yctahOBneHb np KpeIeHne o6OpOBAHNc nCIOB3oBAHNem ToCTOPHO Happabnlou, KOtOpA Ch6xHe HA BApTaHbIMN OTBepCTnM. IpypeXoDa Ha NCIOB3oBAHne ToT CTOPHO MOnTAXHO Happabnlou, KOtOpA CH6xHe pe3b6oBIMN OTBepCTnM, Heo6xOIMO BInONHHTcNeDyUOue DeECTBN:
Kakda HappaBnloa npkpenHe Ka Kopnyu kkaopa npn NMOUIN DByX BHTOB, OINH 3 KOtopbIX pacnoaraetc B Bepxhem yJy, a pyro- - B HxHem. C NOMOUB KpceTOo6pa3HOI OTBePTKBbBepHNTe BNHTb, KOtOpble KpEaT HappaBnlouie K Kopnyu kkaopa.
IomehyPe pacnoIOxKeHHe HAnpaBnIOxN. Y6eINTeCB B TOM, yTo KaKJaI N3 HApBaBnIOxNpacnonaraetc TaKIM o6pa3OM, qTo ee CTOPOHa C pe3bOBBIMN OTBepCTnMn O6paueHa K nepedneI DBepue.
TIOBTOPO3aKpeHnTe MOHTaKbHbIe HAnpaBJIIOUHe.
4 PnKpeNITe O6OpYOBaHHe K CToeHbIM HAnpaBraIOUcM C NcNoIb3OBAHNEM BXOJxIN B KOMIIeKT MOHTaXHbX BNHTOB CE6pCtOro Ubeta. IomeCTte YaWeo6pa3HbIe WaBb MExdy BnHTAMn MOHTaXHbIM KPOHHTeHaAM DnI KpeJIeHnO6OpYOBaHn.
PpumueaHue. B KOMnneKm nocmaeku baweO obopydoaHua Moay makke exodum MOHmaxhble npucno6nHeu. Npeed ycmaHOeKo obopydoaHua 03HaKOMbmec c yka3aHuaMu no MOHmaxy, nocmaenMeMU e KOMnneKme C HUM.
8. XpaheHne n TexHnueckoe o6cIyXnBaHne
XpaHne
KaФdoJKeH XpaHnTcBcR B NOMeUeHmN C KOHTpOInpyEmbIM MKNpOKJIINMaTOM BdaIIN OT NCTOCHIKOB BlaIIN, 3KCTpeMaJIbHbIX TeMnepaTp, BOCIIaMeHraOuNXcR KIκKocTei Ra3OB, 3NeKTpOInpoBOdHbIX 3arpa3HNteNe, PbIIN IN PpAmORo coJIHeHOro CBeta. IIO Bo3MOXHOCTn XpaHNTe UkaΦ B erO 3aBoDcKo TpaHCnOpTHoi ynaKOBke.
CepBnchoe o6cIyXnBaHne
Ha npdykun kOMnAHm Tripp Lite daetc orpaHueHHa rapaHTn yCIOBn KOTopo n3IOKeHb B HactoIeM pyKOBOCTBe. TaKoe dcTynhpa3JIMHbIe nporpammbl npdneBaemr rapaHTm n o6cyxuBAHn Ha o6bkeTe OT kOMnAHm Tripp Lite. nnoIyehn 6Oee noDpoBHO m HfOpMaUN O cepBnCHOM o6cnyxBAHm nocTeTbe Be6-caT kOMnAHm www.triplite.com/support. PpeD Bo3BPaTOM npdykun dna obcnyxuBAHn, BInoINHte Cne dyUcne DeiCTBnA:
- Ppocmptne HNCTpykun no yctahOBKe n 3KcIpyatau, n3noxeHHbE B HactoJem pyKOBOdCTBe, YTO6bl y6eHTbcra, TTO npObeMbipponcxOaTHe n3-3a He npabHbHO NOHMAMn HNCTpykun.
- Ecn npobnema coxpaHareTc, He obaaauTecb H He Bo3BpaauTe n3dene ToproBOMy nopeHky. BmecTo 3toro noceTte Be6-caNT www.triplite.com/support.
- Ecni nIpeHn np6bnmI trpeyctra pmoHT, nocTe NTBe 6b-caT Ww.trpllite.com/support n nepeDnTe no cblke Product Returns (Bo3bpat npdykun). 3decMoXHO cEnaTb 3anPoc O Homepe pa3peHnna HA Bo3BpaT (RMA), KOTOpB Heo6xoDnIM IpnpeMOHa. B 3to npocTo INTEPAKTHBOHOF oFpme Hyxho 6ydt 3aoNtHb Homep moenu ycTroCBA u erO cepHnHb Homep, a taKe obuyIO hnofopMaHIO O noKynateHe. Homep RMA BmecTe C IHCTpyKUHMn NO OTnpABKE 6ydt BbcNAH No 3eKTPHOH NOte. JIO6be NOBpeJXeHnRA pOdykUN (npMBe, KOcBEHbE, yMbIUnHEHbE iIN NO6OHyBe), NOLyueHNb Be p3yNbTaTe TpAHCnOpTIpOBKn B KomnAnHIO Tripp Lite nB yIOLNHOMeHHb CEpBCHb CEHTp, rapaHTne He NOKpbIAOTc. TpaHCnOpTIpOBKa npOduKun B KomnAnHIO Tripp Lite nB ABTOHN30BaHb CEpBCHb CEHTp DOJnxHa 6b1b ONNaeha OTnpABHTenEM. Ha BHeuHcSTopoHe ynakobKn HaeCIne Homep pa3peHnna HA Bo3BpaT. Ecn npOdyKT HaxoNTc H a rapaHTnB, BNOxHte KOniU YoKa IIN DOKyMeHTa Ha npNo6peTeHne. DoCTABky npOduKun dIra ObcnyKBaHnO cOyueCTBnIte Yepe3 3acTpaxoBaHbIX NepeBO3uKNOB IO aDpccy, NOlyueHHOMy BmecTe c pa3peHnem Ha BO3BpaT.
9. rapaHTnHbIe 683aTeJbCTBa
OrpaHnueHHra rapaHTna 5 net
PpOaBcRapAHTpyETIgDAnHOro PPOyKTA OTCyTCTBne DepeKTOB B MaTePnAax N TexHONrnx B TeueHe 5 let OT daTbI nepBvHOn IpoaJxPi npYcNoBN INCNOIb30BaHnra ERO B COOTBeTCTBnco BCEMN pnpMeHNbIMN IHCTpykUmaM. B cnyae BblBneHnE depeKTOB, CB3aHHbx CO CBOIcTBAMn MaTePnAna IIN KaueCTBOM I3rTOBHeHn DaHHOro I3dEInna B TeueHnE yka3aHHOro nepnoa, PpOaBeu o6a3yeTc, n CBOeMy YCMOTpeHIO, npOBecTn 3a CBoI cTuE tero peMOHT IIN 3aMeHy.
3TA TAPAHNTY HE PACNPOCTPAHRETCA HA HOPMAJbHbI N3HOC ININIOBPEXDEHENE IPODyKTABPE3yJIbTATEHECACTHO CUYAHA, HEPABUNBOHOOBAHNA, HEBPEXHOOBAUENIA ININ PNEHEBPEXEHNAIPABUNAMN 3KCNLYATALUN. INPODABEUHE 3AABJETHNKAKHX TAPAHNTI, KPOME YBHO BbIPAXEHHbIX 3DECb. 3A NCKIOUCHEM OPAHUEHNI, 3ANPEUHbIX DEIECTBYIOUIM 3AKOHODATENBTBOM, BCE IOpRA3VMEBAEMBLE TAPAHNTIN, BKJIOUHAE BCE TAPAHM INPINOHOCTN K PNOADAXE ININ NOHOCTN DIA KOHKPTHO TIPUMHEHNA, ORPAHUNHbI NO CPOKY DEIECTBNA TAPAHNTNbIM INPPOIDOM, YKA3AHBBIM BblE; IN 3TA TAPAHNTN RAHBO NCKIQUAET BCE CNUYAHbIE ININ IOBOUHbIE PNOBPEXDEHNA. (PpImeHMoe 3aKoHOaTeNbCTBO HeKOTbX cTpaHnpeuaet orpauHne HcpoKa DeiCTBnIO npdaMaBcHbIM B dpytix cTpaHx 3aPpeueho NckIOUeHne ININ ORPAHueHne DEIECTBNA TAPAHNTN B OTHoHeHm cNYaHbIX ININ pOcNeuOuHx NobpeXDeHMI, B CBsIc 3TNM, BblSepeueucnHbIe ORPAHueHna INckIOUeHne DeIECTBNA HAcTOAeepaHTR aPapHTN MOrYT OKa3aTcBc HEPpIMeHMbIM N B BaWem KOHKpEThOM cUYae. HaToTaIaR aPapHTN ppeOCTaBnIe Bam onpeJeHhIbe IOpNduueckne Ipaba, KoTopbIe MOrYT 6bItb DOONHeHb DpyTMMnpabAmN B 3aBNCIMOCnT O npncndkun).
BHIMAHHE: Npeed nncnbs0bAHem Hactoere 3dne Jnnn BnoBtebn DoJnkeHcMoCTeBn OnpdeNtB cTeene b er npiroDnOCTn dI npednonaraemoro npimehenra, a taKKe CTe neh 6e3onachocTn TaKOro npimehenra. Ta KAK Hactouee 3dne MeMeET MHOKeCTBO INHmBnAylbHbIX npimehenn, npou3BOInTeB He daet rapaHTnHbIX o63aTeBCTB B OTHOWeHHn pnproDnOCTn HactoUxN 3dne Jnn TEx ININ hX KOHKPeTHbIX npimehenn.
KoMaHnri TrippLite noCToRHHo COBepueHcTByet CBOH npOdykUHO. B CBaN C 3TmM BO3MOXHO N3MeHeHne TexHnuecknx XapakTePncTK 6e3 npeDbapntelbHorO yBeOMHeHn.


1111 W. 35th Street, Chicago, IL 60609 USA • www.triplite.com/support


- Non-Swinging Wall-Mounted SmartRack® Enclosures
- Table of Contents
- PROTECT YOUR INVESTMENT!
- Important Safety Instructions
- SAVE THESE INSTRUCTIONS
- Overview
- Feature Identification
- Enclosure Installation
- Caution! Read All Instructions andWarnings Before Installation!
- Preparation
- Unpacking
- Use at least two people to unpack the enclosure.
- Never extend more than one component from the enclosure at a time.
- Warning: Never attempt to lift or install without adequate help. Do not try lifting the enclosure alone.
- Ground Connection
- Enclosure Configuration
- Door Locks
- Cable Access and Management
- Reversing the Enclosure
- Enclosure Configuration continued
- Mounting Rails
- Adjusting Mounting Rail Depth
- Warning: Do not attempt to adjust rails while equipment is installed in the enclosure. Do not attempt to use rails without screws installed. (2 per rail.)
- Wall Mounting the Enclosure
- Equipment Installation
- Installing or Removing Cage Nuts
- To Remove Cage Nuts, Reverse Steps 1-3
- Equipment Installation continued
- Alternate Mounting: Tapped Hole Mounting Rail
- Storage and Service
- Storage
- Service
- Warranty and Product Registration
- 5-Year Limited Warranty
- Product Registration
- PykoBODCTBO NOJIb3OBaTeJIA
- PacnaKobka
- IpaacnakOBbBaHnHaKaopaTpe6yetcHe MeHee DByx Yenobek.
- Hn B Koem cnyae He n3Bnekaite n3 ukaΦa 6onee ODHORO KOMNOHEHTa ODHOBpeMeHHo.
- BHMaHHe! Hn B KOem cnyae He nbTaIaTeCb n3BNeKaTb WkaΦ m3 yNaKOBKn mnn yctaHaBJIbBaTb ero 6e3 nonHoceHHo nOmoU. He nbTaIaTeCb noDHMaTb WkaΦ B ODNHOuyk.
- 3a3eMJIeHne
- KomnohoBka wkaqpa
- 5.1Дверныезамки
- OTBepCTne IJI BBOda Ka6eJeN OONHM3aunrKa6eJbHbIX CoednHeHH
- 5.3ПepebopaunBaHneшkaфa
- KomnoHOBka ukaΦa npodonjxene
- MoHTaXHbIe HAppaBnIoUne
- Perynnpobka rny6HHb MoHTaXHbIX HapablaIOxN
- Nopraok HacteHHoro MOHTaKa shka
- yctaHObKa o6OpyDoBaHnIa
- YctaHOBka NJI CHrTne 3aknaIbIX raeK
- IIN3BneHn 3aKnapHbIX raeK nobTOPte warn 1-3 B o6paTHOM npAke
- YctaHOBka o6OpydoBaHn npoDoJIxKeHne
- AInbTePhaTHBbI CNOCo6 MOHTaXa: MOHTaXHa HAnpaBJIouaJc pe3b6OBbIMN OTBepCTnA M
- XpaheHne n TexHnueckoe o6cIyXnBaHne
- XpaHne
- CepBnchoe o6cIyXnBaHne
- rapaHTnHbIe 683aTeJbCTBa
- OrpaHnueHHra rapaHTna 5 net
Brand : Tripp Lite
Model : SmartRack SRW9U
Category : Desktop Computer