
Dynamic U1 Allergy PowerLine SHCF3 - Broom MIELE - Free user manual and instructions
Find the device manual for free Dynamic U1 Allergy PowerLine SHCF3 MIELE in PDF.
| Brand | Miele |
| Model | Dynamic U1 Allergy PowerLine SHCF3 |
| Product type | Canister vacuum (bagged vacuum) |
| Color | Black and grey (as shown) |
| Electrical supply | 230 V, 50/60 Hz, 10 A or 16 A protection |
| Suction power | Adjustable (rotary selector on the control unit) |
| Filtration system | Triple filtration: dust bag, motor filter, exhaust filter (AirClean, Active AirClean 30, or HEPA AirClean 30) |
| Container capacity | Dust bag (type U, standard capacity) |
| Bag full indicator | Replacement gauge (red when full) |
| Motorized brush | Integrated power brush, with lighting (depending on model) |
| Telescopic tube | With length adjustment (adjustment button) |
| Cable length | Approximately 10 meters (estimated, wound on hooks) |
| Weight | Approximately 7 kg (estimated) |
| Noise level | Not specified, but typically moderate |
| Main functions | On/off (I/O), power brush deactivation, power selection, automatic shut-off in upright position |
| Safety | Thermal protection, automatic shut-off in case of overload, safety lock for cover |
| Maintenance | Regular replacement of bag and filters, cleaning of power brush (cutting threads), compartment maintenance |
| Included accessories | Upholstery nozzle, crevice tool, dusting brush |
| Spare parts and filters | Original Miele bags and filters (type U, AirClean, Active AirClean 30, HEPA AirClean 30) |
| Warranty | 24 months (according to sales conditions) |
Frequently Asked Questions - Dynamic U1 Allergy PowerLine SHCF3 MIELE
User questions about Dynamic U1 Allergy PowerLine SHCF3 MIELE
0 question about this device. Answer the ones you know or ask your own.
Ask a new question about this device
Download the instructions for your Broom in PDF format for free! Find your manual Dynamic U1 Allergy PowerLine SHCF3 - MIELE and take your electronic device back in hand. On this page are published all the documents necessary for the use of your device. Dynamic U1 Allergy PowerLine SHCF3 by MIELE.
USER MANUAL Dynamic U1 Allergy PowerLine SHCF3 MIELE
natural_image
Illustration of a car seat with mesh grille and handle, resting on textured floor (no text or symbols)en Vacuum cleaner operating instructions
Warning and Safety instructions.... 27
Caring for the environment 33
Guide to the appliance 34
Illustrations 37
Preparing for use.... 37
Use 37
Using the Electrobrush 39
Maintenance 40
Purchasing new dustbags and filters 40
Ordering the correct dustbags and filters 40
When to change the dustbag 41
To check the dustbag change indicator.... 41
How the dustbag change indicator works 41
How to replace the dustbag 41
When to change the motor protection filter.... 42
How to change the dust compartment filter 42
When to replace the exhaust filter.... 42
How to replace the AirClean exhaust filter 42
Replacing the Active AirClean 30 and HEPA AirClean 30 exhaust filters 43
Replacing one type of exhaust filter with another 43
When changing the filter, please note 43
How to remove threads and hair from the Electrobrush 43
Cleaning and care 44
Problem solving guide 45
After sales service.... 47
Contact in case of malfunction 47
Warranty 47
Optional accessories 47
Electrical connection for the UK 48
This vacuum cleaner complies with current safety requirements. Inappropriate use can, however, lead to personal injury and damage to property.
To avoid the risk of personal injury and damage to the vacuum cleaner, please read these instructions carefully before using it for the first time. They contain important information on its safety, operation and maintenance.
Keep these instructions in a safe place and pass them on to any future owner.
Always disconnect the vacuum cleaner from the mains supply when you have finished using it, before changing over accessories, as well as for maintenance work and cleaning. Switch the vacuum cleaner off at the wall socket and unplug it.
Correct application
This vacuum cleaner is intended for cleaning flooring in domestic households and similar residential environments.
This vacuum cleaner is suitable for daily cleaning of carpets and rugs.
This vacuum cleaner is not intended for outdoor use.
The vacuum cleaner must only be used to vacuum dry floor surfaces. Do not use on people and animals. Any other usage, modification or alteration is not supported by the manufacturer and could be dangerous.
This vacuum cleaner can only be used by people with reduced physical, sensory or mental capabilities, or lack of experience or knowledge, if they are supervised whilst using it or have been shown how to use it in a safe way and understand and recognise the consequences of incorrect operation.
Safety with children
Danger of suffocation. Packaging, e.g. plastic wrappings, must be kept out of the reach of babies and children. Whilst playing, children could become entangled in packaging or pull it over their head and suffocate.
Children under 8 years of age must be kept away from the vacuum cleaner unless they are constantly supervised.
Children 8 years and older may only use the vacuum cleaner unsupervised if they have been shown how to use it safely and recognise and understand the consequences of incorrect operation.
Children must not be allowed to clean or maintain the vacuum cleaner unsupervised.
▶ Please supervise children in the vicinity of the vacuum cleaner and do not let them play with it.
Technical safety
Before using the vacuum cleaner and its accessories, check for any visible signs of damage. Do not use a damaged appliance.
▶ Ensure that the connection data on the data plate of the vacuum cleaner (voltage and frequency) match the mains electricity supply exactly. The vacuum cleaner is suitable for use with 50 Hz or 60 Hz without modification.
The mains electrical plug must be fitted with an appropriate fuse.
▶ Reliable and safe operation of this vacuum cleaner can only be assured if it has been connected to the mains electricity supply.
While the vacuum cleaner is under warranty, repairs should only be undertaken by a Miele authorised service technician. Otherwise the warranty will be invalidated.
Do not pull or carry the vacuum cleaner by the cable, and be careful not to damage the cable when withdrawing the plug from the socket. Keep the cable away from sharp edges and do not let it get squashed, for example, under a door. Avoid running the vacuum cleaner over the cable. This could damage the cable, plug or socket. The appliance must not be used if any of these have suffered damage.
Do not use the vacuum cleaner if the mains cable is damaged. If the mains cable is damaged it must be replaced with an original cable. For safety reasons this must only be done by Miele Service or a Miele authorised service technician.
▶ Caution: The vacuum cleaner handle, hose and Electrobrush contain electrical connections. The handle, suction tube, suction hose and Electrobrush are not parts which can be serviced by the user.
▶ Caution: The vacuum cleaner handle, handle tube and Electrobrush contain electrical connections. The handle, handle tube and Electrobrush are not parts which can be serviced by the user.
The handle tube should be checked regularly for signs of damage. Do not use the handle tube if it is damaged.
Do not let the vacuum cleaner get wet. Clean only with a dry cloth or slightly damp cloth when disconnected from the mains supply.
The Electrobrush contains electrical connections. Do not use the Electrobrush to suck up water or immerse the Electrobrush in water for cleaning.
▶ Repairs should only be carried out by a Miele authorised service technician. Repairs and other work by unqualified persons can cause considerable danger to users.
▶ Miele can only guarantee the safety of the appliance when genuine original Miele replacement parts are used. Faulty components must only be replaced by Miele spare parts.
Correct use
▶ Never touch the roller brush while it is rotating.
Do not use the Electrobrush at head level.
Do not vacuum at head height and do not let the suction get anywhere near a person's head.
To avoid the risk of damage, do not use the vacuum cleaner without the dustbag, dust compartment filter and exhaust filter in place.
The dust compartment cover will not close without a dustbag fitted. Do not force it.
Do not use the vacuum cleaner to vacuum up any water, liquid or damp dirt. Wait until any freshly cleaned or shampooed rugs or carpets are completely dry before attempting to vacuum.
Do not use the vacuum cleaner to vacuum toner dust. Toner, such as that used in printers and photocopiers, can conduct electricity.
Do not vacuum up any inflammable or combustible liquids or gases and do not vacuum in areas where such substances are stored.
Do not vacuum up anything which has been burning or is still glowing e.g. cigarettes, ashes or coal, whether glowing or apparently extinguished.
Accessories
It is not advisable to vacuum directly with the handle, i.e. without an accessory attached as the rim could get damaged and you could hurt yourself on sharp edges.
Only use genuine dustbags, filters and accessories with the “ORIGINAL Miele” logo on them. Otherwise the manufacturer cannot guarantee the safety of the product.
Miele cannot be held liable for damage caused by incorrect use or operation or by non-compliance with these Warning and Safety instructions.
Disposal of the packing material
The packaging is designed to protect the appliance from damage during transportation. The packaging materials used are selected from materials which are environmentally friendly for disposal and should be recycled.
Recycling the packaging reduces the use of raw materials in the manufacturing process and also reduces the amount of waste in landfill sites.
Disposing of the dustbag and filters
Dustbags and filters are made from environmentally friendly materials, and can be disposed of with the normal household waste, as long as they have been used exclusively for general household dust.
Disposing of your old appli- ance
Before disposing of your old appliance remove the dustbag and filters and dispose of them with your household waste.
Electrical and electronic appliances often contain valuable materials. They also contain specific materials, compounds and components, which were essential for their correct function and safety. These could be hazardous to human health and to the environment if disposed of with your domestic waste or if handled incorrectly. Please do not, therefore, dispose of your old appliance with your household waste.
Please dispose of it at your local community waste collection / recycling centre for electrical and electronic appliances, or contact your dealer or Miele for advice. You are also responsible (by law, depending on country) for deleting any personal data that may be stored on the appliance being disposed of. Please ensure that your old appliance poses no risk to children while being stored prior to disposal.
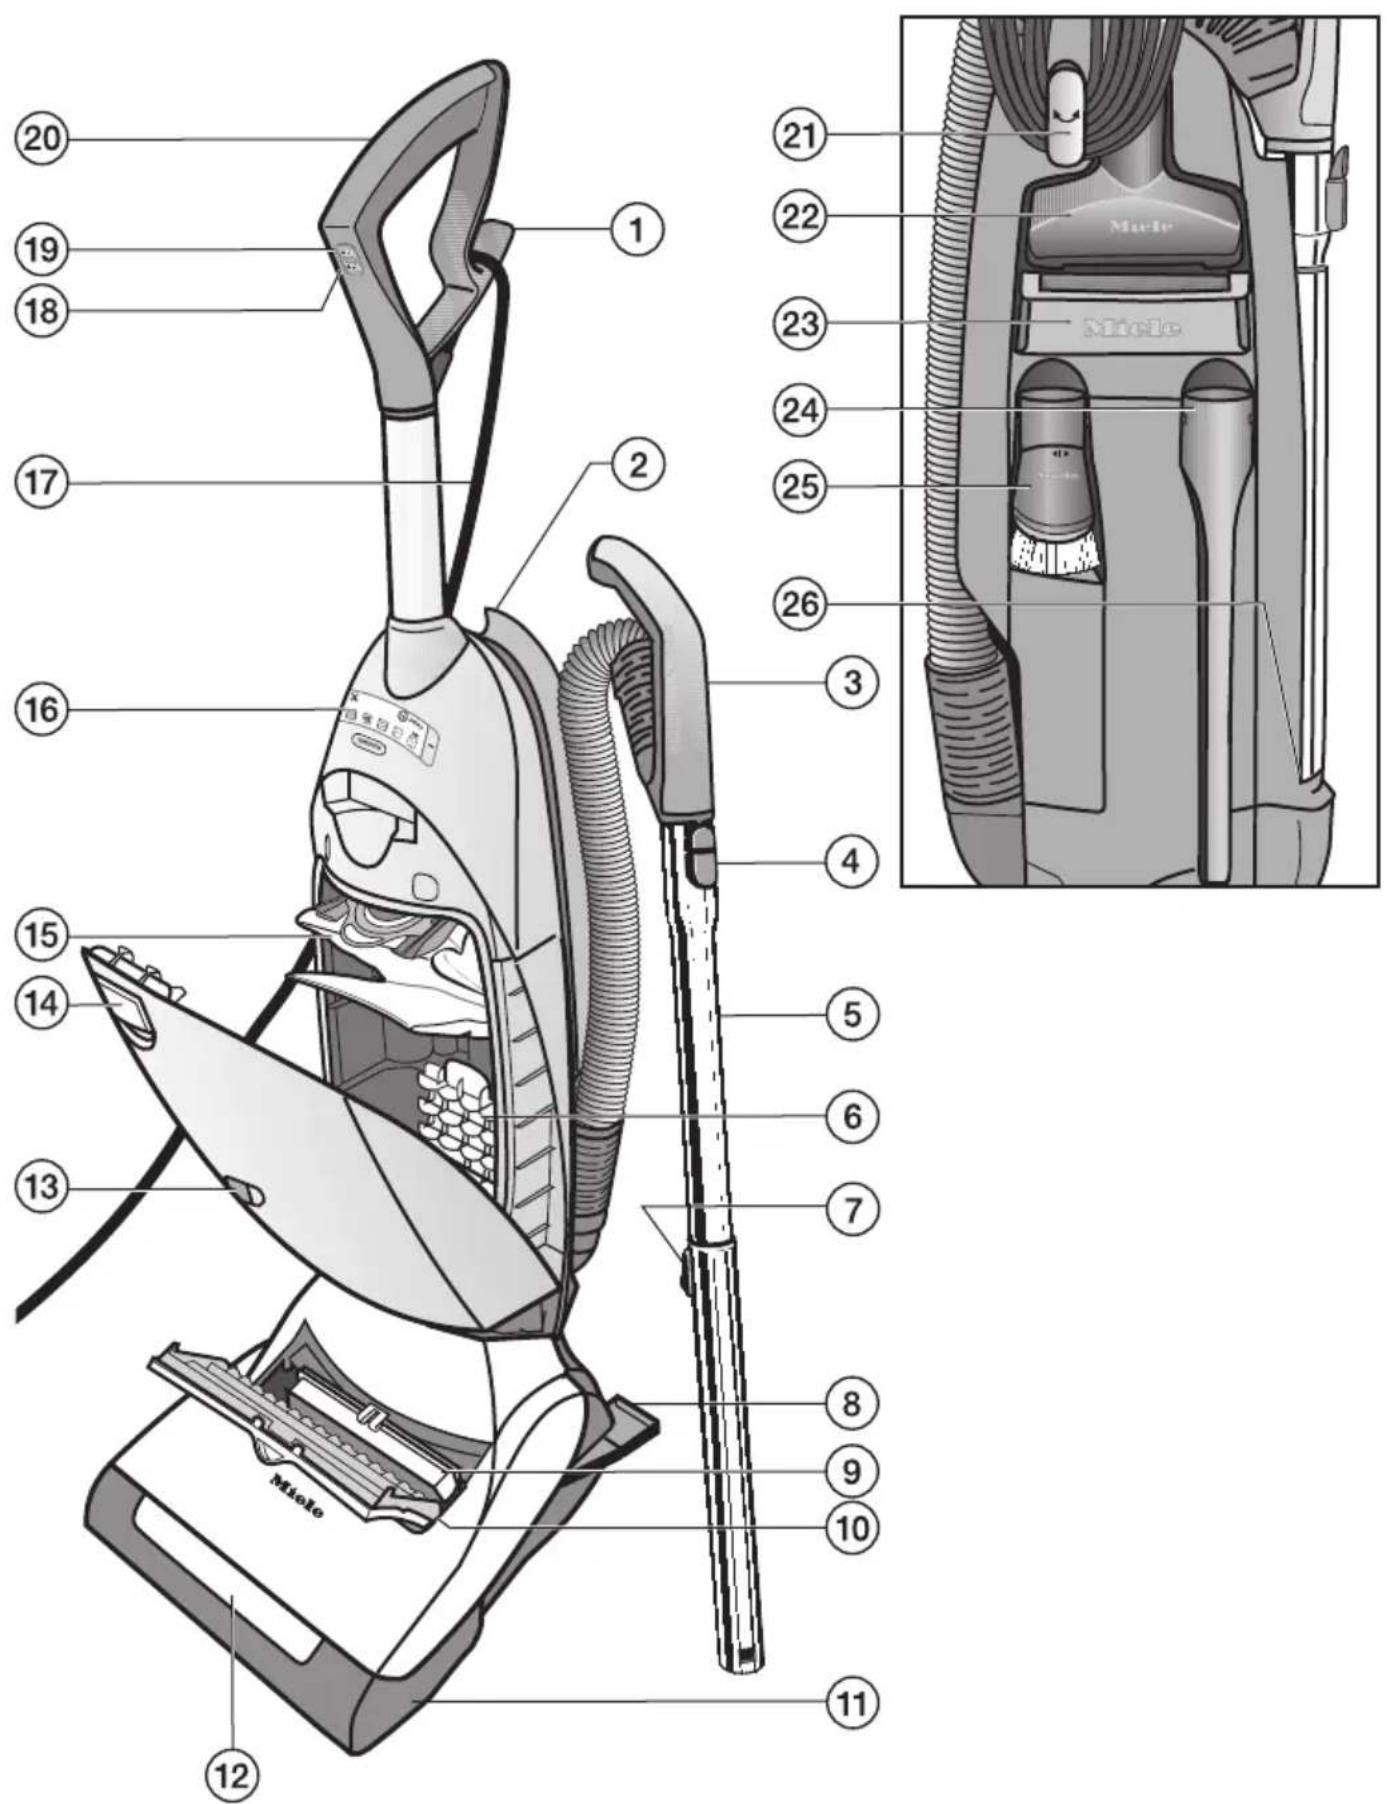
The illustration shows the maximum number of features available.
* these features depend on model and may vary or may not be available on your vacuum cleaner.
① Upper cable hook for mains cable
② Suction hose holder
③ Suction hose with handle
④ Release catch
⑤ Telescopic suction tube
⑥ Motor protection filter
⑦ Telescopic suction tube release button
⑧ Foot switch to release the vacuum cleaner
⑨ Original Miele exhaust filter *
⑩ Exhaust filter compartment
⑪ Electrobrush
⑫ Light *
⑬ Dustbag change indicator
⑭ Dust compartment lid release catch
⑮ Original Miele dustbag
⑯ Control unit (see next page for description) *
⑰ Mains cable
⑱ Electrobrush On/Off button (○/O)
⑲ On/Off (I/O)
⑳ Handle
At the rear
②1 Lower swivel hook for mains cable
⑳ Upholstery nozzle
②3 Carrying handle
⑳ Crevice nozzle
⑲ Dusting brush with natural bristles (only available in selected countries)
⑳ Telescopic suction tube holder
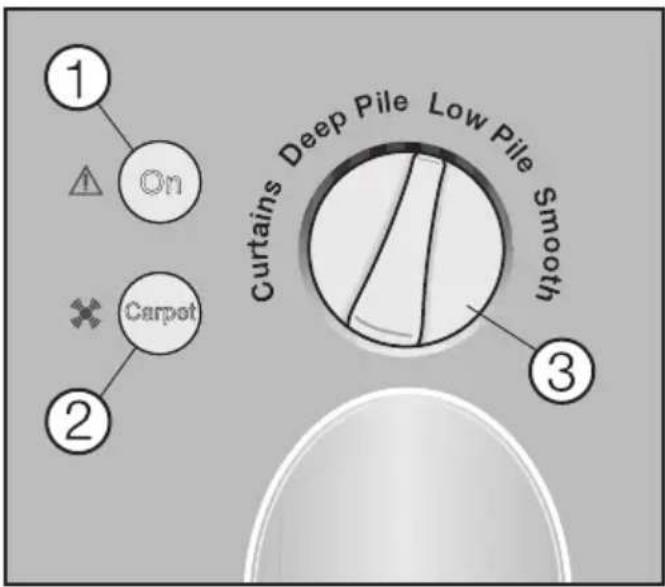
① Vacuum cleaner in-operation indicator light
② Electrobrush in-operation indicator light
③ Rotary suction power selector
Illustrations
The illustrations referred to in the text are shown on the fold-out pages at the end of these operating instructions.
Preparing for use
Assembling the vacuum cleaner (dia. 01)
■ Raise the vacuum cleaner into the vertical position.
■ Insert the handle into the vacuum cleaner until it clicks into position.
Activating the exhaust filter timestep® change indicator on the exhaust filter
Depending on model, your vacuum cleaner will be fitted as standard with one of the following exhaust filters (dia. 02).
a AirClean
b Active AirClean 30 (black)
c HEPA AirClean 30 (white)
If your vacuum cleaner is fitted with filter b or c, you need to activate the exhaust filter timestep® change indicator.
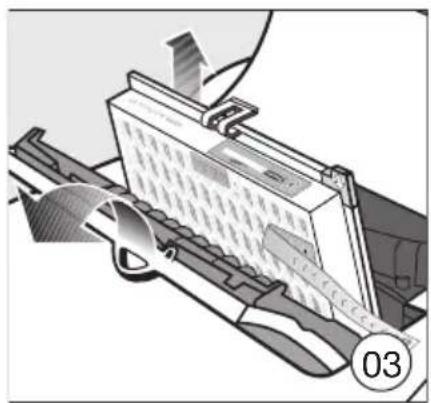
■ Open the lid of the exhaust filter compartment and pull the exhaust filter a little way out of the holder (dia. 03).
■ Remove the label, then put the exhaust filter back in again (dia. 04).
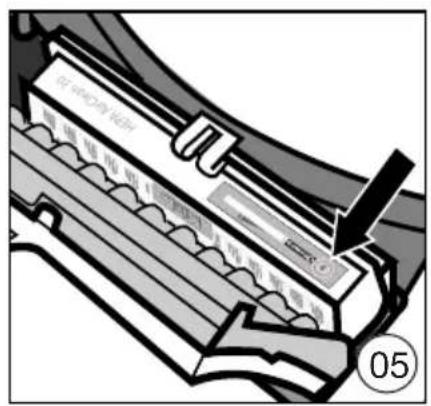
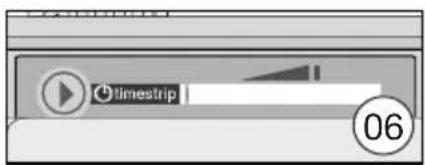
■ Press the exhaust filter timestep® change indicator (dia. 05).
After approx. 10 - 15 seconds, a thin red line will appear in the left hand side of the display (dia. 06).
■ Close the exhaust filter compartment lid.
How the exhaust filter timestep® works
The exhaust filter timestep® indicator shows the remaining functional life of the exhaust filter. After approx. 50 operating hours, or approx. one year of average use, the display will be completely filled with red (dia. 07).
Use
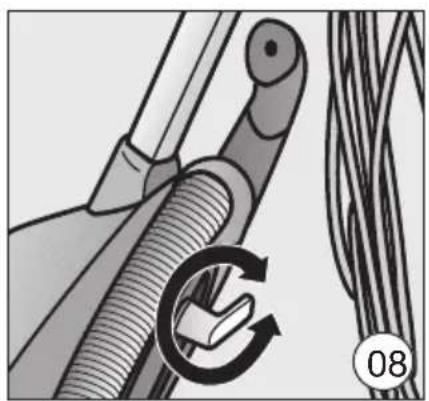
Unwind the mains cable (dia. 08)
The lower cable hook swivels.
■ Turn it upwards to release the cable.
Winding up the mains cable (dia. 09)
When the vacuum cleaner is not in use, the cable can be wound around the two cable hooks.
Secure the mains cable by clamping the plug to the cable (see detail).
Mains cable whilst vacuuming (dia. 10)
■ Whilst vacuuming, the mains cable can be fed through the guide at the side of the upper cable hook.
This way the mains cable will not get in the way during vacuuming. This also protects the cable from becoming kinked.
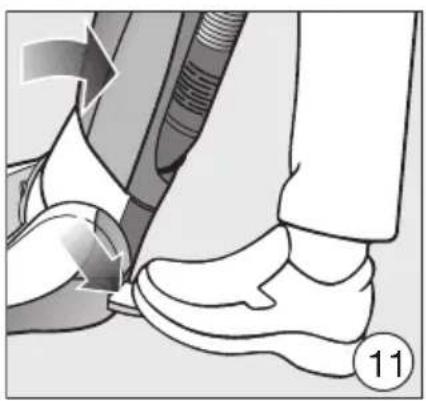
To release the vacuum cleaner (dia. 11)
■ Step on the foot release briefly and tilt the vacuum cleaner to a comfortable position for vacuuming.
Switching on and off (dia. 12)
Please observe the flooring manufacturer's cleaning and care instructions.
■ Press the I button on the handle.
The vacuum cleaner will switch on.
The vacuum cleaner in-operation indicator light on the control unit will light up yellow.
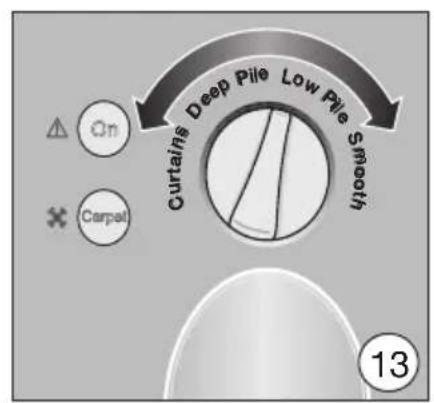
To regulate the suction power
The suction power can be regulated to suit the type of flooring being cleaned. Reducing the suction power reduces the amount of effort required to manoeuvre the floorhead.
Rotary selector (dia. 13)
■ Turn the suction power selector manually to the suction power setting you require.
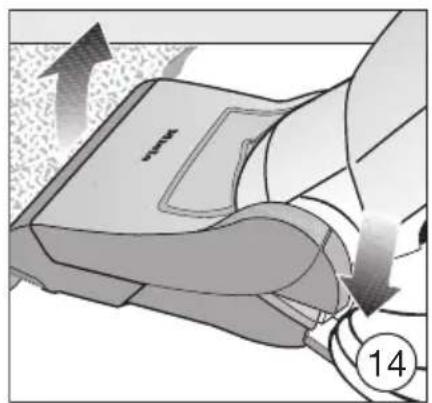
Obstacles (dia. 14)
Obstacles and variations in floor height, for instance when vacuuming over thresholds and the edges of rugs, are easy to cope with.
■ Briefly press the foot release and lift the front of the vacuum cleaner over the obstacle.
Vacuuming using the suction hose
⚠️ Do not vacuum with the suction hose handle at head level to avoid the risk of injury.
⚠️ Be careful when vacuuming directly with the handle of the suction hose, without an accessory attached, that the handle is not damaged. Danger of injury.
⚠️ To prevent the risk of injury when vacuuming the stairs, ensure the vacuum cleaner is placed on a lower step.
■ Raise the vacuum cleaner into the vertical position.
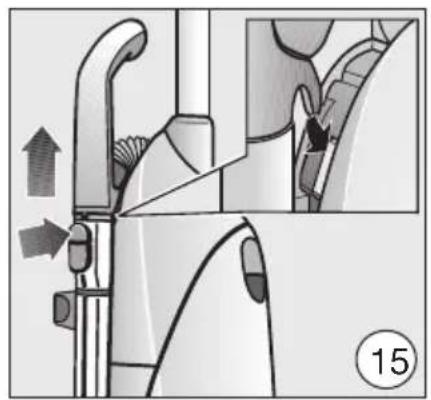
■ Press the release button on the telescopic tube to detach the suction hose handle (dia. 15).
■ To increase stability turn the elbow joint at the bottom of the hose downwards as illustrated until it clicks into position above the retainer (dia. 16).
During normal vacuuming, the suction hose handle should be securely connected to the telescopic tube. Make sure the handle is correctly hooked into its holder on the vacuum cleaner (dia. 15).
Vacuuming using the telescopic suction tube
⚠️ Do not vacuum with the telescopic suction tube at head level to avoid the risk of injury.
⚠️ To prevent the risk of injury when vacuuming the stairs, ensure the vacuum cleaner is placed on a lower step.
■ Raise the vacuum cleaner into the vertical position.
■ Lift the handle out of its holder to access the telescopic suction tube (dia. 17).
■ To increase stability turn the elbow joint at the bottom of the hose downwards as illustrated until it clicks into position above the retainer (dia. 16).
One part of the telescopic suction tube is packed inside the other, and it can be adjusted to suit your height for comfortable vacuuming.
■ Press the release button and adjust the telescopic suction tube to the desired height (dia. 18).
For normal vacuum cleaning, the parts of the telescopic tube must be pushed back together and hooked back into position.
Make sure the handle is correctly hooked into its holder on the vacuum cleaner (dia. 17).
Using the Electrobrush
Recommended use
Please observe the flooring manufacturer's cleaning and care instructions.
The Electrobrush is particularly suitable for intensive vacuuming of carpets which are subject to hard wear. It is very effective at removing deep seated dirt and preventing areas of frequent use being trodden into a path.
⚠️ Please note that the Electrobrush should not be used for vacuuming deep-pile rugs and carpets or valuable hand-knotted rugs, e.g. Persian and oriental rugs etc. There is a danger of the threads being pulled out. If in doubt, contact the carpet manufacturer/retailer.
⚠️ Do not use the Electrobrush to clean highly variable or uneven floors. The brush might come into contact with the floor and cause damage.
Switching the Electrobrush on and off (dia. 19)
To use the Electrobrush, you need to switch it on in addition to the vacuum cleaner with the Ⓧ button on the handle.
The Electrobrush indicator light on the control unit will light up yellow.
This button also enables you to switch off the Electrobrush during vacuuming.
The Electrobrush will switch itself off automatically as soon as the vacuum cleaner is raised to its upright position.
How to use the Electrobrush
■ To achieve the best results, pass the Electrobrush slowly backwards and forwards over the carpet or floor.
For rugs with fringes always draw the Electrobrush from the middle of the rug across the fringe towards the floor.
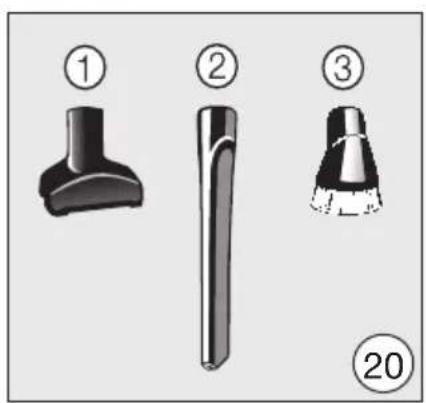
Using the accessories supplied (dia. 20)
The following accessories are stowed at the rear of the vacuum cleaner.
① Upholstery nozzle
② Crevice nozzle, 300 mm
③ Dusting brush with natural bristles (only available in selected countries)
■ Attach the accessory required onto the suction hose handle or onto the telescopic suction tube.
Maintenance
⚠️ Always disconnect the vacuum cleaner from the electrical supply for maintenance work and for cleaning. Switch off at the wall socket and unplug it.
The Miele filtration system consists of three components:
- Original Miele dustbag
- Motor protection filter
– Original Miele exhaust filter
These will need to be replaced from time to time to ensure that your vacuum cleaner performs efficiently.
We recommend only using genuine dustbags, filters and accessories with the “ORIGINAL Miele” logo on them. This will ensure that the suction power of the vacuum cleaner is maintained, giving the best possible cleaning results.
Dustbags with the “ORIGINAL Miele” logo on them are not made from paper or paper-based materials and nor do they have a cardboard collar. This is why our dustbags are particularly long-lasting and reliable.
Please note that appliance faults and damage originating from the use of accessories which do not carry the "ORIGINAL Miele" logo will not be covered by the appliance guarantee.
Purchasing new dustbags and filters
Original Miele dustbags and filters are available from the Miele webshop, the Miele Spare Parts Department and your Miele dealer.
Ordering the correct dustbags and filters
Only use original Miele U dustbags with a green collar and original Miele filters. These are identified by the “ORIGINAL Miele” logo on the packaging.

Every packet of original Miele dustbags contains four dustbags, one AirClean exhaust filter and one motor protection
filter. Original Miele multipacks contain 16 dustbags, four AirClean exhaust filters and four motor protection filters.
Original Miele exhaust filters can also be purchased separately from your Miele dealer or from the Miele Spare Parts Dept. Please quote the model number of your vacuum cleaner when ordering to make sure you get the correct filter. You can also order all accessories via the Miele webshop.
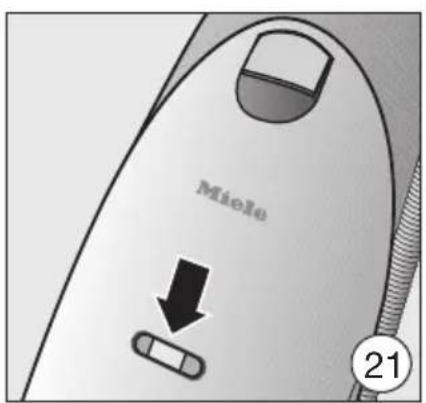
When to change the dustbag (dia. 21)
Change the dustbag when the colour marker in the dustbag change indicator turns red, or sooner if it is no longer effective (see possible reasons for this below).
Miele dustbags are disposable and designed for single use only. Dispose of the dustbag when full. Do not attempt to reuse. Blocked pores in used dustbags will reduce the suction power of the vacuum cleaner.
To check the dustbag change indicator
■ Make sure that the vacuum cleaner is in the vertical position.
■ Switch the vacuum cleaner on with the I button on the handle and select highest power setting.
■ Tilt the vacuum cleaner until you can see the colour marker in the dustbag change indicator easily. The front of the Electrobrush will lift up as you do this.
If the marker completely fills the dust-bag change indicator, you should replace the dustbag with a new one.
How the dustbag change indicator works
The dustbag change indicator is set for normal household dust. This generally contains a mixture of dust, hair, threads, carpet fluff, grit etc.
However, if the cleaner has been used to vacuum up fine dust, such as plaster, brick dust, cement or flour, the pores of the dustbag will become blocked very quickly.
This affects the air permeability of the bag, and the marker will indicate that the bag is “full” even when it is not. If this happens you must still change the dustbag because suction power will be greatly reduced by blocked pores in the dustbag.
If, on the other hand, a large amount of hair and carpet fluff which typically contains a lot of air is vacuumed up, the indicator may fail to react even though the bag is full. For this reason, you should check the dustbag regularly and change it if necessary. Both these extremes can occur.
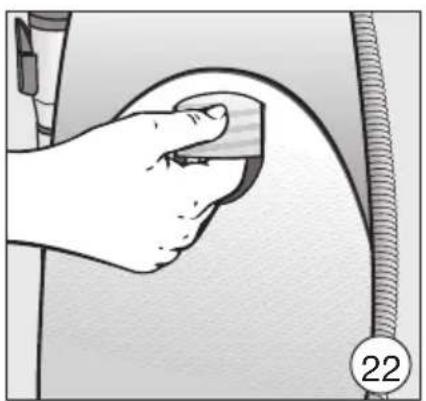
How to replace the dustbag (dia. 22, 23 + 24)
■ Make sure that the vacuum cleaner is in the vertical position.
■ Raise the release button and open the lid to its resting position.
■ Pull the tab on the collar and swing the bag up away from the suction socket before taking it out of its holder.
The dustbag has a closing flap which closes automatically when the dust compartment lid is raised to prevent any dust escaping.
■ Fit the new dustbag into the holder as far as it will go. Leave it folded up when you take it out of the box.
■ It should be unfolded as far as possible in the dust compartment.
■ Close the dust compartment lid securely, making sure it clicks into position. Take care not to trap the dust-bag when doing so. The dustbag is then automatically guided into position for vacuuming.

The lid will not close without a ag in place. Do not force it!
When to change the motor protection filter
Replace this filter every time you start a new packet of dustbags.
Every packet of original Miele dustbags contains a motor protection filter. Multipacks contain four motor protection filters (only available in selected countries).
How to change the dust compartment filter (dia. 25)
■ Open the dust compartment lid.
■ Remove the dustbag.
■ Unclip the filter frame in the dust compartment and remove the old filter. Hold by the clean, unsoiled section to remove it.
■ Replace with a new dust compartment filter.
■ Close the filter frame.
■ Fit the dustbag into the holder as far as it will go.
■ Close the dust compartment lid securely, making sure it clicks into position. Take care not to trap the dust-bag when doing so.
When to replace the exhaust filter
Depending on the model, your vacuum cleaner will be fitted as standard with one of the following exhaust filters (dia. 02).
a AirClean
Replace this filter every time you start a new packet of dustbags. Every packet of original Miele dustbags contains one AirClean exhaust filter. Multipacks contain four AirClean filters.
b Active AirClean 30 (black)
c HEPA AirClean 30 (white)
Replace this filter when the exhaust filter timestep® change indicator is completely red (dia. 07). The indicator lights up after approximately 50 hours of operation, which is equivalent to about a year of average use. You can continue vacuuming when the light comes on. However, the suction power will be reduced as will the effectiveness of the filter if it is not replaced in good time.
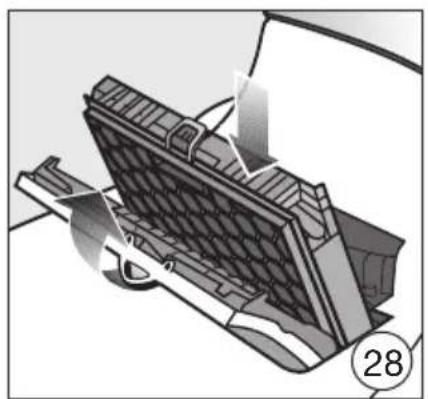
How to replace the AirClean exhaust filter (dia. 26, 27 + 28)
Do not use more than one exhaust filter at a time.
■ Open the exhaust filter compartment lid.
■ Remove the filter grille.
■ Open the filter grille and remove the used AirClean filter by one of the clean, unsoiled sections.
■ Replace it with a new AirClean filter.
If you wish to fit an Active AirClean 30 or a HEPA AirClean 30, see “Maintenance - Replacing one type of exhaust filter with another”.
- Secure the catch on the filter grille and replace it inside the exhaust filter compartment.
■ Close the exhaust filter compartment lid.
Replacing the Active AirClean 30 and HEPA AirClean 30 exhaust filters (dia. 29)
Do not use more than one exhaust filter at a time.
■ Open the exhaust filter compartment lid.
■ Remove the exhaust filter.
- Insert the new exhaust filter and press the exhaust filter timestep® change indicator (dia. 05).
After approx. 10 - 15 seconds, a thin red line will appear in the left hand side of the display (dia. 06).
If you wish to fit an AirClean filter, see “Maintenance - Replacing one type of exhaust filter with another”.
■ Close the exhaust filter compartment lid.
Replacing one type of exhaust filter with another (dia. 02)
Depending on model, your vacuum cleaner will be fitted as standard with one of the following exhaust filters:
a AirClean
b Active AirClean 30 (black)
c HEPA AirClean 30 (white)
Do not use more than one exhaust filter at a time.
When changing the filter, please note
- If you wish to replace exhaust filter a with filter b or c, it is essential that you remove the filter grille before you fit the new exhaust filter.
You must also activate the exhaust filter timestep® change indicator (dia. 05).
- If you wish to replace exhaust filter b or c with filter a, you must insert the new filter into a filter grille * before installing (dia. 27).
* Filter grille - see “Optional accessories”
How to remove threads and hair from the Electrobrush
■ Switch the Electrobrush and the vacuum cleaner off, switch off at the wall socket and remove the plug.
■ Release the vacuum cleaner (dia. 11) and place it flat on the floor.
■ Turn the vacuum cleaner over.
■ Use scissors to cut any threads or hairs which have wound around the roller brush. There is a groove on the roller to guide you (dia. 30).
Then run the vacuum cleaner to vacuum up the bits.
The bottom of the suction hose can be accessed to remove any heavy soiling or blockages. Any large particles inside it can then be easily removed.
■ Raise the vacuum cleaner into the vertical position.
■ Press the release button on the telescopic tube to detach the suction hose handle (dia. 15).
■ To increase stability turn the elbow joint at the bottom of the hose downwards as illustrated until it clicks into position above the retainer (dia. 16).
1 Unlock the hose connector by turning it in the direction of the arrow (dia. 31).
2 Now remove the hose connector from the elbow by pulling it (dia. 31).
■ Remove any debris or blockages.
- Replace the connector making sure it goes on straight. Lock it into position.
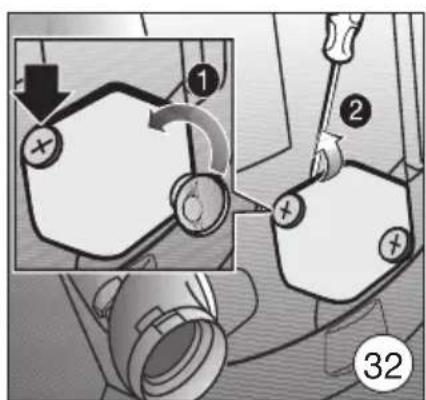
If you have not been able to reach all of the soiling, you could also try the following.
Unlock the panel at the back of the vacuum cleaner as follows (dia. 32).
① Using a coin turn the two screws as far as they will go.
② Lever off the panel.
■ Remove any debris or blockages.
- Replace the panel and lock it with the screws.
Cleaning and care
⚠️ Always disconnect the vacuum cleaner from the electrical supply before cleaning it. Switch off at the wall socket and unplug it.
Vacuum cleaner and accessories
The vacuum cleaner and all plastic accessories can be cleaned with a proprietary cleaner suitable for plastic.
Do not use abrasive cleaning agents, glass cleaning agents, all-purpose cleaners or oil-based conditioning agents.
Dust compartment
The dust compartment can, if necessary, be cleaned using a dry duster, brush or, if available, a second vacuum cleaner to vacuum the dust out.
Do not let the vacuum cleaner get wet. If moisture gets into the appliance, there is a risk of electric shock.
Problem solving guide
Many malfunctions and faults that can occur in daily operation can be easily remedied. Time and money will be saved because a service call will not be needed.
The following guide may help you to find the reason for a malfunction or a fault, and to correct it.
| Problem Cause and remedy | |
| The vacuum cleaner switches off automatically. | The overheating protection mechanism has been activated due to overheating or a blockage.The vacuum cleaner in-operation indicator light will light up red.■ Switch the Electrobrush and the vacuum cleaner off, switch off at the wall socket and remove the plug.■ Check the vacuum cleaner for any blockages and check all the filters in the vacuum cleaner.Once the blockage has been removed, do not use the vacuum cleaner for about 20 - 30 minutes to allow it to cool down. |
| The Electrobrush switches itself off. The Electrobrush indicator light is lit up red. | The red light indicates a blockage in the roller; for example, due to a large item being vacuumed up.■ Switch the Electrobrush and the vacuum cleaner off, switch off at the wall socket and remove the plug.■ Remove the blockage.The vacuum cleaner can then be used again. |
| The Electrobrush switches itself off. The Electrobrush indicator light will continue to light up yellow. | The overheating protection mechanism has been activated due to overheating or a blockage, for example.■ Switch the Electrobrush and the vacuum cleaner off, switch off at the wall socket and remove the plug.■ Check the vacuum cleaner for any blockages and check all the filters in the vacuum cleaner.The Electrobrush has to cool down. To speed this up:■ Reconnect the vacuum cleaner to the mains supply and switch it back on.■ Vacuum for approx. 10 minutes without switching the Electrobrush on.This will cool the Electrobrush down so that it can then be used again as normal. |
After sales service
Contact in case of malfunction
In the event of any faults which you cannot remedy yourself, please contact your Miele Dealer or Miele Service.
Contact information for Miele Service can be found at the end of this document.
Please note that telephone calls may be monitored and recorded for training purposes and that a call-out charge will be applied to service visits where the problem could have been resolved as described in this booklet.
Warranty
For information on the appliance warranty specific to your country, please contact Miele. See back cover for address.
In the UK, your appliance warranty is valid for 2 years from the date of purchase. However, you must activate your cover by calling 0330 160 6640 or registering online at www.miele.co.uk.
Optional accessories
Certain models are supplied as standard with one or more of the following accessories.
Please observe the flooring manufacturer's cleaning and care instructions.
These and many other products can be ordered from the Miele webshop, the Miele Spare Parts Dept. or your Miele dealer.
Floor brushes
Hard floor Twister floorbrush with swivel action (SBB 300-3)
This brush is suitable for a variety of hard floor surfaces and has a swivel joint enabling it to get into awkward corners.
Parquet Twister floorbrush with swivel action (SBB 300-3)
(only available in selected countries)
With natural bristles for vacuuming smooth hard floors and small gaps.
Parquet Twister XL floorbrush with swivel action (SBB 400-3)
(only available in selected countries)
With natural bristles for quickly vacuuming smooth hard floors and small gaps.
Other accessories
MicroSet (SMC 20)
This set is specially designed for cleaning small objects and difficult to reach areas (such as PC keyboards, stereo equipment, intricately carved furniture and ornaments, models etc).
Hand turbobrush
For vacuuming upholstery, mattresses or car seats, etc.
Universal brush
For dusting books, shelves, etc.
Radiator brush
For dusting radiators, narrow shelves and crevices.
Mattress nozzle
For vacuuming upholstery, mattresses, cushions, curtains, covers etc.
Upholstery nozzle, 190 mm
For vacuuming upholstered furniture, mattresses and cushions.
Filters
Active AirClean 30 exhaust filter (SF-AA 30)
For a significant reduction of unpleasant odours. Ideal for households with pets or smokers.
HEPA AirClean 30 exhaust filter (SF-HA 30)
Effectively filters fine dust and allergens. Ideal for people allergic to house dust.
Filter grille
The filter grille is required if you wish to use an AirClean filter instead of an Active AirClean 30 filter or a HEPA AirClean 30 filter.
Electrical connection for the UK
All electrical work should be carried out by a suitably qualified and competent person in strict accordance with current national and local safety regulations (BS 7671 in the UK). The voltage and frequency are given on the data plate located underneath the vacuum cleaner. Please ensure that these match the household mains supply. The fuse rating is quoted on the plug. The appliance is supplied with a cable and moulded plug ready for connection to a 230-240 V/50 Hz a.c. single phase supply.
Non-rewireable plugs BS 1363
The fuse cover must be re-fitted when changing the fuse, and if the fuse cover is lost the plug must not be used until a suitable replacement is obtained. The colour of the correct replacement cover is that of the coloured insert in the base of the plug, or the colour that is embossed in words on the base of the plug, (as applicable to the design of plug fitted). Replacement fuses should be ASTA approved to BS1362 and have the correct rating. Replacement fuses and fuse covers may be purchased from your local electrical supplier.
(croquis 26, 27 + 28)
Controle of de stofcassette vol is
c HEPA AirClean 30 (wit)
natural_image
Illustration of a vacuum cleaner with attached circuit board and handle, labeled '01' (no text or symbols on the device itself)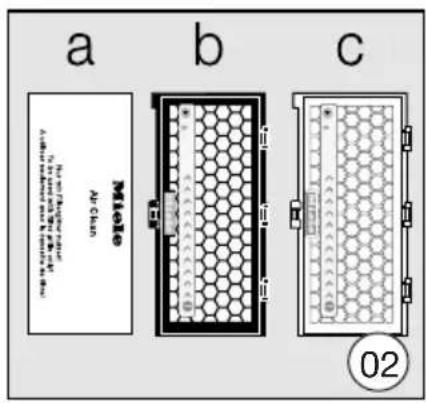
natural_image
Cross-sectional diagram of a mechanical device with internal components and motion arrows (no text or symbols)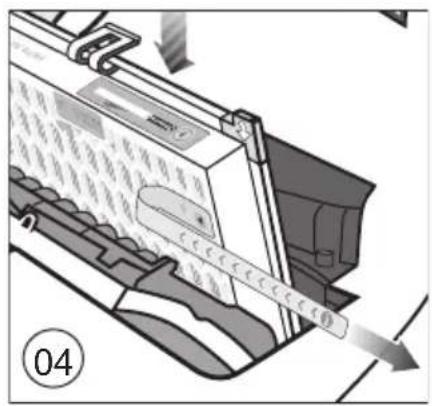
natural_image
Mechanical diagram showing a tool interacting with a coiled cable, labeled with number 08 (no text or symbols on the diagram itself)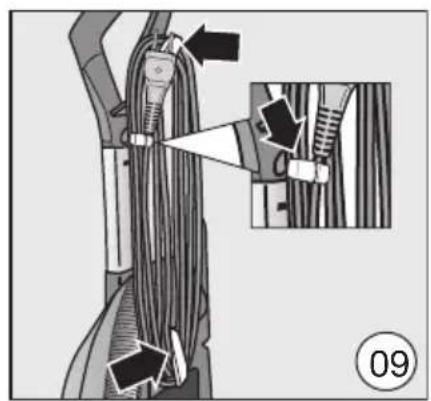
natural_image
Mechanical assembly diagram showing cable routing and component insertion (no text or symbols)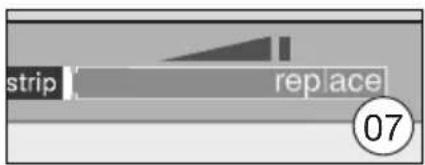
natural_image
Illustration of a person's foot and shoe being adjusted to press a circular component, with no visible text or symbols.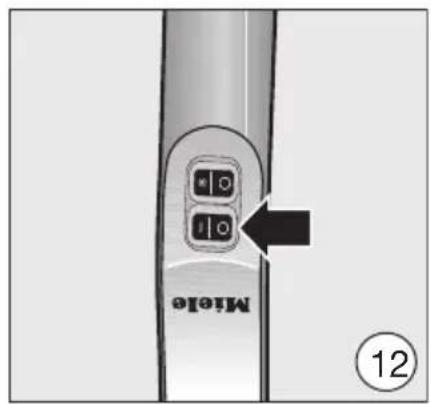
natural_image
Mechanical component diagram showing a lever mechanism with directional arrows and a numbered label (15), no readable text or symbols present.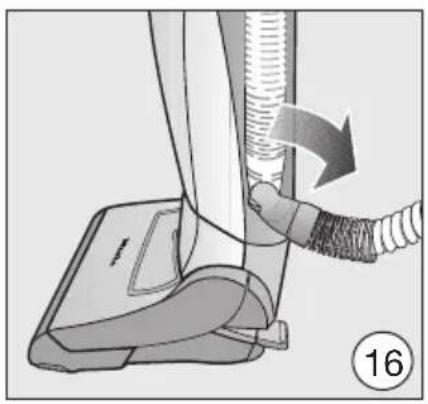
natural_image
Illustration of a vacuum cleaner's base with a hand adjusting the tube and cable (no text or symbols)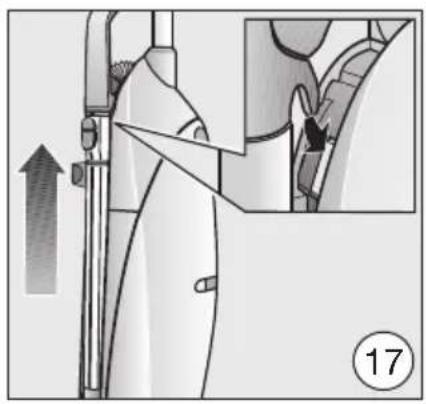
natural_image
Mechanical assembly diagram showing a lever mechanism with an inset close-up of a component detail (no text or symbols)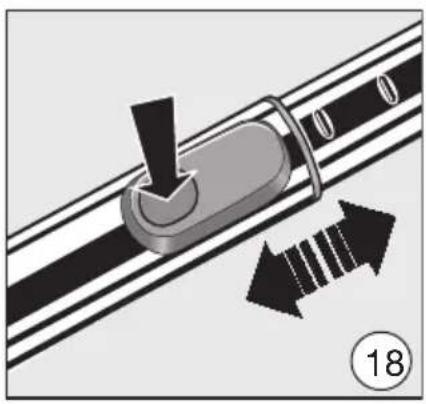
natural_image
Mechanical component with directional arrows indicating motion or movement (no text or symbols)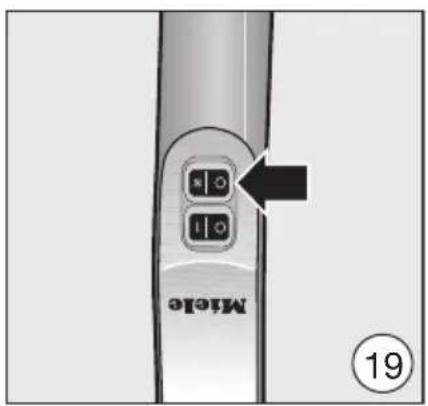
natural_image
Hand holding a small object near a coiled cable or hose (no text or symbols visible)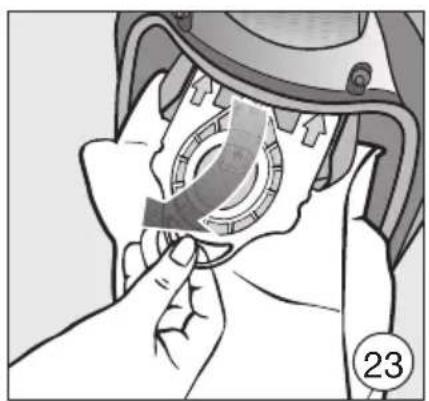
natural_image
Illustration of a hand adjusting a mechanical component with a circular component (no text or symbols visible)
natural_image
Close-up of a hand using a tool to adjust or install a mechanical component, no visible text or symbols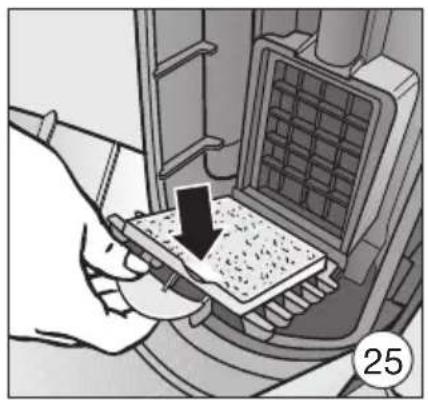
natural_image
Illustration of a hand inserting a component into a device with a black arrow indicating the direction (no text or symbols present)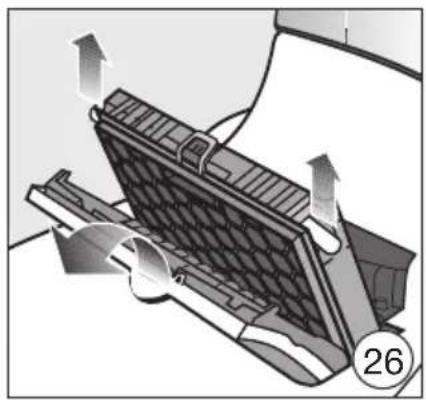
natural_image
Diagram of a mechanical device with directional arrows indicating motion or force, no visible text or symbols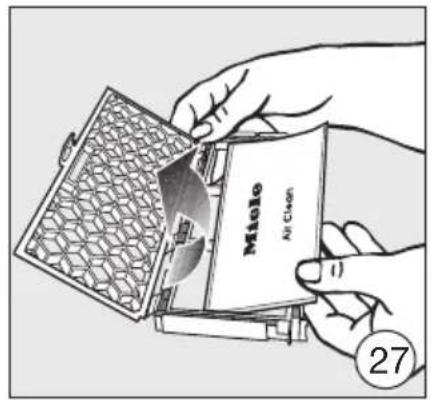
natural_image
Technical diagram of a mechanical component with internal structure and labeled part (28), no readable text or symbols present.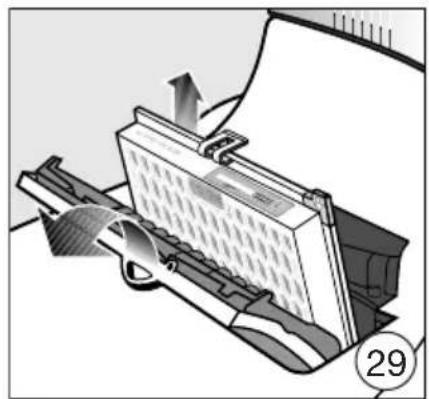
natural_image
Diagram of a printer or printer printing process with an arrow indicating motion (no text or symbols present)
natural_image
Illustration of a hand using scissors to cut or remove a device (no text or symbols visible)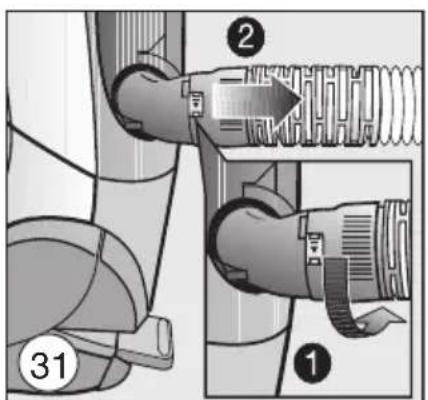
United Kingdom
Miele Co. Ltd.
Fairacres, Marcham Road
Abingdon, Oxon, OX14 1TW
Customer Contact Centre Tel: 0330 160 6600
E-mail: mielecare@miele.co.uk
Internet: www.miele.co.uk

Australia
Miele Australia Pty. Ltd.
ACN 005 635 398
ABN 96 005 635 398
1 Gilbert Park Drive
Knoxfield, VIC 3180
Tel: 1300 464 353
Internet: www.miele.com.au
China
Miele (Shanghai) Trading Ltd.
1-3 Floor, No. 82 Shi Men Yi Road
Jing' an District
200040 Shanghai, PRC
Tel: +86 21 6157 3500
Fax: +86 21 6157 3511
E-mail: info@miele.cn,
Miele (Hong Kong) Limited
41/F - 4101, Manhattan Place
23 Wang Tai Road
Kowloon Bay, Hong Kong
Tel: (852) 2610 1025
Fax: (852) 3579 1404
Email:
customerservices@miele.com.hk
Website: www.miele.hk
India
Miele India Pvt. Ltd.
Ground Floor
Copia Corporate Suites
Plot No. 9, Jasola
New Delhi - 110025
Tel: 011-46 900 000
Fax: 011-46 900 001
E-mail: customercare@miele.in
Internet: www.miele.in
Ireland
Miele Ireland Ltd.
2024 Bianconi Avenue
Citywest Business Campus
Dublin 24
Tel: (01) 461 07 10
Fax: (01) 461 07 97
E-Mail: info@miele.ie
Internet: www.miele.ie
Malaysia
Miele Sdn Bhd
Suite 12-2, Level 12
Menara Sapura Kencana
Petroleum
Solaris Dutamas No. 1
Jalan Dutamas 1
50480 Kuala Lumpur, Malaysia
Phone: +603-6209-0288
Fax: +603-6205-3768
New Zealand
Miele New Zealand Limited
IRD 98 463 631
Level 2, 10 College Hill
Freemans Bay, Auckland 1011
New Zealand
Tel: 0800 464 353
Internet: www.miele.co.nz
Singapore
Miele Pte. Ltd.
163 Penang Road
# 04 - 03 Winsland House II
Singapore 238463
Tel: +65 6735 1191
Fax: +65 6735 1161
E-Mail: info@miele.com.sg
Internet: www.miele.sg
South Africa
Miele (Pty) Ltd
63 Peter Place, Bryanston 2194
P.O. Box 69434, Bryanston 2021
Tel: (011) 875 9000
Fax: (011) 875 9035
E-mail: info@miele.co.za
Internet: www.miele.co.za
Taiwan
K.E. & Kingstone Co., Ltd.
6th Fl., No. 120, Sec. 2
Jianguo N. Rd.
Taipei, Taiwan
TEL: +886 2 2502-7256
FAX: +886 2 2502-3077
BHIRAJ TOWER at EmQuartier
43rd Floor Unit 4301-4303
689 Sukhumvit Road
North Klongton Sub-District
Vadhana District
Bangkok 10110, Thailand
United Arab Emirates
Miele Appliances Ltd.
Gold & Diamond Park
Office No. 6-217
Sheikh Zayed Road
P.O. Box 11 47 82 - Dubai
Tel. +971 4 3044 999
Fax. +971 4 3418 852
800-MIELE (64353)

- Correct application
- Safety with children
- Technical safety
- Correct use
- Accessories
- Disposal of the packing material
- Disposing of the dustbag and filters
- Disposing of your old appli- ance
- At the rear
- Illustrations
- Preparing for use
- Assembling the vacuum cleaner (dia. 01)
- Activating the exhaust filter timestep® change indicator on the exhaust filter
- How the exhaust filter timestep® works
- Use
- Unwind the mains cable (dia. 08)
- Winding up the mains cable (dia. 09)
- Mains cable whilst vacuuming (dia. 10)
- To release the vacuum cleaner (dia. 11)
- Switching on and off (dia. 12)
- To regulate the suction power
- Rotary selector (dia. 13)
- Obstacles (dia. 14)
- Vacuuming using the suction hose
- Vacuuming using the telescopic suction tube
- Using the Electrobrush
- Recommended use
- Switching the Electrobrush on and off (dia. 19)
- How to use the Electrobrush
- Using the accessories supplied (dia. 20)
- Maintenance
- Purchasing new dustbags and filters
- Ordering the correct dustbags and filters
- When to change the dustbag (dia. 21)
- To check the dustbag change indicator
- How the dustbag change indicator works
- How to replace the dustbag (dia. 22, 23 + 24)
- When to change the motor protection filter
- How to change the dust compartment filter (dia. 25)
- When to replace the exhaust filter
- How to replace the AirClean exhaust filter (dia. 26, 27 + 28)
- Replacing the Active AirClean 30 and HEPA AirClean 30 exhaust filters (dia. 29)
- Replacing one type of exhaust filter with another (dia. 02)
- When changing the filter, please note
- How to remove threads and hair from the Electrobrush
- Cleaning and care
- Vacuum cleaner and accessories
- Dust compartment
- Problem solving guide
- After sales service
- Contact in case of malfunction
- Warranty
- Optional accessories
- Floor brushes
- Hard floor Twister floorbrush with swivel action (SBB 300-3)
- Parquet Twister floorbrush with swivel action (SBB 300-3)
- Parquet Twister XL floorbrush with swivel action (SBB 400-3)
- Other accessories
- MicroSet (SMC 20)
- Hand turbobrush
- Universal brush
- Radiator brush
- Mattress nozzle
- Upholstery nozzle, 190 mm
- Filters
- Active AirClean 30 exhaust filter (SF-AA 30)
- HEPA AirClean 30 exhaust filter (SF-HA 30)
- Filter grille
- Electrical connection for the UK
- Non-rewireable plugs BS 1363
- (croquis 26, 27 + 28)
- Controle of de stofcassette vol is
- c HEPA AirClean 30 (wit)
- United Kingdom
- Australia
- China
- Miele (Hong Kong) Limited
- India
- Ireland
- Malaysia
- New Zealand
- Singapore
- South Africa
- Taiwan
- United Arab Emirates
Brand : MIELE
Model : Dynamic U1 Allergy PowerLine SHCF3
Category : Broom