USER MANUAL TexStyle 7 Pro BRAUN
natural_image
Exterior view of a Bruhun TexStyle 7 Pro iron iron (no text or symbols on the device itself)
Type 12770000, 12770001, 12770002
Register your product
www.braunhousehold.com/register
Deutsch 4
English 8
Français 12
Español 16
Português 20
Italiano 24
Nederlands 28
Dansk 32
Norsk 36
Svenska 40
Suomi 44
Polski 48
Český 52
Slovenský 56
Magyar 60
Hrvatski 64
Slovenski 68
Türkçe 72
Română (MD) 76
Ελληνικά 80
Қазақ 84
Русский 88
Українська 92
عربي 96
De'Longhi Braun Household GmbH

natural_image
Illustration of a hand ironing an iron with a double-headed arrow indicating compression (no text or symbols)
C After Ironing
natural_image
Illustration showing a power plug being inserted into an electrical socket, and a hand using a iron iron (no text or symbols present)
natural_image
Close-up of a car seatbelt with attached plug (no text or symbols visible)
D Descaling
Preparation
Self clean
Reset

E Soleplate cleaning
Deutsch
Vor dem Gebrauch
Please read instructions carefully and completely before using the appliance.
Caution

Caution: Hot surfaces!
Electric Irons combine high temperatures and hot steam that could lead to burns.
This appliance can be used by children aged from 8 years and above and persons with reduced physical, sensory or mental capabilities or lack of experience and knowledge if they have been given supervision or instruction concerning use of the appliance in a safe way and understand the hazards involved.
●Children shall not play with the appliance.
●Cleaning and user maintenance shall not be made by children without supervision.
During operation and cool-down the appliance and its mains cord shall be kept out of reach of children under 8 years.
the supply cord is damaged, it must be replaced by the manufacturer, its service agent or similarly qualified persons in order to avoid a hazard.
Always unplug the station/iron before filling with water.
The appliance must be used and rested on a stable surface.
During ironing pauses, place the iron upright on its heel rest or on the iron rest. Ensure that the heel rest is placed on a stable surface.
The iron must not be left unattended while it is connected to the supply mains.
The appliance must not to be used if it has dropped, if there are visible signs of damage or if it is leaking. Regularly check the cords for damages.
Never immerse the unit in water or other liquids.
This appliance is designed for household use only and for processing normal household quantities.
The cords should never come in contact with hot objects, the soleplate, water and sharp edges.
Before plugging into a socket, check whether your voltage corresponds with the voltage printed on the bottom of the appliance and that you are using an earthed socket.
When using an extension cord watch out that it is in good condition, has a plug with an earth connection and corresponds with the power rating of the appliance (16A).
The soleplate and the iron rest can reach very high temperatures that could lead to burns. Do not touch them.
Description
1 Spray nozzle
2 Water tank lid
3 Spray button
4 Steam regulator
5 Turbo steam button
6 Steam shot trigger
7 Temperature selector
8 Temperature control LED
9 Power cord
10 Heel rest
11 3D soleplate
(A) Start ironing
Filling the water tank
- Make sure that the appliance is switched off and unplugged.
- Fill the water tank with tap water by holding the iron slightly inclined, taking care not to exceed the “max” level. If you have extremely hard water, we recommend that you use a mixture of 50 % tap water and 50 % distilled water.
- Attention: Never use distilled water exclusively. Do not add any additives (e.g. starch). Do not use condensation water from a tumble dryer.
Ironing with steam
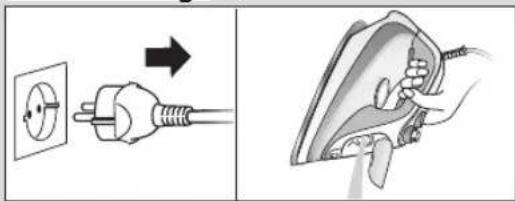
- Place the iron on its heel rest (10) and plug in.
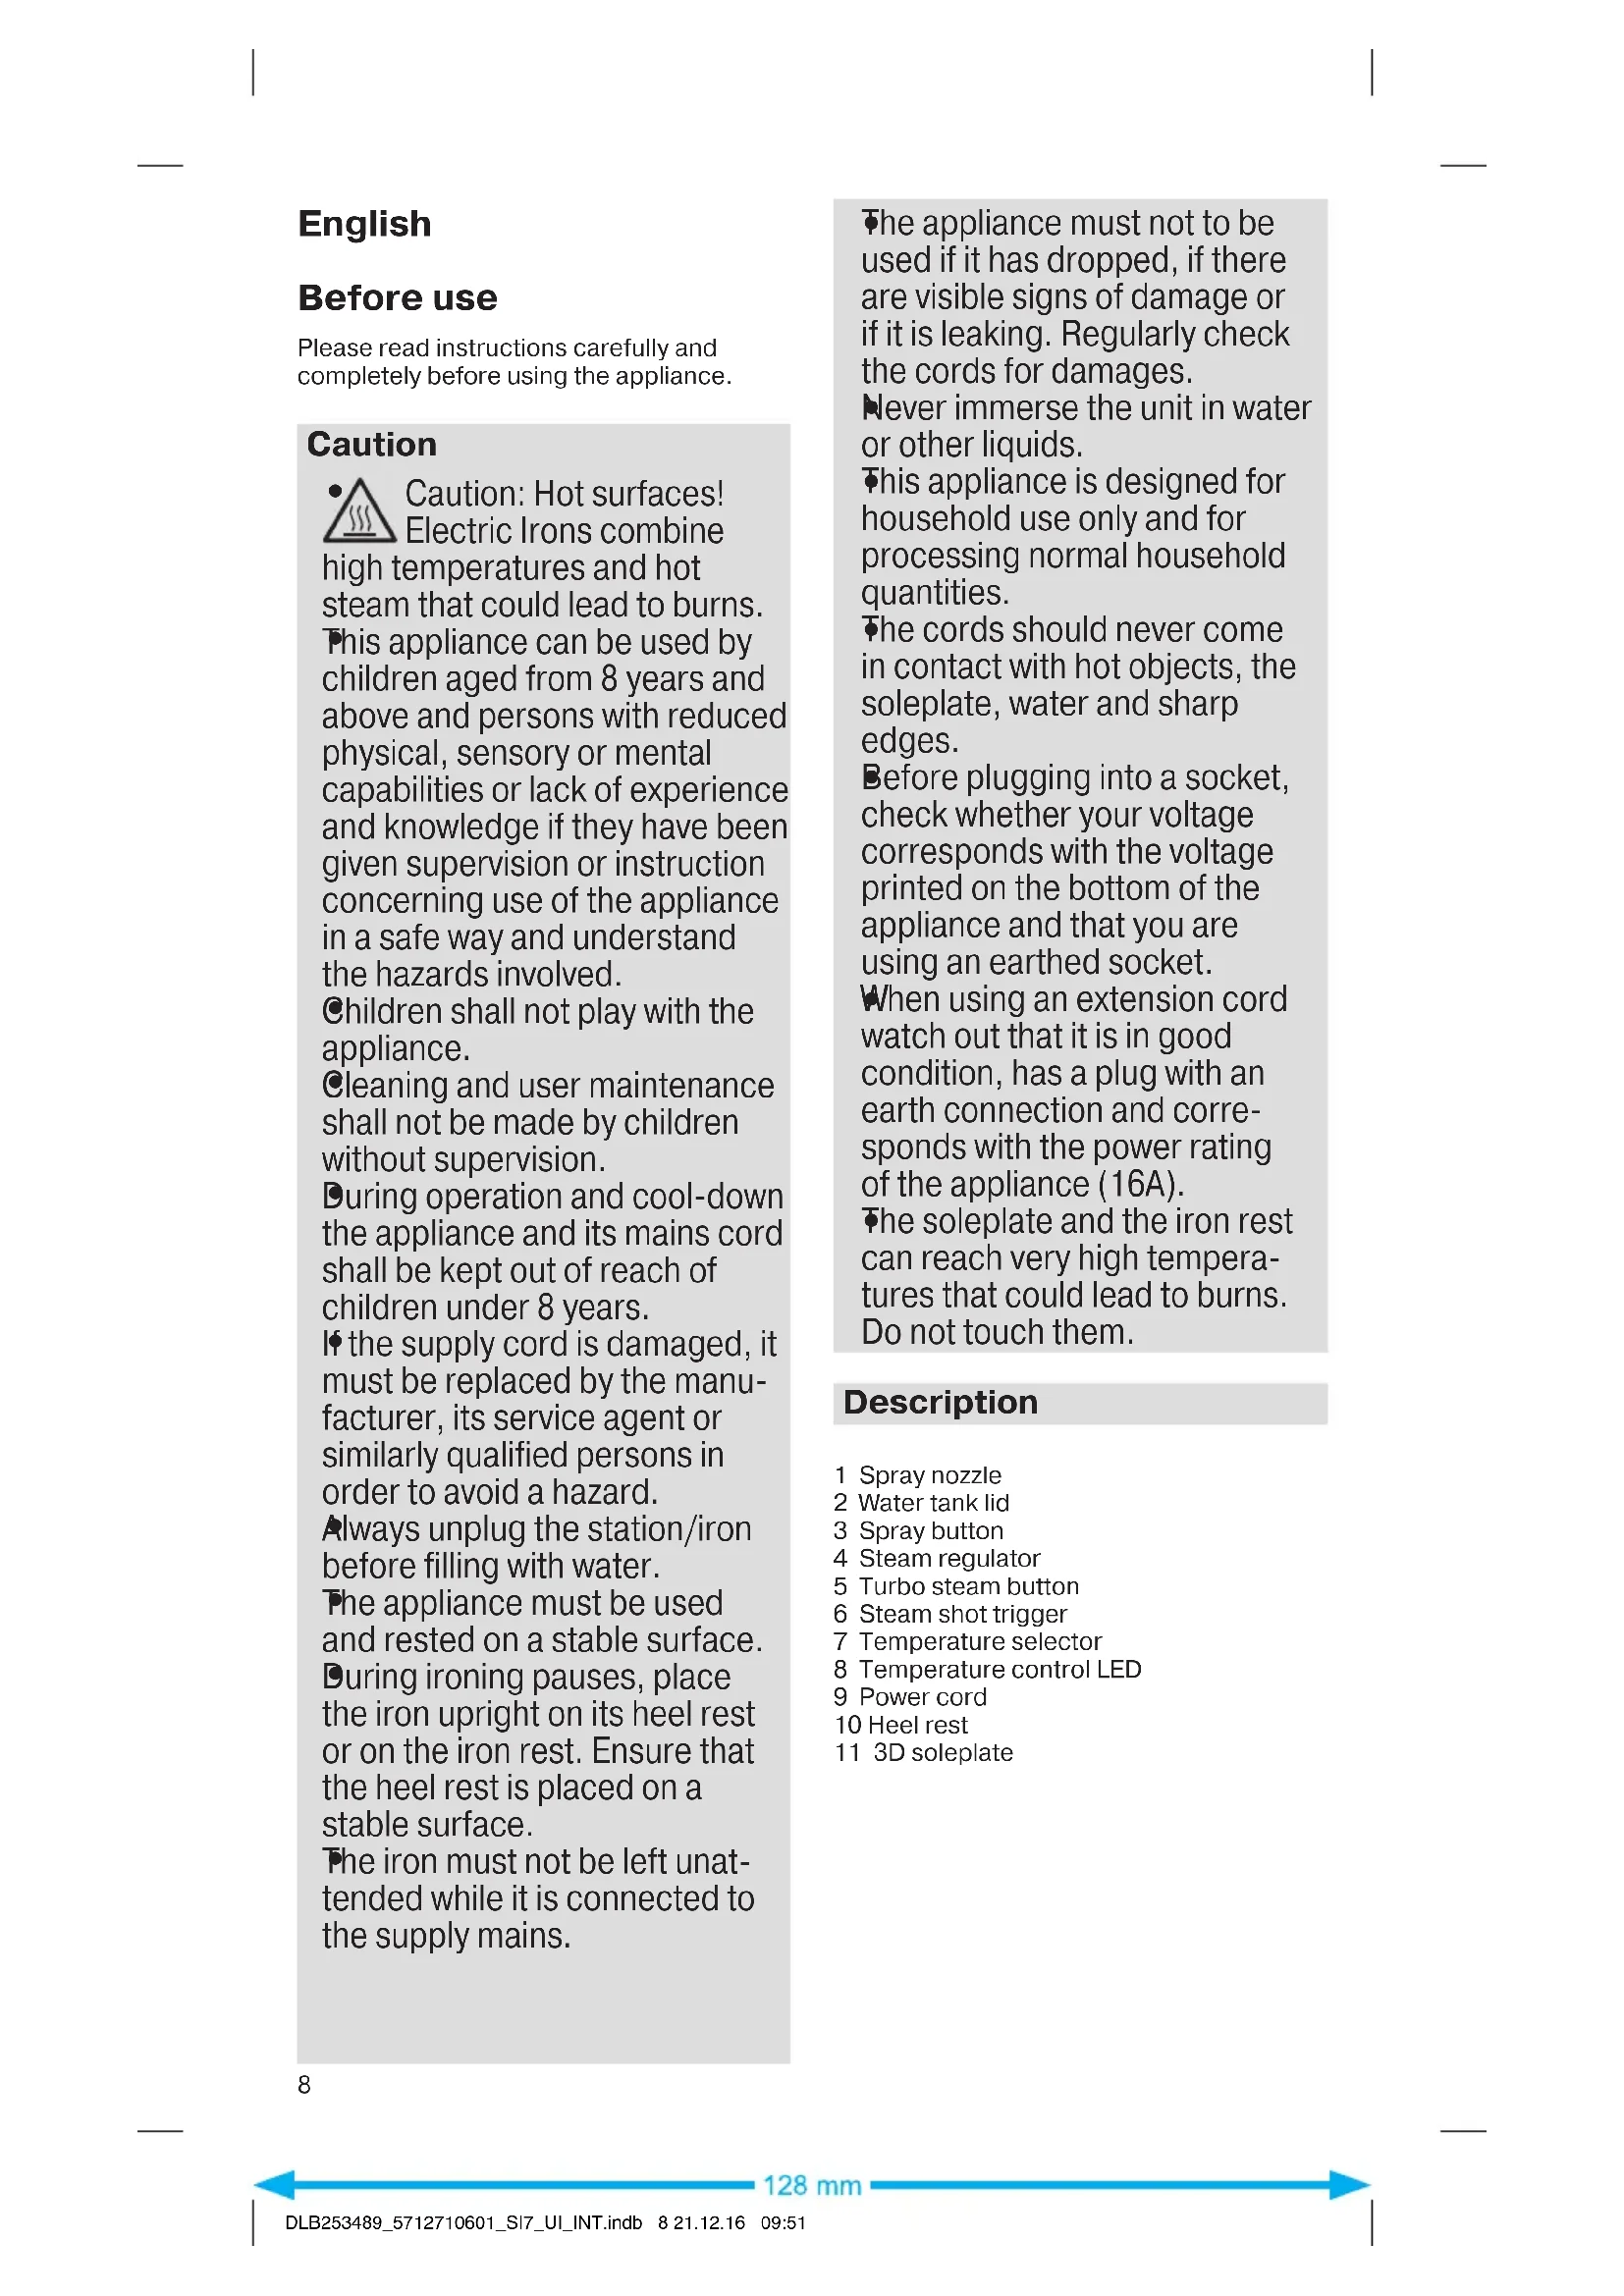
- Select a temperature (7) which is suitable for the garments (refer to the garment guide on the heel rest). The iron starts to heat up and the temperature control LED (8) on the iron is on. The anti-drip function is automatically activated to prevent water leakage at low temperature settings.
- Once the selected temperature is reached, the temperature control LED turns off.
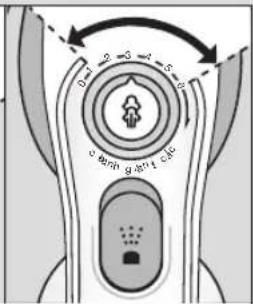
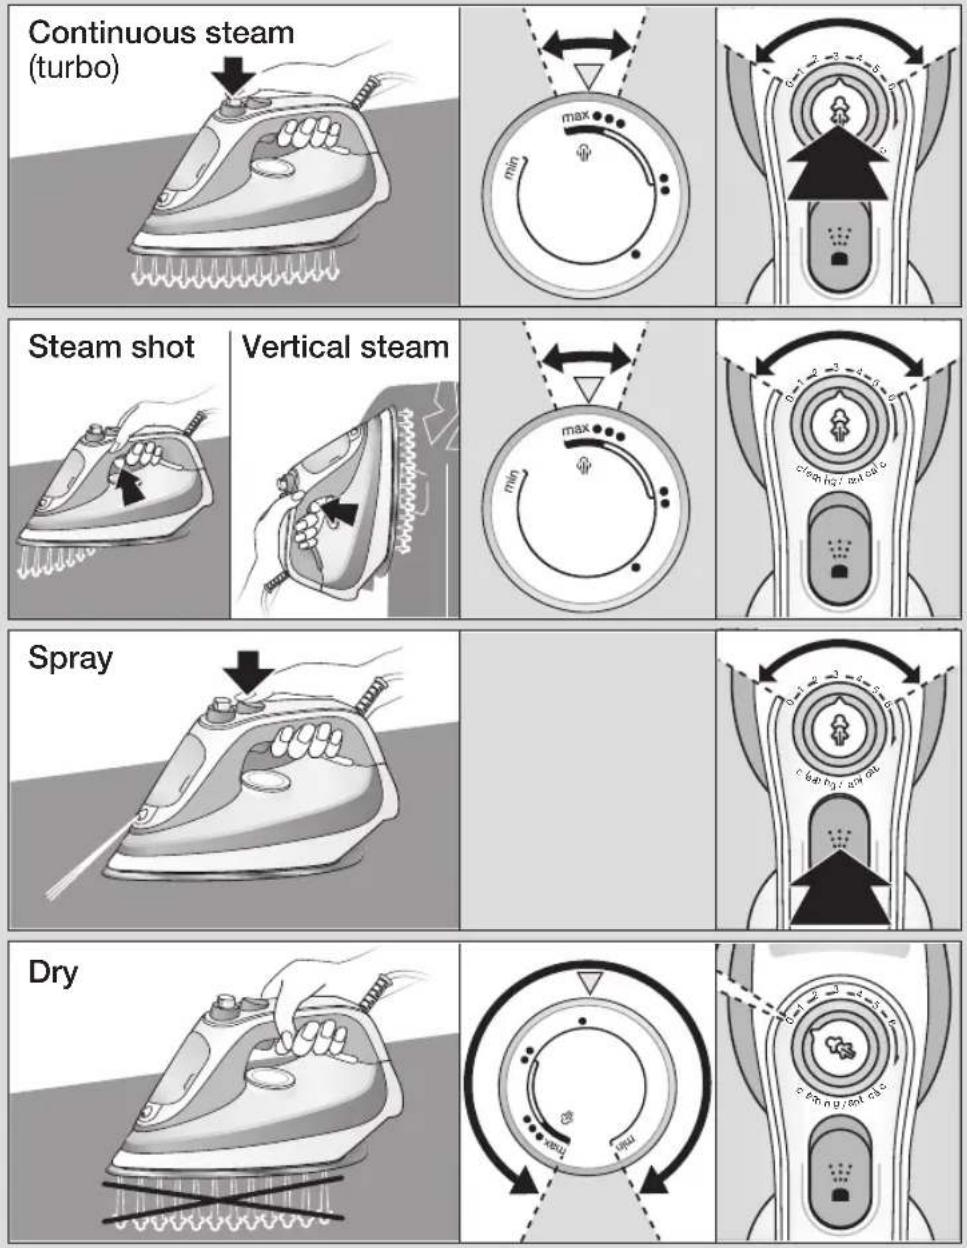
Steam options:
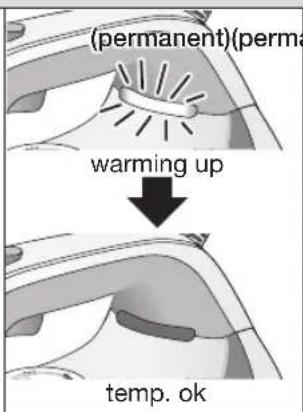
• Continuous steam (normal)
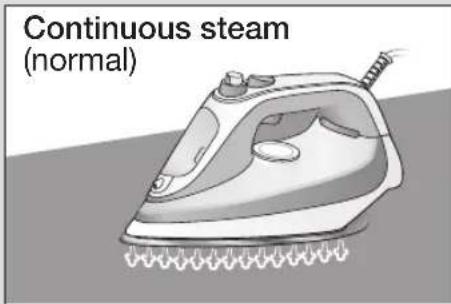
Select the steam quantity by turning the steam regulator (4) in a range from «1» to «6». We recommend a medium steam setting for regular ironing. Only when ironing tough fabrics like linen, thick cotton or jeans it is recommended to use the maximum steam setting
Note: While ironing, do not turn the steam regulator beyond setting «6».
• Continuous steam (turbo)
When the steam regulator is positioned anywhere between «0» and «6» it is possible to activate the turbo function by pressing the turbo steam button (5) in order to emit the highest steam output and remove stubborn creases. Press the turbo steam button for not more than 1 minute.
- Steamshot
Prior to use, press the steam shot trigger (6) 3 to 4 times to activate it.
For a powerful boost of steam, press the steam shot trigger at intervals of a few seconds.
The temperature selector should have a minimum temperature level 3 ( ••• ). It is possible to use the steam shot function by holding the iron in a vertical position and pulling the steam shot trigger. This is useful for removing creases from hanging clothes, curtains etc.
Spray function
The spray function (3) produces a fine mist that evenly moistens the fabric and makes it easier to iron out creases on very tough textiles.
Dry ironing
Set the steam regulator (4) on position «0» (= steam off).
3D soleplate
The unique round shape of the 3D soleplate ensures best gliding results on difficult parts (e.g. buttons, pockets etc.) and in all directions – even backwards.
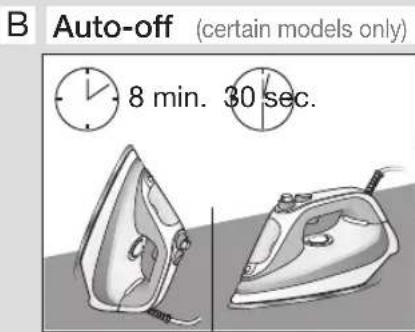
(B) Auto off
For safety and reduced power consumption, the auto-off function is automatically activated when the iron is positioned horizontally on its soleplate for about 30 seconds or vertically on its heel rest for about 8 minutes.
- When the iron is in the auto-off mode the temperature control LED (8) is blinking.
- To turn the iron on again, just move it forward.
- Before start ironing again wait until the temperature control LED is turned off.
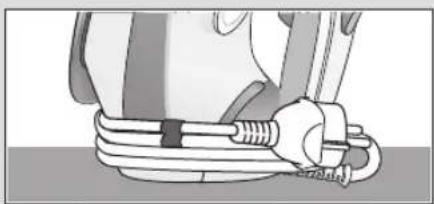
(C) After ironing
- Unplug the iron and empty the water tank.
- Let the iron cool down before storing.
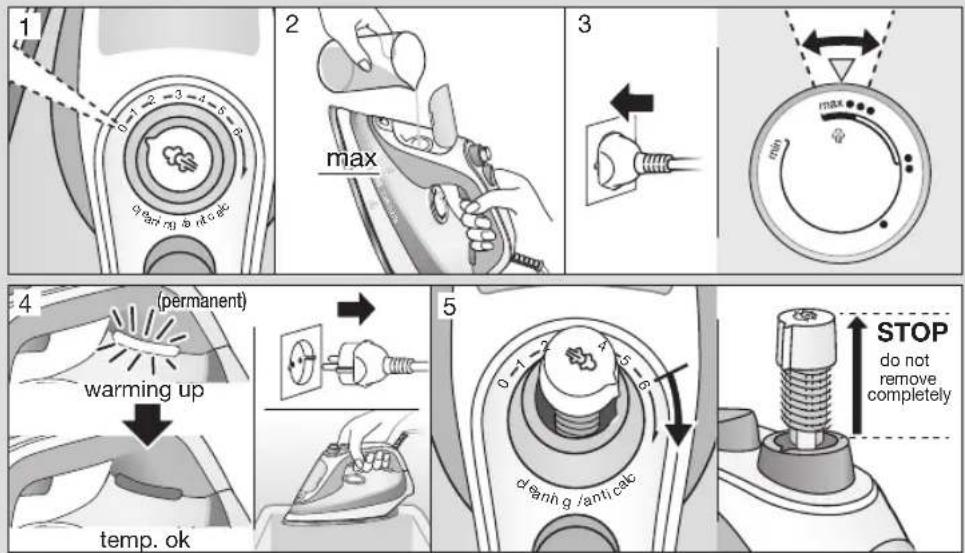
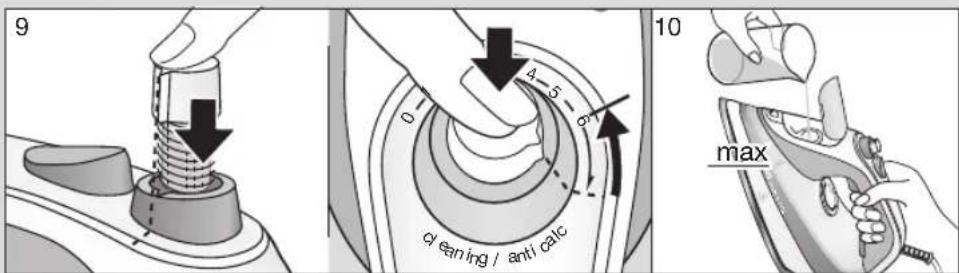
(D) Descaling
Preparation
- Set the steam regulator (4) on position «0» (= steam off).
- Fill the water tank.
- Plug in and set the temperature at "max" on the temperature selector (7).
- Wait until the temperature control LED (8) turns off and unplug the iron. Hold the iron over the sink.
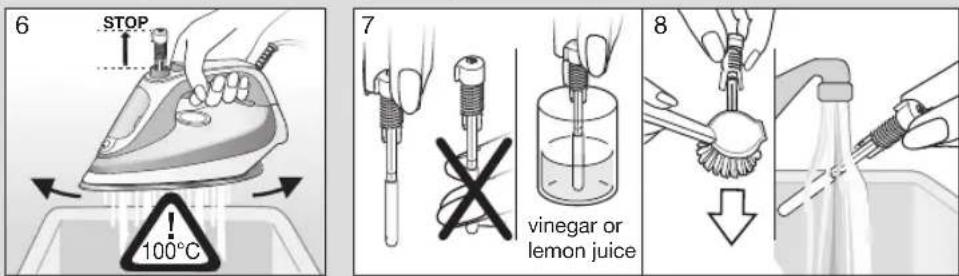
- Turn the steam regulator clockwise beyond steam stetting «6». When you hear a click pull it out vertically until the end of the spring appears. It must not be removed completely.
Self clean
- Move the appliance over the sink. Hot water and steam will come out from the soleplate along with the calc particles from the steam chamber.
Rinsing the valve
To maintain optimum performance, the valve located on the lower end of the turbo steam button has to be rinsed regularly (whenever steam development is insufficient).
- Immerse the lower end of the valve in vinegar (not vinegar essence) or lemon juice for a minimum of 30 minutes.
- Brush off remaining residues and rinse under running water.
Reset
- Re-insert the steam regulator, firmly push it down and turn it back to steam setting «6».
- Refill the water tank.
- Plug in and set the temperature with the temperature selector.
- Wait until the temperature control LED turns off.
Note: The iron must never be used without steam regulator.
Do not use commercial decalcifiers, they may damage the iron.
Note: Frequency of descaling depends on the hardness of the water, quantity of steam used and frequency and duration of ironing sessions.
It is a good practice to run the descaling procedure at least once per month.
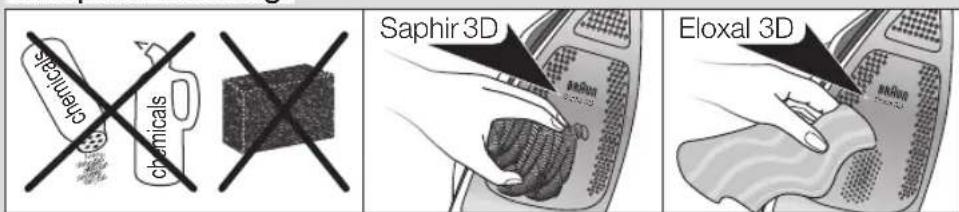
(E) Soleplate cleaning
- Before cleaning, always make sure that the iron is switched off, unplugged and has cooled down completely.
- To clean Saphir soleplate use steel wool. To clean Eloxal soleplate it is suggested to use a damp cloth.
The name of the soleplate is printed on the gift box and on the soleplate itself.
- Never use chemicals, vinegar or scouring pads (eg. sponges with coarse nylon fabrics etc).
For UK Only
Guarantee Information
All Braun Household products carry a minimum guarantee period of two years. (see below for list of exceptions) The rights and benefits under this guarantee are additional to your statutory rights which are not affected.
In the unlikely event of a breakdown you have access to professional help from our team simply by calling:
02392 392333
For service in the Republic of Ireland please call:
012475471
Braun Household undertakes within the specified period to repair or replace any part of the appliance, free of charge (with the exception of any glass or porcelain-ware incorporated in the product) found to be defective provided that;
- We are promptly informed of the defect.
- The product is used and maintained in accordance with the User Instructions.
- The appliance has not been altered in any way or subjected to misuse or repair by a person other than an authorised service agent for Braun Household.
- No rights are given under this guarantee to a person acquiring the appliance second hand or for commercial or communal use.
- Any repaired or replaced appliance will be guaranteed on these terms for the unexpired portion of the guarantee.
- The need for repair has not been caused by insufficient aftercare or cleaning: or damage caused by the chemical or electrochemical effects of water.
Under no circumstances shall the application of this guarantee give rise to the complete replacement of the appliance or entitle the consumer to damages.
Braun Household, New Lane, Havant, Hampshire PO9 2NH
www.braunhousehold.co.uk
Troubleshooting Guide
| PROBLEM POSSIBLE CAUSES SOLUTION | |
| Water droplets drip on the fabric during ironing. | The water tank lid is not properly closed. | Press the water tank lid and check if it is closed . |
| Chemicals have been put into the water tank | Never put chemicals or perfumes into the water tank. Empty the water tank, rinse it 2-3 times. |
| The steam trigger is overused . | Wait a few seconds between each use. Check that the temperature selector is at least on • • . |
| The iron produces little or no steam. | The water tank is empty. Refill the water tank. |
| The valve has collected too much limescale. | Clean the valve. |
| Temperature is not high enough and anti-drip function automatically gets activated to avoid water drops. | Check that the temperature selector is at least on • • . |
| Flakes and white impurities come out during ironing. | The iron has limescale formations inside the steam chamber. | Run the descaling procedure (clean the steam chamber and the valve). |
| The spray function or the steam shot do not work properly. | The water tank is empty. Refill the water tank. |
Subject to change without notice.
Please do not dispose of the product in the household waste at the end of its useful life. Disposal can take place at a Braun Service Centre or at appropriate collection points provided in your country.

Français
Avant utilisation