
PKU375FB1E - Barbecue BOSCH - Free user manual and instructions
Find the device manual for free PKU375FB1E BOSCH in PDF.

| Product type | Electric barbecue with lava stones |
| Brand | Bosch |
| Model | PKU375FB1E |
| Power supply | 220-240 V, 50-60 Hz |
| Cooking type | Grilling with lava stones or poaching |
| Water tank capacity (with stones) | 0.7 liter |
| Water tank capacity (without stones) | 2.5 liters |
| Grill positions | 1 (min) to 9 (max) |
| Preheating time | 8 to 12 minutes |
| Timer | Up to 99 minutes |
| Stopwatch | Yes |
| Automatic safety shut-off | 2-4 hours (adjustable) |
| Child safety | Manual and automatic (adjustable) |
| Residual heat indicator | Two levels: H (hot) and h (warm) |
| Energy consumption display | Yes (in kWh, adjustable according to voltage) |
| Lid material | Glass ceramic |
| Grid material | Metal |
| Prohibited cleaning products | Abrasives, acids, chlorine-based, alcohol-based, hard sponges |
| Spare parts available | Lava stones (ref. 00291050), cleaning gel (ref. 00311761) |
| After-sales service France | 01 40 10 11 00 |
| After-sales service Switzerland | 0848 840 040 |
| Maximum altitude | 2000 m |
| Use | Indoors only |
Frequently Asked Questions - PKU375FB1E BOSCH
User questions about PKU375FB1E BOSCH
0 question about this device. Answer the ones you know or ask your own.
Ask a new question about this device
Download the instructions for your Barbecue in PDF format for free! Find your manual PKU375FB1E - BOSCH and take your electronic device back in hand. On this page are published all the documents necessary for the use of your device. PKU375FB1E by BOSCH.
USER MANUAL PKU375FB1E BOSCH
Register your new Bosch now: www.bosch-home.com/welcome

Elektro-Grill
Electric grill
Gril électrique
Elektrische grill
PKU375FB1E

BOSCH
Störungen, was tun? 14
Important safety information 17

Causes of damage 18

Environmental protection 18
Tips on energy saving 18
Environmentally-friendly disposal 18

Getting to know your appliance 19
Your new lava stone grill 19
Control panel. 19
Controls 20
Residual heat indicator. 20

Before using for the first time. 20
Cleaning the appliance 20
Heating the grill 20

Operating the appliance 21
Grilling with water and lava stones. 21
Switching on or off 21
Setting the grill 21
Preheating the grill 21
Adding water 22
Aftergrilling. 22
Grilling table 22
Tips and tricks 23

Childproof lock. 23
Switching on. 23
Switching off. 23
Automatic childproof lock. 23

Time-setting options 24
Kitchen timer 24
Stopwatch .24

Automatic safety cut-out 24

Energy consumption indicator 24

Basic settings. 25
Changing the basic settings. 25

Cleaning 26
Do not use these cleaning agents .26
Cleaning the appliance 26

Trouble shooting 27
E-report in the displays. 27

Customer service. 28
E number and FD number 28
Additional information on products, accessories, replacement parts and services can be found at www.bosch-home.com and in the online shop www.bosch-eshop.com

Intended use
Read these instructions carefully. Only then will you be able to operate your appliance safely and correctly. Retain the instruction manual and installation instructions for future use or for subsequent owners.
Check the appliance for damage after unpacking it. Do not connect the appliance if it has been damaged in transport.
Only a licensed professional may connect appliances without plugs. Damage caused by incorrect connection is not covered under warranty.
This appliance is intended for private domestic use and the household environment only. The appliance must only be used for the preparation of food and beverages. The cooking process must be supervised. A short cooking process must be supervised without interruption. Only use the appliance in enclosed spaces.
This appliance is intended for use up to a maximum height of 2000 metres above sea level.
Do not use any unsuitable safety devices or child protection grilles. These can cause accidents.
This appliance is not intended for operation with an external clock timer or a remote control.
This appliance may be used by children over the age of 8 years old and by persons with reduced physical, sensory or mental capabilities or by persons with a lack of experience or knowledge if they are supervised or are instructed by a person responsible for their safety how to use the appliance safely and have understood the associated hazards.
Children must not play with, on, or around the appliance. Children must not clean the appliance or carry out general maintenance unless they are at least 8 years old and are being supervised.
Keep children below the age of 8 years old at a safe distance from the appliance and power cable.

Important safety information
This appliance must be installed according to the installation instructions included.

Warning - Risk of fire!
Hot oil and fat can ignite very quickly. Never leave hot fat or oil unattended. Never use water to put out burning oil or fat. Switch off the hotplate. Extinguish flames carefully using a lid, fire blanket or something similar.
The appliance becomes very hot and flammable materials could catch fire. Never store or use flammable objects (e.g. spray cans, cleaning agents) under the appliance or in its immediate vicinity. Never place flammable items on or in the appliance.
- The appliance becomes very hot and flammable materials could catch fire. Do not use any charcoal or similar fuels in this appliance.

Warning - Risk of burns!
The accessible parts become very hot when in operation. Never touch hot parts. Keep children at a safe distance.
- Dripping fat can catch fire quickly during grilling. Do not bend over the appliance. Keep a safe distance away.
- The grill remains hot for a long time after being switched off. Do not touch the grill for 30 - 45 minutes after switching it off.
- When the appliance cover is closed, heat will accumulate. Only close the appliance cover when the appliance has cooled down. Never switch the appliance on with the appliance cover closed. Do not rest food on the appliance cover or use it to keep food warm.
Warning - Risk of electric shock!
Incorrect repairs are dangerous. Repairs may only be carried out by one of our trained after-sales engineers. If the appliance is faulty, unplug the mains plug or switch off the fuse in the fuse box. Contact the after-sales service.
- The cable insulation on electrical appliances may melt when touching hot parts of the appliance. Never bring electrical appliance cables into contact with hot parts of the appliance.
- Do not use any high-pressure cleaners or steam cleaners, which can result in an electric shock.
A defective appliance may cause electric shock. Never switch on a defective appliance. Unplug the appliance from the mains or switch off the circuit breaker in the fuse box. Contact the after-sales service.

Causes of damage
Caution!
- Damage from unsuitable accessories: only use designated original accessories. Do not use grilling trays or aluminium containers. This will damage the cast grill.
If hard or sharp objects fall on the glass ceramic panel or the glass ceramic cover, damage could occur.

Environmental protection
In this section, you can find information about saving energy and disposing of the appliance.
Tips on energy saving
Only heat the appliance until it has reached the desired temperature.
- Switch to a lower grill setting in good time.
- Select the appropriate ongoing grill setting. You will waste energy if you select an ongoing grill setting that is too high.
Use the residual heat of the grill. For longer cooking times, you can switch off the grill 5-10 minutes before the cooking time ends.
Environmentally-friendly disposal
Dispose of packaging in an environmentally-friendly manner.
This appliance is labelled in accordance with European Directive 2012/19/EU concerning used electrical and electronic appliances (waste electrical and electronic equipment - WEEE). The guideline determines the framework for the return and recycling of used appliances as applicable throughout the EU.

Getting to know your appliance
In this section, we will explain the indicators and controls. You will also find out about the various functions of your appliance.
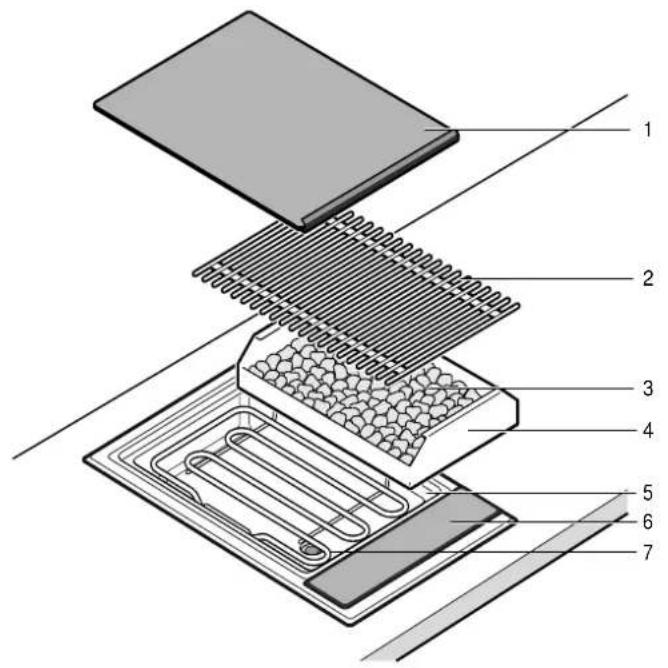
Your new lava stone grill
No. Name
| 1 Glass ceramic cover |
| 2 Wire rack |
| 3 Lava stones |
| 4 Lava stone container |
| 5 Grill container (water bath) |
| 6 Control panel |
| 7 Grill element |
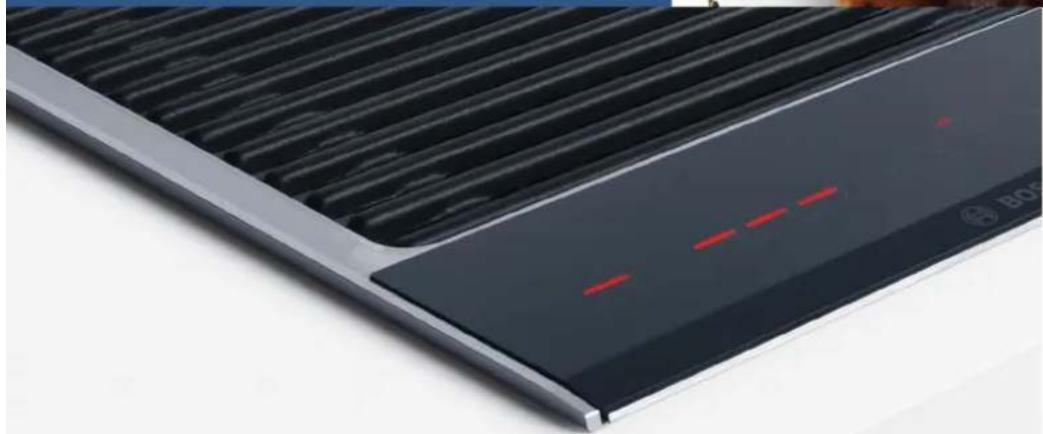
Control panel
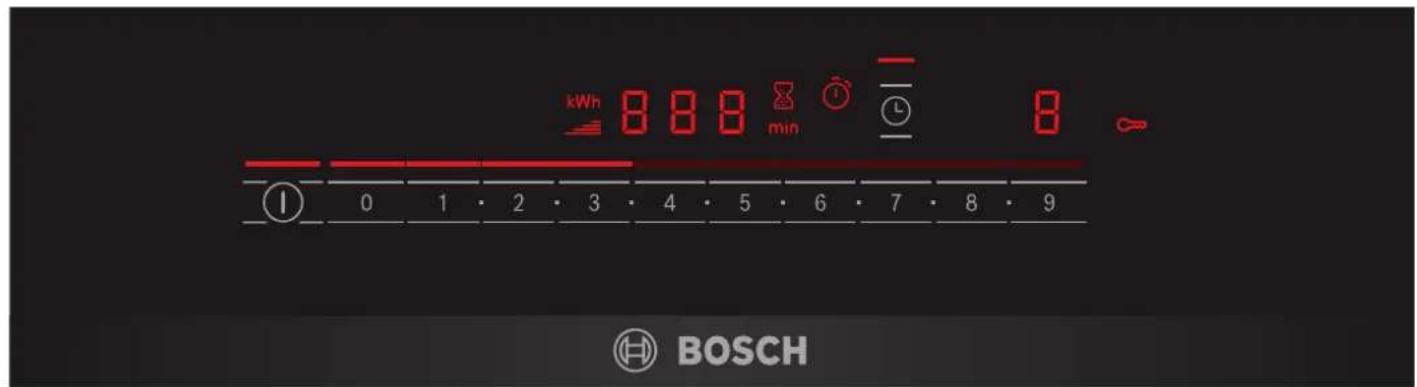
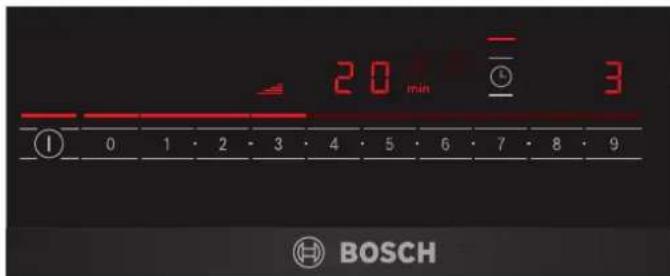
Indicators
| ① 0 | Appliance is switched on* |
| kWh | Energy consumption display |
| = | Heating indicator |
| 00 | Cooking time |
| K | Kitchen timer |
| min | Cooking time |
| ① | Stopwatch |
| *Indicator light above the symbol lights up. | |
Indicators
| Kitchen timer/stopwatch is switched on* | |
| 0-9 | Grill setting |
| ≈ | Childproof lock |
| H/h | Residual heat |
| *Indicator light above the symbol lights up. | |
| Controls | |
| ① | Switch on the appliance |
| ②-9 | Setting the grill setting/kitchen timer |
| ③ | Switching on the kitchen timer/stopwatch/childproof lock |
Controls
Touching a symbol activates the associated function.
Notes
The settings will remain unchanged if you touch multiple symbols at once. This allows you to wipe up spills on the control panel.
Always keep the controls dry. Moisture reduces their effectiveness.
Residual heat indicator
The appliance has a two-stage residual heat indicator. If appears on the display, the appliance is still hot. As the appliance cools down further, the indicator changes to h . The indicator goes out when the appliance has cooled sufficiently.

Before using for the first time
In this section, you can find out what you must do before using your appliance to prepare food for the first time. Read the safety information before you start. "Important safety information" on page 17
Cleaning the appliance
Before using the appliance and accessory parts for the first time, clean them thoroughly with lukewarm soapy water.
Heating the grill
Heat the empty grill for a few minutes at the highest setting. This will eliminate the new odour. A slight development of smoke is normal when the grill is used for the first time.

Operating the appliance
In this section, you can find out how to set your appliance. In the table, you can find the settings for various dishes.
Grilling with water and lava stones
Note: Fill the grill container with water before each use. Otherwise the appliance will overheat.
The amount of water depends on whether you want to use lava stones. The lava stones store the heat from the grill element, leading to intense radiation of heat and even heat distribution.
Filling with water and lava stones
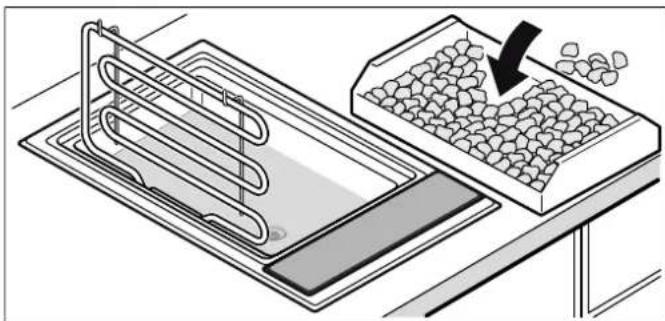
- Remove the wire rack and fold up the grill elements. Remove the lava stone container from the appliance.
- Ensure the drain valve is closed.
- Pour water into the grill container. Grilling with lava stones: 0.7 litre (bottom mark) Grilling without lava stones: 2.5 litres (top mark)
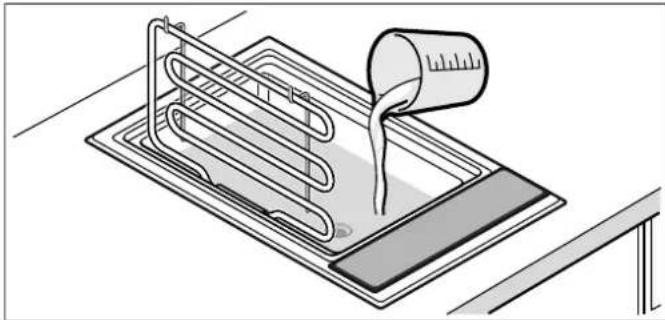
- To grill with lava stones: Remove the lava stones from the packaging and place them in the lava stone container. Insert the lava stone container in the appliance.
- Fold down the grill heating element and replace the wire rack.
The grill is ready to use.
Switching on or off
Note: The appliance switches off automatically when the grill setting remains at 0 for more than 20 seconds.
Switching on
Touch the ① symbol.
An audible signal sounds. The indicator above the main switch lights up. The appliance is ready to use.
Switching off
Touch the ① symbol until the indicator above the main switch goes out.
The appliance is switched off. The residual heat indicator remains lit until the appliance has cooled down sufficiently.
Setting the grill
Set the desired grill setting on the control panel.
Grill setting 1 = lowest output
Grill setting 9 = highest output
Setting the grill setting
- Switch on the grill using the main switch ①.
- Use the buttons to select the desired grill setting. The selected grill setting appears in the display. The heating indicator flashes.
Note: The grill regulates the temperature by switching the grill element on and off. The grill element may also switch on and off at the highest setting.
Preheating the grill
Only place food on the grill when the preheating time has elapsed. The preheating symbol goes out. During the preheating time, the grill heats up at full power. Thereafter, the temperature is reduced by the heating elements being switched on and off in order to maintain a constant temperature for the respective setting.
The preheating time can be between 8 and 10 minutes, depending on the grill setting.
Note: Preheat the empty grill for a maximum of 8-12 minutes. A longer preheating time could result in the appliance switching off (overheating protection). Switch the appliance off and leave it to cool down before switching it on again.
Adding water
Warning - Risk of scalding!
If water touches the hot wire grilling rack or grill element during topping up, hot steam will be generated. Do not reach over the grill while topping up and do not pour water over the hot components.
If there is not enough water in the grill pan, the overheating protection shuts down the appliance. It is therefore important that you keep an eye on the amount of water in the grill pan, and that you add more water if need be.
Note: To add more water, there is no need to remove the wire rack or to swing up the grill element. Before adding more water, allow the grill to cool down sufficiently.
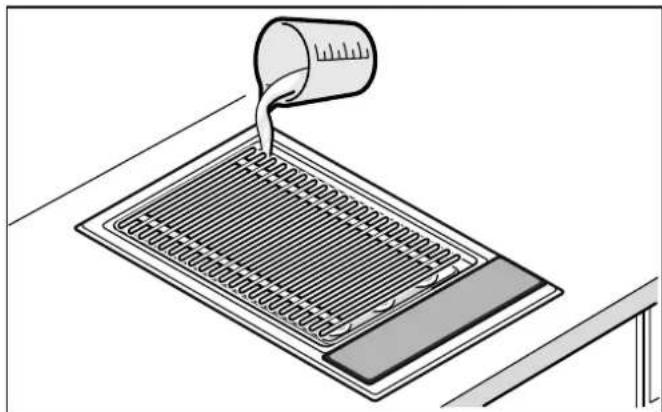
Grilling with or without lava stones: 0.7 litres
Aftergrilling
Only close the glass ceramic cover after the grill has cooled down completely. Leave damp lava stones to dry completely before you close the glass ceramic cover or else mould could develop.
If the water is still hot when being drained, first add cold water to cool it down! To drain the water, place a heat-resistant container underneath the drain tap. Open the tap by turning the lever 90^ downwards. Then close the tap by turning the lever upwards to the stop.
Grilling table
The values in the tables are given as a guide and are based on a pre-heated grill. The values may vary depending on the type and amount of food to be grilled.
Do not place the food to be grilled onto the grill until the pre-heating time has elapsed.
Turn the grilled food at least once.
| Grilled food Grill setting over lava stones | Grill setting over water bath | Grilling time in minutes Information | ||
| Beefsteak, medium, 2-3 cm | 7-898-10 | |||
| T-bone steak, medium rare, 3 cm | 5-66-710-15 | |||
| Pork neck steaks, boned 6-77-812-16 | ||||
| Pork chops, 2 cm 3-44-515-20 Cut along the bone | ||||
| Lamb chops, medium rare, 2 cm | 4-55-612-15 | |||
| Chicken breast, 2 cm 4-55-615-20 | ||||
| Chicken wings, 100 g each | 4-55-615-20 | |||
| Turkey escalope, without breadcrumbs, 2 cm | 4-55-612-15 | |||
| Salmon steak, 3 cm 2-33-420-25 Oil the wire rack | ||||
| Tuna steak, 2 cm 3-44-510-15 Oil the wire rack | ||||
| Trout, whole, 200 g | 4-5 | 5-6 | 12-15 | Oil the skin well; repeat before turning |
| King prawns, 30 g each 5-66-712-15 | ||||
| Hamburgers/meatballs, 1 cm | 3-44-512-17 | |||
| Kebab skewers, 100 g each | 2-33-417-25 Turn frequently | |||
| Grilled sausage, 100 g each | 3-44-510-20 | |||
| Vegetables | 1-22-38-12 | For example, aubergines, courgettes | in slices 1 cm thick, peppers in quarters | |
Tips and tricks
Always pre-heat the grill. That way, the intense heat radiation causes a crust to form quickly and prevents meat juice from escaping.
Before grilling, you can coat or marinate the food in heat-resistant oil (e.g. peanut oil). This improves the flavour. Be careful not to use too much oil/marinade, otherwise this could cause flames to form or generate lots of smoke.
- Do not salt the meat before grilling. Otherwise soluble nutrients and meat juice may escape.
- Place the food to be grilled directly on the wire rack. Do not use any aluminium foil or grilling trays.
- Only turn the items on the grill over when they lift off the wire rack easily. If meat sticks to the grill, the fibres are destroyed and meat juice escapes.
- Do not pierce the meat while grilling it, otherwise meat juice may escape.
Cured meat such as ham and smoked pork chops are not suitable for grilling. This can produce a compound that is harmful to health.
Score chops on the bones and in fatty layers several times so that they do not curl up.
- Remove fatty layers after grilling instead of before, otherwise the meat loses juice and flavour.
Poultry will turn out particularly crispy and brown if you baste it towards the end of the grilling time with butter, salted water or orange juice.
Fruit can be seasoned to taste after grilling with honey, maple syrup or lemon juice.
- You can parboil vegetables that take a long time to cook (e.g. corn on the cob) before placing them on the grill.
- Grill fillets of fish on the skin side first. Coat the skin with oil, so that it does not stick to the wire rack.
- Serve grilled food hot. If you keep it warm it will go tough.
- Drops of fat falling onto the heating element may ignite and briefly produce flames and smoke. Very fatty foods should be grilled over the water bath to minimise this.

Childproof lock
Your appliance is equipped with a childproof lock so that children cannot switch it on accidentally or change any settings.
Switching on
- Switch off the appliance.
- Touch the symbol for at least 4 seconds. The indicator lights up for approximately 10 seconds. The appliance is locked.
Switching off
Touch the symbol until the symbol goes out. The childproof lock is deactivated.
Automatic childproof lock
This function automatically activates the childproof lock every time you switch the appliance off.
Switching on
Switch on the automatic childproof lock. "Basic settings" on page 25

Time-setting options
There are 2 different time-setting options:
Kitchen timer
Stopwatch
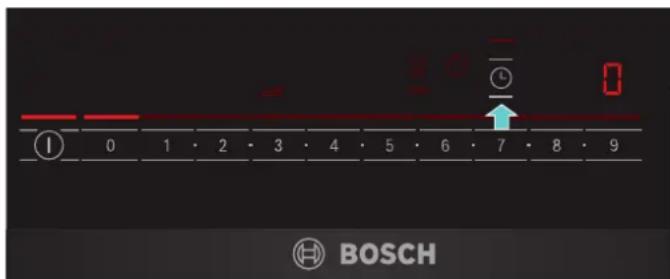
Kitchen timer
You can use the kitchen timer to set a time of up to 99 minutes. It runs independently of all the other settings.
Setting the kitchen timer
- If the appliance is switched off, touch the symbol once; if it is switched on, touch the symbol twice. The indicator lights up. 00 min lights up on the display.
Note: When the appliance is switched on, pressing the symbol once switches on the stopwatch.
- Set the required time using the 0-9 buttons.
The timer starts counting down after a few seconds.
When the time has elapsed
When the time has elapsed, an audible signal sounds and 00 flashes in the display for 10 seconds.
The indicator flashes.
Touch any symbol.
The indicators go out and the audible signal ceases.
Setting the correct time
Use the symbol to select the kitchen timer and reset the time.
Stopwatch
The stopwatch displays the time that has passed since it was activated.
The stopwatch only works when the appliance is switched on. When the appliance is switched off, the stopwatch is switched off as well.
Note: If the kitchen timer is selected in addition to the stopwatch, the setting will appear on the timer display for 10 seconds. The stopwatch will then be displayed again.
Switching on
- Touch the symbol.
is shown on the display. - Touch the buttons for temperature control. Timing starts. Seconds are displayed during the first minute, then minutes.
- Touch the symbol to show the timer display again.
Switching off
- Touch the symbol.
- Touch the temperature setting buttons. The stopwatch will be switched off. The timer display will go out.

Automatic safety cut-out
If an appliance has been switched on for a long time without the setting being changed, the automatic switch-off is activated.
The appliance stops heating. F and the residual heat indicator H / h flash alternately on the display.
The indicator goes out when you touch any of the controls. You can implement new settings.
At what point the automatic switch-off is activated depends on the grill setting selected (2 to 4 hours).

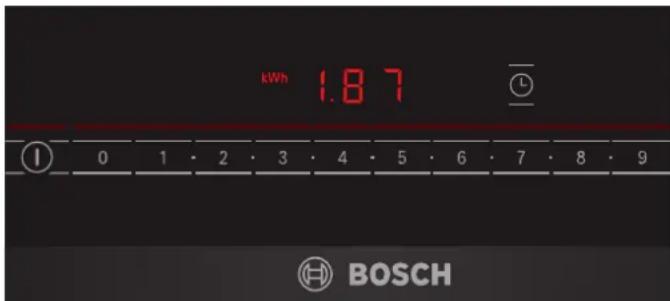
Energy consumption indicator
You can use this function to display the total energy consumption between switching the appliance on and off.
Once switched off, the energy consumption in kilowatt hours (e.g. 1.87 kWh) is displayed for 10 seconds.
The accuracy of the display depends, amongst other things, on the voltage quality of the power supply.
The energy consumption display may not be activated. "Basic settings" on page 25

Basic settings
Your appliance has various basic settings. You can adapt these settings to suit your own needs.
| Display Function | |
| c0 | Reset the basic settings |
| 0 | Switched off.* |
| 1 | Switched on. |
| c1 | Childproof lock |
| 0 | Automatic childproof lock switched off.* |
| 1 | Automatic childproof lock switched on. |
| 2 | Manual and automatic childproof lock switched off. |
| c2 | Audible signal |
| 0 | Confirmation signal and operation error signal switched off (main switch signal always remains on). |
| 1 | Only the operation error signal is switched on. |
| 2 | Only the confirmation signal is switched on. |
| 3 | Confirmation signal and operation error signal switched on.* |
| c3 | Energy consumption display (Ask your electricity supply company what the mains voltage is.) |
| 0 | Consumption display switched off.* |
| 1 | Consumption display with mains voltage at 230 V. |
| 3 | Consumption display with mains voltage at 220 V. |
| 4 | Consumption display with mains voltage at 240 V. |
| c5 | Automatic switch-off (The higher the level selected, the longer the period of time until the appliance switches off.) |
| 0 | Switch off after 2-4 hours.* |
| 1 | Switch off after 1-2 hours. |
| 2 | Switch off after 30-60 minutes. |
| c6 | Duration of the timer end signal |
| 1 | 10 seconds.* |
| 2 | 30 seconds. |
| 3 | 1 minute. |
| c8 | Demo mode |
| 0 | Switched off.* |
| 1 | Switched on. Appliance can be operated but does not heat up. |
| *Basic setting | |
Changing the basic settings
The appliance must be switched off.
- Switch on the appliance.
- Within the next 10 seconds, touch the symbol for approximately 4 seconds until an audible signal sounds.
±bc and ±b flash alternately and lights up.
- Touch the symbol as many times as necessary until the required indicator appears.
- Set the required value using the buttons for temperature control.
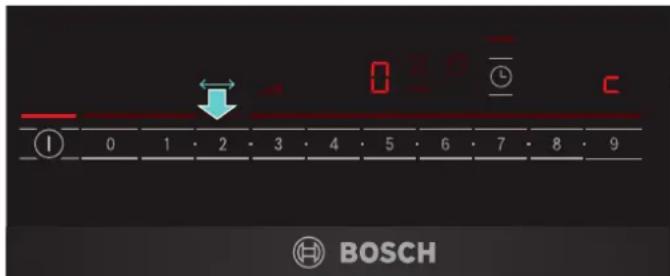
- Repeat steps 3 and 4 until all the required settings have been changed.
- Touch the symbol for approximately 4 seconds until an audible signal sounds.
The settings have been saved.
Discarding the changes
To exit the basic settings, switch off the appliance with the main switch. Changes are not saved.

Cleaning
With good care and cleaning, your appliance will retain its appearance and remain fully functioning for a long time to come. We will explain here how you should correctly care for and clean your appliance.
Suitable maintenance and cleaning products can be purchased from the after-sales service or in our e-Shop.
Warning - Risk of burns!
The appliance becomes hot during operation. Allow the appliance to cool down before cleaning.
Warning - Risk of electric shock!
Do not use any high-pressure cleaners or steam cleaners, which can result in an electric shock.
Warning - Risk of burns!
The accessible parts become very hot when in operation. Never touch hot parts. Keep children at a safe distance.
Do not use these cleaning agents
Scouring or chemically aggressive cleaners
Acidic cleaners (e.g. vinegar, citric acid, etc)
Cleaners containing chlorine or with a high content of alcohol
Oven cleaner
- Hard and scratchy sponges, brushes or scouring pads
Thoroughly wash out new sponge cloths before using them.
Cleaning the appliance
Leave the appliance to cool and clean after each use. This will prevent residues from being burnt on. Residues that have been burnt-on several times can only be removed with difficulty.
- Allow the appliance to cool down.
- Remove the wire rack.
- Swing the heating element upwards.
- Remove the lava stone trough and lava stones.
- Leave burnt-on residues to soak in water and washing-up liquid.
Note: Do not scrape off burnt-on residues.
| Appliance part/sur-face | Recommended cleaning |
| Wire rack Remove large clumps of residue using a scrubbing brush. Soak the wire rack in the sink. Clean using a scrubbing brush and washing-up liquid and dry thoroughly. Apply our grill cleaner gel (order no. 00311761) to stubborn dirt and let it work for at least 2 hours, or overnight for heavy soiling. Then rinse off thoroughly and dry. Follow the instructions on the cleaner's packaging. Note: Do not clean them in the dishwasher. | |
| Lava stone trough and grill container | Remove the lava stones and drain the water. Clean in a sink of water and washing-up liquid using a scrubbing brush; dry with a soft cloth. Soak stubborn dirt or apply our grill cleaner gel (order no. 00311761) to it to remove it. |
| Lava stones Occasionally dry out very damp lava stones in the oven at 200 °C. This will prevent the formation of any mildew. Replace the lava stones when they have turned black. This means that the lava stones are saturated with fat, which may generate a lot of smoke during operation, or the fat may ignite. You can obtain replacement lava stones from your specialist dealer (order number 00291050). Take care when refilling that the grill element is not resting directly on the lava stones. | |
| Control panel and glass ceramic cover | Clean using a soft, damp cloth and some washing-up liquid; the cloth must not be too wet. Dry with a soft cloth. |

Trouble shooting
Warning - Risk of electric shock!
Incorrect repairs are dangerous. Repairs may only be carried out by one of our trained after-sales engineers. If the appliance is faulty, unplug the mains plug or switch off the fuse in the fuse box. Contact the after-sales service.
Faults often have simple explanations. Please read the information in the table before calling the after-sales service.
The electronics of your appliance are underneath the control panel. For various reasons, the temperature in this area may rise sharply.
So that the electronics do not overheat, the appliance is automatically switched off as required. F2 or F4 is displayed alternately with the residual heat indicator H or h .
| Display Error Remedy | ||
| None The power supply has been disconnected. Check the household fuse for the appliance. Check whether there is a power cut by trying other electronic appliances. | ||
| All displays flash The touch controls are wet or an object is resting on them. | Dry the controls or remove the object. | |
| F4 | The electronics have overheated. The appliance has therefore been switched off. | Wait until the electronics have cooled down sufficiently. Touch any control. F4 goes out. |
| F8 | The appliance was in operation for too long and has switched itself off. | Switch the appliance on again. |
| dE Appliance does not heat up | Demo mode is switched on Switching off demo mode: Disconnect the appliance from the power supply for 30 seconds (switch off the household fuse or the circuit breaker in the fuse box). Switch on the appliance. Touch any control in the next 3 minutes. Demo mode is switched off. | |
E-report in the displays
When an error message with "E" appears in the display, e.g. E0111, switch the appliance off and on again.
If it was a one-off error, the display goes out. If the error message appears again, call the after-sales service and quote the exact error message.

Customer service
Our after-sales service is there for you if your appliance needs to be repaired. We will always find an appropriate solution, also in order to avoid after-sales personnel having to make unnecessary visits.
E number and FD number
Please quote the E-number (product number) and the FD number (production number) of your appliance when contacting the after-sales service. The rating plate bearing these numbers can be found on the appliance certificate.
Please note that a visit from an after-sales service engineer is not free of charge in the event of misuse of the appliance, even during the warranty period.
Please find the contact data of all countries in the enclosed customer service list.
To book an engineer visit and product advice
GB 0344 892 8979
Calls charged at local or mobile rate.
IE014502655
0.03 € per minute at peak. Off peak 0.0088 € per minute.
Rely on the professionalism of the manufacturer. You can therefore be sure that the repair is carried out by trained service technicians who carry original spare parts for your appliances.
Table des matieres

E-melding in de indications. 53

Servicedienst 54
Kookwekker
Stopwatch
Kookwekker
- Intended use
- Important safety information
- Warning - Risk of fire!
- Warning - Risk of burns!
- Warning - Risk of electric shock!
- Causes of damage
- Caution!
- Environmental protection
- Tips on energy saving
- Environmentally-friendly disposal
- Getting to know your appliance
- No. Name
- Controls
- Notes
- Residual heat indicator
- Before using for the first time
- Cleaning the appliance
- Heating the grill
- Operating the appliance
- Grilling with water and lava stones
- Filling with water and lava stones
- Switching on or off
- Switching on
- Switching off
- Setting the grill
- Setting the grill setting
- Preheating the grill
- Adding water
- Warning - Risk of scalding!
- Aftergrilling
- Grilling table
- Tips and tricks
- Childproof lock
- Automatic childproof lock
- Time-setting options
- Kitchen timer
- Setting the kitchen timer
- When the time has elapsed
- Setting the correct time
- Stopwatch
- Automatic safety cut-out
- Energy consumption indicator
- Basic settings
- Changing the basic settings
- Discarding the changes
- Cleaning
- Do not use these cleaning agents
- Trouble shooting
- E-report in the displays
- Customer service
- E number and FD number
- To book an engineer visit and product advice
- Table des matieres
- Kookwekker
Brand : BOSCH
Model : PKU375FB1E
Category : Barbecue