
Snow Sound Bar - Soundbar ALTEC LANSING - Free user manual and instructions
Find the device manual for free Snow Sound Bar ALTEC LANSING in PDF.
| Brand | Altec Lansing |
| Model | Snow Sound Bar |
| Product Type | Soundbar with wireless subwoofer |
| Dimensions (soundbar) | 950 x 62 x 45 mm |
| Dimensions (subwoofer) | 465 x 255 x 94 mm |
| Power Supply | AC 220-240 V, 50/60 Hz |
| Output Power (soundbar) | 2 x 30 W |
| Output Power (subwoofer) | 60 W |
| Power Consumption (soundbar) | 30 W |
| Power Consumption (subwoofer) | 30 W |
| Standby Power Consumption | < 0,5 W |
| Frequency Response (soundbar) | 150 Hz - 20 kHz |
| Frequency Response (subwoofer) | 30 Hz - 150 Hz |
| Impedance (soundbar) | 8 Ω x 2 |
| Impedance (subwoofer) | 4 Ω |
| Audio Input Sensitivity | 500 mV |
| Connectivity | Bluetooth, optical, AUX (RCA and 3.5 mm), MP3 LINK (3.5 mm) |
| Main Functions | Bluetooth, equalizer (Movie, Music, Flat), remote control, auto-off |
| Safety | Automatic shutdown after 15 min without signal, minimum distance of 10 cm around for ventilation |
| Maintenance and Cleaning | Wipe with a soft, dry cloth. Do not use abrasive products. |
| After-Sales Service | Customer Service 0811 482 202 (France) |
Frequently Asked Questions - Snow Sound Bar ALTEC LANSING
User questions about Snow Sound Bar ALTEC LANSING
0 question about this device. Answer the ones you know or ask your own.
Ask a new question about this device
Download the instructions for your Soundbar in PDF format for free! Find your manual Snow Sound Bar - ALTEC LANSING and take your electronic device back in hand. On this page are published all the documents necessary for the use of your device. Snow Sound Bar by ALTEC LANSING.
USER MANUAL Snow Sound Bar ALTEC LANSING
ASSOCIATION MANUELLE 9
MODE D'EMPLOI 10
VEILLE/ALLUMÉ 10
SELECTION DU MODE 10
RÉGLAGE DU VOLUME 10
SELECTIONNEZ UN EFFET D'EGALISEUR PREDEFINIT 10
MODES AUX/LIEN MP3/OPTIQUE 10
FONCTION BLUETOOTH 11
ASSOCIATION DES DISPOSITIFS BLUETOOTH 11
ÉCOUTER LA MUSIQUE DIFFUSÉE DEPUIS UN DISPOSITIF BLUETOOTH 12
DEPANNAGE 12
CHARACTERISTIQUES TECHNIQUES 13
ACCESSIONS STANDARDS 13
MAINTENEZ VOTRE APPAREIL AU SEC
Modes AUX/LIEN MP3/OPTIQUE
Accessoires standards
Market Maker Brand Licensing
79/81 ANCIENNE ROUTE NATIONALE 7
69570 DARDILLY
2015 Altec Lansing/AL Infinity, LLC.
IMPORTANT SAFETY INSTRUCTIONS 2
SAFETY PRECAUTIONS 2
WARRANTY CONDITIONS 4
IDENTIFYING THE PARTS 5
MAIN UNIT. 5
WIRELESS SUBWOOFER 6
REMOTE CONTROL 6
PREPARATIONS 7
PREPARE THE REMOTE CONTROL 7
REPLACE THE REMOTE CONTROL BATTERY 7
CONNECTIONS 8
USE THE OPTICAL SOCKET. 8
USE THE AUX SOCKET. 8
USE THE MP3 LINK SOCKET 87
CONNECT POWER 9
PAIRING THE WIRELESS SUBWOOFER WITH THE MAIN UNIT. 9
AUTOMATIC PAIRING 9
MANUAL PAIRING 9
Important Safety Instructions
The lightning flash with arrowhead symbol, within an equilateral triangle, is intended to alert the user to the presence of uninsulated "dangerous voltage" within the product's enclosure that may be of sufficient magnitude as to constitute a risk of electric shock to persons.
The exclamation point within an equilateral triangle is intended to alert the user to the presence of important operating and maintenance (servicing) instructions in the literature accompanying the appliance.

CAUTION
RISK OF ELECTRIC SHOCK DO NOT OPEN
CAUTION: TO REDUCE THE RISK OF ELECTRIC SHOCK, DO NOT REMOVE COVER (OR BACK). NO USER-SERVICEABLE PARTS INSIDE. REFER SERVICING TO QUALIFIED SERVICE PERSONNEL.

Safety precautions
Read these safety instructions before using your device and store them for possible future reference.
- If the cord is damaged, have it repaired by the manufacturer, its service or a similarly qualified person in order to avoid any hazard.
- The power supply must be replaced by a new one in case of malfunction, because this power supply is not repairable.
- The socket-outlet shall be installed near the equipment and shall be easily accessible
- The product is not intended for use by persons (including children) with reduced physical, sensory or mental capacity. Persons who have not read the manual, unless they have received explanations by a person responsible for their safety and supervision should not use this unit.
Children should be monitored to ensure that they do not play with the product. - The cord should always be readily accessible.
The apparatus shall not be exposed to dripping or splashing of water or liquids and that no objects filled with liquids such as flowers vascs shall be placed on the product.
The normal ventilation of the product shall not be impended for intended use.
Always leave a minimum distance of 10cm around the unit to ensure sufficient ventilation. - Open flame sources, such as candles, should not be placed on top of the device.
The device is intended for use only in a temperate climate. - CAUTION: Danger of explosion if battery is incorrectly replaced or not replaced by the same type or equivalent.
The battery should not be exposed to excessive heat such as sunshine, fire or similar.
Different types of batteries, new and used batteries should not be mixed. - The battery must be installed according to the polarity.
If the battery is worn, it must be removed from the product. - The battery must be disposed of safely. Always use the collection bins provided (check with your dealer) to protect the environment.
SWITCH OFF IN RESTRICTED AREAS
Switch the mobile device off where the use of mobile devices is not allowed or where there is a risk of causing interference or danger, for example on board an aircraft, near medical equipment, fuel, chemicals or blasting sites.
INTERFERENCE
All wireless devices are susceptible to interference which may affect their performance.
AUTHORISED PERSONNEL
Only qualified people are authorized to install or repair this product.
ACCESSIONS
Only use batteries, chargers and other accessories which are compatible with this equipment. Do not connect incompatible products.
KEEP THE EQUIPMENT DRY
This equipment is not water proof. Keep it dry.
CHILDREN
Keep your mobile device in a safe place, out of the reach of young children. The mobile device contains small parts that may present a choking hazard.
Precautions for use
Radio frequency interference
Radio frequency output from electronic devices can interfere with other electronic equipment and cause malfunctions. Although this mobile device has been designed in accordance with EU regulations on radio frequency emission, mobile device wireless transmitters and electrical circuits can cause interference with other electronic equipment. We therefore recommend taking the following precautions:
Aircraft: Wireless equipment can cause interference in aircraft.
- Turn off your mobile device before boarding the aircraft.
- Do not use on the ground until allowed to do so by the flight crew.
Vehicles: Mobile device radio frequency emissions can affect the electronic systems of motor vehicles. In relation to your vehicle, check with the manufacturer or dealer.
Medical implants: Medical equipment manufacturers recommend a minimum distance of 15 centimeters between a wireless device and an implanted medical device such as a pacemaker or defibrillator to avoid any interference with the medical device. It is recommended that people fitted with such devices:
- Always keep wireless equipment more than 1.5cm away from the medical device.
- Never carry wireless equipment in a breast pocket.
- Place such equipment at the opposite ear to the medical device.
- Turn off the wireless equipment if they think it is interfering with their device
- Follow the instructions provided by the medical implant manufacturer.
- If you are fitted with a medical implant and have any questions related to the use of your mobile/wireless equipment, you should consult your doctor
Hearing Warning: Using a headset risks not bc able to correctly hear outside sounds. Do not use a headset when it could endanger your safety. Some mobile devices can interfere with the proper operation of hearing aids.
Other medical devices: Radio transmitting equipment including mobile devices may interfere with the proper operation of insufficiently protected medical equipment. Consult a doctor or the medical equipment manufacturer to find out whether the equipment is sufficiently protected from external radio wave signals. Turn off your device where required by regulations, particularly in hospitals.
Health facilities: Hospitals and health facilities may be using equipment which is particularly sensitive to external radio frequency emissions. Turn off the mobile device when staff or notices tell you to.
Blasting sites and marked areas: Turn off your device in potentially explosive areas. Follow all official instructions. Sparks in such areas can cause an explosion or a fire, resulting in serious injury or death. Turn off your equipment in petrol/gas stations, especially when near the fuel pumps. Strictly follow usage restrictions in fuel depots, chemical plants or in places using explosives.
Potentially explosive areas are often, but not always, clearly signed. These include areas where it is normally considered advisable to turn off vehicle engines, the area below deck on ships, chemical storage or transfer plants, and areas where the air contains chemical products or particles, such as grain, dust and metal powder. Check with the makers of LPG (such as propane or butane) vehicles that the device can be used safely in their vicinity.
Warranty Conditions
This product is guaranteed for 1 year against defects in manufacturing or assembly.
This guarantee only applies to the primary purchase by the end user. It does not cover issues related to improper handling by the user. Proof of purchase is required in order to render the warranty valid.
The warranty does not cover problems associated with improper use, whether it is a result of negligence, processing, failure to store properly (excessive heat or humidity), improper installation or unauthorized repairs.
The manufacturer is contractually required to repair or replace the defective product. ALTEC LANSING is under no financial obligation to pay any amount in excess of that paid by the end user.
Reasons for warranty exclusions:
- Expired warranty period
No proof of purchase
Visible damage / breakage - Oxidation
- Improper use
Use of non-approved accessories
Product altered, repaired or modified by an unauthorized third party - Missing or altered serial number
Warranty voided due to broken or altered packaging - Damage due to accident, neglect, improper maintenance/care or force majeure
- Damage due to the installation of third-party software or a virus
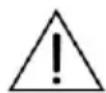
Identifying the Parts
Main Unit
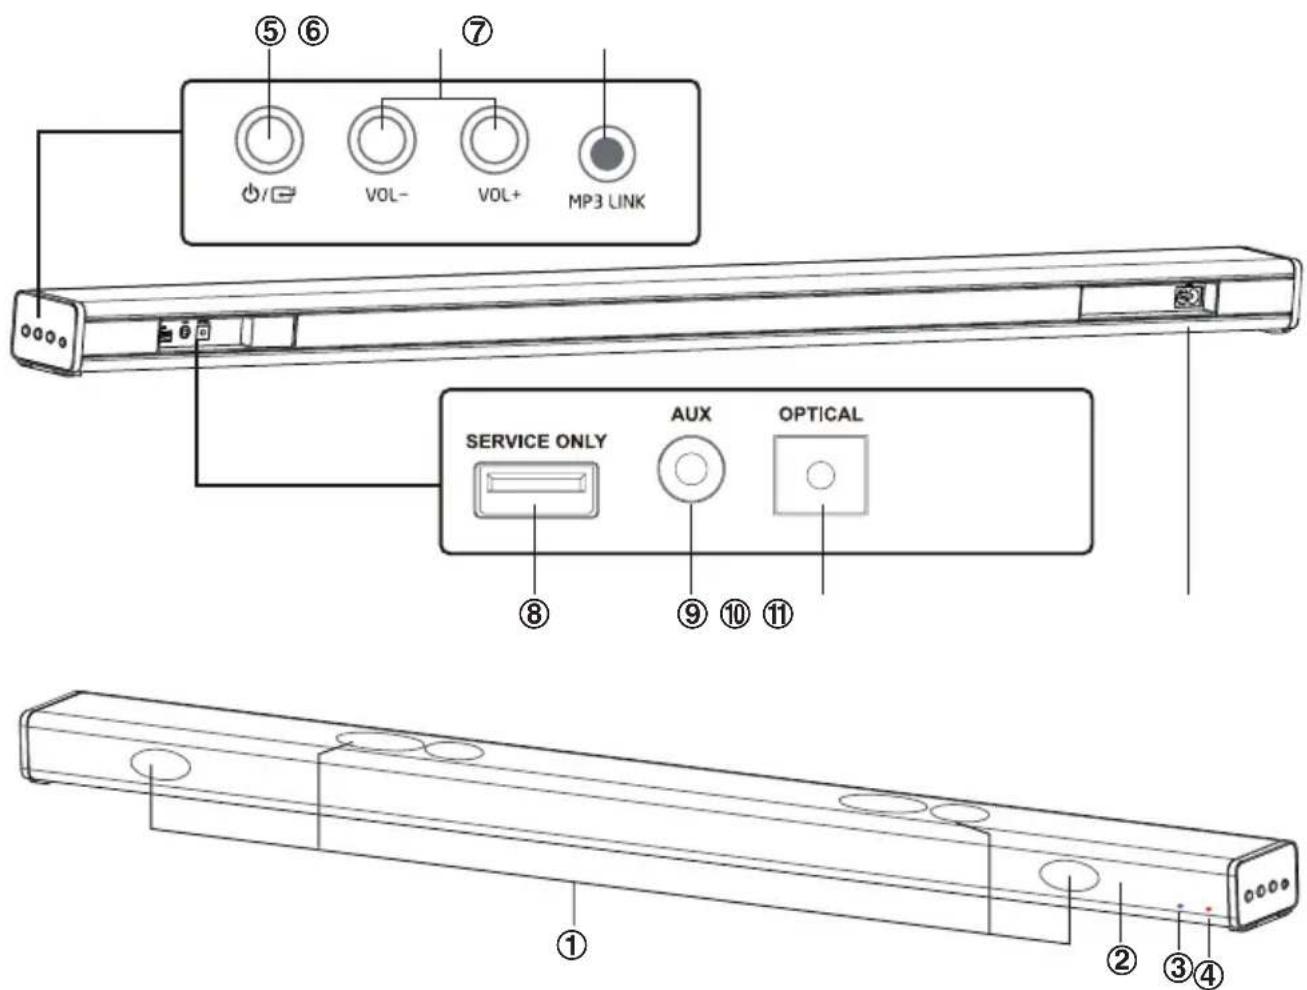
1 Speakers
2 Remote Control Sensor
Receive signal from the remote control.
3 LED Indicators
Purple light : In OPTICAL mode
Green light : In AUX mode
Yellow light : In MP3 LINK mode
Blue light In BT (Bluetooth) mode
4 Standby Indicator
Light up red when in Standby mode.
5 button
Press this button to turn ON or press and hold to Standby mode.
Select the play function.
6 VOL+/VOL- buttons
Increase/decrease the volume level.
7 MP3 LINK Socket
Connect to an external audio device.
8 SERVICE ONLY Socket
The USB socket is for service only. It is not designed to charge smartphones, tablets or similar devices.
9 AUX Socket
Connect to an external audio device.
10 OPTICAL Socket
Connect to an external audio device.
11 AC~Socket
Wireless Subwoofer
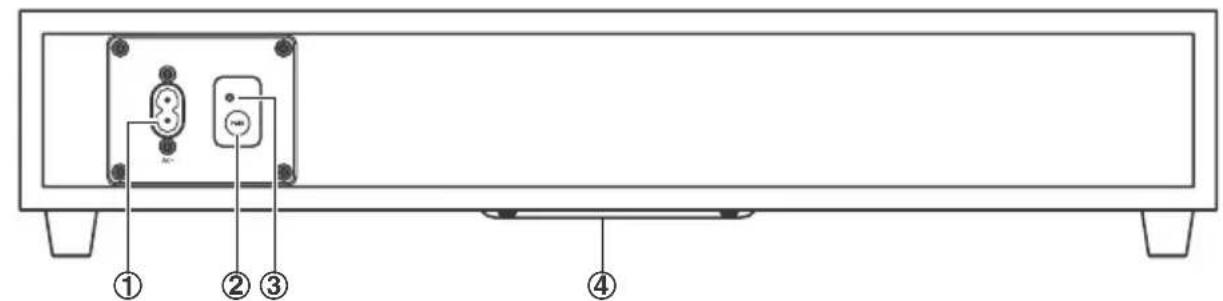
1 AC Power Cord Connect to power.
2 PAIR Button Pair with the main unit.
3 PAIR Indicator Pair indicator lights up when the pairing succeeds
4 Speaker
Remote Control
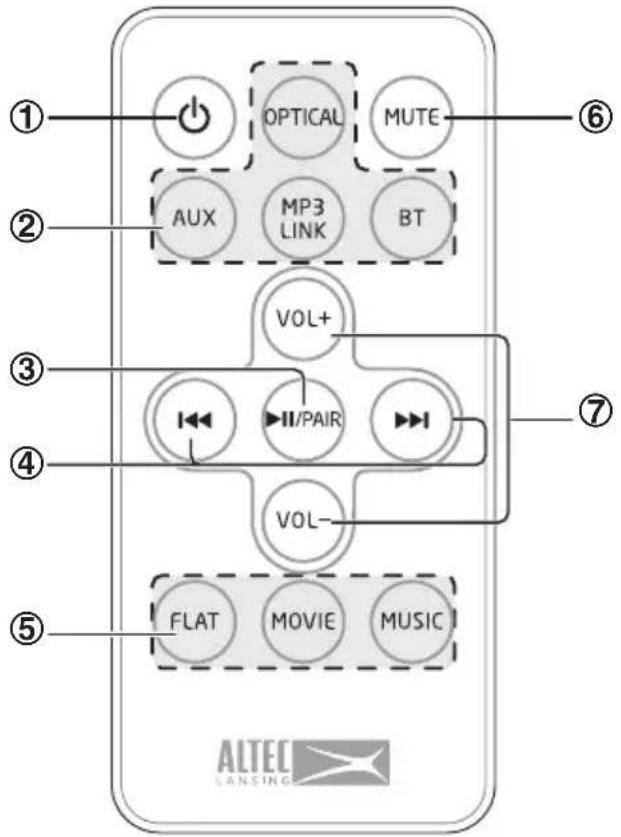
1 Switch the unit between ON and STANDBY mode.
2 SOURCE buttons Select the play function.
3 PAIR Play/pause/resume playback in Bluetooth mode.
Press and hold to activate the pairing function in Bluetooth mode and disconnect the existing paired Bluetooth device.
4 一 / 一 Skip to previous/next track in Bluetooth mode.
5 EQ buttons Select the preset equalizer.
6 MUTE Mute or resume the sound.
7 VOL+/VOL- Increase/decrease the volume level.
Preparations
Prepare the Remote Control
The provided Remote Control allows the unit to be operated from a distance.
- Even if the Remote Control is operated within the effective range (6m), remote control operation may be impossible if there are any obstacles between the unit and the remote control.
- If the Remote Control is operated near other products which generate infrared rays, or if other remote control devices using infra-red rays are used near the unit, it may operate incorrectly. Conversely, the other products may operate incorrectly.
First-time use:
The unit has a pre-installed lithium CR2025 battery. Remove the protective tab to activate the remote control battery.
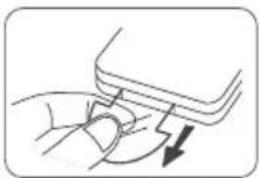
Replace the Remote Control Battery
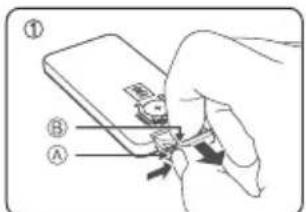
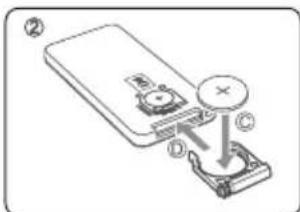
1 Pull out the battery tray and remove the old battery.
2 Place a new CR2025 battery (not included) into the battery tray with correct polarity (+/-) as indicated.
3 Insert the battery tray back into the slot.
Precautions Concerning Batteries
- When the Remote Control is not to be used for a long time (more than a month), remove the battery from the Remote Control to prevent it from leaking.
- If the batteries leak, wipe away the leakage inside the battery compartment and replace the batteries with new ones.
- Do not use any batteries other than those specified.
- Do not heat or disassemble batteries. Never throw them in fire or water.
- Do not carry or store batteries with other metallic objects. Doing so could cause batters to short circuit, leak or explode.
- Never recharge a battery unless it is confirmed to be a rechargeable type.
Connections
Use the OPTICAL Socket
- Remove the protective cap of the OPTICAL socket, then connect an OPTICAL cable (not included) to the TV's OPTICAL OUT socket and the OPTICAL socket on the unit.
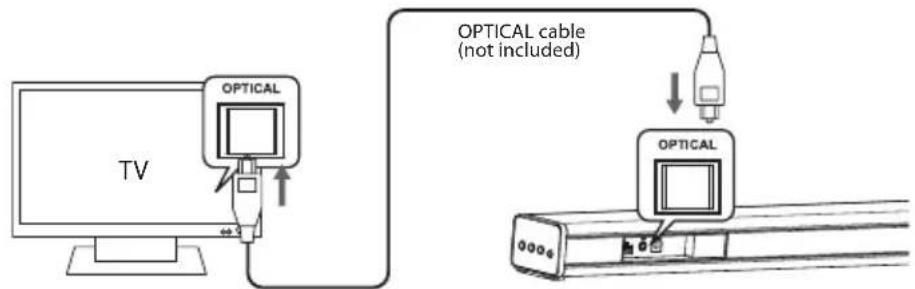
Tip: If there is no sound come out of the soundbar and the optical indicator light flash fast. Make sure the audio setting of your source player (e.g. DVD player, game player, TV) is setted to PCM with optical input.
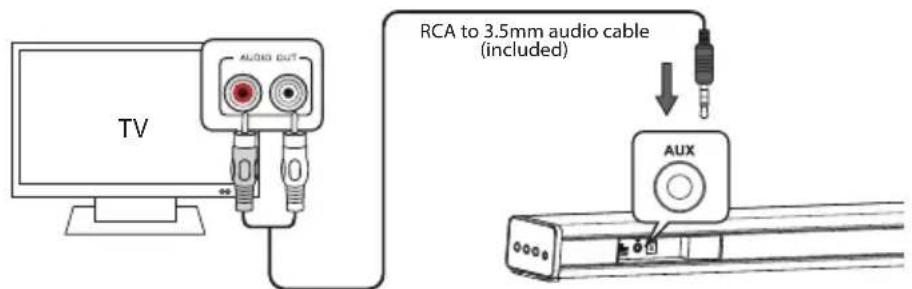
Use the AUX Socket
A. Use a RCA to 3.5mm audio cable (included) to connect the TV's audio output socket to the AUX (R/L) socket on the unit.
B. Use a 3.5mm to 3.5mm audio cable (included) to connect the TV or audio device headphone socket to the AUX socket on the unit.
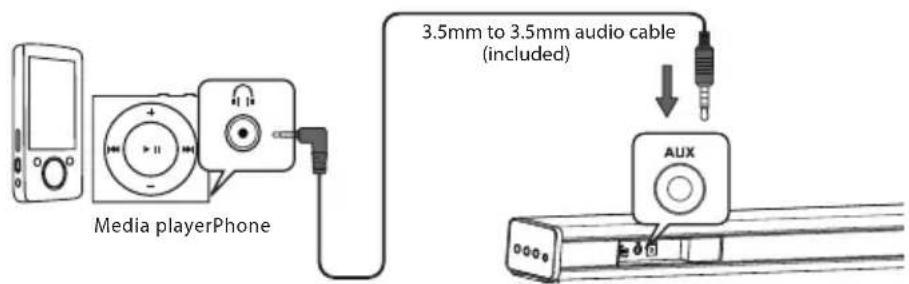
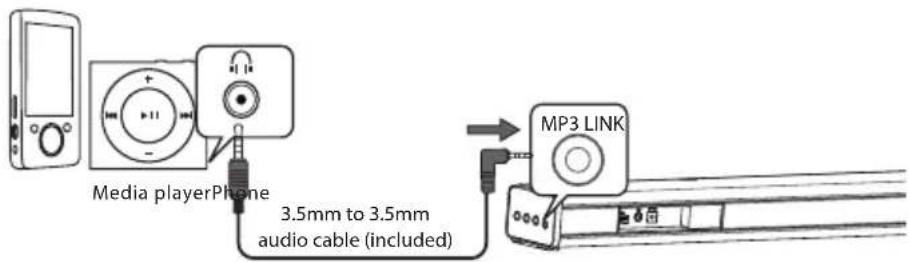
Use the MP3 Link Socket
- Use a 3.5mm to 3.5mm audio cable (included) to connect the external audio device headphone socket to the MP3 LINK socket on the unit.
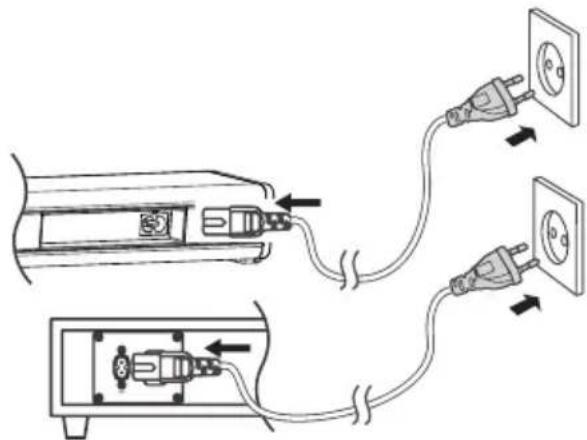
Connect Power
Caution:
Risk of product damage! Ensure that the power supply voltage corresponds to the voltage printed on the back or the underside of the unit.
Before connecting the AC power cord, ensure you have completed all other connections.
- Connect the mains cable to the AC~ Socket of the unit and then into a mains socket
- Connect the mains cable to the AC~ Socket of the subwoofer and then into a mains socket.
Note: Besure to unplug the power cord from the outlet when the system is not in use for an extended period of time.
Pairing the Wireless Subwoofer with the Main Unit
Automatic pairing
The subwoofer and soundbar will automatically pair when both units are plugged into the mains sockets and turned on. No cable is needed for connecting the two units.
- When the subwoofer is pairing with the main unit, the Pair Indicator will flash fast.
- When the subwoofer is paired with the main unit, the Pair Indicator will light up.
NOTE:
Do not press the Pair button on the rear of the subwoofer, except for manual pairing. If the automatic pairing fails, pair the subwoofer with the main unit manually.
Manual pairing
- Ensure that all the cables are well connected and the main unit is in Standby mode.
- Press and hold the Pair button on the rear of the subwoofer for a few seconds. The subwoofer will enter the pairing mode and the Pair Indicator will blink quickly.
- Press the button on the main unit or on the remote control to switch the main unit on.
- After the wireless connection succeeded, the Pair Indicator will light up.
- If the Pair indicator blinks, the wireless connection has failed. Unplug the cable of the subwoofer and then reconnect the main cable after 3 minutes. Repeat step 1 to 4.
NOTE:
- If the wireless connection fails again, check if there is conflict or strong interference (for example, interference from an electronic device) around your location. Remove these conflicts or strong interferences and repeat the above procedures.
- The subwoofer should be within 6m of the soundbar in an open area.
- If a connected TV or external device is switched on, the main unit (only AUX or MP3 LINK mode) and the subwoofer will switch on automatically.
- If the main unit is not connected with the subwoofer and it's at On mode, the POWER Indicator will flash. Follow step 1 to 4 above to pair the subwoofer to the main unit.
General Operation
Standby/ON
When you first connect the main unit to the mains socket, the main unit will be in Standby mode. The Standby Indicator will light up red.
- Press the / button on the main unit or the button on the remote control to switch the main unit on. The status indicator of the last used mode will light up.
- Press and hold the / button on the main unit or press the button on the remote control to switch the main unit back to Standby mode. The Standby Indicator will light up red.
Disconnect the mains plug from the mains socket if you want to switch the unit off completely.
When the unit has a weak or no input signal in AUX, OPTICAL, MP3 LINK and Bluetooth (Stop or Pause) for over 15 minutes, the unit will automatically switch to Standby mode.
Select Modes
Press the / button on the main unit or the OPTICAL, AUX, MP3 LINK, BT(Bluetooth) buttons on the remote control to select the desired mode.
When OPTICAL mode is selected, the status indicator will light up Purple.
When AUX mode is selected, the status indicator will light up Green.
When MP3 LINK mode is selected, the status indicator will light up Yellow.
When BT (Bluetooth) mode is selected, the status indicator will light up Blue.
Adjust the Volume
- Press the VOL+/- button to adjust the volume.
- If you wish to turn the sound off, press the MUTE button on the remote control. Press the MUTE Button again or press the VOL + / - button to resume normal listening.
While adjusting the volume, the status indicator flashes quickly. - While the volume level reaches its maximum level, if you press the VOL+ button again, the status indicator flashes once. While the volume level reaches its minimum level, if you press the VOL- button again, the status indicator flashes once.
Select a Preset Sound Effect
While playing, press the FLAT, MOVIE and MUSIC buttons on the remote control to select desired preset equalizers: MOVIE (recommended for viewing movies), MUSIC (recommended for listening to music), FLAT (EQ mode off).
While selecting a preset sound effect, the status indicator flashes quickly.
Aux/Mp3 Link/Optical Operation
1 Ensure that the unit is connected to the TV or audio device.
2 Press the button on the main unit or the OPTICAL, AUX, MP3 LINK buttons on the remote control to select the desired mode.
3. Operate your audio device directly for playback features.
4 Press the VOL + / - button to adjust the volume to your desired level.
Tip: In OPTICAL mode, if there is no sound coming out of the soundbar and the optical indicator light is flashing fast, make sure the audio setting of your source player (e.g. DVD player, game player, TV) is set to PCM with optical input.
Bluetooth Operation
You can listen to tracks from a media device if connected to the unit via Bluetooth.
Pair Bluetooth-enabled Devices
The first time you connect your Bluetooth device to this player, you need to pair your device to this player.
Note:
- The operational range between this player and a Bluetooth device is approximately 8 meters (without any object between the Bluetooth device and the unit).
- Before you connect a Bluetooth device to this unit, ensure you know the device's capabilities.
- Compatibility with all Bluetooth devices is not guaranteed.
- Any obstacle between this unit and a Bluetooth device can reduce the operational range.
- If the signal strength is weak, your Bluetooth receiver may disconnect, but it will re-enter pairing mode automatically.
1 Press the button on the main unit or the BT (Bluetooth) button on the remote control to select Bluetooth mode. The Blue indicator will flash slowly.
2 The system has entered pairing mode.
Press and hold the /PAIR button on the remote control to be searchable. After the "Pairing" voice prompt and the Blue indicator will flash rapidly.
3 Activate your Bluetooth device and select the search mode. "SNOW" will appear on your Bluetooth device list.
4 Select "SNOW" in the pairing list. After the "Paired" voice prompt, the system is successfully connected and the Bluc indicator will light up solidly.
5 Play music from the connected Bluetooth device.
To disconnect the Bluetooth function, you can:
- Switch to another function on the unit.
- Disable the function from your Bluetooth device. The Bluetooth device will be disconnected from the soundbar after the "Disconnected" voice prompt.
- Press and hold the “▶II/PAIR” button on the remote control.
Tips:
- Enter 0000 for the password if necessary.
-
If no other Bluetooth device pairs with this player within two minutes, the player will recover its previous connection.
-
The player will also be disconnected when your device is moved beyond the operational range.
- If you want to reconnect your device to this player, place it within the operational range.
- If the device is moved beyond the operational range, when it is brought back, please check if the device is still connected to the player.
- If the connection is lost, follow the instructions above to pair your device to the player again.
Listen to Music from Bluetooth-enabled Devices
If the connected Bluetooth device supports Advanced Audio Distribution Profile (A2DP), you can listen to the music stored on the device through the player.
If the device also supports Audio Video Remote Control Profile (AVRCP), you can use the player's remote control to play music stored on the device.
- Pair your device with the player.
- Play music via your device (if it supports A2DP).
- Use supplied remote control to control play (if it supports AVRCP).
To pause/resume play, press the PAIR button.
To skip to a track, press the |,| buttons.
Troubleshooting
To keep the warranty valid, never try to repair the system yourself. If you encounter problems when using this unit, check the following points before requesting service.
No power
Ensure that the AC cord of the unit is connected properly.
Ensure that there is power at the AC outlet.
Remote control does not work
Before you press any playback control button, first select the correct source.
Reduce the distance between the remote control and the unit.
Insert the batteries with their polarities (+ / -) aligned as indicated.
Replace the batteries.
Aim the remote control directly at the sensor on the front of the unit.
The unit does not respond when pressing any buttons
The unit may freeze up during use. Switch the unit off and then on again at the mains socket to reset the unit.
No sound output
Make sure that the unit is not muted. Press MUTE or VOL + to resume normal listening.
Ensure the audio setting of the input source (e.g. TV, game console, DVD player, etc.) is set to PCM mode while using optical connection.
I can't find the name of this unit on my Bluetooth device for Bluetooth pairing
Ensure that the unit is switched on.
Ensure that the Bluetooth function is activated on your Bluetooth device.
Specifications
Soundbar
Power Requirements AC220-240V\~ 50/60Hz
Output Power 30 W x 2
Power Consumption 30 W
Power Consumption of Standby Mode. < 0.5W
Audio Input Sensitivity 500mV
Frequency Response 150Hz - 20KHz
Dimension (W x D x H) 950 x 62 x 45 mm
Impedance 8Ωx2
Subwoofer
Power Supply. AC220-240V\~ 50 / 60Hz
Output Power 60W
Power Consumption 30W
Frequency Response 30Hz - 150Hz
Impedance 4Ω
Dimension (W x D x H) 465 x 255 x 94mm
Remote Control
Distance 6m
Angle 30
Standard Accessories
Remote Control x1
Instruction Manual. x 1
RCA to 3.5mm Audio Cable . x 1
3.5mm to 3.5mm Audio Cable . x 1
AC Power Cord. x 2
Please visit www.alteclansing.com
| MARKET MAKER BRAND LICENSING |
| 79/81 Ancienne Route Nationale 7 69570 DARDILLY - FRANCE |
| HELPLINE 0811 482 202 |
Product features, specifications and appearances are subject to change without notice.
C E

The European directive 2002/96/EC on Waste Electrical and Electronic Equipment (WEEE), requires that old household electrical appliances must not be disposed of in the normal unsorted municipal waste stream. Old appliances must be collected separately in order to optimize the recovery and recycling of the material they contain, and reduce the impact on human health and the environment. The crossed out "wheeled bin" symbol on the product reminds you of your obligation, that when you dispose of the appliance, it must be separately collected.
To avoid possible hearing damage, do not listen at high audio volume for long periods of time.
Declaration of conformity RTTE
Market Maker Brand Licensing, herby declares that this equipment conforms to the essential requirements and other relevant provisions of Directive 1999/5/CE. The declaration of Conformity can be viewed at the following address :
Market Maker Brand Licensing
79/81 ANCIENNE ROUTE NATIONALE 7
69570 DARD ILIX
2015 Altec Lansing/AL Infinity, LLC. All rights reserved. ALTEC, ALTEC LANSING, the Altec Lansing logo are marks of Altec Lansing/AL Infinity LLC.