
Explora 40 - Terrarium Ferplast - Free user manual and instructions
Find the device manual for free Explora 40 Ferplast in PDF.
| Product type | Terrarium for reptiles and amphibians |
| Brand | Ferplast |
| Model | Explora 40 |
| External dimensions (L x W x H) | 42 x 21.5 x 36 cm |
| Volume | Approximately 30 liters |
| Glass thickness | 4 mm |
| Front rim (height) | 7 cm |
| Material | Float glass and treated steel (top parts) |
| Closure system | Plastic lock with two keys |
| Door type | Sliding glass doors with adhesive handles |
| Ventilation | Removable top grilles and front grilles |
| Feet | 4 feet raising the base for air circulation |
| Cable pass-throughs | Yes, with removable plastic plugs |
| Compatible accessories | EXPLORALIGHT lamp panels, SPOT COVER, heating mats, etc. |
| Weight (approximate) | Approximately 8 kg |
| Usage | Indoor, for small animals (escape gap < 3 mm) |
| Maintenance | Glass cleanable with non-abrasive products; grilles dusted |
| Safety | Lockable doors; grilles prevent direct contact with heat sources |
| Warranty | Manufacturer's warranty against manufacturing defects (upon presentation of receipt) |
Frequently Asked Questions - Explora 40 Ferplast
User questions about Explora 40 Ferplast
0 question about this device. Answer the ones you know or ask your own.
Ask a new question about this device
Download the instructions for your Terrarium in PDF format for free! Find your manual Explora 40 - Ferplast and take your electronic device back in hand. On this page are published all the documents necessary for the use of your device. Explora 40 by Ferplast.
USER MANUAL Explora 40 Ferplast
natural_image
Close-up of a grasshopper perched on a leaf, tinted in magenta (no text or symbols visible)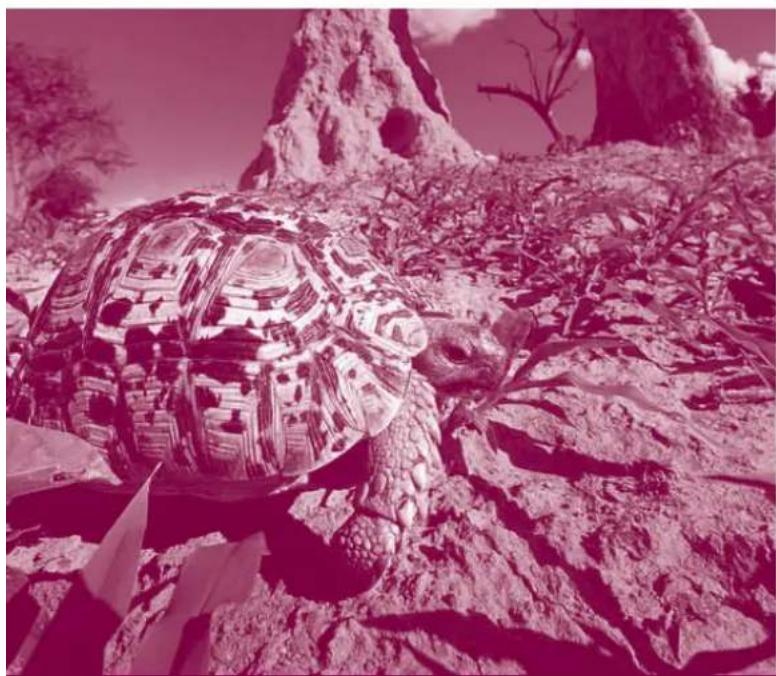
natural_image
Illustration of a large tortoise with patterned shell resting on rocky terrain, no text or symbols visible
natural_image
Illustration of a bearded lizard on rocky terrain with a distant mountain silhouette (no text or symbols)
natural_image
Close-up of a snake's head showing detailed scales and eye (no text or symbols)
ferplast
EXPLORA TERRARIUMS
Manualed'uso
User's manual
Preliminary warnings 9
Opening the package 9
Installation 9
Setting up 9
Safety and accessories 10
Suggested accessories (not included)
- EXPLORALIGHT overtank lamps 12
- SPOT COVER 12
- Display cabinets 12
Guarantee 29
Français 13
EXPLORA
SUGGESTED ACCESSORIES
(NOT INCLUDED)
SPOT COVER EXPLORALIGHT

x2
x2
x2
x2
x1
-
-
√
√
√
√
√
-
-
30W/T8
30W/T8
18W/T8
18W/T8
15W/T8
15W/T8
Esempi di specie di animali da terrario.
Examples of animal species living in terrariums.
Espèces animales qui peuvent s'acclimater dans votre terrarium.
Beispiele für Tierarten, die in Terrarien leben.
Voorbeelden van terrariumdieren.
Ejemplos de especies de animales de terrarios.
Insetti
Insects
Insectes
Insekten
Insecten
InsectosSerpenti
Snakes
Serpents
Schlangen
Slangen
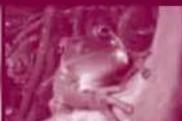
SerpientesAnfibi
Amphibians
Amphibiens
Amphibien
Amfibieën
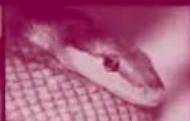
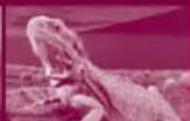
AnfibiosSauri
Lizards
Sauriens
Echsen
Hagedissen
Saurios
| - | • Lampropeltis• Elaphe | - | • Tiliqua• Pogona• Uromastyx |
| - | • Elaphe• Boa Constrictor• Phyton regius | - | • Chamaleon• Iguanidi |
| - | • Lampropeltis | - | • Tiliqua• Pogona• Uromastyx |
| - | • Elaphe• Boa Constrictor• Phyton regius | • Dendrobates• Mantella | • Chamaleon |
| • Fasmidi | SMALL• Lampropeltis• Elaphe• Boa Constrictor• Phyton regius | • Dendrobates• Mantella | MEDIUM• Tiliqua• Pogona• Uromastyx |
| • Fasmidi | - | • Dendrobates• Mantella | SMALL• Tiliqua• Pogona• Uromastyx |
| • Fasmidi | - | • Dendrobates• Mantella | SMALL• Tiliqua• Pogona• Uromastyx |
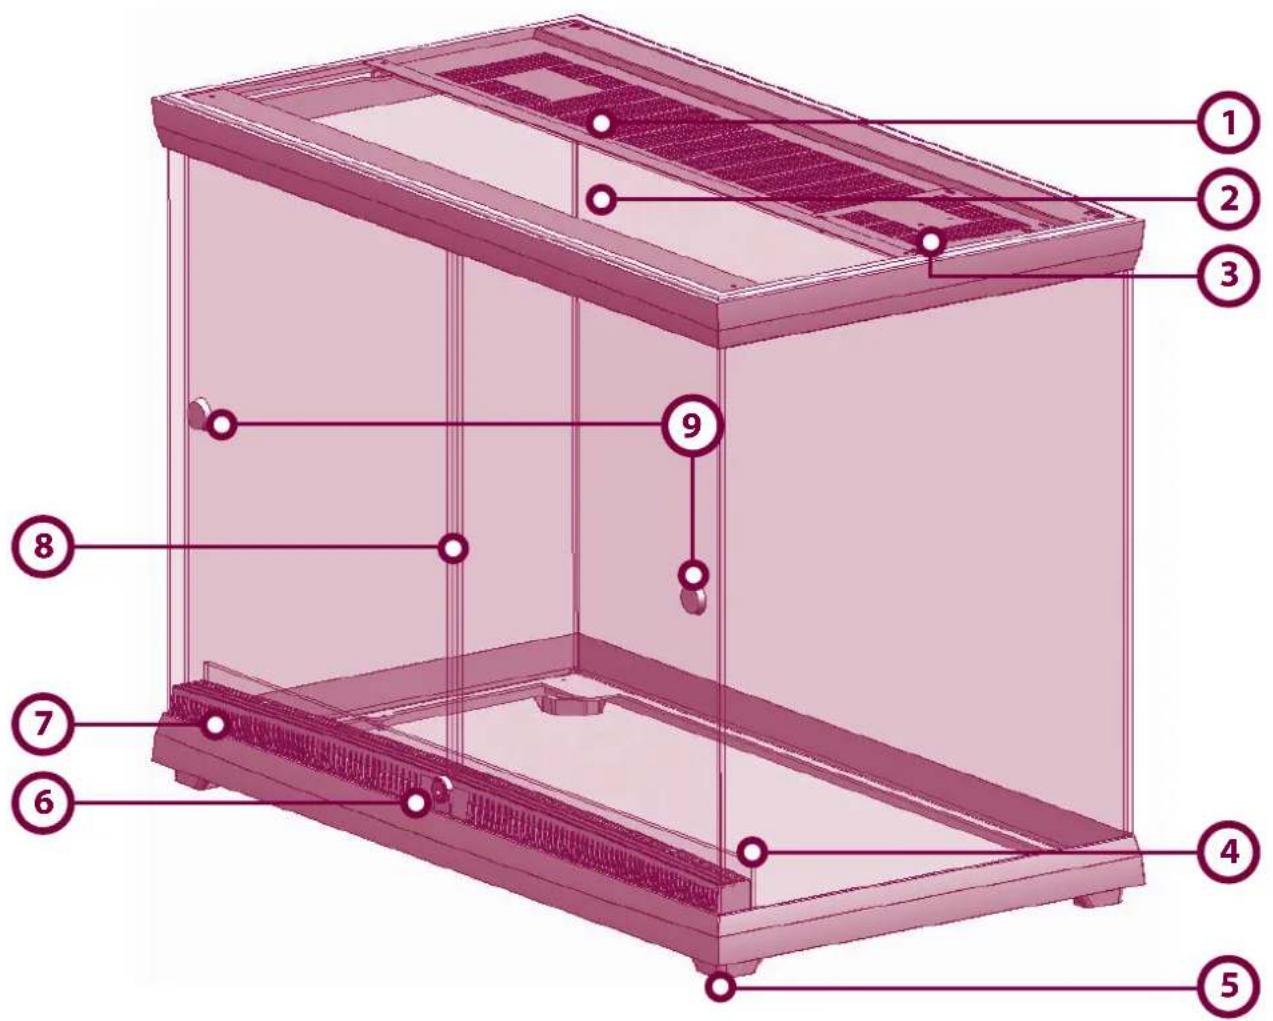
General design of the EXPLORA terrarium
1 Upper removable ventilation grills
2 Removable upper glass panel
3 Removable hatch (SPOT COVER)
4 Glass edge for containing water and substrates
5 Feet
6 Locking system (plastic or metal)
7 Front ventilation grills
8 Glass sliding doors
9 Adhesive knobs
natural_image
Exterior view of a modern petri dish with fish and plants in a clear glass case (no text or symbols visible)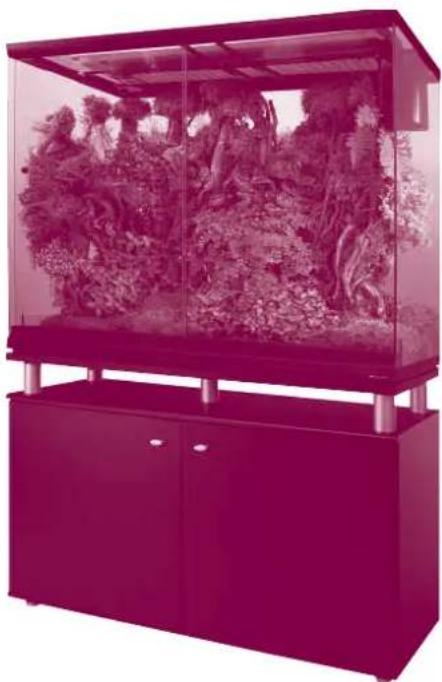
natural_image
Exterior view of a modern office building (no signage)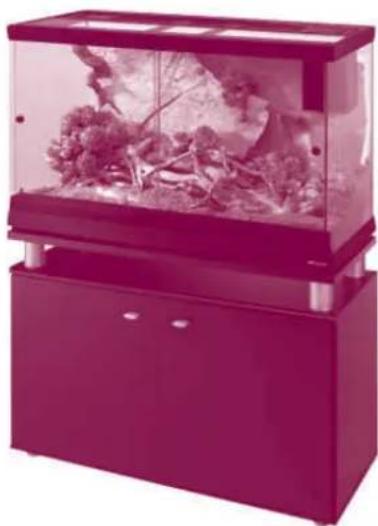
natural_image
Exterior view of a modern office building (no signage)EXPLORA 110 EXPLORA 110 H EXPLORA 80
natural_image
Exterior view of a modern office building (no signage)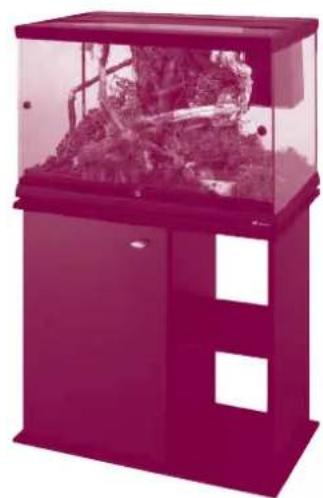
natural_image
Exterior view of a modern office building (no signage)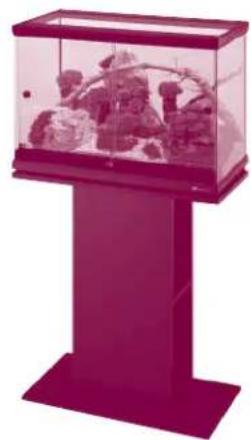
natural_image
Exterior view of a modern office building (no signage)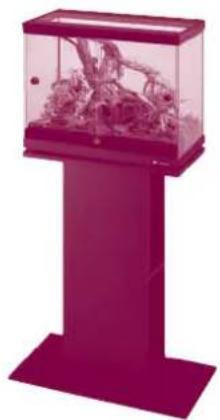
natural_image
Pink glass display stand with fish inside, no visible text or symbolsEXPLORA 80 H EXPLORA 60 EXPLORA 50 EXPLORA 40
EXPLORA TERRARIUMS
Thank you for choosing the EXPLORA terrarium, designed to give you great enjoyment and ensure absolute respect for the life and health of the animals and plants. Installing and running it will be simple and fun.
natural_image
Exterior view of a modern petri dish containing plant growth and roots, with no visible text or symbols.Terrario EXPLORA
natural_image
3D diagram of a rectangular container with internal compartments and directional arrows, labeled 'Fig. 2' (no text or symbols on the diagram itself)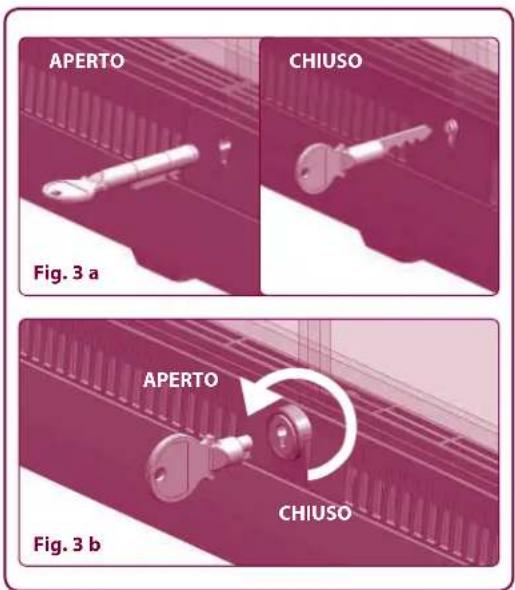
Piedini
natural_image
Illustration of a device's internal structure with arrows indicating assembly or disassembly (no text or symbols)
natural_image
Two-step diagram showing a mechanical component with arrows indicating direction, no text or symbols present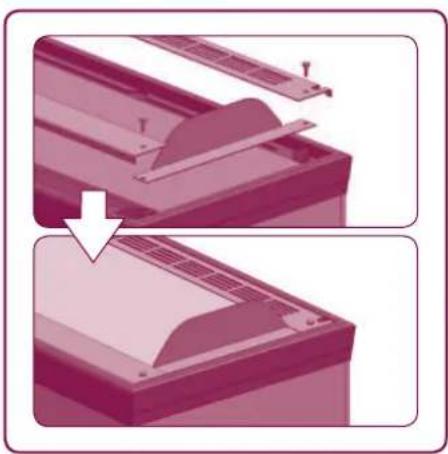
natural_image
Two-step diagram showing a printer or printer blade being cut off, with no text or symbols present.
natural_image
3D rendered object with layered structure, labeled Fig. 11 (no text or symbols on the object itself)
natural_image
3D rendered diagram of a mechanical component with slots and cutouts, labeled Fig. 12 (no text or symbols on the object itself)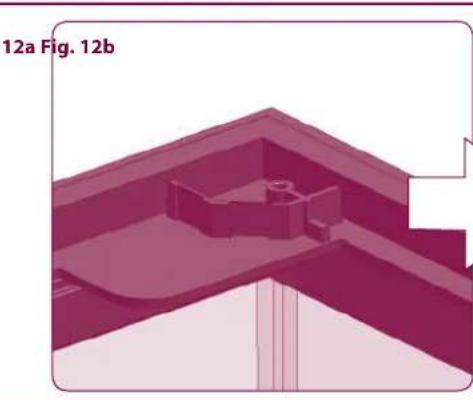
natural_image
3D architectural or structural diagram showing a building interior with no visible text or symbols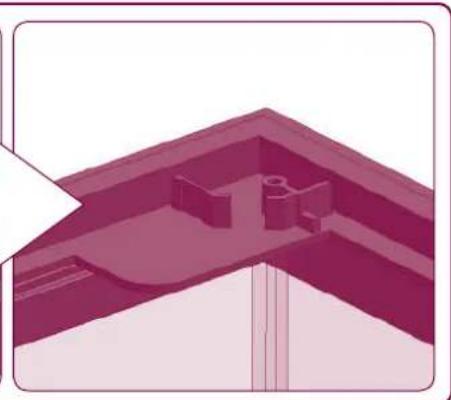
natural_image
Architectural elevation diagram showing a sloped roof structure with internal structural elements (no text or labels)ACCESSORI CONSIGLIATI (non inclusi)
Plafoniere EXPLORALIGHT
natural_image
Two dark, elongated electronic components with metallic legs, shown from different angles (no text or symbols visible)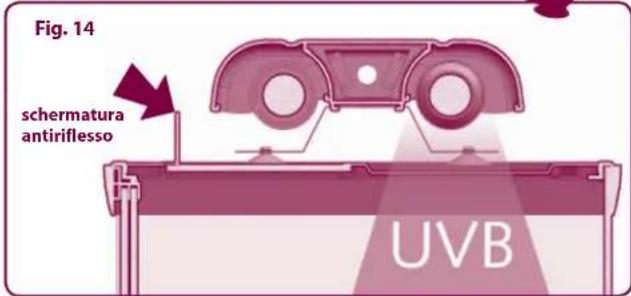
natural_image
Diagram of a mechanical or fluidic device with a conical component and pipe, labeled Fig. 13 (no text or symbols on the diagram itself)
natural_image
Exterior view of a modern office building (no signage)EXPLORA 110 H & CAYMAN 110 TRENDY
Terrarium EXPLORA
Preliminary warnings Opening the package
Make sure that all the components are intact. Although Ferplast uses safe packaging and individually inspects each product, we recommend checking for accidental damage that can occur during shipping, storage or sale, which could compromise the product's durability and performance.
The package of an EXPLORA terrarium includes the following:
• 1 Ferplast terrarium
- 2 plastic keys for models 40-50-60 or 1 metallic lock (with two keys) for models 80-110
• 2 adhesive knobs for opening the doors
Installation: few rules, total safety
Before carrying out any operation, please read the information below carefully to protect your safety and to prevent damage to the terrarium.
PRELIMINARY WARNINGS:
• The EXPLORA terrarium is designed for indoor use.
- The ventilation openings must never be obstructed or positioned near objects that could prevent them functioning efficiently.
- The electrical accessories used must comply with the relevant international safety regulations.
- All electrical wiring of the accessories installed inside the terrarium must be carried out by qualified personnel.
- Position the terrarium on a solid flat support with a smooth and even surface. We recommend using Ferplast display cabinets, especially designed for the purpose.
- Special attention must be paid when closing the sliding doors using the special plastic or metal locks.
Setting up: wonderful results in just a few days
- Apply the adhesive knobs to the doors of the terrarium.
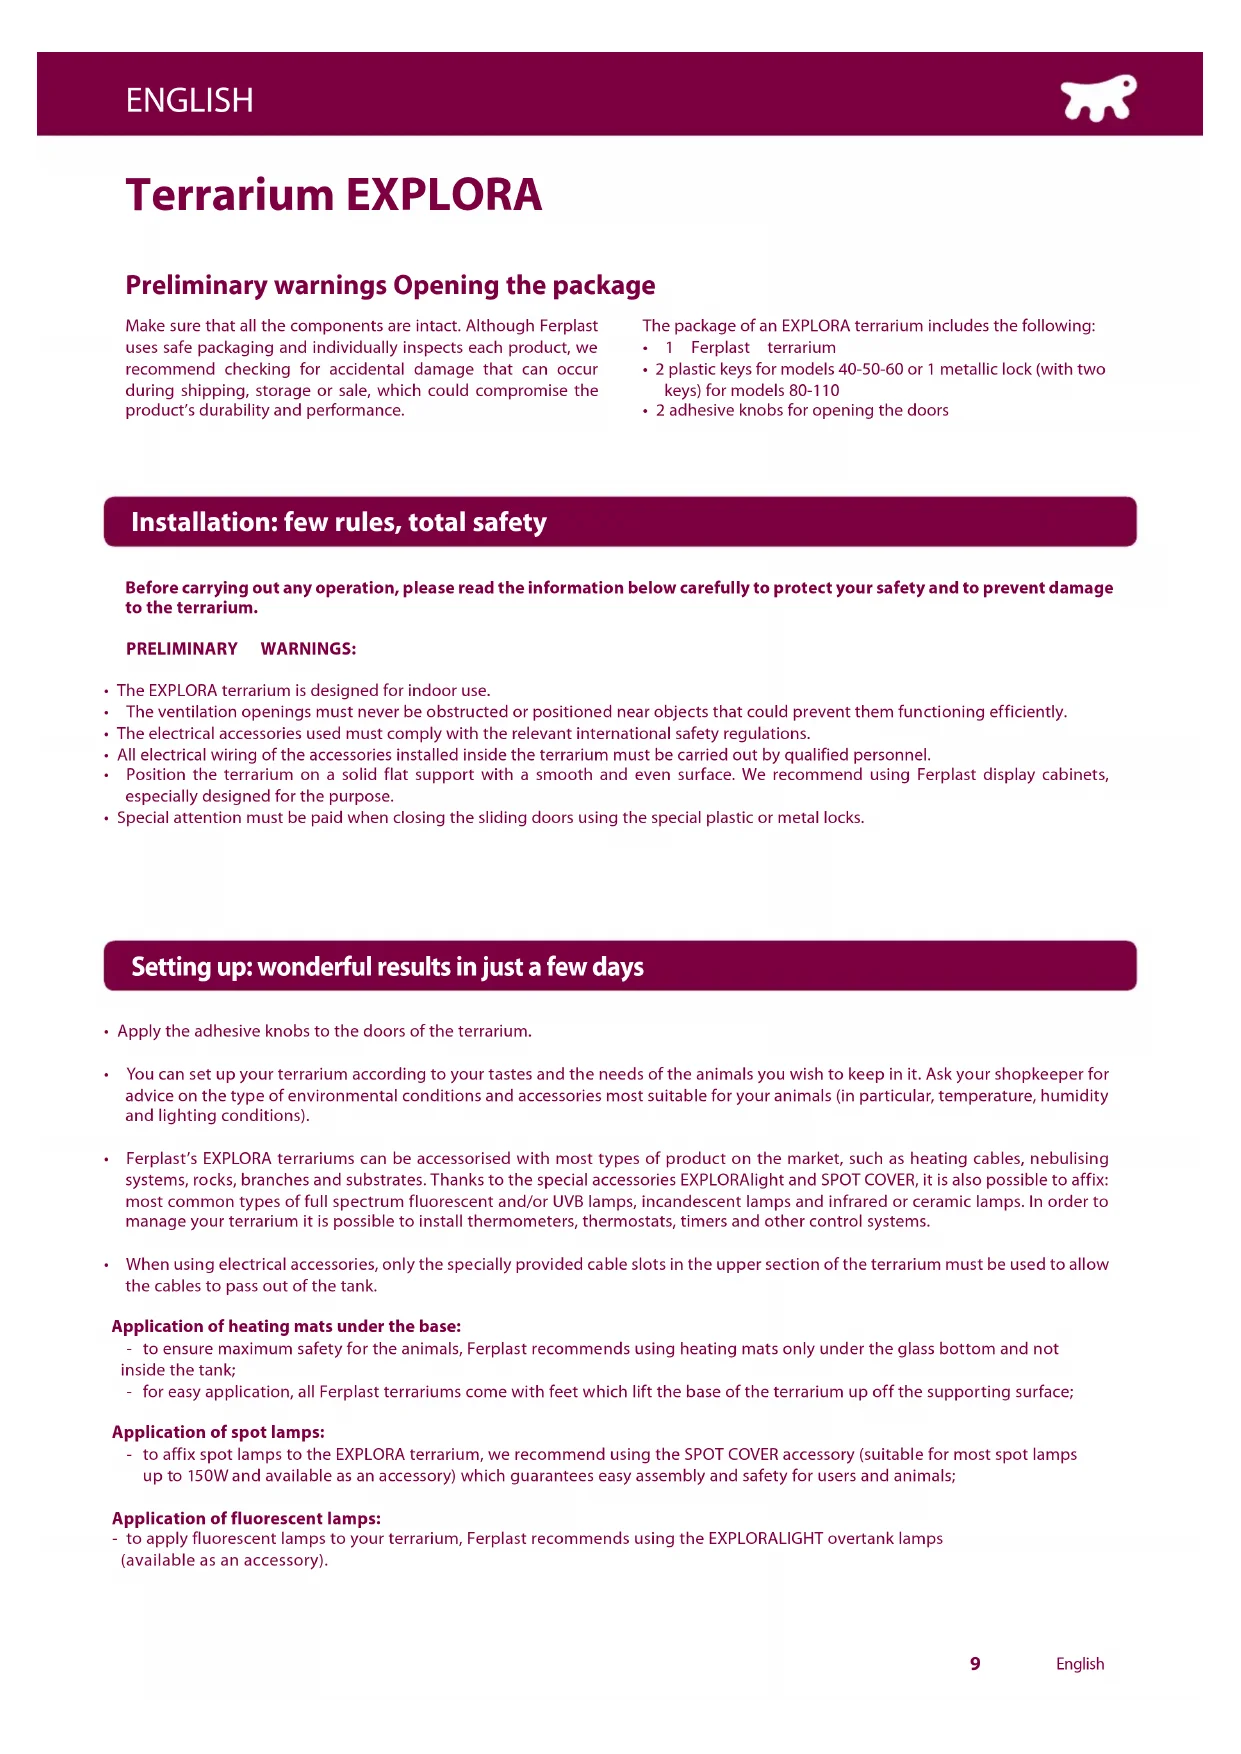
- You can set up your terrarium according to your tastes and the needs of the animals you wish to keep in it. Ask your shopkeeper for advice on the type of environmental conditions and accessories most suitable for your animals (in particular, temperature, humidity and lighting conditions).
- Ferplast's EXPLORA terrariums can be accessorised with most types of product on the market, such as heating cables, nebulising systems, rocks, branches and substrates. Thanks to the special accessories EXPLORALight and SPOT COVER, it is also possible to affix: most common types of full spectrum fluorescent and/or UVB lamps, incandescent lamps and infrared or ceramic lamps. In order to manage your terrarium it is possible to install thermometers, thermostats, timers and other control systems.
- When using electrical accessories, only the specially provided cable slots in the upper section of the terrarium must be used to allow the cables to pass out of the tank.
Application of heating mats under the base:
- to ensure maximum safety for the animals, Ferplast recommends using heating mats only under the glass bottom and not inside the tank;
- for easy application, all Ferplast terrariums come with feet which lift the base of the terrarium up off the supporting surface;
Application of spot lamps:
- to affix spot lamps to the EXPLORA terrarium, we recommend using the SPOT COVER accessory (suitable for most spot lamps up to 150W and available as an accessory) which guarantees easy assembly and safety for users and animals;
Application of fluorescent lamps:
- to apply fluorescent lamps to your terrarium, Ferplast recommends using the EXPLORALIGHT overtank lamps (available as an accessory).
Safety and accessories
The EXPLORA range of terrariums was developed to ensure maximum safety both for the user and for the animals living inside. The presence of sliding doors with safety catches provides maximum flexibility of opening and closing and makes it easy to reach any part of the terrarium. EXPLORA terrariums are characterized by lamps separated by metallic grills from the area used by the animals. This prevents direct contact the animals and the heat source, which could be dangerous for them. All the openings in Ferplast terrariums are less than 3 mm wide, guaranteeing the necessary air circulation while, at the same time, preventing the animals from escaping. EXPLORA terrariums are designed to be easy to accessorize with most types of products on the market. In they come with handy cable slots which permit the use of electrical accessories, special fittings for lamps (both fluorescent and spot) which make it possible to install ready wired equipment, and feet which raise the base up from the supporting surface allowing the application of heaters underneath the terrarium base. The terrarium is not suitable for pets which could get out through gaps smaller than 3 mm. For these animals, until they grow, we recommend the use of special plastic tanks such as Ferplast's GEO line.
Ventilation
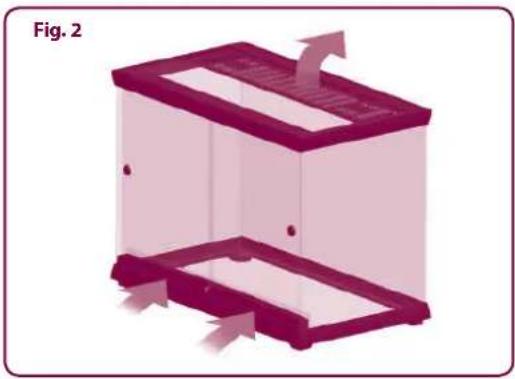
Making use of the fact that air, when warm, tends to rise, the EXPLORA terrarium's ventilation system ensures even distribution of the air flow within the terrarium, preventing the formation of areas of stagnant air which encourage the growth of fungi and bacteria. The sizing of the ventilation openings also ensures that the internal microclimate is maintained. In order to allow the necessary air to enter the terrarium, an innovative system has been designed which allows air to enter both through the grills at the front and from the base of the terrarium (Fig. 1). To allow the air to flow out, special openings have been created in the top (Fig. 2).
Doors
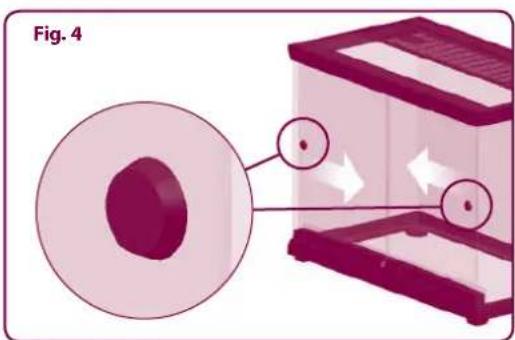
The sliding doors of the EXPLORA terrariums have an innovative safety catch hidden inside the lower runner, thanks to a special feature of the glass. The fastening system of models 80-110 has a professional lock with a metallic key (Fig. 3a) and a plastic lock for models 40-50-60 (Fig. 3b). For easy opening, the sliding doors have handy knobs (Fig. 4). For safety reasons, these cannot be removed.
Affixing overtank lamps
Ferplast's EXPLORALight overtank lamp (available as an accessory) can be affixed to the 50-60-80-110 EXPLORA terrariums. Between the overtank lamp and the terrarium there is a glass shield to prevent danger to the animals (Fig. 5).
Tank
The tank of the EXPLORA terrariums is made from special "float" glass. A very high performance silicon is used in assembly which ensures maximum stability of the product. The glass edge guarantees that the bottom of the tank is watertight in the case of use of water (Fig. 6).
Upper part
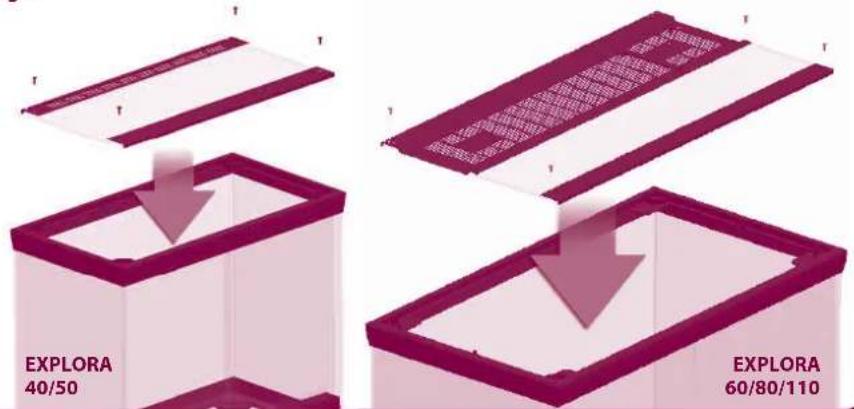
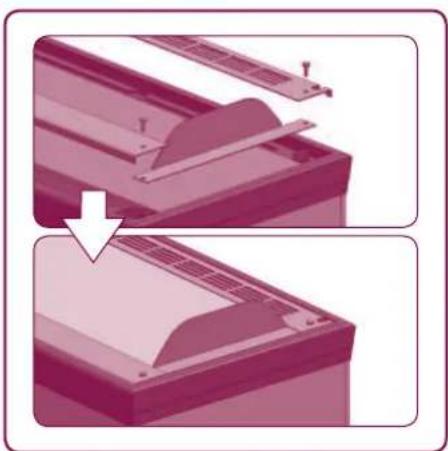
The upper part of EXPLORA terrariums is made up of three rear plate and glass top) which can be removed for setting up and/or extraordinary maintenance (Fig. 7). The plates are made from steel treated with special non-toxic paints which are resistant to high temperatures and humidity, while the "float" glass ensures greater transparency and uniformity of thickness. Removing the three elements is easy: simply unscrew the screws that fix the plates to the frame of the tank. In the interest of safety, when animals are inside, all the screws that fix the upper plates must always be screwed in correctly.
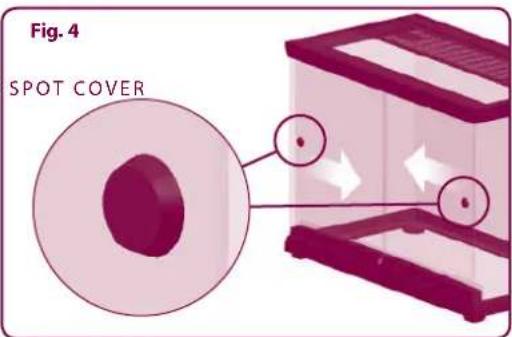
Openings for installation of optional spot lamps
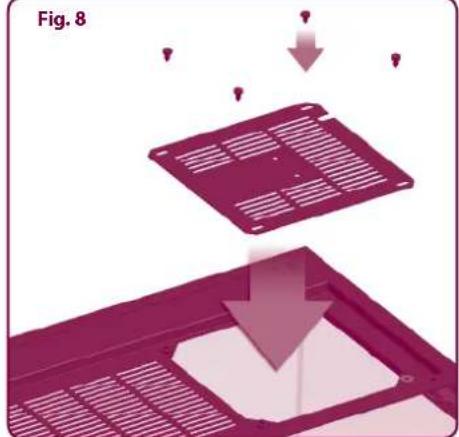
To facilitate installation of spot lamps inside the EXPLORA terrarium, the 60-80-110 models come with special openings in the plates, covered with practical metallic covers attached with screws (Fig. 8). For the safety of the animals inside the terrarium, especially where lamps which get hot are used, we recommend the use of SPOT COVERS (available as an accessory - see page 5) which can be inserted into the openings in order to prevent direct contact between the animals and the heat source. To affix the lamp holders for spot lamps (E27) we recommend that you use the special adjustable brackets, supplied with the spot shields. To allow the electrical cables of the lamps to pass out of the tank, a handy slot is provided in the metal cover, which can be opened and closed by sliding the metal cover itself (Fig. 9). The screws attaching the cover are protected inside by special plastic caps to ensure maximum safety for the animals. All the covers come with grills to allow the necessary circulation of air around the spot lamps. EXPLORA terrariums come with a little plate to support the application of clip-on light fittings (Fig. 10).

natural_image
3D diagram of a rectangular container with internal flow arrows, labeled Fig. 2 (no text or symbols on the diagram itself)

Feet
EXPLORA terrariums come with practical feet which, by lifting the base up from supporting surface, allow the necessary flow of air under the terrarium as well as sufficient insulation from the supportingsurface
(Fig. 11). This also makes it possible to place most types of heating mat underneath the glass bottom.
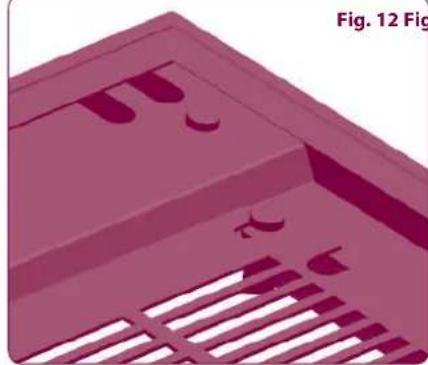
Cable slots
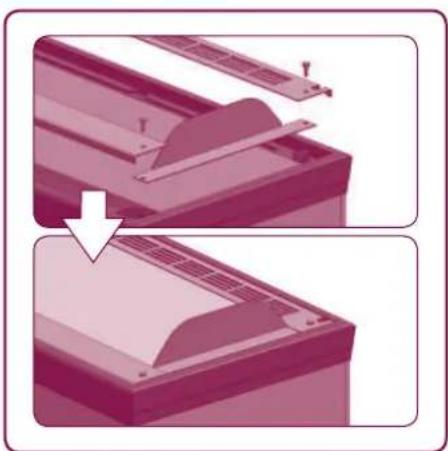
All the EXPLORA models come with handy cable slots so you can install most types of electrical accessory inside safely and without the help of qualified personnel (the cable slots make it possible to affix ready wired accessories) (Fig. 12). To ensure maximum safety of the product, the cable slots are initially closed with plastic plugs which should only be removed when cables need to be inserted (Fig. 12a-b).

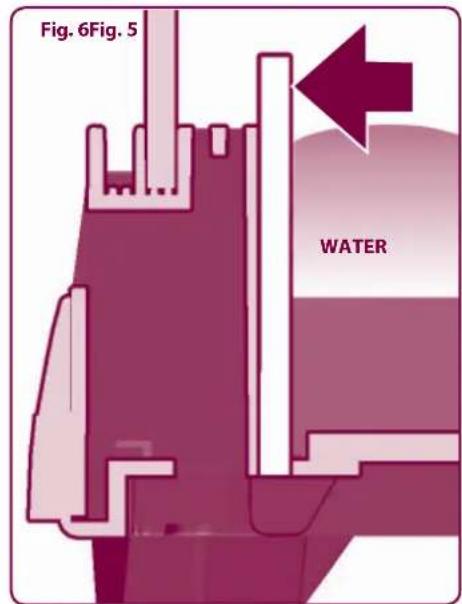
Fig. 7
natural_image
Illustration of a device's internal structure with arrows indicating assembly or transformation (no text or symbols)
natural_image
Two-step diagram showing a mechanical component with striped patterns and a downward arrow, labeled Fig. 9 and Fig. 10 (no text or symbols on the diagram itself)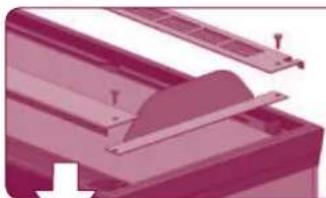
natural_image
Close-up of a mechanical component with a blade and mounting holes (no visible text or symbols)
natural_image
Illustration of a printer or printer with paper and ventilation slots (no text or symbols visible)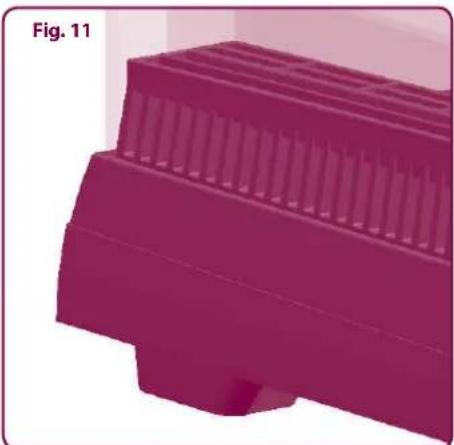
natural_image
3D rendered object with layered structure, no visible text or symbolsFig. 12 Fig. 12a Fig. 12b
natural_image
3D rendered diagram of a mechanical component with slots and brackets (no text or symbols)
natural_image
Architectural elevation diagram showing a building corner with structural elements (no text or labels)
natural_image
3D architectural rendering of a building corner with structural elements (no text or symbols visible)EXPLORALIGHT overtank lamps
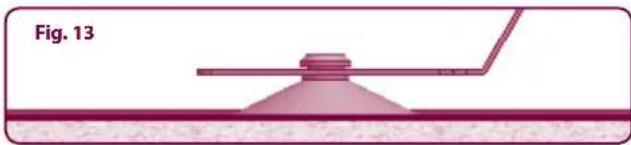
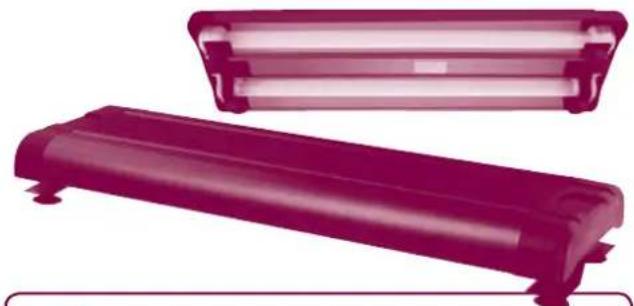
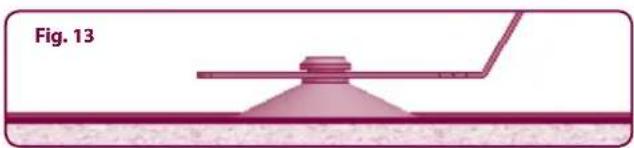
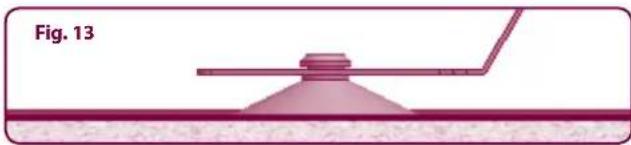
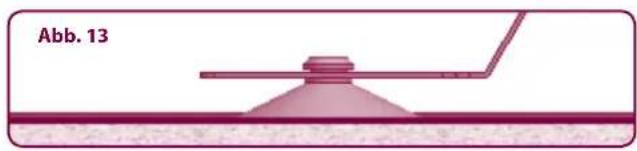
Ferplast's EXPLORALIGHT overtank lamp can be affixed to the EXPLORA 50, 60, 80 and 110 terrariums. This bi-lamp overtank lamp, available in three different lengths and powers (15W, 18W and 30W) holds T8 lamps. Ferplast terrariums are suitable for the EXPLORALIGHT overtank lamps, having support sections to which the special support bracket can be affixed. All the EXPLORALIGHT overtank lamps come complete with reflecting parabolas, waterproof light holders and a switch (fluorescent lamps not included). A special suction system guarantees maximum stability for the overtank lamp (Fig. 13). The position and geometry of the openings in the upper plate mean that UVB lamps can be affixed to the rear of the overtank lamps (Fig. 14), because the light filters through directly without being screened by glass or plastic. An antireflection screen should previously be affixed above the EXPLORA terrarium.
| EXPLORA EXPLORALIGHT | |
| EXPLORA 40 | - |
| EXPLORA 50 | EXPLORALIGHT 15 W / T8 |
| EXPLORA 60 | |
| EXPLORA 80 | EXPLORALIGHT 18 W / T8 |
| EXPLORA 80 H | |
| EXPLORA 110 | EXPLORALIGHT 30 W / T8 |
| EXPLORA 110 H | |
SPOT COVER
• Ferplast's SPOT COVER guarantees maximum safety for animals and users alike.
The easy assembly and the possibility of applying most types of light fittings provide maximum flexibility when installing your terrarium
- The SPOT COVER should be inserted through the special opening in the upper plate of the terrarium (for sizes 60-80-110) after removal of the hatch
- In the interest of safety, when animals are inside, the hatch must be replaced and the screws must always be screwed in correctly (Fig. 15)
- The particular suitability of the light fitting bracket, matching the shape of the cable slots, makes it possible to affix ready wired accessories (lamp holder, cable and socket) without requiring any electrical wiring operation
- Application of the SPOT COVER permits easy maintenance and replacement of the spot lamps while ensuring the safety of the user and the animals alike
- The opening in the hatch in the cover encourages the necessary flow of air around the spot lights, preventing the lamps from overheating (Fig. 16)
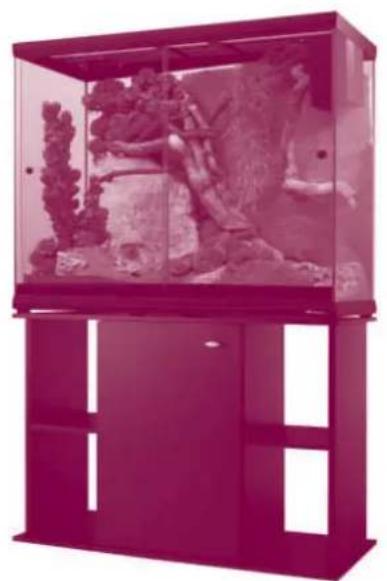
DISPLAY CABINETS
Ideal for the requirements of the EXPLORA terrariums, Ferplast's display cabinets are made from high quality materials which make them extremely sturdy and able to support even the heaviest installations.
| EXPLORA Display cabinet | |
| EXPLORA 40 | STAND CAYMAN 40 |
| EXPLORA 50 | STAND CAYMAN 50 |
| EXPLORA 60 | STAND CAYMAN 60 |
| EXPLORA 80 | STAND CAYMAN 80 |
| EXPLORA 80 H | STAND CAYMAN 80 TRENDY |
| EXPLORA 110 | STAND CAYMAN 110 |
| EXPLORA 110 H | STAND CAYMAN 110 TRENDY |
natural_image
Two magenta rectangular electronic components with mounting holes, shown from different angles (no text or symbols visible)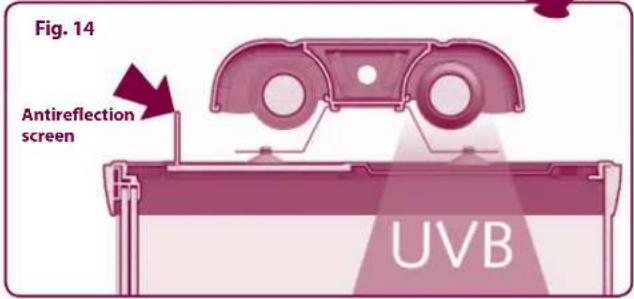
natural_image
Diagram of a conical device with a probe inserted into a liquid channel, labeled Fig. 13 (no text or symbols on the diagram itself)
natural_image
Exterior view of a modern office building (no signage)EXPLORA 110 H & CAYMAN 110 TRENDY
Terrarium EXPLORA
natural_image
3D illustration of a rectangular container with internal compartments and arrows indicating flow or movement (no text or symbols)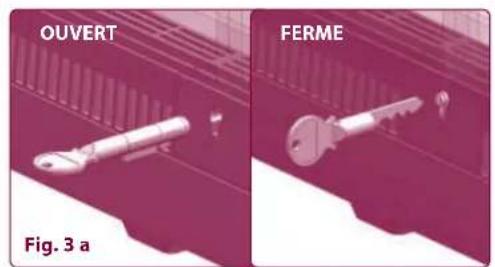
natural_image
Two labeled mechanical components, OUVERT and FERME, shown in two different angles (no text or symbols on the parts themselves)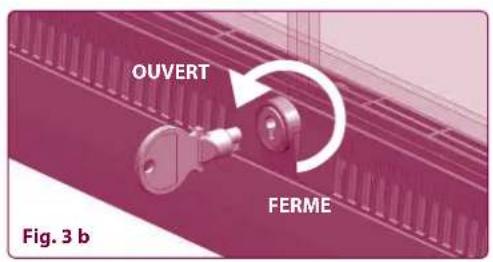
Pieds
natural_image
Illustration of a device's internal structure with arrows indicating assembly or transformation (no text or symbols)
natural_image
Two-step diagram showing a mechanical component with striped patterns and a downward arrow, labeled Fig. 9 and Fig. 10 (no text or symbols on the diagram itself)
natural_image
Close-up of a mechanical component with a blade and mounting holes (no visible text or symbols)
natural_image
Illustration of a printer or printer with paper and ventilation slots (no text or symbols visible)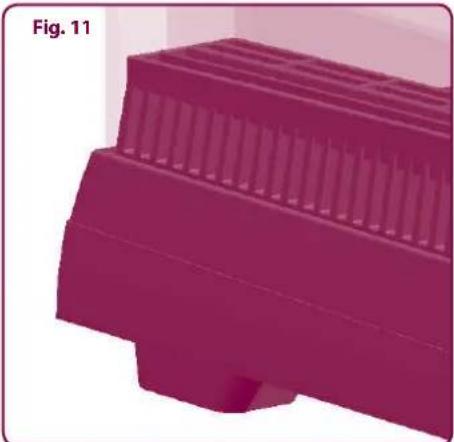
natural_image
3D rendered object with layered structure, no visible text or symbolsFig. 12 Fig. 12a Fig. 12b

natural_image
3D rendered diagram of a mechanical component with slots and brackets, no visible text or symbols
natural_image
Architectural elevation diagram showing a building corner with structural elements (no text or labels)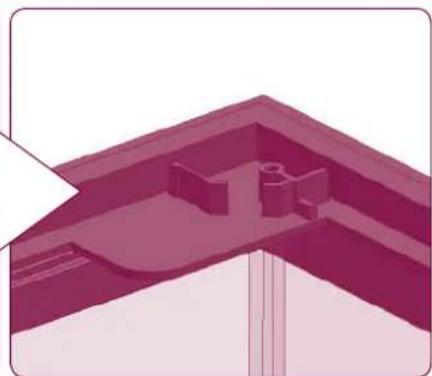
natural_image
3D architectural rendering of a building corner with structural elements (no text or symbols visible)ACCESSOIRES CONSEILLÉS (non inclus)
Plafonniers EXPLORALIGHT
natural_image
Two purple rectangular electronic components with no visible text or symbols on the surfaces
natural_image
Diagram of a mechanical or optical setup with a conical component and a rod, labeled Fig. 13 (no text or symbols on the diagram itself)SPOT COVER
natural_image
3D diagram of a mechanical component with an upward arrow and directional arrows, labeled Fig. 16 (no text or symbols on the diagram itself)MEUBLES
natural_image
Exterior view of a modern office building (no signage)EXPLORA 110 H & CAYMAN 110 TRENDY
Terrarium EXPLORA
natural_image
3D diagram of a rectangular container with internal compartments and directional arrows, labeled Abb. 2 (no text or symbols on the diagram itself)
natural_image
Illustration of a device with a grid panel and a downward arrow indicating process (no text or symbols)
natural_image
Two-step diagram showing a printer or printer blade being inserted into a paper airplane (no text or symbols present)
natural_image
3D rendered object with layered structure, no visible text or symbols
natural_image
3D rendered diagram of a mechanical component with ribbed structure and mounting holes (no text or symbols)
natural_image
3D architectural or mechanical component diagram with no visible text or symbols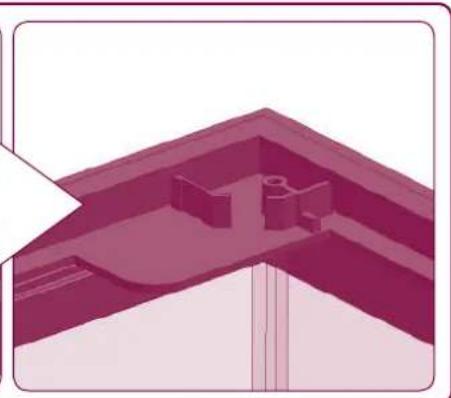
natural_image
Architectural elevation diagram showing a roof structure with structural elements (no text or labels)EMPFOHLENES ZUBEHÖR (nicht inklusive)
Terrarienlampen EXPLORALIGHT
natural_image
Two dark, glossy rectangular electronic components with no visible text or symbols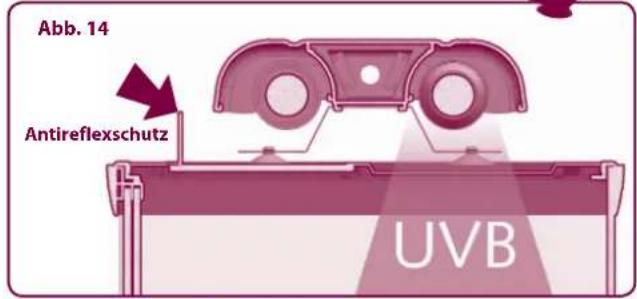
natural_image
Diagram of a mechanical or optical setup with a conical component and a rod, labeled Abb. 13 (no text or symbols on the diagram itself)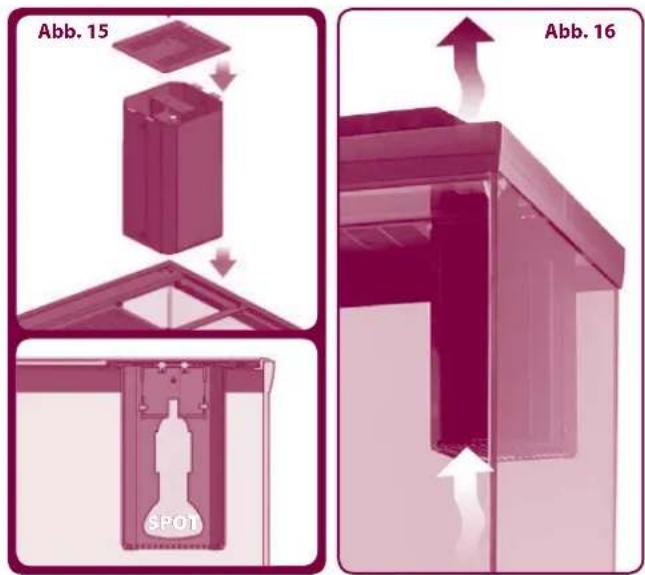

natural_image
Exterior view of a modern petri dish with glass enclosure and purple cabinet (no visible text or symbols)EXPLORA 110 H & CAYMAN 110 TRENDY
Terrarium EXPLORA
WAARSCHUWINGEN VOORAF:
natural_image
3D diagram of a rectangular container with internal compartments and directional arrows, labeled 'Afb. 2' (no text or symbols on the diagram itself)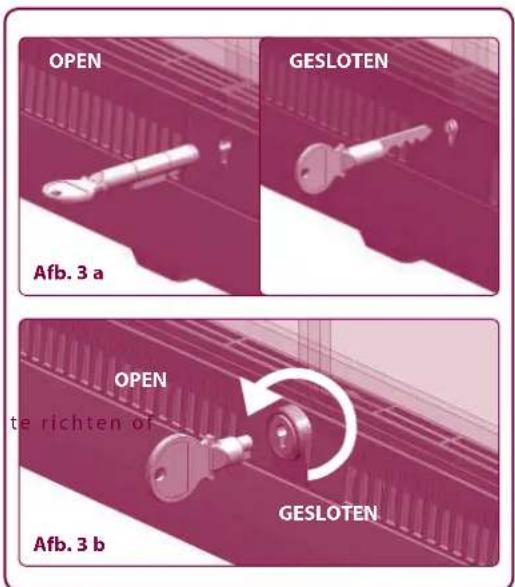
Openingen om optionele spotjes of lampen te monteren
natural_image
Illustration of a mechanical component with downward arrows indicating process (no text or symbols)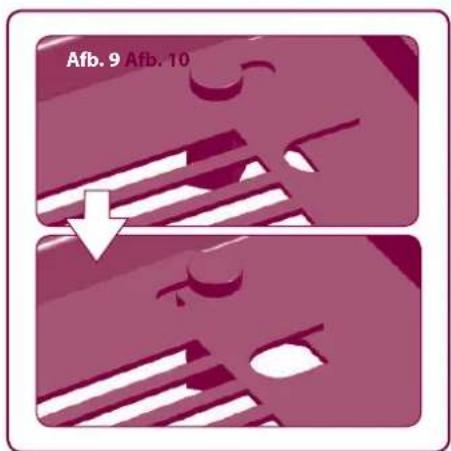
natural_image
Two-step illustration of a printer's front panel being folded, showing the blade and cover (no text or symbols)
natural_image
3D rendered object with layered structure, no visible text or symbols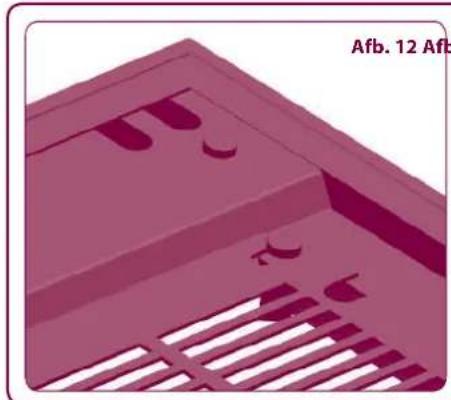
natural_image
3D rendered mechanical component with cutouts and slats, no visible text or symbols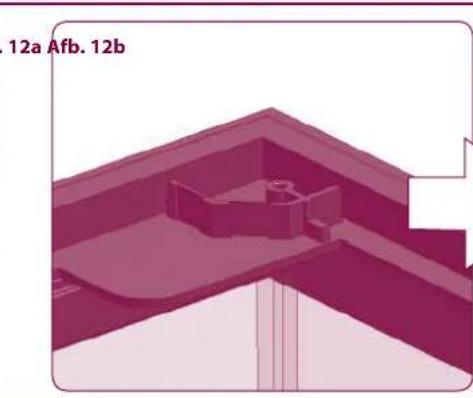
natural_image
3D architectural or structural diagram showing a building interior with no visible text or symbols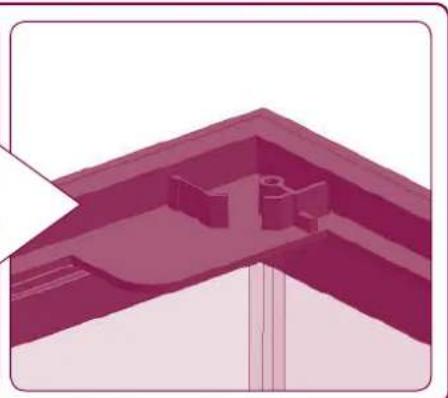
natural_image
3D architectural rendering of a building corner with structural elements (no text or symbols visible)AANBEVOLEN ACCESSOIRES (niet inbegrepen)
Lampen EXPLORALIGHT
natural_image
Two magenta rectangular electronic components with mounting feet, shown from different angles (no text or symbols visible)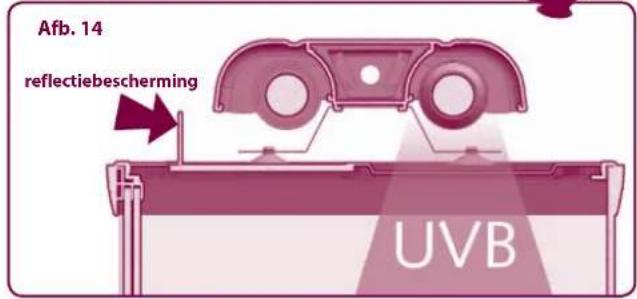
natural_image
Diagram of a microfluidic device with a conical tip and probe, labeled 'Afb. 13' (no other text or symbols)SPOT COVER
natural_image
Exterior view of a modern office building (no signage)EXPLORA 110 H & CAYMAN 110 TRENDY
Terrarium EXPLORA
natural_image
Illustration of a device with a grid panel and a downward arrow indicating process (no text or symbols)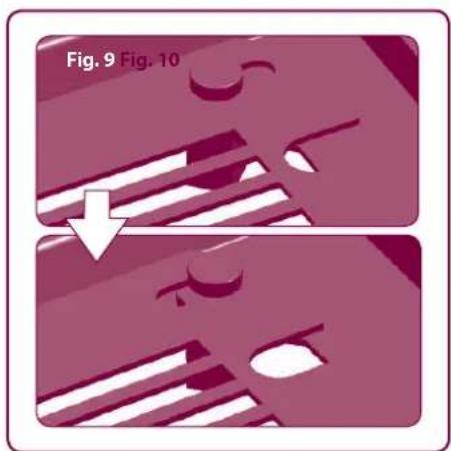
natural_image
Two-step diagram showing a mechanical component with internal features, labeled Fig. 9 and Fig. 10 (no text or symbols on the diagram itself)
natural_image
Two-step illustration of a printer's front panel showing the blade and cover (no text or symbols)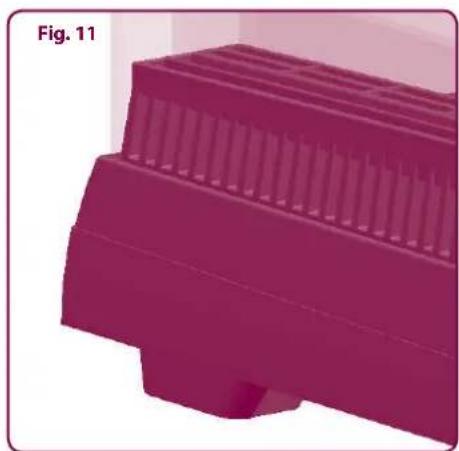
natural_image
3D rendered image of a purple mechanical component with ribbed top and base (no text or symbols)
natural_image
3D rendered diagram of a mechanical component with slots and brackets, labeled Fig. 12 (no text or symbols on the diagram itself)
natural_image
3D architectural or structural diagram showing a building interior with no visible text or symbols
natural_image
Architectural elevation diagram showing a sloped roof structure with internal structural elements (no text or labels)Plafones EXPLORALIGHT
natural_image
Two magenta rectangular electronic components with no visible text or symbols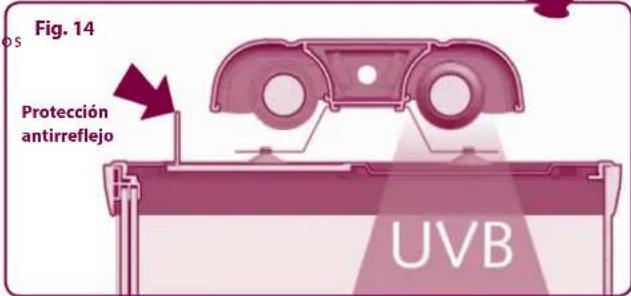
natural_image
Diagram of a mechanical or optical setup with a conical component and a beam, labeled Fig. 13 (no text or symbols on the diagram itself)SPOT COVER
natural_image
Exterior view of a modern office building (no signage)EXPLORA 110 H & CAYMAN 110 TRENDY
GARANZIA
Ferplast guarantees the EXPLORA terrarium and all its parts and accessories within the limits foreseen by this clause and current law provisions. The guarantee only covers manufacturing defects and comprises free repair or replacement. The guarantee becomes null and void in the event of damage and/or defects caused by negligence, wear, failure to comply with the instructions and warnings contained in this booklet, accidents, tampering, improper use, poor repairs or failure to present proof of purchase.
GARANTIE


- EXPLORA TERRARIUMS
- Suggested accessories (not included)
- Français 13
- EXPLORA
- SUGGESTED ACCESSORIES
- General design of the EXPLORA terrarium
- Terrario EXPLORA
- Piedini
- ACCESSORI CONSIGLIATI (non inclusi)
- Plafoniere EXPLORALIGHT
- Terrarium EXPLORA
- Preliminary warnings Opening the package
- Installation: few rules, total safety
- PRELIMINARY WARNINGS:
- Setting up: wonderful results in just a few days
- Application of heating mats under the base:
- Application of spot lamps:
- Application of fluorescent lamps:
- Safety and accessories
- Ventilation
- Doors
- Affixing overtank lamps
- Tank
- Upper part
- Openings for installation of optional spot lamps
- Feet
- Cable slots
- EXPLORALIGHT overtank lamps
- SPOT COVER
- DISPLAY CABINETS
- Pieds
- ACCESSOIRES CONSEILLÉS (non inclus)
- Plafonniers EXPLORALIGHT
- MEUBLES
- EMPFOHLENES ZUBEHÖR (nicht inklusive)
- Terrarienlampen EXPLORALIGHT
- WAARSCHUWINGEN VOORAF:
- Openingen om optionele spotjes of lampen te monteren
- AANBEVOLEN ACCESSOIRES (niet inbegrepen)
- Lampen EXPLORALIGHT
- Plafones EXPLORALIGHT
- GARANZIA
- GARANTIE
Brand : Ferplast
Model : Explora 40
Category : Terrarium