
3702303 - Other kitchen appliances BARTSCHER - Free user manual and instructions
Find the device manual for free 3702303 BARTSCHER in PDF.


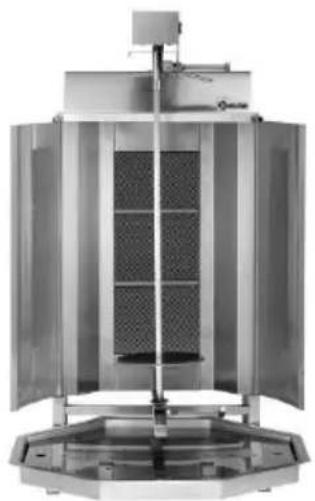
| Product type | Gas kebab grill |
| Brand | Bartscher |
| Model | 3702303 |
| Code No. | 3702303 |
| Material | Stainless steel 18/10 |
| Dimensions (W x D x H) | 597 x 795 x 990 mm |
| Weight | 30 kg |
| Maximum capacity | 40 kg of meat, max. height 45 cm |
| Burners | 3 independently adjustable gas burners with ceramic plates (180 x 130 mm each) |
| Total gas power | 9.75 kW |
| Gas category | II 2ELL3B/P |
| Factory-set gas | G30/G31 (LPG) at 50 mbar, injectors for natural gas included |
| Motor power supply | 230 V, 50/60 Hz, 3.7 W |
| Motor rotation speed | 1 rpm, reversible clockwise/counterclockwise |
| Spit | Length 73.6 cm, plate Ø 190 mm |
| Main functions | Grilling meats for kebab, gyros, shoarma; possibility of use with or without motor |
| Safety | Safety thermocouple on each burner, automatic shut-off in case of extinction; marked hot surfaces; need for a hood and good ventilation |
| Cleaning | Clean daily with a soft cloth and warm soapy water (food-safe detergent); do not immerse the motor or use a water jet |
| Maintenance | Professional check of all functions and tightness every 6 months; use only original spare parts |
| Optional accessories | Electric knife 370240 (90 W, 230 V), heat guiding plates 370245 (2 pieces) |
| General information | Operating instructions available in several languages; device intended for professional indoor use |
Frequently Asked Questions - 3702303 BARTSCHER
User questions about 3702303 BARTSCHER
0 question about this device. Answer the ones you know or ask your own.
Ask a new question about this device
Download the instructions for your Other kitchen appliances in PDF format for free! Find your manual 3702303 - BARTSCHER and take your electronic device back in hand. On this page are published all the documents necessary for the use of your device. 3702303 by BARTSCHER.
USER MANUAL 3702303 BARTSCHER
natural_image
Industrial stainless steel industrial machine with control panel and side-mounted unit (no visible text or symbols)3702303
Bedienungsanleitung
Dönergrill 40, Gas
Seite 1 bis 20
D/A/CH
Instruction manual
Gas kebab grill 40
from page 21 to 40
GB/UK
Mode d'emploi
Gril kebab 40 à gaz
natural_image
Close-up of a metallic microphone with ventilation grille and black handle (no text or symbols visible)natural_image
Two vertical metallic panels with gradient shading, no text or symbols visibleWärmeleitbleche
natural_image
Close-up of a white industrial cabinet with three black rotary switches and a mesh panel on the left side (no visible text or symbols)natural_image
Industrial mixing machine with octagonal base and vertical panel (no visible text or symbols)! ACHTUNG!
Translation of the original instruction manual

Read these instructions before using and keep them available at all times!
1. General information 22
1.1 Information about the instruction manual 22
1.2 Key to symbols.... 22
1.3 Liability and Warrantees 23
1.4 Copyright protection 23
1.5 Declaration of conformity 23
2.Safety 24
2.1 General information.... 24
2.2 Safety instructions for use of the device 24
2.3 Intended use 25
3. Transport, packaging and storage.... 26
3.1 Delivery check.... 26
3.2 Packaging 26
3.3 Storage....26
4. Assembly 27
4.1 Technical regulations concerning gas installations 27
4.2 Assembly of the device 27
4.3 Technical information 28
4.3.1 Sub-assemblies 28
4.3.2 Additional equipment 29
4.3.3 Technical information 30
4.3.4 Gas burner injector applications 30
4.3.5 Changes to gas type 31
4.3.6 Design of the gas configuration 32
4.4 Motor 34
5. Tips for use and maintenance 35
5.1 Tips for safety 35
5.2 Assembling the device 36
5.3 Use 37
5.4 Cleaning....39
5.5 Maintenance 40
6. Disposal 40
Bartscher GmbH
1.1 Information about the instruction manual
This instruction manual contains information about the installation, operation and maintenance of the device and should be consulted as an important source of information and reference guide.
Awareness of the safety instructions and instructions for use in this manual will ensure the safe and correct use of the device.
In addition to the information given here, you should comply with any local Health and safety Controls and generally applicable safety regulations.
The instruction manual forms part of the product and should be kept near the device and easily accessible for anyone carrying out the installation, servicing, maintenance or cleaning.
1.2 Key to symbols
In this manual, symbols are used to highlight important safety instructions and any advice relating to the device. The instructions should be followed very carefully to avoid any risk of accident, personal injury or material damage.

WARNING!
This symbol highlights hazards, which could lead to injury.
Please follow the instructions very carefully and proceed with particular attention in these cases.

WARNING! Electrical hazard!
This symbol draws attention to potential electrical hazards. If you do not follow the safety instructions, you may risk injury or death.

CAUTION!
This symbol highlights instructions, which should be followed to avoid any risk of damage, malfunctioning and/or breakdown of the device.

NOTE!
This symbol highlights tips and information, which have to be followed for an efficient and trouble-free operation of the device.

WARNING! Hot surface!
This symbol is a warning that the device surface is hot when in use. Ignoring this warning may result in burns!
1.3 Liability and Warrantees
All the information and instructions in this manual take into account standard safety regulations, current levels of technical engineering as well as the expertise and experience we have developed over the years.
The instruction manual was translated with all due care and attention. However, we do not accept liability for any translation errors. The German version of this instruction manual is definitive.
If the delivery consists of a special model, the actual scope of delivery may differ from the descriptions and illustrations in this manual. This is also the case for special orders or when the device has been modified in line with new technology.

NOTE!
Read this manual carefully and thoroughly before any operation of the device, and especially before turning it on!
Manufacturer is not liable for any damages or faults caused by:
- violation of advice concerning operation and cleaning;
- use other than designed;
- alterations made by user;
- use of inadequate spare parts.
We reserve the right to make technical changes for purposes of developing and improving the useful properties.
1.4 Copyright protection
The instruction manual including any texts, drawings, images or other illustrations is copyright. No part of this publication may be reproduced, transmitted or used in any form or by any means without permission in writing from the manufacturer. Any person who commits any unauthorized act in relation to this publication shall be liable to claims for damages. All rights reserved.

NOTE!
The contents, texts, drawings, pictures and any other illustrations are copyright and subject to other protection rights. Any person unlawfully using this publication is liable to criminal prosecution.
1.5 Declaration of conformity
The device complies with the current standards and directives of the EU.
We certify this in the EC declaration of conformity.
If required we will be glad to send you the according declaration of conformity.
2.Safety
This section provides an overview of all important safety aspects.
In addition every chapter provides precise safety advice for the prevention of dangers which are highlighted by the use of the above mentioned symbols.
Furthermore, attention should be paid to all pictograms, markers and labels on the device, which must be kept in a permanent state of legibility.
By following all the important safety advice you gain an optimal protection against all hazards as well as the assurance of a safe and trouble-free operation.
2.1 General information
This device is designed in accordance with the presently applicable technological standards. However, the device can pose a danger if handled improperly and inappropriately.
Knowing the contents of the instruction manual as well as avoiding mistakes and thus operating this device safely and in a fault-free manner is very essential to protect yourselves from the hazards.
To prevent hazards and to ensure optimum efficiency, no modifications or alterations to the device that are not explicitly approved by the manufacturer may be undertaken.
This device may only be operated in technically proper and safe condition.
2.2 Safety instructions for use of the device
The specifications regarding the industrial safety are based on the Regulations of the European Union applicable at the time of manufacturing the device.
If the device is used commercially, the user is obliged to ensure that the said industrial safety measures concur with the state of the rules and regulations applicable at the time in question for the entire period of use of the device and to comply with the new specifications.
Outside the European Union, the industrial safety laws applicable at the place of installation of the device and the regional territorial provisions must be complied with.
Besides the industrial safety instructions in the instruction manual, the general safety and accident prevention regulations as well as environment protection regulations applicable for area of application of the device must be followed and complied with.

CAUTION!
o Please keep these instructions and give them to future owners of the device.
○ All people using the device should follow the instructions and tips contained in these instructions.
○ Only use the device indoors.
2.3 Intended use

CAUTION!
The device has been designed and built for commercial use and should be operated only by qualified personnel in kitchen facilities.
Safe operation is only guaranteed when using the device for its intended purpose.
Any technical interventions, as well as assembly and maintenance are to be made by a qualified customer service only.
The Gas Kebab grill is intended for grilling all meat types used in the traditional preparation of kebabs, gyros and shoarma.

CAUTION!
Any use going beyond the intended purpose and/or any different use of the device is forbidden and is not considered as conventional.
Any claims against the manufacturer or his authorized representative as a consequence of experiencing damages resulting from unconventional use are impossible.
The operator is liable for all damages resulting from inappropriate use.
3. Transport, packaging and storage
3.1 Delivery check
Please check the delivery upon completeness and transport damage immediately after receipt. In case of visible damage do not accept or accept the delivery with reservation only.
Note the extent of damage on the carrier's bill of delivery. Trigger off the complaint. Hidden damages should be reclaimed immediately after notice, as claims for damages can only be asserted within the effective period for complaints.
3.2 Packaging
Please do not throw away the covering carton of your device as it might be useful for storage purposes, when moving or, in case of damages, when the device must be sent back to a repair center. The outer and inner packing material should be removed completely from the device before installation.
NOTE!
If you liked to dispose the packing, consider the regulations applicable in your country. Supply re-usable packing materials to the recycling.
Please inspect the device upon completeness. In case any part is missing please contact our customer service center immediately.
3.3 Storage
Keep the package closed until installation and under consideration of the outside indicated positioning- and storage markings.
Packages should be stored under consideration of the following:
- Do not store outdoors.
- Keep it dry and dust-free.
- Do not expose it to aggressive media.
- Do not expose it to direct sunlight.
- Avoid mechanical shocks and vibration.
- In case of longer storage (> 3 months) make sure you check the state of the packaging and the parts regularly. If required refresh or renew.
4. Assembly
4.1 Technical regulations concerning gas installations
- All activities related to installation, assembly, service and maintenance must be conducted by specialized personnel who hold all necessary licenses (producer or seller's authorization). All such work should be performed in accordance with legal regulations concerning installations, product safety and occupational safety.
- All gas attachments in the device meet the ISO 7 – 1 and/or ISO 228 – 1 standards.

WARNING!
All places where the device is to be installed must be equipped with appropriate electrical and gas installations fulfilling local regulations. In addition, all possible safety measures protecting people and property should be applied. In the event of failure to do so, the producer shall bear no liability.
4.2 Assembly of the device
- The device must be located in a closed, well-ventilated space (not in an open-air facility!).
- Place the device on a stable, level surface of stainless material. This surface should be designed so as to prevent dripping of grease through the main base onto the floor. Never place the device on surfaces made of plastic or wood.
- If the device is to be located near a wall, dividing wall, kitchen cabinet, decorative screen or other similar object, ensure that these objects are made of non-flammable materials.
If they are not, they should be impregnated with non-flammable materials, pursuant to all fire safety regulations. Keep a minimum distance of 20 cm from walls. - The gas grill connections should be installed in accordance with applicable regulations.

WARNING!
The room in which the device will be used must be well-ventilated. The ventilation must be made of non-flammable materials resistant to high temperatures and equipped with a fume hood.
4.3 Technical information
4.3.1 Sub-assemblies
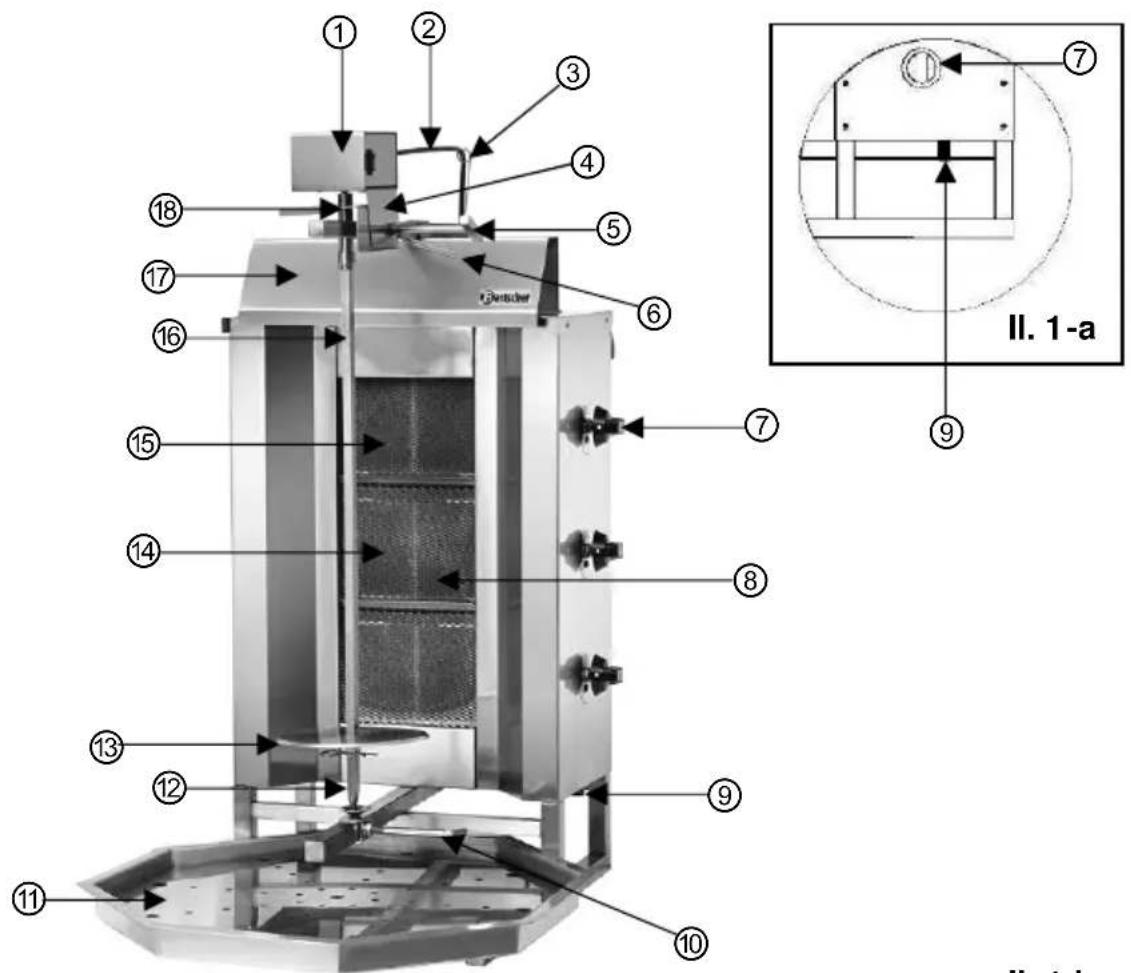
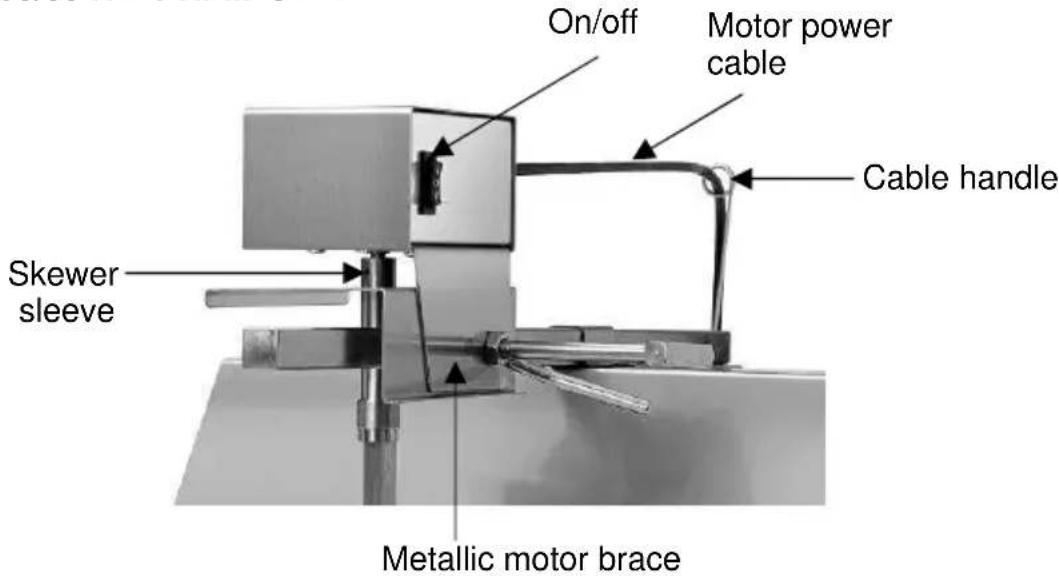
II. 1-b
① Motor
② Motor power cable
③ Cable handle
④ Metallic motor brace
⑤ Upper fastener
⑥ Clamp arm
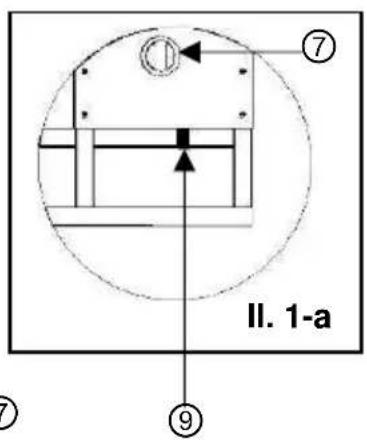
⑦ Gas valve button and gas valve
⑧ Thermal element
⑨ Gas connection and pressure gauge adapter
⑩ Lower fastener
⑪ Grease tray (octagonal) with perforated plate cover
⑫ Pin
⑬ Plate
⑭ Burner
⑮ Protective wire mesh
⑯ Skewer
⑰ Thermal shield
⑱ Skewer sleeve
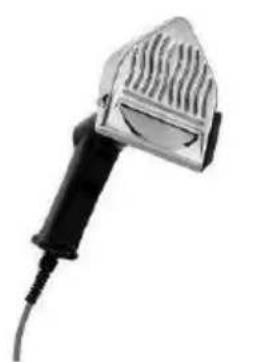
4.3.2 Additional equipment
(not included with the device!)
natural_image
Black and white photo of a vintage-style microphone with ventilation grille and black handle (no text or symbols visible)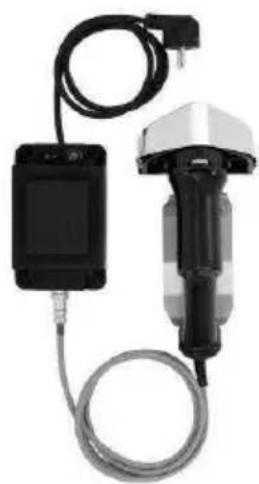
natural_image
Close-up of a handheld electronic device with a black sensor and cable, no visible text or symbols
natural_image
Two vertical metallic cylindrical panels with smooth surfaces, no text or symbols visibleKebab knife 100
- Knife: ∅ 100 mm, adjustable cutting thickness from 1 to 3 mm
- RPM: 4500
• Power: 90 W / 230 V 50 Hz - Weight: 3.85 kg
Handle:
• Head: chrome-nickel steel 18/10
- Handle: plastic
- Cable length: 1,4 m
- Cleaning without disassembly, waterproof
• Dimensions: W 115 x D 235 x H 200 mm
- Weight: 1.1 kg
Power supply:
- Cable length: 1.1 m
• Dimensions: W 90 x D 155 x H 85 mm - Height: 2.75 kg
Art. no. 370240
Heat conducting plates for gas kebab grill 40
• chrome-nickel steel 18/10
- 2 pcs., dimensions of each: W 195 x H 630 mm
- Weight: 2.3 kg
Art. no. 370245
4.3.3 Technical information
| Name | Gas kebab grill 40 |
| Art. no.: | 3702303 |
| Material: chrome-nickel steel 18/10 | |
| Construction: | 3 separate adjustable gas burners with ceramic plated, burn surfaces of each W 180 x H 130 mm |
| Capacity: max. 40 kg, meat height max. 45 cm | |
| Motor: | Motor for rotating skewer with sliding sleeve: RPM: 1, clockwise and counterclockwise |
| Motor power: 3.7 W / 230 V 50/60 Hz | |
| Gas power: 9.75 kW | |
| Gas category: II 2ELL3B/P | |
| Presets: | G30-G31/ 50 mbar, liquid gas, natural gas jets included |
| Dimensions: | device: W 597 x D 795 x H 990 mm skewer: L 73.6 cm, plate: ∅ 190 mm |
| Weight: 30.0 kg | |
We reserve the right to introduce changes!
4.3.4 Gas burner injector applications
| GAS TYPE | G20 - 20 mbar | G20 - 25 mbar | G25 - 25 mbar | G25 - 20 mbar | G25.1 - 25 mbar | G30 - 29 mbar | G31 - 37 mbar | G30 - 50 mbar |
| Device type Burner injector diameter (mm) | ||||||||
| 3GD/37002303 | 1.35 1 | .30 1.40 | 1.50 1 | 45 0.93 | 0.93 0.80 | |||
For burner with output of:
3,25 kW (liquid gas) / injector for by-pass of gas valve ∅ 1.00 mm
3,25 kW (LPG) / injector for by-pass of gas valve ∅ 0.65 mm
The provided outputs may not be adjusted by the user. All changes to the valves and injectors will void the warranty.
The producer will not bear any liability for resulting damage or malfunction.
4.3.5 Changes to gas type
Observe the following recommendations concerning gas types permissible based on local regulations.
- The device is manufactured to be used with liquid gas; natural gas jets are included.
- Employ qualified personnel to perform conversion to another type of gas.
- Close all leads and valves in gas bottles supplying gas to the device.
- Disconnect the device's gas connections.
- Unscrew the appropriate screws and remove the device's rear shielding.
- Disconnect the lines between the gas valves and injectors.
• After removing pins, disconnect the nipples of burners holding the injectors in the burners.
• Install injectors appropriate for the desired gas type in the nipples of the burners.
- Re-assemble the burner nipples using the pins.
- Mount the lines between the gas valves and injectors (to avoid leaks, coat the connectors and gas valve threads with a gas leak paste).
- Change the device's signage to reflect the gas type in use.
- Connect the device to a gas source appropriate to the adjustments made and open the gas valves.
- Check that all connections are airtight (only use approved sprays or foams designed for such tests!). Do not perform such tests using matches, lighters or other sources of open flame.
- After completing testing of the device's seals, test the device's burner.
- If the device gives insufficient heat, use a screwdriver to change the setting of the regulating gas injector (by-pass), which is located over the gas valve. The by-pass injector opens in the direction of the gas flow. This is why you should never loosen the by-pass injector when the device is in use. The gas pressure in the device is preset before it is placed on sale, and if it is not adapted for a different gas type, do not change the factory settings. If the device is working properly, the device's rear shielding can be replaced.
- If the aforementioned instructions are followed, the device can be freely used with any type of gas.
4.3.6 Design of the gas configuration
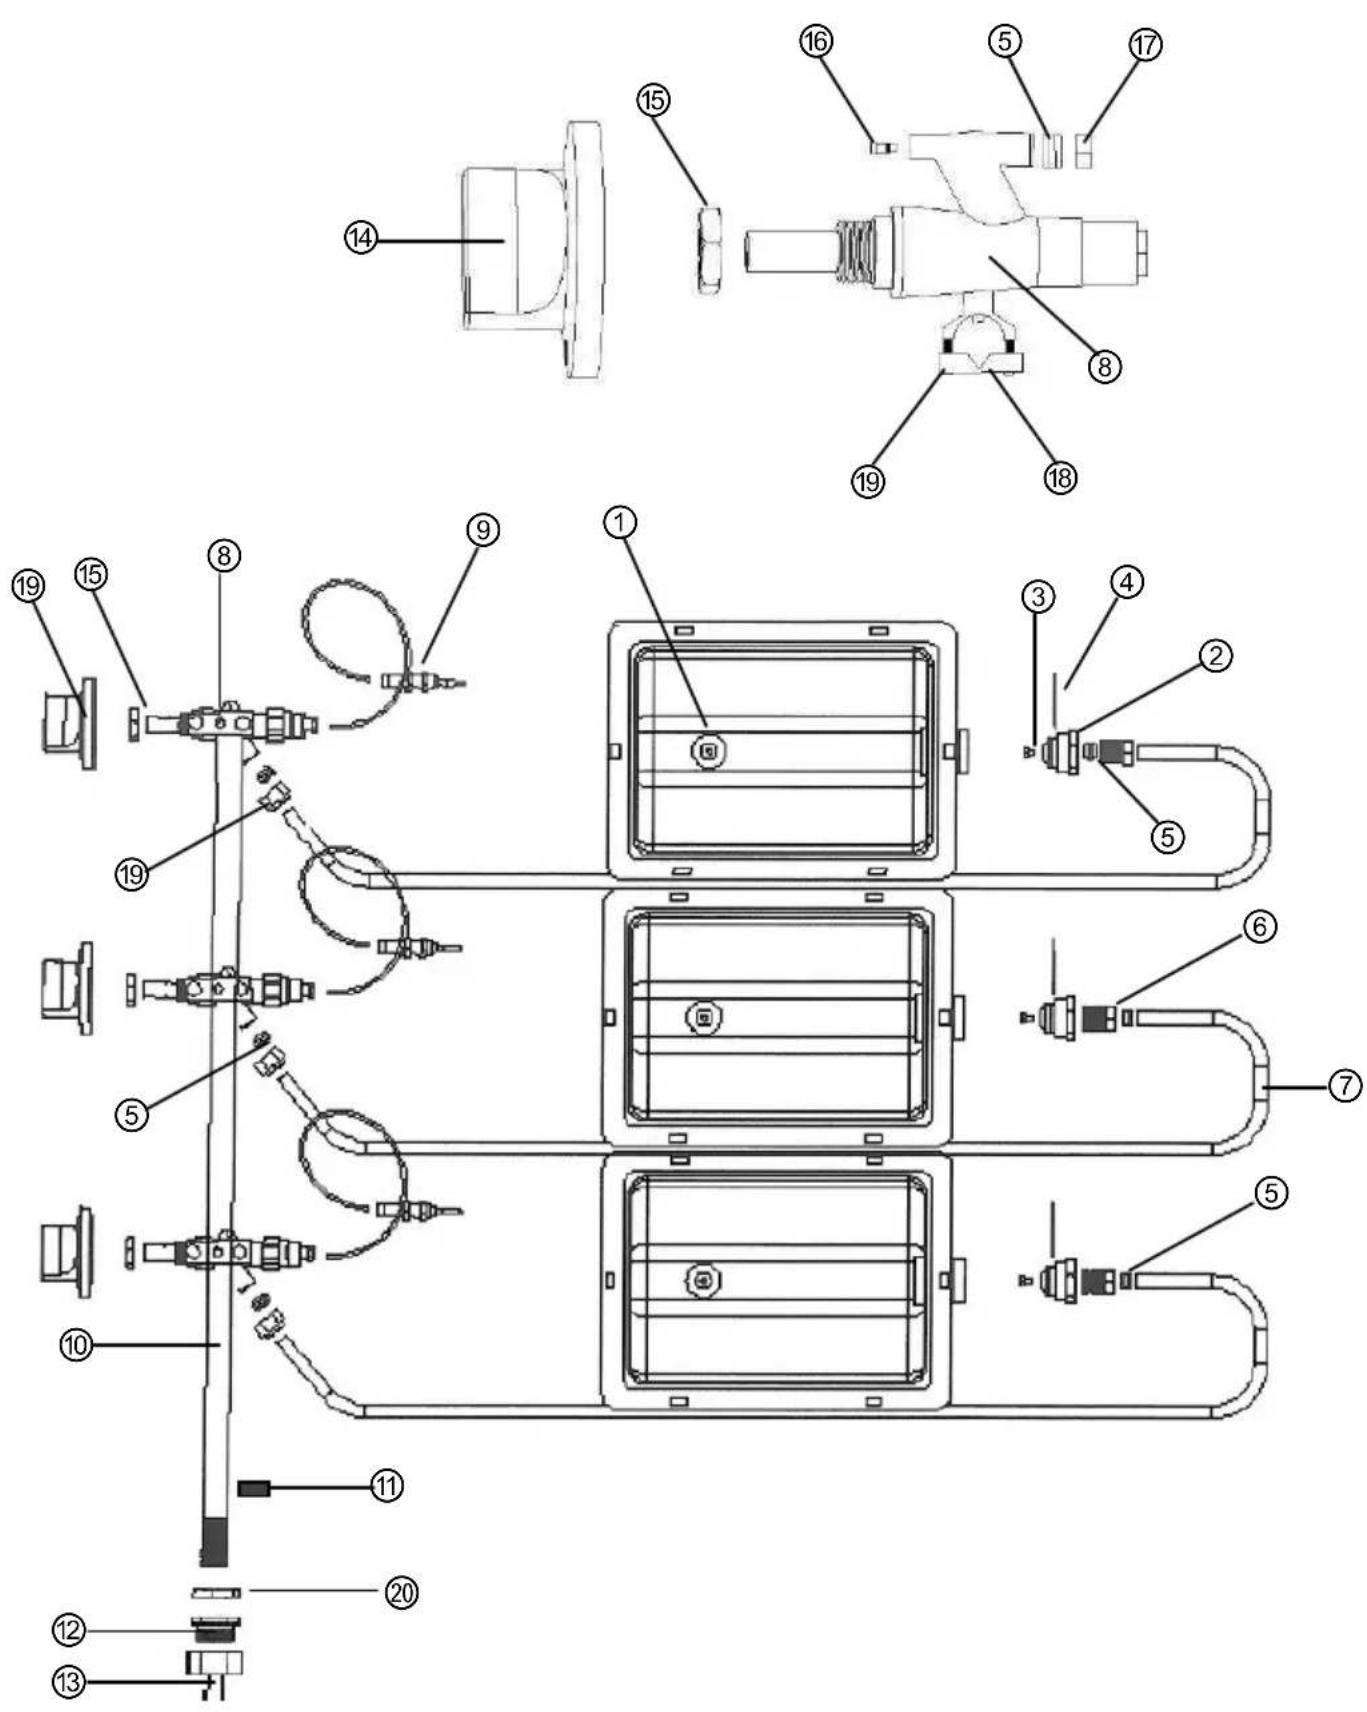
① Burner
② Burner nipple
③ Burner injector
④ Pin
⑤ Ring
⑥ Burner coupler
⑦ Gas line ( ∅ 8x1 )
⑧ Gas valve
⑨ Thermal element
⑩ Gas distributor ( ∅16x1.5 )
⑪ Gas pressure gauge adapter
⑫ Natural gas coupler
⑬ Propane coupler
⑭ Gas valve button
⑮ Gas valve screw
⑯ Gas valve by-pass injector
⑰ Gas valve coupler
⑱ Gas valve band
⑲ Band screw
⑳ Gas line cap
4.4 Motor
Motor technical characteristics
220-240 V\~ 50/60 Hz 1 RPM 3.7 W

WARNING! Danger of electric shock!
If the device is improperly installed there is a risk of injury!
Prior to installation compare the local electrical network with the device's technical parameters (see the rating plate). Only connect the device if there is full compatibility!
- Prior to connecting the device's motor to a power source, ensure that the voltage and frequency values given on the rating plate are compatible with the electric installation.
- The gas kebab grill's electric motor works in two directions (clockwise and counterclockwise). This enables easier use of the device and allows meat to be evenly grilled on all sides.
- Never clean the electric motor with water. To clean the motor's surface use a moist cloth, then dry thoroughly.
- When assembling the electric motor do not allow it to fall or be dropped.
- The motor's electric cable should avoid direct contact with flame.
-
When operating the device, use a thermal shield to reduce the influence of heat on the motor.
-
Inspect the motor's power cable prior to every use. Energy may be lost if the cable overheats or additional connections are performed. Have qualified technicians replace a damaged cable.
- By following the above recommendations the device's motor will offer maximum efficiency.
5. Tips for use and maintenance
5.1 Tips for safety

CAUTION!
These instructions for use should be read carefully, as they contain important information about safety and operation of the device.
Keep these instructions where they are easily accessible.
Improper installation or mistakes in use, maintenance and cleaning, as well as any changes or modifications may result in malfunctioning, damage and injury.
- Do not use accessories and spare parts that are not recommended by the manufacturer. They may cause a threat to the user and others, or can result in damage to the device as well as void the warranty.
- Regularly inspect the power cable for damage. Never use the device if its power cable is damaged. If it is damaged, have it replaced by an authorized service center or qualified electrician.
- Improper installations, mistakes in operation, maintenance and cleaning, as well as changes and modifications may result in malfunction, damage and injury.
• Before activating the device, remove all protective film and packing materia. - Never leave the device unattended when in use.
- The device must be operated under a fume hood.
- The device should only be operated by individuals who have read the instructions concerning the device's construction, operation and maintenance, and have been trained in use of the device.
-
Check the device's gas connections before each use.
-
The room in which the device is to be used must be well-ventilated. The ventilation installation must be composed of non-flammable materials resistant to high temperatures, with an open hood.
- To move the device, remove its plug from the socket, close the gas valves and wait for it to cool completely.
- If the device is used without its motor, rotate the meat on the skewer using the handle at the bottom.
- If the odor of gas is detected, close all of the device's gas valves and external gas installations, then thoroughly ventilate the room. Summon a competent maintenance service immediately.
- Never check if gas lines and valves are airtight using matches or a lighter. Use an appropriate spray or foam for detecting leaks.
- When finished using the device or when malfunctions occur, close all gas valves, gas sources and disconnect the power source.
- The device can only be used in accordance with its intended function.
- When the device is in operation, protect it from impacts and do not move it.
- When using the device, ensure that grease does not drip onto the floor. If grease does drip on the floor, remove it immediately, otherwise accidents and injury may result from slips and falls.
- When moving the device, prevent it from being impacted or falling.
- Do not leave any flammable materials near the device. Do not activate the device if it is near flammable materials.
- The gas pressure values appropriate for a given device are located on the rating plate. The device may only be used with the gas pressure values given therein.
- If the device is supplied by an LPG cylinder, the distance between the cylinder and the device must be at least 50 cm.
5.2 Assembling the device
- Assemble the motor in accordance with the provided instructions, mount the drip tray and perforated plate cover onto the device.
- To place meat in the device, loosen the lower arm and upper fastener. Use the fasteners to regulate the distance between the skewer with meat and the burners.
- Adjust the pressure values according to the information on the device's rating plate, then insert the power cord into a socket. The device is ready for operation.
5.3 Use
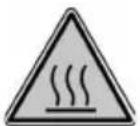
When in use, the device's surface can reach temperatures over 60 °C. To avoid burns, do not touch parts of the device marked with the symbol displayed at the side.
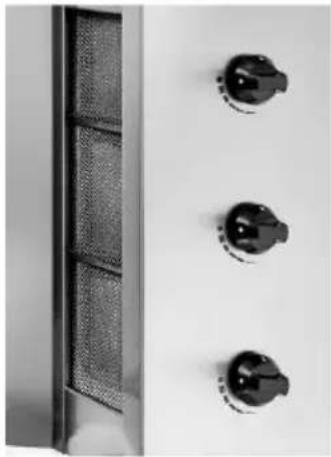
- Open the main gas valve to provide a stream of gas to the device. - Next, push the highest gas valve knob and turn it 14 counterclockwise.
Gas is now being supplied to the burner. Hold the knob down and ignite the burner using a match or lighter. (Use long matches or a long lighter to avoid burns.)
natural_image
Close-up of a wall-mounted control panel with three black rotary knobs and a meshed side panel (no text or symbols visible)- If no flame appears around the burner within 10-15 seconds, close the gas valve and wait a moment before repeating the ignition procedure. The gas valves are equipped with thermal elements, which is why the valve knobs must remain pressed down until the thermal elements finish heating up (approx. 15 seconds). Otherwise the thermal elements do not allow gas to flow freely and the flame will be extinguished. After the thermal elements have heated up, the knob may be released.
- Proceed in the same manner with all burners. If the flame goes out for any reason the thermal elements will cut off the flow of gas.
- Every burner is operated with an independent, dedicated gas valve. The valves have two settings: "Grilling" and "Maintaining temperature".
"Grilling"
The gas valve switch is marked with a symbol showing a large flame. Setting the valve to this position enables grilling of meat.
"Maintaining temperature"
The gas valve switch is market with a symbol showing a small flame. Setting the valve to this position enables maintaining the temperature of meat.
For best use of the heat generated by the burners, mount the heat conducting plates at the left and right sides of the device.
(4.3.2 Additional equipment – code-no.: 370245)
natural_image
Industrial mixing reactor with hexagonal base and central chamber (no visible text or symbols)! CAUTION!
When finished using the device, close all gas valves, main valves and disconnect the electricity supply.
Using the motor
Using the device with an electric motor can ensure even grilling of meat and reduce the effort required for operating the device.
To operate the device with a motor, perform the following steps (Fig. 1-b)
- Loosen the 'T'-shaped arm of the upper fastener (5) and lower fastener (10). Set the arm in the best position for meat of a given diameter in order to easily place it on the skewer.
Loosen the 'T'-shaped arm of the upper fastener (5). While doing this, the clamp arm (6) must be located above the upper fastener (5). Next, thread the 'T'-shaped arm of the upper fastener (5) through the opening in the motor's metal brace (4), connect it to the motor (1) and turn the arm. - Place the lower skewer blade (16) holding meat into the tapered socket in the lower fastener (10) and again tighten the 'T'-shaped arm.
-
Next, move the upper potion of the skewer (16) holding meat to the skewer shield. Lift the connection tube over the skewer shield, place the skewer with meat in the shield and close using the connection tube.
• After completing the previous step, the arm of the lower fastener (10) and upper fastener (5) must be in the same position. -
Next, thread the motor power cable (2) through the cable bracket. Protect the cable from overheating when operating the device. (Use the thermal shield to protect the motor power cable from high temperatures (17).)
- The device is ready for use with the motor. Connect the power cable to a socket and switch the motor on.

CAUTION!
When operating the device with the motor, ensure the power cable remains far from heat sources. When in use, the motor's power cable must always be fixed to the braces.
Use without motor
If the device is to be used without a motor, ensure proper operation of the device by using the original skewer rotation arm, installed and rotated over the skewer.
When operating the device without a motor, adhere to the following instructions. (Fig. 1 – b)
- Loosen the 'T'-shaped arm of the upper fastener (5) and lower fastener (10). Set the arm to the best position for the meat to be cooked so that it will fit on the skewer. Place the lower blade of the skewer (16) holding meat into the tapered socket in the lower fastener (15) and again tighten the 'T'-shaped arm.
- Next, thread the upper part of the skewer holding meat through the ring over the upper fastener (5) and turn the 'T'-shaped arm of the upper fastener (5).
• After completing the previous step, the arm of the lower fastener (10) and upper fastener (5) must be in the same position. - Mount the original arm for rotating the skewer over the skewer and turn the skewer by hand. This will allow you to avoid contact with hot, greasy meat while ensuring hygienic and safe operation of the device.
5.4 Cleaning
o Prior to cleaning and performing maintenance, disconnect the motor from its power source, close off the flow of gas and leave the device to cool completely.
To ensure the device's long life and to ensure good operating conditions, clean the device thoroughly when finished using at the end of every day.
- Never clean the device with scouring powder or concentrated chemicals.
○ Dissolve a small amount of cleaning agent appropriate for food service applications in water, then wash the device using this mixture and a soft cloth or sponge. Dry the cleaned surface using a dry cloth.
- Do not immerse electrical elements of the device such as the motor and power cable.
- Do not allow the burners to come into contact with water.
- Never wash the device under running water. Do not clean the device with pressurized water. Never immerse the device in water or other liquids.
5.5 Maintenance
Depending on the location and intensity of use, the manufacturer or a competent service technician should be assigned to inspect the device's functionality and gas connections at least every six months.
Never attempt to repair the device yourself.
If the device begins to malfunction, immediately summon a qualified service technician and stop using the device until the malfunction is completely removed. Only use original spare parts.
6. Disposal
Old devices should be disposed of in accordance with national and local regulations. Contact a specialist provider of disposal services or your local waste management authority.

CAUTION!
Ensure the device is no longer usable before disposing of it in order to avoid dangers associated with further use. Disassemble the electric motor and deliver the parts to an appropriate waste collections centre.
Bartscher GmbH
natural_image
Two black-and-white product photos: top shows a handheld microphone with ventilation grille, bottom shows a handheld device connected to a cable (no visible text or symbols)Couteau à kebab 100
natural_image
Two vertical metallic cylindrical panels side by side, no text or symbols presentnatural_image
Close-up of a wall-mounted industrial fan with three black rotary knobs, one open to reveal the grille (no text or symbols visible)natural_image
Exterior view of a metallic industrial reactor or reactor with octagonal base and central chamber (no visible text or symbols)! ATTENTION !
natural_image
Two electronic devices: a metallic microphone and a handheld device with cable (no visible text or symbols)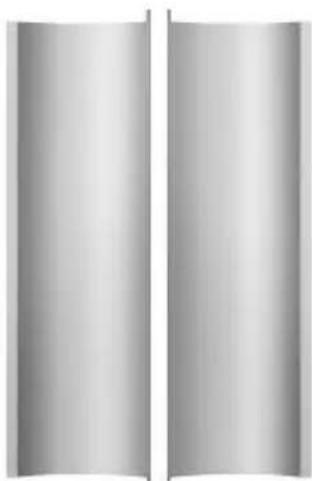
natural_image
Two vertical metallic panels with smooth surfaces, no text or symbols visibleDönermes 100
natural_image
Close-up of a wall-mounted control panel with three black rotary knobs and a mesh fan on the left side (no text or symbols visible)Positie "Warmhouden"
natural_image
Exterior view of a stainless steel industrial reactor with hexagonal base (no visible text or symbols)
OPGELET!
natural_image
Close-up of a metallic electric shaver with grille and black handle (no text or symbols visible)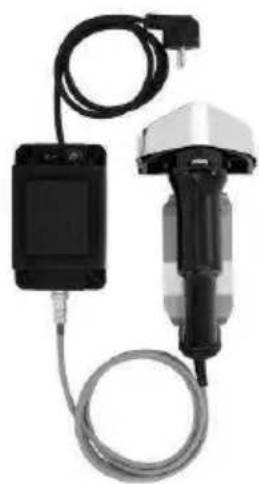
natural_image
Two electronic devices with cables and a power plug, no visible text or symbols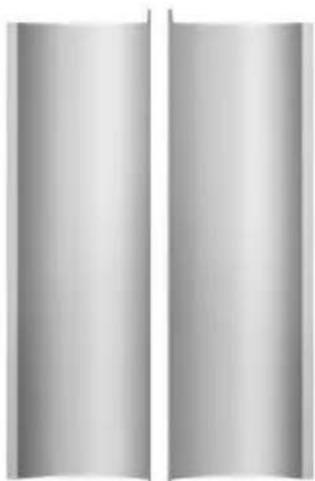
natural_image
Two vertical metallic cylinders side by side, no text or symbols visiblenatural_image
Close-up of a white industrial cabinet with three black rotary switches and a mesh ventilation grille (no text or symbols visible)natural_image
Industrial mixing machine with hexagonal base and central chamber (no visible text or symbols)! OSTRZEŻENIE!
- Bedienungsanleitung
- Instruction manual
- Mode d'emploi
- Wärmeleitbleche
- ! ACHTUNG!
- Translation of the original instruction manual
- Read these instructions before using and keep them available at all times!
- General information 22
- 2.Safety 24
- Transport, packaging and storage.... 26
- Assembly 27
- Tips for use and maintenance 35
- Disposal 40
- Information about the instruction manual
- Key to symbols
- WARNING!
- WARNING! Electrical hazard!
- CAUTION!
- NOTE!
- WARNING! Hot surface!
- Liability and Warrantees
- Copyright protection
- Declaration of conformity
- 2.Safety
- General information
- Safety instructions for use of the device
- Intended use
- Transport, packaging and storage
- Delivery check
- Packaging
- Storage
- Assembly
- Technical regulations concerning gas installations
- Assembly of the device
- Technical information
- Sub-assemblies
- Additional equipment
- Kebab knife 100
- Handle:
- Power supply:
- Heat conducting plates for gas kebab grill 40
- Technical information
- Gas burner injector applications
- For burner with output of:
- Changes to gas type
- Observe the following recommendations concerning gas types permissible based on local regulations.
- Design of the gas configuration
- Motor
- WARNING! Danger of electric shock!
- Tips for use and maintenance
- Tips for safety
- Assembling the device
- Use
- "Grilling"
- "Maintaining temperature"
- ! CAUTION!
- Using the motor
- To operate the device with a motor, perform the following steps (Fig. 1-b)
- Use without motor
- When operating the device without a motor, adhere to the following instructions. (Fig. 1 – b)
- Cleaning
- Maintenance
- Never attempt to repair the device yourself.
- Disposal
- Couteau à kebab 100
- ! ATTENTION !
- Dönermes 100
- Positie "Warmhouden"
- OPGELET!
- ! OSTRZEŻENIE!
Brand : BARTSCHER
Model : 3702303
Category : Other kitchen appliances