Chronograph 1513013 - Watch Hugo Boss - Free user manual and instructions
Find the device manual for free Chronograph 1513013 Hugo Boss in PDF.

| Product type | Chronograph watch |
| Brand | Hugo Boss |
| Model | Chronograph 1513013 |
| Movement | Quartz battery |
| Power source | Battery (type CR2016 or equivalent) |
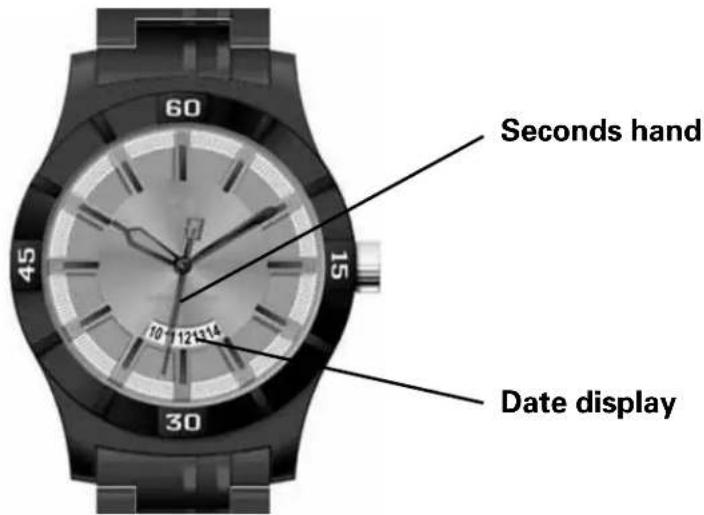
| Main functions | Display hours, minutes, seconds; chronograph (1/5 s, up to 59'59''80), date |
| Crystal | Mineral |
| Case | Stainless steel |
| Strap/Bracelet | Leather or steel depending on version |
| Water resistance | 50 meters (estimated) |
| Case diameter | Approximately 42 mm |
| Case thickness | Approximately 12 mm |
| Approximate weight | Approximately 100 g |
| Warranty | 2 years (manufacturer) |
| Maintenance and cleaning | Clean with a soft, dry cloth; avoid impacts and chemicals |
| Safety | Do not use the chronograph underwater; do not operate the crown between 9 PM and 3 AM for date adjustment |
| Spare parts and repairability | Battery replaceable by a watchmaker; service recommended every 2 years |
| General information | Detailed manual provided with setting diagrams for chronograph, date, dual time zone, and moon phase (depending on version) |
Frequently Asked Questions - Chronograph 1513013 Hugo Boss
User questions about Chronograph 1513013 Hugo Boss
0 question about this device. Answer the ones you know or ask your own.
Ask a new question about this device
Download the instructions for your Watch in PDF format for free! Find your manual Chronograph 1513013 - Hugo Boss and take your electronic device back in hand. On this page are published all the documents necessary for the use of your device. Chronograph 1513013 by Hugo Boss.
USER MANUAL Chronograph 1513013 Hugo Boss
WARRANTY AND SERVICE GUIDE
BOSS BLACK
WATCHES WITH SIMPLE FUNCTIONS
2 or 3 hands - Hours - Minutes 3
2 or 3 hands - Hours - Minutes - Date aperture(s) 4
WATCHES WITH MULTIPLE FUNCTIONS
2 or 3 hands & small seconds 5
3 hands - date counter 6
Multi-eye - Day - Date - 24-hour counter 7
Multi-eye - Day of the week - Date & moon phase 8
WATCHES WITH CHRONOGRAPH FUNCTION
Simple Chronograph 9
1/10 seconds Aviator Chronograph 10
1/5 seconds Chronograph 11
COMPLEX WATCHES WITH CHRONOGRAPH FUNCTION
Regatta Chronograph 12
Racing Chronograph 13-15
Worldtimer Chronograph 16
AUTOMATIC WATCHES 17-18
BOSS Orange
DIGITAL WATCHES
Models with digital display 20
Digital Chronograph Models 21
Models with analog and digital display 22
ANALOG WATCHES
Models with two or three hands 23
Models with multi-eye 24
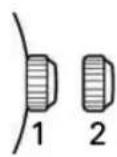
WATCHES WITH SIMPLE FUNCTIONS 2 or 3 hands - Hours - Minutes

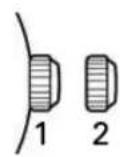
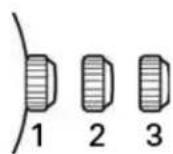
Positions of the crown:
Position 1 - Normal position.
Crown pushed against the case.
Position 2 - Setting the TIME:
Rotate the crown in either direction.
WATCHES WITH SIMPLE FUNCTIONS 2 or 3 hands - Hours - Minutes - Date aperture(s)
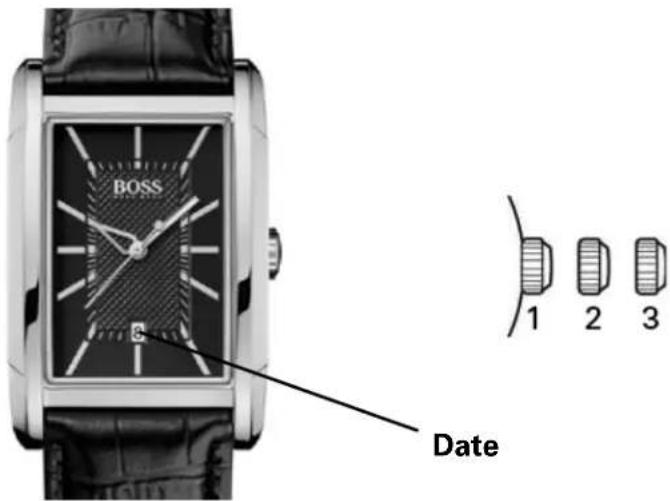
Positions of the crown:
Position 1 - Normal position.
Crown pushed against the case.
Position 2 - Setting the DAY*: Rotate the crown clockwise.
NOTE: For models with DAY OF THE WEEK/DAY display(s): Rotate the crown clockwise to set the DAY and counterclockwise to set the DAY OF THE WEEK.
Position 3 - Setting the TIME: Rotate the crown in either direction.
*WARNING: Never set the day of the week when the hands are between 9:00 pm and 3:00 am to avoid damage to the calendar mechanism.
NOTE: Setting the date does not affect the working of the watch. When the watch is working, the date changes gradually during the period between 9:00 pm and 3:00 am.
WATCHES WITH MULTIPLE FUNCTIONS 2 or 3 hands & small seconds
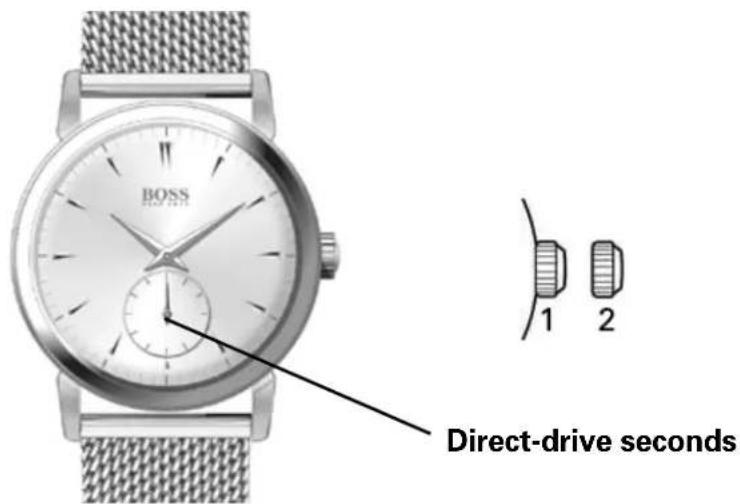
Positions of the crown:
Position 1 - Normal position.
Crown pushed against the case.
Position 2 - Setting the TIME:
Rotate the crown in either direction.
WATCHES WITH MULTIPLE FUNCTIONS 3 hands - date counter

Positions of the crown:
Position 1 - Normal position.
Crown pushed against the case.
Position 2 - Setting the DATE counter:
Rotate the crown in either direction.
Position 3 - Setting the TIME:
Rotate the crown in either direction.
WATCHES WITH MULTIPLE FUNCTIONS Multi-eye - Day - Date - 24-hour counter
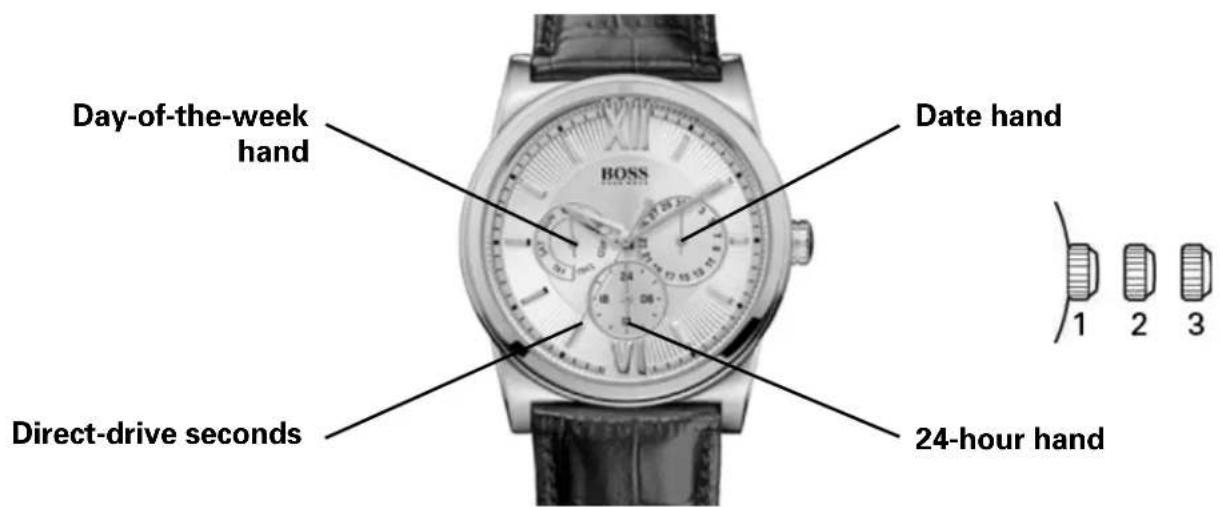
Setting the hour, minutes and 24 hours:
- Pull the crown out to position 3.
- Rotate the crown clockwise to place the hour, minute and 24-hour hands at the desired time.
- Push the crown back to position 1.
Setting the second time zone:
- With the crown in position 1, press and release the pushbutton B to place the 24-hour hand to the desired position; the hand moves forward one hour with each press.
Setting the day:
- Pull the crown out to position 3.
- Rotate the crown clockwise: The day hand moves forward one figure each time the hour and minute hands pass the midnight position (00:00).
- Once the desired day is obtained, push the crown back to position 1.
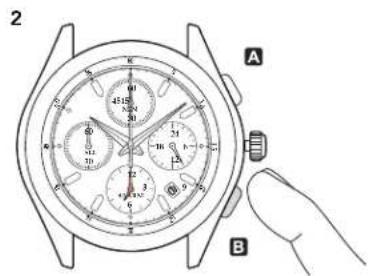
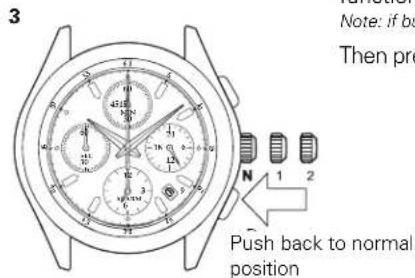
Quick date correction:
- Pull the crown out to position 2.
- Rotate the crown clockwise to move the day forward step by step.
- Once the desired day is obtained, push the crown back to position 1.
WARNING: To avoid damage to the watch mechanism, do not use the quick day correction function between 9:00 pm (21:00) and 12:30 am (00:30) as the automatic date changes take place during this interval.
Setting the day of the week:
- Pull the crown out to position 3.
- Rotate the crown clockwise: the day-of-the-week hand moves forward one day each time the hour and minute hands pass the 4:00 am (04:00) position.
- Once the desired day is obtained, push the crown back to position 1.
Setting the month:
- With the crown in position 1, press then release push-button A to set the month; the month hand moves forward one month at each press.
CAUTION: To avoid damage to the watch mechanism, do not use the quick month correction function on the 31st of the month as automatic month changes take place on this day.
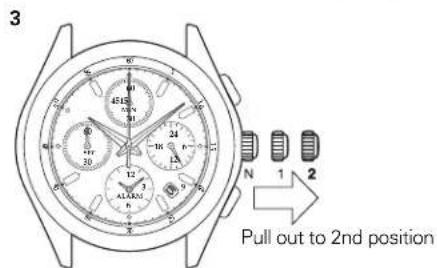
WATCHES WITH MULTIPLE FUNCTIONS Multi-eye - Day of the week - Date & moon phase
Setting the day
Pull the crown out to 2nd position to stop the seconds hand on 0 (12 hours).
Rotate the hours/minutes hands clockwise to set a day.
To set the day, you need to rotate the hour hand forward 24 hours per day.
NOTE:
If you set the day by rotating the crown counterclockwise, the date may not change.
Do not set the day by rotating the crown counterclockwise.
The day changes during the period between 0:00 am and 5:30 am or a bit later.
Setting the time
Having set the day, set the hour and minute hands.
Rotate the hour/minute hands clockwise to set the time.
To ensure correct setting of the time, first rotate the minute hand 5 minutes ahead of the desired time, then go back (by rotating counterclockwise) to the desired time.
Having set the time, use a time signal to synchronize the watch by pushing in the crown to its normal position to start the direct-drive seconds hand.
NOTE:
Make sure you have correctly set the AM/PM status before setting the time.
When the day changes, the watch moves to AM status (ante meridiem).
(The day changes during the period between 0:00 am and 5:30 am or a bit later).
Setting the moon phase
Pull the crown to the 1st position.
Rotate the crown clockwise to move the moon phase forward.
WATCHES WITH CHRONOGRAPH FUNCTION Simple Chronograph
Positions of the crown:
Position 1 - Normal position.
Crown pushed against the case.
Position 2 - Setting the DAY*:
Rotate the crown counterclockwise.
Position 3 - Setting the TIME:
Rotate the crown in either direction.
*NOTE: If the date setting is performed between 9:00 pm and 3:00 am, it is possible that the date will not be changed the following day.
Using the chronograph:
The chronograph function of this model lets you time an event lasting up to 59 minutes / 59 seconds in one second increments. Use the buttons A and B to use the chronograph.
IMPORTANT: The crown must be in position 1, and the hands of the chronograph must be at 60 (zero) before starting chronograph. Do not use the chronograph if the crown is in position 2 or 3. If necessary press button B to set the hands of the chronograph to zero before using it.
Simple chronograph functions:
Measuring a single event without interruptions:
- Press button A to start the chronograph.
- Press button A a second time to stop the chronograph.
- Press button B to reset the chronograph to zero.
Clocking total time of a series of events of short duration (for example, the exact playing time of a soccer game which is frequently interrupted):
- Push button A to start the chronograph at the beginning of the match.
- Push button A to stop the timing when the match is interrupted.
- Press button A again when play resumes.
- Repeat steps 2 and 3 until the end of the match.
- Press button B to reset the chronograph to zero.
Synchronizing the chronograph hands:
After a battery change or in case of error, it may be necessary to adjust the seconds hand of the chronograph to align it correctly to the zero position:
- Pull the crown out to position 2.
- Press button A to adjust the chronograph seconds hand: Each press of button A will move the chronograph hand forward one second. Press button A without releasing the pressure to move the hand forward fast.
- Once the hand is properly aligned, push the crown back to position 1.
WATCHES WITH CHRONOGRAPH FUNCTION 1/10 seconds Aviator Chronograph
OVERVIEW
This precision quartz-movement chronograph has a minute counter (up to 30"), a counter of tenths of seconds (after 30 minutes it counts the hours), a small subdial for seconds, a central seconds hand, an advanced calendar function with display apertures for the day and month, and a central hand indicating the date. It can be used to measure an event lasting up to 30 minutes to the tenth of a second, or events lasting up to 10 hours to the nearest second.
SETTING THE TIME
Setting the time:
- Pull the crown to position 3 as soon as the small seconds hand reaches the 60 seconds position. The watch stops.
- Rotate the crown in either direction to move the hands and set the time, making sure that the date changes at midnight and not at noon.
- Place the hands slightly ahead of the exact time, then rotate the crown slowly counterclockwise to align the minute hand with the correct minute marker.
- Use an accurate and reliable time signal (from a radio station for example). When the exact time is given, push the crown back to position 1, against the case. The watch restarts at the exact time.
Setting the date:
- Pull the crown to position 2.
- Rotate the crown in either direction to move the hands and set the time making sure that the date changes at midnight and not at noon. (To set the time to the precise second, see "Setting the time").
WATCHES WITH CHRONOGRAPH FUNCTION 1/5-second Chronograph
Setting the day and time:
Positions of the crown:
Position 1 - Normal position.
Crown pushed against the case
Position 2 - Setting the DAY*: Rotate the crown clockwise.
Position 3 - Setting the TIME: Rotate the crown in either direction.
*NOTE: If the day setting is performed between 9:00 pm and 3:00 am, it is possible that the date will not be changed the following day.
Using the chronograph:
This watch offers a chronograph function to measure an event lasting up to 20 minutes to the fifth of a second. Use the buttons A and B for the chronograph.
IMPORTANT: The crown must be in position 1 and the hands of the chronograph must be at 60 (zero) before starting the chronograph. Do not use the chronograph if the crown is in position 2 or 3. If necessary, Press button B to reset the hands of the chronograph to zero before using it.
Simple chronograph functions:
Measuring a single event without interruptions:
- Press button A to start the chronograph.
- Press button A a second time to stop the chronograph.
- Press button B to reset the chronograph to zero.
Intermediate time functions:
Clocking split times during a race:
- Press button A to start the chronograph.
- Press button B to temporarily stop the chronograph.
- Read the intermediate time.
- Press button B to restart the chronograph. The hands go back to catch up with the ongoing event.
- To read a second intermediate time, press button B again. Repeat steps 2 to 4 to measure further intermediate times.
- Press button A to stop the chronograph.
- Final time display.
- Press button B to reset the chronograph to zero.
NOTE: The chronograph's 1/5-seconds hand will stop after 10 minutes while the internal mechanism continues the calculation.
Synchronization of the chronograph hands:
After a battery change or in case of error, it may be necessary to adjust the 1/5-second, seconds, minute and hour hands to correctly align their respective positions to zero.
NOTE: It is important to follow the steps in the prescribed order.
- Pull the crown out to position 3.
- Press button B and keep it down for 2 seconds, then release.
- Rotate the crown to move the chronograph minute hand to zero position.
- Press button B again and keep it down for 2 seconds, then release.
- Rotate the crown to bring the seconds hand to zero.
- Press button B a third time and keep it down for 2 seconds, then release.
- Rotate the crown to bring the minute and hour hands to zero.
- If necessary, Press button B and keep it down for 2 seconds, then release to prepare the mechanism to adjust the seconds hand of the chronograph.
- When the chronograph hand setting is finished, push the crown back to position 1.
WATCHES WITH COMPLEX CHRONOGRAPH FUNCTIONS Regatta Chronograph
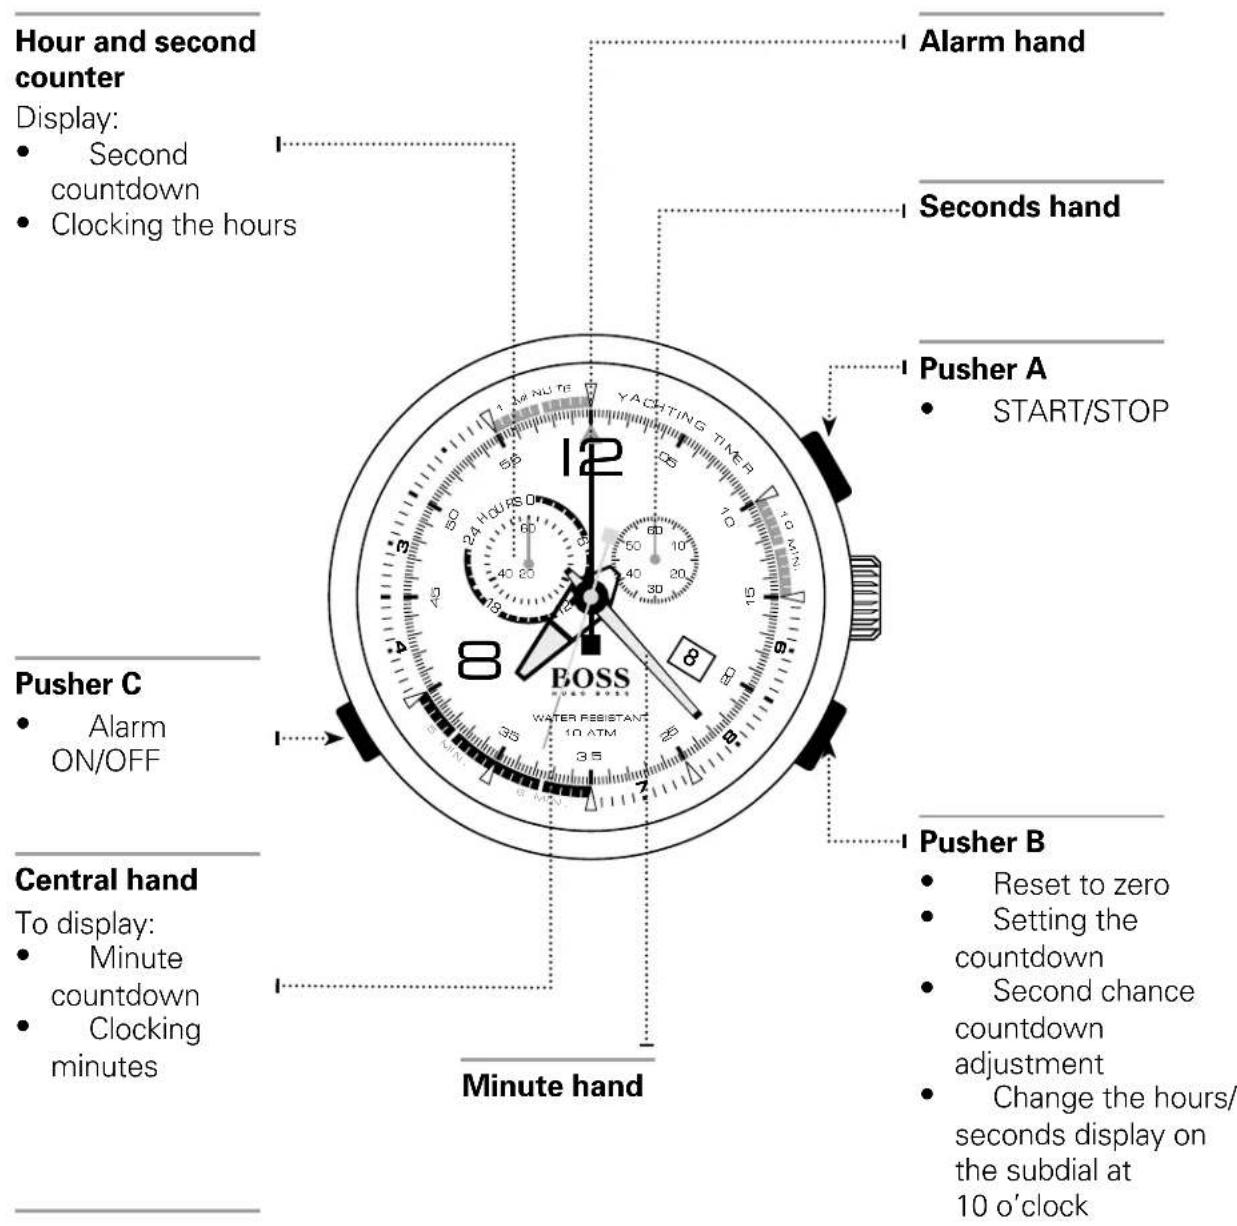
Warning: timing starts with a countdown, then continues with chronograph timing.
WATCHES WITH COMPLEX CHRONOGRAPH FUNCTIONS Racing Chronograph
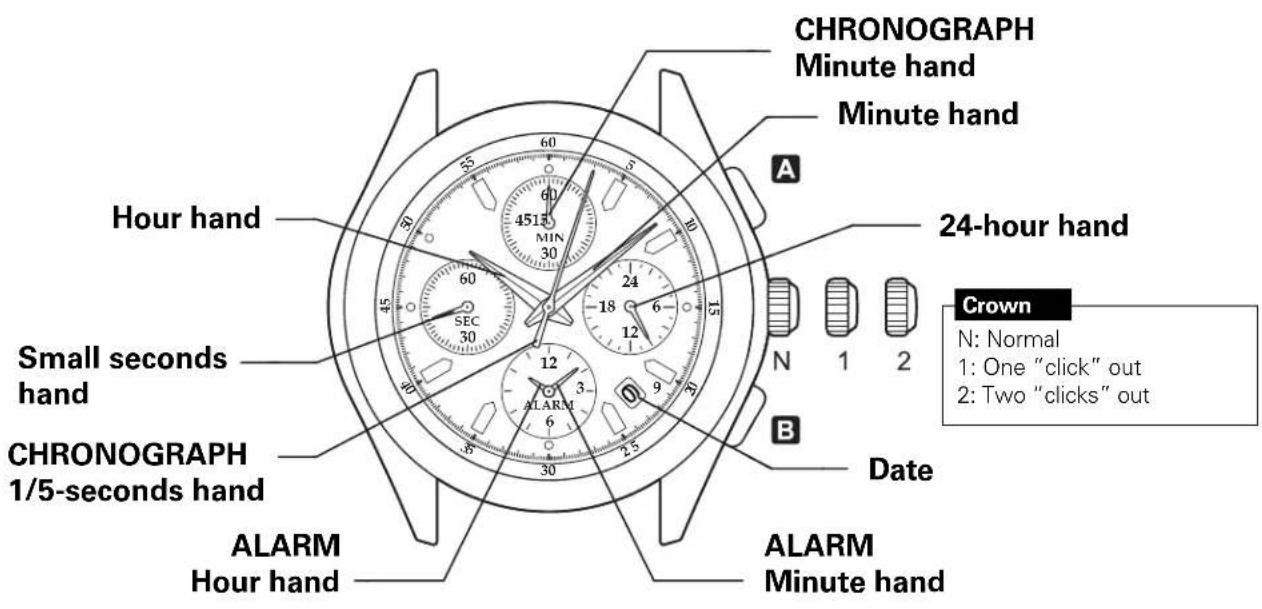
How to set the time and date:
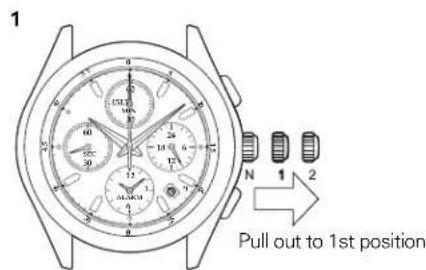
Pull the crown out one click.
- Rotate the crown clockwise until the previous day's date is displayed.
Note: do not set the date between 9 pm and 1 am to avoid upsetting the change.
Pull the crown out one more click when the seconds hand is at 12 o'clock.
Note: when the chronograph is running or has stopped, the hands will be automatically reset to zero if the crown is two clicks out.
WATCHES WITH COMPLEX CHRONOGRAPH FUNCTIONS Racing Chronograph
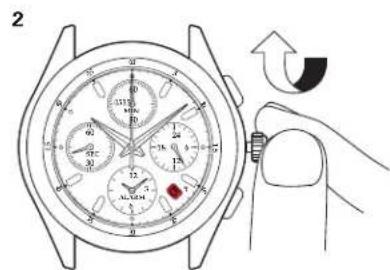
How to set the alarm function:
Pull the crown out one click.
Press button B several times to set the Alarm
function hands to the desired time.
Note: if button B is kept down, the Alarm function hands move fast.
Then press button A to activate the alarm.
Replace the crown in normal position.
Note: the alarm function is automatically activated.
How to cancel the alarm you have set:

Pull the crown out one click.
Press button B and keep it down until the Alarm function hands stops on the current time.
Note: if button B is kept down, the alarm function hands move fast.
Replace the crown in normal position.
Note: the alarm function is automatically activated.
WATCHES WITH COMPLEX CHRONOGRAPH FUNCTIONS Racing Chronograph
How to use the Chronograph functions:
The Chronograph can measure up to 59' 59" 80 in 1/5 second increments.
After 60 minutes, it resumes counting from zero to 12 hours.
After 12 hours the Chronograph stops automatically.
CHRONOGRAPH Minutes dial
CHRONOGRAPH Minute hand
START STOP RESTART
SPLIT-TIME COUNTER RELEASING THE SPLIT-TIME COUNTER HAND REINITIALIZING
CHRONOGRAPH 1/5-seconds hand
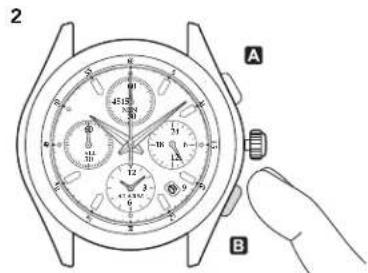
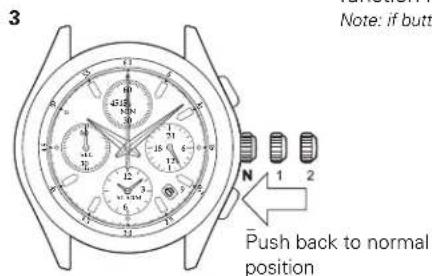
WATCHES WITH COMPLEX CHRONOGRAPH FUNCTIONS Worldtimer chronograph
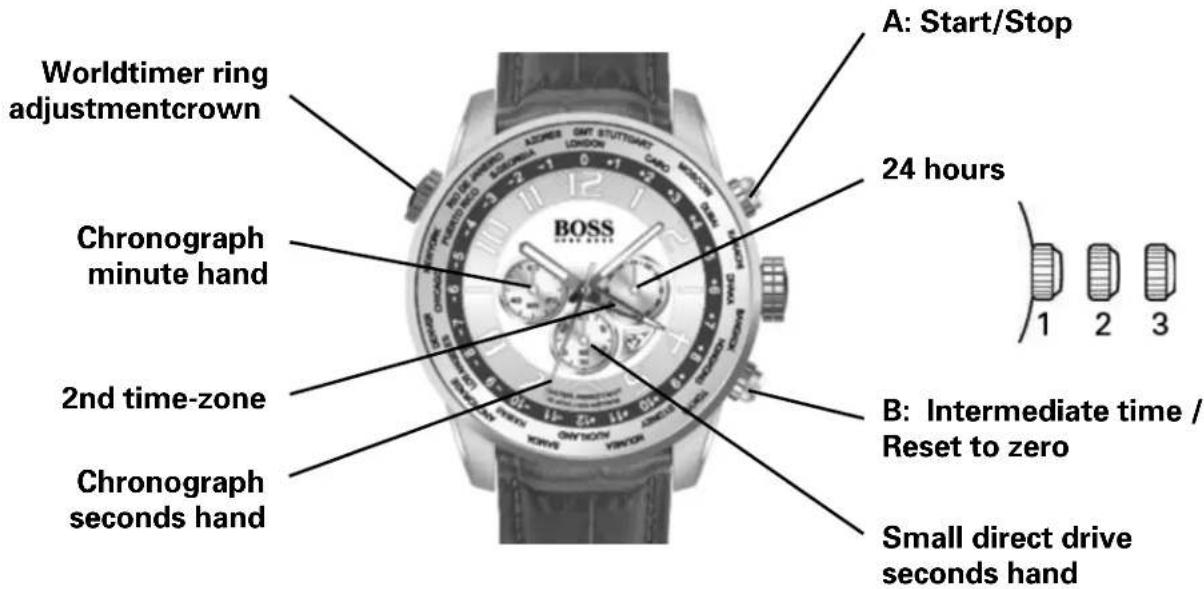
Positions of the crown:
Position 1 - Normal position.
Crown pushed against the
Position 2 - Setting the DAY*: Rotate the crown clockwise. Setting ONLY the HOUR:
Turn the crown in either direction.
Position 3-To set the hour for both the local time and in a second time zone, turn the crown in either direction. The hour hand for the local time and the hour hand for the second time zone are connected to set the time for both.
*NOTE: If the date setting is performed between 9:00 pm and 3:00 am, it is possible that the date will not be changed the following day.
Simple chronograph functions:
Measuring a single event without interruptions:
- Press button A to start the chronograph.
- Press button A a second time to stop the chronograph.
- Press button B to reset the chronograph to zero. Clocking total time of a series of events of short duration (for example, the exact playing time of a soccer game which is frequently interrupted):
1) Push button A to start the chronograph at the beginning of the game.
2) Push button A to stop the chronograph when the game is interrupted.
3) Press button A when play resumes.
4) Repeat steps 2 and 3 until the end of the game.
5) Press button B to reset the chronograph to zero.
Synchronizing the chronograph hands:
After a battery change or in case of error, it may be necessary to adjust the seconds hand of the chronograph to align it correctly to the zero position:
- Pull the crown out to position 2.
- Press button A to adjust the chronograph seconds hand: Each press of button A will move the chronograph hand forward one second. Press button A and keep it pressed to make the hand advance fast.
- Once the hand is properly aligned, push the crown back to position 1.
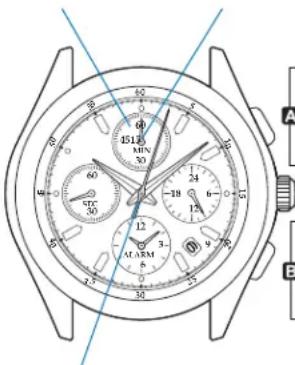
GMT functions:
- The red hand indicates a second time zone.
To set the second time-zone, pull the crown to position 2 and rotate counterclockwise.
Then push the crown back to position 1.
Worldtimer functions:
- The crown at 10 o'clock rotates a graduated ring set in the watch dial. It is not necessary to pull the crown to rotate this ring.
- The user can instantly calculate the time in the 24 cities printed on the flange.
Simply align the figure "0" with your current city. Then add the number corresponding to each city to the local time to know the time instantly.
So in the diagram below, it is 10:10 am in London.
It is therefore 10:10 + 2 hours = 12:10 pm in Cairo 10:10 + 4 hours = 14:10 (2:10 pm) in Dubai 10:10 - 6 hours = 4:10 am in Chicago
AUTOMATIC WATCHES
Positions of the crown:
Position 1 - Normal position.
Crown pushed against the case.
Rotate the crown clockwise to manually wind up the movement.
Position 2 - Setting the TIME:
Rotate the crown in either direction.
AUTOMATIC WATCHES
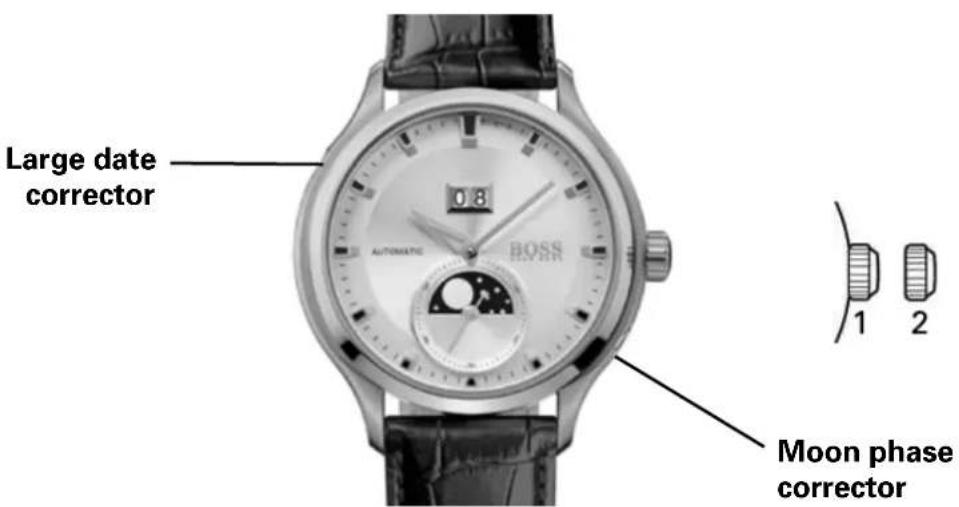
Positions of the crown:
Position 1 - Normal position.
Crown pushed against the case.
Rotate the crown clockwise to manually wind up the movement.
Position 2 - Setting the TIME: Rotate the crown in either direction.
The correction of the moon phase is accomplished with small touches on the corrector at 10 o'clock with the crown pulled out.
The correction of the date phase is accomplished with small touches on the corrector at 4 o'clock with the crown pulled out.

BOSS ORANGE
HUGO BOSS
WATCH CARE AND MAINTENANCE, OPERATING INSTRUCTIONS WARRANTY AND SERVICE GUIDE
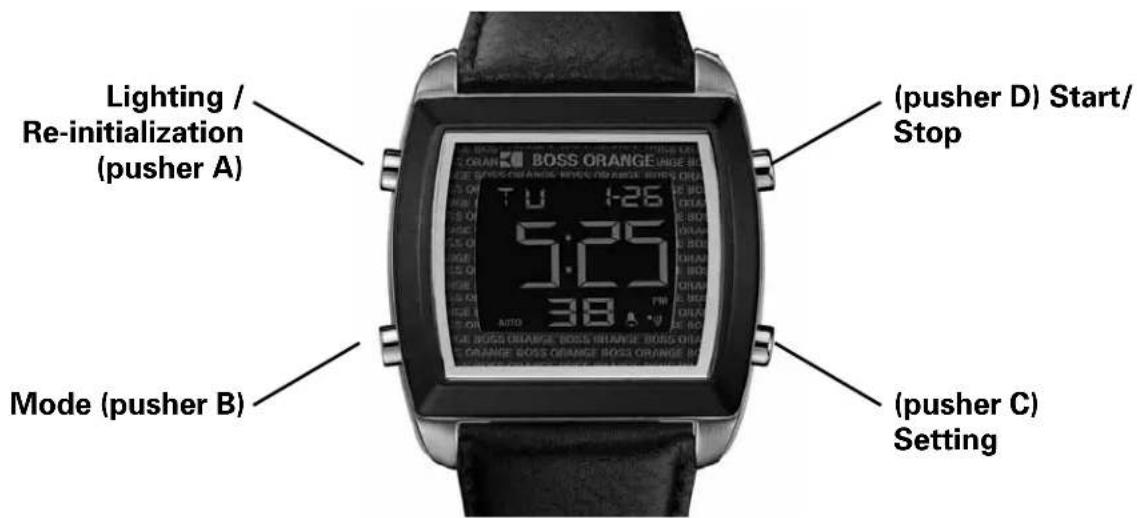
DIGITAL WATCHES Models with simple digital display
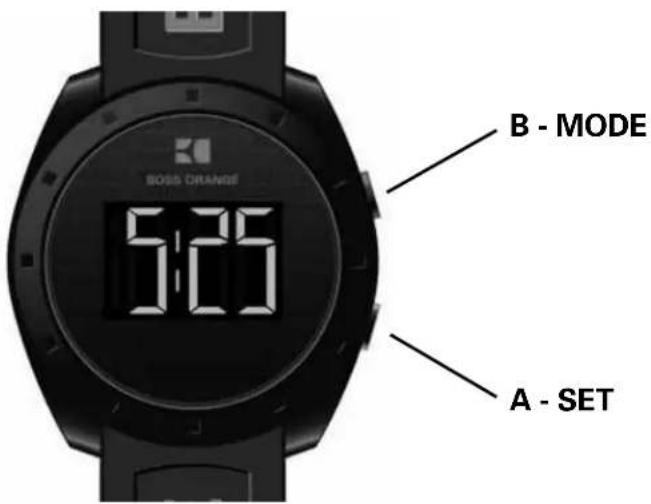
Time setting
Press key A twice to set the time, select the chosen display: month / day / hours / minutes.
The display flashes. Press B to set your choice.
Press A to confirm.
DIGITAL WATCHES Digital Chronograph Models
Setting the time
1. Real time
Press A to turn on lighting whatever the mode selected.
Setting the time:
- Press C to set the time.
- Press B to select the hour, minutes, year, month and day.
- Press D to set the flashing unit and C to return to Real Time mode.
- Setting the double time-zone: with the time setting function selected, press A to choose the 12 or 24 hour format.
2. Setting the Alarm function
- Press C to select alarm setting. This causes the hour display to flash and sets the alarm to auto start.
- Press B to select the hour, minutes, year, month and day.
- Press D to set the flashing and C to return to Alarm mode.
- With the Alarm function selected, press A to stop or start the alarm ( ) or the chime ( )
- When the alarm time is displayed, an alert sounds and an indicator ( ) flashes for around 20 seconds.
3. Timer
Setting the timer:
- Press C to select the timer:
- Press A to start/stop the timer.
- Press B to set the hour, minutes and seconds.
- Press D to set the flashing and C to return to Timer mode.
- Functioning of the timer: Press D to start/stop the timer: press C to reset to zero when the timer stops.
- A 10 second alert is triggered at this precise moment.
4. Chronograph
- Press D to start/stop the Chronograph:
- Once the Chronograph stops, press A to reset it to zero.
- When the Chronograph is running, it is possible to press B to return to Real Time mode.
DIGITAL WATCHES Models with analog and digital display
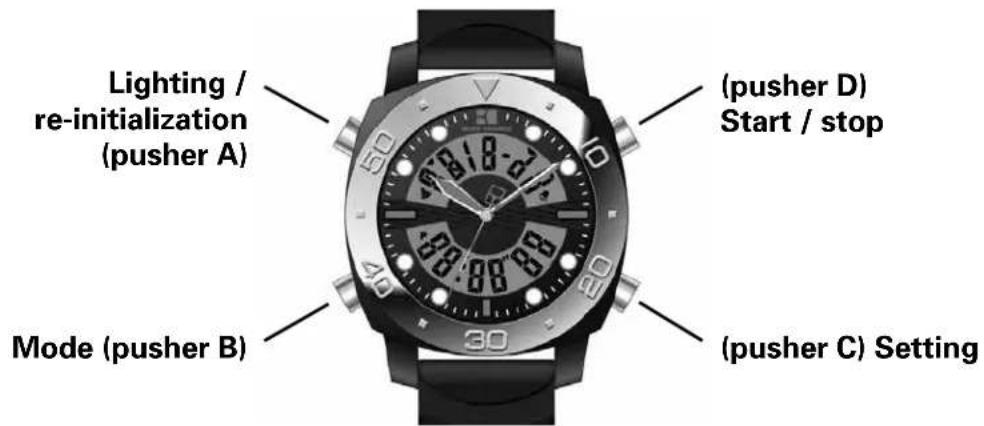
Real time
Pusher B
→
Chronograph
Pusher B
→
Alarm
Pusher B
→
Setting the time
Setting the time
1. Press A to turn on lighting for 3 seconds at any time.
2. Chronograph
Press D to start/stop the Chronograph.Once the Chronograph stops, press C to reset it to zero. When it is running, press C to display an intermediate time. The indicator "SP" appears. Then, press D to leave Intermediate Time mode and stop the timing. Press C again to reset to zero.
When the Chronograph is running, it is possible to press B to return to Real Time mode.
3. Daily alarm
Start and stop of the alarm and the chimePress D to stop or start the alarm ( ) or the chime ( ) Setting the alarm function: press C to select the hour and minutes and D to set the flashing unit. Press C to confirm and B to return to Real Time mode.
Starting and stopping the Repeater function. When the alarm chime sounds, press a pusher or on D to stop the chime and press B to start or stop the Repeater function. When it is activated, the chime will sound after five minutes, and will stop automatically after 20 seconds.
4. Setting the time
The seconds flash during loading. Press D to return to zero. Press C to select the elements, in the following order: Hour -> Minute -> Month -> Day -> Day of the week -> Second.
When setting the time, "H" is displayed for 24 hour format, and "A" or "P" for 12 hour format. If you press D while the number of seconds displayed is between 30 and 59, seconds are reset to zero and the time is set to the next minute. If the number of seconds is between 00 and 29, the minutes stay the same.
ANALOG WATCHES Models with two or three hands
Setting the time
Pull the crown to position 3. To set the time, rotate the crown in either direction.
Setting the date
Pull the crown to position 2. To set the date, rotate the crown in either direction.
ANALOG WATCHES Multi-eye models

Watches with multiple subdials are activated by multi-function movements which display information such as the month, the day of the week and the day in apertures (or windows) placed on the dial.
Setting the time and name of the day
Pull the crown to position 3. To set the time, rotate the crown in either direction. To set the name of the day the crown should be rotated until the hour hand has completed 2 rotations to move to the following or previous day.
Setting the date
Pull the crown to position 2. To set the date, rotate the crown in either direction.