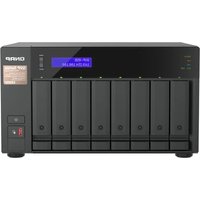
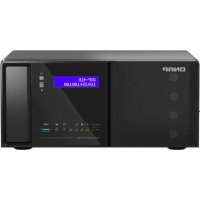
VS4108URP PRO+ - VCR QNAP - Free user manual and instructions
Find the device manual for free VS4108URP PRO+ QNAP in PDF.
| Product Type | Network Video Recorder (NVR) 4-bay, 8-channel |
| Dimensions | Rackmount 2U (approx. 89 x 440 x 300 mm) |
| Weight | Approximately 6 kg |
| Power Supply | Redundant dual power supply, 250 W each |
| Main Functions | Live monitoring, scheduled and alarm recording, playback, intelligent video analytics (IVA), PTZ control, remote access via browser or QVR app, support for up to 128 multi-server channels, HDMI/VGA output for local display |
| Maintenance and Cleaning | Unplug before cleaning, use a damp cloth, avoid chemicals and aerosols |
| Security | Kensington lock, hardware reset, administrator password, RAID support (0,1,5,6), event logging |
| Spare Parts and Repairability | Compatible SATA 3.5" hard drives, replaceable power supplies, system fans (contact support for repairs) |
| General Information | Brand: QNAP, Model: VS4108URP PRO+, Firmware version: 5.0.3, Limited warranty |
Frequently Asked Questions - VS4108URP PRO+ QNAP
User questions about VS4108URP PRO+ QNAP
0 question about this device. Answer the ones you know or ask your own.
Ask a new question about this device
Download the instructions for your VCR in PDF format for free! Find your manual VS4108URP PRO+ - QNAP and take your electronic device back in hand. On this page are published all the documents necessary for the use of your device. VS4108URP PRO+ by QNAP.
USER MANUAL VS4108URP PRO+ QNAP
Chapter 1. Introduction....10
1.2.6 VS-6120/6116/6112 Pro+ 16
1.2.7 VS-6020/6016/6012 Pro 17
1.2.8 VS-4116/4112/4108U-RP Pro+....18
1.2.9 VS-4016/4012/4008U-RP Pro....19
1.2.10 VS-4116/4112/4108 Pro+ 20
1.2.11 VS-4016/4012/4008 Pro 21
1.2.12 VS-2212/2208/2204 Pro+ 22
1.2.13 VS-2112/2108/2104 Pro+ 23
1.2.14 VS-2012/2008/2004 Pro 24
1.2.15 VS-S2212/S2208/S2204 Pro+ 25
Chapter 2. Installation du NVR....26
10.1 Service myQNAPcloud....296
10.2 File Station 320
10.3 App Center 325
Chapter 11. Gestion centrale de la surveillance QNAP (QSCM Lite)....328
11.1 Introduction ...... 328
11.2 Installation de QSCM Lite sur un serveur NVR....328
Support technique 364
GNU GENERAL PUBLIC LICENSE 365
natural_image
Front view of a rack-mounted server rack with multiple drive bays and indicator lights (no visible text or labels)
text_image
Diagram of a server rack with labeled ports and connectors, showing internal network topologynatural_image
Front view of a rack-mounted server with multiple drive bays and a blue vertical indicator arrow (no text or symbols on the rack itself)
text_image
Diagram of a server rack with numbered ports and internal connections, likely for system architecture or network management.text_image
Diagram of a computer drive rear panel with numbered labels pointing to ports and indicatorstext_image
Diagram of a server rack with labeled ports and fan connections, showing numbered components from 7 to 13.text_image
Diagram of a computer tower rear panel with numbered labels pointing to ports and connectorstext_image
Labeled diagram of a computer drive showing ports, connectors, and ventilation slots with numbered annotationstext_image
Diagram of a device rear panel with numbered labels pointing to ports and connectorstext_image
Internet Options General Security Privacy Content Connections Programs Advanced Select a Web content zone to specify its security settings. Internet Local intranet Trusted sites Internet This zone contains all Web sites you haven't placed in other zones Security level for this zone Custom Custom settings. - To change the settings, click Cus - To use the recommended setting Custom Level... OK Security Settings Settings: .NET Framework-reliant components Run components not signed with Authenticode Disable Enable Prompt Run components signed with Authenticode Disable Enable Prompt ActiveX controls and plug-ins Automatic prompting for ActiveX controls Disable Enable Reset custom settings Reset to: Medium Reset OK Canceltext_image
Internet Options General Security Privacy Content Connections Programs Advanced Select a Web content zone to specify its security settings. Internet Local intranet Trusted sites Restricted sites Trusted sites This zone contains Web sites that you trust not to damage your computer or data. Sites... Trusted sites You can add and remove Web sites from this zone. All Web sites in this zone will use the zone's security settings. Add this Web site to the zone: http://10.11.11.11/ Add Web sites: Remove Require server verification (https:) for all sites in this zone OK Cancel =>text_image
ONAP VS-8120Pro+ Welcome Thank you for mounting Onap Washer Mill. Please click "Manual Setup" then to start installation. Check the location process should take about 95-61 minutes, depending on the use of your hand draw. Note: Directionally installation is for VisaRis Web Services that identify user hand draw and enabled. Manual Setup Copyright © Onap Devices, Inc. All rights reserved.text_image
QNAP NAME / PASSWORDED DATE / TIME NETWORK DISH MESSAGE SUMMARY NAME / PASSWORDED MAY NAME: Altex-61.20 Unknown: admin Password: Unchanged DATE / TIME Time Zone: (GMT+ISO/DVI) (En[ing, Chongqing, Tsung Rong, Shang) Site: Name on the computer/device time NETWORK Network: October ex 2F address automatically OK Apply Canceltext_image
Add Add a camera This wizard guides you through the following settings: • Camera Configuration • Recording Settings • Schedule Settings ✓ Search camera(s) automatically Step 1/6 Next Canceltext_image
Add Confirm Settings Please confirm the following information Channel: Channel 2 Camera Brand: Axis Camera Model: Axis P3367 Camera Name: Camera 2 IP Address/Port: 10.11.1.23/80 Recording: Enabled Multi-stream Profile: System configured Enable manual recording: Disabled Enable auto snapshot: Disabled Step 5/6 Back Next CancelVue en direct
text_image
UiOStor NVR Network Video Recorder The system is starting up. Please wait...text_image
Welcome Welcome to Quick Configuration Wizard. This wizard will help you complete the system configuration quickly. System Information Model Name: VS-4016Pro IP Address: Date/Time: 2010-11-18 08:02:31 Time Zone: (GMT) Greenwich Mean Time : Dublin-- Disk 1: ATA WDC WD5001ABYS-059.0 465.76 GB Disk 2: --- Disk 3: --- Disk 4: --- Firmware Version: 3.3.1 Build 3517 English Cancel Nexttext_image
Administrator Password Change the administrator password. User Name: admin New Password: ****** Verify Password: [] Use the original password Note: If you select "Use the original password", the administrator password will not be changed. Back Nexttext_image
Network Settings Obtain an IP address automatically by DHCP Use a static IP address IP Address 0 0 0 0 Subnet Mask 0 0 0 0 Default Gateway 0 0 0 0 Primary DNS Server 172 16 2 6 Secondary DNS Server 172 16 2 7 Back Nexttext_image
Disk Volume Configuration Please select a disk configuration for the system. Disk Configuration Do not set disk configuration Do not configure the disk volume Note: All the hard disk drives will be formatted and the disk data will be cleared if you select to configure a disk volume on the server. Disk Information Back Nexttext_image
Camera Settings Camera Name Camera Brand IP Address Camera 1 Notice 2 Camera 2 3 Camera 3 4 Camera 4 5 Camera 5 6 Camera 6 7 Camera 7 8 Camera 8 You did not configure any cameras yet. Do you want to search for the cameras on the local network (LAN)? Cancel OK Search Back Nexttext_image
Recording Settings - Camera 1 Video Compression: Motion JPEG Resolution: 320x240 Frame Rate: 3 Quality: Compression 50 Audio Recording: Disable audio Digital Watermarking: Disabled Cancel OKtext_image
Finish The changes you have made to the server are as below. Click "Next" to begin the quick configuration; or click "Back" to return to the previous steps to modify the settings. Model Name: VS-4016Pro Password: ******** Network: Date/Time: 2010-11-18 08:24:26 Time Zone: (GMT) Greenwich Mean Time : Dublin, Edi- Disk configuration: Do not set disk configuration Disk 1: ATA WDC WD5001ABYS-059.0 465.76 GB Disk 2: ... Disk 3: ...System is initializing, please wait.
The system is being configured, do NOT power off the server or unplug the hard disk drive(s).
- Change the administrator password.
- Enter the IP address, subnet mask, and default gateway for this server.
- Enter the date, time, and time zone for this server.
- Initialize the disk volume on this server.
- Add the IP cameras to be recorded to this server.

System configuration completed.
Start Monitoring
natural_image
Four-panel collage showing industrial scenes: factory worker at control, emergency response with ambulance, factory production line with water bottles, and logistics vehicle (no visible text or symbols)text_image
UiStar NVR Network Video Browser Settings Change Password Network Settings Time Settings Disk Volume Configuration Camera Settings Reward Shutdown English Start MonitoringThe system event logs are shown in this dialog. Click 'Clear' to delete a log; or click 'Clear All' to delete all logs.
| Type | Camera | Date & Time | Log |
| Alarm | 0 | 2010-09-01 11:36:14 | Logical input TB* is triggered |
| Alarm | 0 | 2010-09-01 10:55:23 | Logical input TB* is triggered |
| Alarm | 0 | 2010-09-01 10:35:42 | Logical input δ is triggered |
| Alarm | 1 | 2010-09-01 09:33:32 | Event(s) Triggered on Camera 1. |
| Alarm | 1 | 2010-09-01 09:33:30 | Event(s) Triggered on Camera 1. |
| Alarm | 1 | 2010-09-01 09:33:29 | Event(s) Triggered on Camera 1. |
| Alarm | 1 | 2010-09-01 09:33:27 | Event(s) Triggered on Camera 1. |
| Alarm | 1 | 2010-09-01 09:33:26 | Event(s) Triggered on Camera 1. |
| Alarm | 1 | 2010-09-01 09:33:23 | Event(s) Triggered on Camera 1. |
| Alarm | 1 | 2010-09-01 09:33:21 | Event(s) Triggered on Camera 1. |
| Alarm | 1 | 2010-09-01 09:33:19 | Event(s) Triggered on Camera 1. |
| Alarm | 1 | 2010-09-01 09:33:18 | Event(s) Triggered on Camera 1. |
| Alarm | 1 | 2010-09-01 09:33:15 | Event(s) Triggered on Camera 1. |
| Alarm | 1 | 2010-09-01 09:33:13 | Event(s) Triggered on Camera 1. |
| Alarm | 1 | 2010-09-01 09:33:11 | Event(s) Triggered on Camera 1. |
| Alarm | 1 | 2010-09-01 09:33:09 | Event(s) Triggered on Camera 1. |
| Alarm | 1 | 2010-09-01 09:33:06 | Event(s) Triggered on Camera 1. |
□ Alert sound
Clear All
Close
natural_image
Exterior view of a modern building with surrounding roads and parked cars, labeled 'Engineering Ramcam' in the top-left corner (no other signage visible)text_image
Screenshot of a software toolbar with icons and a green button, likely from an older application interface.text_image
Screenshot of a software toolbar with icons and dropdowns, highlighting a highlighted button in red.text_image
General Video Screen Event Notification ✓ Enable alert for all surveillance events ☐ Enable alert for disk error and warning System Status Notification ☐ Display CPU status ☐ Display hard drive status Display Order Reset Reset the display order of the monitoring channels. OK Canceltext_image
General Video Screen Video Windows Highlight video window when an event is triggered Display unauthorized channels Display unconfigured channels OK Canceltext_image
General Video Screen Screen Resolution Settings To change the screen resolution, you will leave the current screen. Click "Settings" to proceed. After configuring the resolution settings, you will enter the monitoring screen. OK Canceltext_image
UiOStar NVR Network Video Recorder Monitor model 14H251A The resolutions supported by the monitor are shown below Screen resolution 1000x1080 Screen refresh rate 60 Hz OK Cancel3.4 Lecture vidéo
text_image
Uiostor Jul 11 12:30 14 >1 Position speed —— OKtext_image
Full Screen Keep aspect ratio Deinterlace ✓ Keep original sizetext_image
Export to: USB Drive Camera: Camera 2 From: 2014/07/16 00:00 To: 2014/07/16 11:03 Export format: CNAP Encrypted AVI file Standard AVI file Optimized CNAP AVI file Password: CNAP Encrypted AVI file Total / Free size: - Folder: Camera-2_07-16-00-00-07-16-11-03 OK Canceltext_image
Event Notifications Show All Error Warning Clear Alltext_image
Options Profile Wallpaper Change Password Miscellaneous Username: admin E-mail: E-mail Applytext_image
Options Profile Wallpaper Change Password Miscellaneous Select the default wallpaper. Applytext_image
Options Profile Wallpaper Change Password Miscellaneous To change your password, please fill out the form below: Old password: New password: Verify new password: ApplyD. Divers :

text_image
Options Profile Wallpaper Change Password Miscellaneous ✓ Warn me when leaving QVR ✓ Reopen windows when logging back into QVR ✓ Show the Dashboard button ✓ Show the NVR time on the desktop Desktop Shortcut Reset desktop shortcuts to default settings. Reset Applytext_image
Search Power Settings Power UPS Settings External Device QTS Help Power UPS SettingsRessource en ligne
text_image
Quick Start QVR Help Tutorials QNAP Forum Customer ServiceLangue
text_image
App Center yettext_image
System Health Good Uptime 0 day(s) 04:25:51 HDD Health x1 Good No errors were detected Resource Monitor 17% 19% LAN 2 52 KB/s 0 KB/s CPU RAM Hardware System 30°C/86°F ✓ CPU 43°C/109°F ✓ Fan 5882 RPM ✓ Scheduled Tasks All Jobs Last 24 hours Online Users (5) admin 00 : 01 : 00 10.8.14.111 admin 00 : 01 : 33 10.8.14.110 admin 00 : 00 : 23 10.11.15.16 admin 00 : 00 : 39 10.11.10.44 Storage Single Disk: Drive 1 Ready Used:395.78 GB Available:1.42 TBtext_image
HDD SMART Disk1 has startedtext_image
Screenshot of a video editing interface displaying multiple video thumbnails with Chinese text labels, likely related to urban and transportation scenes.text_image
Event Notification This dialog shows the event logs of the system. You can select an event log and click 'Clear' to delete the log; or click 'Clear All' to delete all logs. Type Date & Time Log Warning 2014-01-14 14:5... Motion detected on Camera 3. Inform... 2014-01-14 14:5... Motion Stopped on Camera 3. Warning 2014-01-14 14:5... Motion detected on Camera 3. Inform... 2014-01-14 14:5... Motion Stopped on Camera 3. Warning 2014-01-14 14:5... Motion detected on Camera 3. Alert sound Clear Clear All Closenatural_image
Overhead view of a cluttered office desk with a person working on equipment, no visible text or symbolstext_image
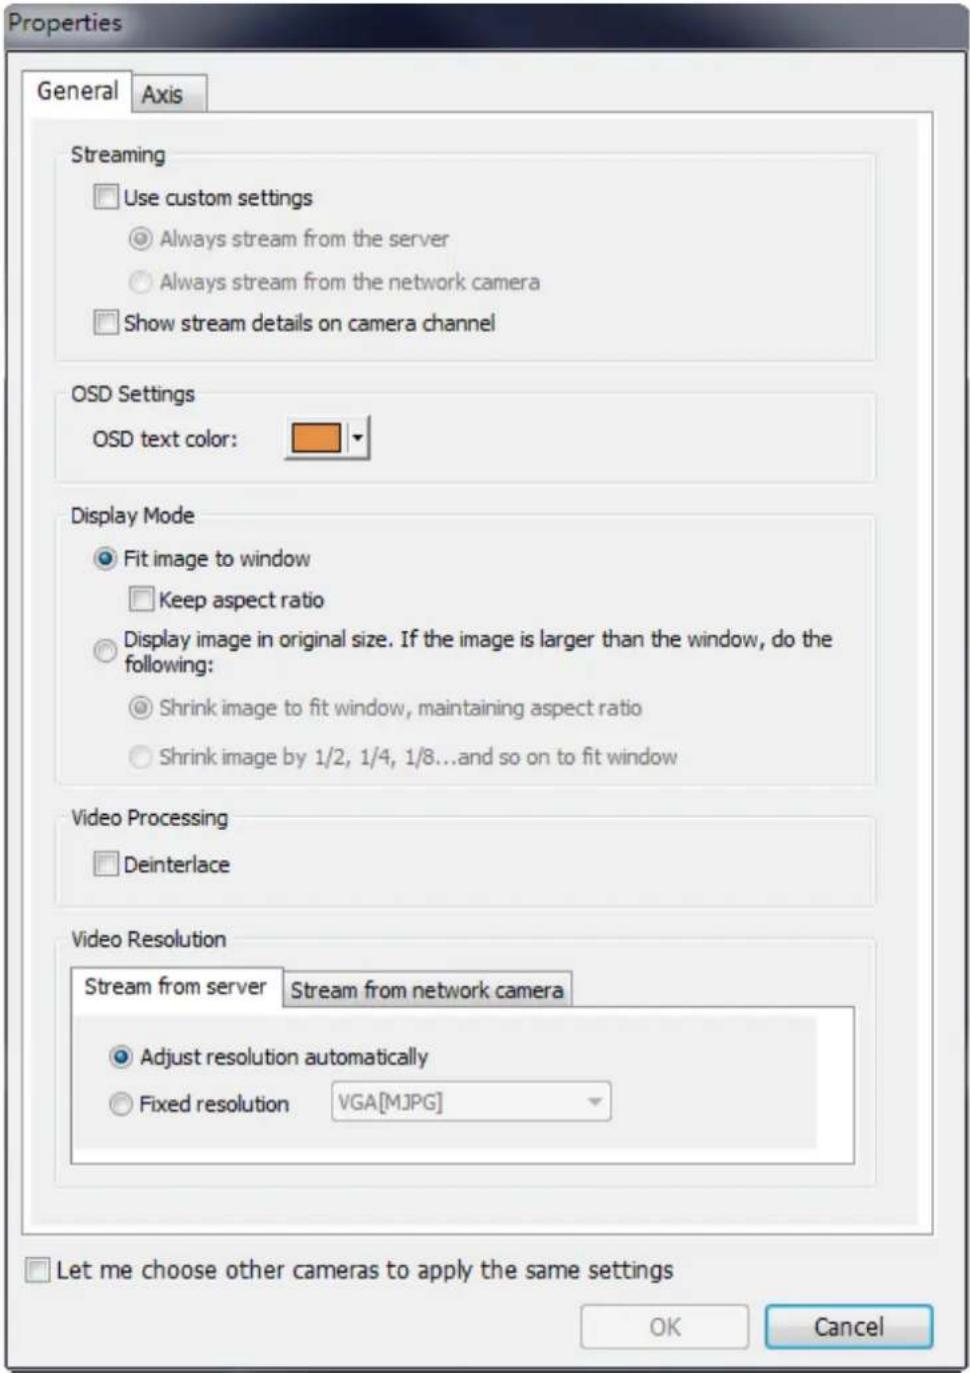
Properties General Axis Streaming Use custom settings Always stream from the server Always stream from the network camera Show stream details on camera channeltext_image
OSD Settings OSD text color:text_image
Display Mode ○ Fit image to window □ Keep aspect ratio ● Display image in original size. If the image is larger than the window, do the following: ○ Shrink image to fit window, maintaining aspect ratio ● Shrink image by 1/2, 1/4, 1/8...and so on to fit windowtext_image
Video Resolution Stream from server Stream from network camera Adjust resolution automatically Fixed resolution VGA[MJPG]□ Let me choose other cameras to apply the same settings
text_image
Properties General Axis Streaming Use custom settings Always stream from the server Always stream from the network camera Show stream details on camera channel OSD Settings OSD text color: Display Mode Fit image to window Keep aspect ratio Display image in original size. If the image is larger than the window, do the following: Shrink image to fit window, maintaining aspect ratio Shrink image by 1/2, 1/4, 1/8...and so on to fit window Video Processing Deinterlace Video Resolution Stream from server Stream from network camera Adjust resolution automatically Fixed resolution VGA[MJPG] Let me choose other cameras to apply the same settings OK Canceltext_image
Composite image showing four scenes: a man operating a control panel, emergency ambulance with medical staff, a factory production line with barrels, and a truck on an airway.État de la caméra
text_image
User interface icons for search, navigation, and remote control with labeled buttons and numeric input fieldtext_image
General | Video | Snapshot | Event Notification ✓ Enable alert for all surveillance events □ Enable alert for disk error and warning Display Order Reset Reset the display order of the monitoring channels. PTZ Control Panel □ Show PTZ Panel OK Canceltext_image
Options General Video Snapshot Streaming ○ Stream from server ● Stream from network camera Video Windows □ Highlight video window when an event is triggered ✓ Display unauthorized channels ✓ Display unconfigured channels OK Canceltext_image
Options General | Video | Snapshot | Snapshot □ Always ask me where to save the snapshot images C:\Users\andrew\Documents\Snapshot Preferred image format: JPEG □ Show timestamp and camera name □ Save the snapshot as it is displayed. If this option is not selected, the snapshot will be saved in its original size. OK Canceltext_image
Camera configure File Camera Configuration Video Settings Estimate Settings Camera Brand: Asia Camera Model: Asia M1.113 Camera Name: QNAP IP Address: 10.05.10.92 Port: 80 WINS IP Address: Port: 80 User Name: root Password: **** Enable recording on this camera Name Canceltext_image
E-map 200% 魔幻 floor1 office1 1-05 S. Vivotek P26112 1-07 7. Vivotek PD7131 office2 1-15 15. Vivotek PD6112 DINING AREA 1-07 KITCHEN Icon Delete Up Up-right Right Down-right Down Down-left Left Up-left O1-54-12164LP 1-01 L. Vivotek IP8361 1-02 2. Vivotek CC-8130 1-03 3. Vivotek IP7361 1-04 4. Vivotek IP8130 1-06 6. Vivotek IP7135 1-08 8. Vivotek IP8330 1-09 9. Vivotek I27151 1-30 10. Vivotek P27151 1-11 11. Vivotek IP7151 1-05text_image
Emap Options Icon Size : Medium Double-click on Camera Icon action Open live view Open live view in new window OK Canceltext_image
E-map 100% 预设 floor 1 office1 1-05 5. Vivotek FD6112 1-07 7. Vivotek FD7131 office2 1-15 15. Vivotek FD6112 7. Vivotek FD71... DIVING AREA 1-05 DOW 1-05 BEDROOM CATHROOM AREA LIVING ROOM DIVIDICIPORCHI5.2.6 Activer/désactiver l'alerte d'événement
text_image
E-map 100% 更改 1111 office2 1-05 S. Vivotek P76112 1-07 T. Vivotek PD7131 office2 1-15 IS. Vivotek PD6112 1-07 1 KITCHEN BATH @DHOODI DINOVALEA 1-05 CATHURAL AREA LIVING ROOM CONVEE PERSONtext_image
Login IP Address/Port : 80 User name Password Remember IP address/port Remember user name and password OK Canceltext_image
Screenshot of a video editing software interface showing a timeline with multiple subatches and a user interface, including a live scene and family photos.text_image
IVA Settings Detection Mode ✓ Motion detection ☐ Foreign object ☐ Missing object ☐ Out of focus ☐ Camera occlusion Sensitivity: Define detection zone | Define object size | Please select an area for detection Select all Pause when found Highlight the detection zone Search Canceltext_image
Detection Mode ✓ Motion detection □ Foreign object □ Missing object □ Out of focus □ Camera occlusiontext_image
Sensitivity: - - +text_image
IVA Settings Detection Mode ✓ Motion detection ☐ Foreign object ☐ Missing object ☐ Out of focus ☐ Camera occlusion Sensitivity: Define detection zone Define object size ✓ Ignore objects with width or height less than this setting Note: Please specify a minimum bounding box ☐ Pause when found ✓ Highlight the detection zone Search Cancel
text_image
Search Results S. Rony CS11 07/18/06/05:18:00:54 Start Time Elapsed Time Detection T... 07/10/2012 18:00:01 1.30 secs Motion 07/10/2012 18:00:02 0.30 secs Motion 07/10/2012 18:00:03 2.40 secs Motion 07/10/2012 18:00:06 1.70 secs Motion 07/10/2012 18:00:08 18.20 secs Motion 07/10/2012 18:00:26 0.17 secs Motion 07/10/2012 18:00:27 20.23 secs Motion 07/10/2012 18:00:47 2.33 secs Motion 07/10/2012 18:00:50 2.30 secs Motion 07/10/2012 18:00:53 0.50 secs Motion 07/10/2012 18:00:53 1.00 secs Motion Play Clear ExitAutres options :
text_image
Search Results 07/18/2012 18:00:01 07/18/2012 18:00:02 07/18/2012 18:00:03 07/18/2012 18:00:06 07/18/2012 18:00:09 07/18/2012 18:00:26 07/18/2012 18:00:27 Start Time Exposed Time Detection T... 07/18/2012 18:00:01 1.30 secs Motion 07/18/2012 18:00:02 0.30 secs Motion 07/18/2012 18:00:03 2.40 secs Motion 07/18/2012 18:00:06 1.70 secs Motion Export to... Play Clear Exittext_image
Regular Recording Export Channel Name: QNAP Export Output Export Options Recording Type: All recordings From: 2014/ 4/22 00:00 To: 2014/ 4/22 00:30 Destination: ● Client PC C:\Users\Public\Video\ ○ Export folder on Web Browse... OK Canceltext_image
Regular Recording Export Channel Name: QNAP Export Output: Export Options Resolution Keep aspect ratio Format Original size Yes Add (HOPDG) Advanced Settings Include time stamp Include channel name Add comment OK Canceltext_image
Settings Playing Mode Play all frames Skip expired video frames when necessary, and make playback as smooth as possible Real-time playback; skip all expired video frames Snapshot Snapshot Folder: D:\Documents and Settings\Administrator\My Doc Browse... Show timestamp and camera name Watermark Add digital watermark in the exported snapshot Add digital watermark in the exported video OK Canceltext_image
Login IP Address/Port : 80 User name Password Remember IP address/port Remember user name and password OK Canceltext_image
Watermark Proof Filename Result Stop when watermark error is detected Exittext_image
Watermark Proof Filename Result 2.avi Failed 1.avi Passed 2011-03-21 12-15-00~12-19-59.avi Failed + -0 □ Stop when watermark error is detected 2009/03/26 18:06:27 DCS-2121 Exittext_image
Camera Settings Camera Dimensions Camera Configuration Event Management Trivalent Settings Advanced Settings Prudging Settings Product Management Simbalance logo Backup & Expansion Recovery Management License Management Channel Camera Name IP Address Status Recording Setting Date Recorded Date Recording Time are saved Camera 1 Camera 2 Camera 3 Camera 4 Camera 5 Camera 6 Camera 7 Camera 8 Camera 9 Camera 10 Camera 11 Camera 12 Camera 13 Camera 14 Camera 15 Camera 16 Camera 17 Camera 18 Camera 19 Camera 20 Camera 21 Camera 22 Camera 23 Camera 24 Camera 25 Camera 26 Camera 27 Camera 28 Camera 29 Camera 30 Camera 31 Camera 32 Camera 33 Camera 34 Camera 35 Camera 36 Camera 37 Camera 38 Camera 39 Camera 40 Camera 41 Camera 42 Camera 43 Camera 44 Camera 45 Camera 46 Camera 47 Camera 48 Camera 49 Camera 50 Camera 51 Camera 52 Camera 53 Camera 54 Camera 55 Camera 56 Camera 57 Camera 58 Camera 59 Camera 60 Camera 61 Camera 62 Camera 63 Camera 64 Camera 65 Camera 66 Camera 67 Camera 68 Camera 69 Camera 70 Camera 71 Camera 72 Camera 73 Camera 74 Camera 75 Camera 76 Camera 77 Camera 78 Camera 79 Camera 80 Camera 81 Camera 82 Camera 83 Camera 84 Camera 85 Camera 86 Camera 87 Camera 88 Camera 89 Camera 90 Camera 91 Camera 92 Camera 93 Camera 94 Camera 95 Camera 96 Camera 97 Camera 98 Camera 99 Camera 100 Resolution: Hertz=0.000 Resolution: Alt=0.000 Resolution: Alt=0.000 Quality: Standard Recording Status: Recording Frequency: Hertz=0.000 Frequency: Alt=0.000 Frequency: Alt=0.000 Frequency: Standard Recording Status: Recording Recording File Size: L2.76 / Free Oak Space: ZS-0.000X/4x JXWATX/2X XZJX/0.4x SPX usage: -14%, Total Bandwidth Usage: SE-4 MHz; Last storage capacity check: MIA-SE-21, SE-33, SE-35, SE-36, SE-37, SE-38, SE-39, SE-40, SE-41, SE-42, SE-43, SE-44, SE-45, SE-46, SE-47, SE-48, SE-49, SE-50, SE-51, SE-52, SE-53, SE-54, SE-55, SE-56, SE-57, SE-58, SE-59, SE-60, SE-61, SE-62, SE-63, SE-64, SE-65, SE-66, SE-67, SE-68, SE-69, SE-70, SE-71, SE-72, SE-73, SE-74, SE-75, SE-76, SE-77, SE-78, SE-79, SE-80, SE-81, SE-82, SE-83, SE-84, SE-85, SE-86, SE-87, SE-88, SE-89, SE-90, SE-91, SE-92, SE-93, SE-94, SE-95, SE-96, SE-97, SE-98, SE-99, SE-100text_image
Add Add a camera This wizard guides you through the following settings: • Camera Configuration • Recording Settings • Schedule Settings ✓ Search camera(s) automatically Step 1/6 Next Canceltext_image
Add Recording Settings Video Compression: H.264 Resolution: 1920x1080 Frame Rate: Full Quality: Compression 30 Enable audio recording on this camera Enable panomorph support A0** Enable manual recording Enable real-time digital watermarking Minimum number of days recording files are kept 1 day(s) Enable auto snapshot Step 3/6 Back Next Canceltext_image
Snapshot schedule Auto snapshot Take 60 snapshot(s) every hourSave to (apply to all channels):

text_image
● Snapshot folder on the NVR (/snapshot) ○ Remote Destinationtext_image
Add Schedule Settings Enable schedule recording Active: Inactive: 0 1 2 3 4 5 6 7 8 9 10 11 12 13 14 15 16 17 18 19 20 21 22 23 Sun Mon Tues Wed Thurs Fri Sat Step 4/6 Back Next Canceltext_image
Edit Camera Configuration Recording Settings Schedule Settings Camera Brand: Axis Camera Model: Axis M1014 Camera Name: Camera 1 IP Address: 10.8.10.41 Port: 80 RTSP Port: 554 WAN IP Address: Port: 80 RTSP WAN Port: 554 User Name:=root Password: **** ✓ Enable recording on this camera Apply Canceltext_image
Properties General Streaming Use custom settings Always stream from the server Always stream from the network camera OSD Settings OSD text color: Display Mode FR image to window Keep aspect ratio Display image in original size. If the image is larger than the window, do the following: Shrink image to fit window, maintaining aspect ratio Shrink image by 1/2, 1/4, 1/8 ... and so on to fit window Video Processing Deinterlace Video Resolution Stream from server | Adjust resolution automatically Fixed resolution 4VGA[H264] QGIF[M3PG] VGA[H264] 4VGA[H264] Let me choose other cameras to apply the same settings OK Canceltext_image
Add Video Settings Multi-stream Profile: User defined Recording Mode: Round-the-clock Recording Regular Recording: Stream 1 Stream Video Compression Resolution Frame Rate Quality 1 H.264 1920x1080 Full Compression 30 2 Motion JPEG 640x480 6 Compression 50 3 H.264 1280x720 12 Compression 30 Enable audio recording on this camera Enable manual recording Enable real-time digital watermarking Minimum number of days recording files are kept : day(s) Enable auto screenshot Step 3/6 Back Next Canceltext_image
Add Video Settings Multi-stream Profile: User defined Recording Mode: Smart Recording Regular Recording: Stream 2 Alarm Recording: Stream 1 Stream Video Compression Resolution Frame Rate Quality 1 H.264 1920x1080 Full Compression 30 2 Motion JPEG 640x480 6 Compression 50 3 H.264 1280x720 12 Compression 30 Enable audio recording on this camera Enable manual recording Enable real-time digital watermarking Step 3/6 Back Next Canceltext_image
Add Video Settings Multi-stream Profile: User defined Recording Mode: Smart Recording Regular Recording: Stream 2 Alarm Recording: Stream 1 Stream Video Compression Resolution Frame Rate Quality 1 H.264 1920x1080 Full Compression 30 2 Motion JPEG 640x480 6 Compression 50 3 H.264 1280x720 12 Compression 30 Enable audio recording on this camera Enable manual recording Enable real-time digital watermarking Step 3/6 Back Next Canceltext_image
Stream Profile Settings Stream Profile Profile name: NVRedgeProfile Video encoding: H.264 Description: NVR edge profile Image Audio H.264 MJPEG Image Appearance ✓ Resolution: 640x480 (4:3) ✓ Compression: 50 [0..100] ✓ Mirror image: Off Video Stream ✓ Maximum frame rate: ○ Unlimited ● Limited to 15 [0..30] fps Overlay Settings □ Text and/or image overlay nonetext_image
AXIS P1344 Network Camera Live View | Setup | Help Recording List Filter Recording time: From: First recording (yyyy-mm-dd hh:mm) To: Now 2013-04-12 11:53 (yyyy-mm-dd hh:mm) Event: Any Storage: Any Sort: Descending Results: Max 20 recordings at a time Filter Recording 1 to 5 of 5 Start date & time Duration Event 2013-04-09 15:17:05 Ongoing continuous 2013-04-09 14:36:13 00:00:38 continuous 2013-04-09 14:24:31 00:04:58 continuous 2013-04-09 10:44:32 03:57:13 continuous 2013-04-07 11:18:46 42:24:26 continuous System Options Abouttext_image
AXIS P1344 Network Camera Live View | Setup | Help Continuous Recording Recording Settings Enable Disk: SD card Stream profile: NVRedgeProfile Save Reset Recordings List Continuoustext_image
Storage Overview Camera Controlled Storage Type 2. Status Total size Used space SD Card ready 7.5 GB 2.9 GB Network Share not defined - System Options/Disk Management - AXIS P1344 Network ... 開啓網站 Storage Management SD Card File system: vfat Status: ready Unmount Storage Tools Format Check disk Repair Recording Settings Remove recordings older than: 5 days Lock (write protection) About OK Canceltext_image
Surveillance Settings Camera Settings Camera Overview Camera Configuration Alarm Settings Traditional Mode Advanced Mode Alerts Settings SMSC Settings Channel No. Camera Name IP Address Alarms Recordings 1 1. Servy VB6008 10.11.14.186 OFF 2 2. Axis P1354 10.65.12.206 OFF 3 3. JVC VN-H137 10.65.12.208 OFF 4 4. Axis P1355 10.65.12.207 OFF 5 5. Axis P1357 _10.65.12.211-Jason OFF 6 6. Axis M1114 10.65.13.57 OFF 7 7. Axis M3006 10.65.12.210 OFF 8 8. Axis P3384 10.65.12.209 OFF Enable alarm recording User recording system reset is determined by the system Advance share recording only to selected alarm-up ApplyRemarque :
text_image
Camera Settings Camera Dimensions Camera Configuration Event Management System Settings Advanced Settings Privilege Settings Protocol Management Surveillance Logo Backup & Expansion Recovery Management License Management Traditional Mode Advanced Mode Alarm Settings SMSC Settings [SMS Server Settings] Clickshell Enable SSL Connection SSL port: 447 SMS Server Login Name: admin SMS Server Login Password: +0000 SMS Server API_3D: [SMS Notification Settings] Country Code: Afghanistan (+03) Cell Phone No. 1: Cell Phone No. 2: Interval of sending SMS text messages of the same events: 60 Minute(s) Send SMS text messages when the following events take place: Prompt:Mode avancé
text_image
Event List Edit Connection Failure 7. Axis M3006 Motion Detection Connection Failure 8. Axis P3384 Motion Detection Alarm Input1 Connection Failure Surveillance event Recording Failure External event User-defined Event + jasontext_image
Add Action Execute the action when a moving object is detected by the IP camera Specify the FTP address for the NVR to receive the alarm messages from the IP camera (optional) IP Address: Post: Set schedule Apply Cancel Connection Failure Page 1 3 4 Display Item: 1-4, Total: 8 Show 10 Marks Back2. Entrée d'alarme
text_image
Add Action Execute the action when the alarm input of the IP camera is OPEN Set schedule Apply Cancel Connection Failure Page 1 /1 No data to display Show Itemstext_image
Surveillance Settings Monitor Playback Camera Settings Camera Overview Camera Configuration Alarm Settings System Settings Advanced Settings Privilege Settings Protocol Management Surveillance Logs Historical Users List Backup & Expansion Recovery Management License Management Traditional Mode Advanced Mode Event List Action List Edit Contribution results 7. Axis M3006 Motion Detection Connection Failure 8. And P3384 Motion Detection Alarm Input1 Connection Failure Surveillance event Recording Failure External event User-defined Event OKOK Add Delete Name Content Operation H I Page 1 /1 H No data to display Show 10 Items Applytext_image
Schedule Settings Select from the list All day New Delete Active Inactive: 0 1 2 3 4 5 6 7 8 9 10 11 12 13 14 15 16 17 18 19 20 21 22 23 Sun Mon Tue Wed Thurs Fri Sat Apply to All Events Apply CancelActions :
text_image
Add Action ✓ Execute the action when a moving object is detected by the IP camera Specify the FTP address for the NVR to receive the alarm messages from the IP camera (optional) IP Address: Port: Set schedule Apply Cancel1. Enregistrement
text_image
Add Action Action Type: Recording New Select From the Act Select one or more channels to start recording when an event is triggered. Ch-01 Ch-02 Ch-03 Ch-04 Ch-05 Ch-06 Ch-07 Ch-08 Ch-09 Ch-10 Ch-11 Ch-12 Ch-13 Ch-14 Ch-15 Ch-16 Execute the action for 30 second (c) when the event is triggered Execute the action when the event starts and stop the action when the event ends* * This option is applicable to duration events only. If the action is activated by duration event and both settings above are enabled, the ball will exclude the setting only. Note: A duration event is an event with start and end time and lasts for a period of time. It does not include the events related to status change, such as camera's connection failure or ball recording failure. Apply Apply to all Events Canceltext_image
Add Action Action Type: Name: Selected from the Xial Select a preset position of the PTZ camera or enter the HTTP URL. The IP camera will adjust the monitoring angle to the preset position or do further action according to HTTP URL when an event is triggered. Actions Name: Camers Name: Please select a camera. □ Preset Position: IP HTTP (p); 确定 imize the IP Camera Cancel3. Sortie d'alarme
text_image
Add Action Switch Table: Camera 1 Alarm Output Select from this list Select an alarm output of the IP camera. The alarm will be activated when an event is triggered. Camera Number: 1. Camera 2 Note: Link the IP camera contains of which the alarm output is supported by the next will be listed. Set the alarm output 1 of the IP camera on Excludes the action for "yes" second (i) when the event is triggered Execute the action when the event starts and stop the action when the event ends* * This option is applicable to duration events only. If the action is activated by duration event and both settings above are enabled, the Shift will activate this setting unit. Note: 1 duration event is an event with start and end time and tests for a period of time. It does not include the events related to status change, such as Camera's connection failure or Shift recording failures. Apply Apply for All Events Cancel4. Email
text_image
Add Action Action Type E-mail (HTTP) server address: Enable HTTP Authentication User Status: Password: Sender: Recipients: Subject: Content: Use 95% / TLS secure connection Attached with snapshot: 136-01 136-02 136-03 136-04 136-05 136-06 136-07 136-08 136-09 136-10 136-11 136-12 136-13 136-14 136-15 136-16 Time interval to send the alert email when the same kind of events is triggered: seconds(£) 确定 Cancel5. SMS
text_image
Add Action Action Type [SPS Server Settings] ClickNext Enable SSL Connection SPS Server Login Name: admin SPS Server Login Password: *****. SPS Server API_30: [SPS Notification Settings] Country Code: Afghanistan (I+I) Cell Phone No. 1: Cell Phone No. 2: Message : Text (Interval of sending SPS text messages of the same event): 30 Minutes(s)6. Sonnerie
text_image
Add Action Button Type Enable the buzzer on the tMR. The buzzer will sound when an event is triggered. Text Execute the action for 30 second (c) when the event is triggered □ Execute the action when the event starts and drops the action when the event ends* * This option is applicable to duration events only. If the action is activated by duration event and both settings above are enabled, the tMR will execute this setting only. Note: A duration event is an event with start and end time and lasts for a period of time. It does not include the events related to status change, such as correct's connection failure or tMR recording failure. Apply Apply to all Events Canceltext_image
Add Action Action Type: HTTP-URL OK Next Select from the list Enter IP address, port, HTTP URL, user name, and password of another network surveillance device. The device will be activated when an event is triggered. Action Name: IP Address: Port: HTTP URL: User Name: admin Password: ****Recording length and keeping period
Maximum length of each recording file: 10 minute(s).
When the available storage is less than 10%
- overwrite the oldest recordings
○ stop writing recordings
☐ Maximum number of days all recording files are kept 10 day(s)
☐ Number of days alarm recording files are kept 10 day(s)
Alarm Recording
Start recording video (at minimum) 30 second(s) before the event occurs.
Stop video recording 30 second(s) after the event ends.
Local Display Settings
□ Enable anonymous access
Apply
text_image
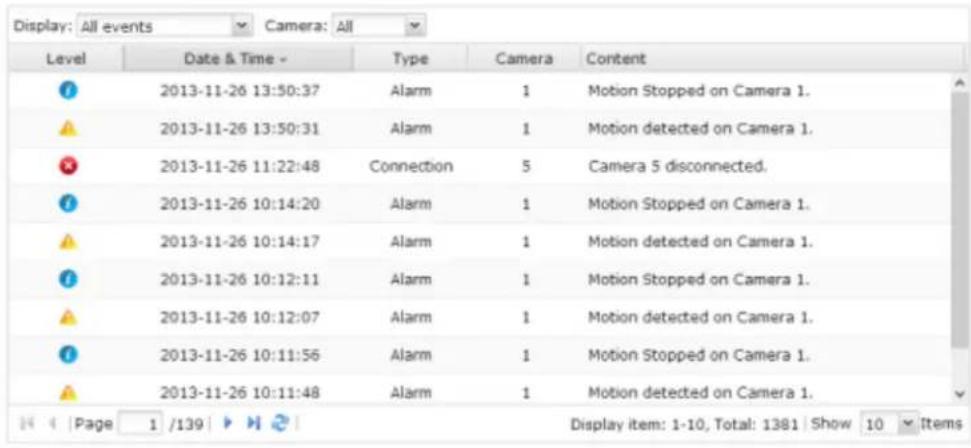
Surveillance Settings Monitor Playback Camera Settings Camera Status Camera Configuration Alarm Settings System Settings Advanced Settings Privilege Settings Protocol Management Surveillance Logs Historical Users List Backup & Expansion Recovery Management License Management You can manage the access permissions for the camera in this page. User: admin Channel Camera Monitoring Playback PTZ Cont... Audio 1 Camera 1 2 Camera 2This page shows the surveillance logs such as camera connection, motion detection and camera authentication failure.
text_image
Display: All events Camera: All Level Date & Time Type Camera Content 2013-11-26 13:50:37 Alarm 1 Motion Stopped on Camera 1. 2013-11-26 13:50:31 Alarm 1 Motion detected on Camera 1. 2013-11-26 11:22:48 Connection 5 Camera 5 disconnected. 2013-11-26 10:14:20 Alarm 1 Motion Stopped on Camera 1. 2013-11-26 10:14:17 Alarm 1 Motion detected on Camera 1. 2013-11-26 10:12:11 Alarm 1 Motion Stopped on Camera 1. 2013-11-26 10:12:07 Alarm 1 Motion detected on Camera 1. 2013-11-26 10:11:56 Alarm 1 Motion Stopped on Camera 1. 2013-11-26 10:11:48 Alarm 1 Motion detected on Camera 1. Page 1 /139 Display item: 1-10, Total: 1381 | Show 10 Items
text_image
Download Logtext_image
Surveillance Settings Monitor Playback Camera Settings Camera Overview Camera Configuration Event Management System Settings Advanced Settings Privilege Settings Protocol Management Surveillance Logs Backup & Expansion Recovery Management License Management Surveillance Event Logs Surveillance Connection Logs Online Surveillance Users Display: All events Save Type Date - Time Users IP Computer... Accessed resources Action 2014-08-14:04:04 adults 10.65.12.159 --- Monitor Login OK Page 1 /1 Display item: 1-1, Total: 1 Show 10 Itemstext_image
Recovery Schedule Recovery Status Edge Recording Status Server Time: 2013/12/19 10:16:42 Channel Brand Model Camera Name Time Status 1 Axis Axis M5013 1 M5013 N/A Disconnected 2 Axis Axis M5013 2 M5013 2013/12/19 10:16:42 Readytext_image
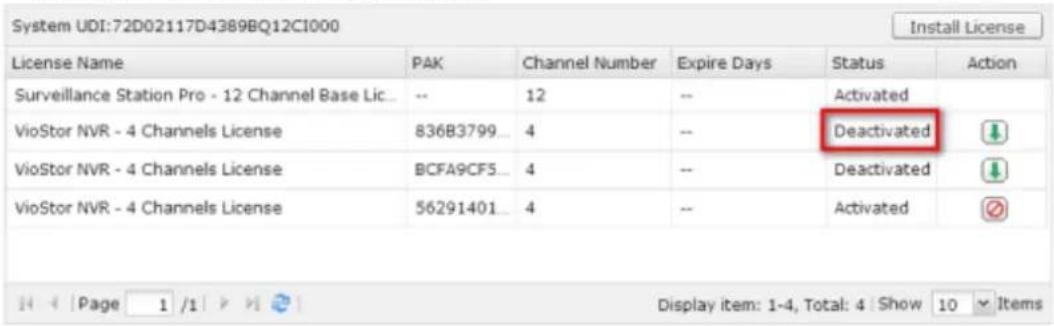
Share/Record Settings Monitor Flashback Camera Settings Camera Status Camera Configuration Alarm Settings System Settings Advanced Settings Privilege Settings Protocol Management Surveillance Logs Historical Users List Backup & Updates Recovery Management License Management Expand Recording Channels The Visitor NVR offers various channel base licenses depends on different models. To add extra number of recording channels, please contact authorized reseller for assistance. Or you can contact QNIP Security (http://compenscunv.com/SalesInmars.aspx) for authorized reseller. How to install license Click Install License to install the license. Current / Maximum Number of recording channels: 16 / 16 System UCL: AAS0074HDBR098Q127E00 Install License License Name PAC Channel Number Expense Dates Status Action Visitor NVR - 10 Channel Base License - 26 - Activated Page 1 / 2 3 4 5 Display Item: 1-1, Total: 1 Show 10 Items Note: The number of recording channels supported via the NVR model. Please refer to the information on http://www.apasscunv.com/before-purchasing or activating the license on the NVR. The maximum number of recording channels supported is for reference only. The actual recording performance may vary depending on the ID creation, other updates, network handwidth, recording settings, and other pricing applications on the Thursday, December 19 QVR VS-4116UPro+text_image
Add a License Activate the License ○ Online Activation Activate the license online. Make sure the system is connected to the Internet. ○ Offline Activation Activate the license offline. Step 1/4 Next Canceltext_image
Add a License Online License Activation Enter the Product Authorization Key (PAK) code to activate. 1ED45A1EA266C14BFB4EE968 Note: Make sure the system is connected to the Internet. Step 3/4 Back Next Canceltext_image
Add a License Online License Activation License activated The camera license has been activated. Click "Download" to download the Deactivation Ticket. Step 4/4 Finishtext_image
Add a License Activate the License ○ Online Activation Activate the license online. Make sure the system is connected to the Internet. ● Offline Activation Activate the license offline. Step 1/4 Next Canceltext_image
ONAP Account Global/English LICENSE PURCHASE Turbo NAS LICENSE MANAGEMENT Offline Activation Offline Deactivation INFORMATION Contact Us FAQ PayPal. CREATE ACCOUNT I am a new customer. Register an Account By registering an account you will be able to shop faster, be up to date with the status of your order, and keep track of the orders you have previously made.. Continue Returning Customer I am a registered customer. Email: Password: Forgot Password? Enter the code in the box below: 2me2c Try a different image Type characters: Sign intext_image
QNAP License PURCHASE Turbo MAS LICENSE MANAGEMENT Offline Activation Offline Deactivation INFORMATION Contact Us FAQ PayPal. OFFLINE ACTIVATION Copy the system UDI from your Surveillance Station Pro and upload the PAK here. After the activation is verified, you will get a Permission File. Step 1 Please fill out your device UDI Your UDI can be copied from the Surveillance Station Pro. Step 2 Please fill out the PAK Please fill out the PAK you want to activate on this device. Enter the code in the box below: pa3fm Try a different image Type characteris Activatetext_image
QNAP License Purchase Turbo NAS License MANAGEMENT Offline Activation Offline Disactivation INFORMATION Contact Us FAQ PayPal. Message The activation is verified, please check the receiver's email for Permission File. Return to Account.text_image
QNAP License Store - Your Permission file license_support@qnapsecurity.com.tw 寄給 我 Dear Customer, Congratulations! You can now activate the license offline. Please download the attached permission file and import it to the server to activate the new camera recording channel. Please notice that the permission file can only be used with the specific system UDI you registered previously. QNAP Systems, Inc. License Store Customer Service Email: license_support@qnapsecurity.com.tw QNAP® 137D5384567AF7B53180B59B.act.tgz 2K 下載text_image
Add a License Offline License Activation Step 2: Import License File Import the license file to activate the new camera recording channel. Browse... Step 3/4 Back Next Canceltext_image
Add a License Offline License Activation License activated The camera license has been activated. Click "Download" to download the Deactivation Ticket. Step 4/4 Finish7.5.2 Désactivation de licence
text_image
Surveillance Settings Monitor Playback Camera Settings Camera Status Camera Configuration Alarm Settings System Settings Advanced Settings Privilege Settings Protocol Management Surveillance Logs Historical Users List Backup & Expansion Recovery Management License Management Expand Recording Channels The Visitor NVR offers various channel base license depends on different models. To add extra number of recording channels, please contact authorized reseller for assistance. Or you can contact QNAP Security (http://gnapsecurity.com/Salestmaev.aspx) for authorized reseller. How to install license Click: Install License to install the license. Current / Maximum number of recording channels: 5 / 12 System UDI: 72D02117D4389BQ12C3000 Install License License Name PAK Channel Number Expire Days Status Action Surveillance Station Pro - 12 Channel Base Lic... -- 12 -- Activated VioStor NVR - 4 Channels License 836B3799... 4 -- Activated ② VioStor NVR - 4 Channels License BCFA9CF3... 4 -- Deactivated ① VioStor NVR - 4 Channels License 56291401... 4 -- Activated ② Display Item: 1-4, Total: 4 Show 10 Items Page 1 /1 Page 2 Note: The number of recording channels supported varies by the NVR model. Please refer to the information on http://www.gnasesecurity.com/ before purchasing or activating the license on the NVR... The maximum number of recording channels supported is for reference only. The actual recording performance may vary depending on the IP cameras, video contents, network bandwidth, recording settings, and other running applications on the NVR. Please contact an authorized reseller or the camera vendors for more information.text_image
Deactivate License Deactivate the License Confirmation Warning! The license will be removed from this system. 39A7B4468727E39969D68023 To continue, click "Next". Step 1/5 Next CancelDeactivate the license online. Make sure the system is connected to the Internet.
○ Offline Deactivation
Deactivate the license offline.
Step 2/5
Back
Next
Cancel
Are you sure you want to remove the license from the system?
☑ Yes, I want to remove the license from the system.
Step 4/5
Back
Next
Cancel
text_image
Deactivate License Online Deactivation License deactivated. The camera license has been deactivated. Click "Download" to download the Deactivation Ticket. Step 5/5 FinishExpand Recording Channels
The VioStor NVR offers various channel base license depends on different models. To add extra number of recording channels, please contact authorized reseller for assistance. Or you can contact QNAP Security (http://qnapsecurity.com/SalesInquiry.aspx) for authorized reseller.
How to install license
Click Install License to install the license.
Current / Maximum number of recording channels: 4 / 12
text_image
System UDI:72D02117D4389BQ12CI000 Install License License Name PAK Channel Number Expire Days Status Action Surveillance Station Pro - 12 Channel Base Lic... -- 12 -- Activated VioStor NVR - 4 Channels License 836B3799_ 4 -- Deactivated VioStor NVR - 4 Channels License BCFA9CF5_ 4 -- Deactivated VioStor NVR - 4 Channels License 56291401_ 4 -- Activated Display item: 1-4, Total: 4 | Show 10 ▼ Itemstext_image
Deactivate License Deactivate the License Confirmation Warning! The license will be removed from this system. 39A7B4468727E39969D68023 To continue, click "Next". Step 1/5 Next Canceltext_image
Deactivate License Deactivate the License Confirmation ○ Online Deactivation Deactivate the license online. Make sure the system is connected to the Internet. ● Offline Deactivation Deactivate the license offline. Step 2/5 Back Next Canceltext_image
Deactivate License Offline License Deactivation Step 1: Deactivate the License on the system Remove the license from the system and download a Deactivation Ticket. Step 2: Deactivate the License on the License Store To complete the deactivation, please visit the License Store and submit the Deactivation Ticket. http://license.gnap.com/deactivate.html Step 3/5 Back Next Canceltext_image
Deactivate License Offline License Deactivation Are you sure you want to remove the license from the system? ✓ Yes, I want to remove the license from the system. Step 4/5 Back Next Canceltext_image
10.11.11.11/cgi-bin/main.html?5.8.0.20131124.S0866872 OMAP-VS-41380 Surveillance Show Desktop Surveillance Console Monitor Product Camera Settings Camera Status Camera Configuration Alarm Settings System Settings Advanced Settings PlayAega Settings Protocol Management Surveillance Logs Historical Users List Remote Replication Surveillance Recovery Maps Storage Expansion Setting License Management 13 Monda Expanded Recording Channels The visitor NVR offers various channel base license depends on different modes. To add extra a number of recording channels, please contact authorized reseller for assistance. Or you can contact QuAP Security (http://www.onpapi.com/sales/ncapri.org) for authorized reseller. How to Install License: Click Install License to install the licenses. Current / Maximum number of recording channels: 10.7.1h System UDEAA3009KDD488BQNAF0000 Install License License Name PAC Channel Number Expiry Days Status Action Visitor NVR - 10-Channel Base License — 18 — Activated Visitor NVR - 4 Channels License 36A7B446... 8 — Deactivated Visitor NVR - 4 Channels License 75T5749F... 6 — Deactivated Visitor NVR - 4 Channels License CFCBC29... 4 — Deactivated Display Item: 2-4, Total: 4 | Show: 10 | Rooms Note: The number of recording channels supported varies by the toll model. Please refer to the information on http://www.onpapi.com/before purchasing or activating the license on the NVR. The maximum number of recording channels supported is for reference only. The actual recording performance may vary depending on the DF cameras, video content, network bandwidth, recording settings, and other running applications on the NVR. Please contact an authorized reseller or the camera vendors for more information. R#Av_06a76ab667_sxp R#Av_75T576AF882_sxptext_image
QNAP License PURCHASE Turbo NAS LICENSE MANAGEMENT Offline Activation Offline Deactivation INFORMATION Contact Us FAQ PayPal. OFFLINE DEACTIVATION QNAP License Deactivation Service allow you to apply license deactivation. Step 1 Please upload your deactivation ticket 选择版本 RMV_39A7B446_9D68023.tgz Enter the code in the box below: cnhe6 Try a different image Type characters:cnhe6 Apply Copyright ©2012; QNAP License Store v0.9. This site is best viewed in 1024 x 768 true color with IE7.0+, Firefox 3+ or Chrome 6+.text_image
QNAP Sign out | Account English - Global LICENSE PURCHASE Turbo NAS LICENSE MANAGEMENT Offline Activation Offline Deactivation INFORMATION Contact Us FAQ PayPal. MESSAGE License deactivated Return to Account Copyright ©2012; QNAP License Store v0.9. This site is best viewed in 1024 x 768 true color with IE7.0+, Firefox 3+ or Chrome 6+.text_image
10.11.11.11/cgi-bin/main.htmlPS.8.0.20131124.SBN66872 Show Desktop Surveillance Console Monitor > Playback Camera Settings Camera Status Camera Configuration Alarm Settings System Settings Advanced Settings Profile Settings Portfolio Management Surveillance Logs Historical Users List Remote Replication Surveillance Recovery Maps... Storage Expendive Setting License Management 13 Monda Expand Recording Channels The visitor NVR offers various channel base license depends on different models. To add extra number of recording channels, please contact authorized reader for assistance. Or you can contact QnIP Security (http://miposecurity.com/salesinsurance.org) for authorized reader. How to Install License: Click Install License to install the license. Current / Maximum number of recording channels: 16 / 16 System/IDEA5500HODABB9BQNAF0000 Install License License Name PAC Channel Number Expense Days Status Action Visitor NVR - 16 Channel Base License — 15 — Activated Visitor NVR - 4 Channels License 38x78445 4 — Deactivated Visitor NVR - 4 Channels License 7375749F 4 — Deactivated Visitor NVR - 4 Channels License CFCBC28 4 — Deactivated Page 1 / 2 Display Item: 1-4, Total: 4 Show 10 = Xeno Note: The number of recording channels supported varies by the NVR model. Please refer to the information on http://www.nmagesunbrv.com/ before purchasing or activating the license on the NVR. The maximum number of recording channels supported is for reference only. The actual recording performance may vary depending on the IF cameras, video contents, network bandwidth, recording settings, and other running applications on the NVR. Please contact an authorized reader or the camera vendors for more information. Rty_757578F8X2_spx Rty_757578F8X2_spxtext_image
Surveillance Settings Monitor Playback Camera Settings Camera Overview Camera Configuration Event Management System Settings Advanced Settings Privilege Settings Protocol Management Surveillance Logs Backup & Expansion Recovery Management License Management (Archived) Historical User List Display the information of the users that have accessed the system via networking services Login Date - Login Time Users Source IP Computer name Connection Accessed Resources 2014-06-23 09:30:44 admin 10.65.12.101 --- HTTP Monitoring 2014-06-23 09:30:46 admin 10.65.12.101 ceylonzeng-pc2 Samba record_nvr 2014-06-23 09:30:47 admin 10.65.12.101 ceylonzeng-pc2 Samba record_nvr_alarm 2014-06-23 09:30:44 admin 10.65.12.101 --- HTTP Administration 2014-06-23 09:46:11 admin 10.65.12.101 --- HTTP Monitoring 2014-06-23 09:46:21 admin 10.65.12.101 ceylonzeng-pc2 Samba record_nvr 2014-06-23 09:46:21 admin 10.65.12.101 ceylonzeng-pc2 Samba record_nvr_alarm 2014-06-23 09:48:11 admin 10.65.12.101 --- HTTP Administration 2014-06-23 10:09:15 admin 10.65.9.9 --- HTTP Monitoring 2014-06-23 09:46:42 Anonymous 127.0.0.1 --- HTTP Monitoring Page 1 /3 H Display Item: 1-10, Total: 21 Show 10 Itemstext_image
Backup & Expansion External Backup One Touch Video Backup Remote Replication Storage Expansion The external backup function allows you to copy the video files from the local disk volume to an external storage device. You can create a backup job and back up the data to the external storage device on the specific port. Create a Job Task / Backup Frequency Status ActionThis wizard helps you create a sync job through the following steps.
-
Connect to an external storage device.
-
Configure real-time or scheduled sync options.
Click "Next" to start.
Step 1/7
Next
Cancel
text_image
Create a Job Replication Schedule ● Back up Now ○ Schedule The "External Device Backup" feature will back up new files, files that have been modified or renamed within the scheduled period. Hourly 00 : 10 Step 3/7 Back Next Canceltext_image
Create a Job Backup Settings Channel Backup Channel Settings The system will back up all recording channels by default if the channel backup settings are not changed. Backup Period The system will back up all the recording files on the specified days by default if the backup period setting remains unchanged. ● Back up recording files for the last 3 day(s). ○ Configure the time period for backup 2013/12/22 (00:00) ~ 2013/12/24 (23:59) Period Settings Step 4/7 Back Next Canceltext_image
Configuring Backup Channels Available Channels Selected Channels Ch1 - Camera 1 Ch2 - Camera 4 Ch4 - Camera 4 Ch7 - Camera 4 Ch8 - Camera 4 Ok Canceltext_image
Configuring Backup Period Regular Recording: Alarm Recording: Alarm and Regular: Inactive: 0 1 2 3 4 5 6 7 8 9 10 11 12 13 14 15 16 17 18 19 20 21 22 23 Sun Mon Tues Wed Thurs Fri Sat Include auto snapshots Ok Canceltext_image
Create a Job Backup Settings Channel Backup Channel Settings The system will back up all recording channels by default if the channel backup settings are not changed. Backup Period The system will back up all the recording files on the specified days by default if the backup period setting remains unchanged. Period Settings Step 4/7 Back Next Canceltext_image
Configuring Backup Channels Available Channels Selected Channels Ch1 - Camera 1 Ch2 - Camera 4 Ch4 - Camera 4 Ch7 - Camera 4 Ch8 - Camera 4 Ok Canceltext_image
Configuring Backup Period Regular Recording: Alarm Recording: Alarm and Regular: Inactive: 0 1 2 3 4 5 6 7 8 9 10 11 12 13 14 15 16 17 18 19 20 21 22 23 Sun Mon Tues Wed Thurs Fri Sat Include auto snapshots Ok Cancel√ Overwrite the oldest recordings
√ Enable password protection
Confirm password

Step 4/7
Back
Next
Cancel
text_image
Create a Job Please enter a name for the backup task USBDisk1 Specify a name for the sync job. It is a required field and cannot be empty. Step 5/7 Back Next Canceltext_image
Backup & Comparison External Backup One Touch Video Backup Remote Application Storage Explorer Enable One Touch Video Backup Enable this feature, cannot an external storage device to the front USB port and press the "One Touch Video Backup" button to back up recording file. Chiral Backup The system will back up all recording channels by default if the channel backup settings are not changed. Chiral Settings Setup Schedule The system will back up all recording files on the specified desk by default if the backup duration and the settings remain unchanged. Back up recording files for the next 1 Box() Configure the time period for backup Prepaid Settings Boot Control Enable alarm backup Advanced Settings Converes the added recordings Enable password protection Unfire password Note: Backup: None and include this "One Touch Video Backup" button for any network and access by backup. If the alarm status is enabled, you will have a short time, meaning that the backup has been loaded. The USB LED light will think when data backup is in progress, then used with the backup line is loaded (the USB LED light will become static).Configuring Backup Channels
text_image
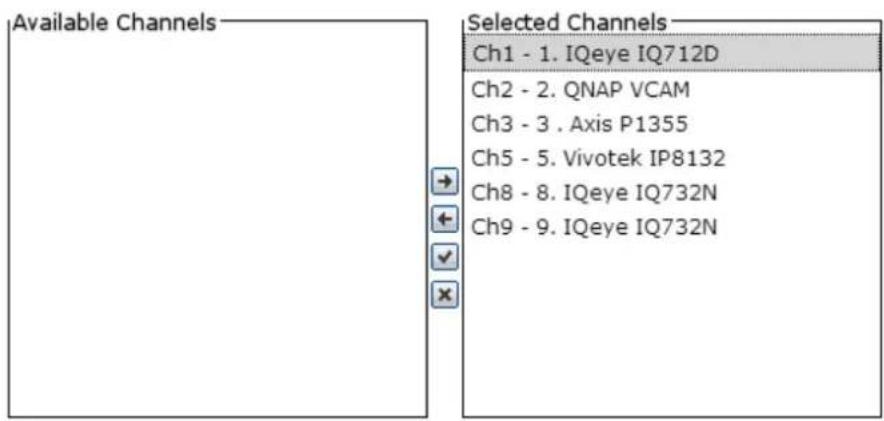
Available Channels Selected Channels Ch1 - 1. IQeye IQ712D Ch2 - 2. QNAP VCAM Ch3 - 3 . Axis P1355 Ch5 - 5. Vivotek IP8132 Ch8 - 8. IQeye IQ732N Ch9 - 9. IQeye IQ732N
Configuring Backup Period

√ Include auto snapshots in the specified period
Ok
Cancel
√ Overwrite the oldest recordings
√ Enable password protection
Confirm password

Step 4/7
Back
Next
Cancel
text_image
Remote Replication Enable Remote Replication Back up alarm recordings only (instead of all recordings) Back up the recordings of the last 1 day(s) only Remote Destination Remote Host IP Address: 10.65.11.28 Destination Path (Network Share/Directory) Public / RR for 11.6 User Name: jason Password: *** Remote Host Testing Test (Status:--) Replication Schedule Daily 00 100 Weekly Sunday Apply Stop running tasktext_image
Enable Remote Replication Back up alarm recordings only (instead of all recordings) Back up the recordings of the last 3 day(s) onlyRemote Host IP Address:
Destination Path (Network Share/Directory)
User Name:
Password:
Remote Host Testing

text_image
/ Test (Status:---)Remote Host IP Address:
Destination Path (Network Share/Directory)
User Name:
Password:
Remote Host Testing

text_image
Test (Status:---)☐ Overwrite the oldest recordings when the available storage on the remote host is less than 4GB
☐ Perform mirroring replication by deleting extra files on the remote destination
Note: When remote replication is in process, the recording performance will be decreased
text_image
A-173 (in S700) App Center My App All Apps QNSP Select Revenues/credit Data Lab Partners Backup/Give Business Comfort Management Communications Developer Tools Download Entertainment Surveillance Utilities Education StorageExpansion 1.5.2 Launch ServerResource Station Pro Surveillance LaunchDésactiver : désactiver StorageExpansion QPKG.
| Status | Description |
| Connection Success | |
| Failure of storage expansion due to incorrect storage expansion assignments (please check your setting on the storage expansion page.) | |
| Failure of storage expansion because Subnet Mask setting of NAS and NVR should be the same. | |
| NVR | Failure of storage expansion as the NVR (MAC address) is changed. |
| IP | Failure of storage expansion because no NVR is found. |
text_image
Backup & Expansion External Backup One Touch Video Backup Remote Replication Storage Expansion Overview Storage Expansion Assignment NAS List Add Fail Remove Create a Job Status IP Address Destination Volume Total Size Free Size Recording Storage Details Recording Storage Details Recording Time Period Actiontext_image
Overview Storage Expansion Assignment NAS List Add Edit Remove Create a Job Status IP Address Destination Volume Total Size Free Size Recording Storage Details Recording Storage Details Recording Time Period ActionSelect a disk volume
6
Apply
Cancel
Remarque :
text_image
Config NAS NAS IP Address: 10.11.14.151 Port: 8080 User Name: admin Password: ****** Destination: constant Volume: Select a volume... Cache Count: 48 Hours Query Volume Apply Canceltext_image
Control Panel Overview System Settings Several Settings Storage Manager Network Security Hardware Power Notification Hardware Update Backup / Accounts External Device System Status System Loga Privilege Settings Network Services System Administration None Server names: VizhuriR&R OP Address: 10.8.10.1855 You can change the default port number (ATDP) for Web Administration. System port: 80 Enable secure connection (SSL) Port number: 443 Portx secure connection (SSL) only Note: After enabling the "Portx secure connection (SSL) only" option, the Web Administration can only be connected via Https. Apply Audio allHeure
text_image
System Administration Time Current date and time: 2014/04/24 18:24:39 Thursday Time zone: (GMT+08:00) Taipei Date and time format: yyyy/MM/DD 24HR Time setting: ■ Manual setting Date/Time: 2014/04/24 / 18 : 23 : 38 ○ Synchronize with an Internet time server automatically Server: pool.mts.org □ Time zone synchronization at 10 : 00 □ Disable RTC synchronization Set the server time the same as your computer time Update Apply Apply Alltext_image
Control Panel Search Overview System Settings General Settings Storage Manager Network Security Hardware Power Notification Fireworks Update Backup / Restore External Device System Status System Logs Privilege Settings Network Services Volume Management RAID Management Hard Disk SMART Create Current Configuration: Physical Disk Scan now Disk Model Capacity Status SMART Information Drive 1 WDC WD1002FAEX-00Z3A05.0 931.51 GB Ready Good Drive 2 WDC WD1002FAEX-00Z3A05.0 931.51 GB Ready Good Drive 3 -- -- No Disk -- Drive 4 -- -- No Disk -- Drive 5 WDC WD1002FAEX-00Z3A05.0 931.51 GB Ready Good Drive 6 -- -- No Disk -- Drive 7 WDC WD1002FAEX-00Z3A05.0 931.51 GB Ready Good Drive 8 -- -- No Disk -- Note that if you are going to install a hard drive (new or used) which has never been installed on the Nift before, the hard drive will be formatted and partitioned automatically and all the disk data will be cleared.text_image
General Settings Storage Manager Network Security Hardware Power Notification Firmware Update Volume Management RAID Management HDD SMART Action Disk / Volume Total Size Bitmap Status RAID 5 Disk Volume: Drive 4 8 12 3693.71 GB no Readytext_image
Expand Capacity Change Disk Model Capacity Status Description Drive 1 WDC WD2500AAKX-22ER... 232.89 GB Ready You can replace this drive. Drive 2 WDC WD2500AAKX-22ER... 232.89 GB Ready You can replace this drive. Drive 3 WDC WD2500AAKX-22ER... 232.89 GB Ready You can replace this drive. Source Disk Volume: RAID 5 Disk Volume: Drive 1 2 3 The system can only support expanding the volume size up to 16TB (and under). Expand Capacity Backtext_image
Expand Capacity Cancel Disk Model Capacity Status Description Drive 1 WDC WD2500AAKX-22ER_ 232.89 GB Ready Please remove this drive. Drive 2 WDC WD2500AAKX-22ER_ 232.89 GB Ready No operation can be executed on this d... Drive 3 WDC WD2500AAKX-22ER_ 232.89 GB Ready No operation can be executed on this d... Source Disk Volume: RAID 5 Disk Volume: Drive 1 2 3 The system can only support expanding the volume size up to 16TB (and under). Expand Capacity Backtext_image
Expand Capacity Change Disk Model Capacity Status Description Drive 1 -- -- No Disk Please insert the new drive. Drive 2 WDC WD2500AAKX-22ER... 232.89 GB Ready No operation can be executed on this d. Drive 3 WDC WD2500AAKX-22ER... 232.89 GB Ready No operation can be executed on this d.. Source Disk Volume: RAID 5 Disk Volume: Drive 1 2 3 The system can only support expanding the volume size up to 16TB (and under). Expand Capacity Backtext_image
Expand Capacity Change... Disk Model Capacity Status Description Drive 1 Seagate ST31000528AS 931.51 GB Rebuilding (0%) No operation can be executed on this d... Drive 2 WDC WD2500AAKX-22ER... 232.89 GB Rebuilding (0%) No operation can be executed on this d... Drive 3 WDC WD2500AAKX-22ER... 232.89 GB Rebuilding (0%) No operation can be executed on this d... Source Disk Volume: RAID 5 Disk Volume: Drive 1 2 3 The system can only support expanding the volume size up to 16TB (and under). Expand Capacity Backtext_image
Expand Capacity Change Disk Model Capacity Status Description Drive 1 Seagate ST31000528AS CC... 931.51 GB Ready You can replace this drive. Drive 2 Seagate ST31000528AS CC... 931.51 GB Ready You can replace this drive. Drive 3 Seagate ST31000528AS CC... 931.51 GB Ready You can replace this drive. Source Disk Volume: RAID 5 Disk Volume: Drive 1 2 3 You can expand the disk volume capacity to approximately 1862 GB The system can only support expanding the volume size up to 16TB (and under). Expand Capacity Back| Current Configuration: Physical Disks | ||||
| Scan now | ||||
| Disk | Model | Capacity | Status | SMART Information |
| Drive 1 | WDC WD2500AAKX-22ERM17.0 | 232.89 GB | Ready | Good |
| Drive 2 | WDC WD2500AAKX-22ERM17.0 | 232.89 GB | Ready | Good |
| Drive 3 | WDC WD2500AAKX-22ERM17.0 | 232.89 GB | Ready | Good |
| Drive 4 | -- | -- | No Disk | -- |
| Drive 5 | -- | -- | No Disk | -- |
| Note that if you are going to install a hard drive (new or used) which has never been installed on the NAS before, the hard drive will be formatted and partitioned automatically and all the disk data will be cleared. | ||||
| Current Configuration: Logical Volumes | ||||
| Format Check File System Remove | ||||
| Disk / Volume | File System | Total Size | Free Size | Status |
| Single Disk: Drive 1 | EXT4 | 229.57 GB | 228.52 GB | Ready |
| Single Disk: Drive 2 | EXT4 | 229.57 GB | 228.88 GB | Ready |
| Single Disk: Drive 3 | -- | -- | -- | Unmounted |
text_image
Migrate 1. Disk Model Capacity Status Drive 2 WDC WD2500AAKX-22ERM17.0 232.89 GB Ready Drive 3 WDC WD2500AAKX-22ERM17.0 232.89 GB Ready Select the migration method: Single Disk Volume =RAID 1 Mirroring Disk Volume Single Disk Volume =RAID 5 Disk Volume Single Disk Volume =RAID 6 Disk Volume Single Disk Volume =RAID 10 Disk Volume Source Disk Volume: Single Disk: Drive 1 The drive configuration is about to be configured as RAID 5 Disk Volume, The capacity is approximately 461.12GB. Migrate Backtext_image
Volume Management RAID Management Hard Disk: SMART Monitor hard disk health, temperature, and usage status by the hard disk S.M.A.R.T. mechanism. ✓ Issue notification when the disk reaches maximum operation time set below: 30000 Hours Settings Select Hard Disk: Disk 1 Summary Hard Disk Information SMART Information Test Settings Good No errors were detected on the hard disk. Your hard disk should be operating properly. Hard disk model: WDC WD20EVDS-63T3B0 01.0 Drive capacity: 1863.02 GB Hard drive health: Good Temperature: 36°C/96°F HDD I/O Status: Good Test time: --- Test result: Not tested9.1.3 Réseau
TCP/IP
(i) Adresse IP
text_image
Control Panel Overview Systems Settings General Settings Storage Manager Network Security Hardware Power Notification Hardware Update Backup / Readiness External Device System Status System Logs Privilege Settings Network Services TCP/IP DNS Server IP Address Refresh Post Tracking Edit Link Interface DHCP IP Address Subnet Hash Gateway HAC address Ethernet 1x2 No 10:65.9.27 255-235-234.0 10:43.8.1 01:08:08:08 DNS Server DNS port DNS server additional administrator: Use the following DNS server address: Primary DNS server: 00 .8 .2 .31 Secondary DNS server: 100 .85 .1 .3 Default Gateway Use the settings from: Ethernet 1+2 Apply Apply Alltext_image
TCP/IP - Property Network Parameters DHCP server Network Speed: Auto-negotiation Obtain IP address settings automatically via DHCP Use static IP address Fixed IP Address: 10 .65 .9 .27 Subnet Mask: 255 .255 .254 .0 Default Gateway: 10 .65 .8 .1 Jumbo Frame: 1500 Apply Canceltext_image
TCP/IP DDNS Service IP Address Refresh Port Trunking Edit Link Interface DHCP IP Address Subnet Mask Gateway MAC address Ethernet 1+2 No 10.65.12.111 255.255.254.0 10.65.12.1 00:06:98:03 DNS Server Obtain DNS server address automatically Use the following DNS server address: Primary DNS server: 10 .8 .2 .11 Secondary DNS server: 8 .8 .8 .8 Default Gateway Use the settings from: Ethernet 1+2 Apply Apply AllRemarque :
text_image
TCP/IP DDNS Service IP Address Edit Link Interface DHCP IP Address Subnet Mask Gateway Port Trunk Refresh MAC ad Ethernet 1+2 No 10.65.12.111 255.255.254.0 10.65.12.1 00:08:1 DNS Server Obtain DNS server address automatically Use the following DNS server address: Primary DNS server: 10 8 2 .11 Secondary DNS server: 8 8 8 .8 Default Gateway Use the settings from: Ethernet 1+2 Apply Apply Alltext_image
TCP/IP - Port Trunking Select the port trunking membership and mode. Please note that incompatible mode settings might cause the network interface to hang or affect the overall performance. For more information, please click here. Interface Standalone Trunking Group 1 Active Backup Balance-rr Active Backup Balance XOR Broadcast IEEE 802.3ad Balance-tlb Balance-alb Ethernet 1 Ethernet 2 Use the settings from: Ethernet 1 Apply Canceltext_image
TCP/IP - Port Trunking Select the port trunking membership and mode. Please note that incompatible mode settings might cause the network interface to hang or affect the overall performance. For more information, please click here. Interface Standalone Trunking Group 1 Active Backup Ethernet 1 ○ ○ Ethernet 2 ○ ○ Use the settings from: Trunking Group 1 (Ethernet 1+2) Apply Canceltext_image
General Settings Storage Manager Network Security Hardware Power Notification Firmware Update TCP/IP Settings The TCP/IP settings are being configured. Please wait and use the following link to connect to the server. If you cannot connect to the server, please use the Finder to find the new IP of the server. Configuration completed. Click here to connect to the login page.text_image
IP Address Edit Link Interface DHCP IP Address Subnet Hack Gateway MAC address Speed MTU Ethernet 1x2 Yes 10.8.12.153 255.255.254.0 10.8.12.1 03:08:68/CP:05:98 100Mbps 1500 Port Trunkingtext_image
Control Panel Overview System Settings General Settings Storage Manager Network Security Hardware Power Notification Firmware Update Backup / Restore External Device System Status System Logs Privilege Settings Network Services Security Level Certificate & Private Size Allow all connections Deny connections from the list. Allow connections from the list only Enter the IP address or network from which the connections to this server will be allowed or rejected. Add Remove Genre IP Address or Network Domain Time Left for IP Blocking Apply Apply Alltext_image
Security Level Certificate & Private Key You can upload a secure certificate issued by a trusted provider. After you have uploaded a secure certificate successfully, you can access the administration interface by SSL connection and there will not be any alert or error message. If you upload an incorrect secure certificate, you may not be able to login the server via SSL. To resolve the problem, you can restore the secure certificate to default and access the system again. Status:default secure certificate being used Download Certificate Download Private Key Restore Default Certificate & Private Key Certificate:please enter a certificate in X.509PEM format below. View Sample Private Key:please enter a certificate or private key in X.509PEM format below. View Sample9.1.5 Matériel
text_image
Control Panel Search Overview System Settings General Settings Storage Manager Network Security Hardware Power Notification Firmware Update Backup / Restore External Devices System Status System Logs Privilege Settings Network Services General Routine Smart Fan Enable configuration reset switch Enables the light signal alert when the free storage size is less than the value Size: 3072 Mb Enable Redundant Power Supply Mode Apply Alltext_image
Enable configuration reset switch Enables hard disk standby mode: The status LED will turn off if there is no access within Time: 30 minutes Enables the light signal alert when the free storage size is less than the value (Only support simple volume.) Size: 3072 MB Enable write cache (EXT4 delay allocation) Enable Redundant Power Supply Mode Apply ABtext_image
General Buzzer Smart Fan Enable Alarm Buzzer ✓ System operations (startup, shutdown, and firmware upgrade) ✓ System events (error and warning) Apply Alltext_image
Fan rotation speed settings: Enable Smart Fan (Recommended) When ALL of the following temperature readings are met the fan will rotate at low speed: The system temperature is lower than 40°C (150°F). When AIV of the following temperature readings are met the fan will rotate at high speed: The system temperature is higher than or equal to 37°C (135°F). The CPU temperature is higher than or equal to 62°C (140°F). The hard drive temperature is higher than or equal to 52°C (125°F). Self-defined temperature: When the system temperature is lower than 40°C, rotate at low speed. When the system temperature is higher than 40°C, rotate at high speed.Configuration Smart Fan :
text_image
Control Panel Overview System Settings General Settings Storage Manager Network Security Hardware Power Notification Firmware Update Backup / Restore External Device Systems Status Systems Logs Privilege Settings Network Services Power Recovery Assume the server to the previous power on or power off status. Turn on the server automatically. The server should remain off. Apply Apply All...9.1.7 Notification
Serveur SMTP
text_image
SMTP Server Alert Notification Alert Notification When a custom event occurs, do the following immediately: Send system error alert by: E-mail Send system warning alert by: E-mail E-mail Notification Settings E-mail address 1: E-mail address 2: Send a Text E-mail Note: The SMTP server must be configured first for alert meal deliveries. Next calltext_image
Control Panel Search Overview System Settings General Settings Storage Manager Network Security Hardware Power Notification Newuser Update Backup / Rechts External Device System Status Systems Logis Privilege Settings Network Services Live Update Firmware Update Model: VS-01240Pro Current firmware version: 3.0.0 Date: 2014/04/24 Check for Update Status: Last checked 2014/04/24 10:44:19 Automatically check if a newer version is available when logging into the VAR web administration interface. Applytext_image
Current software version: v3-0124Pro Date: 2016/04/24 Before updating system firmware, please make sure the product model and firmware version are correct. Follow the steps below to update firmware. 1. Download the release notes of the same version as the firmware from QMAP website http://earsensoft.com/. Read the release notes carefully to make sure you need to update the firmware. 2. Before updating system firmware, Back up all disk data on the server to avoid any potential data loss during system update. 3. Click the [software] button to select the correct firmware image for system update. Click the [Update System] button to update the firmware. Browse... Update Button Custom updates may take time of seconds by several minutes to complete depending on the network connection status, please exit packets. The scenario will offer us when system update is completed.text_image
Control Panel Search Overview System Settings General Settings Storage Manager Network Security HARDICARES Power Notification Firmware Update Backup / Restore External Device System Status System Logs Privilege Settings Network Services Backup/Restore Settings Restore to Factory Default... Back up System Settings To backup all settings, including user accounts, server name and network configuration etc., click [Backup] and select to open or save the setting file. Back up Restore System Settings To restore all settings, click [Browse...] to select a previously saved setting file and click [Restore] to confirm. Browse... Restoretext_image
Backup/Restore Settings Restore to Factory Default To reset all settings to default, click [Reset]. Caution: When you press [Reset] on this page, all drive data, user accounts, network shares and system settings are cleared and restored to default. Please make sure you have backed up all the important data and system settings before resetting the NVR. Reset:9.1.10 Appareil externe
Stockage externe :
text_image
Format External Storage Drive File System: EXT4 Mainly for NAS and Linux/UNIX environment Encryption: AES 128 bits Password: ...... Verify Password: ...... Save encryption key Format Canceltext_image
All disk data will be removed. Are you sure? OK Canceltext_image
Storage Information Format Eject Enorption Management Data Sharing USBDisk1 StoreJet Total:698.63 GB (NTFS) Used:694.64 GB Free:3.99 GB Ready USB PI-288 Total:465.76 GB (NTFS) Used:70.25 GB Free:395.51 GB Ready Disconnect disk partition Remove devicetext_image
Encryption Management Encryption Management Lock this device Manage encryption key Next Canceltext_image
Encryption Management Encryption Management Click "Finish" to lock the device now. □ Do not save encryption key Back Next Canceltext_image
Encryption Management Encryption Management Unlock this device Manage encryption key Next Canceltext_image
Encryption Management Encryption Management Unlock this device by: Password Key File Password: .... Save encryption key Back Next Canceltext_image
Encryption Management Encryption Management Lock this device Manage encryption key Next Canceltext_image
Encryption Management Encryption Management Change encryption key Old password: ...... New password: ...... Verify new password: ...... Download encryption key file Password: Back Next CancelASI (UPS)
text_image
UPS Enable UPS Support Enable Network UPS Support Allows the following IP addresses to be notified in the event of power failure: IP_address 1 IP_address 2 IP_address 3 IP_address 4 IP_address 5 IP_address 6 Turn off the server after the AC power fails for minute(s): 5 The system will enter ""auto-protection" mode after the AC power fails for minute(s): 2 *Auto-protection: when the power restores, the system automatically resumes to its previous state UPS Information Normal Battery capacity: 100% Estimated protection time: 5:35:0 (hh:mm:ss) Manufacture: American Power Conversion Model: Smart-UPS 1500 Apply AllMode autonome - SNMP
text_image
UPS ✓ Enable UPS Support Protocol: APC UPS with SNMP management IP Address of UPS: 172.17.25.220 ● Turn off the server after the AC power fails for minute(s): 5 ○ The system will enter ""auto-protection" mode after the AC power fails for minute(s): 2 *Auto-protection: when the power restores, the system automatically resumes to its previous state UPS Information Normal Battery capacity: -- Estimated protection time: -- Manufacture: American Power Conversion Model: apc-snmp-ups Apply AllMode Maître réseau
text_image
UPS ✓ Enable UPS Support ✓ Enable Network UPS Support Allows the following IP addresses to be notified in the event of power failure IP address 1: 10.8.19.27 IP address 2: 23.58.11.249 IP address 3: 71.55.7.56 IP address 4: 192.168.0.55 IP address 5: IP address 6: ● Turn off the server after the AC power fails for minute(s): 5 ○ The system will enter ""auto-protection" mode after the AC power fails for minute(s): *Auto-protection: when the power restores, the system automatically resumes to its previous state UPS Information Normal Battery capacity: 71% Estimated protection time: 3:57:0 (hh:mm:ss) Manufacture: American Power Conversion Model: Smart-UPS 1500 Apply Alltext_image
UPS Enable UPS Support Protocol: Network UPS slave IP address of network UPS server: 10.8.12.153 Turn off the server after the AC power fails for minute(s): 5 The system will enter "auto-protection" mode after the AC power fails for minutes(s): *Auto-protection: when the power restores, the system automatically resumes to its previous state UPS Information AC power status: -- Battery capacity: -- Estimated protection time: -- Manufacture: -- Model: --text_image
Power Recovery ■ Resume the server to the previous power-on or power-off status. □ Turn-on the server automatically. ■ The server should remain off. Apply... Apply Off...text_image
System Status Systems Information Network Status Hardware Information Resource Monitor Ethernet 1 Link Up IP address 10.85.4.27 MAC address 00:08:96 cdc 30:30 Subnet mask 255.255.254.0 DNS 10.8.2.11 168.95.1.1 Packets received 53362547 Packets went 9747100 Error packets 0 Ethernet 2 Link Up IP address 10.85.9.27 MAC address 00:08:96 cdc 30:31 Subnet mask 255.255.254.0 DNS 10.8.2.11 168.95.1.1 Packets received 36193192line
| System Status | Packets Received (MB/s) | Packets Sent (MB/s) | | -------------- | ------------------------ | ------------------- | | Ethernet 1 | 7.8 | - | | Ethernet 1 | 5.9 | - | | Ethernet 1 | 3.9 | - | | Ethernet 1 | 2.0 | - | | Ethernet 2 | 3.0 | - | | Ethernet 2 | 3.9 | - | | Ethernet 2 | 2.0 | - |text_image
System Logs Recording Statistics System Connection Logs Online Users All events Clear Save Type Date Time Users三人源 IP Customer name Content 2014-02-05 10:47:29 System 127.0.0.1 localhost CMS-Lite 0.52 has been installed in /share/HDA_DATA/.qpkg/CMS-Lite. 2014-02-05 10:47:08 System 127.0.0.1 localhost VCAM 0.1 has been installed in /share/HDA_DATA/.qpkg/VCAM. 2014-02-05 09:25:35 System 127.0.0.1 localhost System started. 2014-02-05 09:23:12 System 127.0.0.1 localhost System was shut down on Wed Feb 3 09:23:12 CST 2014. 2014-02-05 09:21:44-admin 10.8.10.96 --- [Power Management] System will be restart now. 2014-02-05 09:20:39 System 127.0.0.1 localhost [Firmware Upgrade] System updated successfully from 5.0.0(2014B117 to 5.0.0(2014D205). 2014-02-05 09:18:11 System 127.0.0.1 localhost [Firmware Upgrade] Start to update the firmware. 2014-01-29 11:48:48 System 127.0.0.1 localhost myQNAPcloud user [mikeshaw@qnap.com] has been signed in 2014-01-29 11:48:42 System 127.0.0.1 localhost myQNAPcloud CloudLink has been turned on 2014-01-29 11:48:37 System 127.0.0.1 localhost myQNAPcloud DONS has been turned on 2014-01-28 13:34:54 System 127.0.0.1 localhost System started. 2014-01-28 13:32:34 System 127.0.0.1 localhost System was shut down on Tue Jan 28 13:32:34 CST 2014. 2014-01-28 13:31:33idasin 10.8.10.124 Page 1/2 H Display item: 1-56, Total: 52 Show 50 Itemstext_image
Options Select the connection type to be logged. ✓ HTTP □ SMB (Windows) □ When the number of logs reaches 10,000, archive the connection logs and save the file in the folder: mobile Apply Canceltext_image
System Logs Recording Statistics System Connection Logs Online Users Type Login Date Login Time Users Source IP Computer name Connection t... Accessed Resources 2014-02-05 09:46:11 admin 10.8.10.95 mileshaw-gc Samba record_nvr 2014-02-05 10:37:32 admin Disconnect this connection Add to the block list Disconnect this connection and block the IP Administrationtext_image
System Logs System Event Logs System Connection Logs Online Users Syslog Client Management All events Clear Save Content Search Log type: All events Date: 2013-05-03 2013-05-11 Users: system Source IP: Computer name: Search Reset Type Date Time Users Source IP Computer name Content 2013-05-07 17:07:04 System 127.0.0.1 localhost [Drive 1] The scanning is stopped by user 2013-05-07 17:06:55 System 127.0.0.1 localhost [Drive 1] Start scanning bad blocks. 2013-05-06 08:04:00 System 127.0.0.1 localhost [USBDisk2] Device detected. The file system is ntfs. 2013-05-06 02:46:29 System 127.0.0.1 localhost [USBDisk2] Device removed. 2013-05-03 23:23:50 System 127.0.0.1 localhost [Video Station] Video Station is enabled successfully. Page 1 /1 Display item: 1-5, Total: 5 | Show 50 | Itemstext_image
Control Panel Search Overview System Settings Privilege Settings Users Network Services Create Username admin supervisor avgmgr Actiontext_image
Create a User Username: Password: 0-16 characters Too short Verify Password: User Type: user Privilege Settings Channel Monitoring Playback PTZ Control Audio 1 2 3 4 Create Cancel9.3 Services réseau
9.3.1 Win
Réseau Microsoft
text_image
Control Panel Search Overview System Settings Privilege Settings Users Network Services WIN FTP Microsoft Networking Enable file service for Microsoft networking Server description (Optional): NVR Server Workgroup: NVR Advanced Options Apply assign AllOptions avancées
text_image
Advanced Options Enable WINS server Use the specified WINS server WINS server IP address: 0,0,0,0 Local master browser Allow only NTLMv2 authentication. Name resolve priority: DNS only Login style: DOMAIN\USERNAME instead of DOMAIN+USERNAME for FTP, AFP, & File Station Automatically register in DNS Enable trusted domains Apply CancelServeur WINS :
text_image
Control Panel Search Overview System Settings Privilege Settings Users Network Services Win FTP Service Advanced General Enable FTP Service Protocol type: FTP (Standard) FTP with SSL/TLS (Explicit) Port number: 21 Unicode support: Yes No Enable anonymous: Yes No Note: If your FTP client does not support Unicode, please select "Yes" for Unicode support. Connection Maximum number of all FTP connections: 30 Maximum number of connections for a single account: 10 Enable FTP transfer limitation Apply Alltext_image
FTP Service Advanced Passive FTP port range: Use the default port range Define port range: 13336 20149 Respond with external IP address for passive FTP connection request External IP address: Apply Alltext_image
myQNAPcloud myQNAPcloud Remote Access Services Auto Router Configuration My QNAP/Cloud Portal Cloud Services Amazon 52 myQNAPcloud Welcome to myQNAPcloud. You may send out to your QNAP My Cloud Application via the network by myQNAPcloud services. Please click the option below to create your myQNAPcloud account and audio remote access services. You currently myQNAPcloud Remote Access Services Auto Router Configuration My QNAP/Cloud Portal Create this function to allow access to your XIR from the Internet as an XIR router. Create your personal cloud to publish private application services at the myQNAPcloud portal. Cloud Services QNAP XIR accounts to venue a third party virtual storage service as the backup generation, securing cloud data with an additional off- sler copy. Download a power client party cloud packet backup panel protects the XIR against Unspecified data loop and allows converted disaster recovery. Amazon 52 amazon web servicesAssistant myQNAPcloud
text_image
myQNAPcloud Welcome to myQNAPcloud! You may connect to your QNAP NVR from anywhere over the network by myQNAPcloud services. Please click the button below to create your myQNAPcloud account and enable remote access services. Get Started myQNAPcloudCliquez sur
- "Démarrer".
text_image
Welcome to myQNAPcloud! Hello! Welcome to myQNAPcloud wizard. This wizard helps you set up the QNAP NVR for remote access on the Internet by the steps below: 1. Create or sign in a myQNAPcloud account 2. Register your NVR 3. Enable myQNAPcloud remote access services Start Quittext_image
Welcome to myQNAPcloud! Sign in myQNAPcloud account Please sign in myQNAPcloud account to proceed ( or Create myQNAPcloud account ) myQNAPcloud ID (QID) : Your email Password : Password Forgot your password? Resend activation email Step 1/4 Next CancelRegister your myQNAPcloud device name
Please enter a name to register your QNAP NVR. This name will be used to access your NVR remotely.
qvrtest
After finishing the wizard, you can access your QNAP NVR remotely with the following Internet address:
qvrtest.myqnapcloud.com
Step 2/4
Next
Cancel
text_image
Welcome to myQNAPcloud! Configuring your router... Please wait patiently. The router configuration will be completed in a minute. Configuring network environment and applying myQNAPcloud services... 7% Step 3/4 Next CancelCongratulations! You have completed the following settings. You can now access your QNAP NVR remotely on the Internet.

Auto router configuration (UPnP port forwarding)
Setup successfully

myQNAPcloud device name qvrtest
Connect to the QNAP NVR from the myQNAPcloud website (http://www.myqnapcloud.com) by entering the device name, or use the following Internet address:
name: qvrtest.myqnapcloud.com

Publish NVR services on the cloud portal:
QVR, File Station
Step 4/4
Finish
text_image
Access your QNAP device anywhere and anytime myQNAPcloud provides various remote access services, such as DDNS and CloudLink services No matter where you go, you can always and securely access your QNAP devices. Sign In or sign up now!text_image
My Devices QVIT Task My Devices optest Published services Device denial Paventified Devices Published services QVIT Wps File Status Published entrance of secure connection (SSL) QVIT Wps File Status
text_image
myQWithCloud QVRTest JP My Devices qtest Published services Device detail Favored Devices Device name qtest Model name VS-2112Prp+ Internet address qtest myqnapcloud com Device IP 152.168.0.101 WATP IP 118.168.63.237 Firmware version 5.0.0 Last update time 2014-02-09 13:30:21 Searchable Yes Gotext_image
myQVAR/Novel QVRTest My Devices qvrtest Published services Device detail Fastified Devices Published services QVR Web File Station Published entrance of secure connection (SSL) QVR Web File Station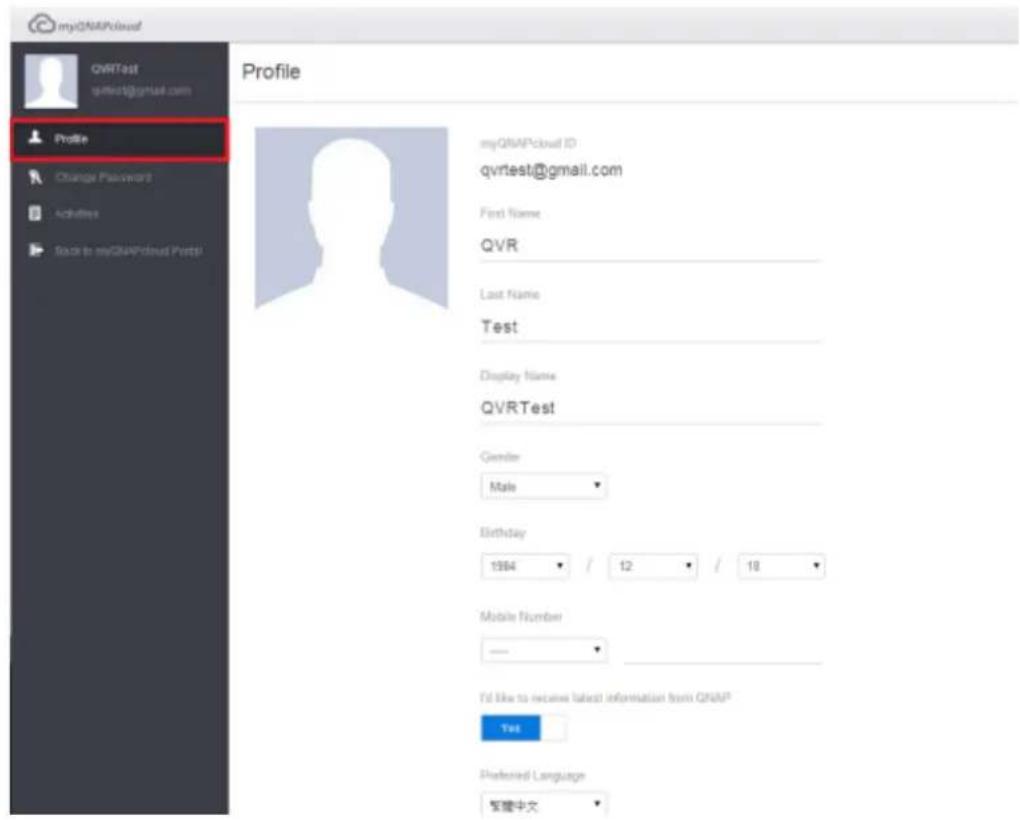
text_image
myGNAPcloud QVRTest qvrtest@gmail.com Profile Change Password Activities Back to myGNAPcloud Print Profile myGNAP-cloud ID qvrtest@gmail.com First Name QVR Last Name Test Display Name QVRTest Gender Male Birthday 1984 / 12 / 18 Mobile Number I'll like to receive latest information from QNAP Test Preferred Language 繁體中文
text_image
myQNAPcLoad QVRTest qtrisurg@gmail.com Unidio Change Password Activities Back to myQNAPcLoad Portal Change Password Old Password New Password Confirm New Password Submit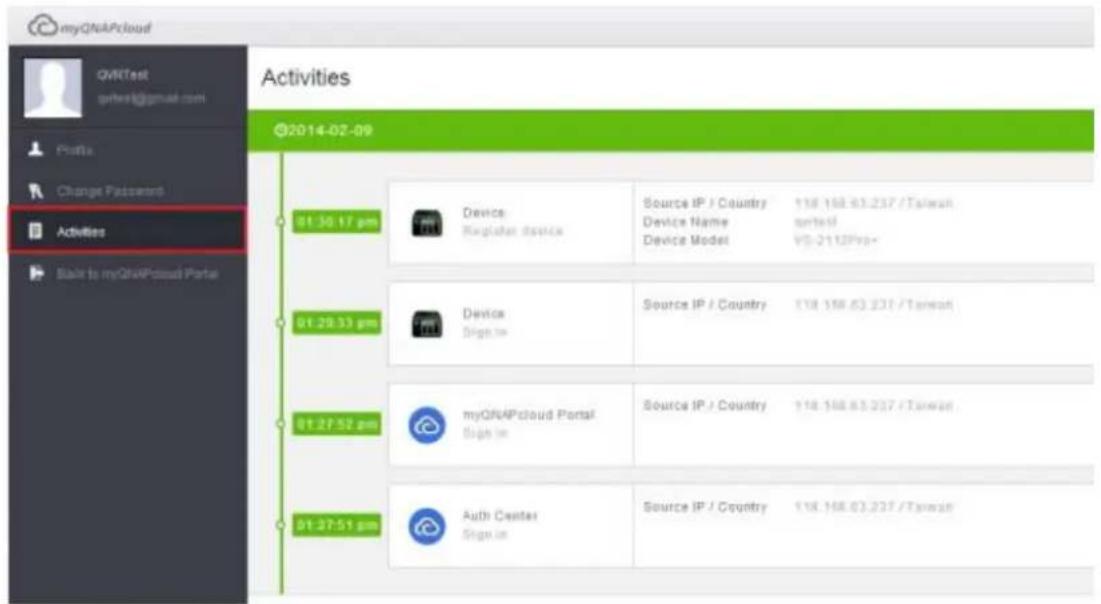
text_image
myQNAPcloud QNTest qntest@gmail.com Profile Change Posttest Activities Make to myQNAPcloud Portal Activities ©2014-02-09 01:30:17 pm Device Register device Source IP / Country 118.168.63.237 / Taiwan Device Name tartest Device Model 95-2113Pro+ 01:29:33 pm Device Sign-in Source IP / Country 118.168.63.237 / Taiwan 01:27:57 pm myQNAPcloud Portal Sign-in Source IP / Country 118.168.63.237 / Taiwan 01:27:51 pm Auth Center Sign-in Source IP / Country 118.168.63.237 / Taiwantext_image
NASQTS Go! Search devicetext_image
myOSAPCloud Welcome to qyrtest's cloud portal Published Services Private Services Add to Preferred Devices Q COS Web Info Status Published entrance of secure connection (SSL) Q COS Web Info Statustext_image
Private Services User name Access code Confirmtext_image
myQNAPcloud Remote Access Services Auto Router Configuration My DDNS/Cloud Portal Cloud Services Amazon S3 Enable UPnP Port forwarding Enable this function to allow access to your NVR from the Internet via an UPnP router. Note: This function only works with the UPnP supported devices. Status : N/A Apply√ Enable UPnP Port forwarding
Enable this function to allow access to your NVR from the Internet via an UPnP router.
Note: This function only works with the UPnP supported devices.
Status: No UPnP router found on the network
Rescan
Diagnostics
Network Diagnostics
---- NAT PMP Diagnostics ----
initnatpmp() returned 0 (SUCCESS)
using gateway : 192.168.0.1
sendpublicaddressrequest returned 2 (SUCCESS)
readnatpmpresponseorretry returned -100 (TRY AGAIN)
readnatpmpresponseorretry returned -100 (TRY AGAIN)
readnatpmpresponseorretry returned -7 (FAILED)
---- UPnP Diagnostics ----
upnpc : miniupnpc library test client. (c) 2006-2011 Thomas Bernard
Go to http://miniupnp.free.fr/ or http://miniupnp.tuxfamily.org/
for more information.
List of UPNP devices found on the network :
desc: http://192.168.0.1:12592/rootDesc.xml
st: urn:schemas-upnp-org:device:InternetGatewayDevice:1
Close
text_image
Your router does not support UPnP protocol or you have not enabled the UPnP function on the router. UPnP Router Compatibility Feedback...text_image
myQNAPCloud myQNAPCloud My QNAPCloud Remote Access Services Auto Router Configuration My DDNS/Cloud Portal Cloud Services Amazon S3 My DDNS Cloud Portal Enable myQNAPcloud DDNS service Enable myQNAPcloud DDNS service and complete the settings to connect to your NvR by a web browser with the following URL: qtest.myqnapcloud.com To change myQNAPcloud DDNS domain name, please click hereRemarque :
text_image
Publish Services You can publish Mail services to me/QMIPCloud website. https://www.mcpmail.com. Select "Mail" to publish the Mail service to me/QMIPCloud website. Select "Private" to help the published Mail services from public access. The private services are me/QMIPCloud website are only available to specified users with me/QMIPCloud Access Codes. Mail services Status Publish Private Mail Web Disabled □ □ File Station Disabled □ □ Secure Mail Web Disabled □ □ Secure File Station Disabled □ □| NVR Services | Status | Publish | Private |
| NVR Web | Enabled | ☑ | ☑ |
| File Station | Enabled | ☑ | ☑ |
| Secure NVR Web | Enabled | ☑ | ☑ |
| Secure File Station | Enabled | ☑ | ☐ |
Set the myQNAPcloud Access Code:

Note: The code must be 6-16 characters (a-z, A-Z, 0-9 only).
text_image
User Management Click "Add User" and specify the local NVR users who are allowed to view the private NVR services published on myQNAPcloud website. These users may also use the myQNAPcloud Connect at the same time for remote access. Maximum 9 users can be specified. Select the users and click "Send Invitation" to send an email with instruction to access the services. Delete Add Users Smart Invitation Username myQNAPcloud Websitetext_image
Select users and their privileges Username myQNAPcloud Website admin supervisor sysmgr test01 ✓ test02 ✓ test03 ✓ Employee072 Employee073 Employee074 ✓ Employee075 Display item: 1-10, Total: 12 Apply Canceltext_image
myQNAPcloud Access Code Set the myQNAPcloud Access Code: 111111 Note: The code must be 6-16 characters (a-z, A-2, 0-9 only). User Management Click "Add User" and specify the local NVR users who are allowed to view the private NVR services published on myQNAPcloud website. These users may also use the myQNAPcloud Connect at the same time for remote access. Maximum 9 users can be specified. Select the users and click "Send Invitation" to send an email with instruction to access the services. Delete Add Users Send Invitation Username(myQNAPcloud Website test01) Apply| Invite users with email notification to access service | |||
| Username | Status | ||
| test01 | test01@qnap.com | ||
Send
Close
10.1.2 Services Cloud
Amazon S3
Sign In or Create an AWS Account
You may sign in using your existing Amazon.com account or you can create a new account by selecting "I am a new user."
My e-mail address is:
I am a new user.
I am a returning user and my password is:

Sign in using our secure server
Forgot your password?
Has your e-mail address changed?
Learn more about AWS Identity and Access Management and AWS Multi-Factor Authentication, features that provide additional security for your AWS Account.
About Amazon.com Sign In
Amazon Web Services uses information from your Amazon.com account to identify you and allow access to Amazon Web Services. Your use of this site is governed by our Terms of Use and Privacy Policy linked below.
Terms of Use | Privacy Policy © 1996-2014, Amazon.com, Inc. or its affiliates An amazon.com. company
text_image
amazon web services Sign Up My Account / Console AWS Management Console My Account Billing & Cost Management Security Credentials AWS Products & Solutions AWS Product Information AccountYour Security Credentials
Use this page to manage the credentials for your AWS account. To manage credentials for AWS Identity and Access Mangement (IAM) users, use the IAM Console. To learn more about the types of AWS credentials and how they're used, see AWS Security Credentials in AWS General Reference.
- Password
Multi-Factor Authentication (MFA) - Access Keys (Access Key ID and Secret Access Key)
Note: You can have a maximum of two access keys (active or inactive) at a time.
Created
Feb 16th 2014
Deleted
Access Key ID
Status
Active
Actions
Make Inactive | Delete
text_image
myQNAIPcloud myQNAIPcloud This function allows you to upload the data from the NVR to Amazon S2, or vice versa. Note: Please synchronize this system time with an Internet time server before using this function. To configure the system data and time, please click here. Create a replication job Job Name Usage Type Schedule Status Remote Access Services Auto Router Configuration My DDRS/Cloud Portal Cloud Services Amazon S3Create a Replication Job
Remote Replication Wizard
This wizard helps you create a remote replication job.Enter the name of the remote replication job and click Next.
Remote Replication Job Name:
Step 1/5
Next
Cancel
Create a Replication Job
Amazon S3
Usage Type:
Upload

Access Key:
AKIAJ4TC2PUP34CC63FC
Secret Key:

Remote Path
qnapqvrtest
test
(Bucket/Directory):
Remote Host Testing:
Test
Maximum number of retries (0-99):
10
Maximum upload rate (KB/s):
☐ Perform incremental replication
Delete extra files on remote destination
√ Enable Server Side Encryption
Enable Reduced Redundency Storage


Step 2/5
Back
Next
Cancel
Create a Replication Job
Local Path
Please specify: Local Path (Network Share/Directory):
mp4

20140214
Step 3/5
Back
Next
Cancel
The remote replication settings have been completed. Click Finish to exit the Wizard.
Step 5/5
Finish
text_image
myGMM-Cloud MyGMM-Cloud Reverse Access Systems Note Master Configuration My GMM-Cloud Portal Closed Service Session 14 This function allows you to upload the data from the HMI to Dataset ES, or your series. Mail: Please synchronization for the system type with an Ethernet low-series better using this function. To configure the system data list type, please click http: Create a Applications ID... File Name Package Type Schedule Status actions synthesis Download CH-DS - Hardware Monday Pays synthesis() Download CH-DS - Hardware Monday Pays10.2 File Station
text_image
W1-27-B1244.P APPLICATIONS Surveillance Settings File Station DISCRETE Control Panel myQIAIqCloud Backup & Expansion App Center Quick Start Systematics surveillance settings File Station myQIAIqCloud Backup & Expansion App Center Quick Start Systematics QVR VS-8124UProtext_image
W1-07-6124UP File Station Search Create folder Upload More Action W1-07-6124UP-adren Name homes mobile record_export record_nur record_nur_stains snapshot Computer Share File Sharing Name Modified Date - Type Size Page 1 /1 / 1 /1 No data to display: Share 20 4UProtext_image
App Center Search My Apps All Apps You have not installed any Apps.Démarrer App Center
text_image
Search Update All Refresh Install Manuallytext_image
Control Panel Surveillance Settings File Station myONAPCloud Backup & Expansion App Center 17:56 Thursday. May 29 QVR VS-4112Pro+text_image
all apps QCOM Ltd 2.0.33 Kemoto CSAgent 9-21 10:33 Friday, June 20 QVR VS-4116UPro+text_image
Add Cntrix Add To Go OK 10:33 Friday: June 20 QVR VS-41.16UPro+text_image
App Login My App All apps Downloading... Download Instructions/Options 8.2.3 10:34 Friday, June 20 QVR VS-4116UProtext_image
App Clear My Name: All Name Installing... 20:35 EmptyOnAgent 10:35 Friday, June 20 QVR VS-41160Pro+text_image
SOM LIB SOM LIB Exercise/Program1 0:36 Friday, June 20 10:36 QVR VS-4116UPro+text_image
QPCR library QPCR library 10:54 Friday, June 20 QVR VS-4116UPro+text_image
Add User Add User 10:40 Friday, June 20 QVR VS-4116UPro+text_image
Control Panel Surveillance Settings File Station myQNAPCloud Backup & Expansion App Center 17:56 Thursday, May 29 QVR VS-4112Pro+text_image
VMwareVR App Center App Center APPLICATIONS Surveillance Settings File Station SYSTEMs Control Panel Backup & Expansion myQNAPcloud App Center Quick Start1 QSCM Lite Surveillance Settings File Station myQNAPcloud App Center Backup & Expansion Hardware Update Storage Manager Notification System Logs External Device General Settings Users Networks Power QVR VS-4116UPro+text_image
ONAP System Overview User Accounts User Account Login Driver Home + User Total User Accounts VVR Connection Camera Connection I/O HCD Fixed Part Fixed Current Status Online Share Output S/Ho Online Camera 14:01:46text_image
QNAP VS-6120Pro+ English Welcome Thank you for choosing QNAP Viostor NVR. Please click "Manual Setup" below to start installation. The installation process should take about 10-15 minutes, depending on the size of your hard drives. Note: Website installation is for Viostor NVR servers that already have hard drives installed. Manual Setup Qstart Qstart: Provides users with a quick & easy NVR installation experience. Everything related to the initial setup will be automatically processed in a single click.text_image
ONAP US-6120Pro+ English Welcome Thank you to checking ONAP vector NVR. Please click "Manual Setup" below to start installation. The installation process, should write almost 10-15 remote depending on the case of your hard drive. Note: Website availability is for the OJ or NVR servers that is always found in local players without access. DHCP server detected. All IP settings are assigned. Manual Setup Qstarttext_image
ONAP VS-5120Pro+ English - Welcome Thank you for discovering QNAP Vosier NVR. Please click "Manual Setup" below to start installation. The installation process should take about 10-15 minutes, depending on the size of your hard drives. Note: Website installation is for YouTube NVR servers that already have found drives installed. No DHCP server is detected. Manual Setup. Qstarttext_image
No DHCP server is detected. Please click YES to enable the NVRs DHCP server to continue Qstart. If no DHCP server assigns an IP, Qstart will not function. (Please ensure that no IP conflict exists, otherwise the network may crash.) Do you want to enable the NVRs DHCP server? Yes No Manual Setup Qstart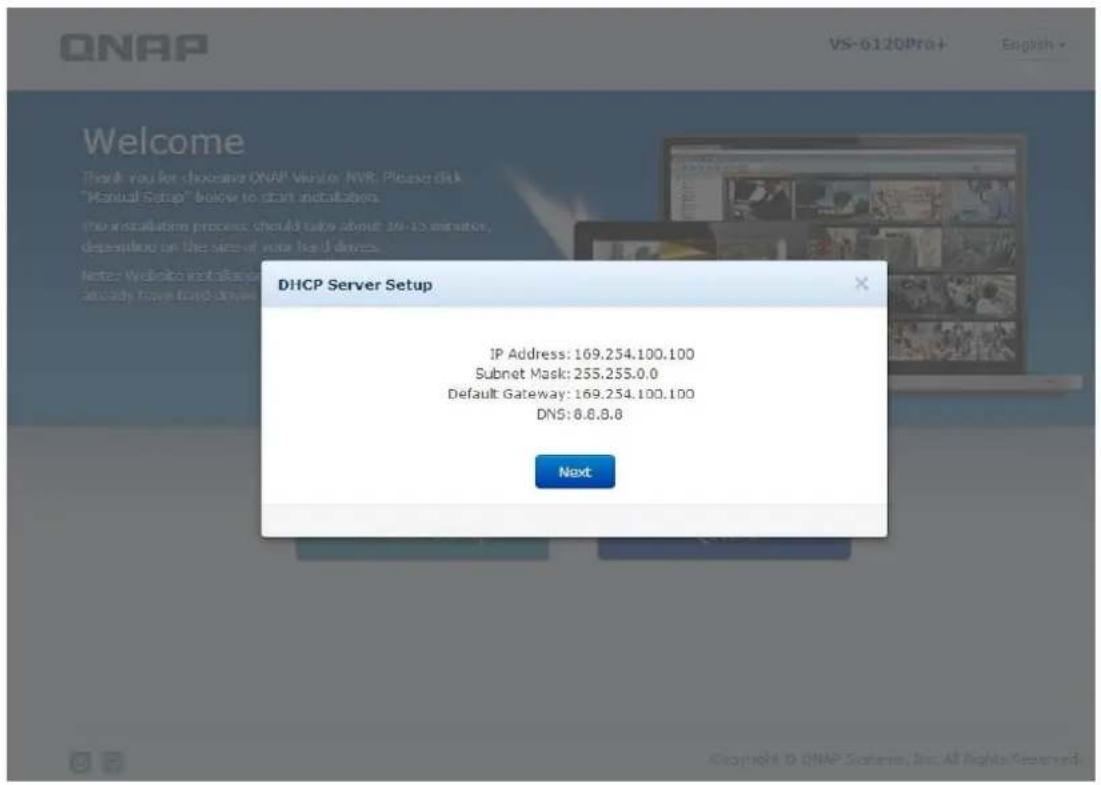
text_image
DHCP Server Setup IP Address: 169.254.100.100 Subnet Mask: 255.255.0.0 Default Gateway: 169.254.100.100 DNS: 8.8.8.8 Nexttext_image
QNAP VS-6120Pro t English Welcome Thank you for choosing QNAP Viostor NVR. Please click "Manual Setup" below to start installation. The installation process should take about 10-15 minutes, depending on the size of your hard drives. Note: Website installation is for VioStor NVR servers that already have hard drives installed. Manual Setup Qstart Qstart: Provides users with a quick & easy NVR installation experience. Everything related to the initial setup will be automatically processed in a single click.Please review the following settings and click "Proceed" to continue. Don't worry! You can modify these settings later on the NVR administration page.
NVR Name: NVRDFDDB8
Username: admin
Password: ********* ( Default password : admin)
IP Address: (DHCP)
Time Zone: (GMT+08:00) Taipei
Date / Time: 2014/08/13 15:3:26
Disk Configuration: Single (Found 1 Disks, Total Storage Capacity: 465.76 GB)
Bad Block Scan: No
CAMERA: Auto configure
Proceed
Cantel

Quick Setup
-
©
| Channel | Brand | Model | IP Address | MAC Address | |
| √ | 1 | Panasonic iPro | Panasonic iPro SF334 | 169.254.101.191 | 08:00:23:90:b5:86 |
| √ | 2 | Vivotek | VivoTek FD7160 | 169.254.101.200 | 00:02:d1:0a:44:c3 |
| √ | 3 | Sony | Sony SNC-DS10 | 169.254.101.183 | 00:1d:ba:4f:5e:8d |
| √ | 4 | Vivotek | VivoTek IP8362 | 169.254.101.196 | 00:02:d1:11:28:43 |
| √ | 5 | Sony | Sony SNC-VB600B | 169.254.241.77 | 3c:07:71:1e:36:08 |
| √ | 6 | Sony | Sony SNC-VB630 | 169.254.85.251 | 54:53:ed:f9:19:1e |
| √ | 7 | Vivotek | VivoTek FD8136 | 169.254.101.198 | 00:02:d1:18:2d:8d |
| √ | 8 | Sony | Sony SNC-EM630 | 169.254.206.87 | d8:d4:3c:13:97:19 |
| √ | 9 | Panasonic iPro | Panasonic iPro SF135 | 169.254.101.184 | 08:00:23:96:33:5d |
| √ | 10 | Sony | Sony SNC-EB600B | 169.254.49.192 | d8:d4:3c:38:63:6e |
| √ | 11 | ACTi | ACTi D61 | 169.254.101.197 | 00:0f:7c:0a:95:57 |
| √ | 12 | Sony | Sony SNC-CS20 | 169.254.101.185 | 00:1d:ba:3f:a3:ed |
| √ | 13 | Panasonic iPro | Panasonic iPro SW152 | 169.254.101.186 | 08:00:23:95:a4:8e |
| √ | 14 | Vivotek | VivoTek PD8136 | 169.254.101.199 | 00:02:d1:1c:07:0a |
| √ | 15 | ACTi | ACTi D11 | 169.254.101.192 | 00:0f:7c:09:21:20 |
| √ | 16 | ACTi | ACTi E31 | 169.254.101.190 | 00:0f:7c:09:78:19 |
| √ | 17 | Panasonic iPro | Panasonic iPro SP102 | 169.254.101.194 | 08:00:23:95:a6:a7 |
| √ | 18 | ACTi | ACTi E41 | 169.254.101.193 | 00:0f:7c:09:ae:bf |
| √ | 19 | Axis | Axis P1357 | 169.254.101.188 | ac:cc:8e:03:05:d9 |
| √ | 20 | Axis | Axis P1355 | 169.254.101.187 | 00:40:8c:f4:cd:d8 |
Proceed
Cancel
QNAP
VS-6120Pro+
English ▼
Build up your Exclusive Surveillance Center
Follow the steps guided by the setup wizard to easily add new cameras.
Afterward, you can configure recording settings, modify other surveillance settings, and check surveillance logo.

natural_image
Illustration of a white robot with gear and a wrench icon, set against a blue background (no text or symbols)
Applying the settings
This process may take a few minutes depending on the system hardware and hard drive capacity.
○ Formatting the hard drives...
2024
text_image
My20897 Quick Start Sunshine 5.1 Window: You can check the configured cameras, watch the E-mail, link to all views, watch instant playback, enable accessible manual watering, and take snapshot fans. PlayBack: You can play recordings & export recordings to the Shift or Event PC. Do not show this again Quick Start Monitor Pushback Surveillance Settings Camera Settings Camera Direction Camera Configuration Event Management System Settings Advanced Settings Privilege Settings Protocol Management Surveillance Logs Backup & Expansion Recovery Management License Management Camera 1 169.254.191.191 Connected Video Compression: H264 Resolution: 1280/980 Frame Rate: 30 / 20 8K Rate: 1.3 Mbps Qualify: 1536Mbps Recording Status: Recording Channel2 Camera 2 169.254.157.244 Connected Video Compression: H264 Resolution: 1280/720 Frame Rate: 9 / 9 8K Rate: 2.4 Mbps Qualify: 8K rate 200Mbps Recording Status: Recording Channel3 Camera 3 169.254.191.191 Connected Video Compression: H500, M810 Resolution: 640-880(5GA) Frame Rate: 10 / 10 8K Rate: 2.9 Mbps Qualify: Level 5 Recording Status: Recording Channel4 Recording File Size: 0.2 KB / Free Disk Space: 2.7 KB @74x 2014/12/02 32:30:54 CPU usage: info, Total Bandwidth usage: 15.5 Mbps, Last storage capacity check, read door: 0.06-0.06/2014e Normal: 3 days(s) Alarm: 0 Days(s) Normal: 1 day(s) Alarm: 0 Days(s) Normal: 2 days(s) Alarm: 0 Days(s) 09:58 Wednesday, November 5 QVR VS-6120Pro+text_image
Surveillance Settings Monitor Playback Camera Settings Camera Overview Camera Configuration Event Management System Settings Advanced Settings Privilege Settings Protocol Management Agent Management Surveillance Logs Backup & Expansion Recovery Management License Management Concurrent Logins Maximum number of concurrent logins (http) 5 [1-32] Enable network intrusion detection Enable network intrusion detection Note: The system will alert users when possible attacks from the network are detected and give recommendation. Qstart Settings You can only manage Qstart when using supported switch models. Current switch (brand, model): ZyXEL,GS2210-24HP Test Enable Qstart mode Note: If you enable Qstart mode again, all of your camera settings will be erased. The NVR will detect all devices and configure settings automatically. Applytext_image
Camera Settings Camera Overuse Camera Configuration Event Management System Settings Advanced Settings Privilege Settings Protocol Management Surveillance Logs Backup & Expansion Recovery Management License Management File In Qwen channel, it's not allowed to add cameras to whatever channel to you want to keep the relationship between switch post number a and MRI channel number. However, you can click 3 to be selected as psodic Pro things page to divide Qwen mode. Camera 2 Virtalk Camera 3 Sony Camera 4 Virtalk Camera 5 Sony Camera 6 Sony Camera 7 Virtalk Camera 8 Sony Camera 9 Panasonic Pro Camera 10 Sony Camera 11 ACTI Camera 12 Sony Camera 13 Panasonic Pro Camera 14 Virtalk Camera 15 ACTI Camera 16 ACTI Camera 17 Panasonic Pro Camera 18 ACTI Camera 19 Avia Camera 20 Avia IP Address Resolution Frame Rate Action Quick Link 169.254.101.101 VSA 5 fps OK OK OK 169.254.101.300 800x800 6 fps OK OK OK 169.254.101.183 840x480(VSA) 15 fps OK OK OK 169.254.101.196 840x300 15 fps OK OK OK 169.254.242.77 1280x720 6 fps OK OK OK 169.254.85.251 1920x1080 6 fps OK OK OK 169.254.101.198 840x400 15 fps OK OK OK 169.254.208.87 1920x1080 6 fps OK OK OK 169.254.101.184 VSA 5 fps OK OK OK 169.254.48.192 1280x720 6 fps OK OK OK 169.254.101.197 N1280x720/91280x720 15 fps OK OK OK 169.254.101.183 840x480(VSA) 15 fps OK OK OK 169.254.101.186 VSA 5 fps OK OK OKnotre assistance technique.
flowchart
graph TD
    A["NVR"] --> B["Headquarters"]
    C["IP Cameras"] --> D["Asian Office"]
    E["American Office"] --> F["Internet or VPN"]
    B --> D
    D --> F
| Adresse IP | |
| NVR | 219.87.144.205 |
| Caméra 1 | 61.62.100.101 |
| Caméra 2 | 61.62.100.102 |
| Caméra 3 | 61.62.100.103 |
Version 3, 29 June 2007
Copyright © 2007 Free Software Foundation, Inc. http://fsf.org/
Everyone is permitted to copy and distribute verbatim copies of this license document, but changing it is not allowed.
Preamble
The GNU General Public License is a free, copyleft license for software and other kinds of works.
The licenses for most software and other practical works are designed to take away your freedom to share and change the works. By contrast, the GNU General Public License is intended to guarantee your freedom to share and change all versions of a program--to make sure it remains free software for all its users. We, the Free Software Foundation, use the GNU General Public License for most of our software; it applies also to any other work released this way by its authors. You can apply it to your programs, too.
When we speak of free software, we are referring to freedom, not price. Our General Public Licenses are designed to make sure that you have the freedom to distribute copies of free software (and charge for them if you wish), that you receive source code or can get it if you want it, that you can change the software or use pieces of it in new free programs, and that you know you can do these things.
To protect your rights, we need to prevent others from denying you these rights or asking you to surrender the rights. Therefore, you have certain responsibilities if you distribute copies of the software, or if you modify it: responsibilities to respect the freedom of others.
For example, if you distribute copies of such a program, whether gratis or for a fee, you must pass on to the recipients the same freedoms that you received. You must make sure that they, too, receive or can get the source code. And you must show them these terms so they know their rights.
Developers that use the GNU GPL protect your rights with two steps: (1) assert copyright on the software, and (2) offer you this License giving you legal permission to copy, distribute and/or modify it.
For the developers' and authors' protection, the GPL clearly explains that there is no warranty for this free software. For both users' and authors' sake, the GPL requires that modified versions be marked as changed, so that their problems will not be attributed erroneously to authors of previous versions.
Some devices are designed to deny users access to install or run modified versions of the software inside them, although the manufacturer can do so. This is fundamentally incompatible with the aim of protecting users' freedom to change the software. The systematic pattern of such abuse occurs in the area of products for individuals to use, which is precisely where it is most unacceptable. Therefore, we have designed this version of the GPL to prohibit the practice for those products. If such problems arise substantially in other domains, we stand ready to extend this provision to those domains in future versions of the GPL, as needed to protect the freedom of users.
Finally, every program is threatened constantly by software patents. States should not allow patents to restrict development and use of software on general-purpose computers, but in those that do, we wish to avoid the special danger that patents applied to a free program could make it effectively proprietary. To prevent this, the GPL assures that patents cannot be used to render the program non-free.
The precise terms and conditions for copying, distribution and modification follow.
TERMS AND CONDITIONS
0. Definitions.
'This License' refers to version 3 of the GNU General Public License.
'Copyright' also means copyright-like laws that apply to other kinds of works, such as semiconductor masks.
'The Program' refers to any copyrightable work licensed under this License. Each licensee is addressed as 'you'. 'Licensees' and 'recipients' may be individuals or organizations.
To ‘modify’ a work means to copy from or adapt all or part of the work in a fashion requiring copyright permission, other than the making of an exact copy. The resulting work is called a ‘modified version’ of the earlier work or a work ‘based on’ the earlier work.
A ‘covered work’ means either the unmodified Program or a work based on the Program.
To ‘propagate’ a work means to do anything with it that, without permission, would make you directly or secondarily liable for infringement under applicable copyright law, except executing it on a computer or modifying a private copy. Propagation includes copying, distribution (with or without modification), making available to the public, and in some countries other activities as well.
To ‘convey’ a work means any kind of propagation that enables other parties to make or receive copies. Mere interaction with a user through a computer network, with no transfer of a copy, is not conveying.
An interactive user interface displays ‘Appropriate Legal Notices’ to the extent that it includes a convenient and prominently visible feature that (1) displays an appropriate copyright notice, and (2) tells the user that there is no warranty for the work (except to the extent that warranties are provided), that licensees may convey the work under this License, and how to view a copy of this License. If the interface presents a list of user commands or options, such as a menu, a prominent item in the list meets this criterion.
1. Source Code.
The ‘source code’ for a work means the preferred form of the work for making modifications to it. ‘Object code’ means any non-source form of a work.
A ‘Standard Interface’ means an interface that either is an official standard defined by a recognized standards body, or, in the case of interfaces specified for a particular programming language, one that is widely used among developers working in that language.
The ‘System Libraries’ of an executable work include anything, other than the work as a whole, that (a) is included in the normal form of packaging a Major Component, but which is not part of that Major Component, and (b) serves only to enable use of
the work with that Major Component, or to implement a Standard Interface for which an implementation is available to the public in source code form. A 'Major Component', in this context, means a major essential component (kernel, window system, and so on) of the specific operating system (if any) on which the executable work runs, or a compiler used to produce the work, or an object code interpreter used to run it.
The ‘Corresponding Source’ for a work in object code form means all the source code needed to generate, install, and (for an executable work) run the object code and to modify the work, including scripts to control those activities. However, it does not include the work's System Libraries, or general-purpose tools or generally available free programs which are used unmodified in performing those activities but which are not part of the work. For example, Corresponding Source includes interface definition files associated with source files for the work, and the source code for shared libraries and dynamically linked subprograms that the work is specifically designed to require, such as by intimate data communication or control flow between those subprograms and other parts of the work.
The Corresponding Source need not include anything that users can regenerate automatically from other parts of the Corresponding Source.
The Corresponding Source for a work in source code form is that same work.
2. Basic Permissions.
All rights granted under this License are granted for the term of copyright on the Program, and are irrevocable provided the stated conditions are met. This License explicitly affirms your unlimited permission to run the unmodified Program. The output from running a covered work is covered by this License only if the output, given its content, constitutes a covered work. This License acknowledges your rights of fair use or other equivalent, as provided by copyright law.
You may make, run and propagate covered works that you do not convey, without conditions so long as your license otherwise remains in force. You may convey covered works to others for the sole purpose of having them make modifications exclusively for you, or provide you with facilities for running those works, provided that you comply with the terms of this License in conveying all material for which you do not control copyright. Those thus making or running the covered works for you must do so exclusively on your behalf, under your direction and control, on terms
that prohibit them from making any copies of your copyrighted material outside their relationship with you.
Conveying under any other circumstances is permitted solely under the conditions stated below. Sublicensing is not allowed; section 10 makes it unnecessary.
3. Protecting Users' Legal Rights From Anti-Circumvention Law.
No covered work shall be deemed part of an effective technological measure under any applicable law fulfilling obligations under article 11 of the WIPO copyright treaty adopted on 20 December 1996, or similar laws prohibiting or restricting circumvention of such measures.
When you convey a covered work, you waive any legal power to forbid circumvention of technological measures to the extent such circumvention is effected by exercising rights under this License with respect to the covered work, and you disclaim any intention to limit operation or modification of the work as a means of enforcing, against the work's users, your or third parties' legal rights to forbid circumvention of technological measures.
4. Conveying Verbatim Copies.
You may convey verbatim copies of the Program's source code as you receive it, in any medium, provided that you conspicuously and appropriately publish on each copy an appropriate copyright notice; keep intact all notices stating that this License and any non-permissive terms added in accord with section 7 apply to the code; keep intact all notices of the absence of any warranty; and give all recipients a copy of this License along with the Program.
You may charge any price or no price for each copy that you convey, and you may offer support or warranty protection for a fee.
5. Conveying Modified Source Versions.
You may convey a work based on the Program, or the modifications to produce it from the Program, in the form of source code under the terms of section 4, provided that you also meet all of these conditions:
a) The work must carry prominent notices stating that you modified it, and giving a relevant date.
b) The work must carry prominent notices stating that it is released under this
License and any conditions added under section 7. This requirement modifies the requirement in section 4 to 'keep intact all notices'.
c) You must license the entire work, as a whole, under this License to anyone who comes into possession of a copy. This License will therefore apply, along with any applicable section 7 additional terms, to the whole of the work, and all its parts, regardless of how they are packaged. This License gives no permission to license the work in any other way, but it does not invalidate such permission if you have separately received it.
d) If the work has interactive user interfaces, each must display Appropriate Legal Notices; however, if the Program has interactive interfaces that do not display Appropriate Legal Notices, your work need not make them do so.
A compilation of a covered work with other separate and independent works, which are not by their nature extensions of the covered work, and which are not combined with it such as to form a larger program, in or on a volume of a storage or distribution medium, is called an ‘aggregate’ if the compilation and its resulting copyright are not used to limit the access or legal rights of the compilation's users beyond what the individual works permit. Inclusion of a covered work in an aggregate does not cause this License to apply to the other parts of the aggregate.
6. Conveying Non-Source Forms.
You may convey a covered work in object code form under the terms of sections 4 and 5, provided that you also convey the machine-readable Corresponding Source under the terms of this License, in one of these ways:
a) Convey the object code in, or embodied in, a physical product (including a physical distribution medium), accompanied by the Corresponding Source fixed on a durable physical medium customarily used for software interchange.
b) Convey the object code in, or embodied in, a physical product (including a physical distribution medium), accompanied by a written offer, valid for at least three years and valid for as long as you offer spare parts or customer support for that product model, to give anyone who possesses the object code either (1) a copy of the Corresponding Source for all the software in the product that is covered by this License, on a durable physical medium customarily used for software interchange, for a price no more than your reasonable cost of physically performing this conveying of source, or (2) access to copy the Corresponding Source from a network server at no charge.
c) Convey individual copies of the object code with a copy of the written offer to provide the Corresponding Source. This alternative is allowed only occasionally and
noncommercially, and only if you received the object code with such an offer, in accord with subsection 6b.
d) Convey the object code by offering access from a designated place (gratis or for a charge), and offer equivalent access to the Corresponding Source in the same way through the same place at no further charge. You need not require recipients to copy the Corresponding Source along with the object code. If the place to copy the object code is a network server, the Corresponding Source may be on a different server (operated by you or a third party) that supports equivalent copying facilities, provided you maintain clear directions next to the object code saying where to find the Corresponding Source. Regardless of what server hosts the Corresponding Source, you remain obligated to ensure that it is available for as long as needed to satisfy these requirements.
e) Convey the object code using peer-to-peer transmission, provided you inform other peers where the object code and Corresponding Source of the work are being offered to the general public at no charge under subsection 6d.
A separable portion of the object code, whose source code is excluded from the Corresponding Source as a System Library, need not be included in conveying the object code work.
A ‘User Product’ is either (1) a ‘consumer product’, which means any tangible personal property which is normally used for personal, family, or household purposes, or (2) anything designed or sold for incorporation into a dwelling. In determining whether a product is a consumer product, doubtful cases shall be resolved in favor of coverage. For a particular product received by a particular user, ‘normally used’ refers to a typical or common use of that class of product, regardless of the status of the particular user or of the way in which the particular user actually uses, or expects or is expected to use, the product. A product is a consumer product regardless of whether the product has substantial commercial, industrial or non-consumer uses, unless such uses represent the only significant mode of use of the product.
'Installation Information' for a User Product means any methods, procedures, authorization keys, or other information required to install and execute modified versions of a covered work in that User Product from a modified version of its Corresponding Source. The information must suffice to ensure that the continued functioning of the modified object code is in no case prevented or interfered with solely because modification has been made.
If you convey an object code work under this section in, or with, or specifically for
use in, a User Product, and the conveying occurs as part of a transaction in which the right of possession and use of the User Product is transferred to the recipient in perpetuity or for a fixed term (regardless of how the transaction is characterized), the Corresponding Source conveyed under this section must be accompanied by the Installation Information. But this requirement does not apply if neither you nor any third party retains the ability to install modified object code on the User Product (for example, the work has been installed in ROM).
The requirement to provide Installation Information does not include a requirement to continue to provide support service, warranty, or updates for a work that has been modified or installed by the recipient, or for the User Product in which it has been modified or installed. Access to a network may be denied when the modification itself materially and adversely affects the operation of the network or violates the rules and protocols for communication across the network.
Corresponding Source conveyed, and Installation Information provided, in accord with this section must be in a format that is publicly documented (and with an implementation available to the public in source code form), and must require no special password or key for unpacking, reading or copying.
7. Additional Terms.
'Additional permissions' are terms that supplement the terms of this License by making exceptions from one or more of its conditions. Additional permissions that are applicable to the entire Program shall be treated as though they were included in this License, to the extent that they are valid under applicable law. If additional permissions apply only to part of the Program, that part may be used separately under those permissions, but the entire Program remains governed by this License without regard to the additional permissions.
When you convey a copy of a covered work, you may at your option remove any additional permissions from that copy, or from any part of it. (Additional permissions may be written to require their own removal in certain cases when you modify the work.) You may place additional permissions on material, added by you to a covered work, for which you have or can give appropriate copyright permission.
Notwithstanding any other provision of this License, for material you add to a covered work, you may (if authorized by the copyright holders of that material) supplement the terms of this License with terms:
a) Disclaiming warranty or limiting liability differently from the terms of sections 15 and 16 of this License; or
b) Requiring preservation of specified reasonable legal notices or author attributions in that material or in the Appropriate Legal Notices displayed by works containing it; or
c) Prohibiting misrepresentation of the origin of that material, or requiring that modified versions of such material be marked in reasonable ways as different from the original version; or
d) Limiting the use for publicity purposes of names of licensors or authors of the material; or
e) Declining to grant rights under trademark law for use of some trade names, trademarks, or service marks; or
f) Requiring indemnification of licensors and authors of that material by anyone who conveys the material (or modified versions of it) with contractual assumptions of liability to the recipient, for any liability that these contractual assumptions directly impose on those licensors and authors.
All other non-permissive additional terms are considered ‘further restrictions’ within the meaning of section 10. If the Program as you received it, or any part of it, contains a notice stating that it is governed by this License along with a term that is a further restriction, you may remove that term. If a license document contains a further restriction but permits relicensing or conveying under this License, you may add to a covered work material governed by the terms of that license document, provided that the further restriction does not survive such relicensing or conveying.
If you add terms to a covered work in accord with this section, you must place, in the relevant source files, a statement of the additional terms that apply to those files, or a notice indicating where to find the applicable terms.
Additional terms, permissive or non-permissive, may be stated in the form of a separately written license, or stated as exceptions; the above requirements apply either way.
8. Termination.
You may not propagate or modify a covered work except as expressly provided under this License. Any attempt otherwise to propagate or modify it is void, and will automatically terminate your rights under this License (including any patent licenses granted under the third paragraph of section 11).
However, if you cease all violation of this License, then your license from a particular copyright holder is reinstated (a) provisionally, unless and until the copyright holder explicitly and finally terminates your license, and (b) permanently, if the copyright holder fails to notify you of the violation by some reasonable means prior to 60 days after the cessation.
Moreover, your license from a particular copyright holder is reinstated permanently if the copyright holder notifies you of the violation by some reasonable means, this is the first time you have received notice of violation of this License (for any work) from that copyright holder, and you cure the violation prior to 30 days after your receipt of the notice.
Termination of your rights under this section does not terminate the licenses of parties who have received copies or rights from you under this License. If your rights have been terminated and not permanently reinstated, you do not qualify to receive new licenses for the same material under section 10.
9. Acceptance Not Required for Having Copies.
You are not required to accept this License in order to receive or run a copy of the Program. Ancillary propagation of a covered work occurring solely as a consequence of using peer-to-peer transmission to receive a copy likewise does not require acceptance. However, nothing other than this License grants you permission to propagate or modify any covered work. These actions infringe copyright if you do not accept this License. Therefore, by modifying or propagating a covered work, you indicate your acceptance of this License to do so.
10. Automatic Licensing of Downstream Recipients.
Each time you convey a covered work, the recipient automatically receives a license from the original licensors, to run, modify and propagate that work, subject to this License. You are not responsible for enforcing compliance by third parties with this License.
An ‘entity transaction’ is a transaction transferring control of an organization, or substantially all assets of one, or subdividing an organization, or merging organizations. If propagation of a covered work results from an entity transaction, each party to that transaction who receives a copy of the work also receives whatever licenses to the work the party's predecessor in interest had or could give
under the previous paragraph, plus a right to possession of the Corresponding Source of the work from the predecessor in interest, if the predecessor has it or can get it with reasonable efforts.
You may not impose any further restrictions on the exercise of the rights granted or affirmed under this License. For example, you may not impose a license fee, royalty, or other charge for exercise of rights granted under this License, and you may not initiate litigation (including a cross-claim or counterclaim in a lawsuit) alleging that any patent claim is infringed by making, using, selling, offering for sale, or importing the Program or any portion of it.
11. Patents.
A ‘contributor’ is a copyright holder who authorizes use under this License of the Program or a work on which the Program is based. The work thus licensed is called the contributor's ‘contributor version’.
A contributor's ‘essential patent claims’ are all patent claims owned or controlled by the contributor, whether already acquired or hereafter acquired, that would be infringed by some manner, permitted by this License, of making, using, or selling its contributor version, but do not include claims that would be infringed only as a consequence of further modification of the contributor version. For purposes of this definition, ‘control’ includes the right to grant patent sublicenses in a manner consistent with the requirements of this License.
Each contributor grants you a non-exclusive, worldwide, royalty-free patent license under the contributor's essential patent claims, to make, use, sell, offer for sale, import and otherwise run, modify and propagate the contents of its contributor version.
In the following three paragraphs, a ‘patent license’ is any express agreement or commitment, however denominated, not to enforce a patent (such as an express permission to practice a patent or covenant not to sue for patent infringement). To ‘grant’ such a patent license to a party means to make such an agreement or commitment not to enforce a patent against the party.
If you convey a covered work, knowingly relying on a patent license, and the Corresponding Source of the work is not available for anyone to copy, free of charge and under the terms of this License, through a publicly available network server or
other readily accessible means, then you must either (1) cause the Corresponding Source to be so available, or (2) arrange to deprive yourself of the benefit of the patent license for this particular work, or (3) arrange, in a manner consistent with the requirements of this License, to extend the patent license to downstream recipients. 'Knowingly relying' means you have actual knowledge that, but for the patent license, your conveying the covered work in a country, or your recipient's use of the covered work in a country, would infringe one or more identifiable patents in that country that you have reason to believe are valid.
If, pursuant to or in connection with a single transaction or arrangement, you convey, or propagate by procuring conveyance of, a covered work, and grant a patent license to some of the parties receiving the covered work authorizing them to use, propagate, modify or convey a specific copy of the covered work, then the patent license you grant is automatically extended to all recipients of the covered work and works based on it.
A patent license is ‘discriminatory’ if it does not include within the scope of its coverage, prohibits the exercise of, or is conditioned on the non-exercise of one or more of the rights that are specifically granted under this License. You may not convey a covered work if you are a party to an arrangement with a third party that is in the business of distributing software, under which you make payment to the third party based on the extent of your activity of conveying the work, and under which the third party grants, to any of the parties who would receive the covered work from you, a discriminatory patent license (a) in connection with copies of the covered work conveyed by you (or copies made from those copies), or (b) primarily for and in connection with specific products or compilations that contain the covered work, unless you entered into that arrangement, or that patent license was granted, prior to 28 March 2007.
Nothing in this License shall be construed as excluding or limiting any implied license or other defenses to infringement that may otherwise be available to you under applicable patent law.
12. No Surrender of Others' Freedom.
If conditions are imposed on you (whether by court order, agreement or otherwise) that contradict the conditions of this License, they do not excuse you from the conditions of this License. If you cannot convey a covered work so as to satisfy simultaneously your obligations under this License and any other pertinent
obligations, then as a consequence you may not convey it at all. For example, if you agree to terms that obligate you to collect a royalty for further conveying from those to whom you convey the Program, the only way you could satisfy both those terms and this License would be to refrain entirely from conveying the Program.
13. Use with the GNU Affero General Public License.
Notwithstanding any other provision of this License, you have permission to link or combine any covered work with a work licensed under version 3 of the GNU Affero General Public License into a single combined work, and to convey the resulting work. The terms of this License will continue to apply to the part which is the covered work, but the special requirements of the GNU Affero General Public License, section 13, concerning interaction through a network will apply to the combination as such.
14. Revised Versions of this License.
The Free Software Foundation may publish revised and/or new versions of the GNU General Public License from time to time. Such new versions will be similar in spirit to the present version, but may differ in detail to address new problems or concerns.
Each version is given a distinguishing version number. If the Program specifies that a certain numbered version of the GNU General Public License 'or any later version' applies to it, you have the option of following the terms and conditions either of that numbered version or of any later version published by the Free Software Foundation. If the Program does not specify a version number of the GNU General Public License, you may choose any version ever published by the Free Software Foundation.
If the Program specifies that a proxy can decide which future versions of the GNU General Public License can be used, that proxy's public statement of acceptance of a version permanently authorizes you to choose that version for the Program.
Later license versions may give you additional or different permissions. However, no additional obligations are imposed on any author or copyright holder as a result of your choosing to follow a later version.
15. Disclaimer of Warranty.
THERE IS NO WARRANTY FOR THE PROGRAM, TO THE EXTENT PERMITTED BY APPLICABLE LAW. EXCEPT WHEN OTHERWISE STATED IN WRITING THE COPYRIGHT HOLDERS AND/OR OTHER PARTIES PROVIDE THE PROGRAM 'AS IS' WITHOUT WARRANTY OF ANY KIND, EITHER EXPRESSED OR IMPLIED, INCLUDING, BUT NOT
LIMITED TO, THE IMPLIED WARRANTIES OF MERCHANTABILITY AND FITNESS FOR A PARTICULAR PURPOSE. THE ENTIRE RISK AS TO THE QUALITY AND PERFORMANCE OF THE PROGRAM IS WITH YOU. SHOULD THE PROGRAM PROVE DEFECTIVE, YOU ASSUME THE COST OF ALL NECESSARY SERVICING, REPAIR OR CORRECTION.
16. Limitation of Liability.
IN NO EVENT UNLESS REQUIRED BY APPLICABLE LAW OR AGREED TO IN WRITING WILL ANY COPYRIGHT HOLDER, OR ANY OTHER PARTY WHO MODIFIES AND/OR CONVEYS THE PROGRAM AS PERMITTED ABOVE, BE LIABLE TO YOU FOR DAMAGES, INCLUDING ANY GENERAL, SPECIAL, INCIDENTAL OR CONSEQUENTIAL DAMAGES ARISING OUT OF THE USE OR INABILITY TO USE THE PROGRAM (INCLUDING BUT NOT LIMITED TO LOSS OF DATA OR DATA BEING RENDERED INACCURATE OR LOSSES SUSTAINED BY YOU OR THIRD PARTIES OR A FAILURE OF THE PROGRAM TO OPERATE WITH ANY OTHER PROGRAMS), EVEN IF SUCH HOLDER OR OTHER PARTY HAS BEEN ADVISED OF THE POSSIBILITY OF SUCH DAMAGES.
17. Interpretation of Sections 15 and 16.
If the disclaimer of warranty and limitation of liability provided above cannot be given local legal effect according to their terms, reviewing courts shall apply local law that most closely approximates an absolute waiver of all civil liability in connection with the Program, unless a warranty or assumption of liability accompanies a copy of the Program in return for a fee.
END OF TERMS AND CONDITIONS