
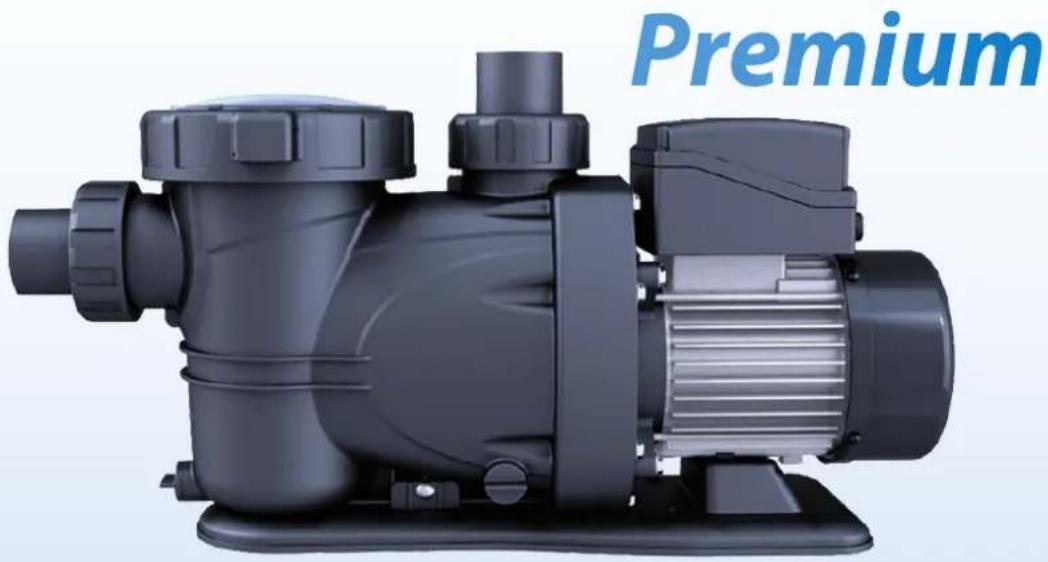
PP150 - Pump GRE - Free user manual and instructions
Find the device manual for free PP150 GRE in PDF.

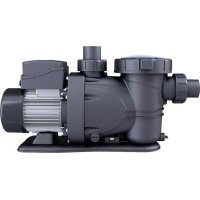
| Product type | Self-priming centrifugal pump for swimming pool |
| Brand | Gre |
| Model | PP150 |
| Category | Filtration pump |
| Power supply | Single-phase, voltage according to nameplate, 30 mA protection |
| Motor power | Not specified (standard estimate: approx. 0.75 kW) |
| Rated flow | Not specified (estimate approx. 6-10 m³/h) |
| Hydraulic connection | Inlet and outlet Ø 50 mm (2 inches) minimum |
| Cable length | Not specified (cable supplied with Y-type connection) |
| Protection rating | Not specified (IPX4 typical for pool pump) |
| Materials | High-quality materials, body and pre-filter in reinforced plastic |
| Water temperature range | 5 °C to 35 °C |
| Installation | Horizontal, on a fixed support, 1 m free space around |
| Main functions | Pool water filtration and recirculation, integrated pre-filter |
| Routine maintenance | Regular cleaning of pre-filter basket, checking seals |
| Warranty | 2 years (conditions in manual) |
| Safety | Integrated thermal protection, mandatory grounding, 30 mA circuit breaker |
| Spare parts available | Seal, mechanical seal, basket, power cable |
| Repairability | Repair by qualified professional, original parts recommended |
Frequently Asked Questions - PP150 GRE
User questions about PP150 GRE
0 question about this device. Answer the ones you know or ask your own.
Ask a new question about this device
Download the instructions for your Pump in PDF format for free! Find your manual PP150 - GRE and take your electronic device back in hand. On this page are published all the documents necessary for the use of your device. PP150 by GRE.
USER MANUAL PP150 GRE
Pumps - Bombas - Pompes - Pumpen Pompe - Pomps - Bombas
PP100 1CV
PP150 1,5CV
PP200 2CV
Instruction Manual - Manual de Instrucciones Manuel d'instructions - Bedienungsanleitung Manuale delle instruzioni - Handleiding met instructies Manual de instruções
We reserve to change all of part of the articles or contents of this document, without prior notice. Nos reservamos el derecho de cambiar total o parcialmente las características de nuestros artículos o contenido de este documento sin previo aviso. Nous nous réservons le droit de modifier totalement oru en partie les caracteristiques de nos articles ou le contenu de ce document san pré avis. Wir behalten uns das recht vor die eigenschaften unserer produkte oder den inhalt diese prospektes teilweise oder wollstanding, ohne vorherige benachichtigung su andern. Ci riservamo il diritto di cambiare totalement o parzialmente le caratteristiche tecniche dei nostri prodotti ed il contenuto di questo documento senza nessum preavviso. Wij behouden ons het recht voor geheel of gedeeltelijk de kenmerken van onze artikelen of de inhouk van deze handleiding zonder voorafgaand bericht te wijzigen. Reservamo-nos no dereito de alterar, total ou parcialmente as características os nossos artigos ou o conteúdo deste documento sem aviso prévio.
Self-priming SWIMMING POOL PUMP BOMBA DE PISCINA autocebante POMPE DE PISCINE auto-amorçante Selbstansaugende SCHWIMMBADPUMPE POMPA DI PISCINA auto-aspirante Zelfaanzuigende ZWEMBADPOMP BOMBA PISCINA autocomeçando
1 - 1,5 - 2 CV
| EN ES FR DE IT | NL PT | ||||||
| n° | Description Descripción Descripción Beschreibung: Descripción: Descripción | ||||||
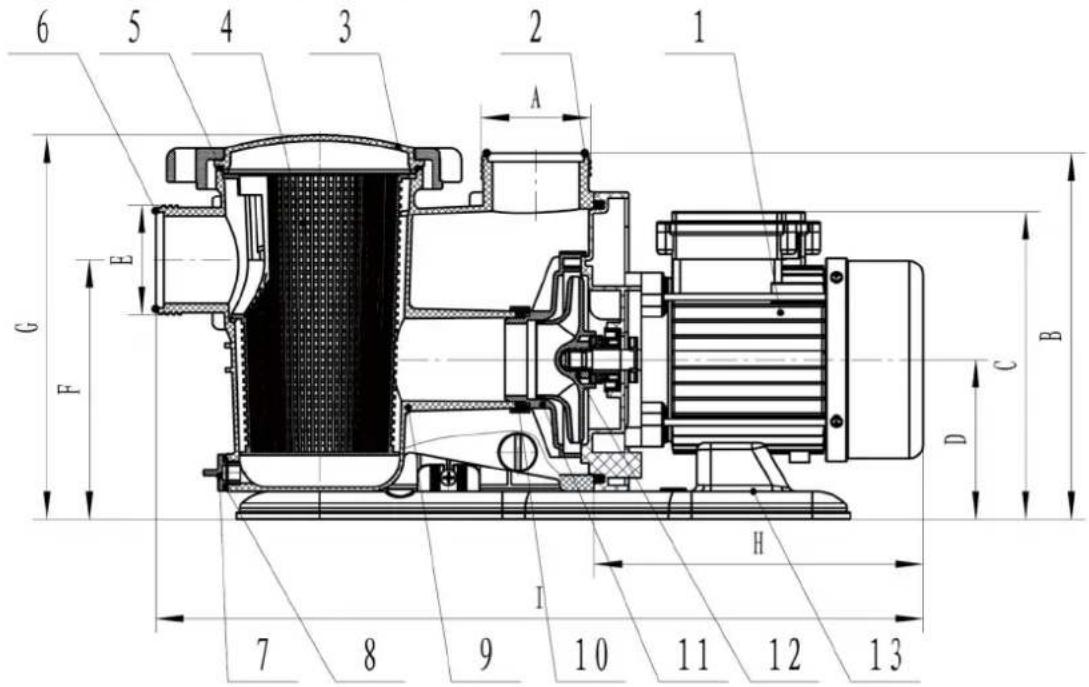
| 1 | Motor | Motor | Moteur | Motor | Motore | Motor | Motor |
| 2 | O-ring seal for drive | Junta tórica impulsión | Joint thorique refoulement | O-Ring des Antriebs Guarnizione impulso | Guarnizione impulso | O-ring impuls Tampão impulso | |
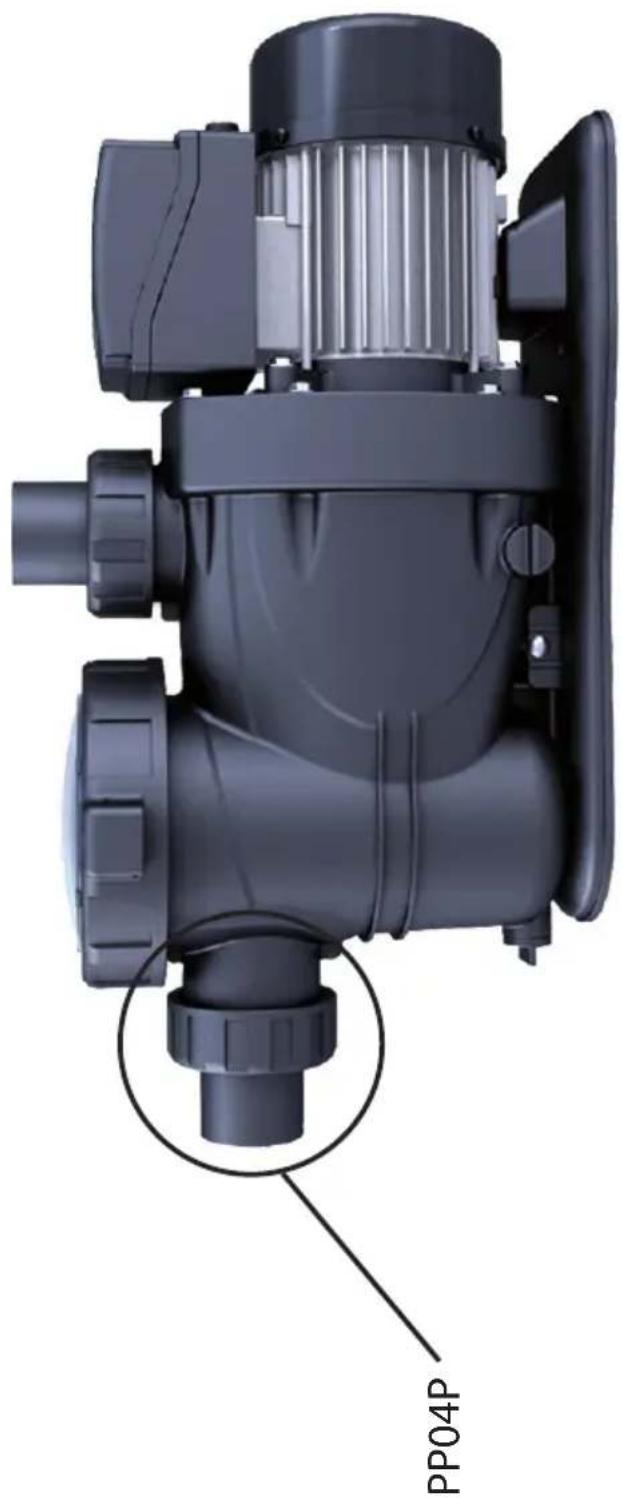
| 3 | Pre-filter cover | Tapa de prefiltro | Buse | Vorfilterdeckel | Coperchio prefiltro | Deksel van de voorfilter | Tampa pre-filtro |
| 4 | Pre-filter basket | Cesto del prefiltro | Panier du préfiltre | Vorfilterkorb | Canestro prefiltro | Korf van de voorfilter | Cesto pre-filtro |
| 5 | O-ring seal for pre-filter | Junta tórica del prefiltro | Joint thorique de la buse | O-Ring für Vorfilter | Guarnizione prefiltro | O-ring voor voorfilter | Junta pre-filtro |
| 6 | O-ring seal for suction | Junta tórica aspiración | Joint thorique aspiration | O-Ring für den Sauger | Guarnizione aspirazione | O-ring voor aanzuiging | Tampão aspiração |
| 7 | Purging plug | Tapón de purga | Bouchon de vindage | Abflussdeckel | Tappo di scario | Aftapplug | Tampão desaguamento |
| 8 | Purging plug seal | Junta tapón de purga | Joint du bouchon de vinfage | Dichtung des Abflussdeckels | Guarnizione tappo di scarico | Dichting aftapplug | Junta tampão desaguamento |
| 9 | Casing | Carcasa | Enveloppe | Gehäuse | Corpo pompa | Behuizing | Corpo bomba |
| 10 | O-ring seal | Junta tórica | Joint thorique | O-Ring | Guarnizione | O-ring | Tampão |
| 11 | Diffuser | Difusor | Diffuseur | Diffusor | Diffusore | Diffusor | Difusor |
| 12 | Air-screw | Helice | Hélice | Helix | Turbina | Schroef | Turbina |
| 13 | Motor assembly plate | Placa de montaje del motor | Plaque de montage du moteur | Montageabdeckung des Motors | Targa d'assemblagio di motore | Monteerbasis voor motor | Placa da montagem do motor |
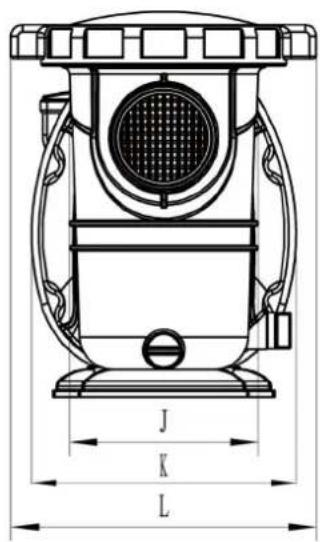
| A (mm) | B (mm) | C (mm) | D (mm) | E (mm) | F (mm) | G (mm) | H (mm) | I (mm) | J (mm) | K (mm) | L (mm) | |
| 1_cv | 79 | 264 | 222 | 115 | 79 | 187 | 278 | 237 | 553 | 136 | 190 | 220 |
| 1,5_cv | 79 | 264 | 222 | 115 | 79 | 187 | 278 | 237 | 553 | 136 | 190 | 220 |
| 2_cv | 79 | 264 | 237 | 115 | 79 | 187 | 278 | 267 | 583 | 136 | 190 | 220 |
EN- Self-priming swimming pool pump
This mode allows making a correct installation with optimal results of your swimming pool pump. Carefully read this instruction manual.
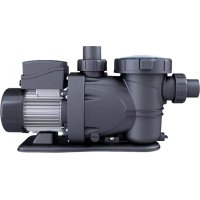
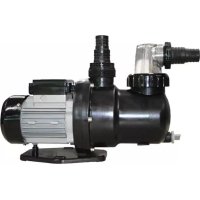
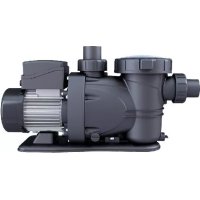
Your new pump is a one-stage self-priming, centrifugal pump, designed for use with a swimming-pool filtering system. It is designed to be used with clean water for temperatures between 5 °C and 35 °C. It is manufactured from high quality materials subject to strict hydraulic and electrical tests. A correct installation of this pump is assured by following the instructions from this manual. We decline all responsibility for damages caused by use different to that explained in this instruction manual.
IMPORTANT
This manual contains basic information on the safety measures to be adopted during installation and start-up. The fitter and the user must therefore read the instructions before installation and start-up.
GENERAL SAFETY REGULATIONS
- The machines indicated in this Manual are especially designed for the pre-filtering and recirculation of water in swimming pools
• Install them in line with the specific instructions for each installation
- All modifications to the pump require prior authorisation from the manufacturer. Original spare parts and accessories authorised by the manufacturer ensure greater safety. The pump manufacturer is exempt from all liability regarding any damage caused by unauthorised spare parts or accessories.
- When working on each machine or on the units linked to them, disconnect the unit from the power supply and the startup devices, as the electrical parts of the pump are live during operation.
- All assembly and maintenance work must be carried out by qualified and authorised personnel who have carefully read the installation and service instructions.
- To guarantee safety when operating the machine, you must comply with that set out in the installation and service instructions.
• In the event of defective operation or faults, contact your supplier or nearest representative.
- If the supply cord is damaged, it must be replaced by the manufacturer or its service agent or a similarly qualified person in order to avoid
• Make sure that water is unable to enter the motor or the live electrical parts.
- Avoid contact at all times - even accidentally - with moving machine parts while the machine is running and/or before it comes to a complete standstill
- Wait for the machine to come to a halt before handling it.
- Before any electrical or mechanical maintenance operation, disconnect the unit from the power supply and block the start-up devices.
- To reduce risk of injury, children should not use this product.
- Do not bury the electric cable. Lay the cable so it cannot be damaged by machinery, like mowing machines, etc.
- Do not start the pump before it is correctly connected to the swimming pool.
• To reduce risk of electric shock, change the electric cable immediately when damaged.
- To reduce risks of electric shock, do not use extension cables to connect the pump to a power supply. Connect it to a correctly installed electricity outlet.
- Do not use the pump without water!
INSTALLATION
- Only authorised and qualified personnel should install the pump and its cabling, respecting the current legislation.
- The pump should be installed horizontally, screwing it to the support, to avoid vibration and unwanted noise.
- The pump should be installed far from any corrosive or flammable products.
- The pump should have sufficient drainage to avoid risk of flooding and should be protected from excessive humidity.
• Install independent water inlet and outlet valves.
- Allow for sufficient access space for pump maintenance and make sure that the technical plate of the pump is visible.
- During the installation of the pump, position it so there is 1 meter of free space around it.
ELECTRICITY
- Place the motor on the floor before connecting it to the mains. Otherwise, the motor could cause a serious and even mortal electric shock. Do not place it on the floor over a gas pipe.
- To avoid a dangerous or mortal electric shock, disconnect the power supply of the motor before working on the electrical connections.
- If it short-circuits, this will indicate there is an electricity problem. If it short-circuits and cannot be restarted, ask a qualified electrician to verify and repair the electrical system.
- The pump should be powered from an insulated transformer or via a circuit breaker or residual-current device of 30mA maximum.
- The power supply should exactly correspond to the voltage indicated on the plate of the motor. Incorrect voltage could provoke a fire and/or damage the motor, and would cancel the guarantee. In case of doubt, check with an electrician.
- The electric cable is included and comes with a "Y" connection. If it is necessary to replace the electricity cable, the new cable should also be of the appropriate type. The guarantee will be cancelled in the case of any unauthorised modification of the components.
- The electrical installation has to be according to current legislation.
- If the electrical cable is damaged, the manufacturer, its agent, or any other qualified person should replace it to avoid any damage.
- The pump is equipped with complete thermal protection. Follow the assembly diagram below for correct electrical installation.

- The electrical installation should be done by someone qualified in working with electrical equipment. This equipment is not designed for those with physical, sensory or mental handicap or people lacking in experience, unless done under supervision or with instructions of use from a person in charge of safety.
Do not permit children nor adults to sit or lean on the equipment. Children should be supervised to ensure that they do not play with the equipment.
- Adjust the value of the thermal relay appropriately depending on the pump current.
- Unsuitable mains connections involve the risk of electrocution
- Adjust the value of the thermal relay appropriately depending on the pump current. - Unsuitable mains connections involve the risk of electrocution
Assembly of pipes
- The pipes should be assembled before and after the pump and should have diameters equal of above those of the pump inlet. To avoid fiction loss, always use 50mm minimum diameter PVC pipe. Increase the diameter for larger pipes.
- The suction and expulsion pipes should never stay connected to the pump.
- Well seal all the connections and the cover of the pump to avoid possible water leaks into the motor, which could damage it.
Tests before starting the pump
Carry out the following operations before starting the pump:
- Check that the power supply as well its frequency correspond to the information of pump specification plate.
- Before starting the pump, fill it with water for self-priming of the pump.
- Check that the mains voltage and frequency correspond with those indicated on the pump characteristics plate
- The pump can continuously work.
Starting the pump
Start the pump only when the suction and expulsion tubes are connected to the inlet and outlet of the pump. Check there are no obstacles in the pipes.
Maintenance and cleaning
- Your new pump does not need any specific or programmed maintenance In the case that the pump is not used during some time, we recommend dismantling it and cleaning it to be kept in a dry and well-aired place.
- If the electrical cable is damaged, the manufacturer, its agent, or any other qualified person to avoid any danger should replace it to avoid any dangers.
- Regularly clean your pump, removing any dirt from the filer so the inlet pipe is not blocked or the pump damaged.
- Pump components that, due to their normal use, suffer wear and/or tear must be regularly replaced to ensure good pump performance.
- For regular control:
- Check that the mechanical parts are tightly secured and check the condition of the screws supporting the machine.
- Check that the power conductors and isolating parts are in their correct position, are secure and in a good state of repair.
Check the temperature of the machine and the electric motor. In the event of a fault, stop the machine immediately and contact the nearest Technical Assistance Service.
- Check for machine vibrations. In the event of a fault, stop the machine immediately and contact the nearest Technical Assistance
- Check that the mechanical parts are tightly secured and check the condition of the screws supporting the machine. - Check that the power conductors and isolating parts are in their correct position, are secure and in a good state of repair. Check the temperature of the machine and the electric motor. In the event of a fault, stop the machine immediately and contact the nearest Technical Assistance Service. - Check for machine vibrations. In the event of a fault, stop the machine immediately and contact the nearest Technical Assistance
| Symptoms Causes Solution | ||
| The pump does not work | There is no power supply | Use another device that works to check the electricity outlet and check the short-circuit switches |
| It has short-circuited | Check the short-circuit switches and replace them if necessary | |
| The automatic thermal cut-out of the pump has activated to protect it. | Cut the power supply and leave to cool before re-starting the pump. Make sure the pump and motor have sufficient ventilation space. Make sure that the pump is not obstructed by dirt and the motor can turn freely | |
| The motor has burnt out due to a power supply overload or flooding | You may have to change the motor. | |
| The pump works with reduced or no flow | The pump is blocked (check if the motor turns freely) | Blockage in the pump or in the basket |
| The valves are closed | Check the system to make sure that the valves are in the correct position for filtering, including the inlet and outlet valves of the pump. | |
| The filter is full of dirt Clean the filter | ||
| Air in the system | Start the pump (see starting procedure). Check to see there are no suction air leaks in the pipes or in the connections. Make sure that the lid of the basket is well closed and hermetically sealed. Check there are no leaks under the pump. | |
| Lack of water | Make sure that the water level is at least at the height of the skimmer. | |
| Dirt in the pump or in the skimmer. (Note: Do not make the pump work without the pump or skimmer basket correctly assembled. | Make sure the pump or skimmer baskets are not full of dirt. Make sure there is no blockage at the inlet or outlet of the pump or make sure there are no foreign objects in the pump. | |
| Leak between the casing of the pump and the motor. | The screws of the casing are not tightened. The watertight or metallic gasket is worn. | Cut-out the pump and loosen the screws, check the alignment and the condition of the water-tight gaskets before tightening the screws, replace the gaskets if necessary. |
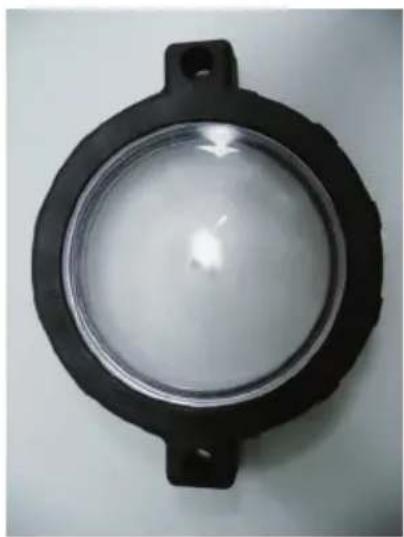
| Pre-filter cover The cover | is not correctly closed | Make sure the lid correctly compresses the O-ring seal. |
ES- Bomba de piscina autocebante
natural_image
Two black circular shapes on a plain white background, no text or symbols presentPP01P PP02P
natural_image
Top-down view of a black circular component with a transparent dome and two side handles (no text or symbols visible)PP03P
EN - GUARANTEE CERTIFICATE
1 GENERAL TERMS
1.1 In accordance with these provisions, the seller guarantees that the product corresponding to this guarantee ("the Product") is in perfect condition at the time of delivery.
1.2 The Guarantee Term for the Product is two (2) years from the time it is delivered to the purchaser.
1.3 In the event of any defect in the Product that is notified by the purchaser to the seller during the Guarantee Term, the seller will be obliged to repair or replace the Product, at his own cost and wherever he deems suitable, unless this is impossible or unreasonable.
1.4 If it is not possible to repair or replace the Product, the purchaser may ask for a proportional reduction in the price or, if the defect is sufficiently significant, the termination of the sales contract.
1.5 The replaced or repaired parts under this guarantee, will not extend the guarantee period of the original Product, but will have a separate guarantee.
1.6 In order for this guarantee to come into effect, the purchaser must provide proof of the date of purchase and delivery of the Product.
1.7 If, after six months from the delivery of the Product to the purchaser, he notifies a defect in the Product, the purchaser must provide proof of the origin and existence of the alleged defect.
1.8 This Guarantee Certificate is issued without prejudice to the rights corresponding to consumers under national regulations.
2 INDIVIDUAL TERMS
2.1 This guarantee covers the products referred to in this manual.
2.2 This Guarantee Certificate will only be applicable in European Union countries.
2.3 For this guarantee to be effective, the purchaser must strictly follow the Manufacturer's instructions included in the documentation provided with the Product, in cases where it is applicable according to the range and model of the Product.
2.4 When a time schedule is specified for the replacement, maintenance or cleaning of certain parts or components of the Product, the guarantee will only be valid if this time schedule has been followed.
3 LIMITATIONS
3.1 This guarantee will only be applicable to sales made to consumers, understanding by “consumer”, a person who purchases the Product for purposes not related to his professional activities.
3.2 The normal wear resulting from using the product is not guaranteed. With respect to expendable or consumable parts, components and/or materials, such as batteries, light bulbs, etc. the stipulations in the documentation provided with the Product, will apply.
3.3 The guarantee does not cover those cases when the Product; (I) has been handled incorrectly; (II) has been repaired, serviced or handled by non-authorised people or (III) has been repaired or serviced not using original parts. In cases where the defect of the Product is a result of incorrect installation or start-up, this guarantee will only apply when said installation or start-up is included in the sales contract of the Product and has been conducted by the seller or under his responsibility.
ES - CERTIFICADO DE GARANTÍA
1.1 In order to reduce the amount of waste of electric and electronic apparatus, to reduce the danger of components, to encourage the reuse of apparatus, to assess waste and to set up a suitable waste treatment system, with the aim of improving the efficiency of environmental protection, a set of rules has been established applicable to the manufacture of the product and other rules regarding the correct environmental treatment when these products become waste.
1.2 It is also intended to improve the environmental practices of all agents involved in electrical and electronic goods, including manufacturers, distributors, users and particularly those directly involved in the treatment of waste derived from these apparatus.
1.3 From 13th August 2005, there are two ways of disposing of this apparatus:
1.4 If you purchase a new equivalent apparatus or which has the same functions as the one you wish to dispose of, you can hand it over, free of charge, to the distributor when making your purchase, or
1.5 You can take it to local collection points.
1.6 We shall cover waste treatment costs.
1.7 The apparatus are labelled with a symbol of a "crossed-out waste container". This symbol means that the apparatus is subject to selected waste collection, different from general waste collection.
1.8 Our products are designed and manufactured with top-quality, environmental-friendly materials and components, which can be reused and recycled. In spite of this, several parts of this product are not biodegradable and therefore it should not be left in the environment. For the correct recycling of this product, please completely detach the electrical motor from the rest of the filtration equipment.
ES - CONTENEDOR DE BASURA CON RUEDAS TACHADO
-The products listed above are in compliance with the safety prescriptions:
• 2004/108/EC Electromagnetic compatibility Directive (EMC).
• 2006/95/EC Low voltage Directive.
• IEC 60335-2-41 European Directive.
• 2002/96/EC European Directive (WEEE).
| IF YOU HAVE ANY PROBLEM, CONTACT US! (UK GREEN NUMBER) | 0800 91 76 778 | |
| SI TIENES ALGÚN PROBLEMA,¡CONSÚLTENOS! | +34 946 741 844 | |
| EM CASO DE PROBLEMA,¡CONSULTAR-NOS! | 219 154 690 | |
| EN CAS DE PROBLEME, NOUS CONSULTER! | France Te | +33 0892 707 720 |
| Belgique n. verde | 0800 10 211 | |
| Suisse numéro verde | 08 /563 820 | |
| Nederlands | 0800 022 33 04 | |
| BEI PROBLEMEN KÖNNEN SIE SICH MIT UNS UNTER DER FOLGENDEN DEUTSCHEN | Deutschland | 0180 333 0123 |
| Österreich | +49 180 333 0123 | |
| schweiz freie Numme | 0 800 /563 820 | |
| PER OGNI VOSTRA EVENTUALLE OCCORRENZA, INTERPELLATECI! | Italia | 800 781 592 |
| Suizzera n. verde | 0800/563 820 | |
| MOCHT U EEN PROBLEEM HEBBEN,... ¡RAADPLEEG ONS! | Nederlands | 0800 022 33 04 |
| Belgie | 800 10 211 | |
| DISTRIBUIDO POR: |
| MANUFACTURAS GRE. S.A.ARITZ BIDEA N°57, BELAKO INDUSTRIALDEA48100 MUNGIA (BIZKAIA)· ESPAÑATEL. +34 946 74 11 16 · FAX. 34 946 74 17 08http://www.gre.esN° REG. IND.: 48-06762 |
* Sand not included / * Arena no incluida / * Sable non inclus
* Sand nicht im Inhalt / * Sabbia non inclusa * Zand niet Inbegrepen / * Areia não incluida
We reserve the right to change all or part of the articles or contents of this document, without prior notice

- Pumps - Bombas - Pompes - Pumpen Pompe - Pomps - Bombas
- - 1,5 - 2 CV
- EN- Self-priming swimming pool pump
- IMPORTANT
- GENERAL SAFETY REGULATIONS
- INSTALLATION
- ELECTRICITY
- Assembly of pipes
- Tests before starting the pump
- Starting the pump
- Maintenance and cleaning
- ES- Bomba de piscina autocebante
- EN - GUARANTEE CERTIFICATE
- GENERAL TERMS
- INDIVIDUAL TERMS
- LIMITATIONS
- ES - CERTIFICADO DE GARANTÍA
- ES - CONTENEDOR DE BASURA CON RUEDAS TACHADO
Brand : GRE
Model : PP150
Category : Pump