
Gotab - Tablet Yarvik - Free user manual and instructions
Find the device manual for free Gotab Yarvik in PDF.
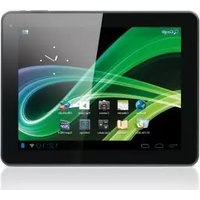
| Product type | Tablet |
| Brand | Yarvik |
| Model | Gotab |
| Screen | Capacitive touchscreen |
| Wireless connectivity | Wi-Fi 802.11 b/g/n, channels 1 to 13 |
| Power supply | AC mains adapter (230 V) |
| Battery | Built-in rechargeable lithium-ion |
| Charging | Plug into a grounded wall outlet |
| Cleaning | Slightly damp cotton cloth (water only) |
| Safety | Do not expose to moisture, excessive heat, or shocks |
| Battery maintenance | Replace only by a qualified technician |
| Compliance | RoHS, WEEE, standards EN 300 328, EN 301 489, EN 60950 |
| Wireless use | Prohibited within 20 km of Ny-Ålesund (Norway) |
| Electrical compatibility | Phase-to-phase 230 V for Norway |
| Included accessories | Power adapter, cable (not listed), built-in battery |
Frequently Asked Questions - Gotab Yarvik
User questions about Gotab Yarvik
0 question about this device. Answer the ones you know or ask your own.
Ask a new question about this device
Download the instructions for your Tablet in PDF format for free! Find your manual Gotab - Yarvik and take your electronic device back in hand. On this page are published all the documents necessary for the use of your device. Gotab by Yarvik.
USER MANUAL Gotab Yarvik
3 Getting on the Internet
18
Internet instellen / Zugriff auf das Internet / Accès à Internet / Como acceder a Internet / Aceder à internet / Laczenie z Internetem / Pripojení k internetu / Pripojenie k internetu / Atkommen på internettet / Ga ut på Internet / Üvðeøn ΟTo Internet / Collegamento a Internet / Podkniouyené K INTEPHeTy / Koble til Internett / Kako se povezati na internet / PiДкniouenняdo INTEPHeTy / DeJLJNt / Kapcsolódás az Internetre / Cbþp3Bahe KbM INTEPNet / Conectare la Internet / Spajanje na Internet
4 When a Problem Occurs
24
Problemen oplossen / Problembehandlung / Dépannage / Si se produce un problème / Quando ocorrre um problema / W razie problemów / Pri vzniku problému / Ak sa vyskytne problème / Nár der opstár et problème / Nár att problem uppstár / Šтav Σιμβεί Káπio Ipoβλημα / Se si verifica un problème / При Возноковени поблемы / Nár det oppstár problemer / Ko se pojavi težava / Y paazi винкеня поблем / ἀς / Hiba eseten / При пobлеми / In cazul in care apare o problema / Kad se pojavi problem
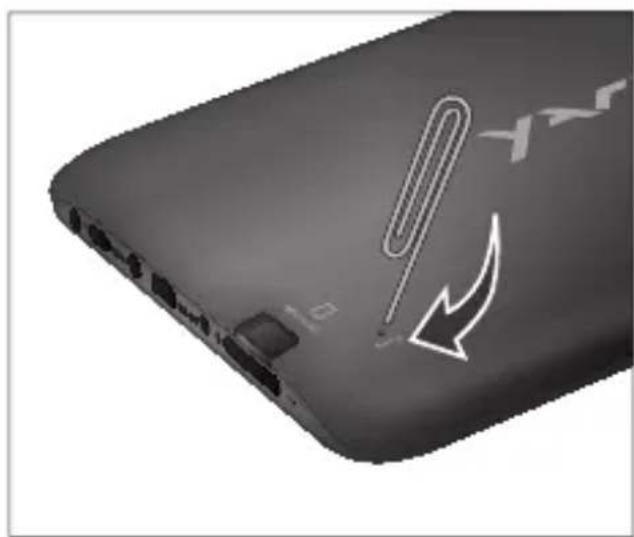
Soft Reset via Reset Button
26
Soft Reset via Reset Button/Soft Reset über Reset-Taste/Réinitialisation logicielle à l'aide du bouton RESET / Restablecimiento parcial mediante el botón Reset (Restablecer) / Reinicialização parcial atraves do botão Reiniciar / Ponowne uruchamianie przyciskiem Reset / Cástecný reset pomoci tlacitka Vymazat / Mäkký reset pomocou tlacidla Reset / Softwarenulstilling via knappen Reset [Nulstil] / Mjuk Återstellning via aterstellningsknapp / Eπαναφρά Λογισκόμου μεσω του Πλήκτρου Reset / Soft reset tramite il pulsante Reset / Πρorpammbhий сбpos nocpeιctbOM KHONK Κбрoca / Omstart med Reset-knappen / Mehka ponastavitev preko gumba za ponastavitev / Πρorpamne CKIДангЯ 3a ДОПOMΟΤΟ KHONК CKNДангЯ / Блесьдурацьдурацьдурацьдурацьдурацьдурацьдурацьдурацьдурацьдурацьдурацьдурацьдурацьдурацьдурацьдурацьдурацьдурацьдурацьдурацьдураçьдурацьдурацьдурацьдурацьдурацьдурацьдурацьдурацьдурацьдурацьдурацьдурацьдурацьдурацьдурацьдурацьдурацьдурацьдурацьдураze resetare / Softverski reset pomócu tipke za resetiranje
1 Package Content
Inhoud doos / Verpackungsinhalt / Contenu de l'emballage / Contenido de la caja / Conteudo da embalagem / Zawartosc opakowania / Obsah baleni / Obsah balenia / Pakkens indhold / Paketets innehalli / Iepiexóvea / Euokzuaiaç / Contenuto della confezione / Codepxmoe ynakoekn / Pakkens innhold / Vsebina paketa / PoanakybaHH / A csomag tartalma / Cbdpxahme ha onakokata / Continutul ambalajului / Sadržaj paketa
1x
Luna tablet
Luna tablet
Luna Tablet
Tablette Luna
Tableta Luna
Tablet Luna
Tablet Luna
Luna tablet
Luna tablet
Luna platta
TaqnAeta Luna
Tablet Luna
Nanwet Luna
Luna nettbrett
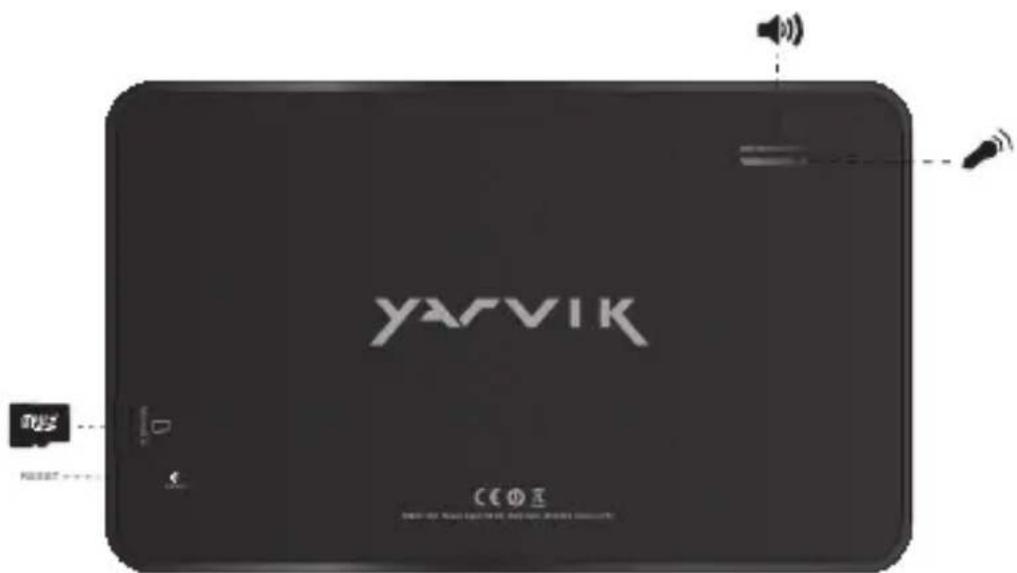
2 Buttons & Connections
Knoppen & Aansluitingen / Tasten & Anschlusse / Boutons et connexions / Botones y conexiones / Botoes e ligações / Przyciski i ziacza / Tlačitka a pripojeni / Tlačidla a pripojenia / Knapper & tilslutninger / Knappar & Ansluttingar / Πληκτρα & Συνόεις / Pulsanti e collegamenti / Khonkn paabembl / Knapper og tilkoblinger / Gumbi in Povezave / Khonkn ta poa'emn / Gombok es csatlakozasok / Bytochm apbaskn / Butoane si conexiuni / Tipke i veze
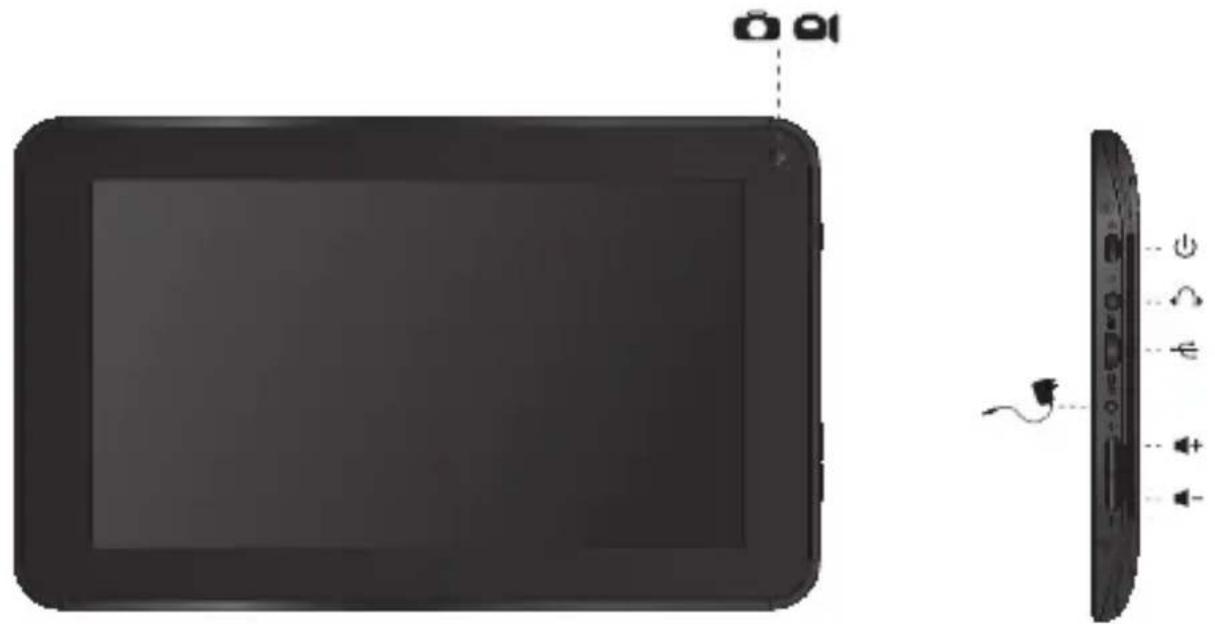
| 1 | On/Off | |
| - Hold 3 sec. for On or Off - 3 sec. indrukken voor Aan of Uit - Zum Ein-/Ausschalten 3 Sek. drucken - Appuyez pendant 3 s pour allumer ou éteindre - Pulse durante 3 s para encender o apagar el dispositiivo - Mantenha premido durante 3段时间o para ligar ou desligar - Nacijsnij i przytrzymaj przyze 3 sek., aby wączyć lub wączyć - Přidrženim po dobu 3 s zapinàte nebo vypínéte - Podržte 3 sek. pre zaputie alebo vypnutie - Hold 3 sek. for On [Til] aller Off [Fra] - Håll ned 3 sekunder För På eller Av - Kpatñóte 3 δeut. yia evepyotoinaŋ (On) ñ aßevepyotoinaŋ (Off) | - Tenere premuto 3 sec. per l'accensione o lo spegnimento. - Yedrjámbaite B touche nme 3 dnia Bknioucen na Bbiknioucenna - Trykk 3 sek. for pâ aller av - Držite 3 sek. za vklop ali izklop - Utpmýte npotrayom 3 c dnia ybIMKhenna abó BVMKhenna - Trésd'la dama fioi liyfau - Nyomja 3 mp-ig a be- vagy kikapcsoláshoz - 3adpýte 3 sek. 3a Bknioubahe nlia n3knioubahe - Pentru activare sau dezactivare, mentinei apâsarea timp de 3 sec. - Držite 3 sek. za uključivanje ili isključivanje | |
| 2 | Sleep/Wake | |
| - Press 1 sec. for Sleep or Wake - 1 sec. indrukken voor Slaapstand of uit Slaapstand - Für Betriebszustand 1 Sek. drucken - Appuyez pendant 1 s pour la mise en veille ou le réveil - Pulse 1 s para que la tableta entre en el estado de inactividad o activarla - Pressione 1 seg. para suspensão ou Wake segundos para ligar ou desligar - Nacijsnij przyze 1 sek., aby przelaczyc w stan uspienia lub wybudzić - Stisknutim po dobu 1 s spustite režim spanku nebo probuzeni - Stláčte 1 sek. pre spanok alebo prebudenie - Tryk på 1 sek. til slumre-eller Wake - Tryck på 1 sek. für att sova erer Wake - Pártñóte 1 δeuteρólettno. yia tvny katáotaaŋ vápknç ñ Wake | - Premere 1 sec. per la funzione Sleep o Wake (Sveglia). - Haxkmaite B touche nme 1 c dnia nepexoda B cπaúnien pexkma nlia npodolxehna pábotby - Trykk 1 sek. for standby erler gâ ut av standby - Pritisnite 1 sek. za spanje ali bujenje - Hatackmaite npotrayom 1 c dnia nepexody y cπaúnien pexkma abo npodobxenehna pavotni - Nyomja 1 mp-ig az alváshoz vagy felebresztéshez - Hatachete 1 sek. 3a zacnibahe nlia c6bukdahe - Pentru stare de repaus sau reactivare, apâsaşi timp de 1 sec. - Pritisnite 1 sek. za spavanje ili budenje uredaja | |
| - + | Volume - + | - Volume up or Down - Volume harder of zachter - Leiser oder laute - Augmentez ou baises le volume - Subir o bajar volumen - Aumentar ou diminuir volume - Zwiekszanie lub zmieje szanie poziomu glośnosci - Zvyseni nebo sniženi hlasitosti - Zwysenie alebo zniženie hlasitosti - Lydstyrke op uller ned - Justera volymen uppãt uller nedât - Aúξηση ñ μειωση tnc Évtáσης íxou | - Aumento o abbassamento del volume - Пераочател уBELУчЕпял умению грмкости - Volum opp aller ned - Jakost +: Povečanje ali zmanjišanje jakosti - Кавішу ratуност - Виб有必要! - Hangerö fel vagy le - УсILA ве пималега сменета на звука - Creşteraea sau reducerea volumului - Glasnoća + i - |
| O O | Built-in Camera | - Built-in Camera - Ingeboudwe Camera - Integrierte Kamera - Caméra intégrée - Camara integrada - Camara incorporada - Wbudowana camera - Zabadovany fotoparát - Zabadovany fotoparát - Indbygget kamera - Indbygdd kamera - Evóμatwμévn Káμε | - Fotocamera integrata - Bстroeоньamy камер - Innebygget kamera - Vgrajena kamera - Бухована камер - Stalma - Beépitett kamera - Brpadena kamepa - Camerä incorporata - Slusalice - Ugradena kamera |
| Built-in Microphone | - Built-in Microphone - Ingeboudwe microfoon - Integriertes Mikrofon - Microphone intégre - Micrófono integrado - Microfone incorporado - Wbudowany mikrofon - Zabadovany mikrofon - Zabadovany mikrofon - Indbygget mikrofon - Inbygdd mikrofon - Evóμatwμéνo Míkρóφυvo - Microfono integrato - Bстroeоньamy камер - Innebygget mikrofon | - Vgrajeni mikrofon - Буховanity мікрфон - Stsɔrɔfion - Beépitett mikrofon - Brpaden мінрфон - Microfonet incorporat - Ugradeni mikrofonn | |
| Speaker Stereo | - Built-in Speaker - Ingebouwde speaker - Integrierter Lautsprecher - Haut-parleur intégre - Altavoz integrado - Alto-falante embutido - Wbudowany glósnik - Zabudovaný reproductor - Zabudovaný reproductor - Indbygget højttaler - Inbyggd högtalare - Evöωματωμévo ηχείο | - Altoparlante integrato - BystroeHHbI dɪnʌmɪk - Innebygget høyttaler - Zvočnik Mono: Vgrajeni zvočnik - Bşydobánni dɪnʌmɪk - ādʒaŋcHQ - Beépītett hangszóró - Brpaşen bɪscoKorOBopɪtěn - Difuzor/incorporat - Ugrädeni zvučnik | |
| Headphones 3.5 mm | - Headphones - Hoofdtelefoon - Kopfhörer - Casque - Auricular - Auscultadores - Sluchawki - Sluchátka - Sluchadlá - Hovedtelefoner - Hörllar | - Akouotíká - Cuffie - Hayshynsk - Hodetelefoner - Slušalke - Habyshynsk - Slažaçat, rəs - Fejhallgató - Cnyuank - Căşti - Slušalice | |
| USB | - Micro USB Port - Micro USB Poort - Micro USB Anschluss - Port micro USB - Micro usb puerto - Porta micro USB - Port micro USB - Micro usb portu - Micro usb portu - Micro usb port - Mikro-USB-port | - Micro USB θúpa - Micro porta USB - Micro USB nopT - Micro USB-port - Mikro USB - Micro USB nopT - Micro USB - Micro USB - Micro USB Port - Micro USB nopT - Micro USB Port - Micro USB prɪključak | |
| MicroSD Up to 32 GB | MicroSD Slot - MicroSD Slot - MicroSD-Einschub - Emplacement carte MicroSD - Ranura para tarjetas MicroSD - Ranhura para cartão MicroSD - Gniazdo karty MicroSD | - Slot pro MicroSD - Slot na Micro SD kartu - MicroSD-stik - MicroSD-kortplats - Ytnoðoyñ MicroSD - Slot per MicroSD - Paʒbem對於 Kaptrbl MicroSD | |
| MicroSD Up to 32 GB | - MicroSD spor | - MicroSD nyilás | |
| - Reža za MicroSD | - Cnot 3a MicroSD kapta | ||
| - Ги dia do lámpу пам'яп | - MicroSD Slot | ||
| MicroSD | - MicroSD utor | ||
| - MicroSD | - MicroSD utor | ||
| Reset | 32GB MicroSDHC™ 32 GB FAT32 For more information about MicroSD formatting see forum yarvik.com | ||
| - Reset button | - Äterställningsknapp | ||
| - Reset knop | - ПлелктоуЕстоворас | ||
| - Reset-Taste | - Pulsante Reset | ||
| - Bouton de réinitialisation | - Кнока сбраза | ||
| - Botón Reset (Restablecer) | - Reset-knapp | ||
| - Botão Reiniciar | - Gumb za ponastavitev | ||
| - Przycisk resetowania | - Кнока сбдань | ||
| - Tlačitko Vymazat | - Visszaàllitas gomb | ||
| - Tlačidlo resetovania | - Бутон Нунише | ||
| terställingsknapp | - Buton de resetare | ||
| - Knappen Reset [Nulstil] | - Tipka za resetiranje | ||
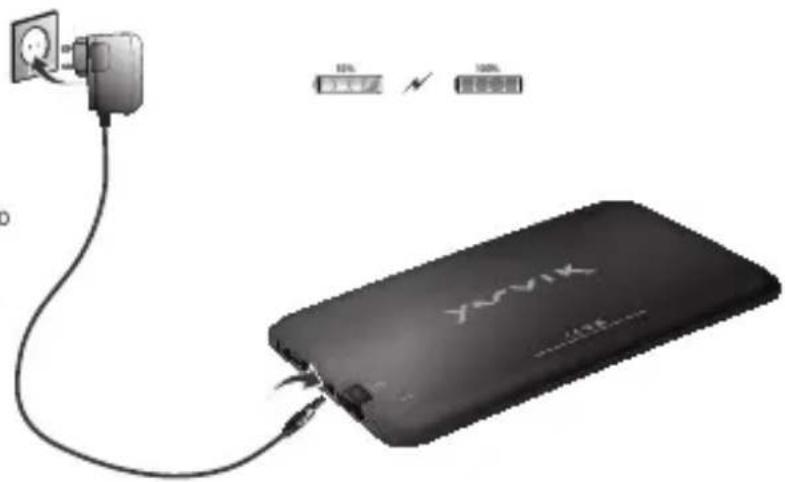
Charging
Opladen / Laden / Chargement / Carga / Carregamento / Ladowanie / Nabijeni / Nabijanie / Opladning / Laddning / Option
/Carica/3apdxa/Lading/Poljnenje/3apxkennnakmyntopa/10tles/3apezdahe/Incarcare/Punjenje
- Use only the supplied AC adapter
- Gebruik alleen de bijgeleverde AC adapter
- Verwenden Sie ausschließlich das mitgelieferte Netzteil
- Utilisez seulement l'adaptateur CA fourni
- Use exclusively el adaptor de corriente de CA incluido
- Utilize開放 o adaptador de CA fornecido
- Korzystaj lyliko z dostarczonego zasilacza pradu zmiennego
- Pouzivejte pouze dodany AC adaptor
- Použivajte iba dodany siefovy adapter
- Brug kun den medfalgende AC-adapter
- Använd endast den medfoljande natadaptern
Xpnaiparotnnte pova to npapexpevo tpoaoaAC - Ubilizzare solo l'adattatore CA fornito.
*Ncnonb3yIe TOnbKO BXo4aunB KOMnNEKT cTeBOH aADANTep - Bruk bare medfolgende AC*adapter
- Uporabite le prilozeni napajalnik AC
Bukopctobyte TINbKN TOB 6NOK XMBENHRA, OBOXDNb DO KOMNNEKTY NOCTAHHH
aag aaj jai jil jgno pann
- Csak a melékelt halózati adapterter használáj
*Hanon3BaTe cAmo CdoCTaBeHHr AC adanTep - Utilizati numai adaptorul CA furnizat
- Koristile samo isporčeni naponski adapter
USB
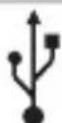
-USB cable
-USB kabel
-USB Kabel
- Cable USB
-USB cable
-CaboUSB
-USB kabel
-USB kabel
-USB kabel
-USB-kabel
-USB-kabel
-Kaawo USB
- Cavo USB
-USB-ka6enb
-USB-kabel
-KabelUSB
-USB-ka6enb
-USBJ
-USB kabel
-USB ka6en
- Cablu USB
-USB kabel
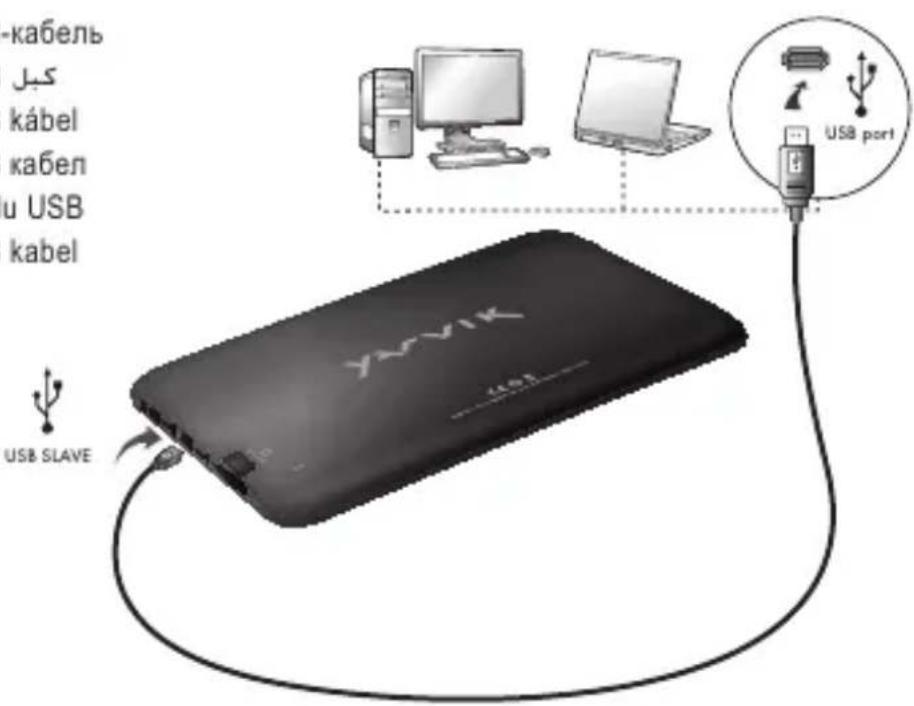
Android Home Screen
Android Home scherm / Android Startbildschirm / Page d'accueil Android / Pantalla de inicio de Android / Ecrã principal do Android / Ekran domowy systemu operacyjngo Android / Domovska obrazovka Androidu / Omáca obrazovka Android / Skaarmen Android Home [Android Hjem] / Android Startskärm / H Apxikn Oθóvn tou Android (Home) / Schermata Home di Android / ΓλανΗι Εκραη Android / Android startskjerm / Domaci zaslon Android / ΓολοΒΗι εκραη Android / Android kezdoképernyo / Ḥаνανη εκραη ha Android / Ecran de inceput Android / Android početni zaslon
EN
- On the bottom of the Luna screen you can always find the status bar. The status bar contains both system information and function buttons.
NL
3 Getting on the Internet
Internet instellen / Zugriff auf das Internet / Accès à Internet / Como acceder a Internet / Aceder à internet / Lactzenie z Internetem / Pripojeni k internetu / Pripojenie k internetu / At comme pa internett / Ga ut pa Internet / Suvdoqon 10 Internet / Collegamento a Internet / PoiKnOueHne K INTepHeTy / Koble til Intenett / Kak se povezati na internet PienknoeHHa do INTEpHeTy / Kapcsolodas az Internetre / Cbbp3Bahe KBM INTepHeT / Conectare la Internet / Spajanje na Internet
- Slide the lock bar (A) to the right (B) to unlock
Schuif de vergrendeling (A) maar rechts (B) voor ontgrendelen
Sperrsymbol (A) zum Entsperren nach rechts (B) schieren - Faites glisser la barre de verrouillage (A) vers la droite (B) pour déverrouiller.
Deslice la barra de bloqueo (A) hacla la
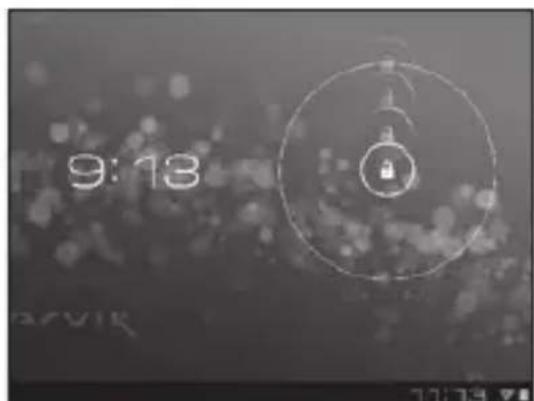
3 Slide the On/Off button to "On"
Schuif de Aan/uit-knop op "Aan"
Ein/Aus-Schaltfläche auf „On“ („An“) schieben.
- Faites glisser le bouton marche/arrêt pour l'allumer.
- Deslice el botón On/Off (Activado/Desactivado) hasta la posición "On" (Activado)
- Deslize o botão On/Off (Ligar/Desligar) para a posicao "On" ("Ligado")
- Przeciagnij przyȩćznik do poźycji „On" ("Wł.")
- Přétáhněte tlacitko Zap./Vyp. na „On“ („Zap.”)
Posunte yvpinač do polohy „On“ („Zap.”)
Glid knappen On/Off [Til/fra] til "On" [Til]
Skjut På/Av-knappen till "På"
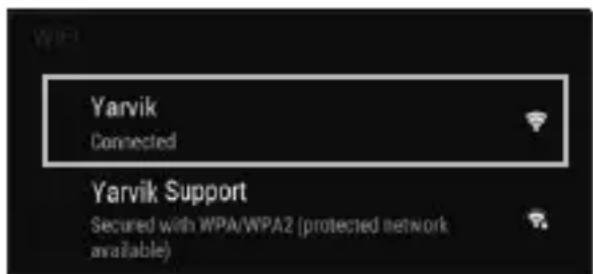
4.1. Non secured, Tap the network of your choice.
- Niet beveiligd, tik op het netwerk van uw keuze.
- Bei ungesichertem Netzwerk auf das gewünschte Netzwerk tippen.
- Non sécurisé, Sélectionnez le réseau de votrechoix.
- No protegida, pulse la red a la que desee conectarse.
- Se não estiver protegida, toque numa rede à sua escolha.
- Niezabezpieczona; dotknij wybranej sieci.
- Nezabezpečeno, klepněte na libovolnou sít'.
- Nezabezpečene,Poklepte na siet' podla vlastného vyberu.
- Ikke sikret. Tap på foretrukket netværk.
- Icke saker, Peka pà det natverk du vill valja.
Xwpi aαφαλεια, ayyiετo επθμηntó δiktuo.
Non protetta, selezionare la rete che si desidera. - Ecnn ceTb Non secured (He3aunueHa), Bbl6epnte ee.
- Usikret nett, trykk på onsket nettverk.
- Non secured (Nezavarovano), Dotaknite se zeelenega omrežja.
- RaKuo MepeKa Non secured (He3axueta), Bn6epitb ii.
1
Non secured (NemBiztonsagos), erintse meg a kivant halozatot.
Ako e Non secured (He 3aunTeHa), HATnCHeTe Bbpxy Mpeka no n36op.
- Reţea Non secured (Nesecurizata), inscrieti reţeaua alesă.
Non secured (Neosigurane) mreze, dodirnite naziv mreze
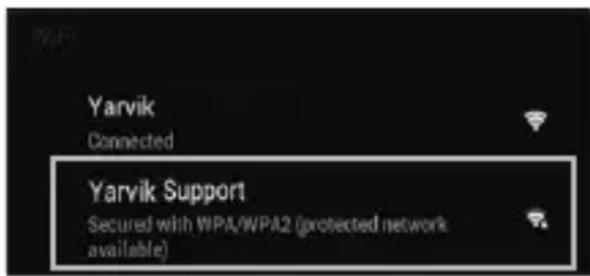
4.2. Secured Network, Type password then press Connect.
- Beveiligd network, vul wachtwoord in en klik op Connect (Verbinden).
- Bei gesichertem Netzwerk Kennwort eingeben und Connect (Verbinden) drücken.
Réseau sécurisé, tapez le mot de passer puis appuyezsur « Connect » (Connector). - Si la red está protegida,oniaa y pulse Connect (Conectar).
Se foruma rede protegida, digite a palavrapasse e deposito prima Connect (Ligar). - Zabezpieczona siec; wpwadz Password (Haslo) i nacijsnij Connect (Połacz).
- Zabezpečena sít, napište Password (Heslo), poté stisknéte Connect (Pripojit).
- Zabezpećená siet', napíste Password (Heslo) a potom stlačte Connect (Pripojit).
- Sikret netværk. Indtast adgangskode, og tryk derefter på Connect [Tilsnut].
Skyddat nätverk, ange lösenordet och tryck sedan på Connect (Anslut). - Δíktuo με ασφαλει, πληκτρολογόne Tov Kωδικό προσβασης και πατήσe Connect (Σύνδεση).
- Rete protetta, digitare la password, quando premere Connect (Connetti).
- Ecnn cetb Secured (3aunueHa), BBeinte npoJIb, a 3aTeM haxmnte KhoNky Connect
(NOdknUeHna)
-
Sikret nett, skriv inn passord og trykk Connect.
Secured Network (Zavarovano omrežje), Vtipkajte geslo in pritisnite Connect (Poveži).
-ЯкwoМерекaSecured(3axueta),BVeIb napoIb ta HATNCHTb KnaBiwy Connect (iDKNIOUeHnHa). -
1c hewol p 11 aols 1 ai o Connect
Secured (Biztonságos) halózat, adja meg a jelszót és érintse meg a Connect (csatlakozás) gombot.
Secured (3aunTeHa)Mpexa, HanuweTe npoIata n cneTToBa HATNCHe Connect (Cbbp3BaHe).
- Reţea Secured (Securizata), inscrieti parola, apoi apăsăti pe Connect (Conectare).
Secured (Osigurane) mreze, upisi te lozinku i pritisnite Connect (Spoji)
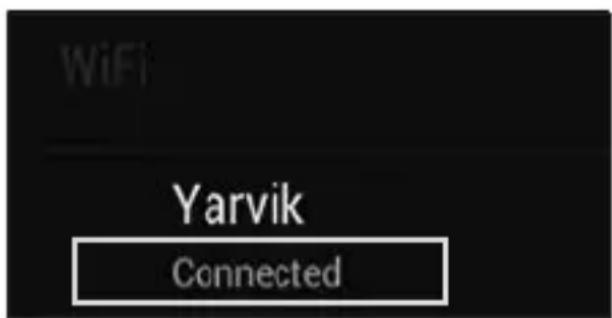
- Check Wi-Fi connection.
- Controller Wi-Fi verbinding.
WLAN-Verbindung überprüfen.
Vérifiez la ae la conexión Wi-Fi. - Verifique a ligaçao Wi-Fi.
Sprawdź stan połaczenia Wi-Fi. - Kontrola Wi-Fi pripojeni.
- Skontrolujte pripojenie Wi-Fi.
- Kontroller Wi-Fi-tilslutning.
- Kontrollera Wi-Fi-anslutning.
- Eλεγετησύνδεση Wi-Fi.
- Controllare la connessione Wi-Fi
-П р ов eр b T e Wi-Fi-coeДиЕнHe. - Sjekk den tradlose tilkoblingen.
Preverite Wi-Fi povezavo.
IepeBipTeWi-Fi-niknueHH
Wi-Fi.
J 1 J 1 J 1 J 1 J 1 J 1 J 1 J 1 J 1 J 1 J 1 J 1 J 1 J 1 J 1 J 1 J 1 J 1 J 1 J 1 J 1 J 1 J 1 J 1 J 1 J 1 J 1 J 1 J 1 J 1 J 1 J 1 J 1 J 1 J
HU
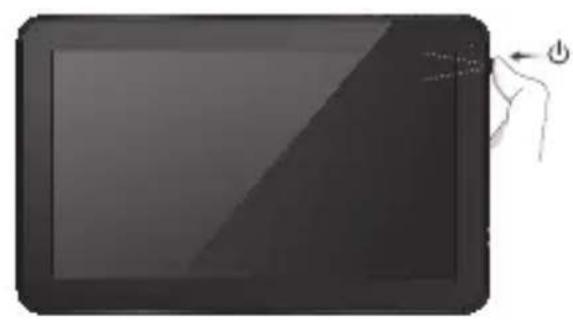
1 Hold for 10 seconds
10 secondengedrukt houden
10 Sekunden gedrück halten
Appuyez pendant 10 secondes
- Mantenga pulsado durante 10segundos
- Mantenha premidos durante 10 segundos
- Przytrzymaj przytez 10 sekundy
Pridrzte po dobu 10 sekund
10 sekundy podrzte
Hold i 10 sekunder
Hallnedi10sekunder
Kpatnate yia 10 eutepeoAeTTA
- Tenere premuto 10 secondi.
- YdepxnBaIte B TeueHne 10 cekyHd.
Holdinne10 sekunder.
Drzite 10sekunde
- YtpmmyTe npotrarom 10 cekyHd.
10 1
Tartsa 10 masodpercig
3aDpBxTe 3a 10 ckyHn.
Asteptati 10 secunde.
Drzite 10 sekundi.
Start up after Soft Reset
- To Start up: Hold for 5 seconds, tablet will start up
- Tablet weeopstarten:5 secondindrukken,Tablet start op
-Einschalten: 5 Sekunden gedrück halten; das Tablet startet - Pour démarrer : appuyez pendant 5 s, la tablette se met en marche
- Para起初 el dispositivo: mantenga pulsado el botón durante 5segundos y la tabletae se encenderá
- Para arrancar: Mantenha premido durante 5 segundose o tablet arranca
- Aby uruchomic: Nacisnij i przytrzymaj przytez 5 sekundy; tablet uruchomi sie
- Spusteni: Pridrzejte po dobu 5 sekund, tablet se spusti
- Spustenie: Podrzej 5 sekundy a tablet sa spusti
- Start: Hold i 5 sekunder, og tablet'en vil starte
- For att starta: Hall intryckt i 5 sekunder, och surfplattankommen att starta
- Tia Ekkivnane: Kpatnate natapevo yia 5 deutepoentkaai n taunetae aekivnoe
- Per l'avvio: tenere premuto 5 secondi, il tablet si avvia.
Hauano paobtby: ydepxmbaite B TeueHne 5 cekyhd, TTObblkIOHTb nnahwET. - For à partir: Holdinne i5 sekunder, tableen starter opp
- Držite gumb vklopizklop 5 sekunde in tablčni računalinik se bo zagnal
- Po3noaTHpo6Oy: yTPMMyTe npOTAROM 5 c dnn yBIMKHeHHnnaHweta.
jssSJJ J 5 aI
-Az inditashoz: Tartsa 5 masodpercig, hogy a tabla elinduljon
-3a da ctaptnpate: 3aepbxtte 3a5cekyndn,tabetae ctaptnpa
- Pentru a demara:mentionand apasat timp de 5 secunde, tableta se va activa.
- ZaPokretanje:Drzite 5 sekunde,tablet ce se pokrenuti
EC Declaration of Conformity
We,
YARVIK
Ampereweg 3
2627BG Delft
The Netherlands
Declare under our sole responsibility that the product:
Brand name : YARVIK
Model no. : TAB07-150 / TAB07-151 / TAB07-152
Product description : Luna 7" tablet
Compliance with the essential requirements of the following Directives is declared:
-EMC DIRECTIVE : 2004/108/EC
-LVD DIRECTIVE : 2006/95/EC
-R&TTE DIRECTIVE 1999/5/EC
-ROHS DIRECTIVE : 2011/65/EU
To which this declaration is based on with full conformance to the following European norms and standards:
Tablet
-EMC : EN 55022:2006 + A1:2007
EN 55024:1998 + A1:2001 + A2:2003
EN 61000-3-2:2006
EN 61000-3-3:2008
Signed, Delft, 25-04-2013
YARVIK

R. Ramaekers,
Purchase Director
Important information
C E ①
Wireless LAN-Regulatory information
Depending on the model, the wireless LAN built-in into tablet devices can only be used in the following countries: Austria, Belgium, Bulgaria, Czech Republic, Denmark, Finland, France, Germany, Greece, Hungary, Iceland, Ireland, Italy, Luxembourg, the Netherlands, Norway, Poland, Portugal, Romania, Slovakia, Slovenia, Spain, Sweden, Switzerland, Turkey and the United Kingdom.
Conditions of use
When using the IEEE 802.11b/g/n Wireless LAN standard, channels 1 to 13 (2.4 GHz ...2.4835 GHz) are selectable for both indoor and outdoor use, however with restrictive conditions applying in France, Italy and Norway, as follows:
- France: When using this product indoor, all channels can be used without restrictions. Outdoor only channels 1 to 6 are allowed. This means that in Peer-to-Peer, the WLAN feature can only be used outside if the peer sets up the communication on an authorized channel (i.e., between 1 & 6). In infrastructure mode, please make sure the access point is configured to a channel from 1 to 6 before setting up the connection.
- Italy: Use of the RLAN network is governed: Disposal of Old Electrical & Electronic
with respect to private use, by the Legislative Decree of 1.8.2003, no. 259 ("Code of Electronic Communications"). In particular Article 104 indicates when the prior obtainment of a general authorization is required and Art. 105 indicates when free use is permitted;
with respect to the supply to the public of the WLAN access to telecom networks and services, by the Ministerial Decree 28.5.2003, as amended, and Art. 25 (general authorization for electronic communications networks and services) of the Code of electronic communications. - Norway: Use of this radio equipment is not allowed in the geographical area within a radius of 20km from the centre of Ny-Alesund, Svalbard.
WEEE Symbol Information
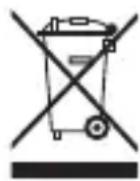
Correct Disposal of This product (Waste Electrical & Electronic Equipment).
(Applicable in the European Union and other European countries with separate collection systems).
This marking shown on the product or its literature indicates that it should not be disposed with other household wasted at the end of its working life. To prevent possible harm to the environment or human health from uncontrolled waste disposal, please separate this from other types of wastes and recycle it responsibly to promote the sustainable reuse of material resources. Household users should contact either the retailer where they purchased this product, or their
local government office, for details of where and how they can take this item for environmentally safe recycling.
Business users should contact their supplier and check the terms and conditions of the purchase contract. This product should not be mixed with other commercial wastes of disposal.
Disposal of waste batteries (applicable in the European Union and other European countries with separate collection systems)
Either of the symbols shown next may appear on the battery or on the packaging to indicate that the battery provided with this product shall not be treated as household waste. On certain batteries this symbol might be used in combination with a chemical symbol. The chemical symbols for mercury (Hg) or lead (Pb) are added if the battery contains more than 0.0005% mercury or 0.004% lead. By ensuring these batteries are disposed of correctly, you will help prevent potentially negative consequences for the environment and human health which could otherwise be caused by inappropriate waste handling of the battery. The recycling of the materials will help to conserve natural resources. In case of products that for safety, performance or data integrity reasons require a permanent connection with an incorporated battery, this battery should be replaced by qualified service staff only. To ensure that the battery will be treated properly, hand over the product at end-of-life to the applicable collection point for the recycling of electrical and electronic equipment.
For all other batteries, please view the section on how to remove the battery from the product safely. Hand the battery over to the applicable collection point for the recycling of waste batteries. For more detailed information about recycling of this product or battery, please contact your local Local government Office, your household waste disposal service or the shop where you purchased the product.
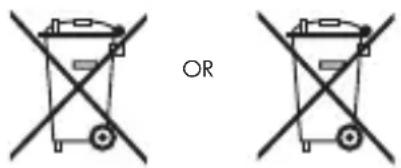
Pb
When travelling to and within the United States of America, please be aware that the U.S. Department of Transportation (DOT) recently published new regulations that apply to passengers travelling with lithium metal batteries and lithium-ion batteries.
For detailed information, visit http://safetravel.dot.gov/whats_new_batteries.html.
Safety Information
Yarvik Tablet device
- Yarvik is not responsible for any interference that you may experience or that may be caused when operating this device.
-
Warning: We strongly advise to connect this device to a earthed wall socket when charging.
-
Opening or dismantling the main unit or any of its accessories, for whatever reason, could lead to damages that are not covered by the guarantee.
- To avoid electrical shock, do not open the cabinet. Refer servicing to qualified personnel only.
- To prevent fire or shock hazard, do not expose your tablet device or any of its accessories to rain or moisture.
- Do not use or store your tablet device in a location subject to heat sources, such as radiators or air ducts; direct sunlight; excessive dust; moisture or rain; mechanical vibration or shock; strong magnets or speakers that are not magnetically shielded; excessively high and low temperatures; and high humidity.
- Turning off your tablet device with the power button does not disconnect the device completely from mains voltage. To disconnect it completely, unplug the AC adapter or the power cord from mains. The socket-outlet shall be installed near the equipment and shall be easily accessible.
- Audio and picture distortion may occur if this equipment is positioned in close proximity to any equipment emitting electromagnetic radiation.
- This apparatus is also designed for IT power system with phase to phase voltage 230V, for customers in Norway.
- Observe the following precautions to provide adequate air circulation and to ensure normal reliable operation:
- Do not use the tablet device and/or the AC adapter while covered or wrapped in cloth. Ensure the AC adapter operates in a clear environment.
- Turn off the tablet device before putting the device into a bag or a carrying case.
- Do not use your tablet device directly on your lap. The temperature of the base of the unit will rise during normal operation and over time could result in discomfort or burns.
- Do not use your tablet device while walking. Listening to music with headphones or watching the LCD screen while walking may lead to an unexpected accident and result in personal injuries.

- Using connected headphones on the tablet device for too long and/or setting the audio volume up too high when using headphones may cause serious hearing damage.
- Avoid strong beating of or to the product.
- Don't operate the touch screen of the tablet device with sharp objects, as this may result in scratching the screen surface.
- Only use permitted batteries, chargers and accessories with your tablet device. The use of any other products with the device can be dangerous and may violate the warranty regulations.
- Only use a slightly wet cotton cloth to clean the device, and only use water to wetten the cotton cloth. The tablet device should not be cleaned with any sort of (glass) cleaning aid.
Wireless functionality
-
If radio interference with other devices occurs while using your tablet device, do not use the wireless functionality. Use of the wireless functionality may cause a malfunction of the devices, resulting in an accident.
-
In some situations or environments, the use of the wireless functionality might be restricted by the proprietor of the building or responsible representatives of the organization, for example on board airplanes, in hospitals or in any other environment where the risk of interference with other devices or services is perceived or identified as harmful. If you are uncertain about the policy applying to the use of wireless functionality in a specific organization or environment, you are encouraged to first ask for authorization prior to switching it on. Consult your physician or the manufacturer of personal medical devices (pacemakers, hearing aids, etc.) regarding any restrictions on the use of wireless functionality.
- If using wireless functionality near a pacemaker, make sure it is at least 19 inches / 50 cm away from the pacemaker.
- Due to the transmission and reception properties of wireless communications, data can occasionally be lost or delayed. This can be due to the variation in radio signal strength that results from changes in the characteristics of the radio transmission path. Yarvik will not be held responsible for damages of any kind resulting from the delays or errors in data transmitted or received via wireless functionality, or failure of wireless functionality to transmit or receive such data.
- If the equipment does cause harmful interference to radio/TV reception, which can be determined by turning the equipment off and on, the user is encouraged to try to correct the interference by one or more of the following measures: reorient or relocate the receiving antenna, increase the distance between the sender and the receiver, consult the dealer or an experienced radio/TV technician for help. Yarvik will not be responsible for any radio/TV interference nor for any other undesired effect.
Wireless LAN Security
Creating security settings for the Wireless LAN is extremely important. Yarvik assumes no responsibility for any security problems that may arise from the use of the Wireless LAN.
Battery pack
Do not charge the battery pack in any way other than as described in the Start guide or as designated by Yarvik in writing.
AC adapter
- It is highly recommended that you use a genuine Yarvik AC adapter supplied by Yarvik for your product.
- This AC adapter is intended for use with the tablet device IT products only.
- Do not place the AC adapter in contact with your skin. Remove the AC adapter away from your body if it becomes warm and causes discomfort.
RoHS
This products has been certified as RoHS Compliant.
Dimensions, specifications, images & illustrations
All dimensions, specifications, images and illustrations are subject to change without prior notice.
Dimensions, specifications, images et illustrations
Please consult the legal information available on your Tablet under Settings - About device - Legal information or visit http://source.android.com/source/licenses.html for more information (internet connection required)
Please visit our website for CE declaration: www.yarvik.com

facebook.com/yarvik

twitter.com/yarvikce

youtube.com/yarvikce

forum.yarvik.com


- Getting on the Internet
- When a Problem Occurs
- Soft Reset via Reset Button
- Package Content
- Buttons & Connections
- Charging
- USB
- Android Home Screen
- EN
- NL
- HU
- Start up after Soft Reset
- EC Declaration of Conformity
- Tablet
- Important information
- Wireless LAN-Regulatory information
- Conditions of use
- WEEE Symbol Information
- (Applicable in the European Union and other European countries with separate collection systems).
- Disposal of waste batteries (applicable in the European Union and other European countries with separate collection systems)
- Safety Information
- Yarvik Tablet device
- Wireless functionality
- Wireless LAN Security
- Battery pack
- AC adapter
- RoHS
- Dimensions, specifications, images & illustrations
- Dimensions, specifications, images et illustrations
Brand : Yarvik
Model : Gotab
Category : Tablet