Secomat 100 - Tumble drier Krüger - Free user manual and instructions
Find the device manual for free Secomat 100 Krüger in PDF.
Frequently Asked Questions - Secomat 100 Krüger
User questions about Secomat 100 Krüger
0 question about this device. Answer the ones you know or ask your own.
Ask a new question about this device
Download the instructions for your Tumble drier in PDF format for free! Find your manual Secomat 100 - Krüger and take your electronic device back in hand. On this page are published all the documents necessary for the use of your device. Secomat 100 by Krüger.
USER MANUAL Secomat 100 Krüger
Chere cliente, cher client,
Operating instructions
DeutschSeite2
Français Page 19
Italiano Pagina 37
English Page 55
dehumidify
heat
cool
refresh
Legal notice
These operating instructions were published by
Krüger + Co. AG
Winterhaldenstrasse 11
CH-9113 Degersheim
T0848370370
info@krueger.ch
www.krueger.ch
All rights, including that of translation, reserved. Reproduction of any kind, e.g. photocopying, storage on microfilm or capture in electronic data processing systems, requires the written agreement of the publisher. Reprinting, in part or in whole, is prohibited. These operating instructions correspond to the technical state of the product at the time of printing. We reserve the right to modify the technology and equipment.
Kruger + Co. AG
These operating instructions contain important information regarding initial use and handling. Please observe them in full even when you pass the device on to a third party, and store them for reference at a later date.
Table of contents
57 Legal notice
59 Key
60 Introduction
61 safety notices
62 operating instructions
Intended use Description of system Transport Storage Installation
63 Fitting the washing line
64 operation
Function keys Starting up Choosing the appropriate drying programme
65 Dehumidifying Manual mode Optional additional heating
66 Cleaning Disposal
67 Faults
68 Technical data
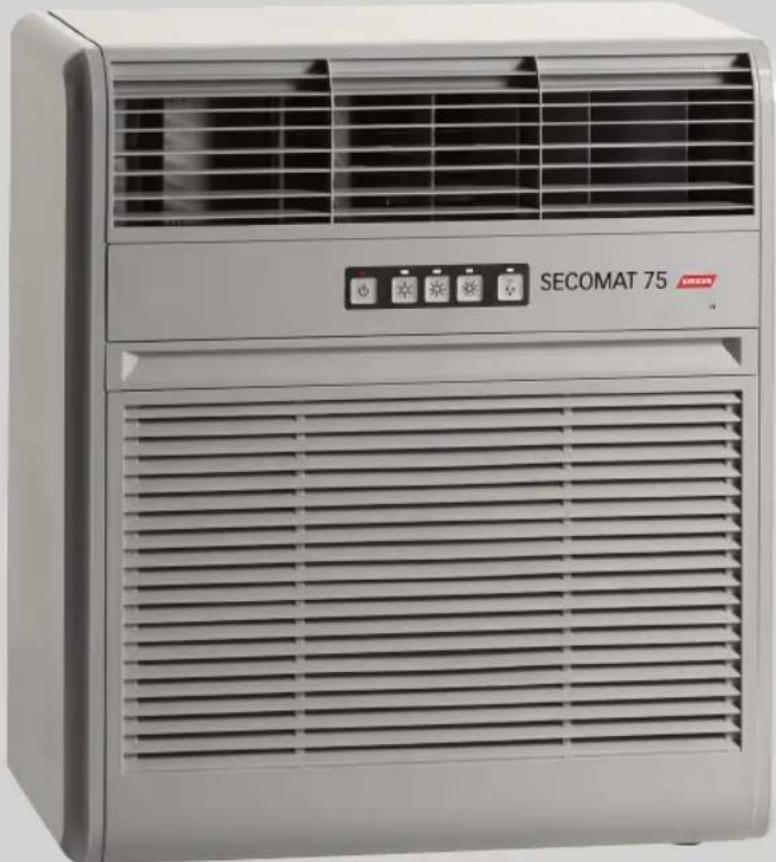
69 Mounting SECOMAT 75
71 Mounting SECOMAT 100/150/200
Key
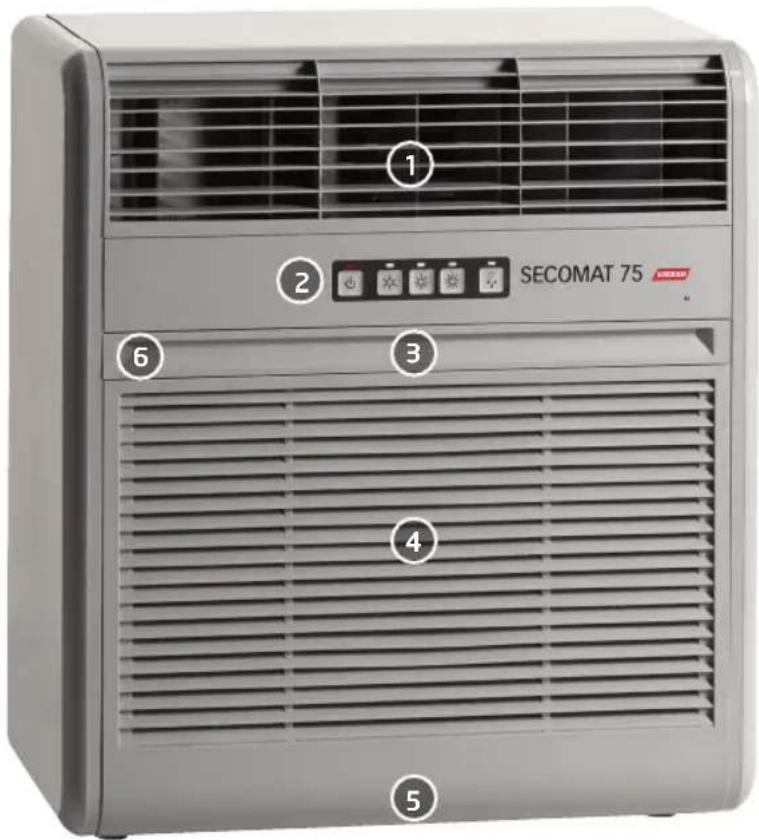
1 Exhaust opening with slats
2 Operating unit
3 Fluff filter
4 Intake opening
5 Water drain with 14 -inch thread
Reset button (behind filter opening)
Dear customer
Congratulations on purchasing our product.
Please read the operating instructions in full before using the dryer. Pay particular attention to all safety notices. Our device is EMC-tested and satisfies the requirements of the current European and national guidelines. CE conformity has been demonstrated, and the manufacturer holds the corresponding declarations.
If you have any questions, do not hesitate to contact our technical support team:
Tel. 0848 370 370 or +41 71 372 82 82
Fax +41 71 372 82 52
info@krueger.ch
www.krueger.ch
Safety notices
- This device is not a toy. It must therefore always be used and stored out of reach of children.
- The device may only be installed in line with the national connection conditions.
- Never place fingers or objects in the device openings. Risk of injury!
- Always switch the device off when it is not being used. Do not allow the electric cable to come into contact with a hot surface.
- Disconnect the mains plug in the event of faults and before cleaning and maintenance.
- Never disconnect the plug from the socket by pulling the mains cable or by touching with wet hands.
- Never pull the device by the mains cable.
- Do not pull the mains cable over sharp edges and be sure not to pinch it.
- Do not start up the device (disconnect mains plug immediately)
If damaged.
If you suspect a defect after the device has been dropped or similar. In these cases, have the device checked by a (refrigeration) specialist and repaired if necessary.
If the mains cable is damaged. In this case, the manufacturer, the manufacturer's customer service or another qualified specialist must replace it.
- Never use the device in standing water! Before stepping into a puddle, first disconnect the device or unscrew the fuse.
- Do not place heavy objects on the device and do not sit on it.
- We assume no liability for any damage if the device is used for anything other than its intended function or is incorrectly operated or not properly repaired. Your warranty claim ceases to apply in such cases.
Operating instructions
Intended use
This device is designed specifically for drying laundry. The room-dehumidifying function can also be used to keep rooms dry.
Description of system
The SECOMAT produces dry air that it blows onto the laundry by means of a ventilator. The items of laundry release humidity into the ambient air. The damp air is absorbed by the device and passes over the cooled surface of the cooling unit, where the steam condenses. The condensed air is then taken to a container or siphon outlet via the collecting tray. The dry air is warmed back up to the original room temperature in the warm part of the cooling unit before being blown out via the ventilator.
Transport
Always transport the device upright. This prevents damage to the compressor and damage in transit.
Storage
If you do not intend to use the device for a long time, you must clean the water bucket and housing before taking into storage. It is then best to pack the device in its original box.
Installation
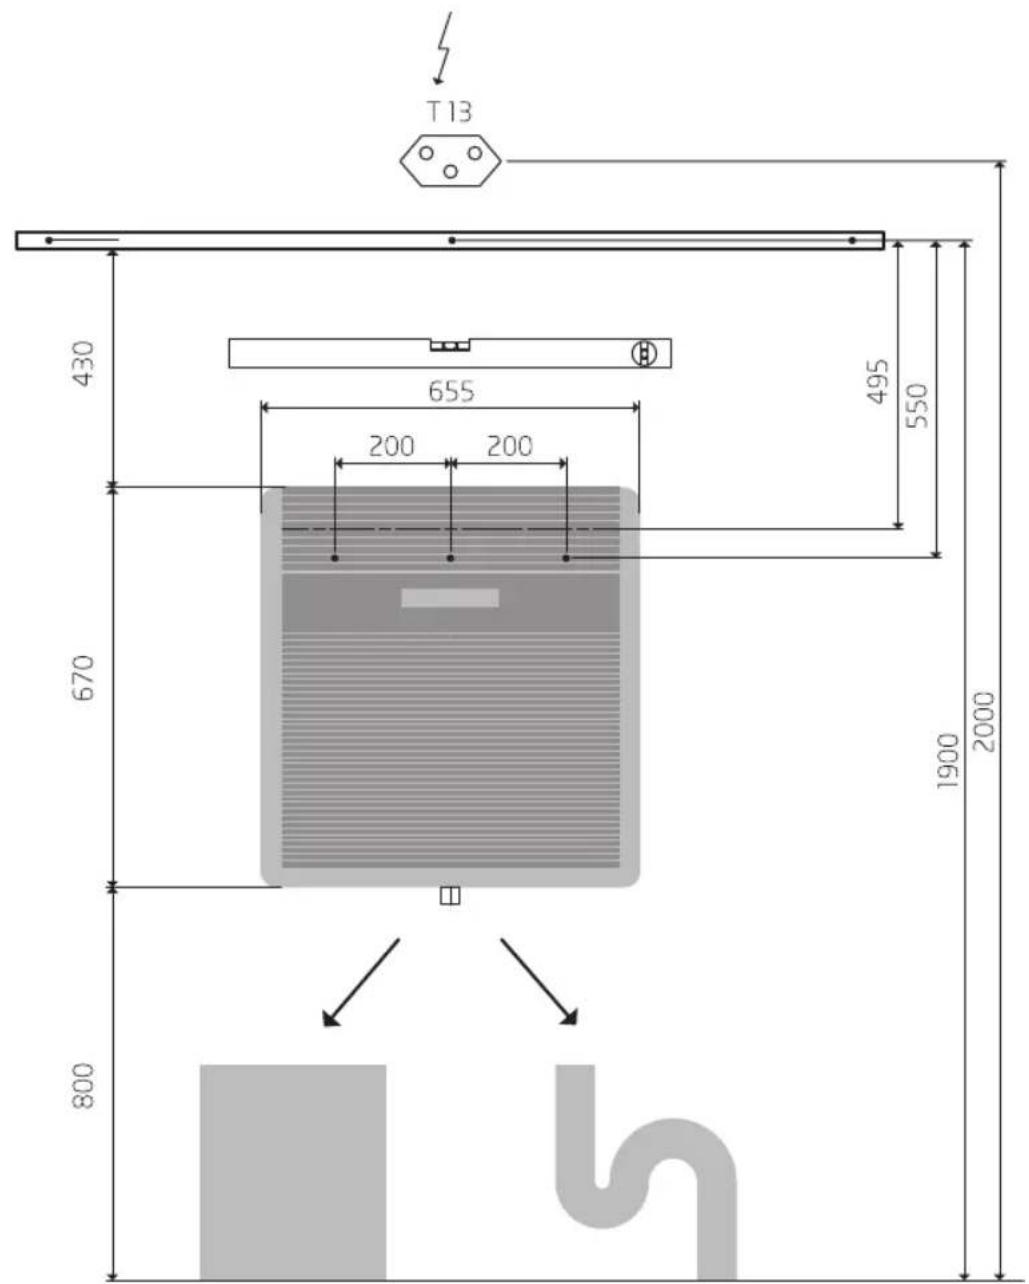
- Mount the fixing rail supplied to the wall 55 centimetres below the drying rack.
- Hang the device from this rail and secure it against accidental removal with screws to the left and right.
- Make sure the device is correctly aligned vertically and horizontally. Use a spirit level to check.
- Keep a safety clearance of 8 centimetres from any flammable materials. The mains plug must still be easily accessible after mounting.
Room temperature of normal version: min. +10^ , max. +30^
Room temperature of version with additional heating: min. +5°C, max. +30°C
If water is collected in the bucket, it must be emptied regularly. Depending on the temperature and humidity of the air, the bucket may fill once or twice a day. Water damage will occur if the bucket is not emptied.
Attaching the hose
- Fit the connecting piece (straight or angled) to the thread on the bottom of the device.
- Pull the hose over the connecting piece.
- Insert the end of the hose into the outlet pipe (preferably siphoned).
Where possible, lead the water away directly.
Fitting the washing line
To achieve optimum drying results, please mount the washing line as follows:
Wrong
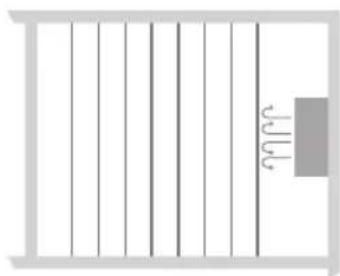
The washing is hanging across the dryer, obstructing the air flow and making the washing hanging behind dry much more slowly.
Good
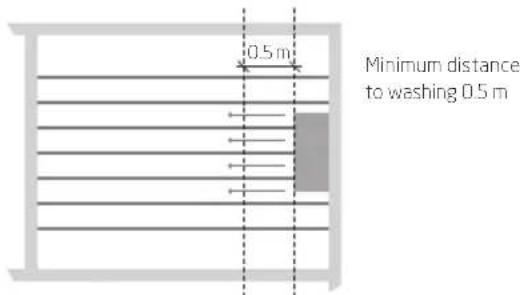
The air can circulate and reach even the items at the back.
Optimal
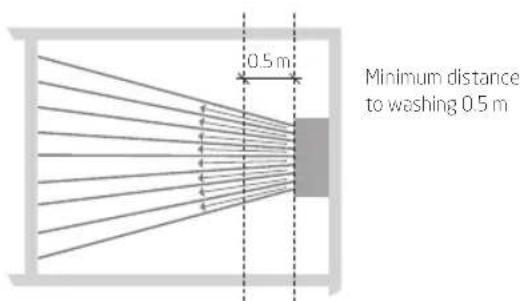
The radial line system developed by Krüger is perfect for the condensation drying method and achieves the shortest drying times.
Make sure there is at least 0.5 metre between the outlet opening and the nearest piece of washing.
Operation
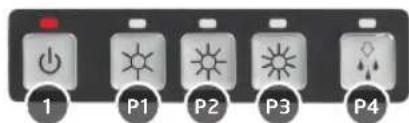
Function keys
1 Standby with red fault indicator
P1 Low washing drying level
P2 Medium washing drying level
P3 High washing drying level
P4 Room dehumidifying (blue LED display)
Starting up
- Close windows and doors
- Check that the cleaned filter is inserted correctly
- Press standby
- P1 P2 P3 Select programme selector key for dryness level
Choosing the appropriate drying programme
The programme can be selected to suit your needs.
P1 low washing drying level
Short drying time, the laundry retains residual humidity and is therefore easy to iron.
P2 medium washing drying level
Medium drying time, the laundry is dry but may still retain some residual humidity.
P3 high washing drying level
Longer drying time, the laundry is bone dry and can be folded immediately.
The air humidity in the drying room depends on the season. During the dry winter months, the device may turn off too soon. In this case, please switch to a higher level (P2 or P3). During the damp summer months, the device may stay on for longer than necessary. In this case, please select a lower drying level (P2 or P1).
The laundry dryer operates fully automatically. In other words, it dehumidifies for as long as the humidity in the room is above the set level of dryness. As soon as the desired level of humidity has been reached, dehumidification is interrupted. If the room humidity rises again, the device automatically switches back on. This process is repeated as often as
necessary until the desired level of dryness has been reached. The device then switches off permanently. If you want to turn the device on again, you have to restart it by hand.
Dehumidifying
P4 The room dehumidifying function can be switched on and off independently of the laundry drying function using the room dehumidifying button. When the function is activated, the blue LED display flashes. If the room dehumidifier function is active and the laundry drying function is switched on, then this controls the dehumidifier function. Once the laundry drying programme is complete, the unit automatically reverts to the dehumidifier function. This function remains active until it is switched off manually.
Manual mode
The manual mode can be used to dry one or a few items of washing. If you press and hold down one of the three function keys stated below for 5 seconds, automatic mode is activated for a defined time:
P1 Manual mode for 30 minutes
P2 Manual mode for 60 minutes
P3 Manual mode for 90 minutes
When manual mode is activated, the LED on the relevant function key flashes. Once the defined time has passed, the device switches off and manual mode is automatically deactivated.
Optional additional heating
In very cold drying rooms, the additional heating function can be used to enhance the drying function (see technical data on page 68). When you purchase the H model, this additional heating function has already been installed by the factory. It can be retrofitted to the normal version for an extra charge.
If room temperature is less than +14^ C, the additional heating switches on automatically and helps to heat up the dry air. If room temperature reaches +16^ C, the heating element switches off automatically. The heating capacity is adjusted according to the volume of air.
Cleaning
Cleaning the device:
- Wipe the housing with a damp cloth.
- Pull the air filter up and out of the device (hold on the left and right side).
- Dust the air filter with a brush and insert again.
Internal cleaning is needed if the device is very dirty. This maintenance work must be undertaken by a refrigeration specialist. Failure to undertake the maintenance work required may result in a device defect. Defects caused by failure to undertake maintenance work are excluded from warranty claims – especially if the filter has not been cleaned, resulting in the device overheating. To ensure a long service life and trouble-free operation, we recommend taking out a maintenance contract.
Disposal
The dehumidifier is filled with a refrigerant. It therefore requires special disposal. Please contact your dealer or the local waste disposal facility.
Faults
Before contacting the fault service team, please consult the following questions:
If the device is not running
Is the mains plug correctly plugged in?
Is the electric box's fuse OK?
Is the mains cable OK?
If the device is running constantly
Are the doors and windows closed?
Can humidity be originating from other sources?
Has the correct drying programme been selected (see page 64: Choosing the appropriate drying programme)
If the device is providing unsatisfactory dehumidification
Is the air circulating in the room?
Are the intake and exhaust openings unobstructed?
Is the room temperature too high or too low (see page 62)?
Is the filter clean?
Is there at least 0.5 metre between the outlet opening and the first piece of washing?
Are only a few or single items of washing hanging up? (see page 65: Manual mode)
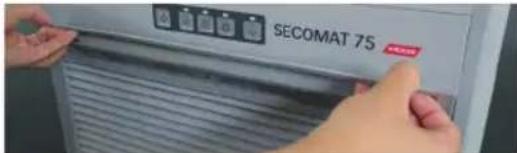
If the red fault lamp is flashing, the device is interlocked. Each fault has its own flash code. In other words, depending on the type of error, the lamp will flash at a different frequency. Establish the fault code and take a note of it before pressing the reset button (see page 59, no. 6) behind the filter. If the interlock cannot be reset despite several attempts, please contact the fault service team. Tell them the error code as well as the article no. and serial no. that can be found on the identification plate on the front left-hand side of the device. This will help to considerably improve troubleshooting.
Technical data
Technical data
| SECOMAT 75 100 150 200 | ||||
| Model without additional heating | ||||
| Quantity of laundry according to standard* | 7.5kg | 10.0kg | 15.0kg | 20.0kg |
| Energy efficiency class A A A A | ||||
| Drying capacity according to standard* | 1.36kg/h | 2.98kg/h | 3.17kg/h | 3.08kg/h |
| Drying time according to standard* | 5h 36 min | 3h 24 min | 4h 36 min | 6h 18 min |
| Sound pressure level according to standard* | 64 dB(A) | 71 dB(A) | 69 dB(A) | 65 dB(A) |
| Dim. W×H×D (mm) | 565×620×330 | 655×670×395 | 655×670×395 | 655×670×395 |
| Weight | 39kg | 47kg | 47kg | 47kg |
| Voltage | 230 V/50 Hz | 230 V/50 Hz | 230 V/50 Hz | 230 V/50 Hz |
| Power consumption without additional heating** | 345 W | 989 W | 989 W | |
| Current consumption without additional heating** | 1.5 A | 4.3 A | 4.3 A | 4.3 A |
| Fuse protection (slow-blow) | 6.0 A | 10.0 A | 10.0 A | 10.0 A |
| Refrigerant (CFC free) | R134a | R407c | R407c | R407c |
| Model with additional heating | ||||
| Voltage | 230 V/50 Hz | 230 V/50 Hz | 230 V/50 Hz | 230 V/50 Hz |
| Max. heating capacity | 1350 W | 1350 W | 1350 W | |
| Max. power consumption*** | 1695 W | 2340 W | 2340 W | 2340 W |
| Max. current consumption | 7.5 A | 10.3 A | 10.3 A | 10.3 A |
| Fuse protection (slow-blow) | 10.0 A | 13.0 A | 13.0 A | 13.0 A |
| Start-up temperature | +14°C | +14°C | +14°C | +14°C |
| Cut-off temperature | +16°C | +16°C | +16°C | +16°C |
- Energy testing method for ambient air laundry dryers (HSLU Lucerne School of Engineering and Architecture, Horw/Lucerne)
** at +20^ / 60% relative humidity
*** varies depending on the volume of air
Mounting
SECOMAT 75


Mounting
SECOMAT 100/150/200


KRUGER
Krüger + Co. AG
Winterhaldenstrasse 11
9113 Degersheim
0848370370
info@krueger.ch
www.krueger.ch
entfeuchten
heizen
kühlen
sanierenHotline 0848370