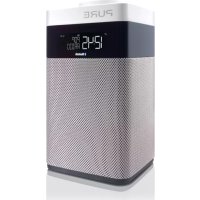
Pop Midi with Bluetooth - Radio PURE - Free user manual and instructions
Find the device manual for free Pop Midi with Bluetooth PURE in PDF.

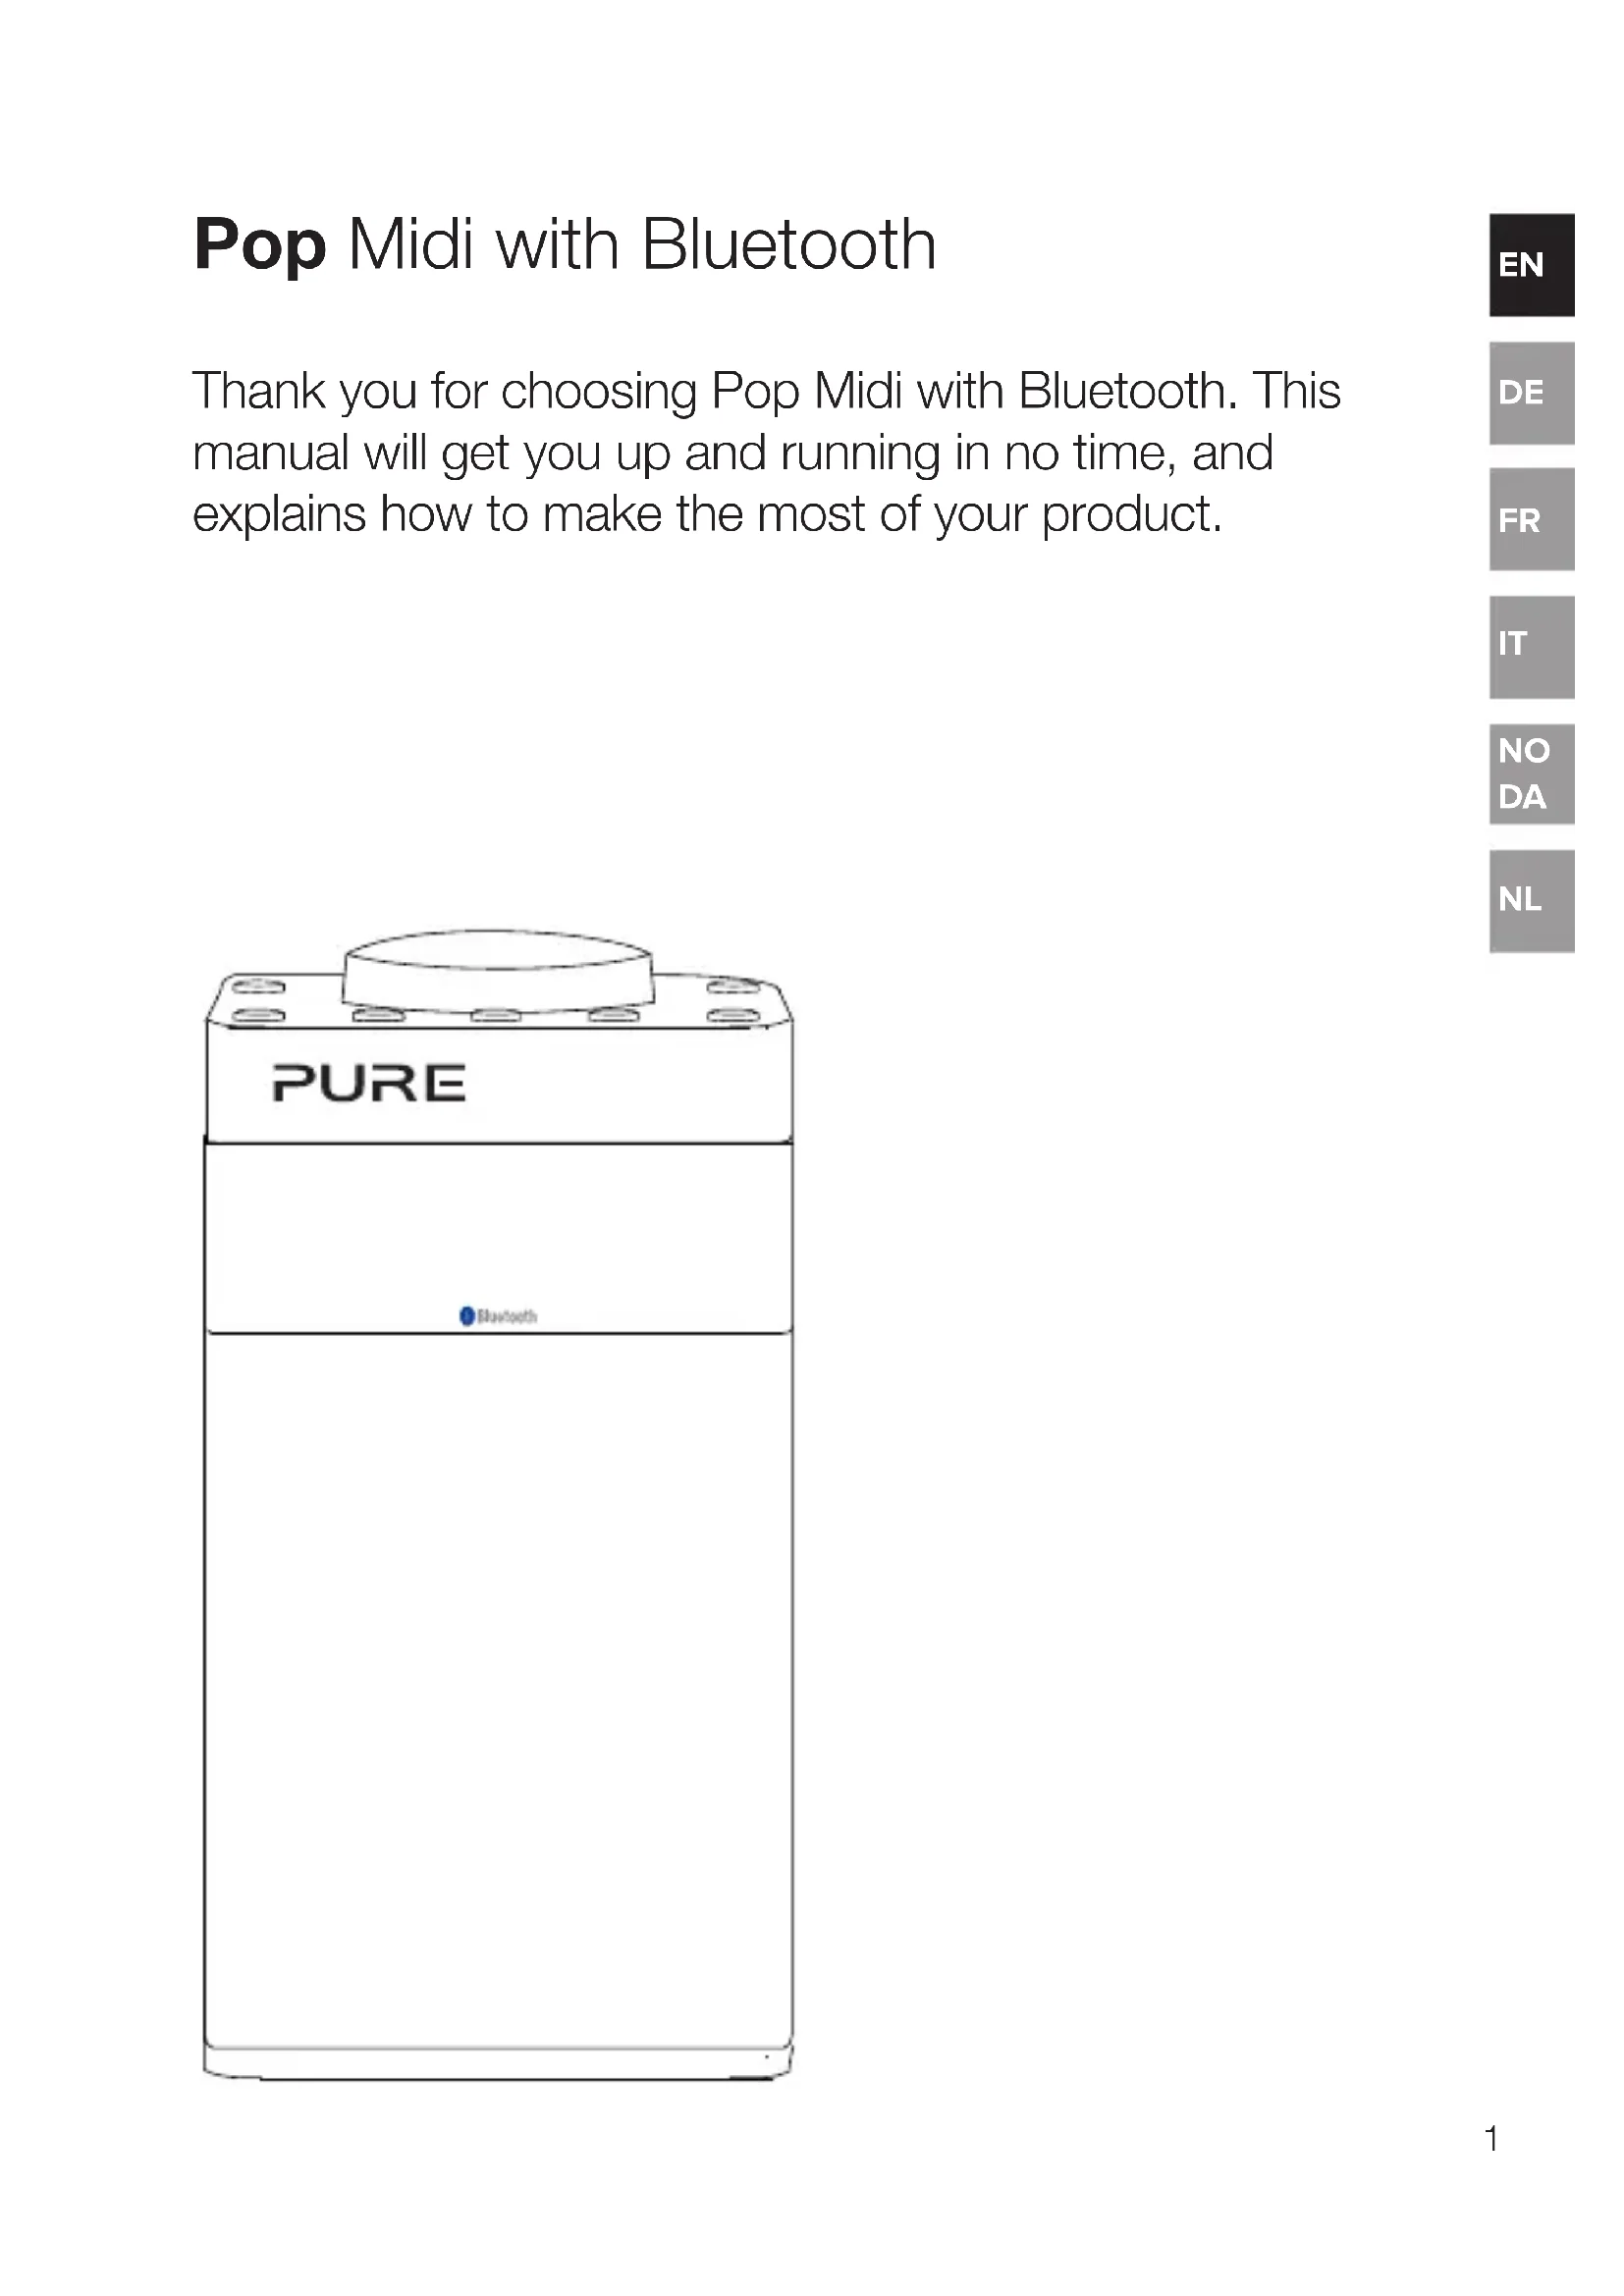


| Product Type | DAB/DAB+/FM Radio with Bluetooth |
| Brand | Pure |
| Model | Pop Midi with Bluetooth |
| Dimensions (L x H x D) | 93 mm x 173 mm x 102 mm |
| Weight | Approx 0.8 kg (with batteries) |
| Main Power | External mains adapter 230 V AC - 5.5 V DC, 2.0 A (supplied) |
| Backup Power | Rechargeable battery ChargePAK D1 (optional) or 4 AA batteries |
| Standby Consumption | 0.5 W (max 1 W) |
| Speaker | 3 inch (7.6 cm) extended range, 4.3 W RMS |
| Connectivity | Bluetooth A2DP, stereo headphone mini-jack socket, mini USB port for charging (exclusive use supplied adapter) |
| Radio Frequencies | DAB/DAB+ (Band III), FM 87.5 – 108 MHz |
| Presets | 10 DAB and 10 FM (total 20) |
| Main Features | DAB/DAB+/FM radio, Bluetooth streaming, 2 alarms with snooze, kitchen timer, programmable sleep, adjustable backlit display, bass/treble equalizer |
| Antenna | Rotatable telescopic |
| Maintenance and Cleaning | Disconnect before cleaning; use a soft, dry cloth, without solvent or abrasive |
| Safety | Do not expose to water or heat; do not open the casing; use only the supplied adapter; risk of explosion if battery is incorrectly replaced |
| Spare parts and repairability | ChargePAK D1 battery (optional), removable sleeve; no user-serviceable parts except batteries |
| General Information | 2-year warranty, CE certification, software V1.0, support at http://support.pure.com |
Frequently Asked Questions - Pop Midi with Bluetooth PURE
User questions about Pop Midi with Bluetooth PURE
0 question about this device. Answer the ones you know or ask your own.
Ask a new question about this device
Download the instructions for your Radio in PDF format for free! Find your manual Pop Midi with Bluetooth - PURE and take your electronic device back in hand. On this page are published all the documents necessary for the use of your device. Pop Midi with Bluetooth by PURE.
USER MANUAL Pop Midi with Bluetooth PURE
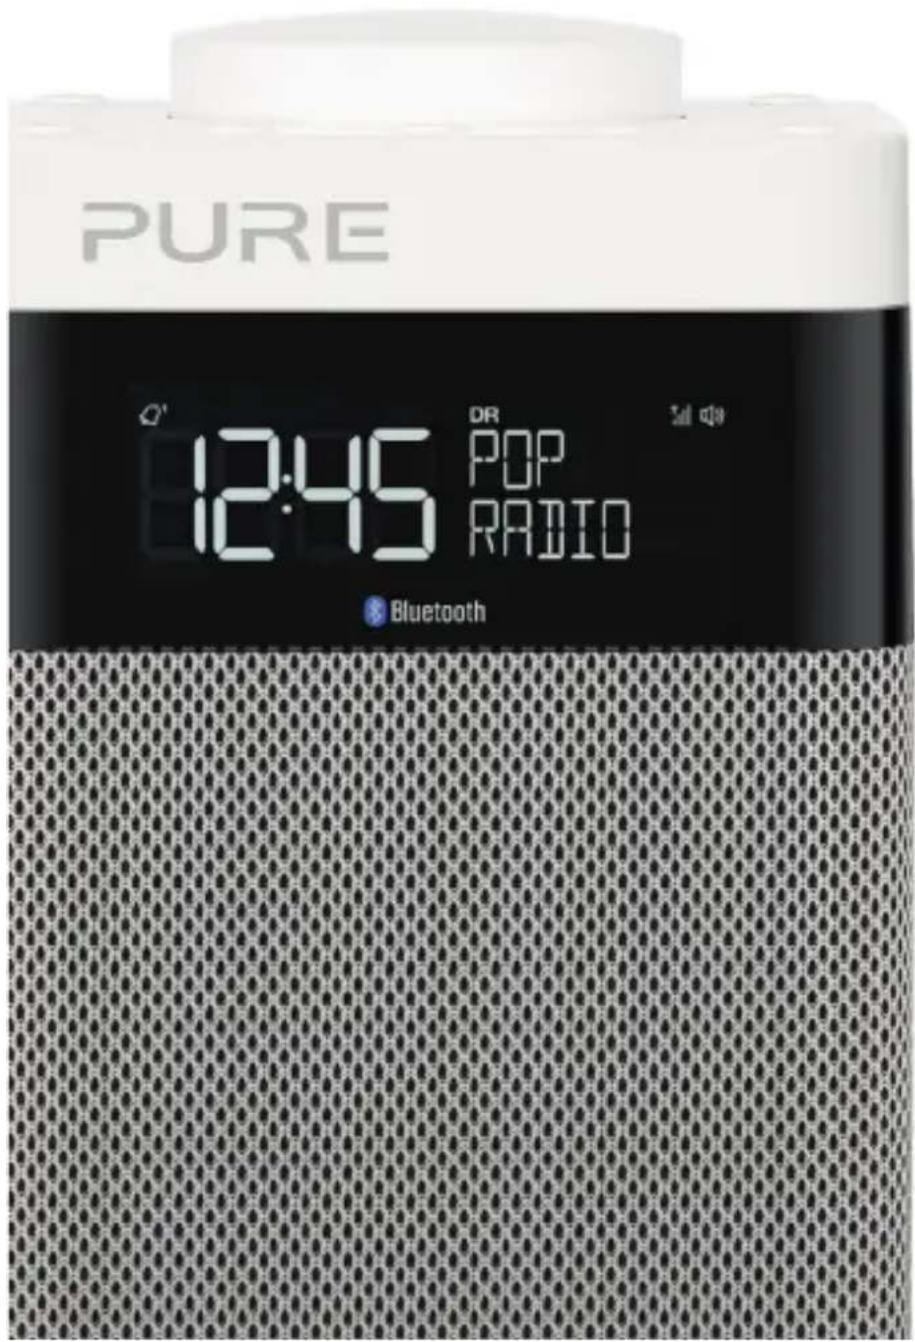
Pop Midi with Bluetooth
Pop Midi with Bluetooth
Thank you for choosing Pop Midi with Bluetooth. This manual will get you up and running in no time, and explains how to make the most of your product.
Safety

Safety information
- Familiarise yourself with all of the safety information and instructions before using the radio. When passing this radio on to others, please include all documents.
- The apparatus shall not be exposed to dripping or splashing and that no objects filled with liquids, such as vases, shall be placed on the apparatus. If liquid or water is spilled on to the radio, switch it off at the mains immediately, disconnect the mains plug and contact your dealer. Never touch the plug or the radio itself with wet hands. Never pull the power cable when disconnecting the power adaptor from the power supply.
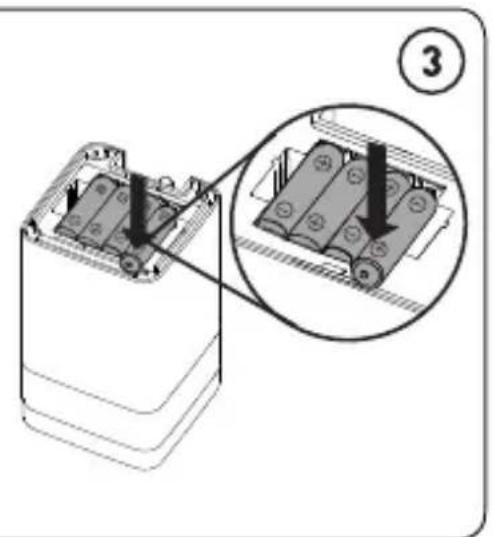
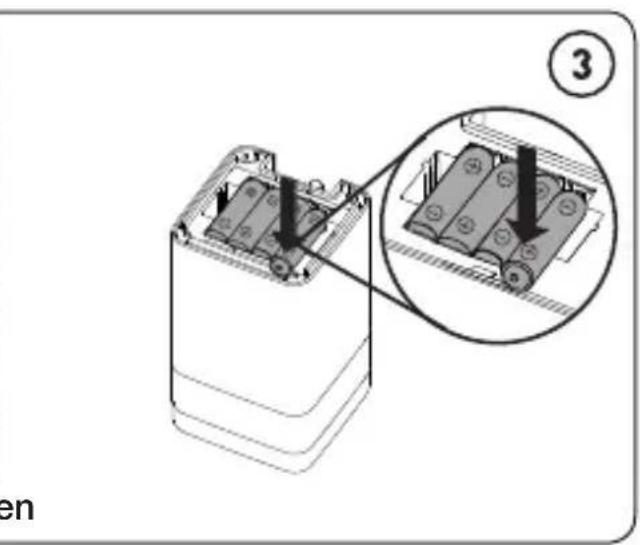
- Danger of explosion if the batteries are incorrectly replaced (ensure correct polarity). Replace only with the same or equivalent type (4 x AA). The batteries or battery (ChargePAK D1) shall not be exposed to excessive heat such as sunshine, fire or similar. Keep new and used batteries and ChargePAKs away from children. Attention is drawn to the environmental aspects of battery disposal.
- Using the radio in rooms or climates with high humidity and temperatures may cause condensation to form inside the radio, which can damage the radio. Use apparatus in moderate climates only.
- Avoid extreme degrees of temperature, either hot or cold. Place the device well away from heat sources such as radiators or gas/electric fires. No naked flame sources, such as lighted candles, should be placed on the apparatus
- The mains power adapter is used as the disconnect device, the disconnect device shall remain readily operable. Fit the mains adaptor to an easily accessible socket located near the radio and only use the mains power adaptor to connect to this product.
- Use only the mains power adaptor listed in the user instructions (supplied by Pure with model numbers ZDD055200, ZDD055200BS, SW055200-NM or SW055200-N01).
- Ensure that the available supply voltage corresponds with the required operational voltage of the radio before use.
- Disconnect your radio from the power supply if you will not use your radio for a long period of time (e.g. if you are going on holiday).
- Always unplug your radio from the mains socket before cleaning. When cleaning the radio, do not use any type of abrasive pad or abrasive cleaning solutions as these may damage the radio's surface.
- To reduce the risk of electric shock, do not remove any screws as there are no user-serviceable parts inside. Refer servicing to qualified personnel.
- Ensure adequate ventilation around the product particularly when charging.

ChargePAK D1 safety instructions
- Read the instructions for ChargePAK use in this document.
- Only use your ChargePAK with original Pure products. Use only the original Pure ChargePAK D1. Caution: Danger of explosion if battery is incorrectly replaced or another type used.
- Store ChargePAK in a cool, dry place at normal room temperature. Remove from devices that will be stored unused for extended periods.
- Do not puncture, modify, drop, throw, or cause other unnecessary shocks to your ChargePAK. May present a risk of fire, explosion, or chemical burn if mistreated.
- Do not dispose of ChargePAK in a fire or incinerator, or leave in hot places such as a motor car under direct sunlight. Do not store near oven, stove, or other heat source.
- Do not connect ChargePAK directly to an electrical source, such as a building outlet or automobile power-point. Do not place into a microwave oven, or any other high-pressure container.
- Do not immerse ChargePAK in water or otherwise expose it to liquids.
- Do not short circuit ChargePAK.
- Do not use or charge a ChargePAK that appears to be leaking, discoloured, rusty, deformed; emitting an odour; or is otherwise abnormal.
- Do not touch a leaking ChargePAK directly; wear protective material to remove and dispose of it properly immediately.
- Do not store where children may have access.
- Dispose of ChargePAK as per normal rechargeable batteries according to the local laws and regulations of your region.
Symbols on the product and in the user manual
 | This WARNING symbol is used throughout this manual to indicate a potentially serious risk to your personal safety. Obey all safety notices that accompany this symbol to avoid possible injury or death. |
 | This symbol is used on the product to indicate a caution and that instructions should be read before use. |
 | This symbol indicates DC. |
| 2A | This symbol indicates a USB socket rated at 2 Amps maximum. |
Contents
EN
4 Introduction
4 Top panel
5 Rear panel
6 Display
7 Getting started
7 Quick set up
9 Using your Pop
9 Listening to digital radio
9 Listening to FM radio
10 Storing and selecting presets
10 To quick-store a station to a preset button (1-4)
10 To store a station to the preset list (1–10)
10 To recall a preset when listening to a digital or FM radio station
11 Using Bluetooth
12 Alarms and timers
12 Setting an alarm
13 Cancelling a sounding alarm
13 Snoozing a sounding alarm
13 Disabling an alarm
13 Setting the sleep timer
13 Setting the kitchen timer
14 Options and settings
14 General settings
15 Audio settings
15 Display settings
16 Clock settings
18 Bluetooth settings
18 FM stereo
19 Appendix
19 Installing a ChargePAK D1 or four AA batteries
20 Changing Pop Midi's removable sleeve
21 Help and advice
22 Technical specifications
Introduction
Top panel
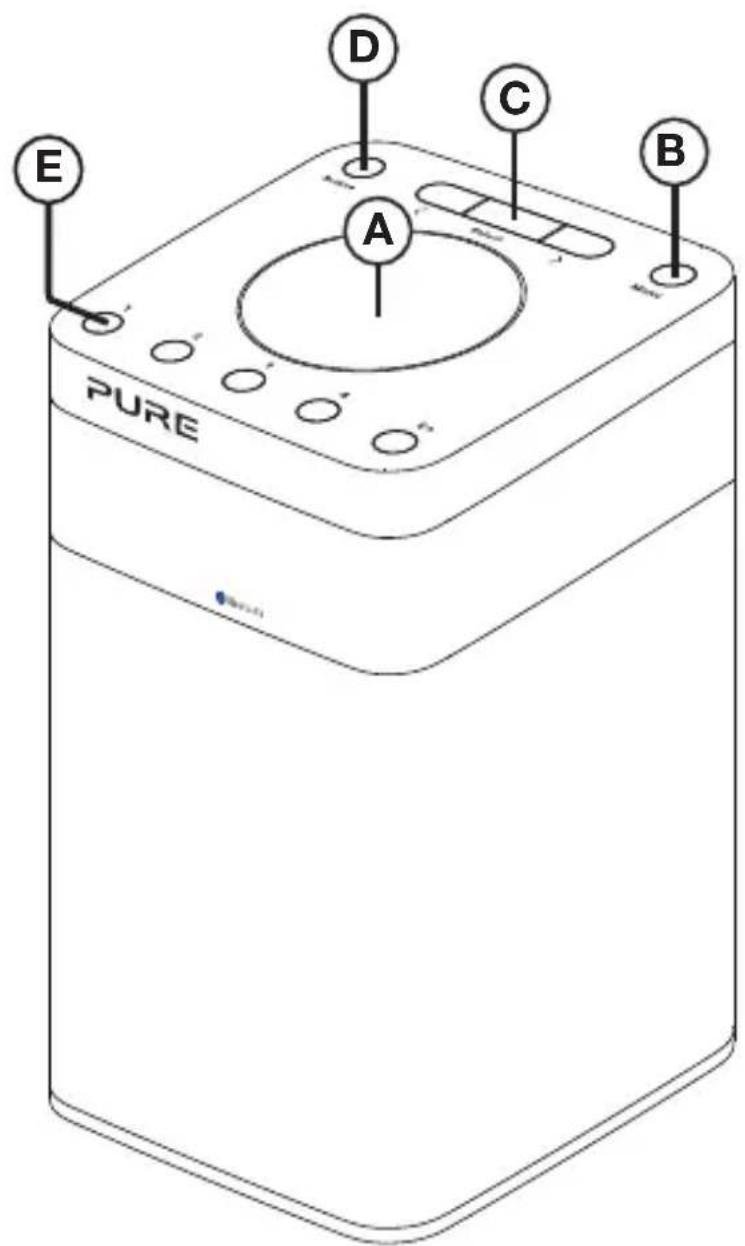
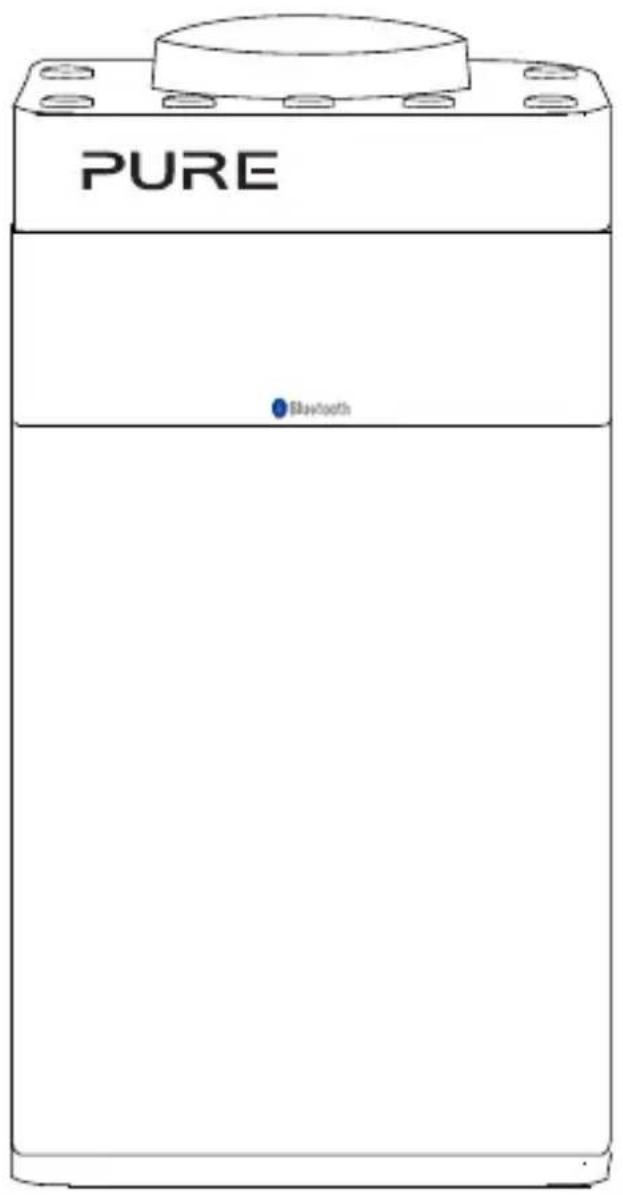
A. Power/Volume dial: Push to switch Pop on/off. Turn to adjust volume.
B. Menu button: Press to change various settings on Pop (see page 14 for more information).
C. Select buttons: Press to change radio stations (see page 9) or press to scroll and select menu options.
D. Source: Press to switch between listening to digital radio and FM radio.
E. Presets 1 - 5+: Store up to 10 digital or 10 FM radio preset stations (see page 10 for more information).
Rear panel
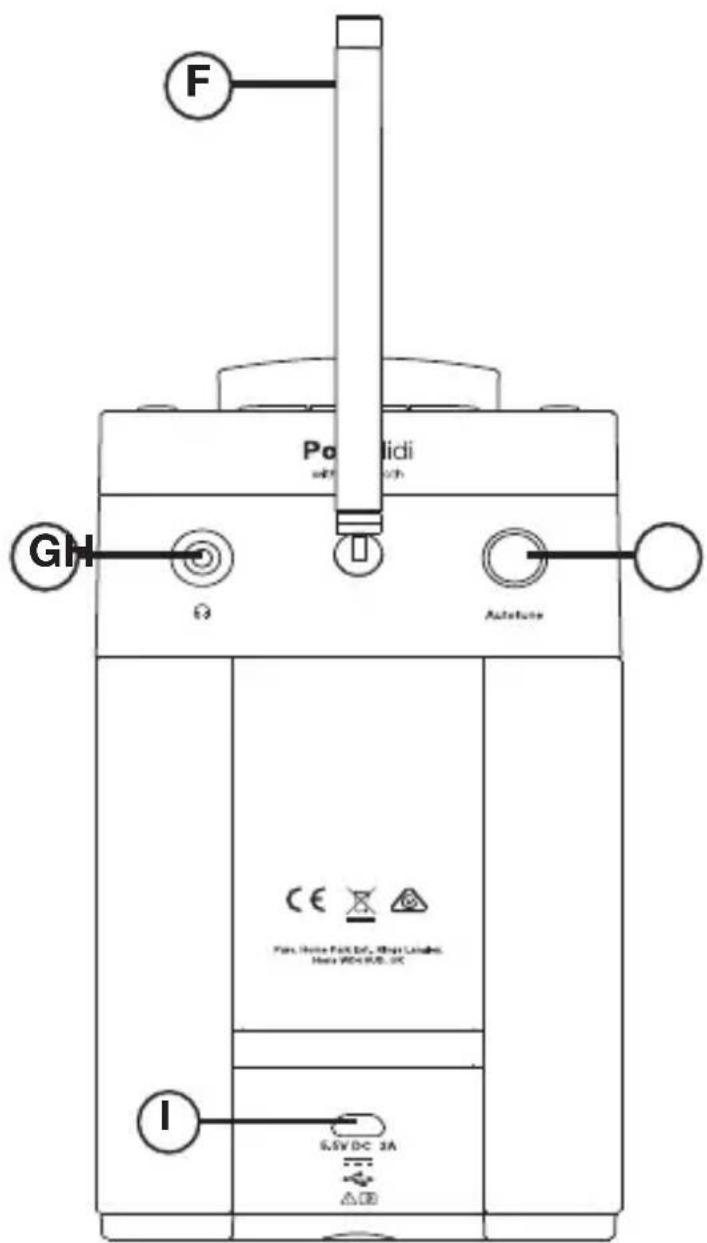
F. Aerial: Rotate the aerial and fully extend it for best reception.
G. Stereo headphone socket (3.5mm)
H. Autotune button: Press to automatically scan for new digital radio stations and remove inactive ones.
I. Micro-B USB 5.5V power connector: Connect to supplied mains adapter only.
Display
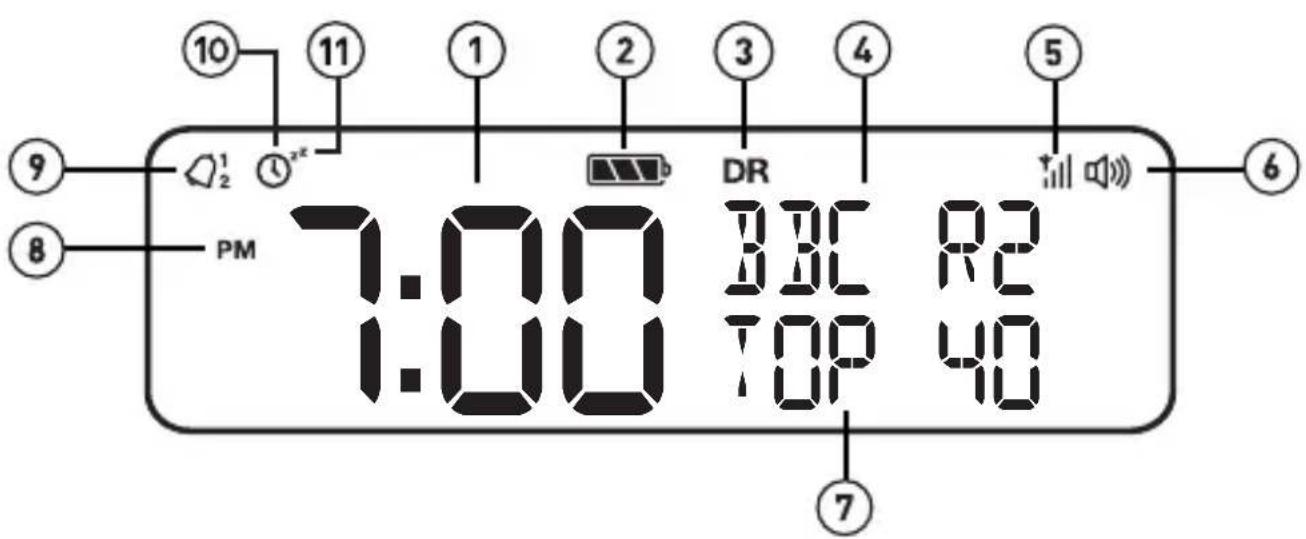
- Displays current time.
- ChargePAK or battery indicator.
- Source indicator (DR= digital radio, FM= FM radio, =Bluetooth).
- Station name.
- Signal strength.
- Volume indicator.
- Displays date, scrolling text, settings and station information (see page 16).
- AM/PM indicator.
- Alarm set indicator (see page 12).
- Sleep and kitchen timer indicator (see page 13).
- Snooze indicator (page 13).
Getting started
EN
Quick set up
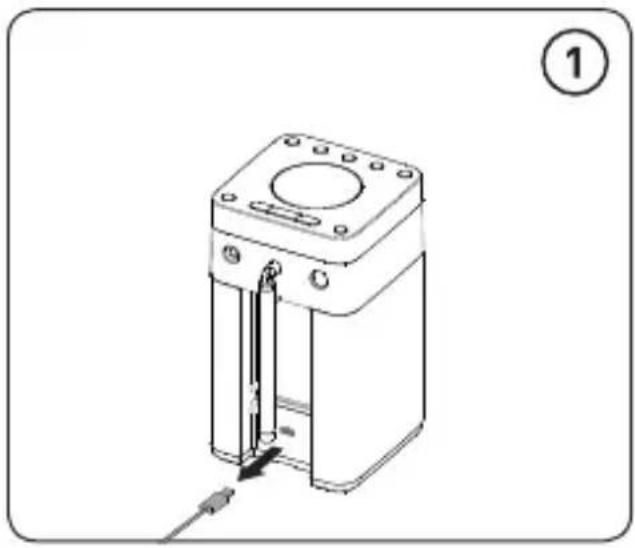
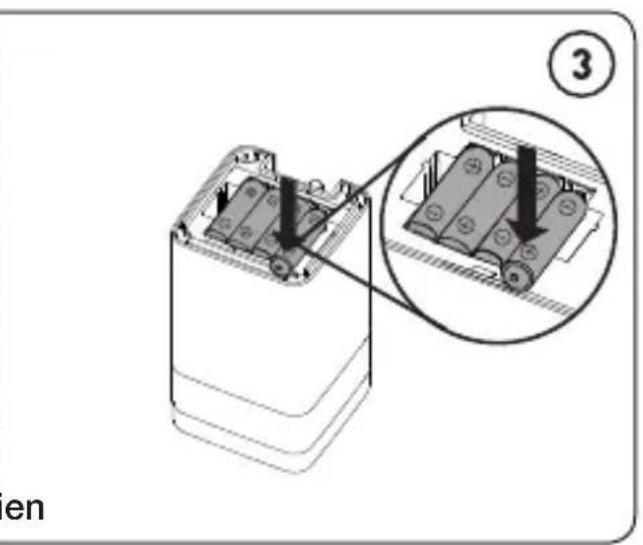
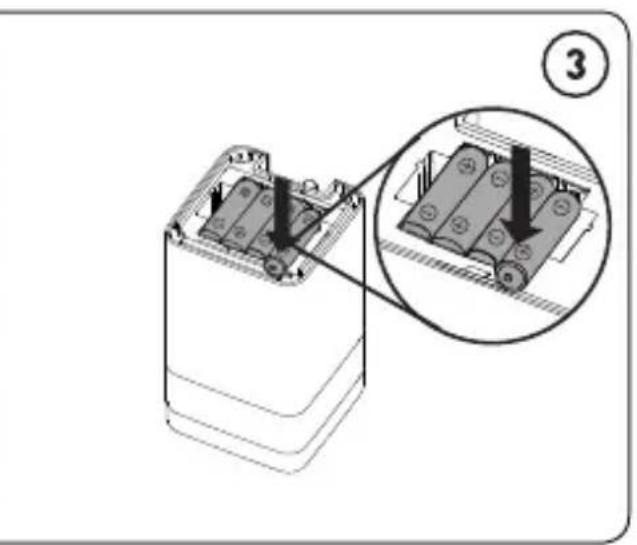
Note: If you have a ChargePAK D1 rechargeable battery (sold separately) or AA rechargeable batteries fit them now before plugging Pop in. See page 19 for more information.
1
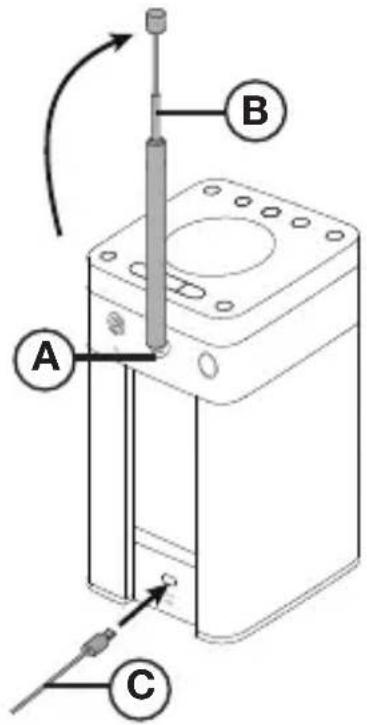
- Rotate the aerial and fully extend it (steps A and B).
- Insert the jack of the supplied mains adapter into the socket on the rear of the radio (C).
2
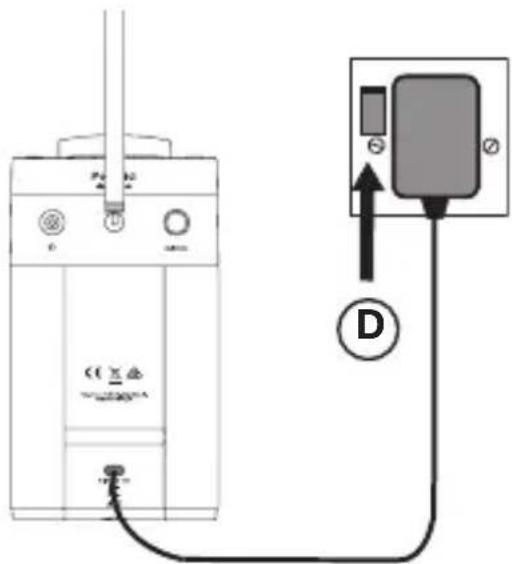
- Plug the mains adapter into the mains supply (D).
3
natural_image
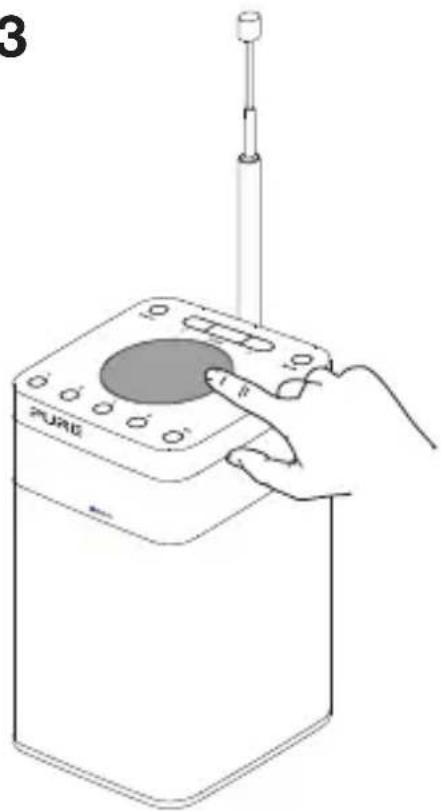
Line drawing of a hand operating a device with a sensor and antenna (no text or symbols)- Push down and release the power button to switch Pop on.
4
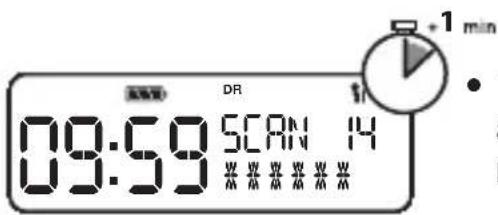
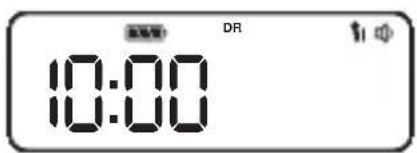
- Wait for Pop to complete an Autotune for all available digital radio stations.
- When the Autotune is complete, a digital radio station will be selected.
Using your Pop
EN
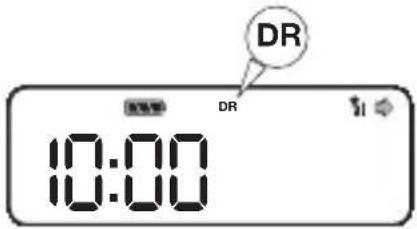
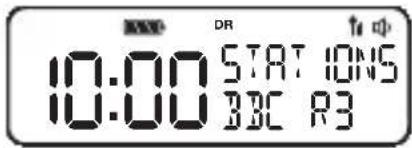
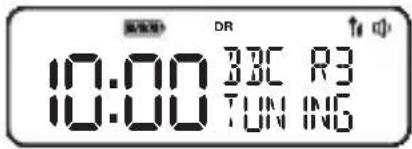
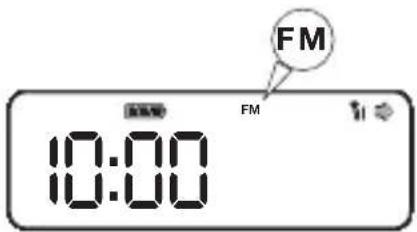
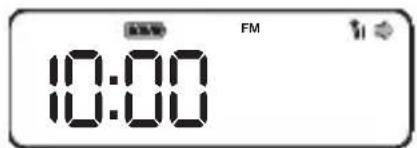
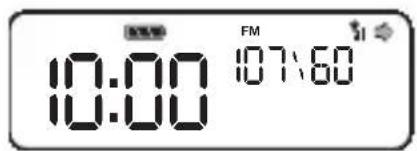
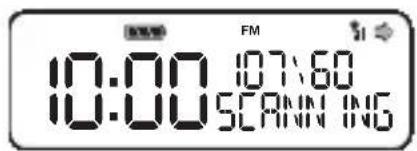
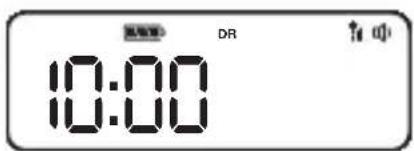
Listening to digital radio
Press the Source button to switch to digital radio.
Changing digital stations
- Press the <> buttons to scroll through the list of stations.
- When you have found the station that you want to listen to, press the Select button.
Listening to FM radio
Press the Source button to switch to FM radio.
Changing FM stations
Manual tuning
Press the <> buttons to step up or down 0.05 MHz.
Seek tuning
Press and hold the <> buttons to seek to the next or previous FM radio station that has a strong signal.
Storing and selecting presets
You can store up to 10 digital and 10 FM radio stations for quick access.
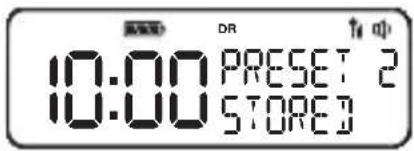
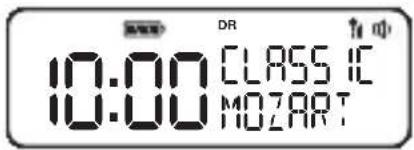
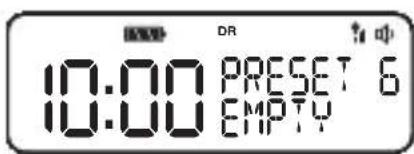
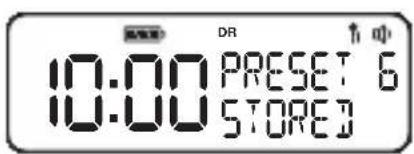
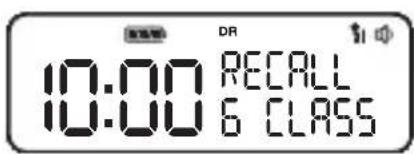
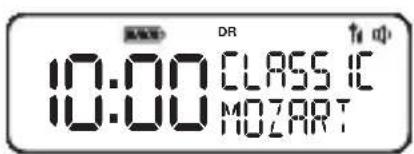
To quick-store a station to a preset button (1–4)
Tune in to the digital or FM radio station that you want to store. Press and hold one of the numbered preset buttons (1–4) for two seconds to save the current station as a preset. You can save over existing presets.
To store a station to the preset list (1–10)
- Tune in to the digital radio or FM radio station you want to store.
- Press and hold the 5+ button to view the numerical list of stored presets, then press <> to choose any preset number between 1 and 10. You can overwrite existing presets.
- Press the Select button until you see the 'Preset stored' message.
To recall a preset when listening to a digital or FM radio station
To tune to presets 1 to 4, press the corresponding numbered button on Pop (1 to 4).
To access the full list of presets (from 1 to 10):
- Press and release the 5+ button.
- Press <> to scroll through the list of presets and push the Select button to tune to the selected preset.
Using Bluetooth
EN
You can use Bluetooth to stream any music from your phone or tablet to Pop.
Note: When using Bluetooth to stream music to Pop, you will need to use your phone or tablet's volume controls to change Pop's volume.
Pairing a mobile device with Pop
Before you can stream audio to Pop, you will need to pair your phone or tablet with Pop.
Note: Bluetooth pairing varies on different mobile devices. See your mobile device manual for specific information.
To pair with Pop using Bluetooth:
- Enable Bluetooth on your mobile device.
- On your mobile device, select the option to add a new Bluetooth device. On some mobile devices you may need to select the search or scan option.
- Start the pairing process on your mobile device. Do this by selecting ‘Pop’ from the list of available devices that appear on the mobile device’s screen. This will connect automatically once paired.
Disconnecting a mobile device from Pop
You can only have one mobile device connected to Pop via Bluetooth at any one time. If you want to stream audio from a different mobile device, you will need to disconnect any mobile device that is currently connected to Pop via Bluetooth first.
If your mobile device goes out of Pop's Bluetooth range (this is usually around 10m (30ft)) the mobile device's Bluetooth connection is disconnected automatically.
To manually disconnect your mobile device from Pop, you will need to open the Bluetooth settings on your mobile device (see your mobile device's manual for more information).
When you disconnect a mobile device from Pop, Pop will remain in the ‘Bluetooth’ source. To select another source, e.g. digital radio, press the Source button.
Note: For more help with Bluetooth, see our 'Help and advice' on page 21.
Alarms and timers
Note: If Pop is running on batteries or a ChargePAK, Pop's alarm function will not work if you turn Pop off after setting an alarm.
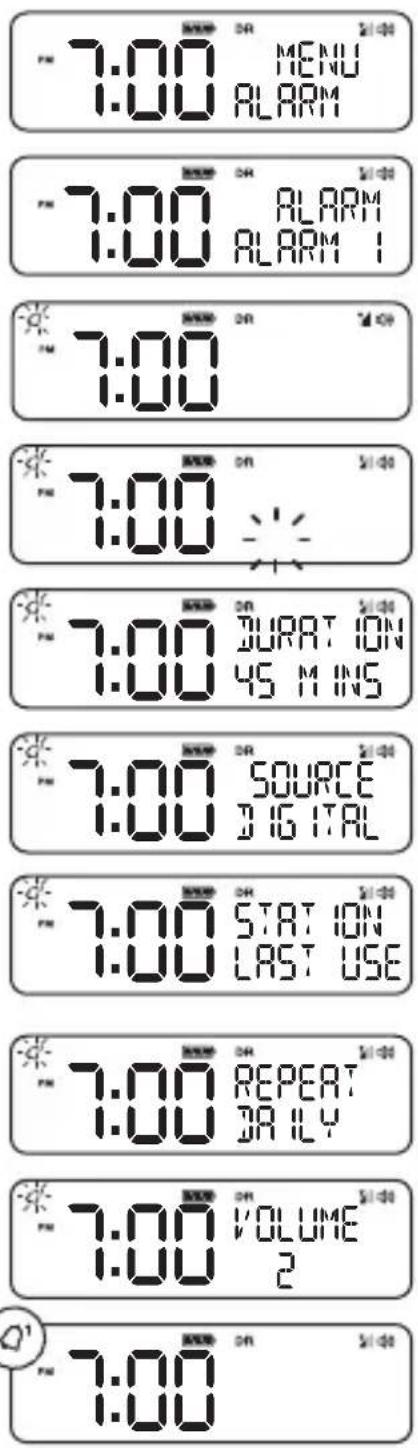
Setting an alarm
Pop has two alarms which can switch the radio on and tune to a digital or FM radio station or sound an alarm tone.
- Press the Menu button and scroll <> to 'Alarm'.
- Scroll <> to 'Alarm1' or 'Alarm2' and press the Select button.
- Scroll <> to 'On' and press the Select button.
- Scroll <> to set the hour for the alarm and press the Select button. Repeat to set the minute for the alarm.
- Scroll <> to set the duration of the alarm and press the Select button.
- Scroll <> to specify 'FM', 'Digital' or 'Tone' and press the Select button to confirm. If you are specifying a tone alarm, skip to step 8.
- Scroll <> to specify which station should be played when the alarm goes off. You have the option of selecting one of your preset stations or you can select 'Last Used' to select the station that you were last listening to. Press Select to confirm.
- Scroll <> to specify one of the following alarm repeat options: 'Daily', 'Weekdays', 'Weekends' or 'Once' and press the Select button to confirm.
- Use <> to set the volume that the radio will play at when the alarm sounds and press the Select button to confirm.
- The alarm icon will light steadily on the display to show that the alarm has set.
Cancelling a sounding alarm
To cancel a sounding alarm, press the Source,
Snoozing a sounding alarm
To snooze a sounding alarm, press one of the Preset buttons. By default, Pop's snooze time is set to eight minutes. To change the Pop's default snooze time see page 17.
Disabling an alarm
To disable an alarm after it has been set:
- Press the Menu button and scroll <> to 'Alarm' and press the Select button.
- Scroll <> to the alarm that you want to disable ('Alarm1' or 'Alarm2') and press the Select button.
- Scroll <> to 'Off' and press the Select button.
- The alarm icon will turn off on Pop's display to show that the alarm has been disabled.
Setting the sleep timer
The sleep timer can be set to switch Pop off after a specific period of time.
Note: If Pop is running on batteries or a ChargePAK, Pop's sleep function is disabled.
- Press the Menu button.
- Scroll <> to 'Sleep' and press the Select button.
- Scroll < > and press the Select button to set the timer for up to 90 minutes or choose 'Off' to cancel.
Setting the kitchen timer
Pop has a countdown kitchen timer which will sound an alarm after a set time period.
- Press the Menu button.
- Scroll <> to 'Timer' and press the Select button.
- Scroll <> to change the hours and press the Select button.
- Scroll <> again to change the minutes and push to confirm and start the countdown timer.
The alarm will sound after the time period you have set whether the radio is on or in standby. Cancel the beeping alarm tone by pressing either the Source,
Options and settings
General settings
Changing the language shown on the display
To switch the display language on Pop between English, French, German, Italian and Spanish:
- Press the Menu button.
- Scroll <> to 'Settings' and press the Select button.
- Scroll <> to 'Lang.' and press the Select button.
- Scroll <> and press the Select button to choose the language that you want Pop to display.
Resetting Pop to factory settings
Resetting your Pop radio removes all presets, clears the station list and resets all options to defaults. To carry out a factory reset:
- Press the Menu button.
- Scroll <> to 'Settings' and press the Select button.
- Scroll <> to 'Reset' and press the Select button.
- Scroll <> to 'Yes' and press the Select button.
Displaying Pop's software version
To display software version that is currently running on Pop:
- Press the Menu button.
- Scroll <> to 'Settings' and press the Select button.
- Scroll <> to 'Version' and press the Select button.
Updating Pop to the latest version of software
Contact Pure technical support (http://support-uk.pure.com) for more information on how to update Pop to the latest software version.
Audio settings
You can use Pop's audio menu to adjust the bass and treble.
- Press the Menu button.
- Scroll <> to 'Audio' and press the Select button.
- Scroll <> to 'Bass' or 'Treble' and press the Select button.
- Scroll <> to adjust the bass or treble levels. You can choose a level between '-3' and '+3'.
- Press the Select button to confirm the bass or treble level.
Display settings
Adjusting the display brightness
You can adjust the brightness of the display when Pop is switched on or in standby. To change the brightness of Pop's display:
- Press the Menu button.
- Scroll <> to 'Display' and press the Select button.
- Scroll <> to 'Backlight' and press the Select button.
- Scroll <> to 'Active' and press the Select button to change the settings that apply when Pop is switched on, or scroll to <> 'Standby' and press the Select button to change settings that apply in standby.
- Scroll <> to 'Level' and press the Select button.
- Scroll <> to choose a brightness level between '1' and '5'.
- Press the Select button to confirm the brightness setting.
Adjusting how long the display backlight stays on for
You can adjust how long Pop's display backlight stays on for:
- Press the Menu button.
- Scroll <> to 'Display' and press the Select button.
- Scroll <> to 'Backlight' and press the Select button.
- Scroll <> to 'Active' and press the Select button to change the settings that apply when Pop is switched on, or scroll to <> 'Standby' and press the Select button to change settings that apply in standby.
- Scroll <> to 'Duration' and press the Select button.
- Scroll <> and press the Select button to choose one of the following options:
On: Choose this option if you want the backlight to always stay on.
Off: Choose this option if you want the backlight to turn off after 10 seconds
Changing the information shown on Pop's display
If you are listening to a digital or FM radio station, you can change the information that is shown on Pop's display:
- Press the Menu button.
- Scroll <> to 'Display' and press the Select button.
- Scroll <> to 'Info' and press the Select button.
- Scroll <> and press the Select button to choose one of the following options:
Text: Choose this option if you want to display the information broadcast by the station you are currently listening to. The information displayed may include song titles, programme details, news, etc.
Strength: Choose this option if you want to display the signal strength of the radio station you are currently listening to. The number of asterisks indicate the reliable reception level.
Date: Choose this option if you want to display the current date.
Clock settings
Setting the time and date
The time and date on Pop are automatically set by the FM or digital radio signal. If the time/date on Pop is not updating automatically, you can manually set it.
- Press the Menu button.
- Scroll <> to 'Clock' and press the Select button.
- Scroll <> to 'Time/date' and press the Select button.
- Scroll <> to set the hour and press the Select button. Repeat to set the minutes.
- Scroll <> to set the day and press the Select button. Repeat to set the month and the year.
Changing the time format
- Press the Menu button.
- Scroll <> to 'Clock' and press the Select button.
- Scroll <> to '12/24 hr' and press the Select button.
- Scroll <> to choose between '12 hour' and '24 hour' and press the Select button to confirm.
Changing the date format
- Press the Menu button.
- Scroll <> to 'Clock' and press the Select button.
- Scroll <> to 'Format' and press the Select button.
- Scroll <> to choose between displaying the date in day, month and year order 'DD-MM-YYYY' or in month, day and year order 'MM-DD-YYYY' and press the Select button to confirm.
Clock synchronization options
You can select the radio sources that you want to use for setting the time. By default, Pop uses both the FM and digital radio signals to synchronize the time.
To specify the clock synchronization options:
- Press the Menu button.
- Scroll <> to 'Clock' and press the Select button.
- Scroll <> to 'Sync to' and press the Select button.
- Scroll <> to choose the required clock synchronization option and press the Select button to confirm.
Changing the snooze time
You can change the amount of time an alarm will snooze for when you press one of Pop's preset buttons during a sounding alarm. By default, Pop's snooze time is set to eight minutes.
To change Pop's snooze time:
- Press the Menu button.
- Scroll <> to 'Clock' and press the Select button.
- Scroll <> to 'Snooze' and press the Select button.
- Scroll <> to choose a snooze time between '5' and '59' minutes and press the Select button to confirm.
Bluetooth settings
You can use the Bluetooth menu to make Pop visible or invisible to other Bluetooth devices.
To change Pop's Bluetooth visibility setting:
- Press Menu.
- Scroll <> to 'Bluetooth' and press the Select button.
- Scroll <> and press the Select button to choose one of the following options:
On: Select this option if you want Pop to be visible to all Bluetooth devices.
Hidden: Select this option if you want to hide Pop from other Bluetooth devices. You will still be able to pair to Pop when Bluetooth is hidden, but you will need to enter Pop's name manually on the device you want to pair with.
Off: Select this option if you want to disable Pop's Bluetooth connection.
FM stereo
You can use the FM stereo menu to make switch between stereo and mono reception. You may want to select ‘Mono’ to try and improve weaker reception.
Note: The ‘FM stereo’ option is only visible when you have selected ‘FM’ as the radio source.
To change Pop's FM stereo setting:
- Press Menu.
- Scroll <> to 'FM stereo' and press the Select button.
- Scroll <> to choose between 'Stereo' and 'Mono' and press the Select button to confirm.
Appendix
EN
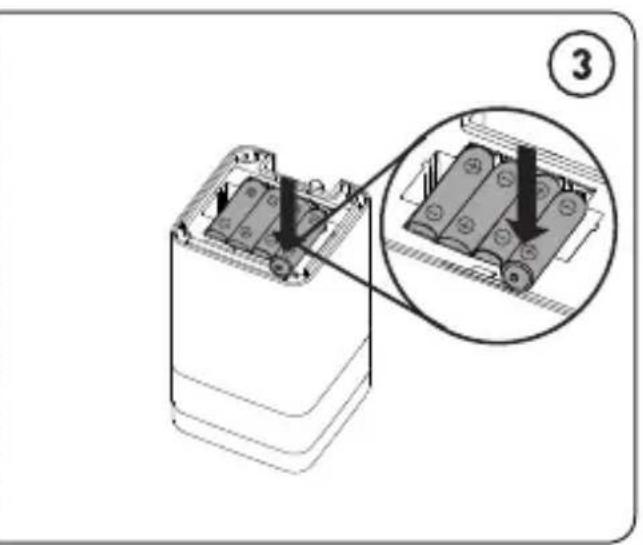
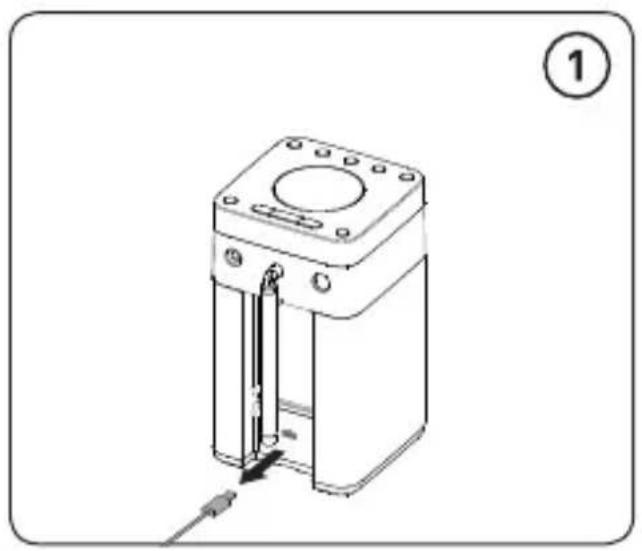
Installing a ChargePAK D1 or four AA batteries
natural_image
Technical line drawing of a mechanical device with a central housing and internal components, showing a cable inserted into the base (no text or symbols)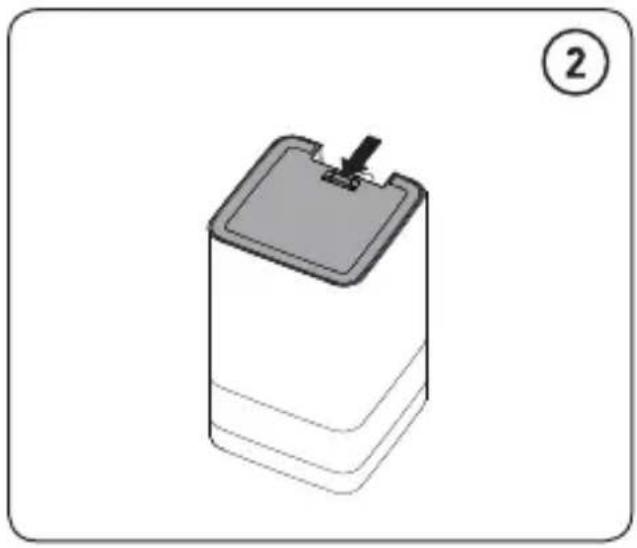
natural_image
3D illustration of a cylindrical battery with a lid and a pin, labeled with number 2 (no text or symbols on the diagram itself)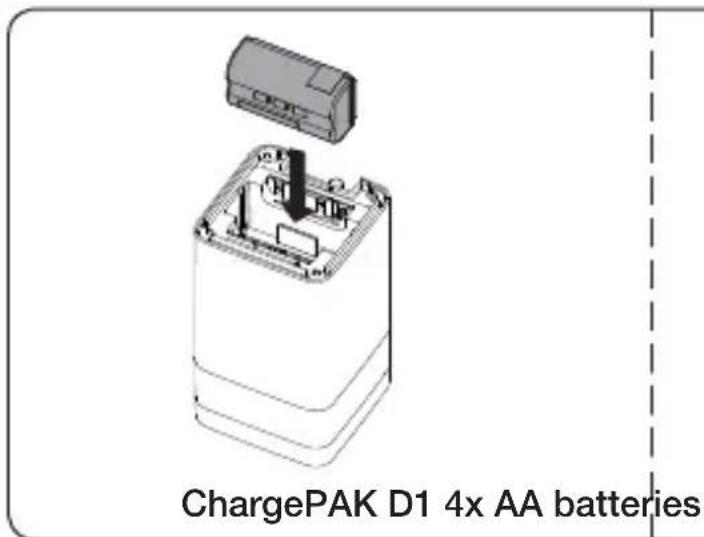
natural_image
Diagram of a battery cell with an inset showing internal components (no text or symbols)
natural_image
Diagram of a battery casing with a lid and arrow indicating a component (no text or symbols)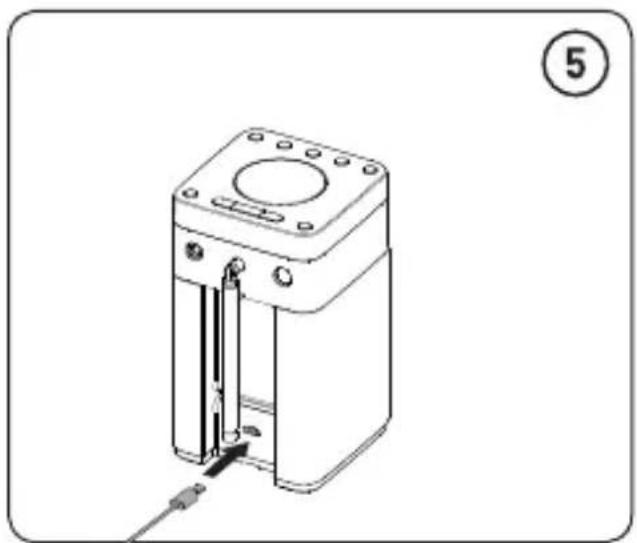
natural_image
Technical line drawing of a mechanical device with a vertical rod inserted into a housing, labeled with number 5 (no text or symbols on the device itself)Changing Pop Midi's removable sleeve
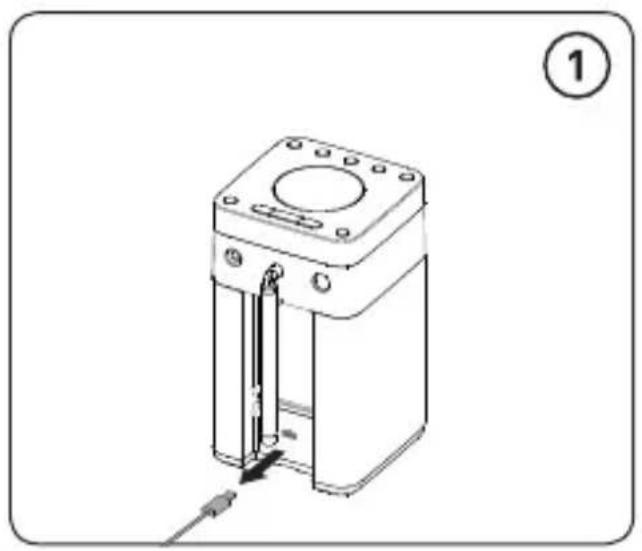
natural_image
Technical line drawing of a mechanical device with a cylindrical housing and internal components, showing a tool inserted into a slot (no text or symbols)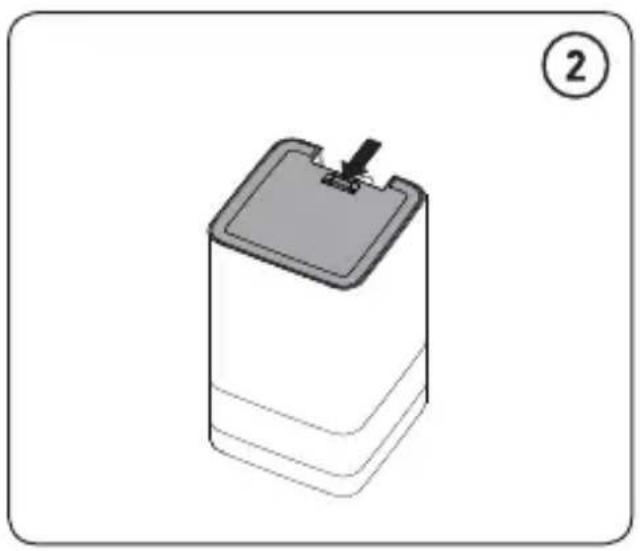
natural_image
3D illustration of a cylindrical battery with a lid and a pin, labeled with number 2 (no text or symbols on the diagram itself)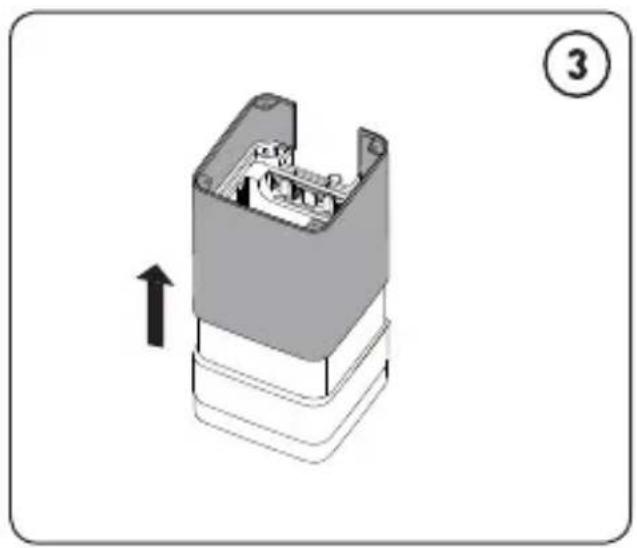
natural_image
3D diagram of a mechanical component with an arrow indicating upward motion, no text or symbols present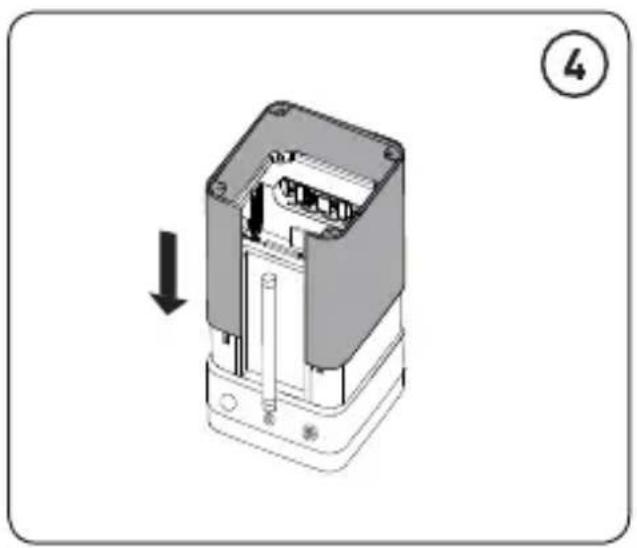
natural_image
Mechanical component diagram showing a housing with internal components and a downward arrow indicating motion (no text or symbols)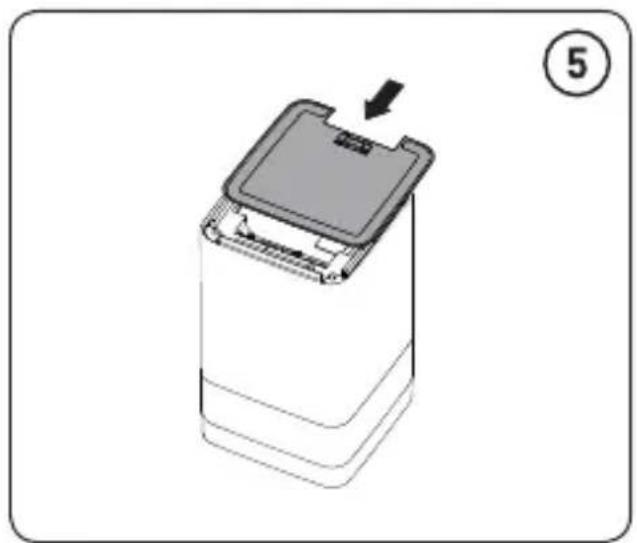
natural_image
3D diagram of a battery casing with a lid and arrow indicating a component (no text or symbols)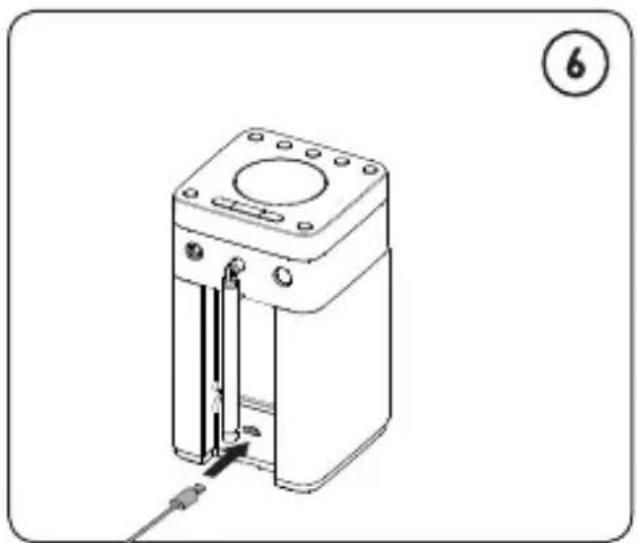
natural_image
Technical line drawing of a mechanical device with a cylindrical housing and internal vertical rod, no text or symbols present.Help and advice
Secondary and inactive stations
() Secondary digital radio services
Some stations have accompanying secondary services which provide extra information or alternative content and may only be broadcast at certain times. If a station has a secondary service available, the station shows ‘>’ next to its name in the station list and the secondary service appears next to the station in the list. A secondary service has a ‘<’ before its name in the station list.
(?) Inactive or unavailable digital radio stations
Inactive or unavailable stations appear on the station list preceded by ‘?’ and cannot be tuned to. A station may be inactive or unavailable because the station is not broadcasting at the current time (check programme listings) or has stopped broadcasting altogether. Also, you may not have a strong enough signal to receive the radio station.
Hints and tips
Display says 'No stations available'
Press the Autotune button on the back of your Pop to search for digital stations. Try adjusting your aerial or radio position.
Receiving new digital radio stations that have started broadcasting
Press the Autotune button on the back of your Pop to search for new digital stations. Try adjusting your aerial or radio position.
I can't see Pop in the list of available Bluetooth devices on my mobile device
This may be because your Pop Bluetooth visibility setting is set to ‘Hidden’ or ‘Off’ (see page 18). Your Bluetooth setting will need to be set to ‘On’ to be visible on your mobile device.
My mobile device is prompting me for a passcode when I try to pair with my Pop
Some legacy Bluetooth devices may prompt you to enter a passcode when trying to pair with Pop. If this occurs, enter the code ‘0000’.
Technical specifications
Radio Digital and FM radio
Frequencies DAB/DAB+, FM radio 87.5-108 MHz
Bluetooth Frequency range: 2402 < 2480 MHz, Maximum power: 3.5 dBm (EIRP)
A2DP support
Speaker Full-range 3" drive unit
Audio power output 4.3W RMS
Input connectors 5.5V DC power adaptor socket (230V supplied)
Output connectors 3.5mm stereo headphone socket
Presets 10 digital radio and 10 FM radio presets
Power supply 230V AC to 5.5V (2.0A) DC external power adapter (supplied), optional ChargePAK D1 rechargeable battery pack or four AA batteries
Power consumption (Standby mode) - 0.5W (limit 1W) Networked Standby mode activated - Automatic after no Bluetooth detected
Power Consumption (Networked Standby mode) – 1.0W Wireless Network(s) On/Off switch - Only single Bluetooth wireless network connection and the network connection is always activated
Standby And/Or Off mode activated – Standby mode, press the large circular button/knob so that it is in the ‘down’ position and level with the top panel
Dimensions 93 mm wide x 173 mm high x 102 mm deep
Aerial Telescopic aerial
Software version V1.0
Approvals

CE marked. Hereby, Pure International Limited declares that this radio model Pop Midi with Bluetooth is in compliance with the essential requirements of RED 2014/53/EU.
The full text of the EU Declaration of Conformity is available at the following internet address http://www.pure.com/about/red
natural_image
Line drawing of a hand operating a device with a sensor and antenna (no text or symbols)natural_image
Technical line drawing of a mechanical component with a cylindrical body and internal structure, showing a pin inserted into a housing (no text or symbols)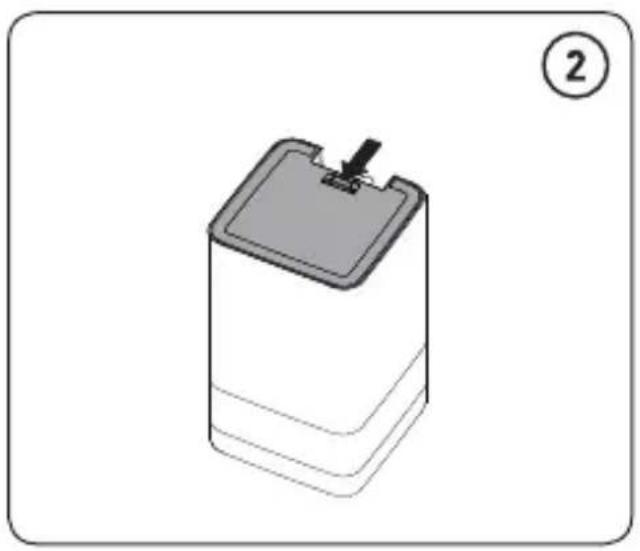
natural_image
3D illustration of a cylindrical battery with a lid and a pin, labeled with number 2 (no text or symbols on the diagram itself)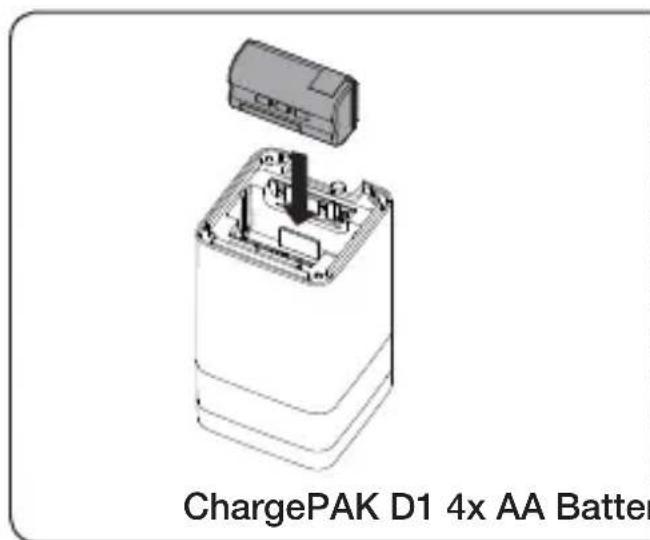
natural_image
Diagram of a battery cell assembly with an inset showing internal components (no text or symbols)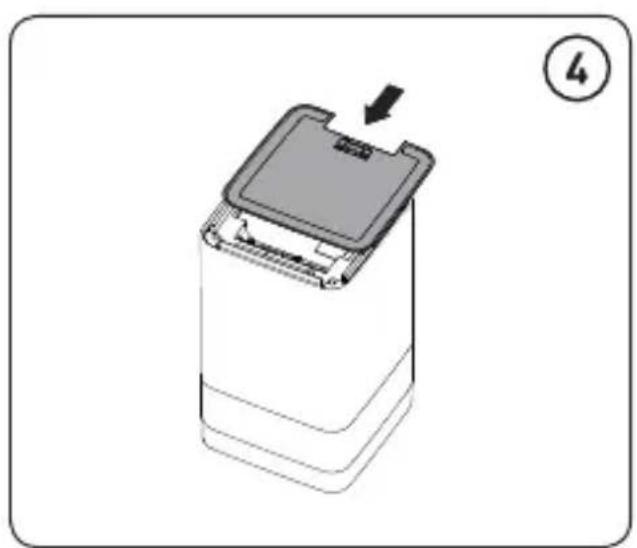
natural_image
3D diagram of a battery casing with a lid and arrow indicating a component (no text or symbols)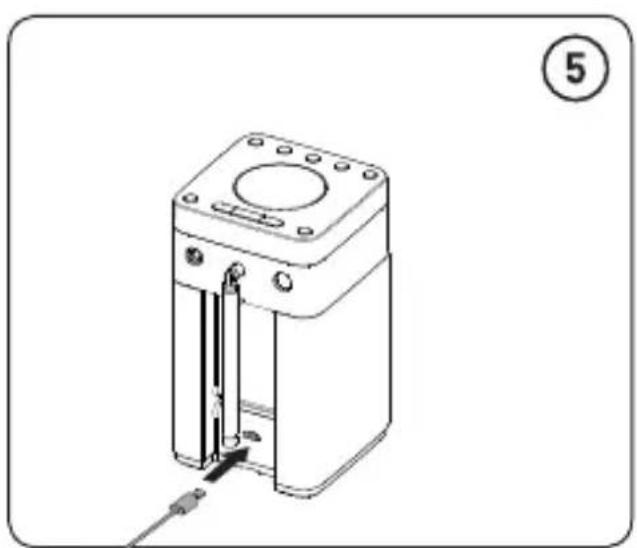
natural_image
Technical line drawing of a mechanical device with a labeled part (5), showing internal components and a cable inserted (no text or symbols beyond label)DE
natural_image
Technical line drawing of a mechanical device with a cylindrical housing and internal components, showing a tool inserted into a base (no text or symbols)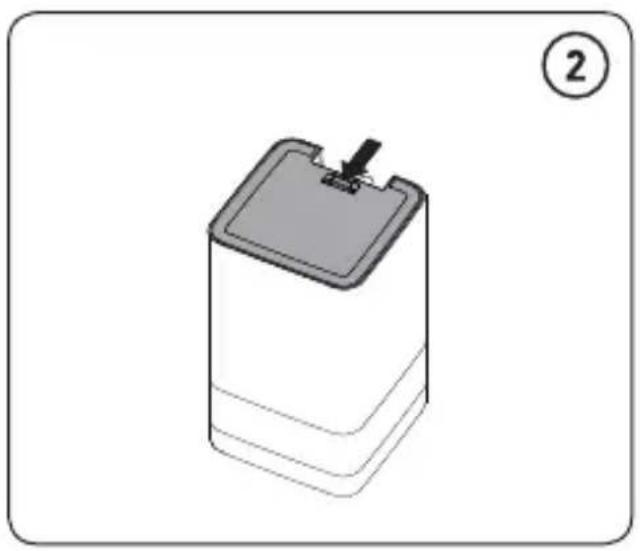
natural_image
3D illustration of a cylindrical battery with a lid and a pin, labeled with number 2 (no text or symbols on the diagram itself)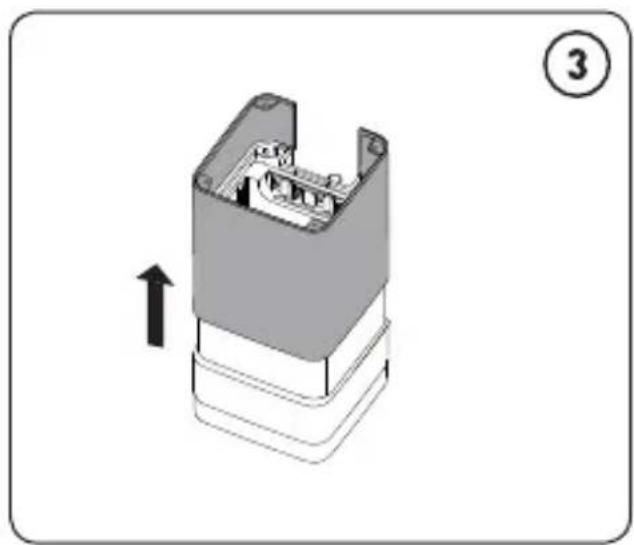
natural_image
3D diagram of a mechanical component with an arrow indicating direction, no text or symbols present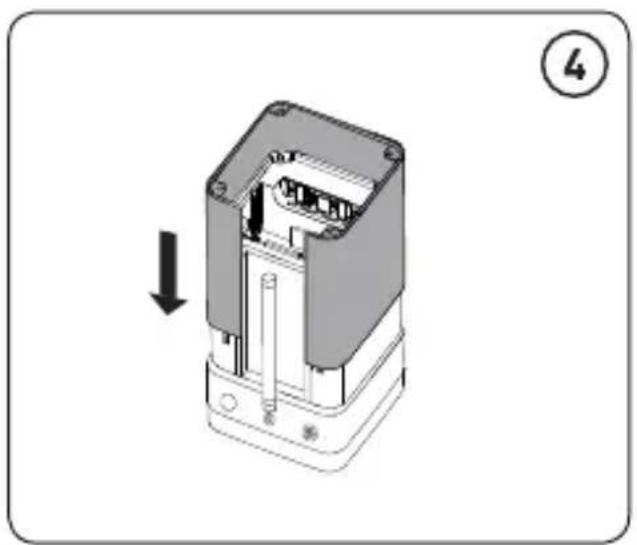
natural_image
Mechanical component diagram showing a housing with internal components and a downward arrow indicating assembly (no text or symbols)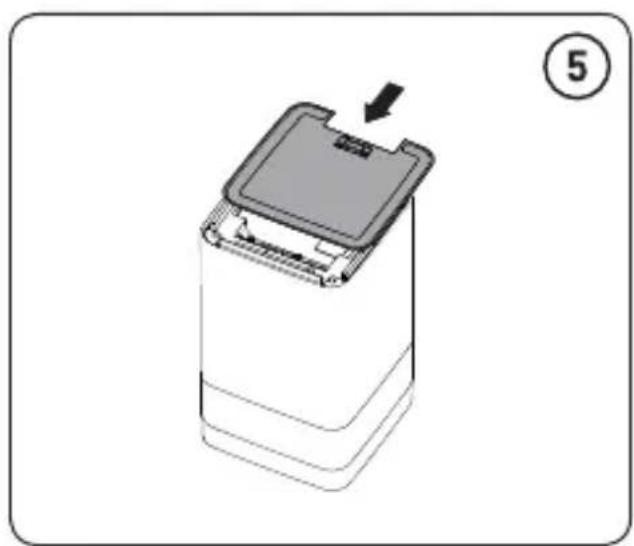
natural_image
Diagram of a battery casing with a lid and arrow indicating a component (no text or symbols)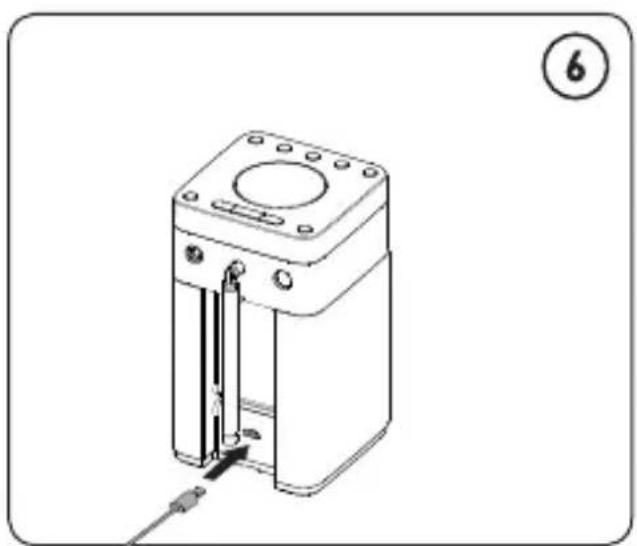
natural_image
Technical line drawing of a mechanical device with a base and internal components, no visible text or symbolsHilfe und Tipps
Softwareversion V1.0
natural_image
Line drawing of a hand operating a device with a sensor and antenna (no text or symbols)natural_image
Technical line drawing of a mechanical device with a central housing and internal components, no text or symbols present.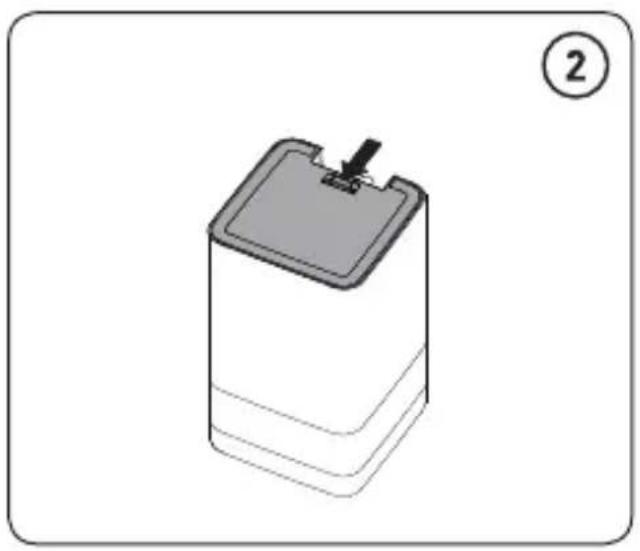
natural_image
3D illustration of a cylindrical battery with a lid and a pin, labeled with number 2 (no text or symbols on the diagram itself)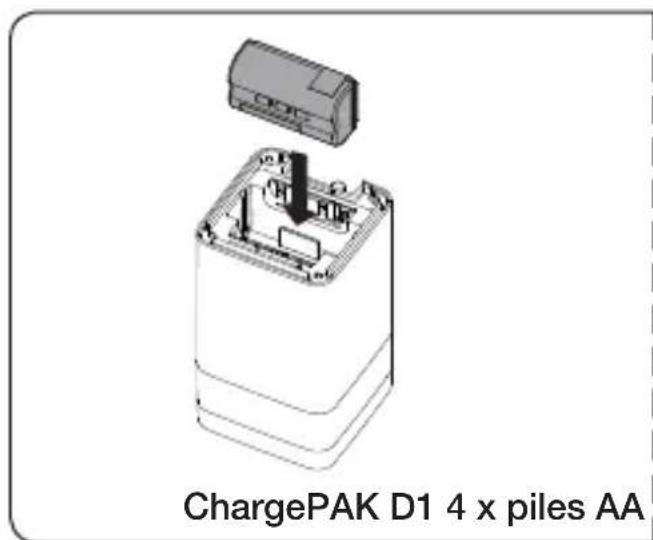
natural_image
Diagram of a battery cell assembly with an inset showing internal components (no text or symbols)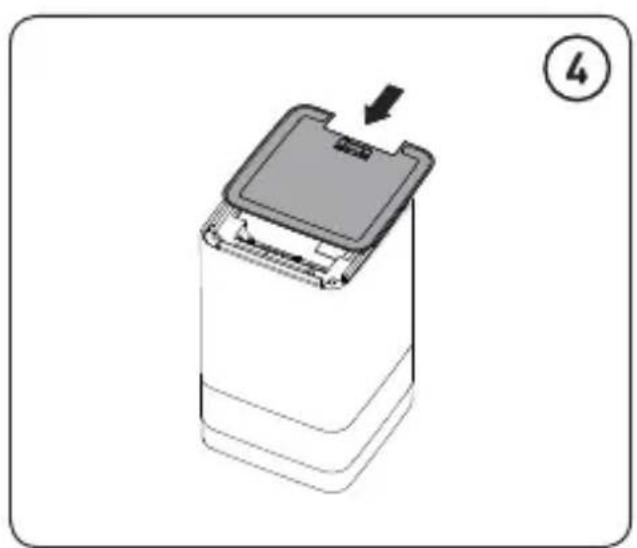
natural_image
3D diagram of a battery casing with a lid and arrow indicating a component (no text or symbols)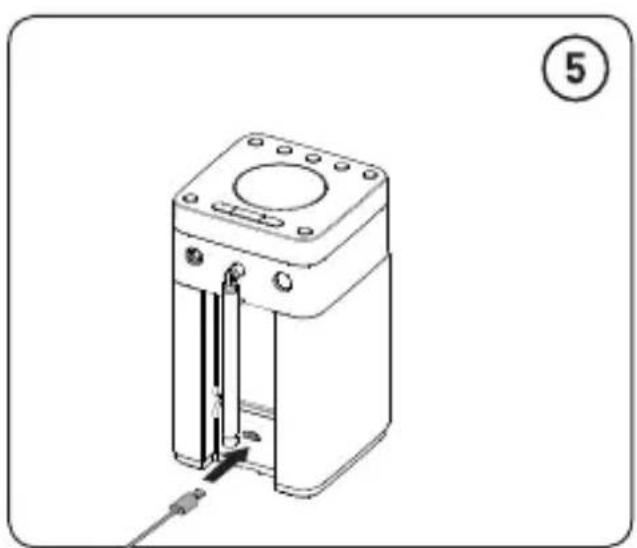
natural_image
Technical line drawing of a mechanical device with a labeled part (5), showing internal components and a cable inserted (no text or symbols beyond label)FR
Changement de la gaine amovible de Pop Midi
natural_image
Technical line drawing of a mechanical component with a cylindrical housing and internal structure, showing a tool inserted into a slot (no text or symbols)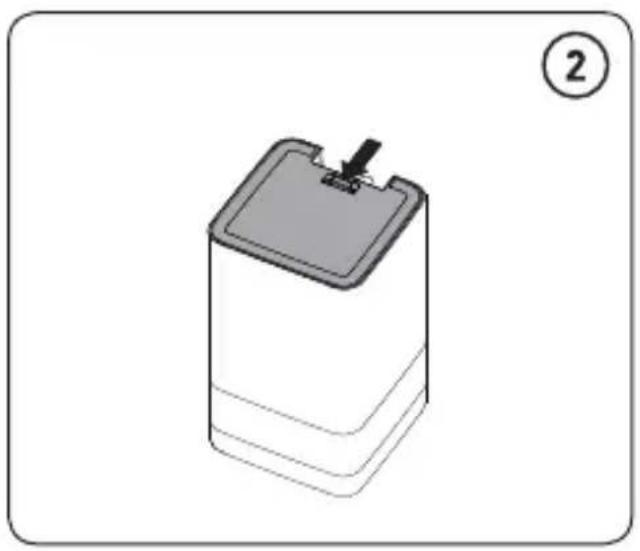
natural_image
3D illustration of a cylindrical battery with a lid and a pin, labeled with number 2 (no text or symbols on the diagram itself)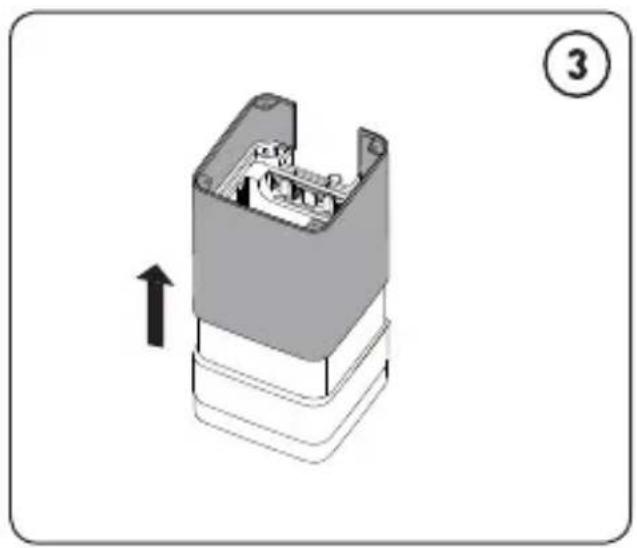
natural_image
3D diagram of a mechanical component with an arrow indicating upward motion, no text or symbols present
natural_image
Mechanical component diagram showing a housing with internal components and a downward arrow indicating motion (no text or symbols)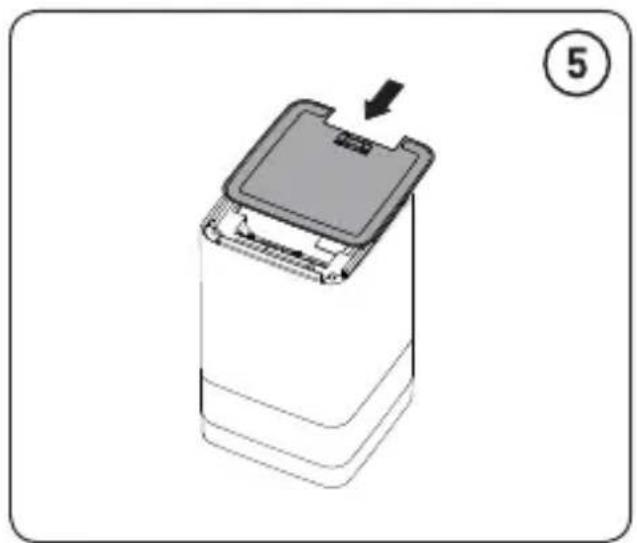
natural_image
3D diagram of a battery casing with a lid and arrow indicating direction (no text or symbols)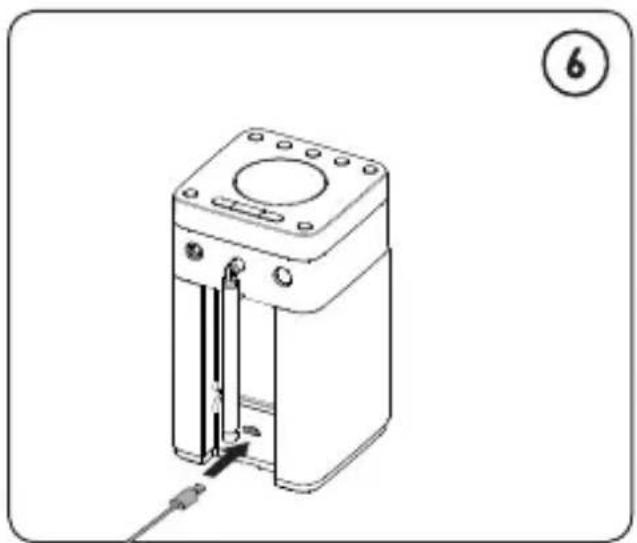
natural_image
Technical line drawing of a mechanical device with a vertical rod inserted into a housing, labeled with number 6 (no text or symbols on the device itself)Aide et conseils
natural_image
Line drawing of a hand operating a device with a sensor and antenna (no text or symbols)natural_image
Technical line drawing of a mechanical device with a cylindrical housing and internal components, showing a cable inserted into a housing (no text or symbols)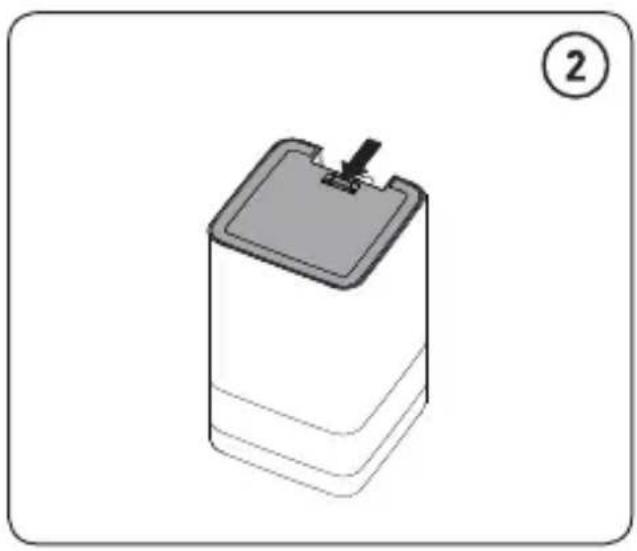
natural_image
3D diagram of a cylindrical battery with a lid and arrow pointing to the top section, labeled with number 2 (no text or symbols on the battery itself)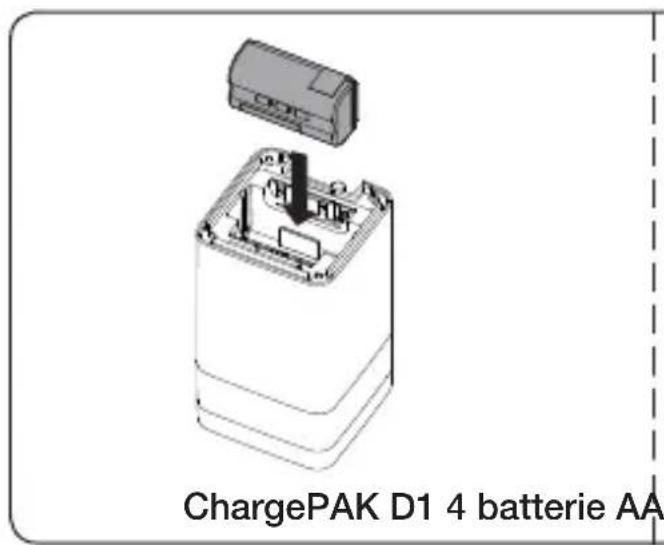
natural_image
Diagram of a battery cell assembly with an inset showing internal components (no text or symbols)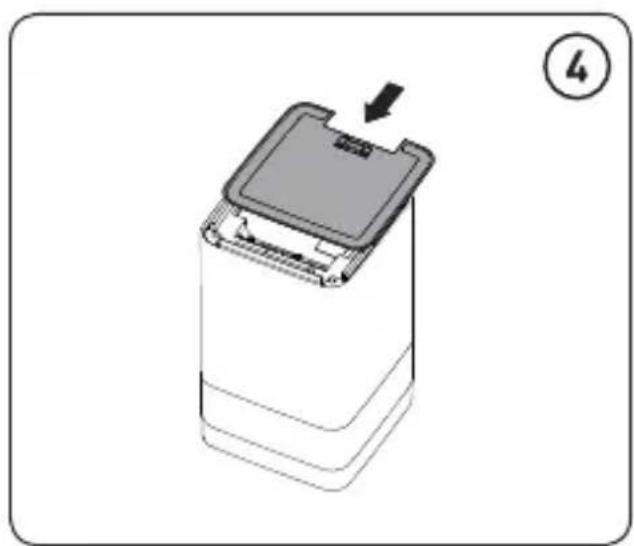
natural_image
3D diagram of a battery casing with a lid and arrow indicating a component (no text or symbols)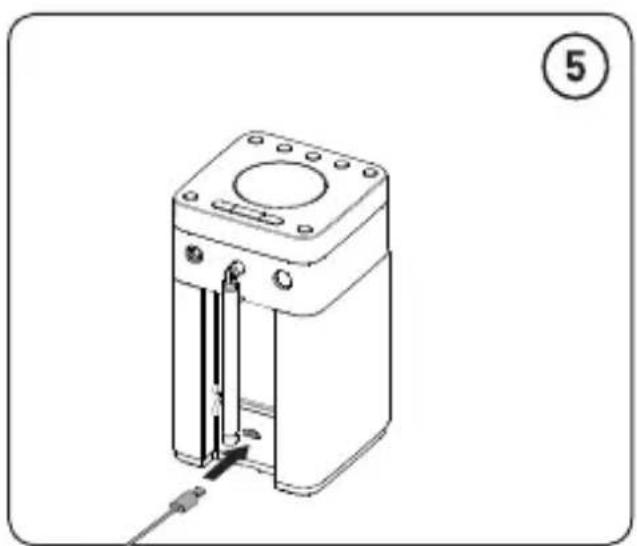
natural_image
Technical line drawing of a mechanical device with a base and internal components, no visible text or symbolsnatural_image
Technical line drawing of a mechanical device with a cylindrical housing and internal components, showing a tool inserted into a base (no text or symbols)
natural_image
3D diagram of a rectangular container with a lid and a small protrusion, labeled with number 2 (no text or symbols on the container itself)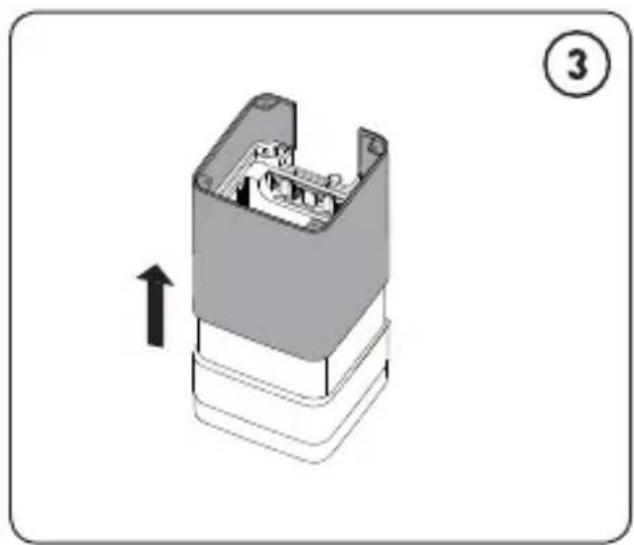
natural_image
3D diagram of a mechanical component with an arrow indicating upward motion, no text or symbols present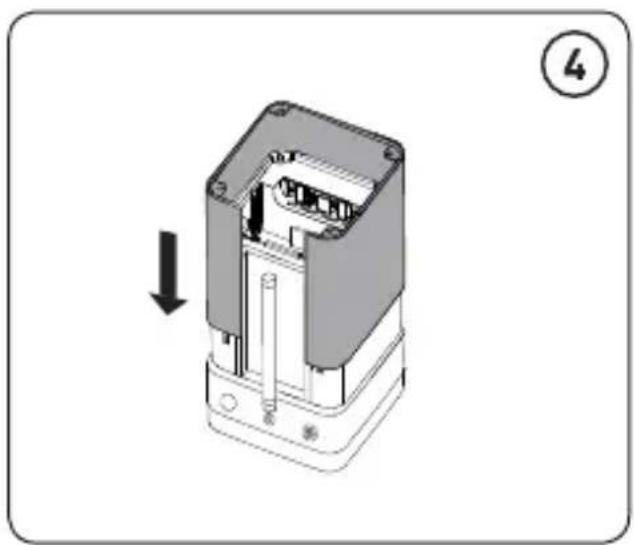
natural_image
3D diagram of a mechanical component with a downward arrow indicating a process or assembly (no text or symbols present)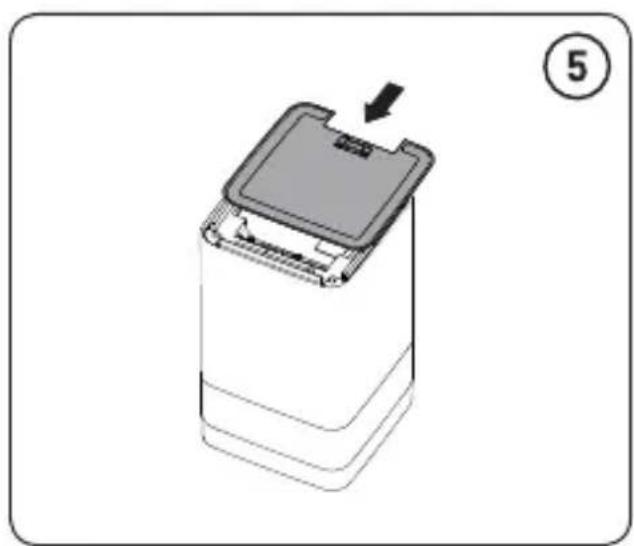
natural_image
Diagram of a battery casing with a lid and arrow indicating a component (no text or symbols)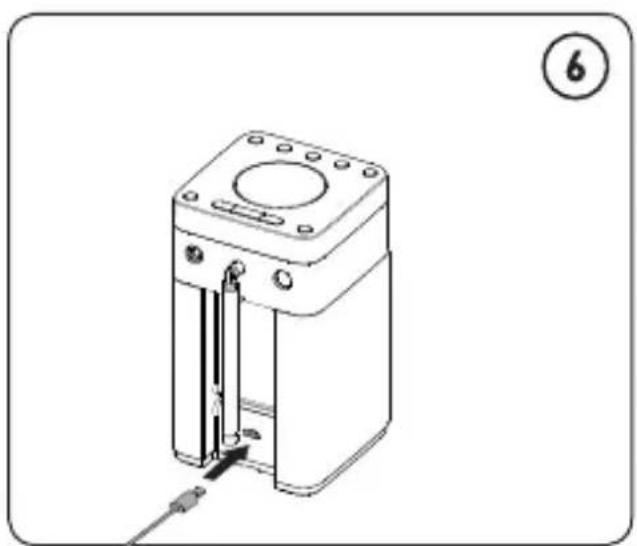
natural_image
Technical line drawing of a mechanical device with a base and internal components, no visible text or symbolsFrequenze DAB/DAB+, FM radio 87,5-108 MHz
http://www.pure.com/about/red
Pop Midi med Bluetooth
natural_image
Line drawing of a hand operating a device with a sensor and antenna (no text or symbols)natural_image
Technical line drawing of a mechanical device with a cylindrical housing and internal components, no text or symbols present.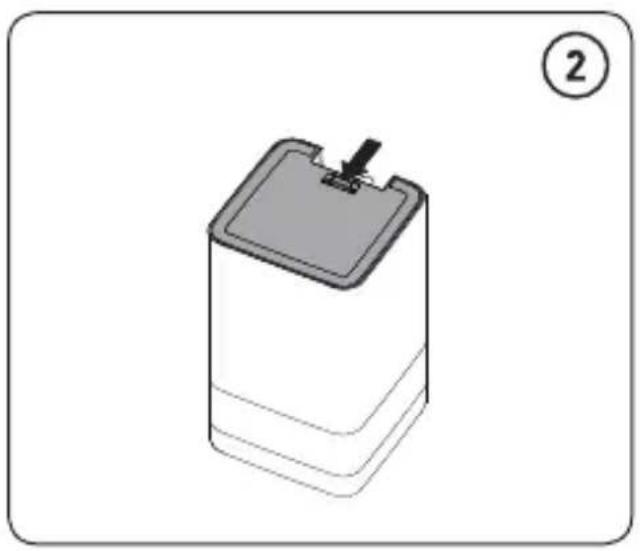
natural_image
3D illustration of a cylindrical battery with a lid and a pin, labeled with number 2 (no text or symbols on the diagram itself)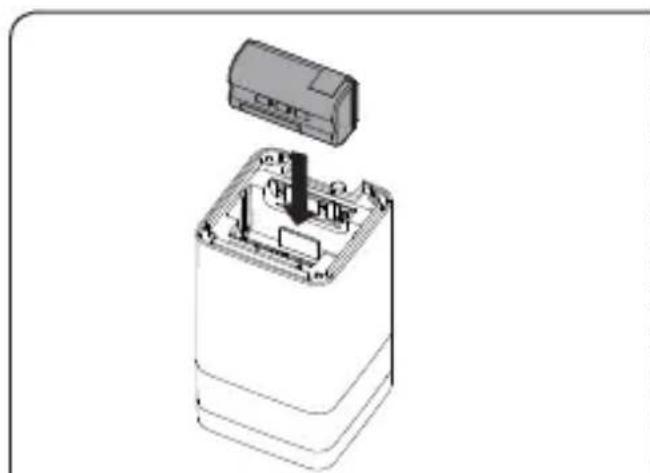
natural_image
3D diagram of a device casing with internal components and a lid, showing no text or symbols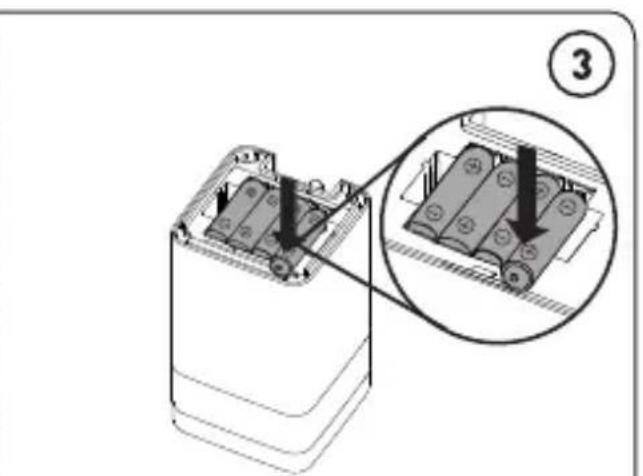
natural_image
Technical illustration of a battery housing with an inset showing internal components (no text or symbols)ChargePAK D1 4 stk. AA-batterier

natural_image
3D diagram of a battery casing with a lid and arrow indicating a component (no text or symbols)
natural_image
Technical line drawing of a mechanical device with a vertical rod inserted into a housing, labeled with number 5 (no text or symbols on the device itself)natural_image
Technical line drawing of a mechanical component with a cylindrical housing and internal structure, showing a tool inserted into a slot (no text or symbols)
natural_image
3D illustration of a cylindrical battery with a lid and a pin, labeled with number 2 (no text or symbols on the diagram itself)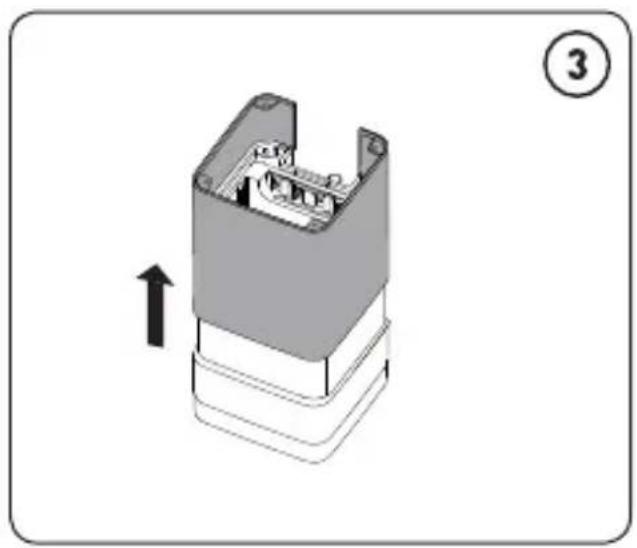
natural_image
3D diagram of a mechanical component with an arrow indicating upward motion, no text or symbols present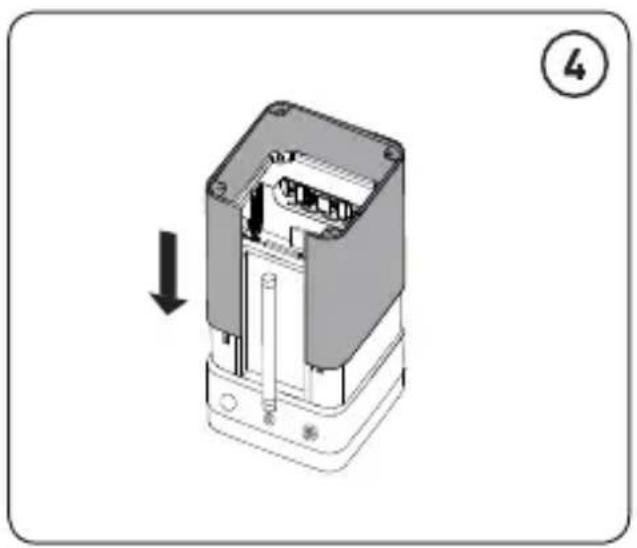
natural_image
Mechanical component diagram showing a housing with internal components and a downward arrow indicating motion (no text or symbols)
natural_image
3D diagram of a battery casing with a lid and arrow indicating a component (no text or symbols)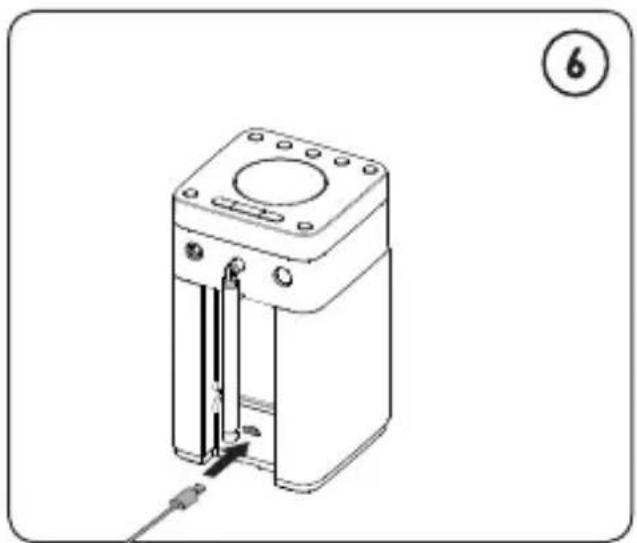
natural_image
Technical line drawing of a mechanical device with a cylindrical housing and internal vertical rod, no text or symbols present.Hjælp og råd
http://www.pure.com/about/red
natural_image
Line drawing of a hand operating a device with a sensor and antenna (no text or symbols)natural_image
Technical line drawing of a mechanical device with a cylindrical housing and internal components, showing a tool inserted into a base (no text or symbols)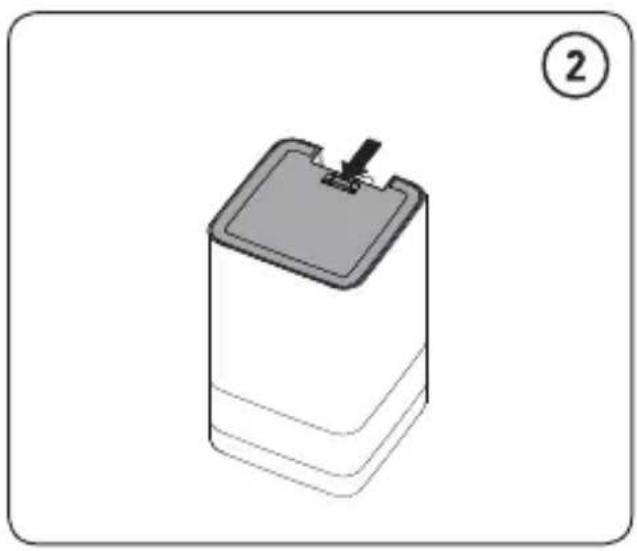
natural_image
3D diagram of a cylindrical battery with a lid and arrow pointing to the top section, labeled with number 2 (no text or symbols on the battery itself)

natural_image
Technical illustration of a battery pack assembly with an inset showing internal components (no text or symbols)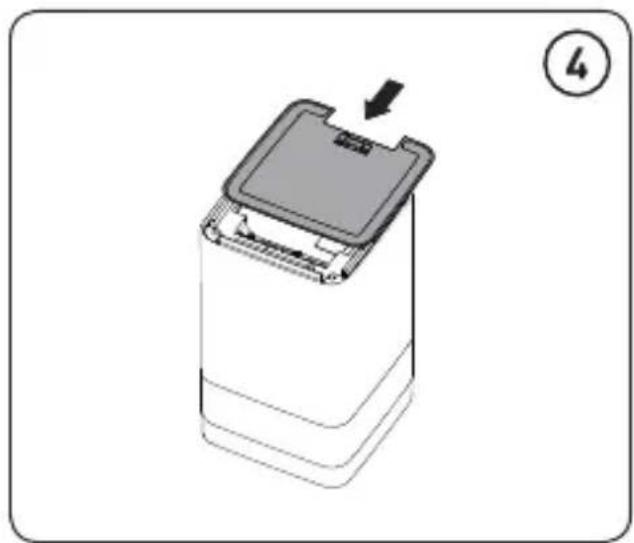
natural_image
3D diagram of a battery casing with a lid and arrow indicating direction (no text or symbols)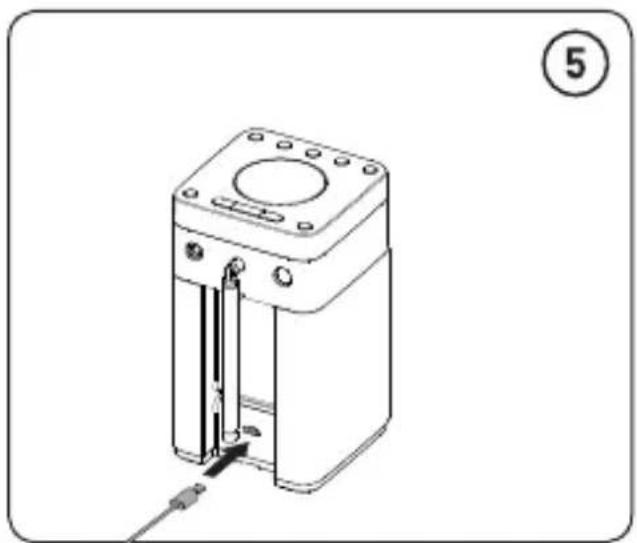
natural_image
Technical line drawing of a mechanical device with a vertical rod inserted into a housing, labeled with number 5 (no text or symbols on the device itself)natural_image
Technical line drawing of a mechanical device with a cylindrical housing and internal components, showing a tool inserted into a slot (no text or symbols)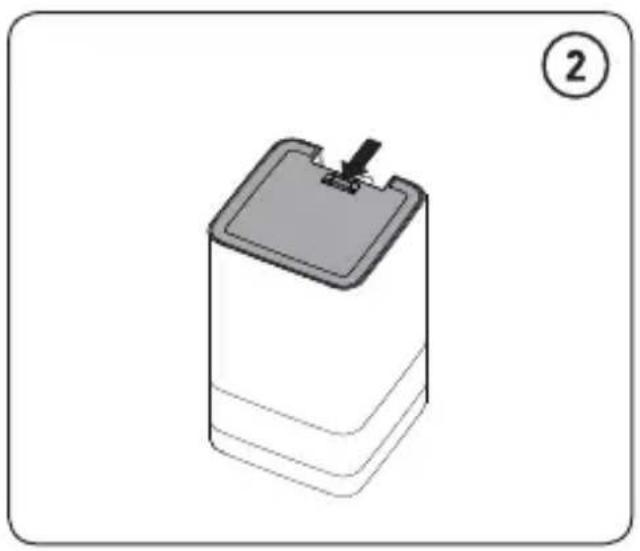
natural_image
3D illustration of a cylindrical battery with a lid and a pin, labeled with number 2 (no text or symbols on the diagram itself)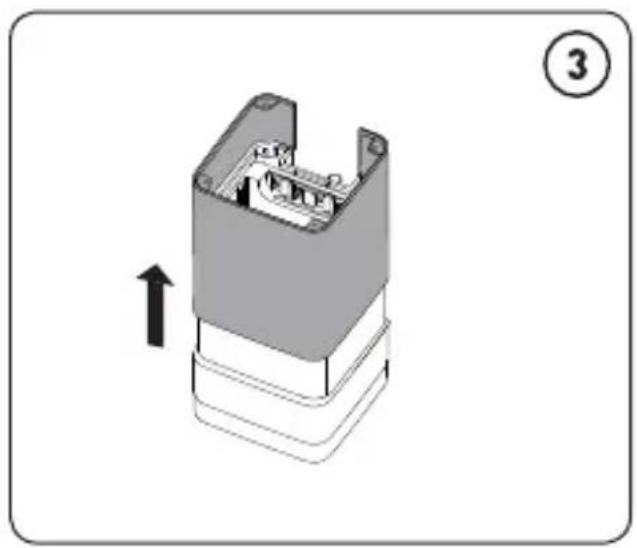
natural_image
3D diagram of a mechanical component with an arrow indicating upward motion, no text or symbols present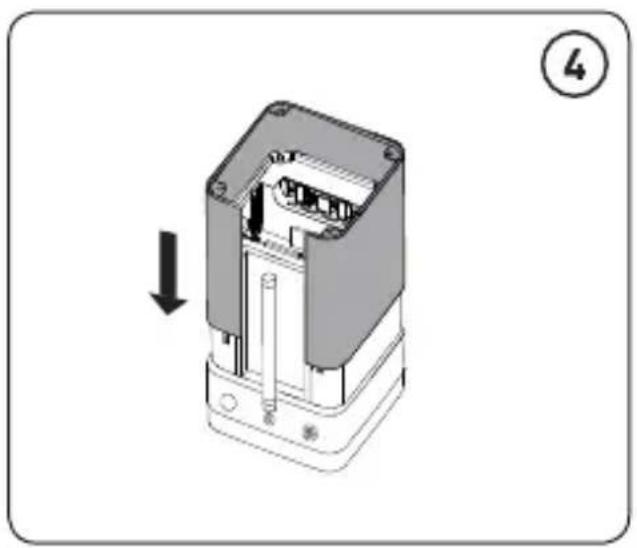
natural_image
Mechanical component diagram showing a housing with internal components and a downward arrow indicating motion (no text or symbols)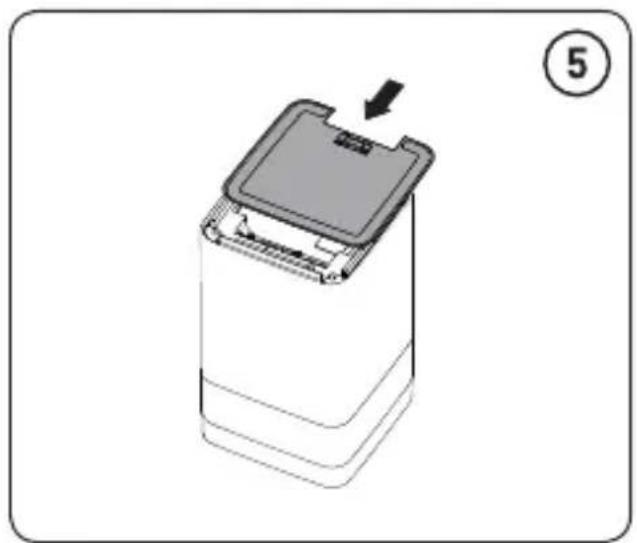
natural_image
3D diagram of a battery casing with a lid and arrow indicating direction (no text or symbols)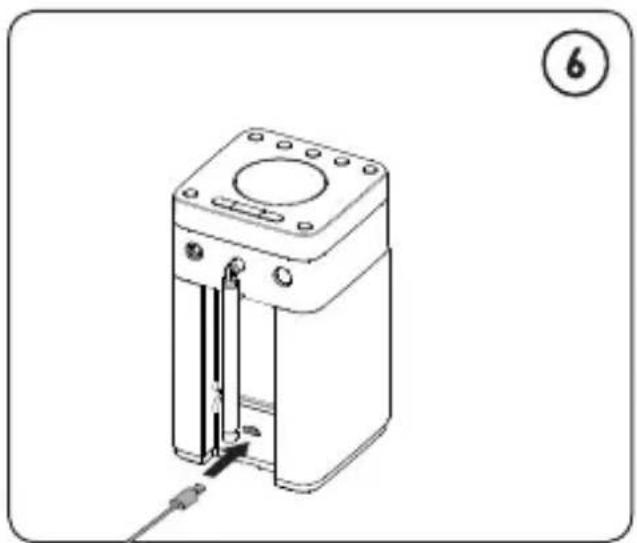
natural_image
Technical line drawing of a mechanical device with a cylindrical housing and internal vertical rod, no text or symbols present.Help en advies
Copyright 2018 by Pure International Limited. All rights reserved. No part of this publication may be copied or distributed, transmitted, transcribed, stored in a retrieval system, or translated into any human or computer language, in any form or by any means, electronic, mechanical, magnetic, manual or otherwise, or disclosed to third parties without the express written permission of Pure International Limited.
Trademarks
Pop Midi with Bluetooth, ChargePAK, Pure and the Pure logo are trademarks or registered trademarks of Pure International Limited. All other product names are trademarks of their respective companies.
Warranty Information
Pure International Limited warrants to the end user that this product will be free from defects in materials and workmanship in the course of normal use for a period of two years from the date of purchase. This guarantee covers breakdowns due to manufacturing or design faults; it does not apply in cases such as accidental damage, however caused, wear and tear, negligence, adjustment, modification or repair not authorised by us. Should you have a problem with your unit please contact your supplier or contact Pure Support at the address shown on the rear of this manual.
Disclaimer
Pure International Limited makes no representation or warranties with respect to the content of this document and specifically disclaims any implied warranties of merchantability or fitness for any particular purpose. Further, Pure International Limited reserves the right to revise this publication and to make changes in it from time to time without obligation of Pure International Limited to notify any person or organisation of such revisions or changes.
Correct disposal of this product
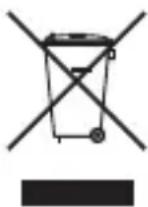
This marking indicates that this product should not be disposed with other household waste throughout the EU. To prevent possible harm to the environment or human health from uncontrolled waste disposal, recycle it responsibly to promote the sustainable reuse of material resources. To return your used device, please use the return and collection system or contact the retailer where the product was purchased. They can take this product for environmental safe recycling.
Urheberrecht
Pure International Limited
Home Park Road
Kings Langley
Herts, WD4 8UD
United Kingdom
www.pure.com
http://support.pure.com
Pure
Deutschland
sales_gmbh@pure.com
http://support.pure.com
PURE
www.pure.com
support.pure.com

- Pop Midi with Bluetooth
- Safety
- Safety information
- ChargePAK D1 safety instructions
- Contents
- Introduction
- Getting started
- Using your Pop
- Storing and selecting presets
- Using Bluetooth
- Alarms and timers
- Options and settings
- Appendix
- Introduction
- Top panel
- Rear panel
- Display
- Getting started
- Quick set up
- Using your Pop
- Listening to digital radio
- Changing digital stations
- Listening to FM radio
- Changing FM stations
- Manual tuning
- Seek tuning
- Storing and selecting presets
- To quick-store a station to a preset button (1–4)
- To store a station to the preset list (1–10)
- To recall a preset when listening to a digital or FM radio station
- Using Bluetooth
- Pairing a mobile device with Pop
- Disconnecting a mobile device from Pop
- Alarms and timers
- Setting an alarm
- Cancelling a sounding alarm
- Snoozing a sounding alarm
- Disabling an alarm
- Setting the sleep timer
- Setting the kitchen timer
- Options and settings
- General settings
- Changing the language shown on the display
- Resetting Pop to factory settings
- Displaying Pop's software version
- Updating Pop to the latest version of software
- Audio settings
- Display settings
- Adjusting the display brightness
- Adjusting how long the display backlight stays on for
- Changing the information shown on Pop's display
- Clock settings
- Setting the time and date
- Changing the time format
- Changing the date format
- Clock synchronization options
- Changing the snooze time
- Bluetooth settings
- FM stereo
- Appendix
- Installing a ChargePAK D1 or four AA batteries
- Changing Pop Midi's removable sleeve
- Help and advice
- Secondary and inactive stations
- () Secondary digital radio services
- (?) Inactive or unavailable digital radio stations
- Hints and tips
- Display says 'No stations available'
- Receiving new digital radio stations that have started broadcasting
- I can't see Pop in the list of available Bluetooth devices on my mobile device
- My mobile device is prompting me for a passcode when I try to pair with my Pop
- Technical specifications
- Hilfe und Tipps
- Changement de la gaine amovible de Pop Midi
- Aide et conseils
- Pop Midi med Bluetooth
- Hjælp og råd
- Help en advies
- Trademarks
- Warranty Information
- Disclaimer
- Correct disposal of this product
- Urheberrecht
- Pure International Limited
- Pure
Brand : PURE
Model : Pop Midi with Bluetooth
Category : Radio