DO215SV - Aspirateur DOMO - Free user manual and instructions
Find the device manual for free DO215SV DOMO in PDF.
Download the instructions for your Aspirateur in PDF format for free! Find your manual DO215SV - DOMO and take your electronic device back in hand. On this page are published all the documents necessary for the use of your device. DO215SV by DOMO.
USER MANUAL DO215SV DOMO
Instruction booklet 2-in-1 Stick vacuum cleaner
Read all instructions carefully - save this instruction manual for future reference.
FR GARANTIE Cher client,
DO215SV EN WARRANTY Dear client ,
All of our products are always submitted to a strict quality control before they are sold to you.
Should you nevertheless experience problems with your device, we sincerely regret this.
In that case, we kindly request you to contact our customer service.
Our sta will gladly assist you.
+32 14 21 71 91 info@linea2000.be
Monday – Thursday: 8.30 – 12.00 and 13.00 – 17.00
Friday: 8.30 – 12.00 and 13.00 – 16.30
This appliance has a two year warranty period. During this period the manufacturer is
responsible for any failures that are the direct result of construction failure. When these
failures occur the appliance will be repaired or replaced if necessary. The warranty will not be
valid when the damage to the appliance is caused by wrong use, not following the instructions
or repairs executed by a third party. The guarantee is issued with the original till receipt. All
parts, which are subject to wear, are excluded from the warranty.
If your device breaks down within the 2-year warranty period, you can return the device
together with your receipt to the shop where you purchased it.
The guarantee on accessories and components that are liable to wear-and-tear is only 6
The guarantee and responsibility of the supplier and manufacturer lapse automatically in the
· If the instructions in this manual have not been followed.
· In case of incorrect connection, e.g., electrical voltage that is too high.
· In case of incorrect, rough or abnormal use.
· In case of insucient or incorrect maintenance.
· In case of repairs or alterations to the device by the consumer or non-authorised third
· If the customer used parts or accessories that are not recommended or provided by the
supplier / manufacturer.27
EN SAFETY INSTRUCTIONS This appliance may be used by children from the age of 16 and up, and also by persons with
a physical or sensorly limitation, as well as mentally limited persons or persons with a lack of
experience and knowledge. But only on the condition that these persons have received the
necessary instructions on how to use this appliance in a safe way and know the dangers that
can occur by using this appliance.
Children cannot be allowed to play with the appliance.
Maintenance and cleaning of the appliance may not be done by children, unless they are
older than 16 years old and are under supervision. Keep the appliance out of reach of children
younger than 16 years old.
This appliance is suitable to be used in a household environment and in similar surroundings
· Kitchen for personnel of shops, oces or other similar professional surroundings
· Hotel or motel rooms and other surroundings with a residential character
· Guest rooms or similar
· Attention: This appliance cannot be used with an external timer or a separate remote
· Read all instructions before use.
· Before use, check if the voltage stated on the appliance corresponds with the voltage of
the power net at your home.
· Do not let the cord hang on a hot surface or on the edge of a table or counter top.
· Never use the appliance when the cord or plug is damaged, after malfunction or when the
appliance itself is damaged. In that case, take the appliance to the nearest qualied service
center for check-up and repair.
· Close supervision is necessary when the appliance is used near or by children.
· The use of accessories that are not recommended or sold by the manufacturer can cause
re, electrical shock or injuries.
· Unplug the appliance when it is not in use, before assembling or disassembling any parts
and before cleaning the appliance. Put all buttons and knobs into the ‘o’ position and
unplug the appliance by grasping the plug. Never unplug by pulling the cord.
· Do not leave a working appliance unattended.
· Never place this appliance near a gas stove or electrical stove or in a place where it may
come into contact with a warm appliance.
· Do not use the appliance outdoors.
· Only use the appliance for its intended use.28
· Always use the appliance on a steady, dry and level surface.
· Only use the appliance for domestic use. The manufacturer can not be held responsible for
accidents that result from improper use of the appliance or not following the instructions
described in this manual.
· All repairs should be carried out by the manufacturer or its aftersales service.
· Never immerse the appliance, the cord or the plug in water or any other liquid.
· Make sure that children do not touch the cord or appliance.
· Keep the cord away from sharp edges and hot parts or other heat sources.
· Before use, remove all packaging materials and any promotional stickers.
· Do not use the vacuum cleaner to vacuum up detergents, liquids, needles, matches and
other similar liquids, sharp objects or ammable objects.
· Do not use the vacuum cleaner to vacuum up cement, powder and other small particles.
Also avoid vacuuming up large objects. The vacuum cleaner could be clogged, the motor
could overheat or other damage may occur.
· Make sure that the air intake or the oor suction opening do not become blocked.
· Make sure that the machine does not come into contact with liquids.
· First charge a new battery up completely.
· Pull the plug from the outlet when the vacuum cleaner is fully charged.29
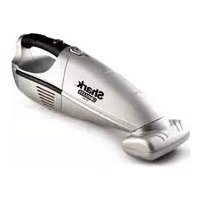
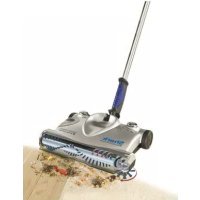
3. Button to bend the handle
4. Release button hand-held vacuum cleaner
5. On-o button hand-held
6. Battery charge indicator
8. Release button oor
9. Floor nozzle with
10. Charging station cord
11. Charging station
12. Crevice vacuum cleaner
BEFORE THE FIRST USE To set up the machine properly, please follow the steps below:
· Straighten the handle of the stick vacuum until it clicks into position.
· Make sure that the oor nozzle is clicked on tightly to the stick vacuum cleaner.
· The charging station may be attached to the wall for extra stability.
· The charging station has a holder for the accessories included.
1. Attach the charger to the charging station via the in-built connector on the
2. Place the hand-held vacuum into the stick vacuum cleaner.
3. Put the stick vacuum cleaner into the charging station, so that the contact
points on the vacuum cleaner are aligned with the contact points on the charging station.
Push the vacuum cleaner and the charging station together so that the stick vacuum
cleaner remains standing vertically on the station. Make sure it all is stable.
4. The battery level indicator will now light up and indicate when the machine is fully
5. The machine cannot be started during charging.
· Press the on-o switch on the handle to turn the machine on. When you switch on the
machine, the rotating oor brush at the bottom of the oor nozzle will begin to turn. This
will cause the dirt in the opening to be shifted and thereby vacuumed up. The dirt will be
collected in the dust reservoir of the hand-held vacuum cleaner.
· Press the speed control to increase or lower the suction power.
· Press the release button on the hand-held vacuum cleaner to remove the hand-held
vacuum cleaner and only use the hand-held vacuum cleaner. To use just the hand-held
vacuum, press the on-o switch on the hand-held vacuum cleaner.
· The machine is equipped with a safety which will ensure that the machine shuts itself o if,
for example, objects which are too large are sucked up, or if ngers become tangled in the
oor brush. This is for personal safety and to protect the motor. To reverse the oor brush,
press the on/o button again or press the speed control.
ACCESOIRES You can attach the following accessories to the hand-held vacuum:
· Dust brush: for furniture, bookshelves, curtains and hard to clean surfaces.
· Crevice vacuum cleaner: for crevices, corners, stairs, keyboards,...
CLEANING AND MAINTENANCE CLEANING THE DUST RESERVOIR
1. Remove the hand-held vacuum cleaner from the stick vacuum and press the release
button on the dust reservoir on the hand-held vacuum cleaner.
2. Remove the dust reservoir from the motor section. Then take the lters out of the dust
3. Empty the dust reservoir. The dust reservoir, the lter (A) and the EPA
lter (B) can be cleaned under running water. Do take care to dry them
completely before using them again in the machine.
We advise replacing the lters regularly to ensure an optimal operation of the machine. Dirty
lters will reduce the suction power drastically. After every cleaning, clean the dust reservoir
and the lters to extend the life span of your machine.
CLEANING THE FLOOR BRUSH
1. Remove the oor nozzle from the upright vacuum cleaner. Press the release button at
the back of the oor nozzle and remove it from the machine.
2. Click on the release button on the left of the oor brush.
3. Remove the rotating oor brush from the oor nozzle.
4. Remove hairs and other dirt that have wrapped around the oor
brush. If you do not clean the oor brush regularly, it will become damaged and your
machine will become unusable.
5. The rotating oor brush may be rinsed o under running water. Make sure that it is
completely dry before using it.
6. Place the oor brush back into the oor nozzle when it is clean.
7. Click the closure valve back into place to close it.
8. Push the nozzle back onto the stick. The machine is now again ready for use.
Stuck hairs can damage the machine or your oor. Always remove the hairs stuck on the
CLEANING THE MACHINE Clean the machine with a slightly moist soft cloth. Dry the machine o well. Never submerge
the machine in water!
PROBLEM AND SOLUTION Problem Solution
The machine does not start up. · The battery is empty. Charge the machine.
· The hand-held vacuum cleaner is not correctly
mounted on the stick vacuum cleaner. Make sure
that the hand-held vacuum cleaner is correctly
The machine does not vacuum. · The lters are dirty/the dust reservoir is full.
· The oor nozzle is clogged/the oor brush is blocked.
· The nozzle opening is clogged.
· Clean the machine as described in this manual.
The running time of the machine
is shorter and shorter.
· The machine is not suciently charged. Charge the
machine fully and try again.
· The battery is broken or old. Replace the battery.
· Stuck hairs.Remove the hairs stuck on the brushes.
The indicator light does not burn
· The hand-held vacuum cleaner is not correctly
mounted on the stick vacuum cleaner. Make sure
that the hand-held vacuum cleaner is correctly
DO215SV EN ENVIRONMENTAL GUIDELINES This symbol on the product or on its packaging indicates
that this product may not be treated as household waste.
Instead it must be brought to the applicable collection point
for recycling of electrical and electronic equipment. By
ensuring this product is disposed of correctly, you will help
prevent potential negative consequences for the environment
and human health, which could otherwise be caused by
inappropriate waste handling of this product. For more
detailed information about recycling of this product, please
contact your local city oce, your household waste disposal
service or the shop where you purchased the product.
The packaging is recyclable. Please treat the packaging
El aparato no aspira. · The lters are dirty/the dust reservoir is full.
· The oor nozzle is clogged/the oor brush is blocked.
· The nozzle opening is clogged.
· Clean the machine as described in this manual.
La autonomía del aparato