A 2236 X - Aspirateur Kärcher - Free user manual and instructions
Find the device manual for free A 2236 X Kärcher in PDF.
Download the instructions for your Aspirateur in PDF format for free! Find your manual A 2236 X - Kärcher and take your electronic device back in hand. On this page are published all the documents necessary for the use of your device. A 2236 X by Kärcher.
USER MANUAL A 2236 X Kärcher
Please read and comply with
these original operating instruc-
tions prior to the initial operation of your appli-
ance and store them for later use or
The appliance is intended for use as a wet
and dry vacuum cleaner corresponding to the
descriptions given in these operating instruc-
tions and the safety notes.
– Protect the unit from rain. Do not store
– This device may not be used to suck in
Use the wet/dry vacuum cleaner only with:
– Original filter bag.
– Original spare parts, accessories and
special accessories.
The manufacturer is not responsible for any
damages that may occur on account of im-
proper use or wrong operations.
The packaging material can be recy-
cled. Please do not place the packaging
into the ordinary refuse for disposal, but ar-
range for the proper recycling.
Old appliances contain valuable materi-
als that can be recycled. Please ar-
range for the proper recycling of old
appliances. Please dispose your old applianc-
es using appropriate collection systems.
Notes about the ingredients (REACH)
You will find current information about the in-
http://www.karcher.de/de/unternehmen/
umweltschutz/REACH.htm
Filters and filter bags are made from environ-
ment-friendly materials.
They can therefore be disposed off through
the normal household garbage provided you
have not sucked in substances that are not
permitted to be thrown into household gar-
– In case of extended downtimes, switch
the appliance off at the main switch / ap-
pliance switch or remove the mains plug.
– This device is not intended for use by per-
sons (including children) with reduced
physical, sensory or mental abilities or
lacking experience and/or knowledge, un-
less they are supervised by a person re-
sponsible for their safety or are instructed
by these persons on the use of the device.
Children should be supervised, to ensure
that they do not play with the device.
– Switch the appliance off after every use
and prior to every cleaning/maintenance
– Risk of fire. Do not vacuum up any burning
– The appliance may not be used in areas
where a risk of explosion is present.
몇 Electrical connection
The appliance may only be connected to al-
ternating current. The voltage must corre-
spond with the type plate on the appliance.
Risk of electric shock
Never touch the mains plug and the socket
Do not pull the plug from the socket by pulling
on the connecting cable.
Check the power cord with mains plug for
damage before every use. If the power cord is
damaged, please arrange immediately for the
exchange by an authorized customer service
or a skilled electrician.
To avoid accidents due to electrical faults we
recommend the use of sockets with a line-
side current-limiting circuit breaker (max.
30 mA nominal tripping current).
pours or mixtures when agitated by the suc-
Never vacuum up the following materials:
– Explosive or combustible gases, liquids
and dust particles (reactive dust particles)
– Reactive metal dust particles (such as
aluminium, magnesium, zinc) in combina-
tion with highly alkaline or acidic deter-
Environmental protection
Disposing the filters and filter bags
– Undiluted, strong acids and alkalies
– Organic solvents (such as petrol, paint
thinners, acetone, heating oil).
In addition, these substances may cause the
appliance materials to corrode.
When unpacking the product, make sure
that no accessories are missing and that
none of the package contents have been
damaged. If you detect any transport
damages please contact your dealer.
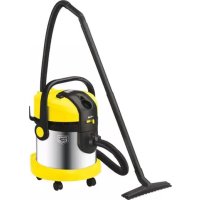
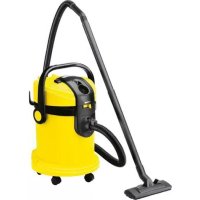
The basic suction device is mounted on a
chassis and can be detached, for e.g. for
emptying or for transporting in a car.
Illustrations on Page 2
1 Chassis with wheels and castors
2 Transport handle; height can be adjusted
4 Unlock basic suction device
9 Blowing connection
10 Air regulation of the blowing function
A 2206 X (Position I - 0)
A 2236 X pt (Position I - 0 - II)
12 Power cord with plug
13 Storage, power cord
14 Suction hose connection
16 Suction tubes 2 x 0.5 m
17 Floor nozzle with hard surface insert
Further, for A 2236 X pt:
Î Before commissioning, it is necessary to
install the steering rollers, the handle and
the wheels with axis on the chassis.
The chassis needs to be assembled
only once; instructions for the same
are described on an enclosed sheet.
몇 Always work with an inserted cartridge
filter - during wet as well as dry vacu-
Î Connect accessories.
Î Plug in the main plug.
Î Switch on the appliance using the ON/
Position I: Normal operations, suction or
Position II: Automatic operations with
connected electric tool
Position 0: Appliance and the connected
electric tool are switched off
Î To move the device, first place one foot on
the ground, hold it and pull the transport
See also illustration 12
For a dust-free disposal of the vacuuming ma-
terial we recommend to insert the paper filter
bag as well. This provides the additional ad-
vantage that the cartridge filter will not be-
come contaminated that quickly.
몇 Work only with a dry cartridge filter!
Î Therefore: Always let the cartridge filter
dry thoroughly before using it!
몇 Added filter bags can burst!
Î Therefore: Change the filter bag at the
몇 Always use a filter bag while sucking in
Description of the Appliance
Turning on the Appliance
Î The filling level of the filter bag depends
on the dirt that is sucked in.
The filter bag needs to be replaced more
frequently while sucking in fine dust, sand,
Î Use a preliminary separator while sucking
in ash or rust particles (order no. 2.863-
Î Insert the hard surface inlay into the floor
nozzle. The bristles should point towards
Î Press both the locking flaps inwards.
Î Remove the hard-surface insert.
Use this function, for example, to blow out
leaves or dust from the garage, hobby room,
work shop, courtyard or garden.
Î Connect connection hose. Open the slide
of the air regulation, and select the de-
sired blowing performance.
Do not use a filter bag!
Immediately switch the appliance off if foam
forms or liquids escape!
Note: If the container is full a float closes the
suction opening and the appliance works at a
higher speed. Switch off the appliance imme-
diately and empty the container.
Further, for A 2236 X pt:
Electric power tools with a power consump-
tion of 100-2100 W can be connected.
(CH: 100 - 1100 W, UK: 100 - 1800 W)
Î A) Plug the enclosed adapter onto the
suction hose and connect the electric tool
with the connection.
Î B) Use hose Flex-Tool; attach the thicker
end directly to the surction hose and the
other end on the enclosed adapter and
connect it to the electric tool.
Î Connect the mains plug of the electric
power tool to the vacuum cleaner.
Î Switch the vacuum cleaner to Position II
Note: The suction turbine starts with a de-
lay of 0.5 seconds after the electric tool
has been switched on. After the electric
tool has been switched off, the suction tur-
bine will continue to run for approx. 5 sec-
onds to suck in the remaining dirt from the
Î Turn off the appliance and disconnect the
Î Press the unlocking mechanism by foot
and remove the vacuuming device from
Î Remove the motor casing and empty the
Î Insert the vacuuming device in the chas-
sis - the container is self-locking.
Storing the Appliance
Î Place the accessories in the appropriate
compartments at the appliance and store
the appliance in a dry room.
Î The large wheels facilitate transportation
on stairs; hold the device at the transport
handle while doing so.
Note: Never transport the device at the
handle of the vacuuming device; risk of
Î The device is to be fastened properly be-
fore transporting the device in the car.
Note: We recommend that you first re-
move the vacuuming device from the
Vacuuming hard surfaces
Vacuuming carpeted floors
Working with electrical power tools
Transporting the device
Always switch off the appliance and pull out
the mains plug before care and maintenance
cleaners! Never immerse the appliance in wa-
Î Clean the appliance and accessory parts
made of plastic with a commercial plastic
Î If required, rinse the container and acces-
sories with water properly and dry them
The terms of the guarantee applicable in each
country have been published by our respec-
tive national distributors. We will repair possi-
ble faults on your unit free of charge within the
warranty period, insofar as the faults are
caused by material defects or defective work-
manship. Guarantee claims should be ad-
dressed to your dealer or the nearest
authorized customer service centre, and sup-
ported by documentary evidence of purchase.
(See address on the reverse)
Our KÄRCHER branch will be pleased to help
you further in the case of questions or faults.
(See address on the reverse)
At the end of the operating instructions you
will find a selected list of spare parts that are
You can procure the spare parts and the at-
tachments from your dealer or your KÄRCH-
(See address on the reverse)
Î Remove the blockage with the help of a
Î Insert new filter bag.
Î Take out the filter and shake it. If the dirt
does not come off, then clean it under
flowing water and let it dry thoroughly be-
fore fitting it back. Replace it if the dirt is
stubborn or if the filter itself is damaged.
Î Switch off the appliance and empty the
Subject to technical modifications!
Maintenance and Care
Cleaning the appliance and accessories
Ordering spare parts and special attach-
Suction power decreases
Attachment, suction hose or suction pipe
Cartridge filter is dirty
Appliance does not suck in water
10 A 16 A Mains fuse (slow-
KÄRCHER UK Limited operate a helpline al-
lowing customers to discuss any problems ex-
perienced with our products.
The helpline operates during normal business
hours and may be busy at peak periods.If you
have difficulty getting through we would ask
that you try to contact us again later in the
The helpline number is 01295 752200,
open from 8.30am to 5.00pm
It helps us if you have the model number and
data plate details to hand before making your
call so that we can assist you with your query
Alternatively you may write to us at the ad-
Notre succursale Kärcher
Î Sett inn ny filterpose.
Mult stimate client,
– pulberi metalice reactive (ex. aluminiu,
Padrunifilter on must
CDN Kärcher Canada Inc.
12 Willow Business Park
KOR Karcher Co. Ltd. (South Korea)
Youngjae B/D, 50-1, 51-1
Sansoo-dong, Mapo-ku
East Tamaki, Auckland
Part B, Building 30,
SGP Karcher Asia Pacific Pte. Ltd.
5 Toh Guan Road East
#01-00 Freight Links