
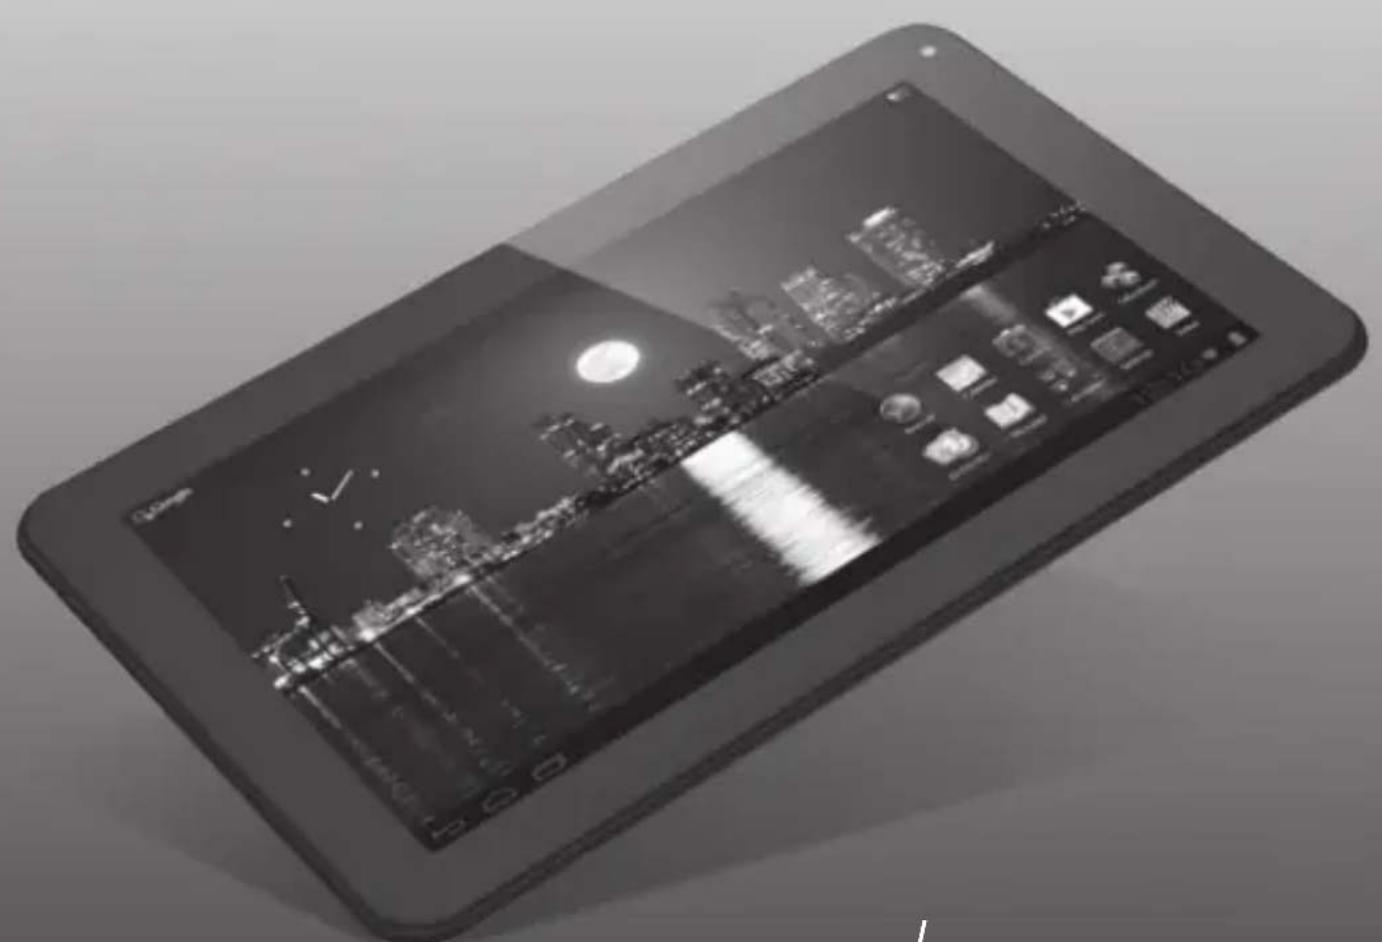
Luna 9c - Tablet Yarvik - Free user manual and instructions
Find the device manual for free Luna 9c Yarvik in PDF.

| Product Type | Touchscreen Tablet |
| Brand | Yarvik |
| Model | Luna 9c |
| Screen | 9-inch LCD touchscreen |
| Screen Resolution | 1024 x 600 pixels (estimated) |
| Operating System | Android |
| Processor | Quad-core 1.2 GHz |
| RAM Memory | 1 GB |
| Internal Storage | 16 GB |
| Wireless Connectivity | Wi-Fi 802.11 b/g/n, Bluetooth |
| Battery | Integrated rechargeable lithium-ion |
| Estimated Battery Life | Up to 6 hours |
| Power Supply | 5V/2A AC adapter |
| Dimensions (approx.) | 240 x 170 x 10 mm |
| Weight (approx.) | Approximately 500 g |
| Main Functions | Internet browsing, video playback, games, Android apps |
| Maintenance and Cleaning | Slightly damp cotton cloth (water only) |
| Safety | Do not expose to moisture, do not open, use only approved accessories |
| Spare parts and repairability | Battery and AC adapter available; repair by qualified technician |
| General Information | RoHS certified, compliant with European standards |
Frequently Asked Questions - Luna 9c Yarvik
User questions about Luna 9c Yarvik
0 question about this device. Answer the ones you know or ask your own.
Ask a new question about this device
Download the instructions for your Tablet in PDF format for free! Find your manual Luna 9c - Yarvik and take your electronic device back in hand. On this page are published all the documents necessary for the use of your device. Luna 9c by Yarvik.
USER MANUAL Luna 9c Yarvik
3 Getting on the Internet
18
Internet instellen / Zugriff auf das Internet / Accès à Internet / Cómo acceder a Internet / Aceder à internet / Lactzenie z Internetem / Pripojeni k internetu / Pripojenie k internetu / Atkommen pà internettet / Gà ut pà Internet / Üvðeøn ΟTo Internet / Collegamento a Internet / Πodklouyené K INTEPHeTy / Koble til Internett / Kako se povezati na internet /Πικλιουyenna do INTEPHeTy / ὅρενηνηνηνηνηνηνηνηνηνηνηνηνηνηνηνηνηνηνηνηνηνηνηνηνηνηνηνηνηνηνηνηνηνηνηνηνηνηνηνηνηνηνηνηνηνηνηνηνηνηνeta/ Kapcsolódás az Intemetre / Cbþp3Bahe KbM INTEPHeT / Conectare la Internet / Spajanje na Internet
4 When a Problem Occurs
24
Problemen oplossen / Problembehandlung / Dépannage / Si se produce un problema / Quando ocorrre um problema / W razie problemów / Pri vzniku problému / Ak sa vyskytne problème / Nár der opstár et problem / Nár att problem uppstár / Šav Σμβεί Káπoio Πρóβλημα / Se si verifica un problema / При Вознковени побlemы / Nár det oppstár problemer / Ko se pojavi težava / У разi винкеньни побlem / ἀς / Hiba eseten / При пoblemsn / In cazul in care apare o problema / Kad se pojavi problem
Soft Reset via Reset Button
26
Soft Reset via Reset Button/Soft Reset über Reset-Taste/Réinitialisation logicielle à l'aide du bouton RESET / Restablecimiento parcial mediante el botón Reset (Restablecer) / Reinicialização parcial atraves do botão Reiniciar / Ponowne uruchamianie przyciskiem Reset / Cástecný reset pomoci tlacítka Vymazat / Mäkký reset pomocoutlacidla Reset / Softwarenulstilling via knappen Reset [Nulstil] / Mjuk Återstellning via aterstellningsknapp / Επαναφρά Λογισκόμετου Πλήκτρου Reset / Soft resettramite il pulsante Reset / ΠρorpamMHbI c6poc nocpeIcTBOM KHONKccbpoca / Omstartmed Reset-knappen / Mehka ponastavitev preko gumba za ponastavitev / ΠρorpamHeCKIDaHHa 3a DoNOMOToI KHOKN CKNDaHHa / Szoftveres visszaállitas a Visszaállitas gombbal / CoΦTyepHo HUINPaeчe3 Byton3a HUINPae / Resetare functiională cu ajutorul butonului de resetare / Softverski resetpomócu tipke za resetiranje
1 Package Content
Inhoud doos / Verpackungsinhalt / Contenu de l'emballage / Contenido de la caja / Conteudo da embalagem / Zawartosc opakowania / Obsah baleni / Obsah balenia / Pakkens indhold / Paketets inneha / Nepetyojev Oukcuocic / Contenuto della confezione / Codepxmoe ynakov / Pakkens innhold / Vsebina paketa / Po3nakybaHH / a csomag tartalma / Cbdpxhanne ha onakoekata / Conjinutul ambalajului / Sadrzaj paketa

1x
Xenta 7" tablet
Xenta 7* tablet
Xenta 7* Tablet
Tablette 7" Xenta
Tablea de 7" Xenta
Tablet de 7" Xenta
Tablet 7" Xenta
Xenta 7'tabet
Xenta 7* tablet
Xenta 7* tablet
Xenta 7^ platta
TaqnHcra 7" Xenta
Tabled a 7 Xenta
Pnauwet 7* Xenta
Xenta 7^ nettbrett
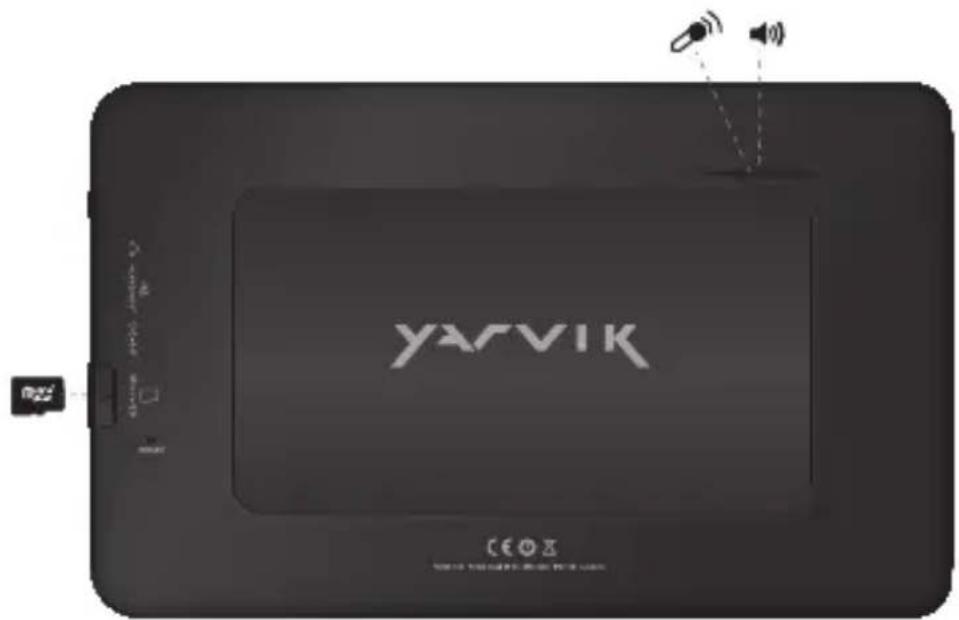
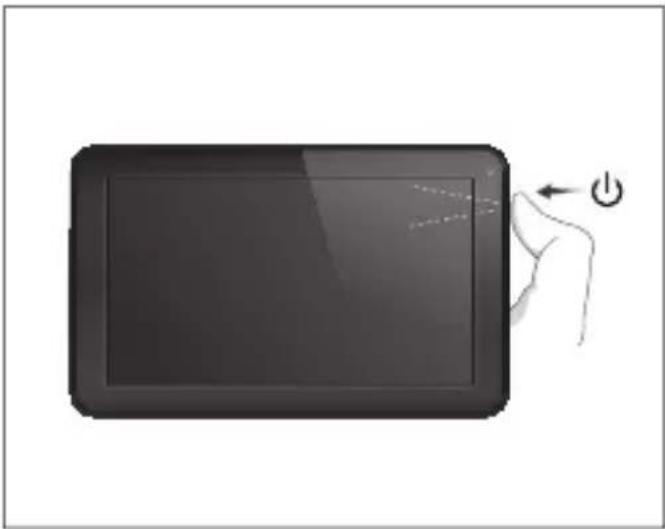
2 Buttons & Connections
Knoppen & Aansluitingen / Tasten & Anschlasse / Boutons et connexions / Botones y conexiones / Botes e ligações / Przyciski i zlacza / Tlačitka a pripojeni / Tlačidla a pripojenia / Knapper & tilslutninger / Knappar & Anslutninger / Плкра & Suvodetoc / Pulsanti e collegamenti / Khonkn pažemb/ Knapper og tilkoblinger / Gumbi in Povezave / Khonkn ta poa'emn / Gombok es csatlakozasok / BytoHm Bpbakn / Butoane.si conexiani / Tipke i vzeze
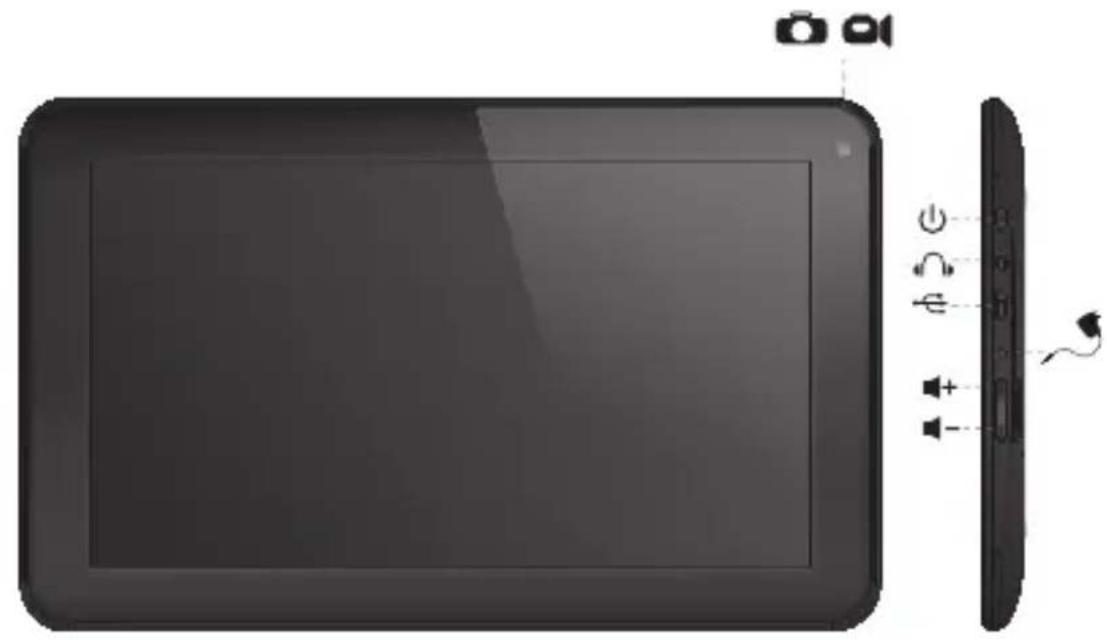
| On/Off | ||
| - Hold 3 sec. for On or Off - 3 sec. indrukken voor Aan of Uit - Zum Ein-/Ausschalten 3 Sek. drucken - Appuyez pendant 3 s pour allumer ou éteindre - Pulse durante 3 s para encender o apagar el dispositivo - Mantenha premido durante 3段时间a para ligar ou desligar - Nacijsij i przytrzymaj przyze 3 sek., aby wączyć lub wączyć - Pridrženim po dobu 3 s zapíniate nebo vypíniate - Podržte 3 sek. pre zaputie alebo vyputie - Hold 3 sek. for On [Til] aller Off [Fra] - Håll ned 3 sekunder För Påller Av - KpatñóTE 3 δειτ. γία ενεργοποίηη (On) η απενεργοποίηη (Off) | - Tenere premuto 3 sec. per l'accensione o lo spegnimento. - Yedexinbaite B Teчende 3 d'la BKNIOUChENIA I li BbIKIQUChENIA - Trykk 3 sek. for pà aller av - Držite 3 sek. za vklop ali izklop - Utpmýte npotrayom 3 c d'la yBIMKHeHNA abo BVMKHeHNA - Cétsa duocájá 3 d'la bckulhJyIg JIg JIg JIg JIg JIg JIg JIg JIg JIg JIg JIg JIg JIg JIg JIg JIg JIg JIg JIg JIg JIg JIg JIg JIg JIg JIg JIg JIg JIg JIg JIg JIg JIg J1 - Nyomja 3 mp-ig a be- vagy kikapcsoláshoz - 3adpbxte 3 sek. 3a BKNIOUBAHE I li N3KIIQUBaHE - Pentru activare sau dezactivare, menţinei apăsarea timp de 3 sec. - Držite 3 sek. za uključivanje ili isključivanje | |
| Sleep/Wake | ||
| - Press 1 sec. for Sleep or Wake - 1 sec. indrukken voor Slaapstand ofuit Slaapstand - Für Betriebszustand 1 Sek. drucken - Appuyez pendant 1 s pour la mise en veille ou le réveil - Pulse 1 s para que la tableta entre en el estado de inactividad o activarla - Pressione 1 seg. para suspensão ou Wake段时间o para ligar ou desligar - Nacijsij przyze 1 sek., aby przelaczyc w stan uispienia lub wybudzić - Stisknutím po dobu 1 s spustite režim spánku nebo probuzeni - Stlačte 1 sek. pre spanok alebo prebudenie - Tryk på 1 sek. til slumre-eller Wake - Tryck på 1 sek. für att sova ell Wake - ΠatñóTE 1 δειτρόλεπTO. γία την κατάσταση νάρκης έ Wake | - Premere 1 sec. per la funzione Sleep o Wake (Sveglia). - Haximmaite B Teчende 1 c d'la nepexoDA B cspaùni pèxim I li piodonjêne I li pabotl - Trykk 1 sek. for standby eller g à ut av standby - Pritisnite 1 sek. za spanje ali bujenje - Hatackaipe npotrayom 1 c d'la nepexoDA y cspaùni pèxim I li piodonjêne I li pabotl - Nyomja 1 mp-ig az alváshoz vagy felébresztéshez - Hatachete 1 sek. 3a zacnbVAbe I li cβbuxdane - Pentru stare de repaus sau reactivare, apàsaùti timp de 1 sec. - Pritisnite 1 sek. za spavanje ili budènje uredaja | |
| - + | Volume - + | - Volume up or Down - Volume harder of zachter - Leiser oder laute - Augmentez ou baises le volume - Subir o bajo volumen - Aumentar ou diminuir volume - Zwiegszanie lub zmieje szanie poziomu glośność - Zvyseni nebo sniženi hlasitosti - Zwysenie alebo zmieje hlasitosti - Lydstyrike op uller ned - Justera volymen uppàt uller nedàt - Äußηση ἡμειωση Σης εντασης ηχου | - Aumento o abbassamento del volume - Пеклочать увением ял уменшенья ромкости - Volum opp ell er nud - Jakost +: Povečanje ali zmanjsanje jakosti - Кавila rуностi - вибъдь - Hangerö fel vagy le - Усанова ял наимальва сината на звука - Creştera sau reducerea volumului - Glasnoća + i - |
| O | Built-in Camera | - Built-in Camera - Ingebouwde Camera - Integrierte Kamera - Caméra intégrée - Camara integrada - Camara incorporada - Wbudowana kamera - Zabadovaný fotoparát - Zabadovaný fotoparát - Indbygget kamera - Indbygdd kamera - Evöswpatówéνη Káme | - Fotocamera integrata - Встrosеная камра - Innebygget kamera - Vgrajena kamera - Бухована kамра - Stojalovs - Beépitett kamera - Brpadena kamera - Camerä incorporata - Slusalice - Ugradena kamera |
| Built-in Microphone | - Built-in Microphone - Ingebouwde microfoon - Integrieres Mikrofon - Microphone intègre - Micrófono integrado - Microfone incorporedo - Wbudowany mikrofon - Zabadovany mikrofon - Zabadovany mikrofon - Indbygget mikrofon - Inbygdd mikrofon - Evöswatowévo Mikróφωνo - Microfono integrato - Bystroehné miκroφôn - Innebygget mikrofon | - Vgrajeni mikrofon - Буховanity mikpoфо - Stojalovs - Beépitett mikrofon - Brpaden miκroφôn - Microfonet incorporat - Ugradeni mikrofonn | |
| Speaker | - Built-in Speaker - Ingebouwde speaker - Integrierter Lautsprecher - Haut-parleur intégré - Altavoz integrado - Alto-falante embutido - Wbudowany glośnik - Zabudovaný reproductor - Zabudovaný reproductor - Indbygget højttaler - Inbygdd högtalare - Evöωματωμένο ηχείο | ||
| Headphones 3.5 mm | - Headphones - Hoofdtelefoon - Kopfhörer - Casque - Auricular - Auscultadores - Sluchawki - Sluchátka - Sluchadlá - Hovedtelefoner - Hörllar | - Akouatíká - Cuffie - Hayushniki - Hodetelefoner - Slušalke - Habyushniki - Slezaká rží - Fejhallgató - Cnyuanki - Căşti - Slušalice | |
| USB | - Micro USB Port - Micro USB Poort - Micro USB Anschluss - Port micro USB - Micro usb puerto - Porta micro USB - Port micro USB - Micro usb portu - Micro usb portu - Micro usb port - Mikro-USB-port | - Micro USB θúpa - Micro porta USB - Micro USB nopT - Micro USB-port - Mikro USB - Micro USB nopT - Micro USB - Micro USB - Micro USB port - Micro USB nopT - Micro USB Port - Micro USB prkličak | |
| MicroSD Up to 32 GB | MicroSD Slot - MicroSD Slot - MicroSD-Einschub - Emplacement carte MicroSD - Ranura para tarjetas MicroSD - Ranhura para cartão MicroSD - Gniazdo karty MicroSD | - Slot pro MicroSD - Slot na Micro SD kartu - MicroSD-stik - MicroSD-kortplats - Ytôboxñ MicroSD - Slot per MicroSD - Pažbem對於 KapTbl MicroSD |
| MicroSD Up to 32 GB | - MicroSD spor - Reža za MicroSD - Гиадо ддя карши пam'ятì MicroSD - MicroSD utor | - MicroSD nyilás - Сnot за MicroSD karpta - MicroSD Slot - MicroSD utor |
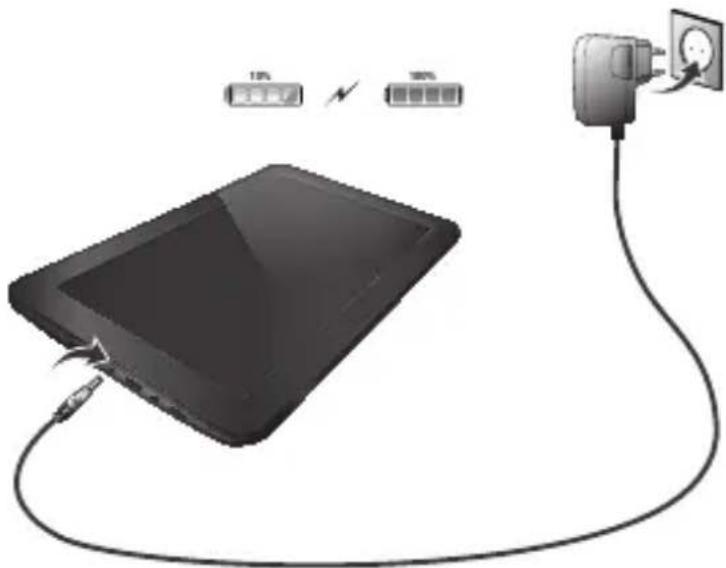
Charging
Opladen / Laden / Chargement / Carga / Carregamento / Ladowanie / Nabijeni / Nabijanie / Opladning / Laddning / Φöption / Carica / 3apäka / Lading / Polnjenje / 3apäxkenha akymynrtopa / Töltes / 3apekdahe / Incarcare / Punjenje
- Use only the supplied AC adapter
- Gebruik alleen de bijgeleverde AC adapter
- Verwenden Sie ausschließlich das mitgelieferte Netzeil
- Utilisez seulement l'adaptateur CA fourni
- Use exclusively el adaptor de corriente de CA incluido
- Utilize開放 o adaptador de CA fornecido
- Korzystaj tyliko z dostarczonego zasilacza pradu zmiennego
- Pouzivejte pouze dodany AC adapler
- Použivajte iba dodany sietovy adaptor
- Brug kun den medfalgende AC-adapter
- Använd endast den medfoljande natadaptern
Xpnnaiipoiirpoivo to rappexoevo tpoobotko AC - Utilizzare solo l'adattatore CA fornito.
Ncnojbayte TOnbKO BKOJAMB KOMNNEKCT CTeBOAaanTep - Bruk bare medfolgende AC*adapter
- Uporabite le priloženi napajalnik AC
BnKOpNCTOByHTe TINbKn ToH BNOK XNBnEHNR, 0o BXoNTb DO KOMNJIeKTy NOCTaHaHH
aagaa jai jia jao pah
Csak amellekelt halozati adapterlert hasznalja
*Hnnon3aBnte cmoCdoCTaBHeHrAC aadantep
Utilizati numai adaptorul CA furnizat
* Koristite samo isporčeni naponski adapler
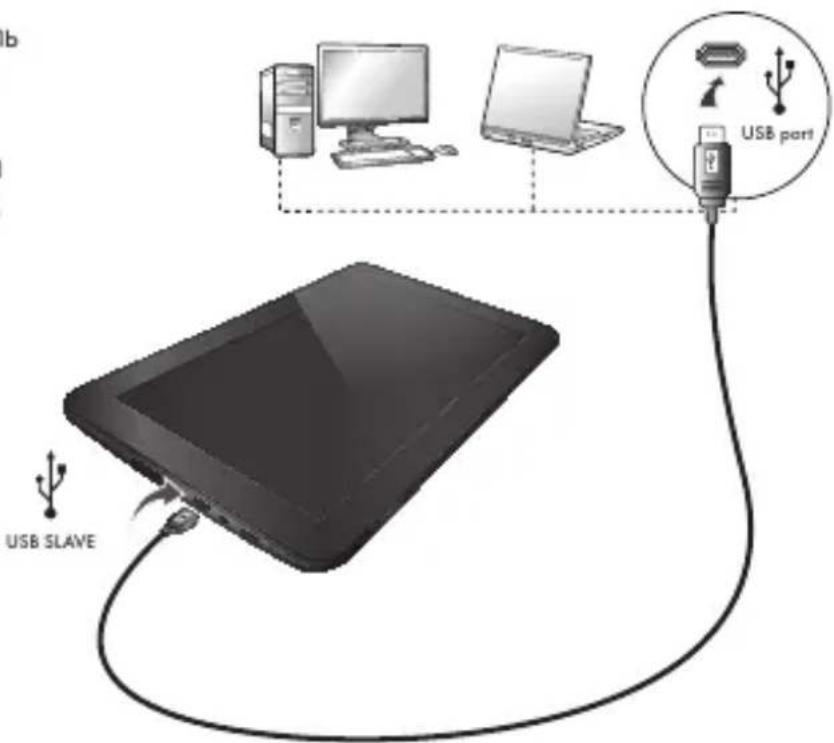
USB
-USB cable
-USB kabel
-USB Kabel
- Cable USB
-USB cable
-CaboUSB
-USB kabel
-USB kabel
-USB kabel
-USB-kabel
-USB-kabel
Kaawo USB
- Cavo USB
-USB-ka6enb
-USB-kabel
-KabelUSB
-USB-ka6enb
-USBJ
-USB kabel
-USB ka6en
-Cablu USB
-USB kabel
Android Home Screen
Android Home scherm / Android Startbildschirm / Page d'accueil Android / Pantalla de inicio de Android / Ecrã principal do Android / Ekran domowy systemu operacyjngo Android / Domovska obrazovka Androidu / Omáca obrazovka Android / Skærmen Android Home [Android Hjem] / Android Startskärm / H Apxɪkŋ Oθóvn Tou Android (Home) / Schermata Home di Android / ΓλανΗΠ ἄκραη Android / Android startskjerm / Domaci zaslon Android / ΦονΗΠ εκραη Android / Android kezdǒképernyö / Hauanē εκραη ha Android / Ecran de inceput Android / Android početni zaslon
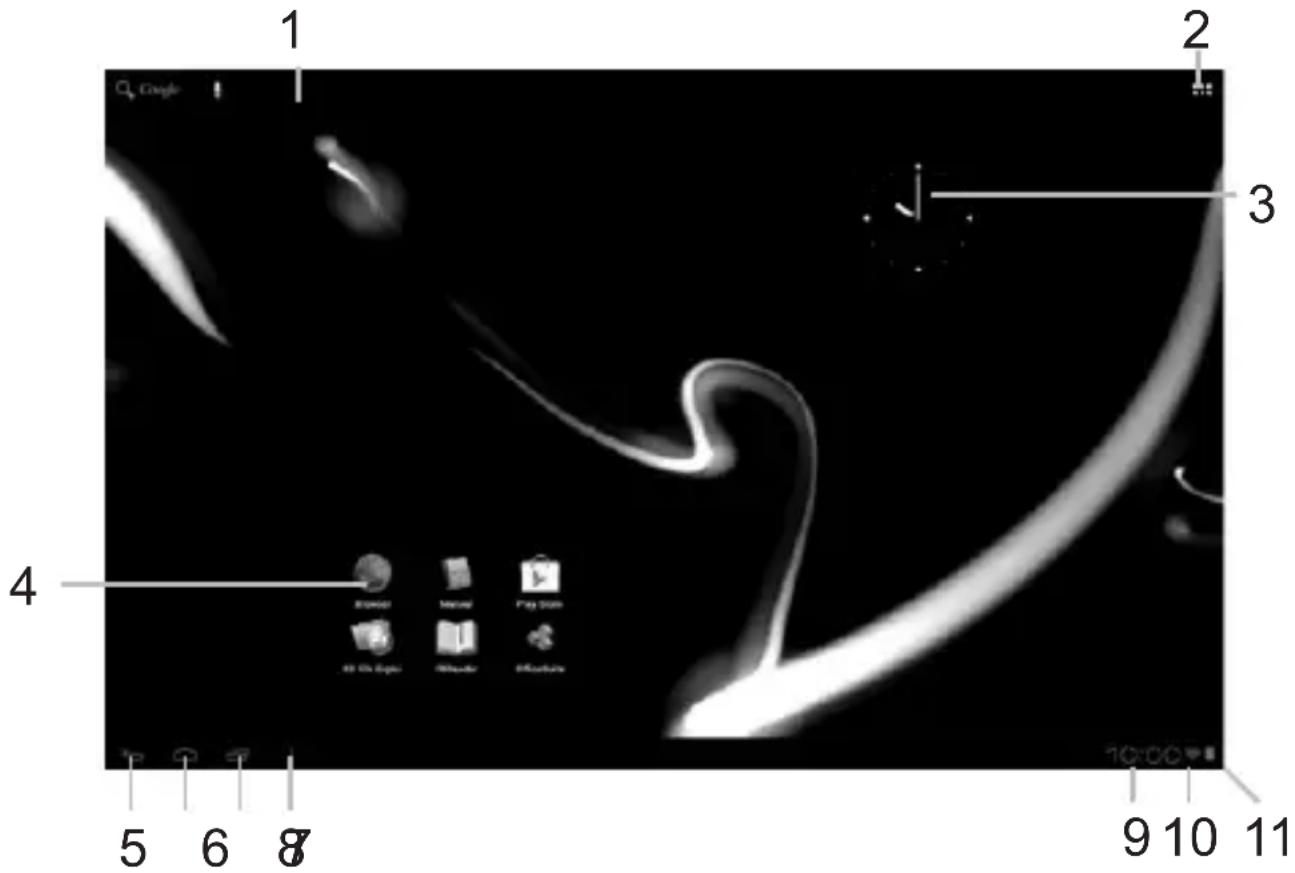

- On the bottom of the Luna screen you can always find the status bar. The status bar contains both system information and function buttons.
- De statusbalk is.altijd te vinden onderin het Luna scherm. In de statusbalk vindt u systeeminformatie en functieknappen.
- Am unteren Rand des Luna-Bildschirms wird die Statusleiste angezeigt. Die Statusleiste enthalt Systeminformationen und Funktionsschaltflächen.
- Vous trouverez la barre d'etat en bas de l'écran Luna. La barre d'etat contient les boutons Informations système et Fonction »
- En la Pantalla inferior de la pantalla de Luna siempre pourrait encontrar la barra de estado. La barra de estado contiene información del
PT
sistema y botones de sistemas.
- Nouve do ecran do Luna, pode sempre encontrar a barra de estado.
A barra de estado contente informacoes do Sistema e botoes de funcionalidades.
PL
3 Getting on the Internet
Internet instellen / Zugriff auf das Internet / Accès à Internet / Cómo acceder a Internet / Aceder à internet / Lactzenie z Internetem / Pripojeni k internetu / Pripojenie k internetu / Atkommen pa internett / Ga ut pa Internet / Üvδεοη στο Internet / Collegamento a Internet / Ποικήουчene κ ΜΝΤΕρΗγ / Koble til Internett / Kako se povezati na internet Πικήουенna do ΘΝΤΕρΗγ / Κανβράda / Kapcsolóda s az Internetre / CБьрbahe κБМ ΜΝΤΕρΗγ / Conectare la Internet / Spajanje na Internet
- Slide the lock bar (A) to the right (B) to unlock
Schuif de vergrendeling (A)aar rechts (B) voor ontgrendelen
Sperrsymbol (A) zum Entsperren nach rechts (B) schieren - Faites glisser la barre de verrouillage (A) vers la droite (B) pour déverrouiller.
- Deslice la barra de bloqueo (A) hacía la
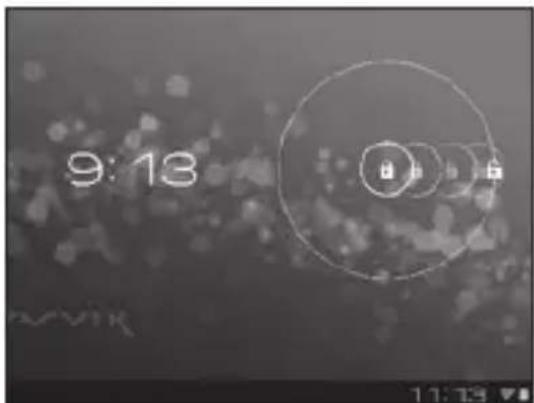
3 Slide the On/Off button to "On"
Schuif de Aan/uit-knop op "Aan"
Ein/Aus-Schaltfläche auf „On“ („An“) schieben.
- Faites glisser le bouton marche/arrêt pour l'allumer.
- Deslice el botón On/Off (Activado/Desactivado) hasta la posición "On" (Activado)
- Deslize o botão On/Off (Ligar/Desligar) para a posicao "On" ("Ligado")
- Przeciagnij przyȩćznik do pozymycji „On" („Wł.”)
- Přétáhněte tlacitko Zap./Nyp. na „On“ („Zap.”)
Posunte yvpinae do polohy "On" (Zap.)
Glid knappen On/Off [Til/fra] til "On" [Til]
Skjut Pá/Av-knappen till "Pá"
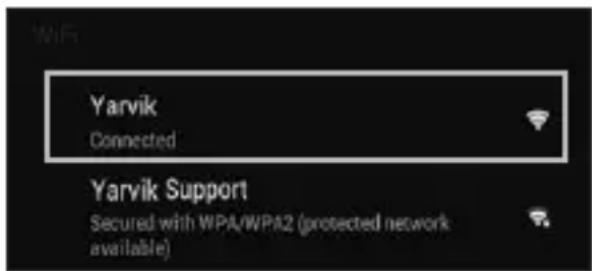
4.1. Non secured, Tap the network of your choice.
- Niet beveiligd, tik op het netwerk van uw keuze.
- Bei ungesichertem Netzwerk auf das gewünschte Netzwerk tippen.
- Non sécurisé, Sélectionnez le réseau de votrechoix.
- No protegida, pulse la red a la que deseee conectarse.
- Se não estiver protegida, toque numa rede à sua escolha.
- Niezabezpieczona; dotknij wybranej sieci.
- Nezabezpečeno, klepněte na libovolnou sít'.
- Nezabezpečene,Poklepte na siet' podla vlastného vyberu.
- Ikke sikret. Tap på foretrukket netværk.
- Icke saker, Peka på det natverk du vill valja.
Xwpiacgpaaleia,ayyigTe to eTIuunTo diktuo.
Non protetta, selezionare la rete che si desidera. - Ecni ceTb Non secured (He3aunueHa), Bbl6epnte ee.
- Usikret nett, trykk på onsket nettverk.
- Non secured (Nezavarovano), Dotaknite se zeelenega omrežja.
-ЯкwoМерекaNon secured (He3axnueHa), Bn6epitbii.
Jj1 10a5wglc aai1 aiol y
Non secured (NemBiztonsagos), erintse meg a kivant halozatot.
Ako e Non secured (He 3aunTeHa), HATnCHeTe Bbpxu Mpeka no n36op.
- Reţea Non secured (Nesecurizata), inscrieti reţeaua alesă.
Non secured (Neosigurane) mreze, dodirnite naziv mreze
4.2. Secured Network, Type password then press Connect.
- Beveiligd network, vul wachtwoord in en klik op Connect (Verbinden).
- Bei gesichertem Netzwerk Kennwort eingeben und Connect (Verbinden) drücken.
Réseau sécurisé, tapez le mot de passer puis appuyezsur « Connect » (Connector). - Si la red está protegida,cribe la contraseña y pulse Connect (Conectar).
Se foruma rede protegida, digite a palavrapasse e deposito prima Connect (Ligar). - Zabezpieczona siec; wpwadz Password (Haslo) i nacinij Connect (Polacz).
- Zabezpečena sít, napište Password (Heslo), poté stisknéte Connect (Připojit).
- Zabezpečená siet', napíste Password (Heslo) a potom stlačte Connect (Pripojit').
- Sikret netværk. Indtast adgangskode, og tryk derefter på Connect [Tilsnut].
Skyddat nätverk, ange lösenordet och tryck sedan på Connect (Anslut). - Δiktuo με ασφαλεια, πληκτρολογόπε TOV κωδικό προσβασης και πατήσε Connect (Σύνδεση).
- Rete protetta, digitare la password, quando premere Connect (Connetti).
- Ecnn cetb Secured (3aunueHa), BBeinte napoIb, a 3aTeM haxmnte KhoNky Connect

(NOdknUeHn)
- Sikret nett, skriv inn passord og trykk Connect.
Secured Network (Zavarovano omrežje), Vtipkajte geslo in pritisnite Connect (Poveži).
-ЯкwoМерекaSecured(3axueta),BBeiTb napoIbTaHATNCHTbKnaBiwyConnect (niknoyehn). - 1c hieol p jy-11 aols .ai Connect
Secured (Biztonságos) halózat, adja meg a jelszót és érintse meg a Connect (csatlakozás) gombot.
Secured (3aunTeHa)Mpexa, HanuweTe npoIata n cneTToBa HATNChe Connect (Cbbp3BaHe). -
Reţea Secured (Securizata), inscrieti parola, apoi apăsăti pe Connect (Conectare).
Secured (Osigurane) mreze, upisite lozinku i pritisnite Connect (Spoji) -
Check Wi-Fi connection.
- Controller Wi-Fi verbinding.
- WLAN-Verbindung überprüfen.
- Vérifiez la ae la conexión Wi-Fi.
- Verifique a ligaçao Wi-Fi.
Sprawdz stan połaczenia Wi-Fi. - Kontrola Wi-Fi pripojeni.
- Skontrolujte pripojenie Wi-Fi.
- Kontroller Wi-Fi-tilslutning.
- Kontrollera Wi-Fi-anslutning.
- Eλεγετη σύνδεοη Wi-Fi.
- Controllare la connessione Wi-Fi
-П р ов eр b T e Wi-Fi-coeДиЕнHe. - Sjekk den tradlose tilkoblingen.
- Preverite Wi-Fi povezavo.

IepeBipTeWi-Fi-niknueHH
Wi-Fi.
Ellenörizze a Wi-Fi kapcsolatot.
IpoBepkaHaWi-Fi Bpb3ka.
Verificati conexiunea Wi-Fi.
Provjerite Wi-Fi vezu.

- With The Browser App you can now browse the internet.
-
Met de Browser App kurz u nu het internet op.
-
Mit dem Browser-App können Sie im Internet surfen.
- Avec l'application du navigateur, vous pouvez restantenant naviguer sur Internet.
- Con la aplicación Browser (Navigador) podrá naviggar por Internet.
- Com a aplicação Browser (Navigador), podeOOTAO navegar na internet.
- Za pomocę aplikacje Browser (Przeglądarka)要去s surfowac po Internecie.
- Pomoci Browser (Prohlige) applác muzete brouzdat po internetu.
- Pomocou aplikácie Browser (prehliadača) si možete teraz prezerat' internetové stranky.
- Med browser-app'en kan du navigere på internettet.
- Med webbläsarappen kan du nu surfa på Internet.
-Me TnV εφαρμογή Browser μπορείτε πλέον vα εξερευνησετε το Internet.
- Con la app Browser ora è possible navigare su Internet.
- Tenepb c nomoosbBrowser (6pay3epa) moxho npncTyntb K 063opy INtepheTa.
- Med Browser-applikasjonen (nettleseren) kan du na surfe på Internett.
- Z aplikacijo brskalnika lahko zdaj brskate po internetu
- Tenep MoXHa po3noaTn nepeIaBbe-CAiTIB IInTePHeTI 3a DOnomoroIO Browser (6pay3epa). Browser
-A Browser (Böngészö) alkalmazásokkal nem böngészhet az Interneten.
- Cera moxete da cbpnpate B INHTepHeT C Browser (Bpay3bpa).
- Cu aplicata Browser puteti acum să navigati pe Internet.
- Pomocu aplikacije Browser (Preglednik) sada要去 pregledavati internetske sadržaje.
| 4 When a Problem Occurs Problemen oplossen / Problembehandlung / Dépannage / Si se produce un problème / Quando ocorrre um problema / W razie problèmes / Pri vzniku problèmes / Ak sa yvskytne problème / Nár der opstár et problème / Nár att problem uppstar / Šоатуν Σицьí Káttóio Πrábǎлмá / Se si verifica un problème / При возноковени побемы / Nár det oppstar problèmes / Ko se pojavi težava / уразу винникени поBLEM / āсу садусу / Hiba esetén / При побему / In cazul in care apare o problema / Kad se pojavi problem |
| EN Your Tablet acts much slower than normal, doesn't react well or freezes. Restart the tablet using the On/Off button. All data/settings will be saved, the tablet will only shutdown. Afterwards hold the On/ Off button until the tablet starts up again. |
| NL Uw Tablet is veel trager dan normala, reageert nicht goed of is vastgelopen. U Start de Tablet opnieuw op middels de AAN/UIT-toets. Alle gevevens/installingen blijven behouden, de Tablet wordt enkel—helemaaluitgeschakeld. Houd daarna de AAN/UIT-toets van de Tablet ingedrukt totdat de Tablet opnieuw opstart. |
| DE Das Tablet reagiert langsamer als gewöhnlich, nicht gut oder gar nicht. Starten Sie das Tablet mit der Ein-/Aus-Taste neu. Alle Daten/Einstellungen werden beibehalten; das Tablet fahrnt nur herunter. Halten Sie danach die Ein-/Aus-Taste gedrückt, bis das Tablet wieder startet. |
| FR Votre tablette fonctionne beaucoup plus lentement que d'habitude, ne réagit pas bien ou se fige. Redémarrez la tablette à l'aide du bouton marche/arrêt . Toutes les données et tous les paramètres seront sauvégardés, la tablette s'éteindra seulement. Ensuite, appuyez longuement sur le bouton marche/arrêt jusqu'à ce que la tablette redémarre. |
| SP La tableta funciona much mox larga lenta de lo normal, no reacciona correctamente o se bloquea. Reinicie la tableta con el boton de encendido y apagado. Se conservaran todos los datos y configuraciones, la tabletaunicamente se apagará. A continuación, mantenga pulsado el botón de encendido y apagado hasta que la tableta se encienda de nuevo. |
| PT O seu tablet está muito mais lento do que o normal, não reage bem ou fica parado. Reinicie o tablet com o botão On/Off (Ligar/Desligar). Todos os dados e definições seront guardados, o tablet apenas se deslga. Seguidamente, mantenha o botão On/Off (Ligar/Desligar) premido até o tablet voltar a arrancar. |
| PL Tablet(PCue duzo wolniej, não normalnie, nie opodiada na polecenia lub zawiesza sie. Uruchom ponownie tablet za pomocapi przycisku wylącznik. Wszystkie dane/ustawienia dostana zapisane, tablet tylko sie wylączy. Nastepnie naciśnij i przytrzymaj wylącznik, AZ tablet uruchomi sie ponownie. |
| CS Tablet(PCue mnohem pomaleji než obvykle, nereaguje nebo zamrznil Restartujte tablet pomoci tlačitka zapnout/vypnout.Všechna data/nastaveni budou uložena, pouze se vypne tablet. Následné pridržte tlačitko zapnout/vypnout, dokud se tablet opét nespusti. |
| SK | Váš tablet je pomalí áko zvyčajne, nereaguje dobre alebo zamíza. Reşstartujte tablet pomocou tlacidla vypínač.Věsényi udaje/nastavenia sa uložia, tablet sa iba vypne. Potom podržte vypínač, až kým sa tablet opátovne nenašartuje. |
| DA | Tablet'en kører meget langu sommere end normal, reagerer ikke godt eller fryser. Genstart tablet'en med knappen On/Off [Til/fra]. Alle data/indstillinger vil blive gemt, og tablet'en lukkes blot. Hold derefter knappen On/Off [Til/fra] nede, indtil tablet'en starter igen. |
| SV | Surfplattanær langsmamare øn normal, reagerer inte bra eller fryser. Starta om surfplattan med på/av-knappen. All data/inställingar sparas, surfplattankommen bara att stängas av. Efteråt häller du på/av-knappen tills surfplattan startar om. |
| EL | H taμπλέτα λειουργέ πού τηργά από to κανονικό, δεν αντίβρά σωστά η "παγώνει". Επανεκκινήσε την taμπλέτα χρησιοποιώντας to πλήκτρο πλήκτρο On/Off. Ελα τα δεδομένα καιο μρθμίσεις θα διαπρηθουν, απλώς θα τερματιοίέ η λειουργία της taμπλέτας. Katόπιν κρατήσε πατημένο το πλήκτρο On/Off μέχρινα εκκινήσειξανά η taμπλέτα.. |
| IT | Il tablet funziona molto più lentamente rispetto al normale, non reagisce bene o si blocca. Riaviare il tablet con il pulsante di accensione/spegnimento. Tutti i dati/impostazioni saranno salvati, solo il tablet si spegne. Dopodiché, tenere premuto il pulsante di accensione/spegnimento finché il tablet non si riavvia. |
| RU | Πλañшet paßotæt me délnēnée, чьم obblúHQ, πλòxó peagrūpyet плпВиснет. С пomoцью кнόнки сбраза nepezárgузnte плánshet. BCE dañhbie/Hacétrponкь 6býdY coхраненьы, заврштся тольков paßoṭa плánshetα. 3aTeM naЖмITE и уdeckжвайтЕ кнόнку ВКлочецья вьклочецья дя повторно началу paßobétу плánshetα. |
| NO | Tableten oppfærer seg tregere enn normal, reagerer sakkeller lásér seg. Start tableten på nytt med på/av-knappen. Alle data og innstillinger lagres, tableten stenges bare ned. Hold deretter innate på/av-knappen til den starter opp igjen. |
| SI | Vaš tablčni računalnik deluje veliko počasneje kot obíčajno, se sploh ne odziva ali zmrzne. Ponomvo zaženite tablčni računalnik z gumbom za Vklop/lzklo. Vsi podatki/nastavitve bodoshranjene, tablčni računalnik se bo samougasnil. Nato držite gumb Vklop/lzklop, dokler se tablčni računalnik pónovno ne zažene. |
| UK | Πλañšet πρaúçον novlbniüe, hiž 3abždɪn, nopāno pearye abo 3abvicae. Перазаан'taxte планшета до ДОпомою увимкен�нь/вимкен�нь. Усdi hyн/haymaуtsuaьнь 3бержульсь, заврштся тількни робота планшета. Потim натусить та утprimутse Кнόнky увимкен�нь/вимкен�нь, ёоб розочати роботу планшета. |
AR
J 1 J 1 J 1 J 1 J 1 J 1 J 1 J 1 J 1 J 1 J 1 J 1 J 1 J 1 J 1 J 1 J 1 J 1 J 1 J 1 J 1 J 1 J 1 J 1 J 1 J 1 J 1 J 1 J 1 J 1 J 1 J 1 J 1 J 1 J
HU
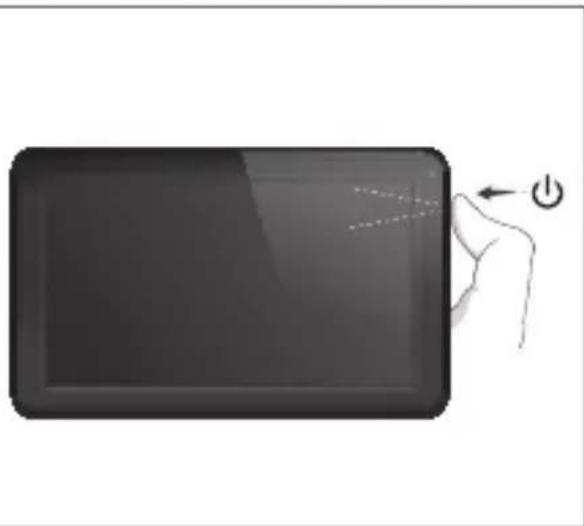
1 Hold for 10 seconds
10 secondengedrukt houden
10 Sekunden gedrück halten
Appuyez pendant 10 secondes
- Mantenga pulsado durante 10segundos
- Mantenha premidos durante 10 segundos
- Przytrzymaj przytez 10 sekundy
Pridrzte po dobu 10 sekund
10 sekundy podrzte
Hold i 10 sekunder
Hallnedi10sekunder
Kpatntote yia 10 eutepeoAeTTa
Tenere premuto 10 secondi.
- YdepxkBaIeB TeueHne 10 ckyHd.
Holdinne10 sekunder.
Drzite 10sekunde
- Ytpmmynt npotrarom 10 cekyHd.
10 1
Tartsa 10 masodpercig
3aepbxte 3a 10cekyHn.
Asteptati 10 secunde.
Drzite 10 sekundi.
Start up after Soft Reset
- To Start up: Hold for 5 seconds, tablet will start up
- Tablet weeopstarten:5 secondindrukken,Tablet start op
-Einschalten: 5 Sekunden gedrück gehen; das Tablet startet - Pour démarrer : appuyez pendant 5 s, la tablette se met en marche
- Para起初 el dispositivo: mantenga pulsado el botón durante 5segundos y la tableta se encenderá
- Para arrancar: Mantenha premido durante 5 segundose o tablet arranca
- Aby uruchomic: Nacisnij i przytrzymaj przyez 5 sekundy; tablet uruchomi sie
- Spusteni: Pridrste po dobu 5 sekund, tablet se spusti
- Spustenie: Podrzej 5 sekundy a tablet sa spusti
- Start: Hold i 5 sekunder, og tablet'en vil starte
- For att starta: Hall intryckt i 5 sekunder, och surfplattankommen att starta
- Tia Ekkivnana: KpatnoTe Tnatnevo yia 5 deutepolaennr Ka n taanla Ta ekkivnoei
- Per l'avvio: tenere premuto 5 secondi, il tablet si avvia.
-HaHano pa6oTb: ydepknBaIe B teueHne 5 ckyHd, YTO6bl BKIOHTb nnAHwET. - For a starte: Hold innate i 5 sekunder, tableten starter opp
- Držite gumb vklop/izklop 5 sekunde in tablicni računalnik se bo zagnal
- Po3no4aTn po6Oy: yTpmyIe npotraom 5 c dnn yBIMKHeHHr nnaHweta.
15 5 5
-Az inditashoz: Tartsa 5 masodpercig, hogy a tabla elinduljon
-3a da cTaptnpate: 3aepbxte 3a 5 cekyndn,Tabneta 电cTaptnpa
- Pentru a demara: mentinand apasat tamp de 5 secunde, tablea se va activa.
- ZaPokretanje:Drzite 5 sekunde,tablet ce se poukrenuti
EC Declaration of Conformity
We,
YARVIK
Ampereweg 3
2627BG Delft
The Netherlands
Declare under our sole responsibility that the product:
Brand name : YARVIK
Model no. :TAB09-100
Product description : Luna 9" Tablet
Compliance with the essential requirements
of the following Directives is declared:
-EMC DIRECTIVE : 2004/108/EC
-LVD DIRECTIVE 2006/95/EC
-R&TTE DIRECTIVE 1999/5/EC
-ROHS DIRECTIVE 2011/65/EU
To which this declaration is based on with full conformance to the following European norms and standards:
Tablet
-EMC:EN55022:2006+A1:2007
EN 55024:1998 + A1:2001 + A2:2003
EN 61000-3-2:2006
EN 61000-3-3:2008
Signed, Delft, 25-05-2013
YARVIK

R. Ramaekers,
Purchase Director
Important information
C E ①
Wireless LAN-Regulatory information
Depending on the model, the wireless LAN built-in into tablet devices can only be used in the following countries: Austria, Belgium, Bulgaria, Czech Republic, Denmark, Finland, France, Germany, Greece, Hungary, Iceland, Ireland, Italy, Luxembourg, the Netherlands, Norway, Poland, Portugal, Romania, Slovakia, Slovenia, Spain, Sweden, Switzerland, Turkey and the United Kingdom.
Conditions of use
When using the IEEE 802.11b/g/n Wireless LAN standard, channels 1 to 13 (2.4 GHz ...2.4835 GHz) are selectable for both indoor and outdoor use, however with restrictive conditions applying in France, Italy and Norway, as follows:
- France: When using this product indoor, all channels can be used without restrictions. Outdoor only channels 1 to 6 are allowed. This means that in Peer-to-Peer, the WLAN feature can only be used outside if the peer sets up the communication on an authorized channel (i.e., between 1 & 6). In infrastructure mode, please make sure the access point is configured to a channel from 1 to 6 before setting up the connection.
- Italy: Use of the RLAN network is governed: Disposal of Old Electrical & Electronic
with respect to private use, by the Legislative Decree of 1.8.2003, no. 259 ("Code of Electronic Communications"). In particular Article 104 indicates when the prior obtainment of a general authorization is required and Art. 105 indicates when free use is permitted;
with respect to the supply to the public of the WLAN access to telecom networks and services, by the Ministerial Decree 28.5.2003, as amended, and Art. 25 (general authorization for electronic communications networks and services) of the Code of electronic communications. - Norway: Use of this radio equipment is not allowed in the geographical area within a radius of 20km from the centre of Ny-Alesund, Svalbard.
WEEE Symbol Information
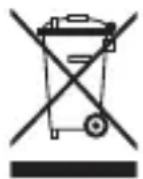
Correct Disposal of This product (Waste Electrical & Electronic Equipment).
(Applicable in the European Union and other European countries with separate collection systems).
This marking shown on the product or its literature indicates that it should not be disposed with other household wasted at the end of its working life. To prevent possible harm to the environment or human health from uncontrolled waste disposal, please separate this from other types of wastes and recycle it responsibly to promote the sustainable reuse of material resources. Household users should contact either the retailer where they purchased this product, or their
local government office, for details of where and how they can take this item for environmentally safe recycling.
Business users should contact their supplier and check the terms and conditions of the purchase contract. This product should not be mixed with other commercial wastes of disposal.
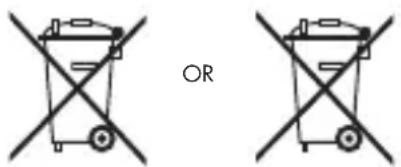
Disposal of waste batteries (applicable in the European Union and other European countries with separate collection systems)
Either of the symbols shown next may appear on the battery or on the packaging to indicate that the battery provided with this product shall not be treated as household waste. On certain batteries this symbol might be used in combination with a chemical symbol. The chemical symbols for mercury (Hg) or lead (Pb) are added if the battery contains more than 0.0005% mercury or 0.004% lead. By ensuring these batteries are disposed of correctly, you will help prevent potentially negative consequences for the environment and human health which could otherwise be caused by inappropriate waste handling of the battery. The recycling of the materials will help to conserve natural resources. In case of products that for safety, performance or data integrity reasons require a permanent connection with an incorporated battery, this battery should be replaced by qualified service staff only. To ensure that the battery will be treated properly, hand over the product at end-of-life to the applicable collection point for the recycling of electrical and electronic equipment.
For all other batteries, please view the section on how to remove the battery from the product safely. Hand the battery over to the applicable collection point for the recycling of waste batteries. For more detailed information about recycling of this product or battery, please contact your local Local government Office, your household waste disposal service or the shop where you purchased the product.
Pb
When travelling to and within the United States of America, please be aware that the U.S.
Department of Transportation (DOT) recently published new regulations that apply to passengers travelling with lithium metal batteries and lithium-ion batteries.
For detailed information, visit http://safetravel.dot.gov/whats_new_batteries.html.
Safety Information
Yarvik Tablet device
- Yarvik is not responsible for any interference that you may experience or that may be caused when operating this device.
-
Warning: We strongly advise to connect this device to a earthed wall socket when charging.
-
Opening or dismantling the main unit or any of its accessories, for whatever reason, could lead to damages that are not covered by the guarantee.
- To avoid electrical shock, do not open the cabinet. Refer servicing to qualified personnel only.
- To prevent fire or shock hazard, do not expose your tablet device or any of its accessories to rain or moisture.
- Do not use or store your tablet device in a location subject to heat sources, such as radiators or air ducts; direct sunlight; excessive dust; moisture or rain; mechanical vibration or shock; strong magnets or speakers that are not magnetically shielded; excessively high and low temperatures; and high humidity.
- Turning off your tablet device with the power button does not disconnect the device completely from mains voltage. To disconnect it completely, unplug the AC adapter or the power cord from mains. The socket-outlet shall be installed near the equipment and shall be easily accessible.
- Audio and picture distortion may occur if this equipment is positioned in close proximity to any equipment emitting electromagnetic radiation.
- This apparatus is also designed for IT power system with phase to phase voltage 230V, for customers in Norway.
- Observe the following precautions to provide adequate air circulation and to ensure normal reliable operation:
- Do not use the tablet device and/or the AC adapter while covered or wrapped in cloth. Ensure the AC adapter operates in a clear environment.
- Turn off the tablet device before putting the device into a bag or a carrying case.
- Do not use your tablet device directly on your lap. The temperature of the base of the unit will rise during normal operation and over time could result in discomfort or burns.
- Do not use your tablet device while walking. Listening to music with headphones or watching the LCD screen while walking may lead to an unexpected accident and result in personal injuries.

- Using connected headphones on the tablet device for too long and/or setting the audio volume up too high when using headphones may cause serious hearing damage.
- Avoid strong beating of or to the product.
- Don't operate the touch screen of the tablet device with sharp objects, as this may result in scratching the screen surface.
- Only use permitted batteries, chargers and accessories with your tablet device. The use of any other products with the device can be dangerous and may violate the warranty regulations.
- Only use a slightly wet cotton cloth to clean the device, and only use water to wetten the cotton cloth. The tablet device should not be cleaned with any sort of (glass) cleaning aid.
Wireless functionality
-
If radio interference with other devices occurs while using your tablet device, do not use the wireless functionality. Use of the wireless functionality may cause a malfunction of the devices, resulting in an accident.
-
In some situations or environments, the use of the wireless functionality might be restricted by the proprietor of the building or responsible representatives of the organization, for example on board airplanes, in hospitals or in any other environment where the risk of interference with other devices or services is perceived or identified as harmful. If you are uncertain about the policy applying to the use of wireless functionality in a specific organization or environment, you are encouraged to first ask for authorization prior to switching it on. Consult your physician or the manufacturer of personal medical devices (pacemakers, hearing aids, etc.) regarding any restrictions on the use of wireless functionality.
- If using wireless functionality near a pacemaker, make sure it is at least 19 inches / 50 cm away from the pacemaker.
- Due to the transmission and reception properties of wireless communications, data can occasionally be lost or delayed. This can be due to the variation in radio signal strength that results from changes in the characteristics of the radio transmission path. Yarvik will not be held responsible for damages of any kind resulting from the delays or errors in data transmitted or received via wireless functionality, or failure of wireless functionality to transmit or receive such data.
- If the equipment does cause harmful interference to radio/TV reception, which can be determined by turning the equipment off and on, the user is encouraged to try to correct the interference by one or more of the following measures: reorient or relocate the receiving antenna, increase the distance between the sender and the receiver, consult the dealer or an experienced radio/TV technician for help. Yarvik will not be responsible for any radio/TV interference nor for any other undesired effect.
Wireless LAN Security
Creating security settings for the Wireless LAN is extremely important. Yarvik assumes no responsibility for any security problems that may arise from the use of the Wireless LAN.
Battery pack
Do not charge the battery pack in any way other than as described in the Start guide or as designated by Yarvik in writing.
AC adapter
- It is highly recommended that you use a genuine Yarvik AC adapter supplied by Yarvik for your product.
- This AC adapter is intended for use with the tablet device IT products only.
- Do not place the AC adapter in contact with your skin. Remove the AC adapter away from your body if it becomes warm and causes discomfort.
RoHS
This products has been certified as RoHS Compliant.
Dimensions, specifications, images & illustrations
All dimensions, specifications, images and illustrations are subject to change without prior notice.
Dimensions, specifications, images et illustrations
Please consult the legal information available on your Tablet under Settings - About device - Legal information or visit http://source.android.com/source/licenses.html for more information (internet connection required)
Please visit our website for CE declaration: www.yarvik.com

facebook.com/yarvik

twitter.com/yarvikce

youtube.com/yarvikce

forum.yarvik.com
YAVIK
Luna _9c
Luna 9c
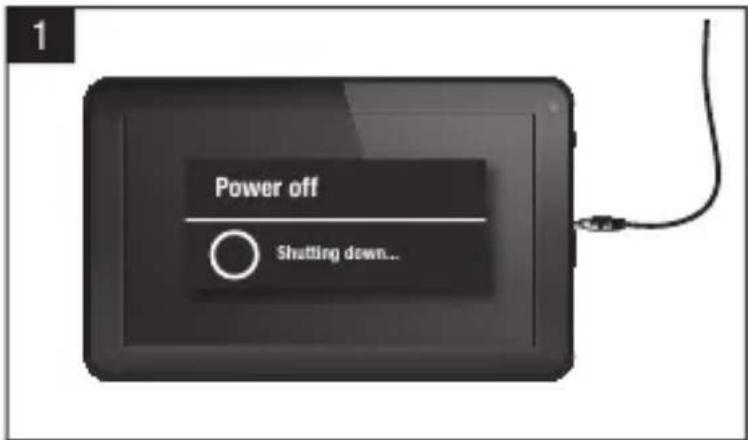
Factory Reset
Reset waar fabrieksinstellungen
Reset der Werkseinstellungen
Réinitialisation par défaut
Restauración d0e configuración de fabrica
Reposicao de fabrica
Przywracanie ustawien fabrycznych
Obnoveni továniho nastaveni
Resetovanie na nastavenia z tovarne
Fabriksnulstilling
Fabriksäterställing
Etnavopóa σε Puθμiαεις Epyoσταιou
Reset delle impostazioni predefinite
C6poc napamempoe K 3naeHnM no ymonuHnO
Factory reset (Tilbakestille til fabrikinnstlinger)
Tovarniska ponastavitev
Ckudahny ycmahoBOK do cmahdapmHux 3a0dcbkux 3naeHb
Gyari visszaallitas
Hynpahe KbM f6puHu hacmpouKu
Restabilirea configuratie implicite din fabricaie
Tvornicko resetiranje
Factory Reset
EN
Your Tablet acts much slower than normal, doesn't react well or freezes even after the Soft Reset.
In this case you need to do a complete "Factory Reset". If you perform a "Factory Reset", all data/ settings will be lost and the tablet will return to its factory settings.
Also if you have a password protection on the tablet and you forgot the password. The only way to access the tablet is by doing a "Factory Reset". The Factory Reset is as follows:
NL
Factory Reset Execution
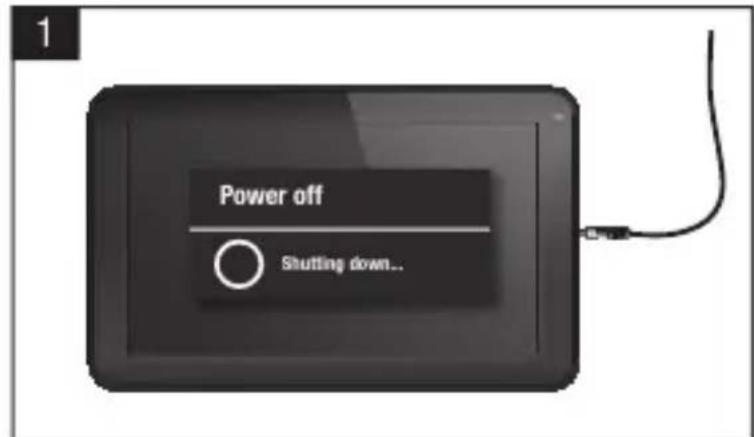
1 Turn Tablet completely OFF before starting Factory Reset.
Schakel de tablet volledig UIT voor u een fabrieksresetuitvoert.
- Tablet vor dem Rücksetzen auf die Werkseinstellungen vollständig AUS schalten.
- Éteignez complètement la tablette avant de démarrer la réinitialisation par défaut.
- Apague la tableta totalmente antes de iniciaar el proceso de restablecimiento de fabrica.
- Desligue Completely o tablet antes de,iniciaruma Reposicao de fabrica.
- Przed Rozpoczeciem procedury przywracania ustawien fabrycznych calkowicie WYLACZ tablet.
- Pred spusténim obnoveni na vyrobní nastaveni zcela VYPNETE tablet.
Pred začatim resetovania na nastavenia z tovarne tablet uplne vypnite.
- Sluk din tablet HELT För start på en fabriksnulstilling.
- Stäng av surfplattan helt innan du gōr en fabriksäterställning.
Ateevepyotoiote pnpw tsv taaneta npiv ekvnoetnv Etnavaopopa Ppuiaeic Epyoataiou.
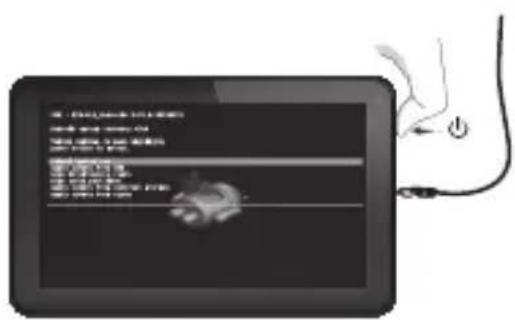
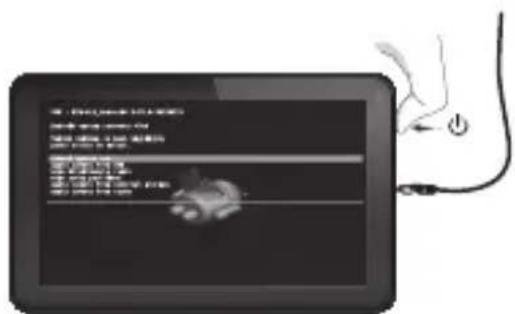
| 2 + / / | Hold |
| Hold for 12 seconds | |
| 2 Release buttons. - Laat de knappen los. - Die Tasten loslassen. - Relâchéz les boutons. - Suelte los botones. - Solte os botões. | - Zwolnij przyciski. - Uvolněni tlačítsa. - Uvolneni tlačidla. - Slip knapperne. - Släpp knappar. - Eλευθερώστε ta πλήκτρa. |
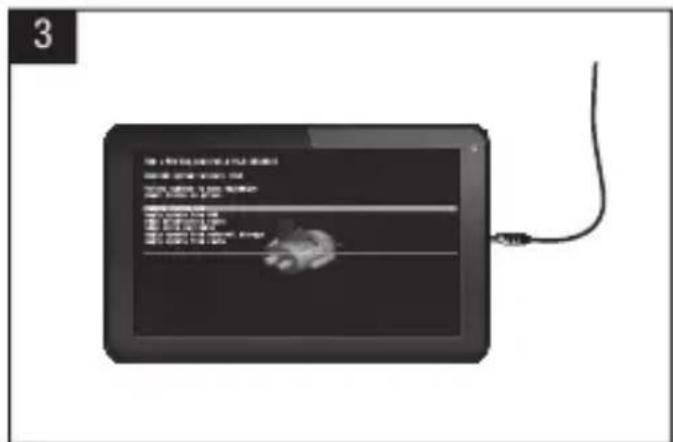
3 Now you are in system recovery mode.
- Nu bent u in de systeemherstelmodus.
- Sie befinden sich im System-Wiederherstellungsmodus.
- Vous étés maintainant en mode restauration système.
- Ahora ya está en el modo de recuperación del sistema.
- Está ahora no modo de recuperação do sistema.
- Jesteš teraz w trybie przywracania systemu
- Nyni jste v režimu obnoveni systému.
- Teraz sa nachadzate v režime obnovenia systému.
Du er nu i systemgendannelsestilstand.
- Nu ār du i systemáterställningsläge.
Twa piaokote e kaataa on aikataotaansuatmuato.
4 With - scroll down to Wipe data/ factory reset.
- Gebruik de - knop en scroll maar beneden om data te wissen/factory reset (fabrieksreset).
- Mit der - - Taste abwärts zum Eintrag Wipe data/factory reset (Datumlöschen/ Werkseinstellungen) gehen.
- À l'aide du bouton -, faites défilier vers le bas et Sélectionnez Supprimer les données/reinitialisation par défaut.
- Con el botón de -, desplácese hacer abajo hasta Wipe data/factory reset (Borrado de datos/Restablecimiento de fabrica).
- Com o botão -, {? -, desca até Wipe data/factory reset (Limpar os dados/ reposicao de fabrica).
- Przewin przyciskiem - w dól do Wipe data/ factory reset (Usun dane/ przywracanie ustawien fabrycznych).
Tlačitkem - skrolujte dolu pro Wipe data/factory reset (Smazani dat/obnoveni na vyrobní nastaveni).
Tlacidom - skrolujte dole pre Wipe data/ factory reset (Odstranit udaje/restovat na nastavenia z továrne).
Med - rul ned til Wipe data/factory reset [Ryd data/fabriksnulstilling].

Volume up/down to move highlight: power button to select.
reboot system now
apply update from ADB
wipe data/factory reset
wipe cache partition
apply update from external storage
apply update from cache
7 After factory reset has performed, scroll down with - button to reboot system now. Press On/Off button to enter reboot system now.
- Nadat de factory reset (fabrieksreset) is uitgevoerd, scroll maar beneden met de -knop om het system opnieuw op te starten. Druk op de Aan/Uit knop om het system opnieuw op te starten.
- Nach dem Reset der Werkseinstellungen mit der --Taste abwärts zum Eintrag reboot system now (Neustart) gehen. Ein-/
8 Tablet will restart with factory reset settings, all previous data/settings/password is lost.
- Tablet herstart met factory reset (fabrieksreset) instellingen, alle vorige data/instellingen/wachtwoorden gaan verloren.
Das Tablet startet mit den Werkseinstellungen; alle vorherigen Daten/ Einstellungen/Kennwörter sind verloren.
La tablette va redémarrer avec les réglages de réinitialisation par défaut, toutes les données, tous les paramètres et tous les mots de passes seront donc perdus. - La tableta se reinciara con la configuración predeterminada de fabrica, perdiendose todos los datos, configuraciones y contraseñas anteriores.
- O tablet está reiniciado com as predefinições de fábrica e perderá todos os dados, definições e palavras-passe anteriores.
- Tablet uruchomi są ponownie z przywoćonymi ustawieniami fabrycznychi;
Factory Reset Execution
1 Nota: L'alimentatore deve restare collegato durante il reset completo delle impostazioni predefinite.
-Примechанe:АдгетерпитаньдогжehОCTaВaTbCЯ NOДКЛQUЧEHьIMHa npOTJKeHn BCero npocecca c6poca napametpoB K 3HAueHnM no yMOJIaHIO.
- Merk: Strømadapteren ma vare tilkoblet ved tilbakestilling til fabrikinnstlinger.
Opomba: Napajalnik mora med povrnitvijo tovarinskih nastavitev ostati priključen.
- Ppimitka: AanTep XnBneHn Ma 3aIiWATncr nikNoyehm niYac NOBHOrO cKnDaHHy YCTAHOBOK Do CTaHApTHnx 3aBOc6Kx 3HaueHb.
- 100000000000000000000000000000000000000000000000
- Megjegyzés: A teljes gyári visszaállitás során a tapadapternek vegig csatlakoztatva kell lennie.
3abenekka:NoBpeMeHaHynipaHe KbMΦa6pnuHnTe HacTpOKn, 3axpaHbaunr aanTep Tp6Ba da OCTaHe BKIOUeH.
- Notă: Pe durata restabilirii configurației implicite din fabricăție, adaptorul de alimentare trebuie să rămă ană conectat.
- Napomena: Strujni adapter mora ostati uključen tijekom cijelog tvornickog resetiranja.
| 2 + / / | Hold |
| Hold for 12 seconds | |
| 2 Release buttons. - Laat de knappen los. - Die Tasten loslassen. - Relâchéz les boutons. - Suelte los botones. - Solte os botões. | - Zwolnij przyciski. - Uvolněni tlačítsa. - Uvolneni tlačidla. - Slip knapperne. - Släpp knappar. - Eλευθερώστε ta πλήκτρa. |
Volume up/down to move highlight: power button to select.
reboot system now
applyupdatefromADB
wipe data/factory reset
wipe cache partition
applyupdate from external storage
applyupdate from cache
7 Dopo aver eseguito il reset delle impostazioni predefinite, con il pulsante scorrere fino all'opzione di riavvio del sistema Premere il pulsante di accensione/ specnimento per riavviare il sistema.
- Pocne c6poca napametpoB K 3HaueHnma No yMOJuaHHIO npOKpyTnte BHN3 KHONKoI -do nyHKta Reboot system now (pepe3arpy3KN CnCTeMbI).HaxMITE KhoNky BKIOUeHn/BBIKIOUeHn IINy BBINOJIHHeHn pepe3arpy3KN CnCTeMbI.
- Etter nullstillingen er ferdig, bruk -knappen til a rulle ned til Reboot system now (start systemet pa nytt). Trykk pa/avknappen for a aktivere Reboot system now.
- Ko se tovarniska ponastavitev izvede, se pomaknite dol z gumbom - in ponovno zazenite systemd. Pritisnite gumb vklop/izklop za vstop v ponovni zagon systemd.
- PicnaycknaHHyctaHOBOKdoCTaHapTHNX 3abOocbKx3HaueHbKnabiWeio - npokpyTb Bn3 do Reboot system now
(nepe3aBAHTaxKeHHcCTeMn).HaTncHITb KHONky yBIMKHeHHBumKHeHHa dnn nepe3aBAHTaxKeHHcCTeMn.
Jawy ylln gail bgs! jz 1
jaiol pall jlc ly - plsulw
pall Jcill bc! JLsy On/Off Ja/
- Miután elvegezte a gyári visszaállitást, gorgessen le a -gombbal, hogy Reboot system now (újrainditsa a rendszert). Nyomja meg a Be/Ki gombot, hogy ëjrainditsa a rendszert most.
Cnei n3BbpuBaHe Ha HynpaHcdo 6yTo-3a Reboot system now (Da pectaptnpate cnctemata).HaTnchete 6yToHa BKn/IMkn, 3a da pectaptnpate CnCTemata BeHara.
- Dupā restabilirea configuratiei implicite din fabricatie, defilati in jos cu ajutorul butonul -pouru Reboot system now (Reporti acum sistemul). Apasati pe butonul activare/
dezactivarepentruareinitializasistemul.
Nakon obavljanja tvornickog resetiranja, pomocu tipke - listajte prema dolje do Reboot system now (PonovnoPokreni


- Getting on the Internet
- When a Problem Occurs
- Soft Reset via Reset Button
- Package Content
- Buttons & Connections
- Charging
- USB
- Android Home Screen
- PT
- PL
- AR
- HU
- Start up after Soft Reset
- EC Declaration of Conformity
- Tablet
- Important information
- Wireless LAN-Regulatory information
- Conditions of use
- WEEE Symbol Information
- (Applicable in the European Union and other European countries with separate collection systems).
- Disposal of waste batteries (applicable in the European Union and other European countries with separate collection systems)
- Safety Information
- Yarvik Tablet device
- Wireless functionality
- Wireless LAN Security
- Battery pack
- AC adapter
- RoHS
- Dimensions, specifications, images & illustrations
- Dimensions, specifications, images et illustrations
- YAVIK
- Luna _9c
- Luna 9c
- Factory Reset
- EN
- NL
- Factory Reset Execution
Brand : Yarvik
Model : Luna 9c
Category : Tablet