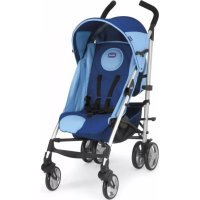
LiteWay Glam Puset - Stroller CHICCO - Free user manual and instructions
Find the device manual for free LiteWay Glam Puset CHICCO in PDF.

Download the instructions for your Stroller in PDF format for free! Find your manual LiteWay Glam Puset - CHICCO and take your electronic device back in hand. On this page are published all the documents necessary for the use of your device. LiteWay Glam Puset by CHICCO.
USER MANUAL LiteWay Glam Puset CHICCO
• WARNING: It may be dangerous to leave your
• WARNING: A CHILD’S SAFETY IS YOUR RE-
• WARNING: Children should be harnessed in at
all times and should never be left unattended.
• WARNING: The child should be clear of moving
parts while making adjustments.
This vehicle requires regular maintenance by the user.
Overloading, incorrect folding and the use
of non-approved accessories may damage or
• WARNING: before assembly, check that the
product and all of its components have not
been damaged during transportation. Should
any part be damaged do not use, and keep out
of reach of children.
• WARNING: This vehicle is intended for use for
children aged between 0 and 36 months of age
and up to weighing up to 15 kg.
• It is recommended that the backrest should be
used in its most reclined position for children
from birth to 6 months of age.
• WARNING: Ensure that all the locking devices
are engaged before use. In particular, ensure
that the stroller is locked in the open position,
by checking that the rear locking device is effec-
• Do not overload the storage basket. Maximum
• Do not carry more than one child at a time.
• Do not use accessories, spare parts, or any com-
ponent not supplied or approved by the manu-
facturer, as they may make the stroller unsafe.
• WARNING: Any load attached to the handle af-
fects the stability of the pushchair.
• WARNING: the use of the crotch strap and sa-
fety harness is necessary to guarantee the sa-
fety of your child. Always use the crotch strap in
combination with the waist belt.
• Ensure that the person using the stroller knows
how to use it safely.
• WARNING: when opening or closing the strol-
ler, ensure that your child is at a safe distance.
Do not attempt to open or close the stroller
with a child on board. Ensure that during these
operations, the movable parts of the stroller do
not come into contact with your child.
• Always apply the brakes whenever the stroller is
• WARNING: never leave the stroller on a sloped
surface with a child on board, even with the
• Do not let other children play unattended close
to the stroller or climb on it.
• To prevent the risk of choking, do not give to
your child, or place near it, any objects with
WARNING: Do not use the stroller on stairs or
elevators: it could cause the loss of control of
the stroller. Pay special attention when manoe-
uvring the stroller up or down pavements or a
• If the stroller is left exposed to direct sunlight
for a long time, allow it to cool before placing
your child in it. Prolonged exposure to direct
sunlight may cause the materials and fabric to
• Do not use the product if some of its parts are
broken, torn or missing.
• WARNING: When it is not used, the stroller
must be kept away from the reach of children.
• WARNING: This product is not suitable for run-
• Prevent the stroller from coming into contact
with salt water. It may cause the formation of
• Do not use the stroller on the beach.
• WARNING: This product must only be pushed
CLEANING AND MAINTENANCE The cleaning and maintenance of this product must be carried
out on a regular basis by the user. The cleaning and maintenance
of the stroller must only be carried out by an adult.
CLEANING The cover can be removed (please refer to the section “How to
Remove the Fabric Cover”).
Please refer to the care labels for instructions on how to clean
the fabric parts. Below are the cleaning symbols and their
Wash by hand in cold water.
Periodically wipe clean plastic parts with a soft damp cloth.
Always dry the metal parts to prevent the formation of rust if
the stroller has come into contact with water.
MAINTENANCE Lubricate the moving parts only if necessary, with a light
application of a silicone based lubricant. Regularly check the
condition of the wheels and, keep them clean of dust and sand.
To avoid friction that may prevent the correct operation of the
stroller, ensure that all the movable plastic parts placed along
the metal frame are clean of dust, dirt or sand. Keep the stroller
GENERAL INSTRUCTIONS HOW TO ASSEMBLE THE FRONT WHEELS
1.Assemble the front wheel, inserting it into the appropriate joint.
A click will be heard, indicating that it is locked correctly into
position (diag. 1). Repeat this operation with the other wheel.
WARNING: Before use, ensure that the wheels are safely
locked into position.
HOW TO OPEN THE STROLLER WARNING: When opening the stroller, ensure that your child,
or other children, are at a safe distance.
Ensure that during these operations, the movable parts of the
stroller do not come into contact with your child.
2. Release the closing device and push the front part of the
stroller forward (diag. 2).
3. Push the rear primary locking mechanism downward with
your foot (diag. 3). Ensure that the stroller is open and locked
in the correct position.
WARNING: Before use, ensure that the stroller is locked in the
open position, by checking that the locking mechanism, at the
rear of the stroller, is effectively locked.
HOW TO USE THE SAFETY HARNESS This stroller has a fi ve-point safety harness featuring two
shoulder straps, two adjustment holes, a waist strap and a
crotch strap with buckle.
WARNING: When using the safety harness with children from
birth up to approximately 6 months of age, it is necessary to
fi rst fi t the shoulder straps through the two adjustment holes.
4. If necessary, adjust the height of the shoulder straps, inserting
them into the adjustment hole, as shown in diagram 4. After
sitting your child in the stroller, fasten the safety harness, fi rst
inserting the two prongs into the hole located on the shoulder
straps (diag. 4A and 4B) and then into the buckle of the crotch
strap (diag. 4C). Adjust the length of the straps, ensuring that
they adhere to the child’s shoulders and body correctly. To
unfasten the waist strap, press and pull the side prongs.
WARNING: Children should be harnessed in at all times. To
ensure your child’s safety, it is necessary to always use the
5. For extra safety, “D” rings are provided for the attachment
of a separate safety harness approved to BS6684. They are
located inside the seat on the left and right, see diagram 5
HOW TO ADJUST THE BACKREST The backrest can be adjusted to 5 positions.
6. Fit the two fabric panels to the rear tubes by fastening the
two press studs, as shown in diagram 6.
7. To adjust the inclination of the backrest, press the button
located on the backrest. Release the button to lock the backrest
in the nearest position (diag. 7).
8. To raise the backrest to the desired position, simply push it in
an upward direction (diag. 8).
WARNING: The child’s weight can make these operations more
HOW TO ADJUST THE LEG REST The stroller’s leg rest can be adjusted to 2 positions to offer
extra comfort to your child.
9. Press simultaneously the two side buttons, as shown in
diagram 9, to adjust the leg rest to the desired position.
REAR BRAKES The rear wheels have linked brakes, which can be applied
simultaneously to the two rear wheel units by using only one pedal.
10. To apply the brakes, push one of the two levers located at
the centre of the rear wheel units in a downward direction, as
shown in diagram 10.
11. To unlock the braking system, push one of the two levers
located at the centre of the rear wheel units in an upward
direction, as shown in diagram 11.
WARNING: Always apply the brakes whenever the stroller is
stationary. Never leave the stroller on a sloped surface, with a
child onboard, even with the brakes applied.
WARNING: After operating the brake lever, ensure that the brakes
have been correctly applied to both of the rear wheel units.
FRONT SWIVEL WHEELS The stroller has front swivel/fi xed wheels.
It is recommended to use the wheels in the fi xed mode when
manoeuvring the stroller on particularly uneven surfaces. The
use of the wheels in the swivel mode is recommended to increase
the manoeuvrability of the stroller on a normal road surface.
12. To use the front wheels in the swivel mode, push the
front lever in an upward direction with your foot, as shown in
diagram 12. To use the front wheels in the fi xed mode, lower
the lever with the foot. The wheel will lock in the straight
position, regardless of its previous position.
WARNING: Both wheels must always be locked or unlocked
13. To fi t the hood, fasten the plastic clip in the appropriate
positions, as shown in diagram 13.
WARNING: the hood must be fi xed on both sides of the stroller.
Ensure that the hood is correctly secured into position.
14. Open the hood as shown in diagram 14A, and lock it by
pressing the two side calliper shaped mechanisms (diag. 14B).
WARNING: If you wish to close the hood, always unlock the
two side calliper shaped mechanisms.
15. The hood can become a summer sun-canopy. The rear
panel may be removed by unfastening the zip (diag. 15).
HOW TO CLOSE THE STROLLER WARNING: When closing the stroller, ensure that your child,
or other children, are kept at a safe distance. Ensure that during19
these operations the moveable parts of the stroller do not
come into contact with your child. Before closing the stroller,
ensure that the storage basket is empty.
16. If it is open, fold the hood, raising the two side calliper
shaped mechanisms (diagram 16A) and pulling the front part
towards you, as shown in diagram 16B.
17. To close the stroller, pull the rear locking mechanism in an
upward direction (diag. 17A), and unlock the pedal, located on
the right side of the stroller, with your foot (see diag. 17B).
18. To close the stroller completely, push the handles forward
19. When the stroller is closed, the locking device located on
the side of the stroller will automatically lock it in the close
position (see diag. 19), therefore preventing any accidental
opening of the stroller.
HOW TO REMOVE THE FABRIC COVER The fabric cover of the stroller can be removed.
20. To remove the fabric cover, raise the leg rest (diag. 20A).
Unfasten the buckles (diag. 20B) and the press studs located
on the seat (diag. 20C); remove the fabric cover, taking care to
slide the safety harness through the appropriate hole.
21. Unfasten the press studs located on the rear tubes of the
stroller, as shown in diagram 21A. Unfasten the press stud C and
remove the two hooks D and E, located under the fabric panel
on the side of the stroller (diag. 21B). Lastly, remove the fabric
cover from the backrest, pulling it in an upward direction.
To fi t the fabric cover to the stroller, carry out the following
22. Fit the fabric cover on the backrest of the stroller.
23. Fasten the two hooks, D and E, and the press stud C, as
shown in diagram 22.
24. Fix the two fabric panels to the rear tubes with the press
studs, as shown in diagram 23.
25. Fasten the press studs (diag. 24A). Fit the fabric cover to
the leg rest, then fasten the buckles (diag. 24B -24C).
ACCESSORIES WARNING: The accessories described below may not be
available for some versions of this product.
Please read carefully the instructions on the accessories
available for the model purchased.
STORAGE BASKET The stroller may come with a storage basket.
26. Fit the storage basket, sliding the straps around the tubes
of the stroller and fastening the press studs in the positions
27. The storage basket can also be used by the parents as a
practical rucksack, as shown in diagram 26.
WARNING: When the storage basket is not fi tted to the
stroller, keep it out of reach of children.
Warning: Do not overload the storage basket. Maximum
RAIN COVER The stroller may come with a rain cover.
28. To fi t the rain cover, fasten the straps around the stroller’s
frame, in the positions shown in diagram 27. After use, if the
rain cover is wet, let it dry in the air before folding the rain
WARNING: Be extremely careful when using the rain cover.
WARNING: Do not use the rain cover if the stroller is not fi tted
with the hood or sun canopy to prevent the risk of suffocation.
To prevent the risk of suffocation, never leave the stroller under
the sun with the rain cover fi tted to it.
FLEECE FOOTMUFF Some versions have a fl eece footmuff, which is ideal in cold weather.
29. Fit the fl eece footmuff as shown in diagram 28, fastening
the press studs in the positions shown.
30. The upper part of the fl eece footmuff has a comfortable
hood, that can be opened and closed with the velcro (diag.
31. The footmuff has holes that allow you to slide through the
safety harness when you use the footmuff (diag. 30).
WARNING: Always use the fl eece footmuff with the safety
harness inserted through the appropriate holes.
32. The footmuff can be used as a legcover by opening the zip
and removing the lower part in fl eece (diag. 31).
33. To fi t the legcover, fasten the clips, fastening the straps around
the stroller’s tubes, in the positions shown in diagram 32.
Important Note: The pictures and instructions contained in
the booklet refer to the complete stroller model. Some of the
components and functions described here may vary according
to the model purchased.
FOR FURTHER INFORMATION, PLEASE CONTACT:
Lowmoor Road Business Park
Kirkby in Ashfi eld - Nottinghamshire NG17 7LF Customer Services Helpline Tel: 01623 750870
(offi ce hours only) - Website:www.chicco.com20
rect is vergrendeld.