
Xenta 7 - Tablet Yarvik - Free user manual and instructions
Find the device manual for free Xenta 7 Yarvik in PDF.

| Product type | Tablet |
| Brand | Yarvik |
| Model | Xenta 7 |
| Screen size | 7 inches (diagonal) |
| Display type | Capacitive touchscreen |
| Wireless connectivity | Wi-Fi 802.11 b/g/n, channels 1 to 13 |
| Battery | Rechargeable lithium-ion battery (built-in) |
| Power supply | 230 V mains adapter with recommended earthed wall socket |
| Dimensions (approx.) | 190 x 120 x 10 mm |
| Weight (approx.) | 300 g |
| Operating system | Android (depending on version) |
| RAM | 512 MB to 1 GB (depending on configuration) |
| Internal storage | 4 GB to 8 GB (expandable via memory card) |
| Main features | Web browsing, multimedia playback, apps, camera |
| Cleaning and maintenance | Use a slightly damp cotton cloth (water only). Do not use cleaning agents. |
| Safety | Do not disassemble. Avoid moisture, excessive heat, and impacts. Use only original accessories. |
| Spare parts and repairability | Battery replaceable by a qualified technician. Other repairs by a professional. |
| Standards | RoHS, WEEE, R&TTE |
| Warranty | Manufacturer's warranty subject to conditions (see manual) |
Frequently Asked Questions - Xenta 7 Yarvik
User questions about Xenta 7 Yarvik
0 question about this device. Answer the ones you know or ask your own.
Ask a new question about this device
Download the instructions for your Tablet in PDF format for free! Find your manual Xenta 7 - Yarvik and take your electronic device back in hand. On this page are published all the documents necessary for the use of your device. Xenta 7 by Yarvik.
USER MANUAL Xenta 7 Yarvik
natural_image
Black-and-white photo of a foldable smartphone displaying a bird perched on its branch, with no visible text or symbols on the device screen.Xenta 7ic
| 2017 | 2016 | |||
| 金额 | 占总资产比例(%) | 金额 | 占总资产比例(%) | |
| 一、营业收入 | 3,584,968.00 | 69.99 | 3,584,968.00 | 69.99 |
| 二、营业成本 | 2,418,371.00 | 49.99 | 2,418,371.00 | 49.99 |
| 三、营业利润 | -1,355,855.00 | 15.71 | -1,355,855.00 | 15.71 |
| 四、净利润 | -1,355,855.00 | 15.71 | -1,355,855.00 | 15.71 |
Xenta 7ic
Start guide
1x
- Start guide
natural_image
Close-up of a black cable with two connectors (no text or symbols visible)1x
- 2.5 to 3.5 mm audio cable
- 2,5 tot 3,5 mm audiokabel
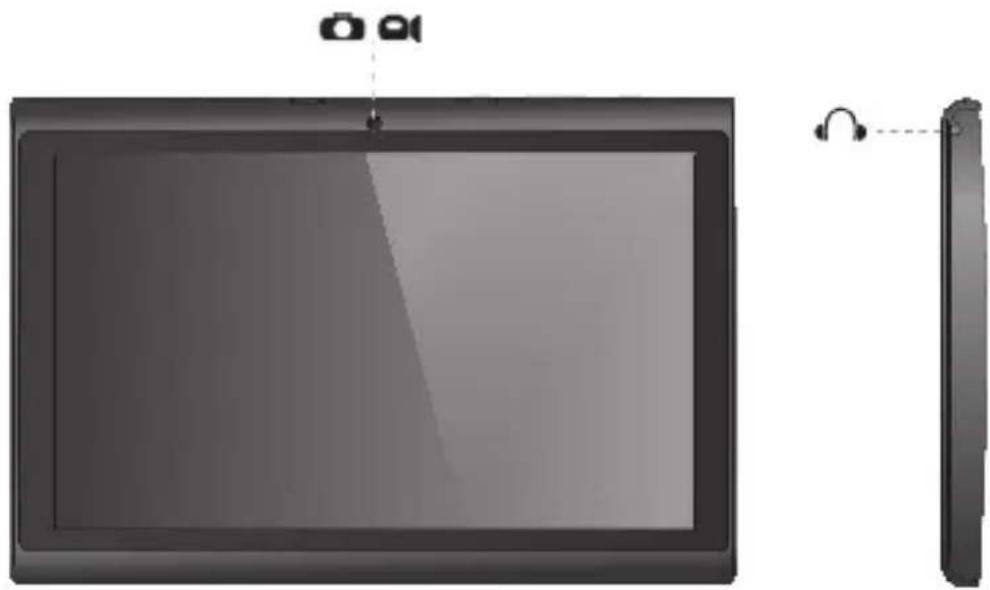
Buttons & Connections
Knoppen & Aansluitingen / Tasten & Anschlüsse / Boutons et connexions / Botones y conexiones / Botões e ligações / Przyciski i złącza / Tlačitka a pñipojení / Tlačidlá a pripojenia / Knapper & tilslutninger / Knappar & Anslutningar / Πλήκτρα & Συνδέσεις / Pulsanti e collegamenti / Кнопки и разъемы / Knapper og tilkoblinger / Gumbi in Povezave / Кнопки та роз'єми / كازار والتوصيلات / Gombok és csatlakozások / Бутони и връзки / Butoane şi conexiuni / Tipke i veze
natural_image
Illustration of a tablet device with a small inset showing its front view and earphones (no text or symbols present)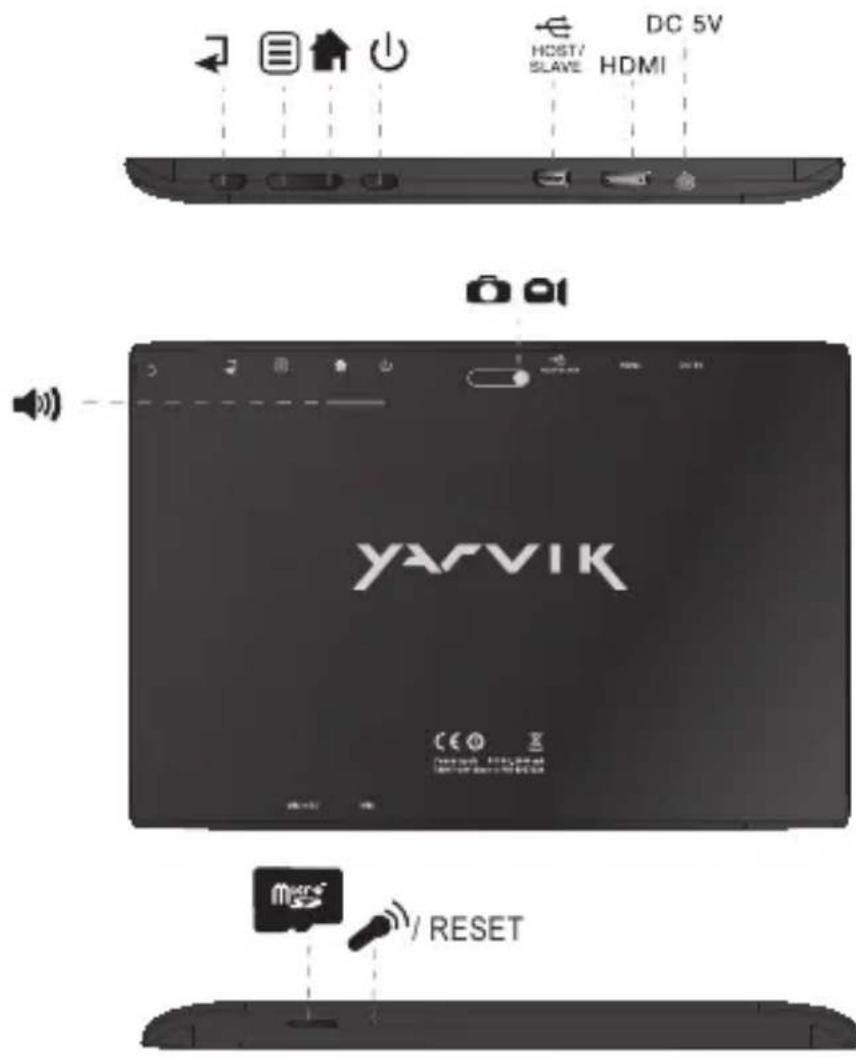
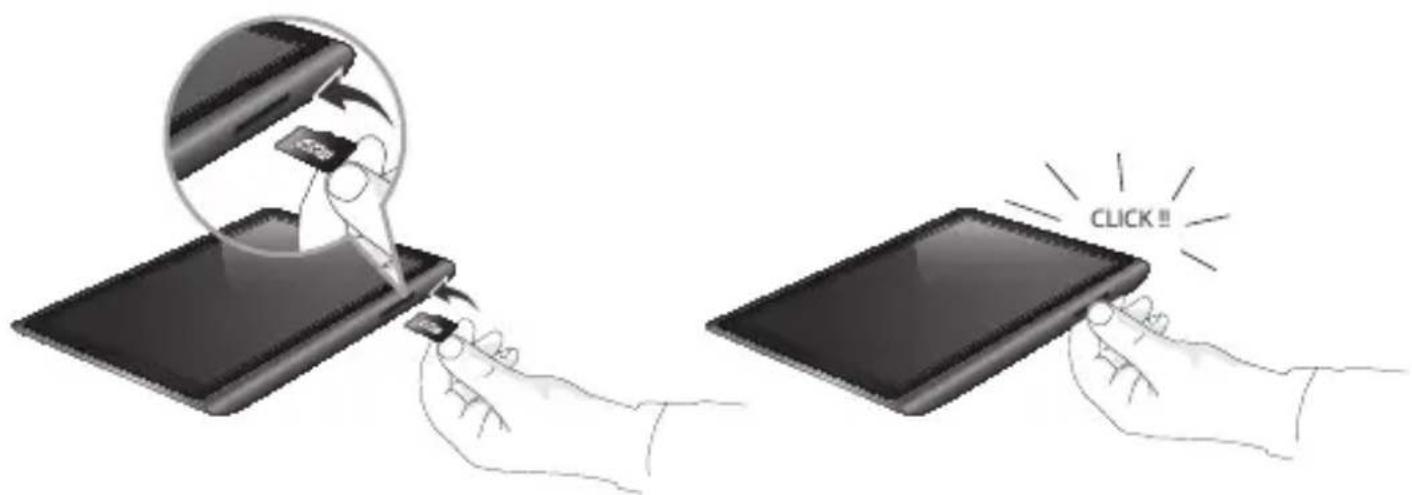
MicroSD
| On/Off | ||
| - Hold 3 sec. for On or Off- 3 sec. indrukken voor Aan of Uit- Zum Ein-/Ausschalten 3 Sek. drücken- Appuyez pendant 3 s pour allumer ou éteindre- Pulse durante 3 s para encender o apagar el dispositivo- Mantenha premido durante 3 segundos para ligar ou desligar- Naciśnij i przytrzymaj przez 3 sek., aby włączyć lub wyłączyć- Přidržením po dobu 3 s zapináte nebo vypínáte- Podržte 3 sek. pre zapnutie alebo vypnutie- Hold 3 sek. for On [Til] eller Off [Fra]- Håll ned 3 sekunder för På eller Av- Кратήστε 3 δευτ. για ενεργοποίηση (On) ή απενεργοποίηση (Off) | - Tenere premuto 3 sec. per l'accensione o lo spegnimento.- Удерживайте в течение 3 с для включения или выключения- Trykk 3 sek. for på eller av- Držite 3 sek. za vklop ali izklop- Утримуйте протягом 3 с для увімкнення або вимкнення- ثبت لددة 3 ثوان للتشغيل أو الإيقاف- Nyomja 3 mp-ig a be- vagy kikapcsoláshoz- Задръжте 3 сек. за включване или изключване- Pentru activare sau dezactivare, mențineți apăsarea timp de 3 sec.- Držite 3 sek. za uključivanje ili isključivanje | |
| Sleep/Wake | ||
| - Press 1 sec. for Sleep or Wake- 1 sec. indrukken voor Slaapstand of uit Slaapstand- Für Betriebszustand 1 Sek. drücken- Appuyez pendant 1 s pour la mise en veille ou le réveil- Pulse 1 s para que la tableta entre en el estado de inactividad o activarla- Pressione 1 seg. para suspensão ou Wake segundos para ligar ou desligar- Naciśnij przez 1 sek., aby przełączyć w stan uśpienia lub wybudzić- Stisknutím po dobu 1 s spustíte režim spánku nebo probuzení- Stlačte 1 sek. pre spánok alebo prebudenie- Tryk på 1 sek. til slumre-eller Wake- Tryck på 1 sek. för att sova eller Wake- Патήστε 1 δευτερόλεπτο. για την κατάσταση νάρκης ή Wake | - Premere 1 sec. per la funzione Sleep o Wake (Sveglia).- Нажимайте в течение 1 с для перехода в спящий режим или продолжения работы- Trykk 1 sek. for standby eller gå ut av standby- Pritisnite 1 sek. za spanje ali bujenje- Натискайте протягом 1 с для переходу у сплячий режим або продовження роботи- اضغط لددة 1 ثانية للنوم أو الに基づة- Nyomja 1 mp-ig az alváshoz vagy felébresztéshez- Натиснете 1 сек. за заспиване или събуждане- Pentru stare de repaus sau reactivare, apăsați timp de 1 sec.- Pritisnite 1 sek. za spavanje ili buđenje uređaja | |
| Built-in Camera | - Built -in Camera- Ingebouwde Camera- Integrierte Kamera- Caméra intégrée- Cámara integrada- Câmara incorporada- Wbudowana kamera- Zabudovaný fotoaparát- Zabudovaný fotoaparát- Indbygget kamera- Inbyggd kamera- Evσωματωμένη Κάμε | - Fotocamera integrata- Встроенная камера- Innebygget kamera- Vgrajena kamera- Вбудована камера- كاميرا مدمجة- Beépített kamera- Вградена камера- Cameră încorporată- Slušalice- Ugrađena kamera | |
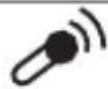 | Built-in Microphone | - Built-in Microphone- Ingebouwde microfoon- Integriertes Mikrofon- Microphone intégré- Micrófono integrado- Microfone incorporado- Wbudowany mikrofon- Zabudovaný mikrofon- Zabudovaný mikrofón- Indbygget mikrofon- Inbyggd mikrofon | - Evσωματωμένο Μικρόφωνο- Microfono integrato- Встроенный микрофон- Innebygget mikrofon- Vgrajeni mikrofon- Вбудований мікрофон- ميكرو Frozen مدمح- Beépített mikrofon- Вграден микрофон- Microfon încorporat- Ugrađeni mikrofonn |
 | Home | - Press 1 sec. for Home screen- 1 sec. indrukken om naar het Home scherm te gaan- 1 Sek. drücken, um den Startbildschirm aufzurufen- Appuyez pendant 1 s sur la page d'accueil.- Pulse durante 1 s para acceder a la pantalla de inicio- Prima durante 1 segundo para ver o Menu principal- Naciśnij przez 1 sek., aby wyświetlć ekran domowy- Stisknutim po dobu 1 s se dostanete na domovskou obrazovku- Stlačte na 1 sek. na domácej obrazovke- Pentru ecranul de început, apăsați timp de 1 sec. | - Tryk 1 sek. for skærmen Home [Hjem]- Tryck i 1 sek. för hem-skärm- Патήστε 1 δευτ. για την Αρχική οθόνη (Home)- Premere 1 sec. per la schermata Home.- Нажимайте в течение 1 с для перехода к главному экрану- Trykk 1 sek. for startskjermen- Paina alhaalla 1 sekunnin ajan alkunäyttöön siirtymiseksi- Натискайте протягом 1 с, щоб перейти на головний екран- ا Compact لدة 1 ثانية للشاشة الرئيسية- Nyomja 1 mp-ig a Kezdöképernyő megjelenítéséhez- Натиснете за 1 сек. за начален екран- Pritisnite 1 sek. za početni zaslon |
 | Apps running | - Hold 2 sec. for Apps running- 2 sec. indrukken voor geactiveerde Apps- Für aktive Apps 2 Sek. drücken- Appuyez pendant 2 s pour lancer les applications- Pulse durante 2 s para ver las aplicaciones que se están ejecutando- Prima durante 2 segundos para ver as Aplicações em execução- Naciśnij i przytrzymaj przez 2 sek., aby uruchomić aplikacje- Pădržením po dobu 2 s zobrazite spuštěné aplikace- Podržte 2 sek. pre spustené aplikácie- Hold 2 sek. for kørende apps- Håll i 2 sek. för Appar som körs- Πατήστε 2 δευτ. για τις εφαρμογές που εκτελούνται | - Tenere premuto 2 sec. per l’esecuzione delle App.- Удерживайте в течение 2 с для запуска приложений- Trykk 2 sek. for âpne programmer- Pidă alhaalla 2 sekunnin ajan käytössä olevien sovellusten avaamiseksi- Утримуйте протягом 2 с, щоб запустити програми- ثبت لددة 2 ثاتية لتشغيل Relayطبيقات- Nyomja 2 mp-ig a futó alkalmazások megjelenítéséhez- Задръжте за 2 сек. за работещи приложения- Pentru activarea aplicațiilor, așteptați timp de 2 sec.- Držite 2 sek. za trenutno aktivne aplikacije |
 | Return to previous | - Return to previous- Terug naar vorige- Zurück- Retour au précédent- Volver al elemento anterior- Voltar ao anterior- Powrót do poprzedniego- Návrat k předchozímu- Návrat k predchádzajúcim- Retur til forrige- Âtergă till föregående- Επιστροφή σε προηγούμενο | - Funzione Return to previous (Torna indietro)- Вернуться к предыдущему- Gă tilbake til forrige- Palaa edelliseen- Повернення на попередній екран- العودة إلى Audience- Vissza az előzőhöz- Връщане към предишен- Revenire la precedenta- Povratak na prethodnu |
 | Menu | - Shows Menu- Toont Menu- Zeigt das Menū an- Afficher le menu- Muestra el menú- Mostra o menu | - Wyświetla menu- Zobrazi nabídku- Zobrazi ponuku- Viser menu- Visar meny- Εμφανίζει το Μενού |
| - Visualizza il menu- Отображение меню- Viser meny- Avaa valikon- Відобразити меню | - tighter القائمة- Menü megjelenítése- Показва менюто- Afişare meniu- Prikazuje izbornik | ||
 | SpeakerMono | - Built-in Speaker- Ingebouwde speaker- Integrierter Lautsprecher- Haut-parleur intégré- Altavoz integrado- Alto-falante embutido- Wbudowany glośnik- Zabudovaný reproduktor- Zabudovaný reproduktor- Indbygget højttaler- Inbyggd högtalare | - Evσωματωμένο ηχείο- Altoparlante integrato- Встроенный динамик- Innebygget høyttaler- Zvočnik Mono: Vgrajeni zvočnik- Вбудований динамик-Smagame مدهje- Beépített hangszóró- Вграден високоговорител- Difuzor încorporat- Ugrađeni zvučnik |
 | Headphones2.5 mm | - Headphones- Hoofdtelefoon- Kopfhörer- Casque- Auricular- Auscultadores- Sluchawki- Sluchátka- Slúchadlá- Hovedtelefoner- Hörlurar | - Акоустика- Cuffie- Наушники- Hodetelefoner- Slušalke- Навушники- Smagats رأس- Fejhallgató- Слушалки- Căşti- Slušalice |
 | USB | - Mini USB Port- Mini USB Poort- Mini-USB-Anschluss- Port mini USB- Puerto mini USB- Porta Mini USB- Port mini USB- Miniport pro USB- Mini USB port- Mini-USB-port- Mini USB-port | - Θύρα Mivi USB- Porta mini USB- Порт Mini USB- Mini USB-port- Vrata Mini USB- Порт Mini USB- Mini USB منقد- Mini USB port- Мини USB порт- Mini port USB- Mini USB sučelje |
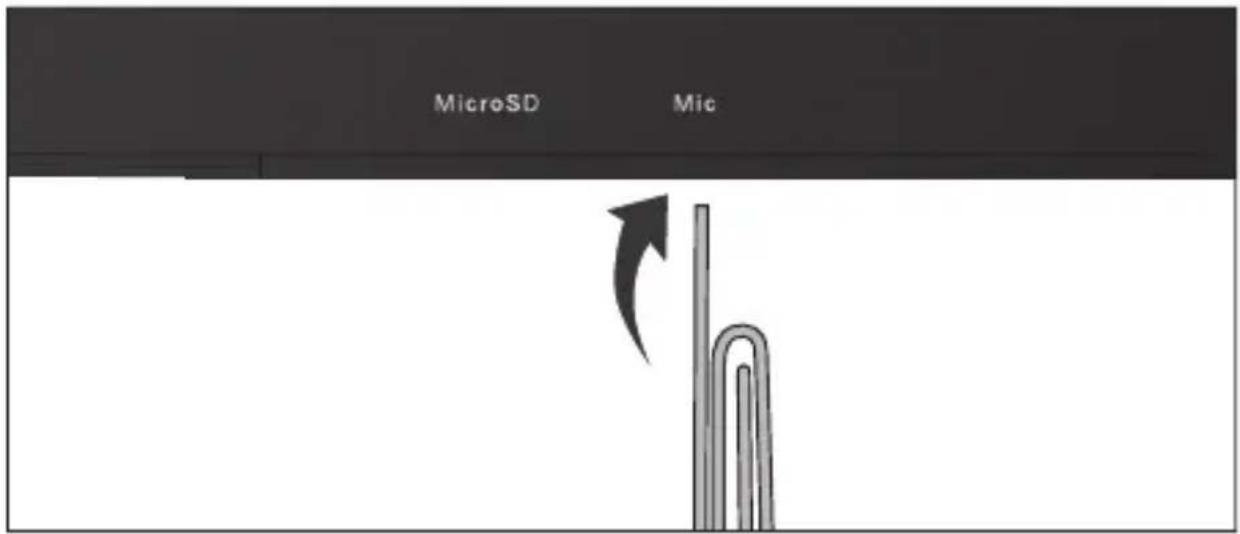
 | MicroSD*Up to 64 GB | - MicroSD Slot- MicroSD Slot- MicroSD-Einschub- Emplacement carte MicroSD- Ranura para tarjetas MicroSD- Ranhura para cartão MicroSD- Gniazdo karty MicroSD- Slot pro MicroSD- Slot na Micro SD kartu- MicroSD-stik- MicroSD-kortplats- Упобохн MicroSD | - Slot per MicroSD- Разьем для карты MicroSD- MicroSD spor- Reža za MicroSD- Гніздо для карти пам'ятіMicroSD- MicroSD فتحة- MicroSD nyílás- Слот за MicroSD карта- MicroSD Slot- MicroSD utor |
 |  | ||
| MicroSDHCTM 32 GB FAT32*MicroSDXCTM 64 GBNTFS format onlyFor more informationabout MicroSD formatting seeforum.yarvik.com | |||
 | 1080p | - Mini HDMI Out- Mini HDMI Uit Mini- HDMI-Ausgang- Sortie mini HDMI- Salida mini HDMI- Saída Mini HDMI- Wyjście mini HDMI- Minivýstup HDMI- Mini HDMI výstup- Mini-HDMI-udgang- HDMI-utgång | - Еξοδος Mívı HDMI- Uscita mini HDMI- Выход Mini HDMI- Mini HDMI ut- Izhod Mini HDMI- Вихід Mini HDMI- Mini HDMI Out مخرج- Mini HDMI kimenet- Mini HDMI Извод- leşire Mini HDMI- Mini HDMI izlaz |
 | PowerAdapter | - Power Adapter- Voedingsadapter- Netzteil- Adaptateur électrique- Adaptador de corriente- Adaptador de corrente- Zasilacz sieciowy- Sítový adaptér- Sietový adaptér- Strømadapter- Nätadapter | - Трофоботикó Реúматоç- Alimentatore- Адаптер питания- Strømforsyning- Napajalnik- Адаптер живлення- محول الطاقة- Hálózati adapter- Захранващ адаптер- Adaptor- Naponski adapter |
| Reset |  | - Reset button- Reset knop- Reset-Taste- Bouton deréinitialisation- Botón Reset (Restablecer)- Botão Reiniciar | - Przycisk resetowania- Tlačítko Vymazat- Tlačidlo resetovaniaterställningsknapp- Knappen Reset [Nulstil]- Återställningsknapp- Плήктро Етпавафорáç |
| - Pulsante Reset- Кнопка сброса- Reset-knapp- Gumb za | ponastavitev- Кнопка скидання- زر إعادة الحبيط- Visszaállítás gomb | - Бутон Нулиране- Buton de resetare- Tipka za resetiranje |
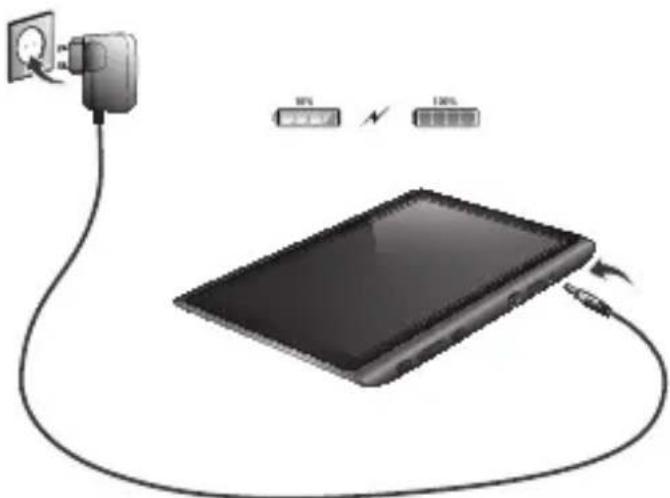
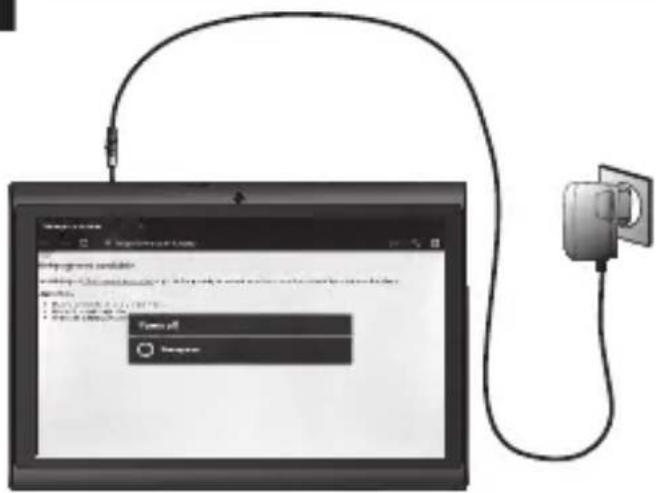
Charging
Opladen / Laden / Chargement / Carga / Carregamento / Ladowanie / Nabijeni / Nabijanie / Opladning / Laddning / Фортюг / Carica / Зарядка / Lading / Polnjenje / Зарядження акумулятора / الشحن / Töltés / Зареждане / İncârcare / Punjenje
* Use only the supplied AC adapter
* Gebruik alleen de bijgeleverde AC adapter
* Verwenden Sie ausschließlich das mitgelieferte Netzteil
* Utilisez seulement l'adaptateur CA fourni
* Use exclusivamente el adaptador de corriente de CA incluido
* Utilize apenas o adaptador de CA fornecido
* Korzystaj tylko z dostarczonego zasilacza prądu zmiennego
* Použivejte pouze dodaný AC adapter
* Použivajte iba dodaný sieľový adaptér
* Brug kun den medfølgende AC-adapter
* Använd endast den medföljande nätadaptern
* Χρησιμαποιήστε μόνο το παρεχόμενο τροφοδοτικό ΑС
* Utilizzare solo l'adattatore CA fornito.
* Используйте только входящий в комплект сетевой адаптер
* Bruk bare medfølgende AC*adapter
* Uporabite le priloženi napajalnik AC
* Використовуйте тільки той блок живлення, що входить до
natural_image
Illustration of a digital tablet connected to a power outlet, with two labeled ports (30% and 100%) above it.- On the bottom of the Xenta screen you can always find the status bar. The status bar contains both system information and function buttons.
NL
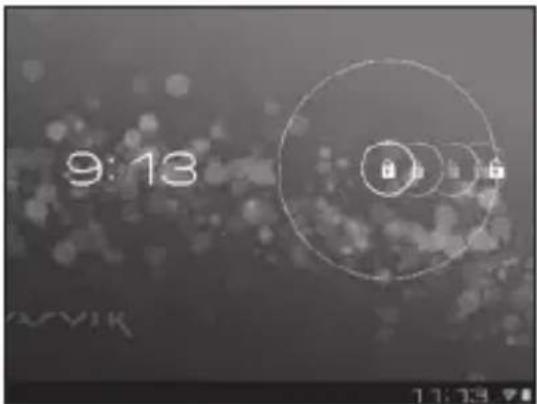
3 Getting on the Internet
Internet instellen / Zugriff auf das Internet / Accès à Internet / Cómo acceder a Internet / Aceder à internet / Łączenie z Internetem / Připojení k internetu / Pripojenie k internetu / At komme på internettet / Gå ut på Internet / Σύνδεση στο Internet / Collegamento a Internet / Подключение к Интернету / Koble til Internett / Kako se povezati na internet Підключення до Интернету / دخول الإنترNET / Kapcsolódás az Intemetre / Свързване към Интернет / Conectare la Internet / Spajanje na Internet
- Slide the lock bar (A) to the right (B) to unlock
- Schuif de vergrendeling (A) naar rechts (B) voor ontgrendelen
- Sperrsymbol (A) zum Entsperren nach rechts (B) schieben
- Faites glisser la barre de verrouillage (A) vers la droite (B) pour déverrouiller.
- Deslice la barra de bloqueo (A) hacia la
natural_image
Dark, grainy image with scattered bokeh lights and faint circular patterns (no text or symbols)-
Press the app and widget button
-
Druk op de App/widget-knop
- Druk op de app/widget-knop
- App- und Widget-Schaltfläche drücken.
- Appuyez sur le bouton d'applications et de widgets.
- Pulse el botón de la aplicación y del widget
- Prima o botão de aplicações e widgets
- Naciśnij przycisk menu aplikacji i widgetów
- Stiskněte tlačítko pro aplikaci a nástroj
- Stlačte tlačidlo aplikácie a miniaplikácie
- Tryk på app- og widget-knappen
- Tryck på app- och widget-knapp
- Πατήστε το κουμπί εφαρμογών και γραφικών στοιχείων
- Premere il pulsante della app e del widget.
- Нажмите кнопку приложений и виджетов
- Trykk app- og widget-knappen
-
Pritisnite gumb za aplikacije in pripomočke
-
Натисніть клавішу програм та віджетів
- ا Compact على زر التطبيق والأداة
- Nyomja meg az „alkalmazások és widgetek” gombot
- Натиснете бутона за приложения и графични елементи
- Apăsați pe aplicație și pe butonul widget
-
P r i t i s n i t e tipku za aplikaci
-
Press Settings menu
- Klik op Settings (Instellingen)
3 Slide the On/Off button to "On"
- Izberite svoje Wireless Network (Brezžično omrežje)
- Оберіть Wireless Network (безпроводову мережу).
- اختر شبكتك اللا스لكية.
- Válassza ki a Wireless Network (vezeték nélküli) hálózatot.
- Изберете своята Wireless Network (Безжична мрежа).
- Alegeti-vă o Wireless Network (Rețea fără fir).
- Odaberite bežičnu mrežu.
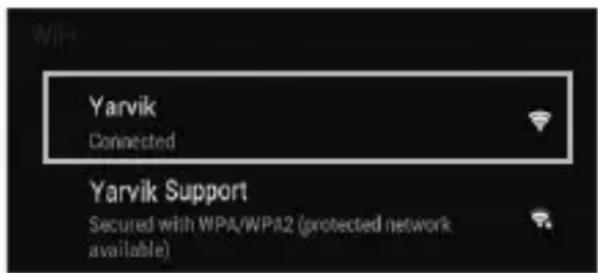
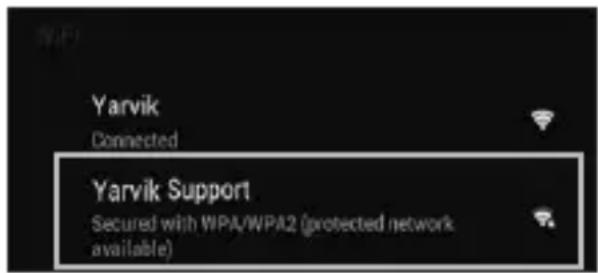
4.1. Non secured, Tap the network of your choice.
- Niet beveiligd, tik op het netwerk van uw keuze.
- Bei ungesichertem Netzwerk auf das gewünschte Netzwerk tippen.
- Non sécurisé, sélectionnez le réseau de votre choix.
- No protegida, pulse la red a la que desee conectarse.
- Se não estiver protegida, toque numa rede à sua escolha.
- Niezabezpieczona; dotknij wybranej sieci.
- Nezabezpečeno, klepněte na libovolnou síť.
- Nezabezpečené, poklepte na siet' podl'a vlastného výberu.
- Ikke sikret. Tap på foretrukket netværk.
- Icke säker, Peka på det nätverk du vill välja.
- Χωρίς ασφάλεια, αγγίξτε το επιθυμητό δίκτυο.
- Non protetta, selezionare la rete che si desidera.
- Если сеть Non secured (незащищена), выберите ее.
- Usikret nett, trykk på ønsket nettverk.
- Non secured (Nezavarovano), Dotaknite se želenega omrežja.
- Якщо мережа Non secured (незахищена), виберіть її.
- غير آمنة. انقر على شبكة من اختيارك.
- Non secured (Nem biztonságos), érintse meg a kívánt hálózatot.
- Ако е Non secured (Не защитена), натиснете върху мрежа по избор.
- Rețea Non secured (Nesecurizată), înscrietii rețeaua alesă.
- Non secured (Neosigurane) mreže, dodirnite naziv mreže
4.2. Secured Network, Type password then press Connect.
- Beveiligd netwerk, vul wachtwoord in en klik op Connect (Verbinden).
- Bei gesichertem Netzwerk Kennwort eingeben und Connect (Verbinden) drücken.
- Réseau sécurisé, tapez le mot de passe puis appuyezsur « Connect » (Connector).
- Si la red está protegida, escriba la contraseña y pulse Connect (Conectar).
- Se for uma rede protegida, digite a palavra-passe e depois prima Connect (Ligar).
- Zabezpieczona sieć; wprowadź Password (Hasło) i naciśnij Connect (Połącz).
- Zabezpečená síť, napište Password (Heslo), poté stiskněte Connect (Připojit).
- Zabezpečená siet', napíšte Password (Heslo) a potom stlačte Connect (Pripojit').
- Sikret netværk. Indtast adgangskode, og tryk derefter på Connect [Tilslut].
- Skyddat nätverk, ange lösenordet och tryck sedan på Connect (Anslut).
- Δίκτυο με ασφάλεια, πληκτρολογήστε τον κωδικό πρόσβασης και πατήστε Connect (Σύνδεση).
- Rete protetta, digitare la password, quindi premere Connect (Connetti).
- Если сеть Secured (защищена), введите пароль, а затем нажмите кнопку Connect (подключения).
- Sikret nett, skriv inn passord og trykk Connect.
- Secured Network (Zavarovano omrežje), Vtipkajte geslo in pritisnite Connect (Poveži).
- Якщо мережа Secured (захищена), введіть пароль та натисніть клавішу Connect (підключення).
- أمنة. اكتب كلمة الم underwater نم اضغط على Connect
- Secured (Biztonságos) hálózat, adja meg a jelszót és érintse meg a Connect (csatlakozás) gombot.
- Secured (Защитена) мрежа, напишете паролата и след това натиснете Connect (Свързване).
- Rețea Secured (Securizată), înscrietii parola, apoi apăsați pe Connect (Conectare).
-
Secured (Osigurane) mreže, upišite lozinku i pritisnite Connect (Spoji)
-
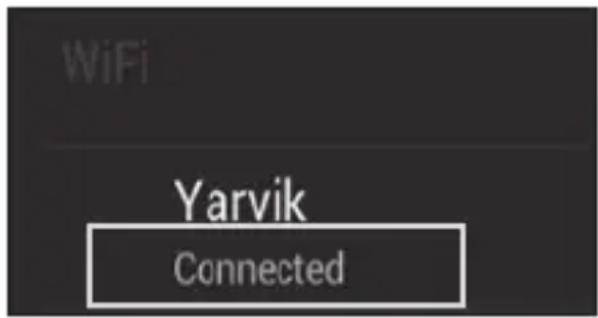
Check Wi-Fi connection.
-
Controleer Wi-Fi verbinding.
- WLAN-Verbindung überprüfen.
- Vérifiez la ae la conexión Wi-Fi.
- Verifique a ligação Wi-Fi.
- Sprawdź stan połączenia Wi-Fi.
- Kontrola Wi-Fi připojení.
- Skontrolujte pripojenie Wi-Fi.
- Kontroller Wi-Fi-tilslutning.
- Kontrollera Wi-Fi-anslutning.
- Ελέγξτε τη σύνδεση Wi-Fi.
- Controllare la connessione Wi-Fi
- П р о в е р ь т е
- Sjekk den trådløse tilkoblingen.
- Preverite Wi-Fi povezavo.
- П е р е в і р т е Wi-Fi-підключення.
- Wi-Fi. - خفق من اتصال
- Ellenőrizze a Wi-Fi kapcsolatot.
- Проверка на Wi-Fi връзка.
- Verificați conexiunea Wi-Fi.
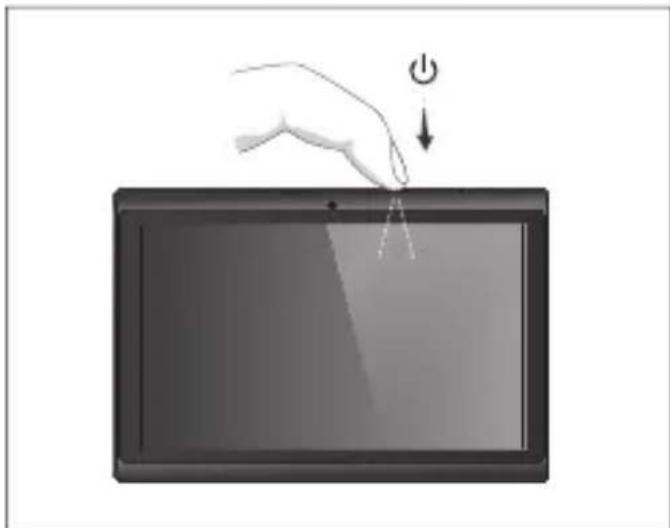
Your Tablet acts much slower then normal, doesn't react well or freezes. Restart the tablet using the On/Off button. All data/settings will be saved, the tablet will only shutdown. Afterwards hold the On/Off button until the tablet starts up again.
NL
1 Hold for 10 seconds
- 10 seconden ingedrukt houden
- 10 Sekunden gedrückt halten
- Appuyez pendant 10 secondes
- Mantenga pulsado durante 10 segundos
- Mantenha premidos durante 10 segundos
- Przytrzymaj przez 10 sekundy
- Přidržte po dobu 10 sekund
- 10 sekundy podržte
- Hold i 10 sekunder
- Håll ned i 10 sekunder
- Κρατήστε για 10 δευτερόλεπτα
- Tenere premuto 10 secondi.
- Удерживайте в течение 10 секунд.
- Hold inne i 10 sekunder.
- Držite 10sekunde
- Утримуйте протягом 10 секунд.
- فيناث 10 قدمل تبث
- Tartsa 10 másodpercig
natural_image
Illustration of a hand pressing down on a tablet screen with a power button (no text or symbols)- Задръжте за 10 секунди.
- Aşteptați 10 secunde.
- Držite 10 sekundi.
2 OR
Start up after Soft Reset
- To Start up: Hold for 5 seconds, tablet will start up
- Tablet weer opstarten: 5 seconden indrukken, Tablet start op
- Einschalten: 5 Sekunden gedrückt halten; das Tablet startet
- Pour démarrer : appuyez pendant 5 s, la tablette se met en marche
- Para iniciar el dispositivo: mantenga pulsado el botón durante 5 segundos y la tableta se encenderá
- Para arrancar: Mantenha premido durante 5 segundos e o tablet arranca
- Aby uruchomić: Naciśnij i przytrzymaj przez 5 sekundy; tablet uruchomi się
- Spuštění: Přidržte po dobu 5 sekund, tablet se spustí
- Spustenie: Podržte 5 sekundy a tablet sa spusti
- Start: Hold i 5 sekunder, og tablet'en vil starte
- För att starta: Håll intryckt i 5 sekunder, och surfplattan kommer att starta
- Για Εκκίνηση: Κρατήστε πατημένο για 5 δευτερόλεπτα και η ταμπλέτα θα εκκινήσει
- Per l'avvio: tenere premuto 5 secondi, il tablet si avvia.
- Начало работы: удерживайте в течение 5 секунд, чтобы включить планшет.
- For å starte: Hold inne i 5 sekunder, tableten starter opp
-
Držite gumb vklop/izklop 5 sekunde in tablični računalnik se bo zagnal
-
Розпочати роботу: утримуйте протягом 5 с для увімкнення планшета.
لليده: ثبت لدة 5 ثوان وسوف يبدأ تشغيل الكمperiوتر. اللوحي - Az indításhoz: Tartsa 5 másodpercig, hogy a tábla elinduljon
- За да стартирате: Задръжте за 5 секунди, таблета ще стартира
- Pentru a demara: menținând apăsat timp de 5 secunde, tableta se va activa.
- Za pokretanje: Držite 5 sekunde, tablet će se pokrenuti

natural_image
Illustration of a hand pressing down on a tablet screen with a power button (no text or symbols)EC Declaration of Conformity
We,
YARVIK
Ampereweg 3
2627 BG Delft
The Netherlands
Declare under our sole responsibility that the product:
Brand name : YARVIK
Model no. : TAB07-200
Product description : Xenta 7" tablet
Compliance with the essential requirements of the following Directives is declared:
- EMC DIRECTIVE : 2004/108/EC
- LVD DIRECTIVE : 2006/95/EC
- R&TTE DIRECTIVE : 1999/5/EC
- ROHS DIRECTIVE : 2011/65/EU
To which this declaration is based on with full conformance to the following European norms and standards:
Tablet
- EMC : EN 55022:2006 + A1:2007
EN 55024:1998 + A1:2001 + A2:2003
Signed, Delft, 04-04-2013
YARVIK

R. Ramaekers,
Purchase Director
Important information
CE!
Wireless LAN-Regulatory information
Depending on the model, the wireless LAN built-in into tablet devices can only be used in the following countries: Austria, Belgium, Bulgaria, Czech Republic, Denmark, Finland, France, Germany, Greece, Hungary, Iceland, Ireland, Italy, Luxembourg, the Netherlands, Norway, Poland, Portugal, Romania, Slovakia, Slovenia, Spain, Sweden, Switzerland, Turkey and the United Kingdom.
Conditions of use
When using the IEEE 802.11b/g/n Wireless LAN standard, channels 1 to 13 (2.4 GHz ...2.4835 GHz) are selectable for both indoor and outdoor use, however with restrictive conditions applying in France, Italy and Norway, as follows:
- France: When using this product indoor, all channels can be used without restrictions. Outdoor only channels 1 to 6 are allowed. This means that in Peer-to-Peer, the WLAN feature can only be used outside if the peer sets up the communication on an authorized channel (i.e., between 1 & 6). In infrastructure mode, please make sure the access point is configured to a channel from 1 to 6 before setting up the connection.
- Italy: Use of the RLAN network is governed: Disposal of Old Electrical & Electronic
- with respect to private use, by the Legislative Decree of 1.8.2003, no. 259 ("Code of Electronic Communications"). In particular Article 104 indicates when the prior obtainment of a general authorization is required and Art. 105 indicates when free use is permitted;
- with respect to the supply to the public of the WLAN access to telecom networks and services, by the Ministerial Decree 28.5.2003, as amended, and Art. 25 (general authorization for electronic communications networks and services) of the Code of electronic communications.
- Norway: Use of this radio equipment is not allowed in the geographical area within a radius of 20 km from the centre of Ny-Ålesund, Svalbard.
WEEE Symbol Information
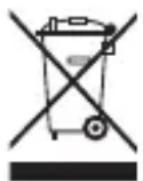
Correct Disposal of This product (Waste Electrical & Electronic Equipment).
(Applicable in the European Union and other European countries with separate collection systems).
This marking shown on the product or its literature indicates that it should not be disposed with other household wasted at the end of its working life. To prevent possible harm to the environment or human health from uncontrolled waste disposal, please separate this from other types of wastes and recycle it responsibly to promote the sustainable reuse of material resources. Household users should contact either the retailer where they purchased this product, or their
local government office, for details of where and how they can take this item for environmentally safe recycling.
Business users should contact their supplier and check the terms and conditions of the purchase contract. This product should not be mixed with other commercial wastes of disposal.
Disposal of waste batteries (applicable in the European Union and other European countries with separate collection systems)
Either of the symbols shown next may appear on the battery or on the packaging to indicate that the battery provided with this product shall not be treated as household waste. On certain batteries this symbol might be used in combination with a chemical symbol. The chemical symbols for mercury (Hg) or lead (Pb) are added if the battery contains more than 0.0005% mercury or 0.004% lead. By ensuring these batteries are disposed of correctly, you will help prevent potentially negative consequences for the environment and human health which could otherwise be caused by inappropriate waste handling of the battery. The recycling of the materials will help to conserve natural resources. In case of products that for safety, performance or data integrity reasons require a permanent connection with an incorporated battery, this battery should be replaced by qualified service staff only. To ensure that the battery will be treated properly, hand over the product at end-of-life to the applicable collection point for the recycling of electrical and electronic equipment.
For all other batteries, please view the section on how to remove the battery from the product safely. Hand the battery over to the applicable collection point for the recycling of waste batteries. For more detailed information about recycling of this product or battery, please contact your local Local government Office, your household waste disposal service or the shop where you purchased the product.
When travelling to and within the United States of America, please be aware that the U.S.
Department of Transportation (DOT) recently published new regulations that apply to passengers travelling with lithium metal batteries and lithium-ion batteries.
For detailed information, visit http://safetravel.dot.gov/whats_new_batteries.html.
Safety Information
Yarvik Tablet device
- Yarvik is not responsible for any interference that you may experience or that may be caused when operating this device.
- Warning: We strongly advise to connect this device to a earthed wall socket when charging.
- Opening or dismantling the main unit or any of its accessories, for whatever reason, could lead to damages that are not covered by the guarantee.
- To avoid electrical shock, do not open the cabinet. Refer servicing to qualified personnel only.
- To prevent fire or shock hazard, do not expose your tablet device or any of its accessories to rain or moisture.
- Do not use or store your tablet device in a location subject to heat sources, such as radiators or air ducts; direct sunlight; excessive dust; moisture or rain; mechanical vibration or shock; strong magnets or speakers that are not magnetically shielded; excessively high and low temperatures; and high humidity.
- Turning off your tablet device with the power button does not disconnect the device completely from mains voltage. To disconnect it completely, unplug the AC adapter or the power cord from mains. The socket-outlet shall be installed near the equipment and shall be easily accessible.
- Audio and picture distortion may occur if this equipment is positioned in close proximity to any equipment emitting electromagnetic radiation.
- This apparatus is also designed for IT power system with phase to phase voltage 230V, for customers in Norway.
- Observe the following precautions to provide adequate air circulation and to ensure normal reliable operation:
- Do not use the tablet device and/or the AC adapter while covered or wrapped in cloth. Ensure the AC adapter operates in a clear environment.
- Turn off the tablet device before putting the device into a bag or a carrying case.
- Do not use your tablet device directly on your lap. The temperature of the base of the unit will rise during normal operation and over time could result in discomfort or burns.
- Do not use your tablet device while walking. Listening to music with headphones or watching the LCD screen while walking may lead to an unexpected accident and result in personal injuries.
- Using connected headphones on the tablet device for too long and/or setting the audio volume up too high when using headphones may cause serious hearing damage.
- Avoid strong beating of or to the product.
- Don't operate the touch screen of the tablet device with sharp objects, as this may result in scratching the screen surface.
- Only use permitted batteries, chargers and accessories with your tablet device. The use of any other products with the device can be dangerous and may violate the warranty regulations.
- Only use a slightly wet cotton cloth to clean the device, and only use water to wetten the cotton cloth. The tablet device should not be cleaned with any sort of (glass) cleaning aid.
Wireless functionality
- If radio interference with other devices occurs while using your tablet device, do not use the wireless functionality. Use of the wireless functionality may cause a malfunction of the devices, resulting in an accident.
- In some situations or environments, the use of the wireless functionality might be restricted by the proprietor of the building or responsible representatives of the organization, for example on board airplanes, in hospitals or in any other environment where the risk of interference with other devices or services is perceived or identified as harmful. If you are uncertain about the policy applying to the use of wireless functionality in a specific organization or environment, you are encouraged to first ask for authorization prior to switching it on. Consult your physician or the manufacturer of personal medical devices (pacemakers, hearing aids, etc.) regarding any restrictions on the use of wireless functionality.
- If using wireless functionality near a pacemaker, make sure it is at least 19 inches / 50 cm away from the pacemaker.
- Due to the transmission and reception properties of wireless communications, data can occasionally be lost or delayed. This can be due to the variation in radio signal strength that results from changes in the characteristics of the radio transmission path. Yarvik will not be held responsible for damages of any kind resulting from the delays or errors in data transmitted or received via wireless functionality, or failure of wireless functionality to transmit or receive such data.
- If the equipment does cause harmful interference to radio/TV reception, which can be determined by turning the equipment off and on, the user is encouraged to try to correct the interference by one or more of the following measures: reorient or relocate the receiving antenna, increase the distance between the sender and the receiver, consult the dealer or an experienced radio/TV technician for help. Yarvik will not be responsible for any radio/TV interference nor for any other undesired effect.
Wireless LAN Security
Creating security settings for the Wireless LAN is extremely important. Yarvik assumes no responsibility for any security problems that may arise from the use of the Wireless LAN.
Battery pack
Do not charge the battery pack in any way other than as described in the Start guide or as designated by Yarvik in writing.
AC adapter
- It is highly recommended that you use a genuine Yarvik AC adapter supplied by Yarvik for your product.
- This AC adapter is intended for use with the tablet device IT products only.
- Do not place the AC adapter in contact with your skin. Remove the AC adapter away from your body if it becomes warm and causes discomfort.
RoHS
This products has been certified as RoHS Compliant.
Dimensions, specifications, images & illustrations
All dimensions, specifications, images and illustrations are subject to change without prior notice.
http://safetravel.dot.gov/whats_new_batteries.html.
Please consult the legal information available on your Tablet under
Settings – About device – Legal information
or visit http://source.android.com/source/licenses.html for more information
(internet connection required)
Please visit our website for CE declaration: www.yarvik.com

facebook.com/yarvik

twitter.com/yarvikce

youtube.com/yarvikce

forum.yarvik.com
YARVIK
natural_image
Black-and-white illustration of a foldable smartphone displaying a toucan perched on its branch, with no visible text or symbols.Xenta 7ic
Xenta 7ic
Factory Reset Reset naar fabrieksinstellingen Reset der Werkseinstellungen Réinitialisation par défaut Restauración d0e configuración de fábrica Reposição de fábrica Przywracanie ustawień fabrycznych Obnovení továrního nastavení Resetovanie na nastavenia z továrne Fabriksnulstilling Fabriksåterställning Επαναφορά σε Ρυθμίσεις Εργοστασίου Reset delle impostazioni predefinite рос параметров к значениям по умолчанию ctory reset (Tilbakestille til fabrikkinnstillinger) Tovarniška ponastavitev я установок до стандартних заводських значень إرجاع ض tight الصنع Gyári visszaállítás Нулиране към фабрични настройки estabilirea configurației implicite din fabricație Tvorničko resetiranje
Factory Reset
EN
Your Tablet acts much slower than normal, doesn't react well or freezes even after the Soft Reset.
In this case you need to do a complete "Factory Reset". If you perform a "Factory Reset", all data/settings will be lost and the tablet will return to its factory settings.
Also if you have a password protection on the tablet and you forgot the password. The only way to access the tablet is by doing a "Factory Reset". The Factory Reset is as follows:
NL
Factory Reset Execution
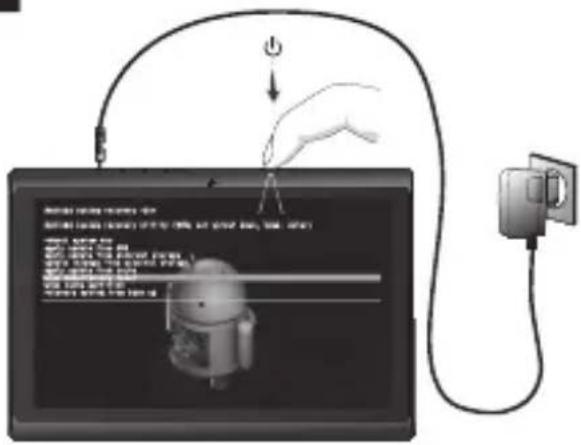
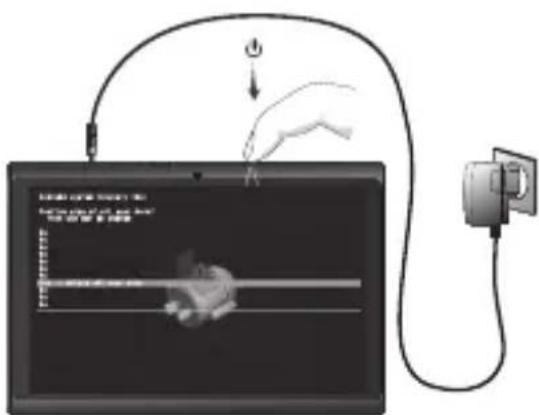
1 Turn Tablet completely OFF before starting Factory Reset.
- Schakel de tablet volledig UIT voor u een fabrieksreset uitvoert.
- Tablet vor dem Rücksetzen auf die Werkseinstellungen vollständig AUS schalten.
- Éteignez complètement la tablette avant de démarrer la réinitialisation par défaut.
- Apague la tableta totalmente antes de iniciar el proceso de restablecimiento de fábrica.
- Desligue completamente o tablet antes de iniciar uma Reposição de fábrica.
- Przed rozpoczęciem procedury przywracania ustawień fabrycznych całkowicie WYŁĄCZ tablet.
- Před spuštěním obnovení na výrobní nastavení zcela VYPNĚTE tablet.
- Pred začatím resetovania na nastavenia z továrne tablet úplne vypnite.
1
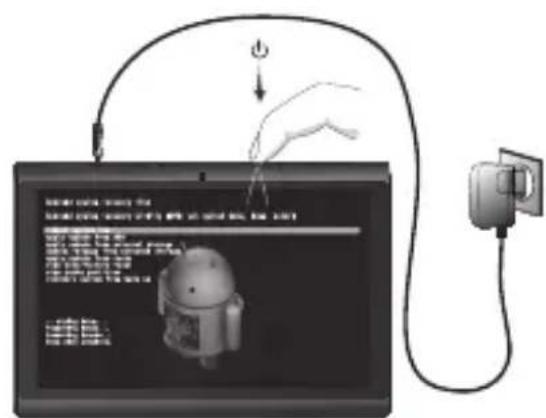
2 Hold for 6 seconds
- 6 seconden ingedrukt houden
- 6 Sekunden gedrückt halten
- Appuyez pendant 6 secondes
- Mantenga pulsado durante 6 segundos
- Mantenha premidos durante 6 segundos
- Przytrzymaj przez 6 sekundy
- Přidržte po dobu 6 sekund
- 6 sekundy podržte
- Hold i 6 sekunder
- Håll ned i 6 sekunder
- Κρατήστε για 6 δευτερόλεπτα
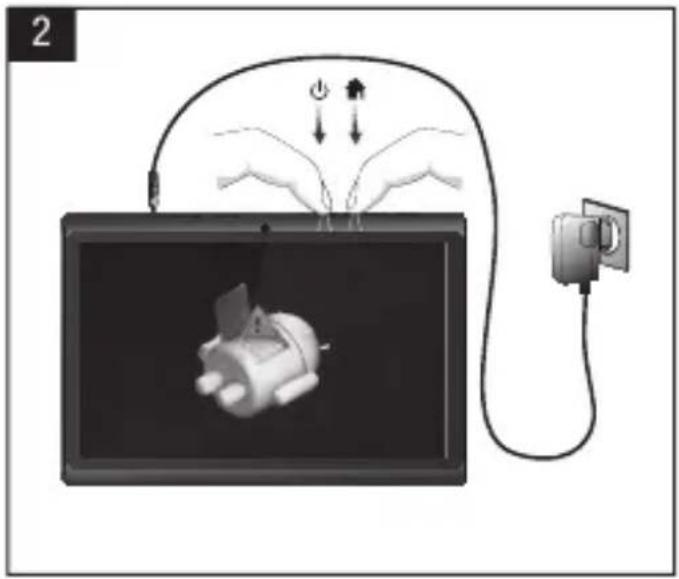
natural_image
Illustration of a device connected to a power plug and cable, with hands performing power transfer (no text or symbols)3


Hold for 2 seconds
3 Hold for 2 seconds
- 2 seconden ingedrukt houden
- 2 Sekunden gedrückt halten
- Appuyez pendant 2 secondes
- Mantenga pulsado durante 2 segundos
- Mantenha premidos durante 2 segundos
- Przytrzymaj przez 2 sekundy
- Přidržte po dobu 2 sekund
- 2 sekundy podržte
- Hold i 2 sekunder
- Håll ned i 2 sekunder
- Κρατήστε για 2 δευτερόλεπτα
3
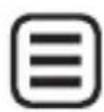
3 Now you are in system recovery mode.
- Nu bent u in systeemherstelmodus aanbeland.
- Sie befinden sich im System-Wiederherstellungsmodus.
-
Vous êtes désormais en mode de récupération de système.
-
Ahora ya se encuentra en el modo de recuperación del sistema.
- Está agora no modo de recuperação do sistema.
- Urządzenie przełączy się w tryb przywracania systemu.
-
Nyní jste v režimu obnovy systému.
-
Teraz sa nachádzate v režime obnovenia systému.
-
Nu er du i systemgendannelsestilstand.
-
Nu är du i systemåterställningsläge.
- Τώρα βρίσκεστε σε κατάσταση αποκατάστασης συστήματος.
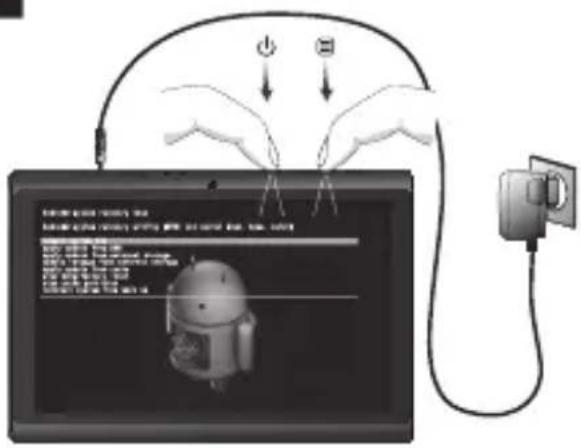
4 With ⬆ (hold for 3 seconds) scroll down to Wipe data/factory reset.
- Gebruik de ⚠ (3 seconden ingedrukt houden) knop en scroll naar beneden om data te wissen/factory reset (fabrieksreset).
- Mit der ⬆ (3 Sekunden gedrückt halten) -Taste abwärts zum Eintrag Wipe data/factory reset (Daten löschen/ Werkseinstellungen) gehen.
- À l'aide du bouton ⬆ (Appuyez pendant 3 secondes), faites défiler vers le bas et sélectionnez Supprimer les données/réinitialisation par défaut.
- Con el botón de ⬆ (Mantenga pulsado durante 3 segundos), desplácese hacia abajo hasta Wipe data/factory reset (Borrado de datos/Restablecimiento de fábrica).
- Com o botão ⬆ (Mantenha premidos durante 3 segundos), desça até Wipe data/factory reset (Limpar os dados/ reposição de fábrica).
- Przewiń przyciskiem ⬆ (Przytrzymaj przez 3 sekundy) w dół do Wipe data/factory reset (Usuń dane/przywracanie ustawień fabrycznych).
- Tlačítkem ⚠ (Přidržte po dobu 3 sekund) skrolujte dolů pro Wipe data/factory reset (Smazání dat/obnovení na výrobní nastavení).
- Tlačidlom ⬆ (3 sekundy podržte) skrolujte dole pre Wipe data/factory reset (Odstránit údaje/resetovať na nastavenia z továrne).
- Med ⬆ (Hold i 3 sekunder) rul ned til Wipe data/factory reset [Ryd data/fabriksnulstilling].
- Bläddra ner med ⬆ (Håll ned i 3 sekunder) till Wipe data/factory reset (Radera-uppgifter/fabriksåterställning).
flowchart
graph TD
    A["Device 1: Battery Storage"] --> B{Recovery System:}
    B -->|Yes| C["Storage System"]
    B -->|No| D["Control System"]
    C --> E["Output: Recovery System"]
    D --> F["Output: Recovery System"]
    E --> G["Storage System"]
    F --> H["Storage System"]
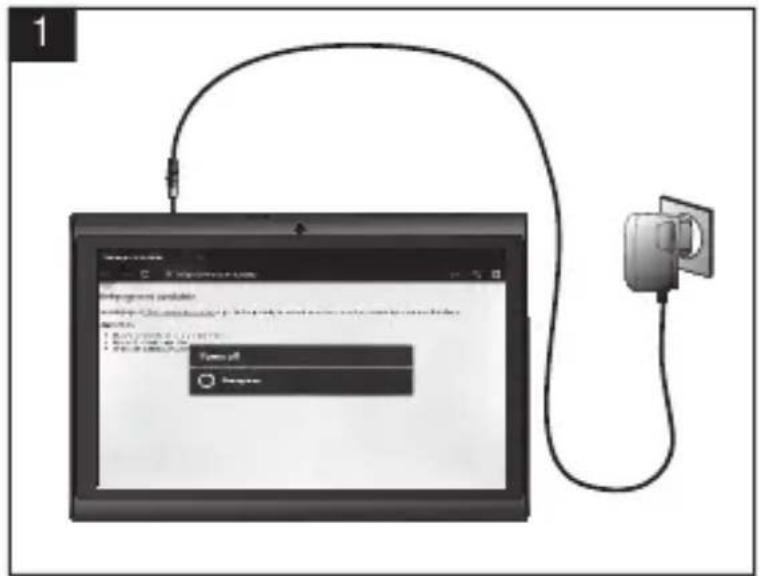
5 Press On/Off button to enter factory reset.
- Druk op de Aan/Uit knop om fabrieksreset uit te voeren.
- Ein-/Aus-Taste drücken, um zum Reset der Werkseinstellungen zu wechseln.
- Appuyez sur le bouton marche/arrêt pour effectuer la réinitialisation d'usine.
- Pulse el botón de encendido y apagado para acceder al restablecimiento de fábrica.
- Prima o botão On/Off (Ligar/Desligar) para entrar em factory reset (reposição de fábrica).
- Naciśnij wyłącznik, aby przejść do przywracania ustawień fabrycznych.
- Stisknutím tlačitka zapnout/vypnout spustte obnovení na výrobní nastavení.
- Ak chcete resetovať na nastavenia z továrne, stlačte vypínač.
- Tryk på knappen On/Off [Til/fra] for at åbne fabriksnulstilling
- Tryck på On/Off-knappen för att öppna
5
flowchart
graph TD
    A["7"] --> B["Android system recovery"]
    B --> C["Android system recovery utility (EVB: vol up/vei down, home, enter)"]
    C --> D["Reboot system reg: apply update from A38, apply update from external storage, update rkitage from external storage, apply update from cache, wipe data/factory reset, wipe cache partition, recovery system from back up"]
    D --> E["Reboot system reg: Android system recovers the EVB: vol up/vei down, home, enter"]
    E --> F["Reboot system reg: Android system recovers the EVB: vol up/vei down, home, enter"]
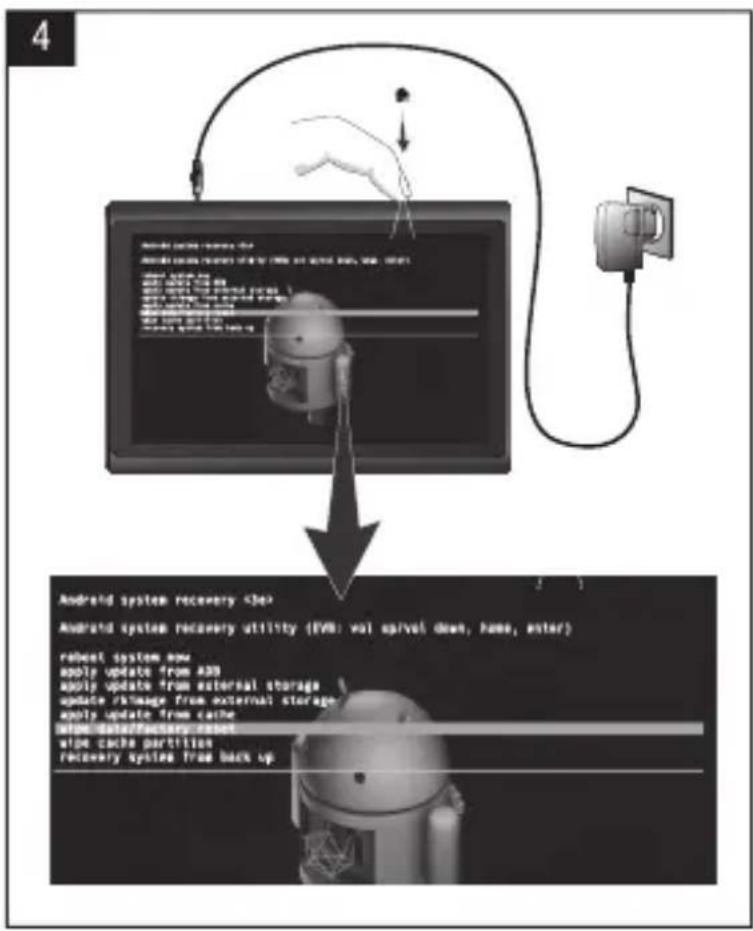
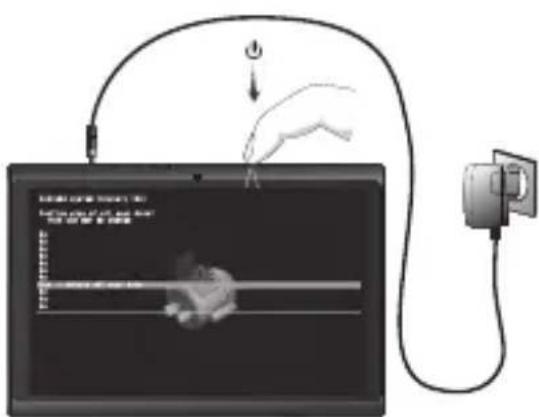
7 After factory reset has performed, scroll down with ⚠ button to reboot system now. Press On/Off button to enter reboot system now.
8 Tablet will restart with factory reset settings, all previous data/settings/password is lost.
- Tablet herstart met factory reset (fabrieksreset) instellingen, alle vorige data/instellingen/wachtwoorden gaan verloren.
- Das Tablet startet mit den Werkseinstellungen; alle vorherigen Daten/Einstellungen/Kennwörter sind verloren.
- La tablette va redémarrer avec les réglages de réinitialisation par défaut, toutes les données, tous les paramètres et tous les mots de passes seront donc perdus.
- La tableta se reiniciará con la configuración predeterminada de fábrica, perdiéndose todos los datos, configuraciones y contraseña anteriores.
- O tablet será reiniciado com as
Factory Reset Execution
1 Spegnere il tablet prima di avviare il reset delle impostazioni predefinite
- Сначала полностью выключите планшет.
- Slå tableten helt AV før start av Factory Reset.
- Pred začetkom tovarniške ponastavitve, popolnoma izklopite tablični računalnik.
- Спочатку повністю вимкніть планшет.
-Code: القيمة الحرفية (الصع)
- Kapcsolja KI a táblát a gyári visszaállítás elvégzése előtt.
- ИЗКЛЮЧЕТЕ напълно таблета преди да преминете към Нулиране към фабричните настройки.
- STINGETI total tableta înainte de a demara restabilirea configurației implicite din fabricație.ite.
- Potpuno ISKLJUČITE tablet prije nego započnete s tvorničkim resetiranjem
2


Hold for 6 seconds
natural_image
Diagram showing hands connecting a device to a power outlet connected to a cable, with no visible text or symbols.3


Hold for 2 seconds
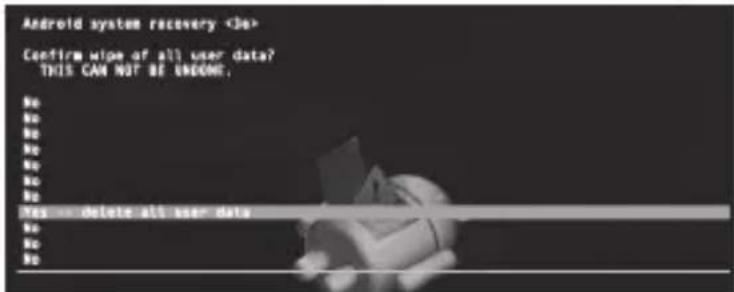
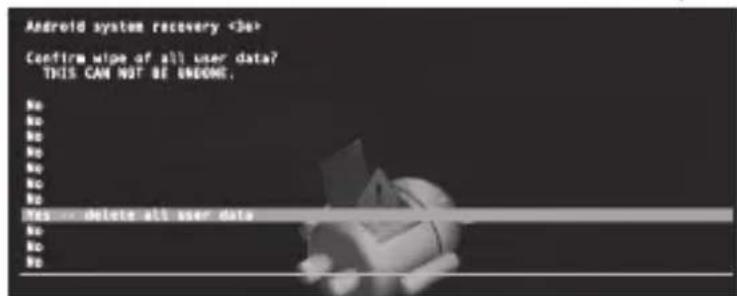
6 Con il pulsante ⚙ scorrere fino a Yes_ Delete all user data (Si_Elimina tutti i dati utente). Premere il pulsante di accensione/ spegnimento per eseguire l'operazione di eliminazione dei dati utente.
- Кнопкой ⚙️ прокрутите вниз до пункта Yes_Delete all user data (Да_удалить все данные пользователя). Нажмите кнопку


- Xenta 7ic
- Buttons & Connections
- Charging
- NL
- Getting on the Internet
- OR
- Start up after Soft Reset
- EC Declaration of Conformity
- Tablet
- Important information
- Wireless LAN-Regulatory information
- Conditions of use
- WEEE Symbol Information
- Correct Disposal of This product (Waste Electrical & Electronic Equipment).
- (Applicable in the European Union and other European countries with separate collection systems).
- Disposal of waste batteries (applicable in the European Union and other European countries with separate collection systems)
- Safety Information
- Yarvik Tablet device
- Wireless functionality
- Wireless LAN Security
- Battery pack
- AC adapter
- RoHS
- Dimensions, specifications, images & illustrations
- YARVIK
- Factory Reset
- EN
- Factory Reset Execution
- 1
- 3
- Hold for 2 seconds
Brand : Yarvik
Model : Xenta 7
Category : Tablet