
CNHR - Epilator RIO - Free user manual and instructions
Find the device manual for free CNHR RIO in PDF.
| Brand | Rio |
| Model | CNHR (Evolution) |
| Product type | Electric epilator using micro-currents |
| Dimensions (approx.) | 15 x 5 x 3 cm |
| Weight (approx.) | 200 g (with battery) |
| Power | 9V battery type PP3 / 6LR61 / MN1604, or optional mains adapter |
| Main functions | Permanent hair removal via micro-currents; adjustable timer (5 to 30 seconds) according to hair type; precision tweezers; power, treatment, and end-of-treatment indicator lights |
| Included accessories | Tweezers, control unit, extension cable, conductive gel, battery, instruction manual |
| Maintenance and cleaning | Clean the tweezers with a slightly damp cloth; do not immerse the unit or tweezers |
| Safety | Do not use if you have a pacemaker, heart problems, are pregnant, or have skin lesions; remove piercings; avoid sensitive areas (eyelids, ears, nostrils) |
| Repairability and spare parts | Detachable tweezers can also be used as standard tweezers; mains adapter available as an option; customer service at +44 (0)1242 702345 |
| Indicators | Green light (power), orange light (treatment), green light (end of treatment); audible beep at end of treatment and in case of error |
| Treated hair types | Fine hair (lip), medium hair (eyebrows), coarse hair (bikini) |
| Operating temperature | Room temperature |
| Country of manufacture | Not specified |
Frequently Asked Questions - CNHR RIO
User questions about CNHR RIO
0 question about this device. Answer the ones you know or ask your own.
Ask a new question about this device
Download the instructions for your Epilator in PDF format for free! Find your manual CNHR - RIO and take your electronic device back in hand. On this page are published all the documents necessary for the use of your device. CNHR by RIO.
USER MANUAL CNHR RIO
Do not use if you have any of the following conditions:
Pacemaker or heart problems. Do not remove hair from moles or areas of sunburn or abrasions. Do not use during pregnancy. Ensure that all body piercings are removed from the area being treated. Do not use on sensitive areas such as; eyelids, the inner ear or on nasal hair.
RIO CUSTOMER CARE LINE
If you have any questions about your Rio Evolution, or if you experience any problems, please call the Rio Customer Care Line on 01242 702345.
Using micro current technology Rio Evolution destroys the hair root and papilla to prevent future hair growth. The micro current changes the pH in the hair follicle to alkaline which then attacks the hair root and papilla cells (it is these cells which are responsible for hair growth). This action continues for sometime after the treatment is complete and the hair has been removed.
It is not always possible to kill all of the papilla cells in a single treatment and in these situations the hair may regrow. If it does regrow it is generally much finer and lighter than previously. Successive treatments will kill the papilla cells giving a permanent result. You may use your normal epilation methods in between treatments.
YOUR RIO EVOLUTION HAIR REMOVER
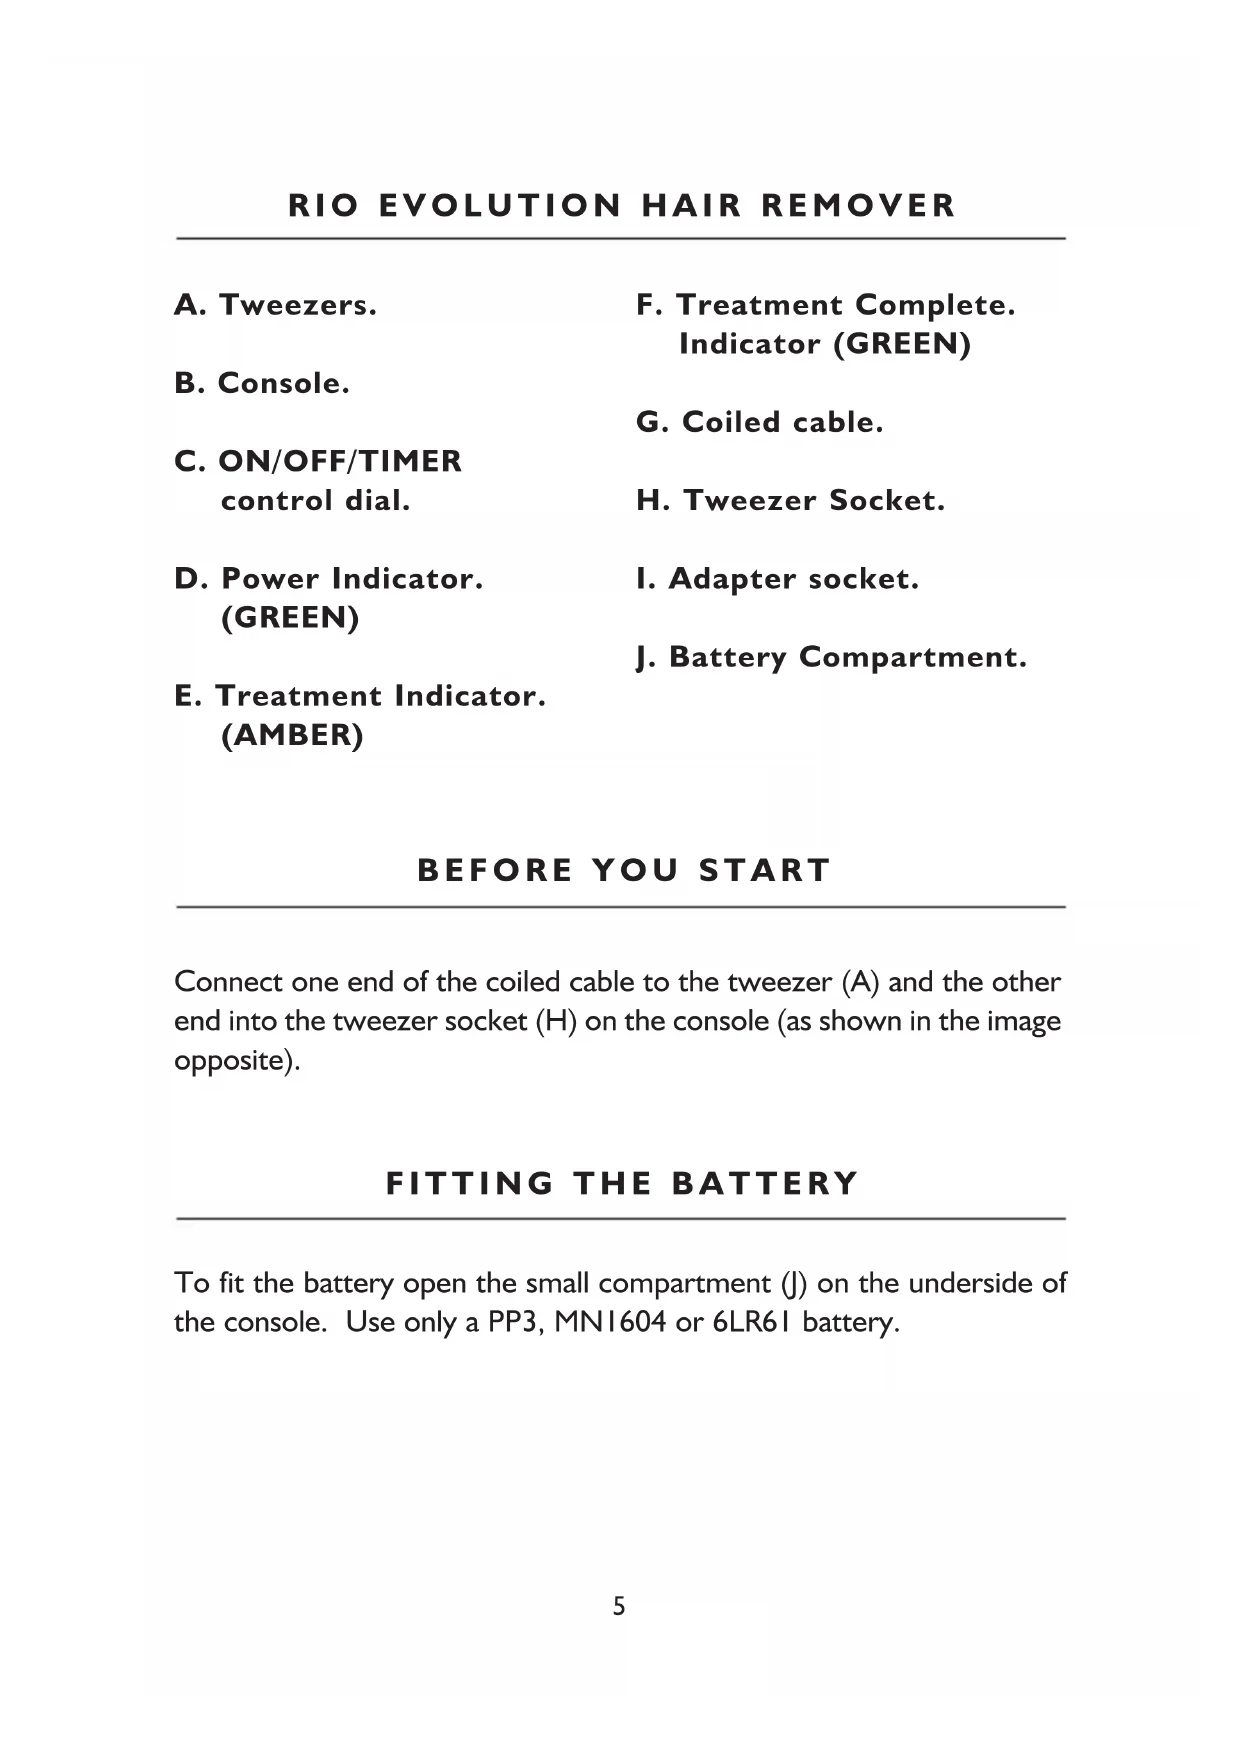
I. Tweezers
2. Coiled Cable
3. Console
4. Conductive Gel
5. Battery
6. Instruction Booklet
Please check you have all components before using your Rio Evolution Hair Remover, if you find any parts are missing please call our Careline on 01242 702345.
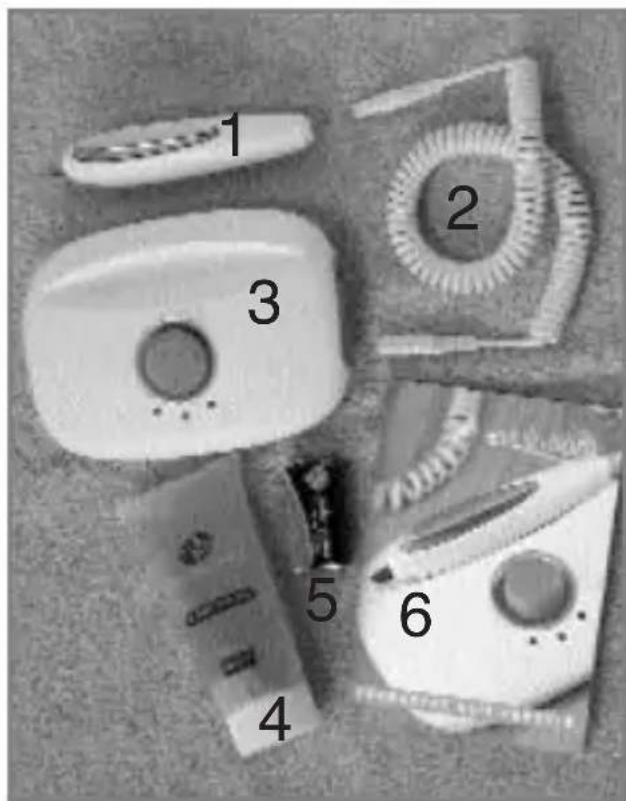
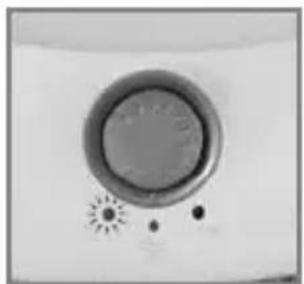
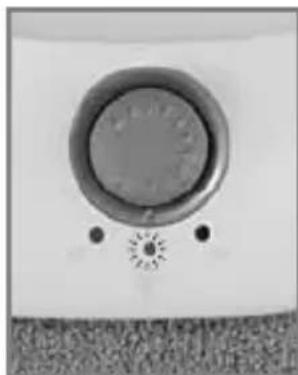
A. Tweezers.
B. Console.
C. ON/OFF/TIMER control dial.
D. Power Indicator. (GREEN)
E. Treatment Indicator. (AMBER)
F. Treatment Complete. Indicator (GREEN)
G. Coiled cable.
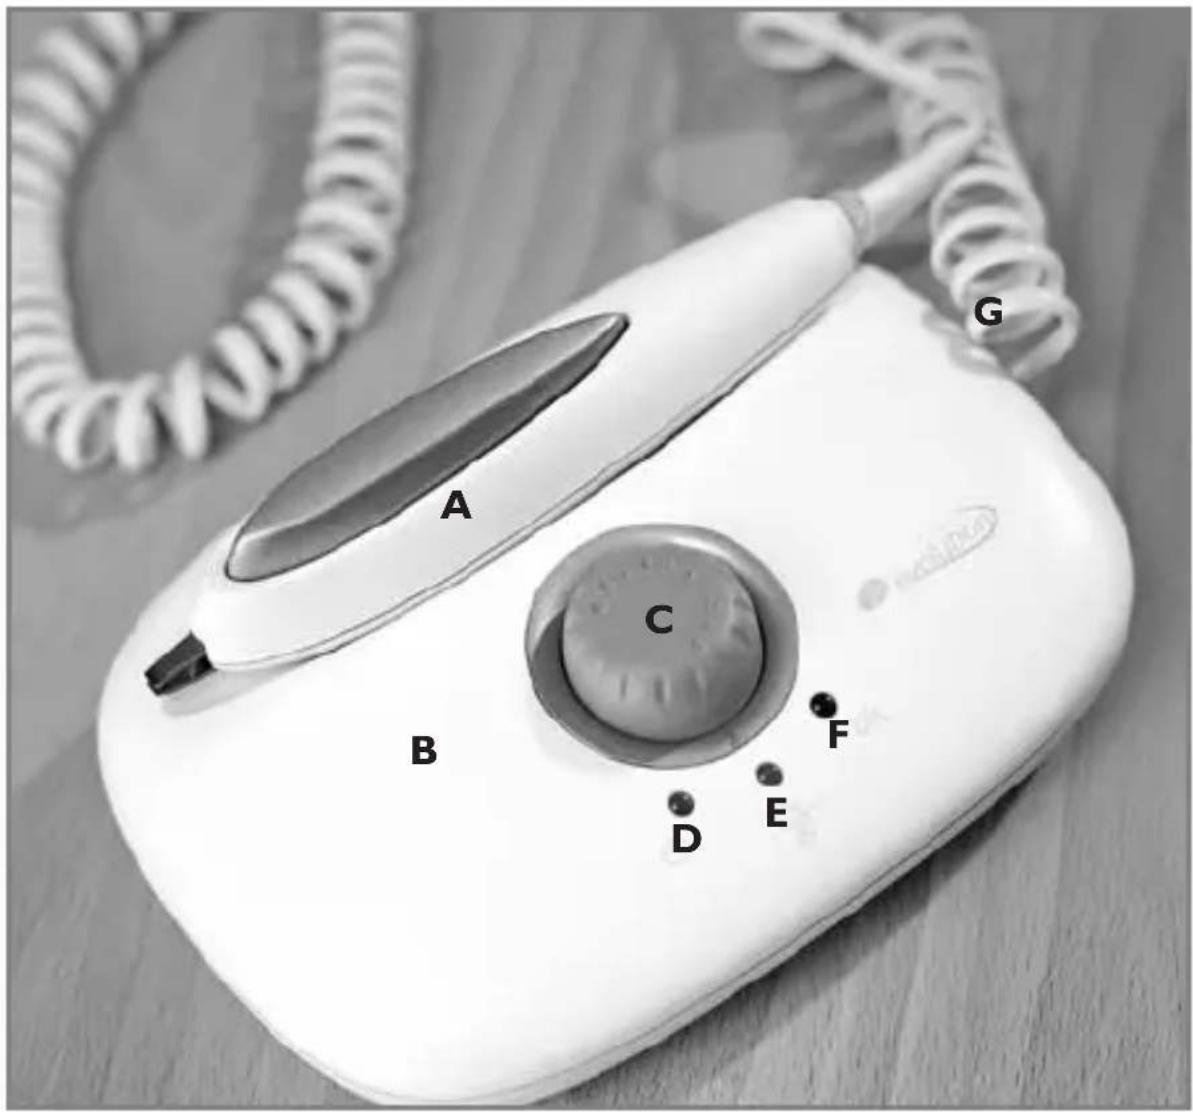
H. Tweezer Socket.
I. Adapter socket.
J. Battery Compartment.
BEFORE YOU START
Connect one end of the coiled cable to the tweezer (A) and the other end into the tweezer socket (H) on the console (as shown in the image opposite).
FITTING THE BATTERY
To fit the battery open the small compartment (J) on the underside of the console. Use only a PP3, MN1604 or 6LR6I battery.
Please Note: Some people may experience a slight redness when the hair has been removed. This is quite normal and will fade within an hour or two.
Before starting remove any make-up and clean the treatment area using soap and water.

I. Apply a small amount of conductive gel to the hairs which are to be treated OR put a blob of gel on the skin, into which you can dip the tweezers before taking hold of the individual hair.
- Switch on the unit by turning the ON/OFF/Timer dial clockwise. The unit will bleep twice and the green power light will illuminate.
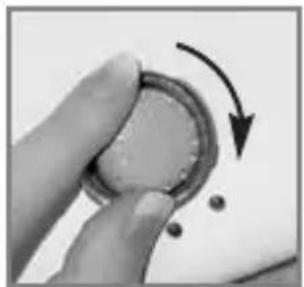
- Set the timer dial to suit the type of hair being treated. The treatment time varies between five and thirty seconds depending on the setting.
| Hair Type | Dial Setting | Treatment Time |
| Fine Hair, e.g. lip. | 1 - 3 | 5 - 15 seconds |
| Medium Hair, e.g. eyebrow. | 3 - 6 | 15 - 25 seconds |
| Thick Hair, e.g. bikini line. | 6 - 8 | 25 - 30 seconds |

- Using the tweezers take hold of the hair at the point where it meets the skin. Only apply a gentle pressure on the tweezers, do NOT press the button fully (see point 6).
- The amber treatment light will start flashing, indicating the treatment is in progress.
If the amber light does not come on, check the tweezers are plugged in and that you are making a good contact with the hair at the point where it meets the skin.

- When the treatment is complete you will hear a short bleep and the green 'treatment complete indicator' will illuminate. The hair can now be removed by increasing the pressure on the tweezers to pluck the hair out of the hair follicle.

If contact with the hair is broken during treatment the amber treatment light will go out and the unit will bleep three times. If the contact is not re-established within three seconds the treatment timer will assume you have moved onto a fresh hair and will restart the treatment programme.
The destruction of the hair root cells continues for some time after the treatment has finished. It makes no difference whether you remove the hair immediately or not.
If there is a particular stubborn hair, an additional treatment or longer treatment time may be required.
As with all hair removal treatments it is recommended that the area you have treated is washed with cool water and a mild antiseptic cream applied.
PLEASE NOTE
If the unit has been turned on, but not used for three minutes it will bleep twice and the power light will flash twice every thirty seconds. This is to attract your attention to turn the unit off and save the battery life.
LOW BATTERY WARNING
'Low Battery' is indicated by bleeping intermittently every five seconds and the power light flashing.
POWER ADAPTER
Your Evolution may also be used with a power adapter (available separately as an optional extra). The power adapter simply plugs into the adapter socket on the side. (You can order the power adapter by phoning the Rio Customer Care Line on 01242 702345, using the order form enclosed or by visiting www.riobeauty.com).
- Do not immerse the console or tweezers in water.
- To enhance the lifetime of your tweezers keep them on the console unit and do not use them for any other purpose than intended.
- After use, wipe the tweezers clean with a slightly damp cloth, the console unit can also be wiped over.
- The tweezer can be removed from the console unit and used on their own as conventional tweezers.
| TROUBLESHOOTING | ||
| Problem | Fault/Cause | Remedy |
| Amber treatment light does not stay/come on and console bleeps. | Good contact with the hair is not being maintained. | Check tweezers are connected. Ensure you are using gel. Grasp hair at skin level. |
| The amber light has gone out and the console is bleeping. | The contact with the hair has been lost. | If the contact is not re-established within three seconds the treatment timer will assume you have moved onto a new hair and restart the treatment from beginning. Grasp hair at skin level. |
| The console is bleeping and the power light is flashing. | Unit left on - and not used. | Turn the console off. |
| Console is bleeping constantly. | Low Battery. | Replace battery. |
| Nothing happens when the console is turned on. | The battery is dead. | Check battery is properly fitted. Fit new battery if necessary. |
| The hair is difficult to remove. | If there is a lot of resistance an additional treatment or longer treatment time of the same hair may be required. Wait for 3-4 minutes and treat the hair again. Allow an additional 3-4 minutes before pulling out the hair | |
| Hair regrows | More than a single treatment is required to kill this hair. | Repeat the treatment when the hair grows back. Use normal epilation methods in between treatments if you want to. Try a longer treatment time. |
| Redness of skin after treatment. | This is quite normal, you may wish to apply a mild antiseptic cream, however the redness should fade within one or two hours. | |
| Treatment light on continuously | Contact is being maintained even when the tweezers are not in use. | Clean tweezers with a damp cloth thoroughly, removing all traces of conductive gel. |
PRECAUTIONS
WAARSCHUWING ALS DE BATTERIJ BIJNA LEEG IS
On receipt of the completed guarantee registration
slip opposite, The Dezac Group Limited
will guarantee your
Rio Evolution Hair Remover
for one year against failure
due to faulty workmanship or components.
This Guarantee does not affect your statutory rights.
After completing the form opposite, cut out and send to:
THE DEZAC GROUP LTD,
PO BOX 17, CHELTENHAM,
GLOUCESTERSHIRE GL53 7ET
GUARANTEE REGISTRATION
Please complete in block capitals
Model
Date of purchase
Purchased from
Title: Mr/Mrs/Miss/Ms Initials
Surname
Address
Town/City
County
Country
Postcode