TCP50GT30 - Téléviseur PANASONIC - Free user manual and instructions
Find the device manual for free TCP50GT30 PANASONIC in PDF.
Download the instructions for your Téléviseur in PDF format for free! Find your manual TCP50GT30 - PANASONIC and take your electronic device back in hand. On this page are published all the documents necessary for the use of your device. TCP50GT30 by PANASONIC.
USER MANUAL TCP50GT30 PANASONIC
(49.9/55,1 inches measured diagonally)
For assistance (U.S.A./Puerto Rico), please call:
1-877-95-VIERA (958-4372)
www.panasonic.com/help
For assistance (Canada), please call:
Thank you for purchasing this Panasonic product.
Please read these instructions before operating your set and retain them for future
reference. The images shown in this manual are for illustrative purposes only. TQB2AA0606 tcp5055GT30eng0606.indb1tcp5055GT30eng0606.indb1 2011/02/2115:32:582011/02/2115:32:582
■Do not display a still picture for a long time This causes the image to remain on the plasma screen(“Image retention”). This is not considered a malfunction and is not covered by the warranty.4 : 3 12 To prevent the “Image retention”, the screen saver is automatically activated after a few minutes if no signals are sent or no operations are performed.Typical still images ● Channel number and other logos ● Image displayed in 4:3 mode ● SD Card photo ● Video game ● Computer image ■Set up
● Do not place the unit where it’s exposed to sunlight or other bright light (including reflections). ● Use of some types of fluorescent lighting may reduce the remote control’s transmission range. Experience an amazing level of
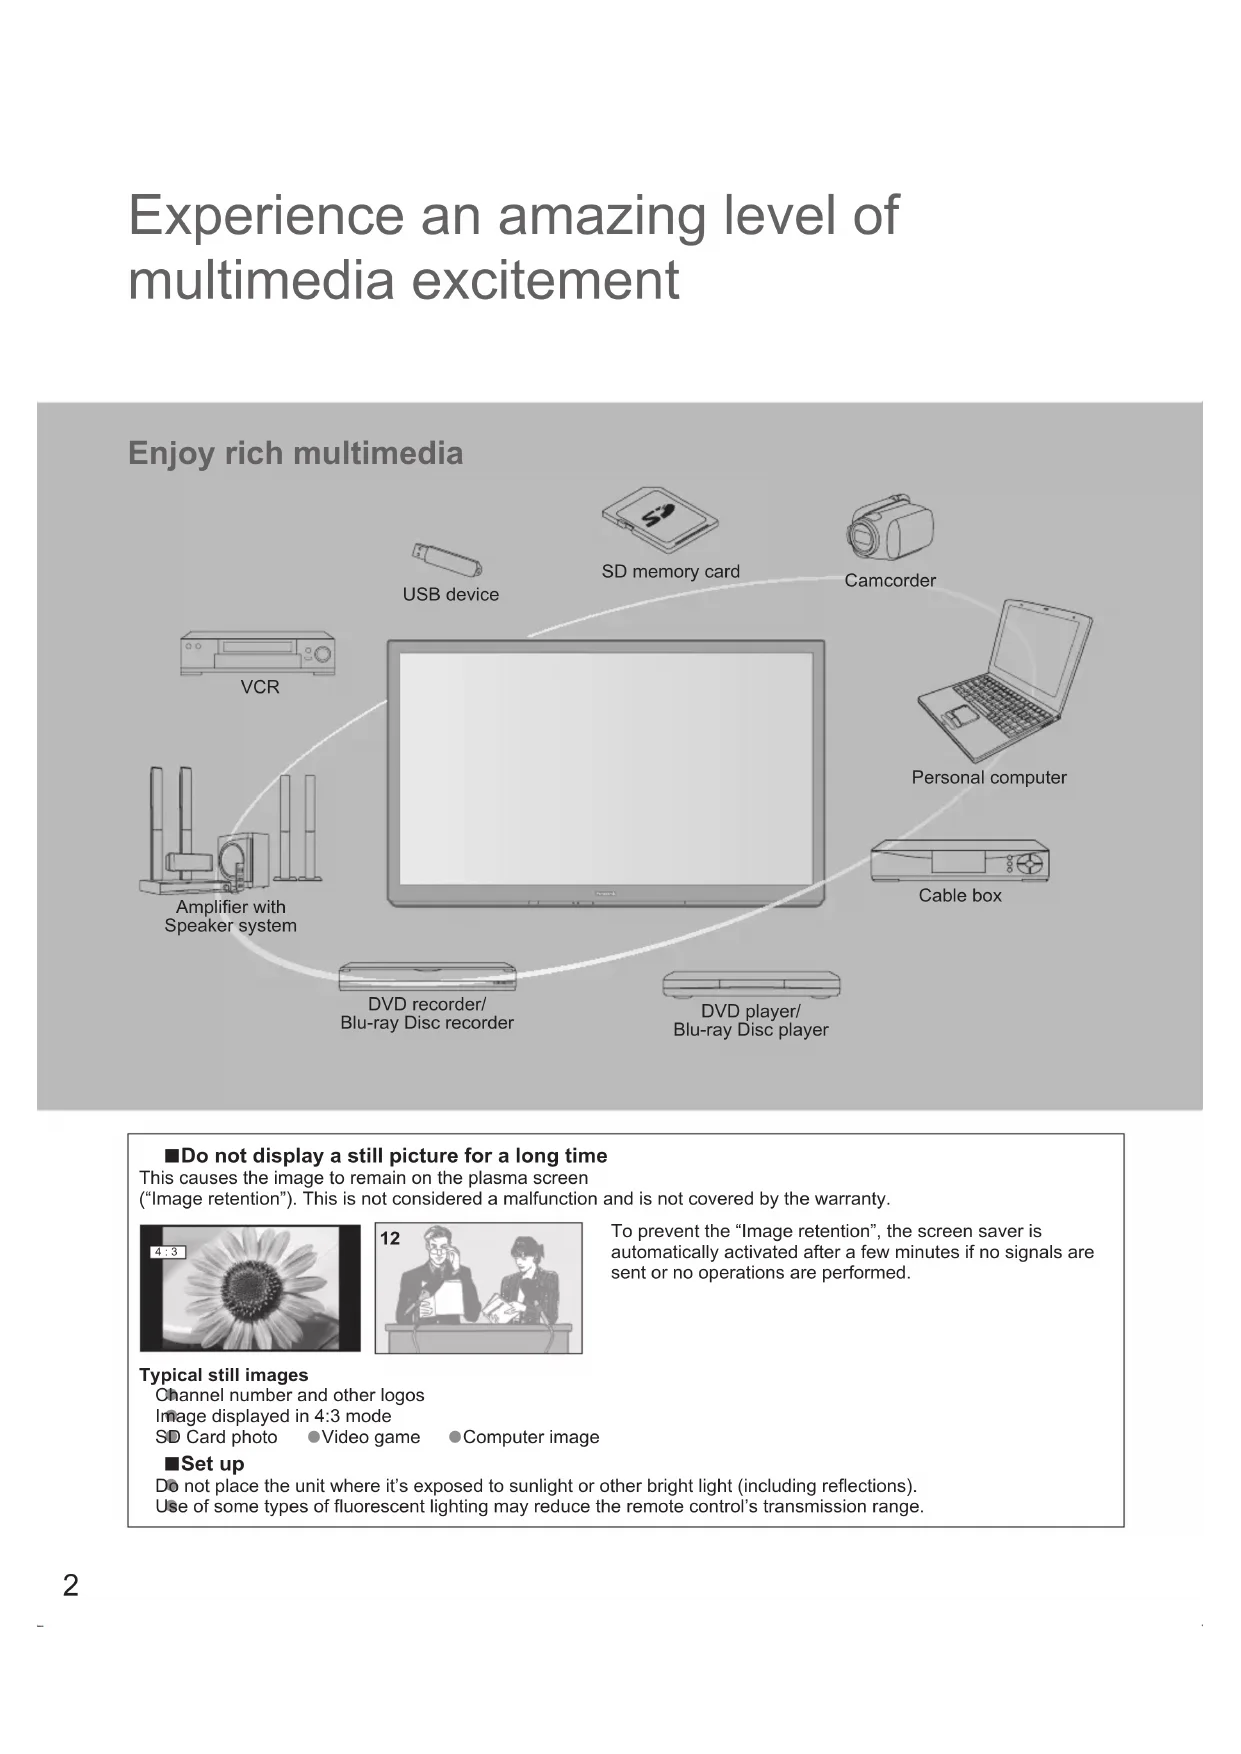
multimedia excitement SD memory cardCamcorderPersonal computerAmplifier withSpeaker systemCable boxDVD player/Blu-ray Disc playerDVD recorder/Blu-ray Disc recorder
VCR Enjoy rich multimedia USB device tcp5055GT30eng0606.indb2tcp5055GT30eng0606.indb2 2011/02/2115:32:592011/02/2115:32:593
Basic Advanced Support Information
Getting started VIERA Link™ is a trademark of Panasonic Corporation.HDMI, the HDMI logo and High-Definition Multimedia Interface are trademarks or registered trademarks of HDMI Licensing LLC in the United States and other countries.SDXC Logo is a trademark of SD-3C, LLC.“AVCHD” and the “AVCHD” logo are trademarks of Panasonic Corporation and Sony Corporation.“RealD 3D” is a trademark of RealD.This product is covered by U.S. Patent 5,193,000 until August 28, 2011. DLNA
® , the DLNA Logo and DLNA CERTIFIED™ are trademarks, service marks, or certification marks of the Digital Living Network Alliance.QuickTime and the QuickTime logo are trademarks or registered trademarks of Apple Inc., used under license therefrom.This product qualifies for ENERGY STAR in the “Home Use” setting and this is the setting in which energy savings will be achieved. Any modifications to the “Home Use” setting or other factory default settings could result in greater energy consumption beyond levels that meet ENERGY STAR qualifications.Manufactured under license from Dolby Laboratories. Dolby and the double-D symbol are trademarks of Dolby Laboratories.HDAVI Control™ is a trademark of Panasonic Corporation.Skype™ is a trademark of Skype limited. TM This product is licensed under the AVC patent portfolio license for the personal and non-commercial use of a consumer to (i) encode video in compliance with the AVC Standard (“AVC Video”) and/or (ii) decode AVC Video that was encoded by a consumer engaged in a personal and non-commercial activity and/or was obtained from a video provider licensed to provide AVC Video. No license is granted or shall be implied for any other use. Additional information may be obtained from MPEG LA, LLC. See http://www.mpegla.com. • Watching TV ················································· 19 • Using VIERA TOOLS ····································22 • Watching content from external devices ·······23 • Viewing 3D images on TV ····························24 • Using Media player ·······································26 • VIERA Link TM “HDAVI Control TM ” ····················32 • Using Network services ································38 • Network Connections ··································39 • Network settings ········································· 40 • VIERA Connect (Enjoy Internet Service) ····43 • Using DLNA feature ···································· 44 • Network Camera ·········································45 • Editing and Setting Channels ·······················46 • How to Use Menu Functions·························48 • Picture settings ··········································· 49 • Audio settings ············································· 51 • Timer settings ·············································51 • Lock ····························································52 • Closed caption ············································ 52 • Setup ··························································53 • Ratings List for parental control ····················54 • Technical Information ···································· 55 • Care and Cleaning ········································ 59 • Frequently Asked Questions (FAQ) ·············· 60 • Specifications················································63 • Index ····························································· 65 • Limited Warranty (for U.S.A. and Puerto Rico only) ················· 66 • Customer Services Directory (for U.S.A. and Puerto Rico) ·························67 • Limited Warranty (for Canada) ·····················68 Basic Features
• Safety Precautions··········································4 Please read before using the unit
• Accessories/Optional Accessories ··················8 • Connections ·················································· 11 • Identifying Controls ·······································14 • First Time Setup············································15 Getting started
tcp5055GT30eng0606.indb3tcp5055GT30eng0606.indb3 2011/02/2115:33:012011/02/2115:33:014
Safety Precautions WARNING:To reduce the risk of fire or electric shock, do not expose this apparatus to rain or moisture.Do not place liquid containers (flower vase, cups, cosmetics, etc.) above the set(including on shelves above, etc.). Important Safety Instructions
CAUTION RISK OF ELECTRIC SHOCKDO NOT OPEN WARNING: To reduce the risk of electric shock, do not remove cover or back.No user-serviceable parts inside. Refer servicing to qualified service personnel.The lightning flash with arrowhead within a triangle is intended to tell the user that parts inside the product are a risk of electric shock to persons.The exclamation point within a triangle is intended to tell the user that important operating and servicing instructions are in the papers with the appliance.1) Read these instructions.2) Keep these instructions.3) Heed all warnings.4) Follow all instructions.5) Do not use this apparatus near water.6) Clean only with dry cloth.7) Do not block any ventilation openings. Install in accordance with the manufacturer’s instructions.8) Do not install near any heat sources such as radiators, heat registers, stoves, or other apparatus (including amplifiers) that produce heat.9) Do not defeat the safety purpose of the polarized or grounding-type plug. A polarized plug has two blades with one wider than the other. A grounding type plug has two blades and a third grounding prong. The wide blade or the third prong are provided for your safety. If the provided plug does not fit into your outlet, consult an electrician for replacement of the obsolete outlet.10) Protect the power cord from being walked on or pinched particularly at plugs, convenience receptacles, and the point where they exit from the apparatus.11) Only use attachments / accessories specified by the manufacturer.12) Use only with the cart, stand, tripod, bracket, or table specified by the manufacturer, or sold with the apparatus. When a cart is used, use caution when moving the cart / apparatus combination to avoid injury from tip-over.13) Unplug this apparatus during lightning storms or when unused for long periods of time.14) Refer all servicing to qualified service personnel. Servicing is required when the apparatus has been damaged in any way, such as power-supply cord or plug is damaged, liquid has been spilled or objects have fallen into the apparatus, the apparatus has been exposed to rain or moisture, does not operate normally, or has been dropped.15) To prevent electric shock, ensure the grounding pin on the AC cord power plug is securely connected. WARNING/CAUTION (TV set) WARNINGSmall parts can present choking hazard if accidentally swallowed.Keep small parts away from young children.Discard unneeded small parts and other objects, including packaging materials and plastic bags/sheets to prevent them from being played with by young children, creating the potential risk of suffocation. ■Set up This Plasma TV may fall and can cause personal injury or even death if not installed correctly. To prevent personal injury or death, follow these warnings: ● Install the Plasma TV in accordance with the manufacturer’s recommended pedestal or stand, corresponding hardware and installation instructions. This Plasma TV is for use only with the following optional accessories. Use with any other type of optional accessories may cause instability. The following accessories are manufactured by Panasonic Corporation.• Wall-hanging bracket (Angled)
TY-WK4P1RW(TC-P50GT30)
TY-WK5P1RW(TC-P55GT30) ● Be sure to ask a qualified technician to carry out the installation and set-up. Two or more people are required to install or remove the television. ● Some wall mounts (wall-hanging brackets) are not designed to be mounted to walls with steel studs or old cinder block constructions. Ask your dealer or licensed contractor to properly secure the wall-hanging bracket. ● Do not route the TV’s power cord inside the wall. The power cord was not designed for in-wall mounting.Doing so can lead to fire hazard. ● Do not place the Plasma TV or its stand on a sloped or unstable surface. The Plasma TV may fall or tip over. ● Do not support the Plasma TV on a non-specified pedestal. ● Do not place the Plasma TV on furniture that can easily be used as steps, such as a chest of drawers. ● Do not climb or allow children to climb on the Plasma TV ● Place or install the Plasma TV where it cannot be pushed, pulled over or knocked down. ● Route all cords and cables such that they cannot be tripped over or pulled by curious children. tcp5055GT30eng0606.indb4tcp5055GT30eng0606.indb4 2011/02/2115:33:042011/02/2115:33:045
● Do not place any objects on top of the Plasma TV. If water spills onto the Plasma TV or foreign objects get inside it, a short-circuit may occur which could result in fire or electric shock. If any foreign objects get inside the Plasma TV, please consult an Authorized Service Center. In the unlikely event that you receive a shock from this product it is possible that your household outlet may be wired improperly. Have an electrician verify that the TV’s outlet is properly wired. If the symptom persists, have the TV serviced by a qualified authorized technician. ● To prevent the spread of fire, keep candles or other open flames away from this product at all times ■AC Power Supply Cord
To prevent fire or electric shock:
● The Plasma TV is designed to operate on a 120 V AC, 60 Hz service. Insert the power cord plug as far as it will go into the wall socket. If the plug is not fully inserted, heat may generate, which could cause a fire. ● The included power cord is for use with this unit only. ● Do not use any power cord other than that provided with this TV. ● Do not handle the power cord plug with wet hands. ● Do not do anything that might damage the power supply cord. ● When disconnecting the power supply cord, hold the plug, not the cord. ● Do not use the power supply cord if the plug or cord is damaged.
Replace the cord or contact your Authorized Service Center. ● Do not use a 3-prong to 2-prong AC plug adapters to connect your TV’s plug to the wall outlet. Doing so will defeat the TV plug’s safety feature, which can lead to a shock hazard. If the wall outlet does not accommodate a 3-prong plug, have a qualified electrician replace your outlet and check the associated wiring. ■Handling the power supply cord
se rt the power plug fully into the socket outlet. (If the power plug is loose, it could generate heat and cause fire.) ● Ensure that the power plug is easily accessible. ● Ensure the earth pin on the power plug is securely connected to prevent electrical shock.• An apparatus with CLASS I construction shall be connected to a power socket outlet with a protective earthing connection. ● Do not touch the power plug with a wet hand. (This may cause electrical shock.) ● Do not use any power cord other than that provided with this TV. (This may cause fire or electrical shock.) ● Do not damage the power cord. (A damaged cord may cause fire or electrical shock.)• Do not move the TV with the cord plugged in the socket outlet.• Do not place a heavy object on the cord or place the cord near a high-temperature object.• Do not twist the cord, bend it excessively, or stretch it.• Do not pull on the cord. Hold onto the power plug body when disconnecting cord.• Do not use a damaged power plug or socket outlet. ● If a problem occurs (such as no picture or no sound), or if smoke or an abnormal odor is detected from the Plasma TV, unplug the power supply cord immediately. Continued use of the TV under these conditions might cause a fire or permanent damage to the TV. Have the TV evaluated by an Authorized Service Center. Servicing of the TV by unauthorized personnel is strongly discouraged due to its high voltage. ● If water or an object gets inside the Plasma TV, if the Plasma TV is dropped, or if the enclosure becomes damaged, unplug the power supply cord immediately. A short-circuit may occur, which could cause a fire. Contact an Authorized Service Center for an evaluation. CAUTION
● Do not cover the ventilation holes. Doing so may cause the Plasma TV to overheat, which can cause a fire or damage to the Plasma TV. ● Leave a space of 3 15/16” (10 cm) or more at the top, left and right, and 2 3/4” (7 cm) or more at the rear. ● When using the pedestal, keep the space between the bottom of the TV and the pedestal or stand surface clear from objects that may obstruct ventilation. ■When Moving the Plasma TV
● Be sure to disconnect all cables before moving the Plasma TV. Moving the TV with its cables attached might damage the cables which, in turn, can cause fire or electric shock. ● To prevent an electric shock, disconnect the power plug from the wall outlet as a safety precaution before carrying out any cleaning. ● Transport only in upright position. Transporting the unit with its display panel facing upright or downward may cause damage to the internal circuitry. ● Using a dry cloth, clean any dust from the power supply cord and plug regularly. Build-up of dust on the power cord plug can increase humidity, which might damage the insulation and cause a fire.This Plasma TV radiates infrared rays; therefore, it may affect other infrared communication equipment. Install your infrared sensor in a place away from direct or reflected light from your Plasma TV.The TV will still consume some power as long as the power supply cord is connected to the wall outlet. ● Display panel is made of glass. Do not apply strong force or impact to the display panel. This may cause damage resulting in injury. ● The TV is heavy. TV should be handled by 2 or more people. Support as shown to avoid injury by the TV tipping or falling.
tcp5055GT30eng0606.indb5tcp5055GT30eng0606.indb5 2011/02/2115:33:042011/02/2115:33:046
CEA CHILD SAFETY NOTICES WARNING Flat panel displays are not always supported on the proper stands or installed according to the manufacturer’s recommendations. Flat panel displays that are inappropriately situated on dressers, bookcases, shelves, desks, speakers, chests or carts may fall over and may cause personal injury or even death. The consumer electronics industry (of which Panasonic is a member) is committed to making home entertainment enjoyable and safe. To prevent personal injury or death, be sure to follow the following safety guidelines: TUNE INTO SAFETY: • One size does NOT fit all. Follow the manufacturer’s recommendations for the safe installation and use of your flat panel display. • Carefully read and understand all enclosed instructions for proper use of this product. • Don’t allow children to climb on or play with furniture and television sets. • Don’t place flat panel displays on furniture that can easily be used as steps, such as a chest of drawers. • Remember that children can become excited while watching a program, especially on “larger than life” flat panel displays. Care should be taken to install the display where it cannot be pushed, pulled over, or knocked down. • Care should be taken to route all cords and cables connected to the flat panel display so that they cannot be pulled or grabbed by curious children. WALL MOUNTING: IF YOU DECIDE TO WALL MOUNT YOUR FLAT PANEL DISPLAY, ALWAYS: • Use a mount that has been recommended by the display manufacturer and/or listed by an independent laboratory (such as UL, CSA, ETL). • Follow all instructions supplied by the display and wall mount manufacturers. • If you have any doubts about your ability to safely install your flat panel display, contact your retailer about professional installation. • Make sure the wall where you are mounting the display is appropriate. Some wall mounts are not designed to be mounted to walls with steel studs or old cinder block construction. If you are unsure, contact a professional installer. • A minimum of two people are required for installation. Flat panel displays can be heavy. Panasonic recommends that a qualified installer perform the wall-mount installation. See page 4.The American Academy of Pediatrics discourages television viewing for children younger than two years of age. WARNING/CAUTION (3D Eyewear)
■About Prevention of Accidental Ingestion
● Do not store batteries, the band accessory or nose pads in places where small children can reach.
T here is a danger small children could swallow such parts by mistake.• If a child accidentally swallows such parts, seek immediate medical attention. ■About Prohibition of Disassembly
● Do not disassemble or modify the 3D Eyewear. ■About lithium battery
● Batteries must not be exposed to excessive heat such as sunshine, fire or the like. CAUTION
● Do not drop, exert pressure on, or step on the 3D Eyewear. Doing so may damage the glass section, which may result in injury.• Always store the 3D Eyewear in the case provided when not in use. ● Be careful of the tips of the frame when putting on the 3D Eyewear. Accidentally inserting the tip of the frame into the eye may cause injury. ● Be careful not to trap a finger in the hinge section of the 3D Eyewear. Doing so may result in injury.• Pay special attention when children are using this product. ■About Use of 3D Eyewear
● Parents/guardians should monitor children’s viewing habits to avoid their prolonged use without rest periods. ● Use only the 3D Eyewear recommended for this TV. ● Only use the 3D Eyewear for the specified purpose. ● Do not move around while wearing the 3D Eyewear. The surrounding area appears dark, which may result in falling or other accidents that may cause injury. ■About Viewing of 3D Images
● In the event that you experience dizziness, nausea, or other discomfort while viewing 3D images, discontinue use and rest your eyes.• When you set the effect by using “3D adjustment”, take into account that the vision of 3D images varies among different individuals. ● Do not use if the 3D Eyewear is cracked or broken. ■About lithium battery
● Danger of explosion if battery is incorrectly replaced.Replace only with the same or equivalent type. tcp5055GT30eng0606.indb6tcp5055GT30eng0606.indb6 2011/02/2115:33:052011/02/2115:33:057
FCC STATEMENT This equipment has been tested and found to comply with the limits for a Class B digital device, pursuant to Part 15 of the FCC Rules. These limits are designed to provide reasonable protection against harmful interference in a residential installation.
This equipment generates, uses and can radiate radio frequency energy and, if not installed and used in accordance with the
instructions, may cause harmful interference to radio communications. However, there is no guarantee that interference will not
occur in a particular installation. If this equipment does cause harmful interference to radio or television reception, which can be
determined by turning the equipment off and on, the user is encouraged to try to correct the interference by one or more of the
• Reorient or relocate the receiving antenna.
• Increase the separation between the equipment and receiver.
• Connect the equipment into an outlet on a circuit different from that to which the receiver is connected.
• Consult the Panasonic Service Center or an experienced radio/TV technician for help.
To assure continued compliance, follow the attached installation instructions and use only shielded interface cables
when connecting to peripheral devices. Any changes or modifications not expressly approved by Panasonic Corp. of
North America could void the user’s authority to operate this device.
FCC Radiation Exposure Statement:
This equipment complies with FCC radiation exposure limits set forth for an uncontrolled environment. This equipment
should be installed and operated with minimum distance 20cm between the radiator & your body.
FCC Declaration of Conformity
Model No. TC-P50GT30, TC-P55GT30
Responsible Party: Panasonic Corporation of North America
One Panasonic Way, Secaucus, NJ 07094
Contact Source: Panasonic Consumer Electronics Company
1-877-95-VIERA (958-4372)
email: consumerproducts@panasonic.com
This device complies with Part 15 of FCC Rules and RSS-Gen of IC Rules.
Operation is subject to the following two conditions:
(1) This device may not cause harmful interference, and (2) this device must accept any interference received, including
interference that may cause undesired operation of this device.
This transmitter must not be co-located or operated in conjunction with any other antenna or transmitter.
This product is restricted to indoor use due to its operation in the 5.15 to 5.25 GHz frequency range.
FCC and IC require this product to be used indoors for the frequency range 5.15 to 5.25 GHz to reduce the potential for harmful
interference to co-channel Mobile Satellite systems. High power radars are allocated as primary users of the 5.25 to 5.35 GHz
and 5.65 to 5.85 GHz bands. These radar stations can cause interference with and/or damage this product.
The available scientific evidence does not show that any health problems are associated with using low power wireless devices.
There is no proof, however, that these low power wireless devices are absolutely safe.
Low power Wireless devices emit low levels of radio frequency energy (RF) in the microwave range while being used.
Whereas high levels of RF can produce health effects (by heating tissue), exposure to low-level RF that does not produce
heating effects causes no known adverse health effects.
Many studies of low-level RF exposures have not found any biological effects. Some studies have suggested that some biological
effects might occur, but such findings have not been confirmed by additional research.
Product Identification Marking is located on the bottom of the Wireless LAN Adapter.
For Model TC-P50GT30, TC-P55GT30
This Class B digital apparatus complies with Canadian ICES-003.
tcp5055GT30eng0606.indb7tcp5055GT30eng0606.indb7 2011/02/2115:33:052011/02/2115:33:058
Accessories/Optional Accessories
Accessories Remote Control Transmitter N2QAYB000571Batteries for theRemote ControlTransmitter (2) AA BatteryAccessoriesCheck you have all the items shown.Quick start guideOwner’s ManualProduct Registration Card (U.S.A.)Wireless LAN Adapter (p. 39) N5HBZ0000055 K2KYYYY00150Child safety Optional Accessories Please contact your nearest Panasonic dealer to purchase the recommended Optional accessories. For additional details, please refer to the Optional accessories installation manual. 3D Eyewear (Rechargeable type) ● TY-EW3D2S ● TY-EW3D2M ● TY-EW3D2L • Product information (Model No. and release date etc.) is subject to change without notice. • For more product information(USA) http://www.panasonic.com (Canada) http://panasonic.ca(Global reference) http://panasonic.net/avc/viera/3d/ Communication Camera ● TY-CC10W• This camera can be used on VIERA Connect.• For details, read the manual of the Communication Camera.Wall-hanging bracket ● TY-WK4P1RW (for 50”)TY-WK5P1RW (for 55”)
a: 15.7” (400 mm) (50”)19.7” (500 mm) (55”)b: 11.8” (300 mm)Rear of the TVHoles for wall-hanging bracket installationScrew for fixing the TV onto the wall-hanging bracket (not supplied with the TV)Depth of screw:minimum 0.39” (10.0 mm), maximum 0.63” (16.0 mm)(View from the side) a
M8 Warning ● In order to maintain the TV’s performance and safety, be absolutely sure to ask your dealer or a licensed contractor to secure the wall-hanging brackets. ●
Carefully read the instructions accompanying optional accessories, and be absolutely sure to take steps to prevent the TV from tipping over.
● Handle the TV carefully during installation since subjecting it to impact or other forces may cause product damage. ●
Take care when fixing wall brackets to the wall. Always ensure that there are no electrical cables or pipes in the wall before hanging the bracket.
● When using the angled-type wall hanging bracket, please ensure that there is sufficient space for the connecting cables not to press against the wall when the TV is tilted forward. ● For safety reasons, remove units no longer being used from their wall-mounted locations.Cable clamperConverter cables (p. 11) TBL5ZX0058 (TC-P55GT30) Pedestal TBL5ZX0081 (TC-P50GT30)How to assemble (p. 9) tcp5055GT30eng0606.indb8tcp5055GT30eng0606.indb8 2011/02/2115:33:052011/02/2115:33:059
Accessories/Optional Accessories
Accessories Assembly screws A XYN5+F20FN (for 50”) size (M5 × 20) (Silver) (4) THEL090N (for 55”) size (M5 x 25) (Black) (4) B THEL088N (for 50”) THEL090N (for 55”) size (M5 x 25) (Black) (4) C
XSB4+8FNK (for 50”) size (M4 x 8) (Black) (1)Pole (1)(for 50”)Poles (2)(for 55”)
R is printed at the front of the poles.Cover(1)(for 50”) Base (1)(for 50”)(for 55”) Attaching the pedestal to TV
Assembling the pedestal Fix securely with assembly screws A (Total 4 screws). Tighten screws firmly. A Front Pole
Base [TC-P50GT30] A [TC-P55GT30] Attach pole cover with assembly screw C (only for 50”) C
Set-up Carry out work on a horizontal and level surface. Tighten assembly screws B (total 4 screws) loosely at first, then tighten them firmly to fix securely. B (Image: TC-P55GT30)Rear sideArrow mark Hole for pedestal installation Pole Base Bottom viewArrow mark
Removing the pedestal from the TV Be sure to remove the pedestal in the following way when using the wall hanging bracket or repacking the TV. Remove the assembly screws B from the TV. Pull out the TV from the pedestal. Remove the assembly screw C from the cover (only for 50”). Pull out the cover (only for 50”). Remove the assembly screws A from the pole.Front tcp5055GT30eng0606.indb9tcp5055GT30eng0606.indb9 2011/02/2115:33:072011/02/2115:33:0710 WarningDo not disassemble or modify the pedestal. Otherwise the TV may fall over and become damaged, and personal injury may result.CautionDo not use any pedestal other than that provided with this TV. Otherwise the TV may fall over and become damaged, and personal injury may result.Do not use the pedestal if it becomes warped or physically damaged.
If you use the pedestal when it is physically damaged, personal injury may result. Contact your nearest Panasonic Dealer immediately. During set-up, make sure that all screws are securely tightened. If sufficient care is not taken to ensure screws are properly tightened during assembly, the pedestal will not be strong enough to support the TV, and it might fall over and become damaged, and personal injury may result.When removing the pedestal, do not remove the pedestal by any methods other than the specified procedure. (p. 9) Otherwise the TV and/or pedestal may fall over and become damaged, and personal injury may result.
c Adjust the plasma panel to your desired angle.(View from above) ● TC-P50GT30 a: 9.6 ” (242 mm) b: 18.2 ” (460 mm) c: 10°Center of the rotation. Note
● Ensure that the pedestal does not hang over the edge of the base even if the TV swivels to the full rotation range. ● Do not place any objects or hands within the full rotation range. Installing the remote’s batteries Pull open Hook Note the correct polarity (+ or -).CloseCaution Incorrect installation may cause battery leakage and corrosion, resulting in damage to the remote control. • Do not mix old and new batteries. • Do not mix different battery types (such as alkaline and manganese batteries). • Do not use rechargeable (Ni-Cd) batteries. Do not burn or break batteries. tcp5055GT30eng0606.indb10tcp5055GT30eng0606.indb10 2011/02/2115:33:152011/02/2115:33:1511 Getting started Connections
Accessories/Optional Accessories
Connections Connection PanelsVHF/UHF Antenna• NTSC (National Television System Committee):ATSC (Advanced Television Systems Committee):Digital TV Standards include digital high-definition television (HDTV), standard-definition television (SDTV), data broadcasting, multichannel surround-sound audio and interactive television. Antenna or Cable connection Cable ● You need to subscribe to a cable TV service to enjoy viewing their programming. ● You may need to subscribe to a high-definition (HD) cable service to enjoy HD programming. The connection for high-definition can be done with the use of an HDMI or Component Video cable. (p. 12) Note
● When using a Cable box, external equipment and video cables shown in this manual are not supplied with the TV. ● When disconnecting the power cord, be absolutely sure to disconnect the power cord plug from the wall outlet first. ● For additional assistance, visit us at: www.panasonic.com/helpwww.panasonic.caPower Cord(Connect after all the other connections have been made.)Back of the TVCable TVVHF/UHF Antenna or
a Antenna adapterAntenna adapter (1) ● K1TYYYY00158 a VIDEO adapter (1) ● K2KYYYY00136 b Component adapter (1) ● K2KYYYY00137 c Audio adapter (1) ● K2KYYYY00138 d Optical adapter (1) ● K7CXGYC00002 e PC adapter (1) ● K1HY20YY0007 f SD card slot (p.26)Back of the TVUSB2/3 terminal LAN
VIERA Link connection, please refer to p. 33
The HDMI connection is required for a 1080p signal.
L R COMPOSITE OUT yellowwhite red yellowwhite red yellowwhite red
For HDMI-ARC (Audio Return Channel) connection, see p. 32
PC / Computer connection (VGA)
Cable Binding Instructions To attach hole InsertTo bundleTo removeTo loosenKeep pushing both sides till they snap Snaps Set hooks knob Keep pushing the knobCable clamper ●
Do not bundle the Antenna cable and AC cord together (could cause distorted image).
Fasten the cables with the Cable clamper as necessary.
Identifying Controls
The TV consumes a small amount of electric energy even when turned off.
Do not place any objects between the TV remote control sensor and remote control.
TV controls/indicators
Switches TV On or Off (Standby)
Displays 3D settings. (p. 25)
Lights the buttons for 5 seconds
Press again to turn off the button lights
Select source to watch (p. 23)
Switches to input terminal
that has “GAME” label (p. 23)
(used for various functions)
Changes aspect ratio and zoom
Switches to previously viewed
External equipment operations
Closed caption On/Off (p. 19)
Selects Secondary Audio Programming (p. 19)
Exits from Menu screen
VIERA Link menu (p. 36-37)
Go back to previous menu
Channel up/down, when viewing from ANT/
Displays or removes the channel banner (p. 19)
Operates the Favorite channel list function
Numeric keypad to select any channel or
press to enter alphanumeric input in menus
Use for digital channels (p. 19)
Identifying Controls
Turn the TV On with the POWER button
or (Remote)(TV) Configure your viewing mode Select your languageLanguage / Idioma / LangueEnglish Español FrançaisStep 1 of 7 / Paso 1 de 7 / Étape 1 de 7 OK SelectSelecciónSélection Select your language
Seleccione su idioma
Sélection de la langue select OK Select your countryStep 2 of 7RETURN OK SelectCountry Select the country where this TV is being used. U.S.A. Canada Other select OK Select your viewing mode (Be sure to select “Home use”)Step 3 of 7RETURN OK SelectSet viewing modeHome use Store Demonstration Select your viewing environment select OK
Please confirm your selection (Home Use) before pressing OK button.
■If you select “ Store Demonstration” by mistake in , confirmation screen will be displayed. No
You are selecting the store demonstration mode.
If you select “Yes”, the picture mode will regularly reset
to “Vivid” and a Picture Refresh message will be displayed on the
Select “No” and return to previous screen
If you select “Yes”, Screen enters the store demonstration mode.
To display the “Set viewing mode” screen again as shown above and
select “Home Use”, do one of the following:
• Press and hold down the front POWER button for at least five seconds.
• Unplug power cord for 30 seconds and plug it again.
If you use any other step other than
then turn the TV off, or if you used
the EXIT button to quit before completing the settings, the next time you turn
the TV on, “First time setup” will not be automatically displayed.
• The settings up to that point are saved.
• You can start “First time setup”. (p. 53)
Language, ANT/Cable setup, Input labels, and Clock can also be changed
in the Settings Menu. (p. 53) The first time setup screen is displayed only when the TV is turned on for the first time after the power cord is inserted into a wall outlet and when “Auto power on” (p. 53) is set to “No”. tcp5055GT30eng0606.indb15tcp5055GT30eng0606.indb15 2011/02/2115:33:192011/02/2115:33:1916
Do you use a Cable, Satellite or Fiber Optic box with this TV? select OK select OK
a Select signal type
(Cable/Antenna) Select scan type b
Select connection type
for Cable or Satellite box
(Input labels) ANT/Cable setupStep 4 of 7Return OK SelectYes NoDo you use a Cable, Satellite or Fiber Optic box with this TV? No
Yes ANT/Cable setupStep 4 of 7Cable service(No box)Over-the-Air AntennaHow does the TV receive its programming content? Antenna
Cable In Return OK SelectAuto programStep 4 of 7Return OK SelectYes NoStart scanning for available channels in your area?ANT/Cable setupStep 4 of 7Antenna/Cable inVIDEO IN Antenna
Cable In Which wiring method is used to connect your box to the TV?
Auto program completed.
Press OK to continue.
Number of analog channels
Number of digital channels
OK RETURN Auto programProgressNumber of analog channelsNumber of digital channels Press RETURN to quit
This may take some time to complete.
RETURN Label the inputs for easy identification (Label inputs)
To name each input, follow the instructions on screen.
When done, select NEXT and press OK to go to the next step. Label inputsStep 5 of 7 What is connected to HDMI 1 ?
For your convenience, you may name each input for easy identification.
The labels will be shown in the “Input select” menu.
PC GAME Follow the instructions on screen to complete the following operations. --> To edit the labels to match your connected devices.
Label: [BLANK] Blu-ray/CABLE/SATELLITE/DVD/DVD REC/DVR/GAME/HOME THTR/RECEIVER/COMPUTER/MEDIA CTR/MEDIA EXT/VCR/CAMERA/
MONITOR/AUX/OTHER/Not used
• Select “Not used” for any back-panel input that has no device connected to it.
Afterward, the input will be skipped when pressing INPUT, for your convenience.
• The input labels can be changed at any time from the TV’s setup menu
tcp5055GT30eng0606.indb16tcp5055GT30eng0606.indb16 2011/02/2115:33:202011/02/2115:33:2017
First Time Setup Press to exit from a menu screen
■ Press to go back to the previous screen Configure Network settings Select the Network typeNetwork settingsStep 6 of 7RETURN OK SelectAutomatic ManualChecks for proper network connection, settings and communication to the Internet and server automatically. Select the setting mode Network settings
Check for IP address duplication
Check connection to the Internet
Check communication with VIERA Connect server.
RETURN Start connection test Connection test
You can set in “Setup” menu later.
: Start “Wireless network” (p. 18)
Automatic: Press OK to start setup automatically.
Error screen is displayed when
Network connection has failed.
Manual: Go to Manual setting.
■Error screen Complete “Network settings” Helpful information is displayed when you
successfully complete “Network settings”. Network settingsConnection testStep 6 of 7Check Ethernet cable connectionValidate IP addressCheck for IP address duplicationCheck connection to the InternetCheck communication with VIERA Connect server.Connection to local network (router) failed.Ensure wireless network availabilityRetry Manual Set laterRETURN OK Select Manual
Retry: Go to “Start connection test”
Ethernet cable Wireless(Wifi) Set later
Select Ethernet cable of wireless network.
Network settings are complete.
You can use VIERA Connect.
VIERA Connect lets you enjoy Internet contents
DNS DNS setting mode
Configure settings of the network connection.
Adjust the Clock (Set clock) When done, select NEXT and press OK to go to the next step. ■Manual setting
Adjust the TV's date and time
Follow the instructions on
screen to complete the
following operations.
Adjust the TV's date and time
2011/4/5 6:00 AM Mode
Manual: Adjust the clock manually (Year/Month/Day/Hour/Minute)
Auto: The clock is adjusted automatically via Internet service.
Only available when the TV is on a network. -->Set “Network
Select your time zone. (EST/CST/MST/PST/AKST/HST/NST/
DST Set DST (Daylight Saving Time) setting. (On/Off)
On: Advances the clock one hour from the time it is set according
tcp5055GT30eng0606.indb17tcp5055GT30eng0606.indb17 2011/02/2115:33:212011/02/2115:33:2118 Press to exit from a menu screen
■ Press to go back to the previous screen Complete First time setup Congratulations! You are done.The First time setup can be repeated at any time.Press MENU and select SETUP; then “First time setup”. OK RETURNCongratulations! Setup is complete.Enjoy your Panasonic VIERA TV.To watch TV via a Cable box, Satellite receiver, or any other source (DVD, DVR, gaming device, etc.), press the INPUT button and select the appropriate input. ■About wireless LAN
● To use the Wireless LAN Adapter, an access point needs to be obtained.For the additional information for Wireless LAN Adapters, check the following website: http://Panasonic.com/NetConnect ● It is recommended to use the Wireless LAN Adapter with the supplied extension cable. ● Do not use the Wireless LAN Adapter to connect to any wireless network (SSID*) for which you do not have usage rights. Such networks may be listed as a result of searches. However, using them may be regarded as illegal access.* SSID is a name for identifying a particular wireless network for transmission. ● Do not subject the Wireless LAN Adapter to high temperatures, direct sunlight or moisture. ● Do not bend, or subject the Wireless LAN Adapter to strong impacts. ● Do not disassemble or alter the Wireless LAN Adapter in any way. ● Do not attempt to install the Wireless LAN Adapter in any incompatible device. ● When VIERA Connect, Network camera, DLNA, or other device is using the network, do not disconnect the Wireless LAN Adapter. ● Check that the Access point supports WPS*. (If it does not support WPS, the encryption key of the Access point is required when configuring settings.) ● Follow the instructions on the Access point setup screen and configure the appropriate security settings.For more details on setting of Access point, please refer to operating manual for the Access point. ● We recommend using 11n (5 GHz) for the wireless system between the Wireless LAN Adapter and Access point.Communication is also possible with 11a, 11b, and 11g (2.4 GHz), but the communication speed may be slower. ● If the wireless system of the Access point is changed, devices that could connect by wireless LAN may no longer be able to connect. ● Data transmitted and received over radio waves may be intercepted and monitored. ● Keep the TV away from the following devices as much as possible:Wireless LAN, microwaves, and other devices that use 2.4 GHz and 5 GHz signals. Otherwise, the TV failures such as malfunction may occur due to the radio wave interference. ● When noises occur due to the static electricity, etc., the TV might stop operating for the protection of the devices. In this case, turn the TV Off with power On / Off switch, then turn it On again.* WPS: Wi-Fi Protected Setup ■Wireless network (First time setup) in Display “Wireless network” Select the connection methodselect
WPS (Wi-Fi Protected Setup using push button)
Please choose connection method:
Search for wireless networks
● Follow the directions on screen to complete the setting. ● See page 41 for more information. tcp5055GT30eng0606.indb18tcp5055GT30eng0606.indb18 2011/02/2115:33:232011/02/2115:33:23BasicGetting started 19 Watching TV First Time Setup
Watching TV Turn power on
or (Remote) Note Please select correct input --> (p. 23) ■VIERA Connect Banner appears Press OK/INTERNET (or VIERA CAST) button to enter VIERA Connect. (p. 43) ● To hide the banner Press any button except OK/INTERNET (or VIERA CAST) button (Time-out period of this banner is 5 sec.) ● You can also set the banner display status (on/off) in the Setup menu. (p. 53)Menu > Setup > Advanced setup > VIERA Connect Banner Select a channel number
or • Also available side CH button on the unit.[For Cable/Satellite box connection]- Use your connected box’s remote control. To directly enter the digital channel numberWhen tuning to a digital channel, press the button to enter the minor number in a compound channel number. example: CH15-1:
Note Reselect “Cable” or “Antenna” in “ANT in” of “ANT/Cable setup” to switch the signal reception between cable TV and antenna. (p. 16, 46)
The channel number and volume level remain the same even after the TV is turned off. ■Other Useful Functions Listen with SAP (Secondary Audio Programming) ■Select the Audio mode for watching TV Digital modePress SAP to select next Audio track (if available) when receiving a digital channel.
(English) Analog modePress SAP to select the desired Audio mode.• Each press of SAP will change the Audio mode. (Stereo/SAP/Mono) SAP is not available when watching TV with a Cable or Satellite box connected via HDMI. Contact your Cable or Satellite operator for instructions on enabling SAP with their box. Closed Caption ■Switches the Closed Caption mode On or Off
Closed caption OnClosed caption Off
Closed caption On mute Closed Caption is not available when watching TV with a Cable or Satellite box connected via HDMI. Contact your Cable or Satellite operator for instructions on enabling CC with their box. Displaying Information ■Displays and removes information. When watching programming via the Antenna/Cable input, shows the channel banner.
Aspect ratioClosed caption
tcp5055GT30eng0606.indb19tcp5055GT30eng0606.indb19 2011/02/2115:33:232011/02/2115:33:2320
Change aspect ratio and Zoom the picture
■Press FORMAT to cycle through the aspect modes (p. 55) • 480i, 480p: FULL/JUST/4:3/ ZOOM• 1080p, 1080i, 720p: FULL/H-FILL/JUST/4:3/ZOOMUse when the picture does not fill the whole screen (bars appears on either side of the image) or portions of the picture is trimmed. Note 1. Some content, such as film-based movies, are available in extra-wide format. Top and bottom bars are unavailable.2. Connected devices, such as Cable/Satellite box, DVD/Blu-ray players and game consoles have their own aspect (format) settings. Adjust the device’s aspect settings. Display the SUB MENU
■Press SUB MENU to show the Sub Menu screen This menu consists of shortcuts to convenient functions.Sub menu is only available when the TV is using the Antenna/Cable input, not when using Cable or Satellite box. Specify favorites or type of channels to view when pressing the channel up/down button.Set favorite channel (below) Edit the channel identifier (p. 47) Check the signal strength (p. 47) All Setup SUB MENUEdit CH captionSignal meterSet favoriteChannel surf mode Call up a favorite channel
■ FAVORITE Channel numbers registered in Favorite are displayed on the favorite tune screen. Select the desired broadcast station with the cursor or use the number buttons. (p. 19) Favorite channels 1/3
Set favorite 1/3 26-1
select the list number save the displayed channelselect the list number(to save the channel without pressing OK) or
■Delete a favorite channel
Set favorite 1/3 26-1
select delete (while holding down) ■To change the page Press repeatedly to change between pages (1/3, 2/3, 3/3 or exit)Changes the page forward/backward ● Favorite channels cannot be set when using Cable or Satellite box. tcp5055GT30eng0606.indb20tcp5055GT30eng0606.indb20 2011/02/2115:33:242011/02/2115:33:2421
■Other Useful operations
Entering characters You can use the remote control keys to enter the alphanumeric characters. ■Switches input mode
■Press each number key
to cycle through the
alphanumeric character
LAST Select OK DeleteABC → abc
Menu Proxy setting Proxy address
● You can also use a USB keyboard (not supplied) to enter the alphanumeric characters. ● Keyboard type (p. 53) Password setting/entering You need to enter the password when you access locked channel or inputs. Input your 4-digit password Menu
● If it is your first time entering the password, enter the password twice in order to register it. ● Make a note of your password. Do not forget it. (If you have forgotten your password, consult your local dealer.) ● When you select a locked channel, a message will be displayed that allows you to view the channel after you input your password. ● Change password (p. 52) Operate USB keyboard You can operate non-character keys as remote control keys. ■Key chart
Keyboard key Remote key Keyboard key Remote key
UP/DOWN/LEFT/RIGHT Cursor key F4 Input
Enter OK F5 Channel Down(-)
BackSpace Return (when you do not
(Red/Blue/Yellow/Green)
● For more details on setting and operation of the USB keyboard, please also read the operating manuals for the USB keyboard. ● Some keyboards do not have these keys. tcp5055GT30eng0606.indb21tcp5055GT30eng0606.indb21 2011/02/2115:33:262011/02/2115:33:2622
Using VIERA TOOLS Press to exit from
Display VIERA TOOLS Select the item select next Set each item
3D Change the view 3D⇔2D (p. 25) THX Change to “THX” mode.Picture mode (p. 49)
VIERA ConnectDisplays VIERA Connect Home Screen for Enjoying Internet Services (p. 43) Media playerMedia player (p. 26-31)
DLNA Using DLNA feature (p. 44) VIERA LinkVIERA Link (p. 36-37) Eco modeECO/energy saving (p. 53) VIERA TOOLS is the easy way to access the TV’s special features. They are displayed as shortcut icons on
tcp5055GT30eng0606.indb22tcp5055GT30eng0606.indb22 2011/02/2115:33:262011/02/2115:33:2623
Watching content from external devices
Using VIERA TOOLS With the connected equipment turned On
Display the Input select menu
Select the input mode Input selectANT/Cable In 1
PC HDMI 4 AUX Not used(example)Input label select enter or Setup ANT/Cable (p. 46) Edit Device labels Input labels (p. 53)(shortcut) Press the corresponding NUMBER button on the remote control to select the input of your choice. Or, press the INPUT button repeatedly, to cycle through the available inputs.* set unused input to “Not used” (below) for quick skipping.Select the input of your choice, then press OK. HDMI 1
GAME Terminal(example)Label ● During the selection, if no action is taken for several seconds, the “Input select” menu disappears. ● The terminal and label (names) of the connected equipment are displayed. Note
● The input label will be displayed on the “Input select” screen if the Input label was customized. ■Press Game to switch to the game screen
Switches to input terminal that has “GAME” label.
● Cycle through the input terminals if there are multiple input terminals that have “GAME” label. (p. 53) ● If there is no input terminal with “GAME” label, you cannot switch the input terminal to any other input terminal than the one currently selected. Video
GAME Operate the connected equipment directly or using the
remote control supplied with the equipment
● For details, see the manual for the connected equipment. ● PC adjustments (p. 50) Watching content from external devices
tcp5055GT30eng0606.indb23tcp5055GT30eng0606.indb23 2011/02/2115:33:282011/02/2115:33:2824
Precautions for Viewing 3D Images Infra-red receiver section Do not soil the infra-red receiver section or attach stickers etc. to it.• Doing so may prevent the receiver from receiving signals from the television, which may prevent the 3D Eyewear from operating normally.
If the 3D Eyewear is affected by other infra-red data communication equipment, the 3D images may not be displayed correctly. Cautions During Viewing Do not expose the infra-red receiver section to strong light such as direct sunlight and fluorescent light. The 3D image may not be displayed correctly. If the 3D Eyewear is used in a room in which fluorescent lights (50 Hz) are used, the light within the room may appear to be flickering. In this case, either darken or switch off the fluorescent lights when using the 3D Eyewear.
Wear the 3D Eyewear correctly. 3D images will not be correctly visible if the 3D Eyewear is worn upside down or back-to-front.
Individual differences may occur in which the 3D images are difficult to see, or cannot be seen, especially in users that have a different level of eyesight between the left and right eyes. Take the necessary steps (wearing glasses etc.) to correct your eyesight before use. For comfortable viewing View the screen at a distance at least 3 times further than the effective height of the screen. Recommended distance: For a 50-inch television, 6’2” (1.9 m) or more. For a 55-inch television, 6’8” (2.1 m) or more. Using the 3D Eyewear at a distance closer than the recommended distance may cause eyesight fatigue. When the top and bottom area of the screen is blackened, such as during some movies, view the screen at a distance 3 times further than the height of the actual image. (That makes the distance closer than above recommended distance.) Viewing 3D images Using the television menu controls, set so that 3D images are shown. ● You can watch 3D images in the following cases:• When a 3D image supporting Blu-ray Disc is played on a 3D image supporting player/recorder connected using a HDMI cable to a 3D image supporting television.• 3D image supported broadcast (program)• 3D Photo, 3D Movie taken by LUMIX/Camcorder. • 2D->3D (Simulated 3D) p. 56Optional Accessories (p. 8)* For more detail on usage of 3D Eyewear (Power button and Accessories etc.), please refer to operating manuals for thepurchased 3D Eyewear seeing it differs depending on the type of 3D Eyewear (Model No. of 3D Eyewear). Wearing the 3D Eyewear Turn on the 3D Eyewear Put on the 3D Eyewear View When the HDMI receives information in which 3D mode is detected, 3D images are automatically displayed according to the signal.If the 3D images are not displayed correctly or the images cause discomfort, the images can be adjusted by “3D format select” or “3D settings”. ● Change the view 3D ⇔ 2D, 3D settings (p.25) After Use Turn off the 3D Eyewear. After using the 3D Eyewear, store it in the case provided. Viewing 3D images on TV
tcp5055GT30eng0606.indb24tcp5055GT30eng0606.indb24 2011/02/2115:33:282011/02/2115:33:2825
Viewing 3D images on TV Change the view 3D⇔2D
⇔ 2D images (Auto mode) ● Switches to Manual mode (see below)(example)3D format select 3D
● VIERA TOOLS -->p. 22”3D” icon also available. ■Change 3D format (Manual mode) During above operation press red button and switch to manual mode. Display “3D format select (Manual) Press 3D to cycle through the 3D format3D format select (Manual)NativeFrame sequential (3D)Frame sequential (2D)Side by side (3D)Side by side (2D)Top and bottom (3D)Top and bottom (2D) 2D
- > 3DFrame sequential (3D)Frame sequential (2D)3D format select (Manual)NativeSide by side (3D) 2D -> 3D Side by side (2D) (example) 3D settings (Adjust 3D images) Select “3D settings” in “Setup”• How to Use Menu Functions (p. 48)• Using “Setup” menu (p. 53) ■3D adjustment Changes 3D depth by adjusting left-right parallax. Set “On” and adjusts “Effect”3D adjustment3D adjustmentEffect On
+1 select adjust3D adjustment (On/Off)Effect (-3 to +3) Select the item and set select next3D settings3D signal notification On Auto detect 3DAuto 12D -> 3D depthMediumDiagonal line filterSafety precautionsLeft / Right swapNormal3D adjustment Off Settings Item DescriptionAuto detect 3DAuto 1: Switches to 3D display when 3D indication is available (HDMI 1.4a, AVCHD file,etc)Auto 2: Same as Auto 1. plus detects 3D signal by identifying similar image in side by side or top-and-bottom 3D formats.Note: choose 3D made manually, when auto detection in not available. (Off/Auto 1/Auto 2)3D signal notificationOn: Displays a message according to the signal received by the “Auto detect 3D”. (On/Off)2D->3D depthAdjusts 3D depth. Available only when “2D->3D” is selected in “3D format select”.(Minimum/Medium/Maximum) 3D adjustment See above. (3D adjustment (On/Off), Effect (-3 to +3)) Left / Right swapChange this to On when the phases are reversed. (when there is an unusual sense of depth). (Normal/Swapped) Diagonal line filter On: Resolves discomfort caused by receiving a quincunx matrix signal. (On/Off) Safety precautions Displays message for viewing 3D images.* The perceived three dimensional effects of the 3D Eyewear differ from person-to-person. * If a signal received from an external device is different from the 3D setting of the TV, such as 2D signal when the TV is set to 3D mode, the images may not be displayed correctly. tcp5055GT30eng0606.indb25tcp5055GT30eng0606.indb25 2011/02/2115:33:292011/02/2115:33:2926
Using Media player You can view still and motion images and play music saved on a USB flash memory and an SD card. Basic features for Media player
■Available contents and features Option menuPhotos --> p. 28-29Videos --> p. 30Music --> p. 31Displays data information.(File name, Date, and Size etc.) * Information differs depending on selected data. select OK select OK Photossotohp llAPhotos reyalp aideMMedia selectSlideshow Drive select Info SD memory cardOKSelectRETURN Sort SUB MENUVideos Titles/Folders viewVideos reyalp aideM
SUB MENU SD memory card
■Inserting or removing an SD card/USB flash memory SD card USB flash memory ● Insert the cardGently insert the SD Card label surface facing front.Label surfacePush until a click is heardCutout ● Remove the card ● Insert the device ● Remove the device Insertstraight inPull straight out
● Compliant card type (maximum capacity):SDXC Card (64 GB), SDHC Card (32 GB), microSDHC Card (32 GB), SD Card (2 GB), miniSD Card (2 GB), microSD Card (2 GB) (requiring microSDHC Card/miniSD Card/microSD Card/ adapter) ● If a microSDHC Card, miniSD Card or microSD Card is used, insert / remove it together with the adapter. ● Media player only supports USB Mass storage class devices. ● For more information and cautions on SD card and USB flash memory (p. 56)Press in lightly on SD Card, then release. tcp5055GT30eng0606.indb26tcp5055GT30eng0606.indb26 2011/02/2115:33:302011/02/2115:33:3027 Basic Using Media player Viewing Contents ■Press to exit from a menu screen ■ Press to go back to the previous screen Insert Media (SD card or USB flash memory) • Auto play setting Image viewer auto play (p. 53) Display Media player
Select Drive (Display connected drive)Media playerSD memory cardDrive select OK RETURNSelect select
OK Select the Media Media player Photos Videos Music SD memory cardMedia select OK RETURNSelect select
OK Select the data (Photos/Videos/Music) How to view the data differs depending on data storage conditions. Select Title/Folder Sort by Date
24/11/2009 01/12/2009 03/12/2009 20/12/2009 22/12/2009
* In DMR mode, Slideshow is not
DMR: Digital Media Renderer p. 38
[Photos playback screen]
Prev. are not available.
To stop in mid-cycle Press
Select the Frame (Off/Array/Collage/Drift(with calendar)/Drift/Gallery(with calendar)/Gallery/Cinema)
Photo effect* Select the display effect (Off/Sepia/Gray scale)
Select the Transition effect shown between photos (Off /Fade in/Wipe
Slide in ↓/Slide in ↑/Slide in →/Slide in ←/Zoom in/Comb ↑↓/Comb →←/Dissolve/Checker
Removes the black borders that are added according to the size of the photo being displayed. (Normal/Zoom)
Burst playback* Continuously plays photos that were shot. (On/Off)
Set “Display interval” each image is displayed in the Slideshow mode. (Short/Fast/Normal/Slow/Very slow)
Repeat playback Turn the Slideshow Repeat (cycle) function on or off (Off/On).
Select the music (Off/Music 1/Music 2/Music 3/Music 4/Music 5/User selected*/Auto*)
User selected: Plays the soundtrack registered in the “Soundtrack settings”. (below)
Auto: Plays the songs on the SD card or USB flash memory.
• Picture quality may become lower depending on the slideshow settings.
• Picture setting may not work depending on the slideshow settings.
* When using DLNA (DMP mode) feature these menus are not displayed.
DMP: Digital media player p. 38
■Soundtrack settings
Select “Soundtrack settings”
Select “User select”
Select the song and register
Select OK RETURN This song: Register current music.
All songs in folder: Register the music in a folder.
tcp5055GT30eng0606.indb28tcp5055GT30eng0606.indb28 2011/02/2115:33:342011/02/2115:33:3429
To change the number of photos on a thumbnail screen
Select first photo and second photo with OK
picture has no relation, or for
Conversion processing message wil be displayed.
The two photos selected for Multi-Shot 3D are not related.
Try to convert them to 3D anyway?
Please wait a moment
Save the 3D image generated by the above steps to the original drive (where the picture was).
The Multi-Shot 3D conversion was successful.
Save the 3D image to the connected storage device?
No (SD card only) Yes
* In DMR mode, Resume playback
[Videos playback screen] 00:00.1000:00.0301/04/2010 15:34SD00:00.1000:00.0301/04/2010 15:34SDRETURN
2D Drive type (SD/USB/DLNA)
30 seconds skip (In DLNA mode only (depends on content))
Five level of 1 to 5 (x2, x5, x30, x70,
x100) are available.
* In DMR mode, Next skip/Prev. skip
Elapsed time of current movie
* Counter may not work correctly with DLNA
feature. In this case “--:--:--”is displayed.
Subtitles are not supported
Displayed menu will differ depending on contents.
Select “Video options” in “Setup SUB MENU”
Setup SUB MENU Video options
Set play repeat function (On/Off)
Compatible Data format for Media player (SD card/USB flash memory)/DLNA Media Compatible format
• JPEG files (DCF and EXIF standards)
Image resolution - 8 × 8 to 30,712 × 17,272 pixels
• SD-Video Files (SD-Video Standard Ver.1.3)
Modified data with a PC may not be displayed correctly.
• AVCHD Standard compatible files
Modified data with a PC may not be displayed correctly.
For more data format information. (p. 56) * For Media player only ** For DLNA only.
Elapsed time of current song
* Counter may not work correctly with
Five level of 1 to 5 (x2, x5, x30, x70, x100)
are available. * In DMR mode, Next skip/Prev. skip/User BGM setting are not available. ● To display/hide Guide and Banner Play/Pause
Select “Music options” in “Setup SUB MENU”
next Setup SUB MENU Music options
■Repeat playback Set play repeat function (Off/Repeat Folder/One song) select
On Music options Repeat playback
Other settings in Media player Display “Menu” Select the item select
■Adjust the Picture, Audio and 3D settings
” Simultaneously control all Panasonic “HDAVI Control” equipped components using one button on the TV remote.Enjoy additional HDMI Inter-Operability with compatible Panasonic products.This TV supports “HDAVI Control 5” function.Connections to equipment (DVD recorder DIGA, HD Camcorder, Home theater system, Amplifier, etc.) with HDMI cables enables VIERA Link controls.Equipment with the “HDAVI Control” function enables the following operations:Version Operations (See p. 34-37, for more information)HDAVI Control or later • Automatic Input Switching • Power on link • Power off link • Default speakers • Speaker controlHDAVI Control 2 or later • VIERA Link control only with the TV’s remote control • Unselected device energy save (for available equipment only)HDAVI Control 3 or later • Provides setting information (Language, time. etc.) • Automatic lip-sync functionHDAVI Control 4 or later • Energy saving mode (with Quick Start mode)HDAVI Control 5 • Audio Return ChannelAudio Return Channel (ARC) is a function that enables digital sound signals to be sent via an HDMI cable back from the TV to a connected audio device. ■When adding new equipment, reconnecting equipment or changing the setup after the connection, turn the equipment on and then switch the TV on. Set the input mode to HDMI1, HDMI 2, HDMI 3, HDMI 4 (p. 23), and make sure that the image is displayed correctly.VIERA Link “HDAVI Control”, is based on the control functions provided by HDMI and industry standard known as HDMI CEC (Consumer Electronics Control), with unique function that we have developed and added. As such, its operation with other manufacturers’ equipment that supports HDMI CEC cannot be guaranteed.Please refer to the individual manuals for other manufacturers’ equipment supporting the VIERA Link function. ■HDMI cable This function needs an HDMI compliant (fully wired) cable. Non-HDMI-compliant cables cannot be utilized.It is recommended that you use Panasonic’s HDMI cable. Recommended part number:RP-CDHS15 (4.9 ft/1.5 m), RP-CDHS30 (9.8 ft/3.0 m), RP-CDHS50 (16.4 ft/5.0 m) * For more details on the external equipment’s connections, please refer to the operating manual for the equipment. tcp5055GT30eng0606.indb32tcp5055GT30eng0606.indb32 2011/02/2115:33:402011/02/2115:33:4033
VIERA Link™ Connections (with VIERA Link function)
■Terminal overview Back of the TV ■Connecting DVD Recorder (DIGA) DVD recorder (DIGA) with VIERA Link functionHDMI cable ■Connecting Home theater system/AV amp HDMI 1 is recommended.DVD recorder (DIGA) with VIERA Link functionHome theater systems with VIERA Link functionAV amp with VIERA Link functionNo optical cable is necessary when connecting a Home Theater supporting “HDAVI control 5” with an HDMI cable. Audio will be supported via ARC (Audio Return Channel) (p. 32)HDMI cableOptical cable ● One AV amp and one DVD recorder (DIGA) can be operated with this unit. ■Connecting HD Camcorder/Digital camera Press INPUT and select an available HDMI terminal, then connect the camcorder to this input. After connection, confirm the HDAVI control functions. (p. 34-37)HD Camcorder with VIERA Link functionHDMI / mini HDMI cableLUMIX with VIERA Link functionIf connection (or setting) of equipment compatible with HDAVI control is changed, switch the power of this unit Off and On again while the power of all equipment is On (so that the unit can correctly recognize the connected equipment) and check that the connected equipment playback operates. Note
Individual HDMI equipment may require additional menu settings specific to each model. Please refer to their respective manuals.
● When audio from other equipment connected to this unit via HDMI is output using “DIGITAL AUDIO OUT” of this unit, the system switches to 2CH audio.(When connecting to an AV amp via HDMI, you can enjoy higher sound quality.) ● Some devices use Mini-HDMI terminal. HDMI (type A) to Mini-HDMI (type C) cable or adapter should be used. tcp5055GT30eng0606.indb33tcp5055GT30eng0606.indb33 2011/02/2115:33:402011/02/2115:33:4034
VIERA Link settings and Available features
To use all VIERA Link functions: After everything is connected, in VIERA Link settings menu, set “VIERA Link” to “On”.
Some features are disabled depending on the “HDAVI Control” version of the equipment.
Please check the list (p. 32)
Select “VIERA Link settings” in “Setup”
(default is On) change Select and make other settings
Automatic Input Switching When using a Blu-ray Disc player, DVD player/recorder or Home theater system, the TV will automatically change to the appropriate input, when playback begins on one of those devices.• For a Home theater system the speakers automatically switch to the theater system. Power on link Yes: The TV is turned on automatically and switches to the appropriate HDMI input whenever VIERA Link compatible equipment is initially turned on and the Play mode is selected. Power off link When “Yes” is selected and the TV is turned off, all connected VIERA Link compatible equipment is also automatically turned off.• A Panasonic DVD Recorder will not turn off if it is still in Rec mode.• The TV remains on even if the VIERA Link compatible equipment is turned off. Energy saving mode Quick Start: When TV is turned off, all connected VIERA Link compatible equipment is moved to ECO Standby mode* automatically under these conditions.• Power off link:(Yes), The connected equipment has “HDAVI Control 4 or later (with Quick Start mode)”* Minimum power consumption of Standby condition for the equipment. Unselected device energy save Yes: The connected VIERA Link compatible equipment will be turned off automatically when not in use under these conditions.• The connected equipment has “HDAVI Control 2 or later” (for available equipment only)[ Example of timing for operation ]• When the input is switched from the HDMI. Default speakers “TV” is the default setting. To set the Home theater system as Default speakers, change the Default speakers setting from “TV” to “Theater”. Sound will be output from the Home theater whenever the TV is powered on. Automatic lip-sync function Minimizes lip-sync delays between the picture and audio when you connect to a Panasonic theater system or Amplifier. TV provided setting information The following information about the TV settings can be transmitted to each piece of equipment (Recorder/Home theater/Player) that has “HDAVI Control 3 or later” function connected to a TV with an HDMI cable.Transmittable data Recorder Home theater Player On Screen Display Language setting (English/Español/Français) ○○○ Panel Aspect Ratio(16:9 fixed) ○○○ Closed caption information (Mode/CC type/Digital setting) ○ --- --- Note
● There is a possibility that all the GUI language information might be set from equipment that has an HDMI CEC function connected to the TV with an HDMI cable. Depending on the operating conditions or the specification for each piece of equipment the setting may or may not be applied. ● For more details on the external equipment’s operation, please refer to the operating manual for the equipment. tcp5055GT30eng0606.indb35tcp5055GT30eng0606.indb35 2011/02/2115:33:422011/02/2115:33:4236
VIERA Link menu and Available features Some features are disabled depending on the “HDAVI Control” version of the equipment. Please check the list (p. 32) Press to exit from
or select next Select the item Recorder TV VIERA Link controlSpeaker outputBack to TVselect • Items in the VIERA Link menu may be grayed out if no compatible equipment is connected (must be HDAVI Control 2 or later) or if the equipment has not initiated a connection with the TV. In that case, switch the equipment’s power Off and On while the TV is On.For further details, see “VIERA Link” on page 34. Select Home theater TV VIERA Link controlSpeaker outputBack to TVchange Set
Speaker control You can select the Home theater or TV speakers for audio output.Control the theater speakers with the TV remote control.This function is available only when a Panasonic Amplifier or Player theater is connected. Select “Speaker output” Select “Home theater” or “TV” select changeRecorder TV Back to TVVIERA Link controlSpeaker output ■Home theater: Adjustment for the equipment Volume up / down Mute • The sound of the TV is muted. • When the equipment is turned off, the TV speakers take over. • Selecting “Home theater” turns the equipment on automatically if it is in Standby mode. ■TV: The TV speakers are on.
VIERA Link control only with the TV’s remote control In the VIERA Link menu, you can select HDMI connected equipment and access it quickly. Continue using your TV remote control to operate the equipment, pointing it at the TV. Select “VIERA Link control” Select the equipment you want to access(Recorder/Home theater/Player/Camcorder/LUMIX/Digital camera/ Network camera) ● Using VIERA TOOLS (p. 22) select changeYou can select available items only. Recorder
TV VIERA Link control
● If there is more than one equipment item, a number after the name indicates the number of items. (e.g. Recorder 1/Recorder 2/Recorder 3...) ● The number of equipment items that can be connected is three for recorders, and a total of three for Home theater/Player/Camcorder/LUMIX/Digital camera/Network camera. Note
● There is a limit to the number of HDMI connectors. Operate the equipment with the TV remote control, pointing it at the TV ● To operate the equipment, read the manual of the equipment. ■Available TV remote control buttons Whether an operation is available differs depending on the connected equipment. Move the cursor/Select PlaySet/Access StopReturn to previous menu Reverse/ForwardDisplay the functions menu on the equipmentSkip Reverse/ForwardAvailable when the purpose of the keys is displayed on screenPauseExit Closed captionChannel Up/Down SAP (Select Audio Mode) - 0-9 Select digital subchannel Back to TV Returns the input selection of the device selected with the VIERA Link Control to the TV input.Select “Back to TV” select
Using Network services Available Network service and features ■ VIERA Connect p. 43 Easily expandable cloud-based services and carefully selected apps. ■Using DLNA feature (Home network) p. 44 This TV is a DLNA Certified™ product.DLNA (Digital Living Network Alliance) is a standard that makes DLNA Certified digital electronics easier and more convenient to use on a home network. To learn more, visit www.dlna.org.It allows you to share photos, videos and music stored in the DMS (for example, PC with windows 7 installed, etc.) connected to your home network, and enjoy watching them on the TV screen as DMP or DMR.DMS (Digital Media Server)Ensure the connected equipment has a DLNA Certified media server.Store photos, videos or music in the media server, and then you can watch them on the TV.“Windows 7” is the server software that has been tested for the performance with this TV (current as of January, 2011).For installing, read the manual for the server software. ● The DLNA control function of Windows 7 is not supported with this TV. ● When a server software for the media server is installed on the PC, the data may be at risk of being accessed by other people. Please be aware of the settings and connections under network circumstances at the office, at a hotel or even at home when not using a router.DMP (Digital Media Player)Finds the content on DMS and provides playback.DMR (Digital Media Renderer)Plays content received from the DMC, which will find content from DMS.DMC (Digital Media Controller)Finds the content on DMS and plays it on the DMR (This TV). (e.g. PDA, Internet tablets etc.) ■DLNA remote control This TV supports the DLNA control function.To use this function, set the “Network link” (p. 42) ■Using Network camera p. 45
tcp5055GT30eng0606.indb38tcp5055GT30eng0606.indb38 2011/02/2115:33:452011/02/2115:33:4539
Using Network services
Contact your Broadband service provider NOTICE: If you don’t have Internet service by your local provider, please order a high-speed Internet service at no less than the following connection speed. If you already have such service, make sure that the connection speed exceeds the following. ● Required speed (effective): at least 1.5 Mbps for SD and 6 Mbps for HD picture quality, respectively. ● Dial-up Internet service cannot be used for VIERA Connect. Select wired or wireless connection If the Cable/DSL modem is close to the TV and you have only one TV set, you may choose a wired connection. If the Cable/DSL modem is far from the TV and/or you have more TVs in the house, you may want to use a wireless network. Connecting to the Internet Wired connection (Directly connected)If you are not using the network for connecting anything else but the TV, you could just connect the TV directly to the Cable/DSL Ethernet connection. Wired connection (Using Router)If you are using the network for connecting various equipment and want to connect the TV, you should use a router to connect the TV to the Internet Wireless connectionIf you are using the network for connecting various equipment and want to connect the TV, you could also use a Wireless LAN Adapter and Access point to connect the TV to the InternetInternetInternet
A B C LAN cableLAN cable ■ Setup Wireless LAN AdapterInsert straight inBack of the TVBack of the TVModemModemHub, Router or Access pointDLNA Certified media server (for example, PC, etc.)Home network(DLNA feature) Network cameraEnsure to use a LAN straight cable for this connection. ● To use only DLNA features or Network camera, you can operate the features without Broadband network environment.Network cameraLAN cableEnsure to use a LAN cross cable for this connection.DLNA Certified media server Back of the TV tcp5055GT30eng0606.indb39tcp5055GT30eng0606.indb39 2011/02/2115:33:462011/02/2115:33:4640
Network settings This is a setting for connecting to a broadband environment. ■Press to exit from a menu screen ■ Press to go back to the previous screen Display the menu
Select “Network settings”
Menu Setup 1/2 ANT/Cable setupInput labelsAnti image retentionNetwork settingsChannel surf mode3D settingsLanguageClock All select Select the settings and set select adjust Menu Network settingsNetwork cameras listSoftware updateMac addressConnection testNetwork connectionWireless networkIP address/DNS settingsNetwork linkWireless (WiFi)00-0b-97-7c-65-e9 Connection test
Check that the Network settings are as shown below, and then start “Connection test”. Select “Connection test” and press OK (It takes a while to cancel the test.) Displayed Connection test screen Connection test
Check Ethernet cable connection
Check for IP address duplication
Check connection to the Internet
Check communication with VIERA Connect server.
Complete Connection test Success
Completion screen is displayed.
Error-->Follow the directions on screen to complete the setting.
If you perform the Proxy settings, check the Proxy address
and the Proxy port number.
Select Network type (Ethernet cable/Wireless (WiFi))
Wireless network (Confirm Current settings and status)
This setting is performed only when “Wireless (WiFi)” is selected in “Network connection” above.
■Displayed “Current settings and status” screen (If connected with Wireless LAN Adapter)
You can confirm the AP connection status.
(SSID/Wireless type/Security type/Encryption type/Connection status /Signal strength) Press “Wireless network” Wireless network
Connect using these settings? Yes No(example) select
OK When you change “Wireless network” -->Press “No” See “Sets / Changes wireless network setting” on p. 41
and follow the directions on screen to complete the
You need to be “Connected” to use network devices.
Please set Access point settings to “Connected”.
tcp5055GT30eng0606.indb40tcp5055GT30eng0606.indb40 2011/02/2115:33:472011/02/2115:33:4741
Using Network services
Wireless network (Wireless network setting)
■Sets / Changes wireless network setting Press “Wireless network” and display setting screen Follow the directions on screen to complete the settingWireless networkWPS (Wi-Fi Protected Setup using push button)Please choose connection method:WPS (Wi-Fi Protected Setup using PIN number)Search for wireless networksManual settings select OK * Wi-Fi Protected Setup is an easy setting of the Wi-Fi Alliance’s certification ● For more details on setting of an Access point, please refer to operating manual for the Access point.Search for Wireless networks: Select an access point from the ones searched for automatically, and configure the settings as instructed on the screen.WPS (Wi-Fi Protected Setup* using push button): You can connect the Access point to press the buttons.WPS (Wi-Fi Protected Setup using PIN number): Set the PIN code that is displayed on the TV on the Access point.Manual settings: Manually set SSID, Security type, and Encryption type to match the settings of the Access point to which to connect. ● When connecting by 11n (5 GHz), select “AES” as the Encryption type for the wireless LAN. IP address/DNS settings Select “IP/DNS setting mode” and set to “Automatic”(When IP/DNS automatic acquisition in DHCP can be used) Menu
IP address/DNS settings
IP address 192.168.0.5
Automatic The acquired address is displayed. select OK Each IP address is acquired automaticallyIf you are using a broadband router, IP automatic acquisition in DHCP can be used under normal circumstances. If you are not sure, check with the person who installed the equipment, or check the instructions for each device. ■Manual setting Select “IP/DNS setting mode” and set to “Manual” Select the item and press OK Check the specifications of the broadband router and enter each IP address.Or Enter each IP address as was specified by the provider IP address
Proxy setting Set only if specified by the provider. It is not required for normal household use. Select “Proxy setting” Menu
IP address/DNS settings
IP address 192.168.0.5
OK Menu Proxy setting Proxy address
Enter address or port number and press OK ● Entering characters (p. 21) ■Proxy address This is the address of the relay server that is connected to the target server instead of the browser and sends data to the browser. Setting is only required if specified by the provider. ■Proxy port This number is specified by the provider together with the Proxy address. tcp5055GT30eng0606.indb41tcp5055GT30eng0606.indb41 2011/02/2115:33:482011/02/2115:33:4842
■Edit the name of this TV Sets your favorite name for this TV. This name
will be used to display the name of this TV on
the screen of the other Network compatible
Select “VIERA network name”
OK Edit the name and press OK Entering characters (p. 21)
■Switches DLNA remote control (Disable/Enable)
Switches DLNA remote control “Disable” or “Enable” selectDLNA remote control Enable ■Volume setting in DMR operation (Disable/Enable)
Sets volume setting in DMR operation
• Available only when “Enable” is selected in “DLNA remote
control” selectDLNA remote volume controlEnable ■Switches Network remote control (Disable/Enable)
Switches remote control of network device such as a
smartphone to “Disable” or “Enable”. selectNetwork remote control Enable Network cameras list
Before using a Network camera, you need to register the camera as shown below. You can also set
Default camera or Disconnect/Delete the registered cameras.
Press “Network cameras list” and
Set Network camera setting
Disconnect Default camera select ●
For this operation, please refer to the operating
manual for the Network camera. Start camera search. ●
Before you start to search for a camera, switch the
camera to registration mode.
Search condition also depends on “Network settings” Delete camera information. Disconnect to camera.“Disconnected” will be displayed in “Status”. Set to default use.Displayed “(Default)” next to camera name.(Available only when reconnecting) Connect to Camera. “Connect” will be displayed in “Status”. Software update
Network cameras list
IP address/DNS settings
Press OK to start the Software update screen
Follow directions on the screen
Set “Clock” first. (p. 17)
tcp5055GT30eng0606.indb42tcp5055GT30eng0606.indb42 2011/02/2115:33:492011/02/2115:33:4943
Using Network services
In Display “Menu” Select the item select
■Adjust the Picture, Audio and 3D settings select adjust 0
0 VividPicture 1/2BrightnessColor Tint SharpnessPicture modeContrastReset to defaultsexample: Picture menuPicture menu/Audio menu (p. 49-51)3D settings (p. 25) ■Use VIERA Link function select changeRecorder TV VIERA Link controlSpeaker outputBack to TVVIERA Link menu (p. 36) VIERA Connect (Enjoy Internet Service) You can access Internet services from the VIERA Connect Home screen. ● You need a broadband environment to use this service. ■Press to exit from a menu screen
■ Press to go back to the Home screen Preparations ● Network connections (p. 39) ● Network settings (p. 40-42) Display the Home screen
Select the item and press OK MORE BACK select viewVideo communication (e.g. Skype™) requires an exclusive Communication Camera TY-CC10W (p. 8).This screen is an example. It varies according to the usage conditions.* Depending on the usage conditions, it may take a while to read all the data.• VIERA Connect allows you to access only to websites supported by Panasonic and has no full browser function.• VIERA Connect contents are subject to change without notice.• Not all VIERA Connect contents are available depending on the country and area.• 3D images are not displayed on center of the home screen depending on the signal. ■Using USB keyboard
● Keyboard type (p. 53) ● Operate USB keyboard/Entering characters (p. 21)(Also available Game pad) tcp5055GT30eng0606.indb43tcp5055GT30eng0606.indb43 2011/02/2115:33:502011/02/2115:33:5044
You can share the contents (Photo, Video, Music etc.) stored in DLNA Certified media server with your home network system.
■Press to exit from a menu screen ■Press to go back to the previous screenPreparations ● Network connections (p. 39) ● Network settings (p. 40-42)
Display VIERA TOOLS Select the “DLNA” select next Select server Display available server.DLNA server
● To display “Slideshow settings” (p. 28) (photo only) ● To display Optional menu View/Play See “Using Media player” to operate. (p. 26-31) tcp5055GT30eng0606.indb44tcp5055GT30eng0606.indb44 2011/02/2115:33:522011/02/2115:33:5245 Advanced Using Network services
■Press to exit from a menu screen ■Press to go back to the previous screenPreparations ● Network connections (p. 39) ● Network settings (p. 40-42) ● Before connecting the Network camera to the TV, please complete “IP setting” and run “Connection test”With all connected equipment turned on Display “VIERA Link” menu
● If there is no registered camera displayed, please set it in Network Camera settings. (p. 42) ● There is also an option to start with sensor detection. Select “Network camera” Network camera TV VIERA Link controlSpeaker outputBack to TV select
BL-C210A Multi screen
BL-C210A Multi screen
(1/4) 9 split screen select OK to Single screenSingle screenPreset positionHome position 1
Tilt RETURNNavigation area4 split screen select OK to Single screen ● Default camera setting (p. 42) Note
● A number of VIERA-compatible network cameras can be found at the following sites:http://www.panasonic.com/http://panasonic.net/pcc/products/netwkcam/ ● For more details on setting and operation of the Network camera, please also read the operating manual for the Network camera. Network CameraYou can operate the Network camera from the TV remote and also check the images from the Network camera on your TV. ● VIERA Link control only with the TV’s remote control (p. 37) tcp5055GT30eng0606.indb45tcp5055GT30eng0606.indb45 2011/02/2115:33:552011/02/2115:33:5546
Editing and Setting Channels
Auto program (Set automatically) Automatically searches and adds available channels to the memory. Select “ANT in” Select “Cable” or “Antenna” Or select “Not used”. Select “Auto program” next select
Menu CableANT/Cable setupANT inAuto programManual programSignal meter
Select a scanning mode (p. 16) OK select
Menu Auto programAll channelsAnalog onlyDigital only
● After the scanning is completed, select “Apply”.(see p. 47 ). ● All previously saved channels are erased. Press to exit from a menu screen Display the menu
Anti image retention
3D settings next select Select “ANT/Cable setup”
Anti image retention
All next select The current channel settings can be changed according to your needs and reception conditions.
ANT/Cable setup and operation
tcp5055GT30eng0606.indb46tcp5055GT30eng0606.indb46 2011/02/2115:33:562011/02/2115:33:5647
Editing and Setting Channels
Manual program ( Set manually)
Use this procedure when changing the channel setup or
changing the channel display.
Also, use this to add or skip channels from the channel list
You can select a channel tuning mode (Digital only/Analog
only) in “Channel surf mode”(p. 53)
Select “Edit” Manual programEdit CancelApplyCaption Favorite Add2 ... ...
• Caption: Changes the station identifier • Favorite: Registers channels to the Favorite List •
Press OK to select “Yes (add)” or “No (skip)”
Move the cursor to a channel number Manual programEdit CancelApplyCaption Favorite Add2 ... ...
Yes Channel select press OK to tune to the channel. Select “Apply” select OK
Changes will be lost. Continue?
Cable setup”) select “Yes” Signal meter (Check signal strength)
Check the signal strength if interference is found or freezing occurs on a digital image.
Tune manually Signal intensity or
If the signal is weak, check the antenna.
If no problem is found, consult your local dealer.
Not available if “Cable” is selected in “ANT in” (see p. 46).
Available only for digital antenna channels.
tcp5055GT30eng0606.indb47tcp5055GT30eng0606.indb47 2011/02/2115:33:572011/02/2115:33:5748
How to Use Menu Functions
Various menus allow you to set the picture, sound, and other functions so that you can enjoy watching TV
best suited for you.
Timer (Sleep, On/Off timer)
Lock (Channel, Game, Program etc.)
Closed Caption setting
Setup (other settings)
Select the item and adjust
How to Use Menu Functions
“Reset to default” will be grayed out if no changes are made in the following menus:
“Picture”, “Pro settings”, “PC adjustments”, “Audio” and “Closed caption” .
Adjust the image or picture quality
Settings Items Item Description
Reset to defaults Resets all picture adjustments to factory default settings except for “Advanced picture”. Picture mode
Vivid Provides enhanced picture contrast and sharpness for viewing in a well-litroom. Standard Recommended for normal viewing conditions with subdued room lighting. Cinema For watching movies in a darkened room. It provides a soft, film-like picture. THX Precisely reproduces the original quality of the image without any revision.Recommended for playback of THX disc (disc with “THX” logo).THX mode is used to mirror the picture settings used by professional filmmakers,faithfully reproducing the image quality of THX Certified movies.• THX Certified movies have the “THX” logo on a disc. Game For playing video games. Custom (Photo) Customizes each item according to your taste.Photo is displayed in JPEG menu. Contrast,
Sharpness Adjusts the color, brightness, etc. for each picture mode to suit your taste• Display range Contrast/Brightness/Color/Sharpness : 0 - 100 Tint : -50 - +50 Color temp. Cool 2/1/Normal/
Warm 1/2 Selects a choice of Cool (blue), Normal, or Warm (red) color. Color mgmt. Off/On On: Enhances green and blue color reproduction, especially outdoor scenes. Photo
On/Off Provides appropriate picture when still images are input. C.A.T.S. Off/On Automatically adjusts the screen brightness according to the ambient lighting condition. Video NR Off/Weak/
Medium/Strong Reduces noise, commonly called snow. Leave it off when receiving a strong signal. Pro settings
Reset to defaults Resets all Pro setting adjustments to factory default settings. Color space Wide/Normal Adjust the color representation in panel color gamut. W/B high R, G, B Adjusts the white balance for light red/green/blue areas. W/B low R, G, B Adjusts the white balance for dark red/green/blue areas. Black extension Adjusts the dark shades of the image in gradation. Gamma
2.2/2.4/2.6 Gamma correction. Adjusts the intermediate brightness of the image. Panel brightness High/Mid/Low Selects the display panel brightness. Contour
Off/On Adjusts the contour emphasis of the image. AGC 0-15 Increases the brightness of dark signal automatically. Save as default Save all “Picture” (when “Picture mode” is “Custom”) and “Pro settings” adjustment. tcp5055GT30eng0606.indb49tcp5055GT30eng0606.indb49 2011/02/2115:33:592011/02/2115:33:5950
Settings Items Item Description
• Some menus are grayed out depending on the input signal or condition.
(e.g. “Zoom adjustments” will be grayed out if the aspect is not set to Zoom.)
JUST/4:3/ZOOM Changes the format (aspect ratio).
Lets you choose the aspect depending on the format of
received signal. (p. 55)
HD size Size 1/Size 2
Selects between 95 % (Size 1) or 100 % (Size 2) for the
scanning area with High-definition signal.
Select “Size 1” if noise is generated on the edges of the screen.
Adjusts the horizontal display range to reduce noise of both side
Size 2: Adjusts the image size according to the aspect mode to
reduce noise. (p. 55)
Adjusts vertical alignment and size when aspect setting is “ZOOM”.
PC adjustments Reset to defaults
Resets PC adjustments.
Sync H & V The H and V sync signals are input from the HD/VD connector. (p. 58)
Uses a synchronized signal on the Video G signal, which is
input from the G connector. (p. 58)
Alleviates the problem if a picture appears to be vertically-striped, flickers partially or is blurred.
Adjusts the horizontal position.
Adjusts the vertical position.
Alleviates the problem if the whole picture appears to flicker or is blurred.
First adjust the Dot Clock to get the best possible picture, then adjust the clock Phase
so that a clear picture appears.
It may not be possible to display a clear picture due to poor input signals.
Switches to wide display.
VGA (640×480 pixels), WVGA (852×480 pixels), XGA (1,024×768 pixels),
WXGA (1,280×768 pixels)
Options change depending on signals
Prevents the blown out highlights and blocked up shadows when
a wide-range signal is received. Selects between standard RGB
range (16-235 bits) or non-compliance (0-255 bits).
HDMI signal information.
Photo: Best setting for JPEG viewing.
Graphics: Best setting for On-Screen display of connected
tcp5055GT30eng0606.indb50tcp5055GT30eng0606.indb50 2011/02/2115:34:002011/02/2115:34:0051
How to Use Menu Functions
Settings Items Item Description
• Some menus are grayed out depending on the input signal or condition.
(e.g. “3:2 pulldown” will be grayed out if the input signal is high definition or you are viewing photos, etc.)
3D Y/C filter Off/On
Minimizes noise and cross-color in the picture.
Color matrix SD/HD Selects image resolution of component-connected devices.
SD: Standard Definition HD: High Definition
Only used with 480p video signal.
Reduces noise of specific digital signals of DVD, Cable box, etc.
Reduces HDTV flicker noise in the contoured sections of an
Motion smoother Off/Weak/Strong
Improved moving picture quality by reducing motion blur.
Black level Dark/Light
Selects Dark or Light. Valid only for external input signals.
3:2 pulldown Off/On/Auto
Adjusts the picture recorded in 24 fps for optimum quality.
24p Direct in 96Hz/60Hz/48Hz
96Hz/48Hz: Achieves more cinematic playback by reproducing
the movie contents at 2 or 4 times the speed of 24 frames per
second. If flicker is seen using 48Hz, please use 60Hz or 96Hz.
Adjust Audio quality
Settings Items Item Description
Resets Bass, Treble, and Balance adjustments to factory default settings.
Increases or decreases the bass response.
Increases or decreases the treble response.
Emphasizes the left / right speaker volume.
Advanced audio A.I. sound Off/On
Equalizes overall volume levels across all channels and
Enhances audio L/R response when listening to stereo.
Enhances bass sound and provides powerful sound.
Minimizes volume disparity after switching to external inputs.
Switches to “Off” when using external speakers.
Off: “A.I. sound”, “Surround”, “Bass boost” and “Volume leveler”
do not work if “Off” is selected.
HDMI 1-4 in Digital/
The default setting is “Digital” for the HDMI connection. (Digital
Select audio input terminal when DVI cable is connected.
(Analog audio input signal)
The TV can automatically turn On/Off at the designated date and time.
If the Timer settings are grayed out, first set the clock (see p. 53) and make sure “Auto power on” is set to “No” (see p. 53)
Settings Items Item Description
Sleep (Off timer) Sleep (minutes)
Off/15/30/60/90 Select how long for the TV to automatically turn off.
Sets the input to select when the TV turns on.
Sets the channel to select when the TV turns on.
Sets the day when the TV turns on.
Sets the time when the TV turns on. The TV will turn off after 90 minutes or as
Sets the time when the TV turns off within 24 hours.
tcp5055GT30eng0606.indb51tcp5055GT30eng0606.indb51 2011/02/2115:34:002011/02/2115:34:0052
Locks specified channels or shows to prevent children from watching objectionable content.
You will be asked to enter your password each time you display the Lock menu.
• Password setting/entering (p. 21)
Set “Custom” in “Mode” to specify “Channel”, “Game”, “Program” and “VIERA Connect” settings.
Settings Items Item Description
Unlocks all the Lock settings of “Channel”, “Game”, “Program” and “VIERA Connect”.
Locks all the inputs regardless of the Lock settings of “Channel”, “Game”, “Program”
and “VIERA Connect”.
Set channel lock status. (Off/All/Custom)
All: Locks all channels
Off: Unlocks all channels
Custom: Locks specified channels. Set “Channel 1” - “Channel 7”
Select a channel to lock. (Select up to 7 (1-7) channels to block.)
Locks Channel 3, Channel 4, and external inputs.
Set program lock status. (Off/On) “V-chip” technology enables restricted shows to lock
according to TV ratings. On: Set each rating level (MPAA, US.TV, C.E.L.R., C.F.L.R.)
MPAA Select U.S. movie ratings to lock.
U.S.TV U.S. TV program ratings.
Canadian English ratings.
C.F.L.R Canadian French ratings.
VIERA Connect On/Off
Locks VIERA Connect. When you access VIERA Connect, the “VIERA Connect Lock”
screen is displayed. Type the correct password to enter the Home screen.
Change the password. Input the new 4-digit password twice.
• This television is designed to support the “Downloadable U.S. Region Rating System” when available.
(Available only in U.S.A.)
• The Off rating is independent of other ratings.
• When placing a lock on a specific-age-based-rating level, the Off rating and any other more restrictive ratings will also be blocked.
Closed caption Display closed caption
The television includes a built-in decoder that is capable of providing a text display of the audio.
The program being viewed must be transmitting the Closed caption (CC) information. (p. 57)
Settings Items Item Description
Resets all Closed caption settings to factory default settings.
On: To display Closed captions.
CC on mute: To display Closed captions when the audio is muted.
(When not using, select “Off”).
Choose the Closed caption service of Analog broadcasting.
CC1-4: Information related to pictures (Appears at the bottom of the screen)
T1-4: Textual information (Appears over the entire screen)
Digital Primary/Second./
The Digital Closed caption menu lets you configure the way you choose to view
the digital captioning.
Outline color of text (Identify the setting options on the screen)
• The settings in “Analog” or “Digital” depend on the broadcaster.
tcp5055GT30eng0606.indb52tcp5055GT30eng0606.indb52 2011/02/2115:34:012011/02/2115:34:0153
How to Use Menu Functions
Other function settings
Settings Items Item Description
Analog only Sets the mode to select the channel with the Channel up/down button. Favorite: Only channels registered as FAVORITE. (p. 20) Language English/Español/
Français Selects the screen menu language. Clock Adjusts the clock. (p. 17) ANT/Cable setup See p. 46-47 for more detail.
Selects the terminal and label of the external equipment.
Devices connected to external input terminals can be labeled for easier identification during the
input selection. (Input select (p. 23))
Terminals: HDMI 1-4/Component/Video/PC Label:
• You can also enter the label name directly. (Entering characters (p. 21))
Bright Changes the brightness of the side barThe recommended setting is “Bright” to prevent the panel “Image retention”. (p. 58) Scrolling bar Press “OK” to start the horizontal “Scrolling” on the screen.• Press any key except the POWER key to return to previous screen.• You will return to the previous screen if no key operation has been performed for 15 minutes.[Scrolling bar] Network settings See p. 40-42 for more detail.
See p. 34-35 for more detail.
TV off) To conserve energy, the TV automatically turns off when NO SIGNAL and NO OPERATION continue for more than 10 minutes.• Not in use when “Auto power on” is set to “Yes”, or “On/Off Timer” is set.• “No signal for 10 minutes was activated” will be displayed for about 10 seconds when the TV is turned on for the first time after the power was turned off by “No signal for 10 minutes”.• The on-screen display will flash 3, 2 and 1 to indicate the last three (3) remaining minutes prior to the shut-off. No activity for 3
TV off) To conserve energy, the TV automatically turns off when no operation of remote and side panel key continues for more than 3 hours.• Not in use when “Auto power on” is set to “Yes”, or “On/Off Timer” is set, or while “PC input” is selected.• “No activity for 3 hours was activated” will be displayed for about 10 seconds when the TV is turned on for the first time after the power was turned off by “No activity for 3 hours”.• The on-screen display will flash 3, 2 and 1 to indicate the last three (3) remaining minutes prior to the shut-off. Keyboard type Select keyboard type. Operate USB keyboard (p. 21) (U.S./Canadian French/Canadian Multilingual Standard/Spanish (Latin
America)/Spanish (Spain))
(No/Yes) Turns TV On automatically when the cable box or connected device is turned On.TV AC cord must be plugged into this device. TV turns on every time the power is restored. Image viewer
Set later/Off Sets the media contents or playback type to play back SD cards automatically. Set later: “Image viewer settings” menu will be displayed repeatedly.“Using Media player” (p. 26) VIERA Connect
(On/Off) Sets the banner display status. First time setup Restarts the first time setup from “Language” setting. (p. 15) About Displays TV version and software license. Reset to defaults Performing Reset will clear all settings made with Setup, such as channel settings.• Password setting/entering (p. 21) tcp5055GT30eng0606.indb53tcp5055GT30eng0606.indb53 2011/02/2115:34:012011/02/2115:34:0154
Ratings List for parental control “V-chip” technology enables you to lock channels or shows according to standard ratings set by the entertainment industry. ■U.S. MOVIE RATINGS (MPAA)
NR NO RATING (NOT RATED) AND NA (NOT APPLICABLE) PROGRAMS. Movie which has not been rated or where rating does not apply.G GENERAL AUDIENCES. All ages admitted.PG PARENTAL GUIDANCE SUGGESTED. Some material may not be suitable for children.PG-13 PARENTS STRONGLY CAUTIONED. Some material may be inappropriate for children under 13.R RESTRICTED. Under 17 requires accompanying parent or adult guardian.NC-17 NO ONE 17 AND UNDER ADMITTED.X ADULTS ONLY. ■U.S. TV PROGRAMS RATINGS (U. S. TV) Age-basedGroupAge-basedRatingsPossible ContentSelectionsDescription NR (Not Rated)TV-NR • Viewable • BlockedNot Rated.Youth TV-Y
• Viewable • BlockedAll children. The themes and elements in this program are specificallydesigned for a very young audience, including children from ages 2-6.TV-Y7 • FV Blocked • Viewable • BlockedDirected to older children. Themes and elements in this program mayinclude mild physical or comedic violence, or may frighten children under the age of 7.Guidance TV-G
• Viewable • BlockedGeneral audience. It contains little or no violence, no strong language,and little or no sexual dialogue or situations.TV-PG • D,L,S,V (all selected) • Any combination of D, L, S, VParental guidance suggested. The program may contain infrequentcoarse language, limited violence, some suggestive sexual dialogue and situations.TV-14 • D,L,S,V (all selected) • Any combination of D, L, S, VParents strongly cautioned. This program may contain sophisticatedthemes, sexual content, strong language and more intense violence.TV-MA • L,S,V (all selected) • Any combination of L, S, VMature audiences only. This program may contain mature themes,profane language, graphic violence, and explicit sexual content.FV: Fantasy/Cartoon Violence. V: Violence S: Sex L: Offensive Language D: Dialogue with sexual content. ■CANADIAN ENGLISH RATINGS (C. E. L. R.)
E Exempt - Exempt programming includes: news, sports, documentaries and other information programming,talk shows, music videos, and variety programming.C Programming intended for children under age 8. No offensive language, nudity or sexual content. C8+ Programming generally considered acceptable for children 8 years and over. No profanity, nudity or sexual content.G General programming, suitable for all audiences.PG Parental Guidance suggested. Some material may not be suitable for children. 14+ Programming contains themes or content which may not be suitable for viewers under the age of 14. Parents are strongly cautioned to exercise discretion in permitting viewing by pre-teens and early teens.18+ 18+ years old. Programming restricted to adults. Contains constant violence or scenes of extreme violence. ■CANADIAN FRENCH RATINGS (C. F. L. R.) E Exempt - Exempt programming. G General - Programming intended for audience of all ages. Contains no violence, or the violence content is minimal or is depicted appropriately.8 ans+8+ General - Not recommended for young children. Programming intended for a broad audience but contains light or occasional violence. Adult supervision recommended.13 ans+Programming may not be suitable for children under the age of 13. Contains either a few violent scenes or one or more sufficiently violent scenes to affect them. Adult supervision strongly suggested.16 ans+Programming may not be suitable for children under the age of 16. Contains frequent scenes of violence or intense violence.18 ans+ Programming restricted to adults. Contains constant violence or scenes of extreme violence.Caution ● The V-Chip system that is used in this set is capable of blocking “NR” programs (non rated, not applicable and none) as per FCC Rules Section15.120(e)(2). If the option of blocking “NR” programs is chosen “unexpected and possibly confusing results may occur, and you may not receive emergency bulletins or any of the following types of programming:”• Emergency Bulletins (Such as EAS messages, weather warnings and others)• Locally originated programming • News • Political • Public Service Announcements • Religious • Sports • Weather tcp5055GT30eng0606.indb54tcp5055GT30eng0606.indb54 2011/02/2115:34:012011/02/2115:34:0155 Support Information Technical Information Aspect Ratio (FORMAT)Press the FORMAT button to cycle through the aspect modes. This lets you choose the aspect depending on the format of the received signal and your preference. (p. 20) (e.g.: in case of 4:3 image) ●
JUST FULL JUST Enlarges the 4:3 image horizontally to the screen’s side edges.(Recommended for anamorphic picture)Stretches to justify the 4:3 image to the four corners of the screen. (Recommended for normal TV broadcast) ● H-FILL ●
4:3 H-FILL Side barEnlarges the 4:3 image horizontally to the screen’s side edges. The side edges of the image are cut off.Standard(Note that “Image retention” of the side bar may occur fromdisplaying it for a long time.) ● ZOOMZOOM Note
● 480i (4:3), 480i (16:9), 480p (4:3), 480p (16:9): FULL, JUST, 4:3 or ZOOM ● 1080p / 1080i / 720p: FULL, H-FILL, JUST, 4:3 or ZOOMEnlarges the 4:3 image to the entire screen. (Recommended for Letter Box) ● Zoom adjustmentsVertical image position and size can be adjusted in “ZOOM”. Select “Zoom adjustments” on the “Picture” menu. (p. 50) V-position: Vertical position adjustment V-size: Vertical size adjustment
● To reset the aspect ratio (OK)H size ● Aspect Ratio: 4:3Size 1 Size 2 ● The width will be decreased on both sides to reduce noise. ● Aspect Ratio: FULL/JUST(H-FILL/ZOOM)Size 1 Size 2 ● The width will be increased on both sides to reduce noise.See page 50 for more information Technical Information
tcp5055GT30eng0606.indb55tcp5055GT30eng0606.indb55 2011/02/2115:34:022011/02/2115:34:0256
Data format information
● Compatible Data format for Media player (SD card/USB flash memory)/DLNA p. 30 DCF (Design rule for camera file system): A Japan Electronics and Information Technology Industries Association’s standard EXIF: Exchangeable Image File Format Note
● Format the card with the recording equipment. ● The picture may not appear correctly on this TV depending on the recording equipment used. ● Display may take some time when there are many files and folders. ● The function (3D Image Viewer/Media player) cannot display still image not DCF formatted (i.e. TIFF, BMP). ● Data modified with a PC may not be displayed. ● Images imported from a PC must be compatible with EXIF 2.0, 2.1 and 2.2. ● Partly degraded files might be displayed at a reduced resolution. ● All “.JPG” extension data in the card and USB flash memory will be read in Photo viewer mode. ● The folder and file names may be different depending on the digital camera used. ● Do not use two-byte characters or other special codes. ● The card may become unusable with this TV if file or folder names are changed. ● For the suitable SD Memory Cards, please confirm the latest information on the following website. http://panasonic.jp/support/global/cs (This site is in English only) Cautions when handling SD Cards 2.1 mm32 mm24 mm ● Use an SD Card which meets SD standards. If not, it may cause the TV to malfunction. ● Do not remove the card while the unit is accessing data (this can damage card or unit). ● Do not touch the terminals on the back of the card. ● Do not subject the card to high pressure or impact. ● Insert the card in the correct direction (otherwise, card or unit may be damaged). ● Electrical interference, static electricity or erroneous operation may damage the data or card. ● Back up the recorded data at regular intervals in case of deteriorated or damaged data or erratic operation of the unit. (Panasonic is not liable for any deterioration or damage of recorded data.) SD Card/USB flash memory warning messages Message Meaning No media. Please insert an SD memory card or USB storage device. ● The device is not inserted.No media. Device removed. ● The device is removed.No photos/ No movies/No music files to play/ No playable media ● The device has no data or this type of data is not supported.Cannot read file ● The file is broken or unreadable. ● The TV does not support the format. 2D→3D (Simulated 3D)
● You can watch content in simulated 3D from photo and all video sources except the PC input. ●
This function converts standard 2D images and displays them in 3D. For this reason, the 3D images appear slightly different from the originals. Please bear this in mind when using this function. ●
Using this function for profit-making purposes, or publically showing images converted from 2D to 3D in places such as coffee shops or hotels etc. may infringe on the rights of the copyright holder protected under the Copyright Act. tcp5055GT30eng0606.indb56tcp5055GT30eng0606.indb56 2011/02/2115:34:032011/02/2115:34:0357
” HDMI connections to some Panasonic equipment allow you to interface automatically. (p. 33) ● This function may not work normally depending on the equipment condition. ● The equipment can be operated by other remote controls with this function on even if the TV is in Standby mode. ● Image or sound may not be available for the first few seconds when playback starts. ● Image or sound may not be available for the first few seconds when input mode is switched. ● Volume function will be displayed when adjusting the volume of the equipment. ● If you connect equipment that has “HDAVI Control 2 or later” function to the TV with an HDMI cable, the sound from the DIGITAL AUDIO OUT terminal can be output as multi-channel surround. ● “HDAVI Control 5” is the newest standard (current as of December, 2010) for the HDAVI Control compatible equipment.This standard is compatible with the conventional HDAVI equipment. HDMI connection
HDMI (high-definition multimedia interface) allows you to enjoy high-definition digital images and high-quality sound by connecting the TV unit and HD devices. HDMI-compatible equipment (*1) with an HDMI or DVI output terminal, such as a Cable or Satellite box or a DVD player, can be connected to the HDMI connector using an HDMI compliant (fully wired) cable. ● HDMI is the world’s first complete digital consumer AV interface complying with a non-compression standard. ● If the external equipment has only a DVI output, connect to the HDMI terminal via a DVI to HDMI adapter cable (*2). ● When the DVI to HDMI adapter cable is used, connect the audio cable to the audio input terminal. ● Audio settings can be made on the “HDMI 1 in”, “HDMI 2 in”, “HDMI 3 in” or “HDMI 4 in” menu screen. (p. 51)Applicable audio signal sampling frequencies (L.PCM): 48 kHz, 44.1 kHz, 32 kHz (*1): The HDMI logo is displayed on an HDMI-compliant device. (*2): Enquire at your local digital equipment retailer shop.Caution ● Use with a PC is not assumed. ● All signals are reformatted before being displayed on the screen. ● If the connected device has an aspect adjustment function, set the aspect ratio to “16:9”. ● These HDMI connectors are “type A”. ● These HDMI connectors are compatible with HDCP (High-Bandwidth Digital Content Protection) copyright protection. ● A device having no digital output terminal may be connected to the input terminal of either “COMPONENT”, or “VIDEO” to receive analog signals. ● The HDMI input terminal can be used with only the following image signals: 480i, 480p, 720p, 1080i and 1080p.Match the output setting of the digital device. ● For details of the applicable HDMI signals, see p. 58. DIGITAL AUDIO OUT terminal
You can enjoy your Home theater by connecting a Dolby Digital (5.1 channel) decoder and “Multi Channel” amplifier to the DIGITAL AUDIO OUT terminals. Caution ● Depending on your DVD player and DVD-Audio software the copyright protection function may operate and disable optical output. ● When an ATSC channel is selected, the output from the DIGITAL AUDIO OUT jack will be Dolby Digital. When an NTSC channel is selected, the output will be PCM. ● When playing a movie on SD Card Movie player, when the sound has been recorded in Dolby Digital, the output from the DIGITAL AUDIO OUT terminal will be Dolby Digital. When the sound is recorded in other formats, the output will be PCM. Closed Caption (CC)
● For viewing the CC of digital broadcasting, set the aspect to FULL (If viewing with H-FILL, JUST, ZOOM or 4:3; characters might be cut off). ● The CC can be displayed on the TV only when the receiver (such as a Cable box or satellite receiver) has the CC set to ON within the device itself. Check with your Cable or Satellite provider for instructions. The TV’s CC button does not operate the Satellite or Cable box’s CC function. ● If the CC is set to On on both the receiver and TV when the signal is 480i (except for the HDMI connection), the CC may overlap on the TV. ● If a digital program is being output in analog format, the CC data will also be output in analog format. ● If the recorder or output monitor is connected to the TV, the CC needs to be set up on the recorder or output monitor. Technical Information
tcp5055GT30eng0606.indb57tcp5055GT30eng0606.indb57 2011/02/2115:34:032011/02/2115:34:0358
4:3 side bars Do not display a picture in 4:3 mode for an extended period, as this can cause “Image retention” to remain on either or both sides of the display field.To reduce the risk of such “Image retention”, change the brightness of the side bars.See page 49 for more information ● The side bar may flash (alternate black/white) depending on the picture.Side Bar 4:3 ScreenDisplayImage retention PC Input Terminals
● Signal Names for D-sub 15P Connector 1
● Signals other than above may not be displayed properly. ● The above signals are reformatted for optimal viewing on your display. ●
Computer signals which can be input are those with a horizontal scanning frequency of 15 to 110 kHz and vertical scanning frequency of 48 to 120 Hz. (However, the image will not be displayed properly if the signals exceed 1,200 lines.) Panasonic does not guarantee operation and performance of peripheral devices made by other manufacturers; and we
disclaim any liability or damage arising from operation and/or performance from usage of such other maker’s peripheral
tcp5055GT30eng0606.indb58tcp5055GT30eng0606.indb58 2011/02/2115:34:032011/02/2115:34:0359
Care and Cleaning First, unplug the Power cord plug from the wall outlet. Display panel
The front of the display panel has been specially treated. Wipe the panel surface gently using only a cleaning cloth or a soft, lint- free cloth. ●
If the surface is particularly dirty, soak a soft, lint-free cloth in diluted mild liquid dish soap (1 part mild liquid dish soap diluted
by 100 times the amount of water) and then wring the cloth to remove excess liquid. Use this cloth to wipe the surface of the display panel, then wipe it evenly with a dry cloth of the same type until the surface is dry. ●
Do not scratch or hit the surface of the panel with fingernails or other hard objects. Furthermore, avoid contact with volatile
substances such as insect sprays, solvents, and thinner; otherwise, the quality of the surface may be adversely affected.
Cabinet If the cabinet becomes dirty, wipe it with a soft, dry cloth. ● If the cabinet is particularly dirty, soak the cloth in a weak mild liquid dish soap and then wring the cloth dry.Use this cloth to wipe the cabinet and then wipe it dry with a dry cloth. ● Do not allow any mild liquid dish soap to come into direct contact with the surface of the Plasma TV.If water droplets get inside the unit, operating problems may result. ●
Avoid contact with volatile substances such as insect sprays, solvents, and thinner; otherwise, the quality of the cabinet surface may be adversely affected or the coating may peel off. ● Do not let articles made from rubber or PVC be in contact with the TV for long periods of time. Pedestal
● Cleaning Wipe the surfaces with a soft, dry cloth. If the unit is particularly dirty, clean it using a cloth soaked with water to which a small amount of mild liquid dish soap has been added and then wipe with a dry cloth. Do not use products such as solvents, thinner, or household wax for cleaning, as they can damage the surface coating. (If using a chemically-treated cloth, follow the instructions supplied with the cloth.) ●
Do not attach sticky tape or labels, as they can make the surface of the pedestal dirty. Do not allow long-term contact with rubber, vinyl products, or the like. (Doing so will cause deterioration.) Care and Cleaning
Technical Information
Frequently Asked Questions (FAQ) If there is a problem with your TV, please refer to the table below to determine the symptoms, then carry out the suggested check. If this does not solve the problem, visit the Panasonic website for further assistance. (see cover) How do I view the picture from
devices such as a: Cable/Satellite
box, game console, Blu-ray or
DVD player? Press the INPUT button on the remote to select the correct input source. Check that the device is turned on and functioning correctly. Why is there no picture or just a
blue, black or snowy screen being
displayed? Check if the power cord is plugged in and the TV is turned on (front red LED light should be on; not blinking) Press the INPUT button on the remote to select the correct input source. Ensure all connections are correct and secure. When using external video source, such as a Cable/Satellite box or DVD player, check that the device is on and functioning correctly. Press MENU on the TV’s remote control. If the menu is displayed, then the TV is working; recheck above steps. Why doesn’t the picture look like
it is in High Definition?
Press the INFO button on the remote to confirm the type of signal being received (p. 19). HD signal should be 720P, 1080i or 1080p. Select a High Definition channel from your HD source (Cable, Satellite or fiber optic service). HD channels sometimes broadcast non-HD content. Ensure that your HD source (HD box, Blu-ray player, etc.) is connected to the TV with an HDMI or Component cable and set to output an HD video signal. Why do black bars appear on the
top and bottom and/or sides of
the screen? Change the format (aspect ratio) of the picture by pressing the FORMAT button on the remote control. (p. 20) Check the aspect settings on your external video source, such as Cable/Satellite box, DVD/Blu-ray Disc player, etc. Note: Some content, such as film-based movies, are available in extra-wide format. Top and bottom bars are unavoidable. Why is the picture snowy when
“ANT/Cable in” is selected? When using a cable service (without a box), check that all connections are secure. When using a cable or satellite box, change the connection (wiring) to Composite, Component or HDMI. (p. 12) If you’re using an antenna, then check that connections are secure. Change the position or direction of the antenna and check the “Signal meter”. (p. 47) Why is the picture chaotic and/
or torn and/or with a buzz in the
speakers? Check if electrical products such as kitchen appliances, fluorescent lights or light dimmers are nearby. They may interfere with the TV’s picture.
Try viewing a picture from another device, such as a DVD player or a game console, to narrow down the source of the problem. Why is there a black box on the
screen? Change settings of Closed Caption (CC). (p. 19, 52) Why is the screen blank and the
power indicator blinking? The TV has gone into shutdown mode to protect itself. Try unplugging it for a few minutes and connecting it again. If there was a temporary power surge on the AC line it may now be OK. If the blinking returns, call 1-877-95VIERA (U.S.A.) or 1-866-330-0014 (Canada). Why do some small spots on the
screen remain bright or dark? The Plasma panel is made up of a few million pixels and is produced with advanced technology through an intricate process. Sometimes a few pixels may be bright or dark. These pixels do not indicate a defective panel and will have no impact on the performance of the TV. tcp5055GT30eng0606.indb60tcp5055GT30eng0606.indb60 2011/02/2115:34:042011/02/2115:34:0461
Frequently Asked Questions (FAQ) Why is there no sound coming from the TV? Make sure the volume is up and MUTE is off. Confirm the TV speakers are set to ON by pressing MENU and selecting “Audio” --> “Advanced audio”. (p. 51) Check that the correct SAP (Secondary Audio Program) is selected by pressing the SAP button on the remote control. (p. 19) If the TV is connected to a Panasonic Home Theater via HDMI cable, then check VIERA Link controls. (p. 37) If the TV is connected to a Home Theater via optical cable, then: Check the connection, the audio system is on, the correct input is selected. Check “HDMI 1 in”, “HDMI 2 in”, “HDMI 3 in” or “HDMI 4 in” analog/digital audio settings. (p. 51) Why is the sound unusual,
distorted, low volume or in
another language? Check that the correct SAP (Secondary Audio Program) is selected by pressing the SAP button on the remote control. Check that all connections of external equipment connected to the TV are secure. When using Cable or Satellite box, check the device’s audio settings. (example: try changing the box’s Audio Range to ‘narrow’)Why is there a clicking, ticking or buzzing sound coming from the TV unit? When TV power is turned on or shut off there are electrical components that make a click sound. This is normal operation. Changes in the temperature and humidity of the room may cause thermal expansion and contraction that can produce sounds. This is not a sign of faulty operation or a malfunction.What is the easiest and best way to connect a High-Definition Cable or Satellite box to the TV? Use an HDMI cable. It carries both digital video and audio signal in HD. HDMI cable is the only cable needed to connect an HD device to the TV.Why does the CC button not display Closed Caption? When viewing TV via an HDMI connected device, such as a Cable or Satellite box, CC must be enabled at the device. Closed Caption is available only at supported TV programming.Why does the screen and back cover of the TV get warm? The main unit radiates heat and some of the parts may become hot. This is normal operation and does not affect the performance of the set. Ensure good ventilation. Do not block the ventilation holes of the TV and do not place the TV on top of other equipment.Why doesn’t the Remote Control work? Check that the batteries are fresh, are of the same type and are installed with the correct polarity (+ & -). To operate other devices, such as changing channels when using Cable or Satellite boxes or operating non-Panasonic Blu-ray players, use the remote supplied with the device.Why is the “ANT/Cable” option at the top of the “Input select” menu gray-out and cannot be selected? During “First time setup”, you indicated in step - that you are using Cable or Satellite box and in step - b that the box is connected to one of the TV’s AV inputs. In this case, the Antenna/Cable input is deactivated to prevent unintentional switching into unused tuner. To re-activate, press MENU, select SETUP and repeat “First time setup”.Some menu items are grayed-out and cannot be selected. Why? Depending on certain modes or the selected input, some options are not available. For example, Zoom adjustments are only available when the FORMAT is changed to zoom mode. tcp5055GT30eng0606.indb61tcp5055GT30eng0606.indb61 2011/02/2115:34:042011/02/2115:34:0462
Networking 3D How do I get VIERA Connect to
1. You need a broadband (high speed) Internet service with a
speed of no less than 1.5 Mbps (p. 39).
Connect the TV to the Internet through your router by an
Ethernet cable or a Panasonic Wireless LAN Adapter (included).
3. Run the “Connections Test”, under the Network Settings menu.
If Connection test fails, then check with your Internet service
provider or router/modem manufacturer if there are firewall,
content filter or proxy settings that may block the TV from
accessing the Internet.
How do I check for the latest
software (firmware) version for
In the main menu, select “Setup”. Highlight “Network Settings”
and press OK. Select “Software Update”. The current version
and latest version software will be shown. If software update
is “grayed out”, the TV is not connected to the Internet. If
newer version is available, update your TV. Follow the on-
screen instructions, do not power off the TV until the update is
complete. Be patient; firmware update may take a while.
Can I use any USB WiFi adapter to
connect the TV to my wireless network?
The TV’s internal software was designed to work with
Panasonic’s Wireless LAN Adapter (included).
How do I reset my TV to all factory
defaults and settings?
In the main menu, select “Setup”. Highlight “Reset to Defaults”
and press OK. Enter your password (if created earlier) or
create a temporary new password. Select Yes to reset the TV.
Can I download new apps
(content & services) into my
No. From time to time, Panasonic will add new quality apps
into VIERA Connect. Your TV will be notified automatically
when new apps are available. Just leave your TV connected
to the Internet. When asked, approve the firmware update to
enjoy new functionality downloaded to your TV.
Why doesn’t my 3D video source
1. Begin playing the 3D video source.
2. Ensure that the Panasonic 3D Eyewear (glasses) are on
(check the glasses battery)
3. Press “3D” button directly or press the VIERA TOOLS button
on the TV’s remote control and select “3D”
3D Blu-ray discs must be played with a 3D capable Blu-ray player.
Check with your Cable or Satellite provider if their supplied box is 3D capable.
3. 3D signal must be connected to the TV via an HDMI cable.
When selecting some 3D video
content, why are there two
pictures next to each other?
There are a few different 3D formats and the current setting may
not match the incoming 3D signal. The format should change
automatically, but depending on the source/connection it may not
signal the TV properly. To manually select other 3D formats:
1. Press “3D” button directly or press VIERA TOOLS button on
the TV’s remote control and select “3D”
2. In the “3D format select” menu, choose another 3D format
such as “side by side” or “top and bottom”.
3. Remember to switch the 3D format setting back to “AUTO”
when you go back to viewing a standard 2D signal.
Why does the power on the 3D Eyewear (glasses) turn off by itself?
The 3D Eyewear receives special synchronizing infrared signals
from the TV. If no signal is received within 5 minutes, the 3D Eyewear automatically turns itself off to save power. Ensure that no
objects are blocking the path between the 3D Eyewear and the TV.
Why does the left and right sides
of the image seem reversed?
The 3D format has two different “phases”. Try the other phase:
In the main menu, select “Setup”. Highlight “3D setting” and press OK.
2. In the “3D Settings” menu, select “Left/Right Swap”
Can I use 3D glasses similar to the
kind given at a 3D movie theater to
watch 3D content on my 3D TV?
No. Movie theater’s 3D glasses are passive. They use a simple
filter ‘lens’. Panasonic 3D Eyewear are actively synchronizing
the left/right eye viewing with the display, providing a superior
3D viewing experience.
tcp5055GT30eng0606.indb62tcp5055GT30eng0606.indb62 2011/02/2115:34:052011/02/2115:34:0563
Design and Specifications are subject to change without notice. Mass and Dimensions shown are approximate. [TC-P50GT30] [TC-P55GT30] Specifications
Wireless LAN Adapter
DC 5V (USB powered) 500mA Antenna
* Transfer rates are theoretical values; however, actual communication rate will vary according to communication environment or
connected equipment.
tcp5055GT30eng0606.indb64tcp5055GT30eng0606.indb64 2011/02/2115:34:062011/02/2115:34:0665
CC Closed Caption 19,52,57
Channel 16,19-20,46-47
Channel Surf Mode 20,53
Communication camera 8,43
Customer Service Directory 67
I Image Viewer Auto 53
M Media player 22,26-31
N Network camera 37-39,42,45
Network services 17,38-42,53
Specifications 63-64
Limited Warranty (for U.S.A. and Puerto Rico only)
Limited Warranty Coverage
If your product does not work properly because of a defect in materials or workmanship, Panasonic Consumer
Electronics Company (referred to as “the warrantor”) will, for the length of the period indicated on the chart below, which
starts with the date of original purchase (“Limited Warranty period”), at its option either (a) repair your product with new
or refurbished parts, (b) replace it with a new or a refurbished equivalent value product, or (c) refund your purchase price.
The decision to repair, replace or refund will be made by the warrantor.
PLASMA TV CATEGORIES PARTS LABOR SERVICE Up to 42” (diagonal)
1 (ONE) YEAR 1 (ONE) YEAR Carry-In
46” (diagonal) and larger On-Site
During the “Labor” Limited Warranty period there will be no charge for labor. During the “Parts” Limited Warranty period,
there will be no charge for parts.
You must carry-in your product or arrange for on-site service during the Limited Warranty period. If non-rechargeable
batteries are included, they are not warranted. This Limited Warranty only applies to products purchased and serviced
in the United States or Puerto Rico. This Limited Warranty is extended only to the original purchaser of a new product
which was not sold “as is”. A purchase receipt or other proof of the original purchase date is required for Limited Warranty
On-Site or Carry-in Service
For On-Site or Carry-In Service in the United States and Puerto Rico call 1-877-95-VIERA (1-877-958-4372).
On-site service where applicable requires clear, complete and easy access to the product by the authorized servicer
and does not include removal or re-installation of an installed product. It is possible that certain on-site repairs will not
be completed on-site, but will require that the product or parts of the product, at the servicer’s discretion be removed for
shop diagnosis and/or repair and then returned.
Limited Warranty Limits And Exclusions
This Limited Warranty ONLY COVERS failures due to defects in materials or workmanship, and DOES NOT COVER
normal wear and tear or cosmetic damage, nor does it cover markings or retained images on the glass panel resulting
from viewing fixed images (including, among other things, non-expanded standard 4:3 pictures on wide screen TV’s,
or onscreen data in a stationary and fixed location). The Limited Warranty ALSO DOES NOT COVER damages which
occurred in shipment, or failures which are caused by products not supplied by the warrantor, or failures which result
from accidents, misuse, abuse, neglect, bug infestation, mishandling, misapplication, alteration, faulty installation,
set-up adjustments, misadjustment of consumer controls, improper maintenance, power line surge, lightning damage,
modification, or commercial use (such as in a hotel, office, restaurant, or other business), rental use of the product,
service by anyone other than a Factory Service Center or other Authorized Servicer, or damage that is attributable to acts
THERE ARE NO EXPRESS WARRANTIES EXCEPT AS LISTED UNDER “LIMITED WARRANTY COVERAGE”.
THE WARRANTOR IS NOT LIABLE FOR INCIDENTAL OR CONSEQUENTIAL DAMAGES RESULTING FROM THE USE OF THIS PRODUCT, OR ARISING OUT OF ANY BREACH OF THIS LIMITED WARRANTY. (As examples, this
excludes damages for lost time, cost of having someone remove or re-install an installed unit if applicable, or travel to
and from the servicer. The items listed are not exclusive, but are for illustration only.) ALL EXPRESS AND IMPLIED WARRANTIES, INCLUDING THE LIMITED WARRANTY OF MERCHANTABILITY, ARE LIMITED TO THE PERIOD OF THE LIMITED WARRANTY.
Some states do not allow the exclusion or limitation of incidental or consequential damages, or limitations on how long an
implied Limited Warranty lasts, so the exclusions may not apply to you.
This Limited Warranty gives you specific legal rights and you may also have others rights which vary from state to state. If
a problem with this product develops during or after the Limited Warranty period, you may contact your dealer or Service
Center. If the problem is not handled to your satisfaction, then write to the warrantor’s Consumer Affairs Department at
the addresses listed for the warrantor.
PARTS AND SERVICE (INCLUDING COST OF AN ON-SITE SERVICE CALL, WHERE APPLICABLE) WHICH ARE NOT COVERED BY THIS LIMITED WARRANTY ARE YOUR RESPONSIBILITY.
tcp5055GT30eng0606.indb66tcp5055GT30eng0606.indb66 2011/02/2115:34:062011/02/2115:34:0667 Support Information Customer Services Directory (for U.S.A. and Puerto Rico)
Limited Warranty (for U.S.A. and Puerto Rico only)
Customer Services Directory (for U.S.A. and Puerto Rico) Customer Services Directory (United States and Puerto Rico)Obtain Product Information and Operating Assistance; locate your nearest Dealer or Service Center; purchase Parts and Accessories; or make Customer Service and Literature requests by visiting our Web Site at: http://www.panasonic.com/help or, contact us via the web at: http://www.panasonic.com/contactinfo You may also contact us directly at:1-877-95-VIERA (958-4372)Monday-Friday 9 am-9 pm; Saturday-Sunday 10 am-7 pm, EST. ■For hearing or speech impaired TTY users, TTY: 1-877-833-8855 Accessory Purchases (United States and Puerto Rico)Purchase Parts, Accessories and Instruction Books on line for all Panasonic Products by visiting our Web Site at: http://www.pstc.panasonic.com or, send your request by E-mail to: npcparts@us.panasonic.com You may also contact us directly at: 1-800-332-5368 (Phone) 1-800-237-9080 (Fax Only) (Monday - Friday 9 am to 9 pm, EST.)Panasonic Service and Technology Company20421 84th Avenue South,Kent, WA 98032(We Accept Visa, MasterCard, Discover Card, American Express, and Personal Checks) ■For hearing or speech impaired TTY users, TTY: 1-866-605-1277
tcp5055GT30eng0606.indb67tcp5055GT30eng0606.indb67 2011/02/2115:34:062011/02/2115:34:0668
Limited Warranty (for Canada)
Panasonic Canada Inc.
5770 Ambler Drive, Mississauga, Ontario L4W 2T3
PANASONIC PRODUCT – LIMITED WARRANTY Panasonic Canada Inc. warrants this product to be free from defects in material and workmanship under normal use and for a period as stated below from the date of original purchase agrees to, at its option either (a) repair your product with
new or refurbished parts, (b) replace it with a new or a refurbished equivalent value product, or (c) refund your purchase price. The decision to repair, replace or refund will be made by Panasonic Canada Inc.Viera TV (42” & over) In-home service One (1) year, parts (including panel) and labour.Viera TV (under 42”) Carry-in service One (1) year, parts (including panel) and labour.In-home Service will be carried out only to locations accessible by roads and within 50 km of an authorized Panasonic service facility.In-home service requires clear, complete and easy access to the product by the Authorized Servicer and does not include removal or re-installation of an installed product. If removal is required to service the product, it will be at the discretion of
the Servicer and in no event will Panasonic Canada Inc. or the Servicer be liable for any special, indirect or consequential damages. This warranty is given only to the original purchaser, or the person for whom it was purchased as a gift, of a Panasonic brand product mentioned above sold by an authorized Panasonic dealer in Canada and purchased and used in Canada, which product was not sold “as is”, and which product was delivered to you in new condition in the original packaging. IN ORDER TO BE ELIGIBLE TO RECEIVE WARRANTY SERVICE HEREUNDER, A PURCHASE RECEIPT OR OTHER PROOF OF DATE OF ORIGINAL PURCHASE, SHOWING AMOUNT PAID AND PLACE OF PURCHASE IS REQUIREDLIMITATIONS AND EXCLUSIONSThis warranty ONLY COVERS failures due to defects in materials or workmanship, and DOES NOT COVER normal wear and tear or cosmetic damage. The warranty ALSO DOES NOT COVER damages which occurred in shipment, or failures which are caused by products not supplied by Panasonic Canada Inc., or failures which result from accidents, misuse, abuse, neglect, mishandling, misapplication, alteration, faulty installation, set-up adjustments, misadjustment of consumer controls, improper maintenance, power line surge, lightning damage, modification, introduction of sand, humidity or liquids, commercial use such as hotel, office, restaurant, or other business or rental use of the product, or
service by anyone other than a Authorized Servicer, or damage that is attributable to acts of God. Dry cell batteries are also excluded from coverage under this warranty.THIS EXPRESS, LIMITED WARRANTY IS IN LIEU OF ALL OTHER WARRANTIES, EXPRESS OR IMPLIED, INCLUDING ANY IMPLIED WARRANTIES OF MERCHANTABILITY AND FITNESS FOR A PARTICULAR PURPOSE. IN NO EVENT WILL PANASONIC CANADA INC. BE LIABLE FOR ANY SPECIAL, INDIRECT OR CONSEQUENTIAL DAMAGES RESULTING FROM THE USE OF THIS PRODUCT OR ARISING OUT OF ANY BREACH OF ANY EXPRESS OR IMPLIED WARRANTY. (As examples, this warranty excludes damages for lost time, travel to and from the Authorized Servicer, loss of or damage to media or images, data or other memory or recorded content. This list of items is not exhaustive, but for illustration only.) In certain instances, some jurisdictions do not allow the exclusion or limitation of incidental or consequential damages, or the exclusion of implied warranties, so the above limitations and exclusions may not be applicable. This warranty gives you specific legal rights and you may have other rights which vary depending on your province or territory. WARRANTY SERVICE For product operation and information assistance, please contact: Our Customer Care Centre: 1-800 #: 1-866-330-0014 Email link: “Contact us → email” on www.vieraconcierge.ca For product repairs, please contact Viera Customer Care Agent using the above contact info.IF YOU SHIP THE PRODUCT TO A SERVICENTRECarefully pack and send prepaid, adequately insured and preferably in the original carton.Include details of the defect claimed, and proof of date of original purchase. tcp5055GT30eng0606.indb68tcp5055GT30eng0606.indb68 2011/02/2115:34:062011/02/2115:34:0669
Limited Warranty (for Canada)
tcp5055GT30eng0606.indb69tcp5055GT30eng0606.indb69 2011/02/2115:34:072011/02/2115:34:07NoteNoteNoteNoteNoteNoteCustomer’s Record
The model number and serial number of this product can be found on its back cover. You should note this serial number in
the space provided below and retain this book, plus your purchase receipt, as a permanent record of your purchase to aid
in identification in the event of theft or loss, and for Warranty Service purposes.
Model Number Serial Number
Division of Panasonic Corporation of North America
2011 Panasonic Corporation of North America. All Rights Reserved.
USA Only: Disposal may be regulated in your community due to
Environmental considerations. For disposal or recycling information,
please visit Panasonic website: http://www.panasonic.com/environmental
• Para ver la televisión ····································19 • Utilización de VIERA TOOLS ·······················22 • Visualización de contenido de dispositivos externos ·······················································23 • Visualización de imagen 3D en TV ··············24 • Utilización de Reproductor de Medios ·········26 • VIERA Link TM “HDAVI Control TM ” ·················· 32 • Uso de servicios de Red ······························38 • Conexión de red ·········································39 • Configuración de red ··································40 • VIERA Connect (Disfrute el servicio de Internet) ··43 • Uso de la característica DLNA ····················44 • Cámara de red ············································45 • Edición y configuración de canales ··············46 • Cómo utilizar las funciones de los menús ····48 • Ajustes de imágen ······································49 • Ajustes de audio ·········································51 • Ajustes de temporizador ·····························51 • Bloqueo ·······················································52 • Subtítulos ····················································52 • Ajuste ··························································53 • Lista de clasificaciones para el bloqueo ······54 • Información técnica ······································ 55 • Cuidados y limpieza ····································· 59 • Preguntas frecuentes ··································· 60 • Especificaciones ··········································63 • Índice ···························································65 Características básicas
Información de soporte
• Accesorios/Accesorios opcionales ················8 • Conexiones ················································· 11 • Identificación de los controles ·····················14 • Ajuste Inicial ················································15 Inicio
(x2, x5, x30, x70, x100).
(x2, x5, x30, x70, x100).
V VIERA Connect 22, 38, 43
• Visionnement de la télévision·······················19 • Utilisation des fonctions VIERA TOOLS ·······22 • Visionnement de contenu à partir de périphériques ···············································23 • Visionnement d’images 3D sur téléviseur ····24 • Utilisation du lecteur multimédia ··················26 • VIERA Link TM “HDAVI Control TM ” ··················· 32 • Utilisation des services du réseau ···············38 • Connexions réseau ·····································39 • Réglage du réseau ·····································40 • VIERA Connect (accès aux services Internet) ··· 43 • Utilisation de la fonction DLNA ···················44 • Caméra réseau ···········································45 • Programmation et édition des canaux ·········46 • Utilisation des fonctions des menus ·············48 • Réglages de l’image ··································· 49 • Réglages audio ···········································51 • Réglages de la minuterie ····························51 • Blocage ·······················································52 • Sous-titres ···················································52 • Réglage ······················································53 • Liste des classifications pour contrôle parental ························································ 54 • Informations techniques ·······························55 • Entretien et nettoyage ··································59 •
Foire aux questions(FAQ) ··························· 60
• Spécifications ··············································· 63 • Index ····························································65 • Garantie limitée ············································66 Fonctions de base
Renseignements supplémentaires
• Mesures de sécurité ·······································4 À lire attentivement
• Accessoires/Accessoires en option ···············8 • Connexions ················································· 11 • Emplacement des commandes ···················14 • Réglage initial ··············································15 Mise en route
tcp5055GT30fra0606.indb3tcp5055GT30fra0606.indb3 2011/02/1816:24:582011/02/1816:24:584
Contact: Panasonic Consumer Electronics Company
Anti-rémanence image
Anti-rémanence image
“Canal”, “Jeu”, “Émission” et “
WEP (64 bits/128 bits)
Dimensions (L × H × P)
30,00 mm x 10,72 mm x 94,85 mm (1,18 po x 0,42 po x 3,73 po)
VIERA Connect 22, 38, 43
Division of Panasonic Corporation of North America