USER MANUAL DAIKIN ONE LITE DAIKIN
Welcome! This homeowner guide features an overview of functions and/or features available through the Daikin One lite smart thermostat*.
*The Daikin One home app is the preferred means of accessing these features, but the instructions that follow are helpful if the app is not used.

Create a Daikin One home app account
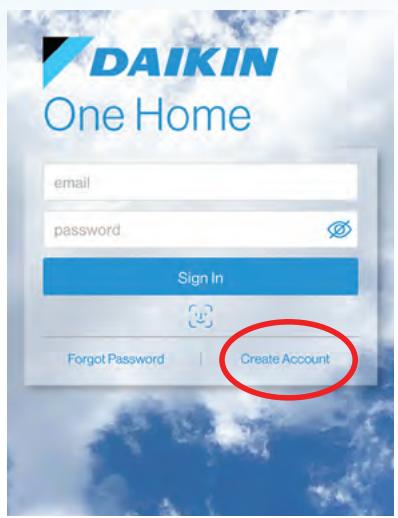
1. After installing the Daikin One home app from the App Store or Play Store, select "Create Account".
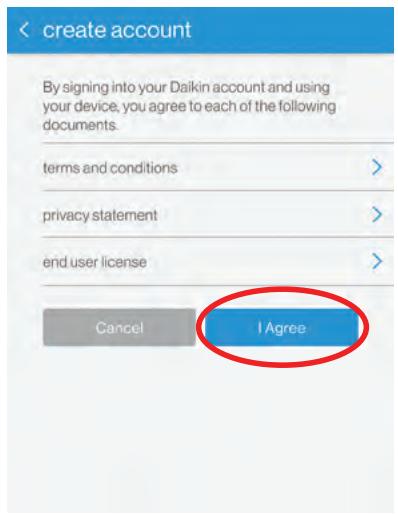
2. Review the documents and select "I Agree."
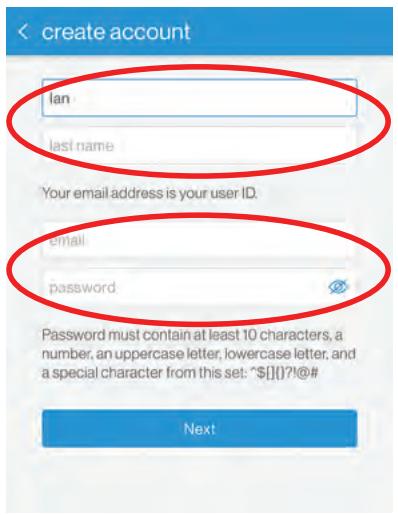
3. Enter your name, email address, and a password that meets the length and complexity requirements.
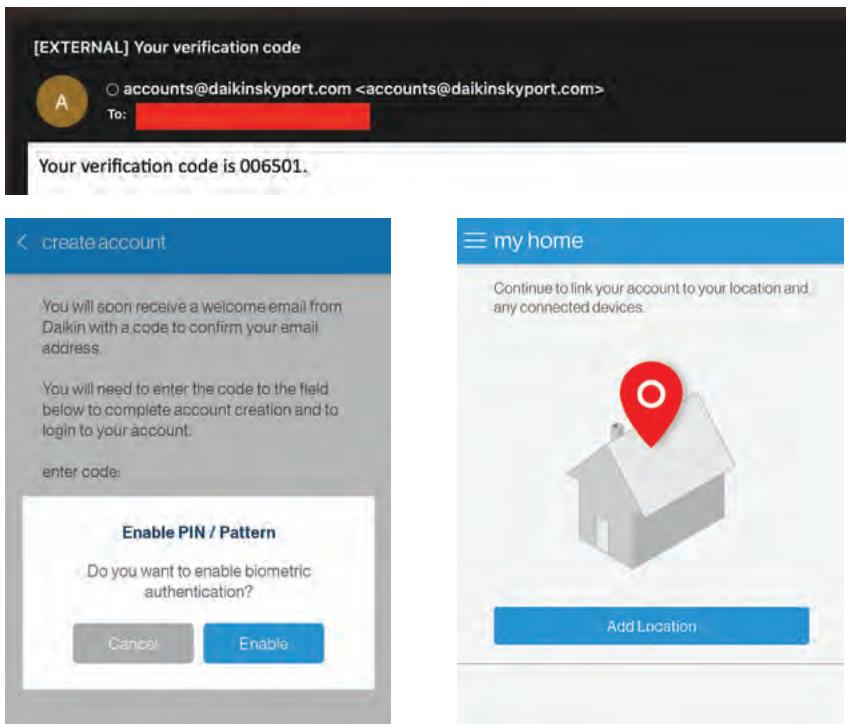
4. Check your email account for an email with your account verification code.
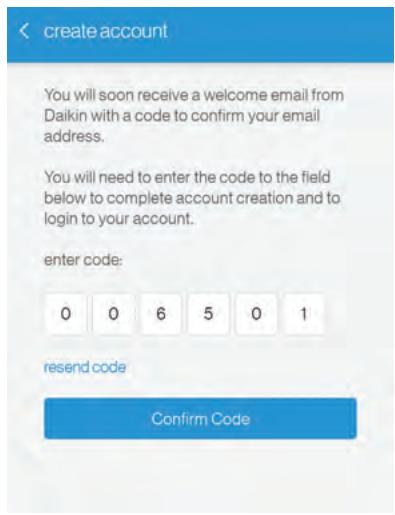
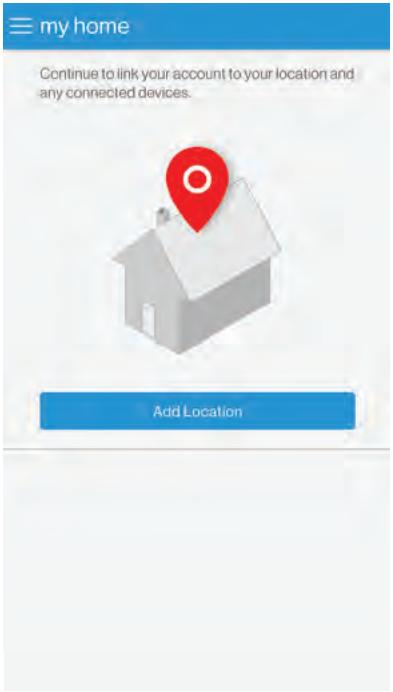
5. Enter the verification code in the app and select "Confirm Code." When successful, you will next be asked about enabling biometrics, and then navigated to the "my home" screen.

To learn more about operating the Daikin One lite smart thermostat, visit our how-to videos at: https://daikinone.com/product/one-lite-smart-thermostat
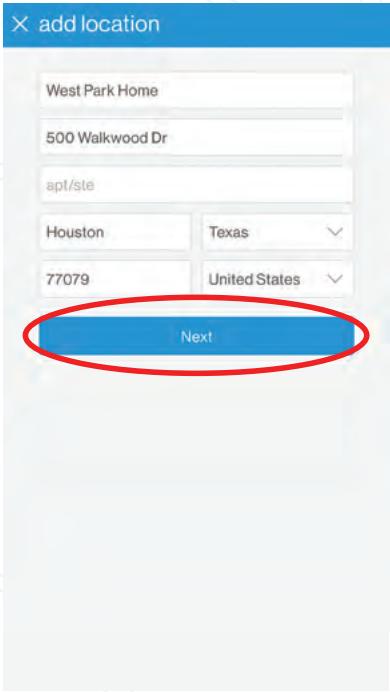
Add location name and address to the Daikin One home app
-
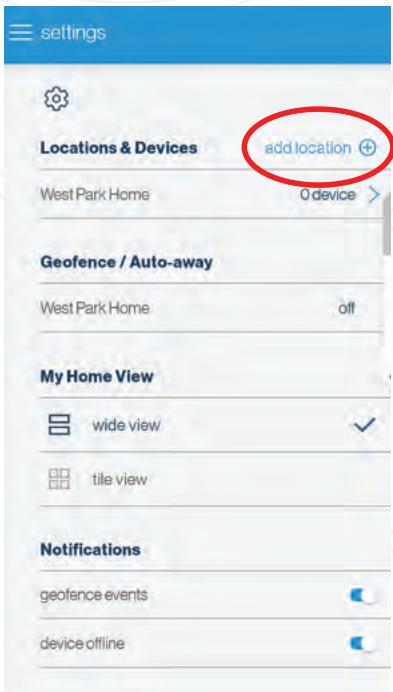
After creating a Daikin One home account, you will be prompted to add a location. If you already have a location and want to add another, select "add location" on the "settings" screen.
-
Enter the location name and address, then select "Next".
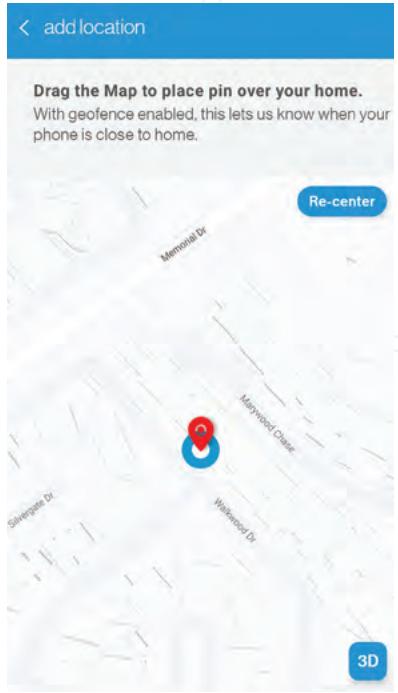
- Verify the location address on the map. Move the pin to the correct location if needed, then select "Save This Location".
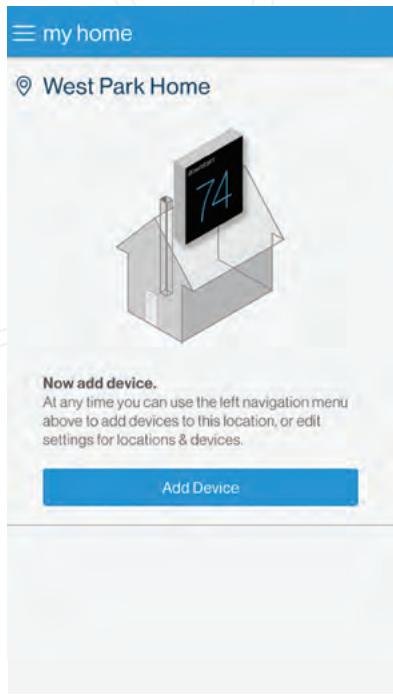
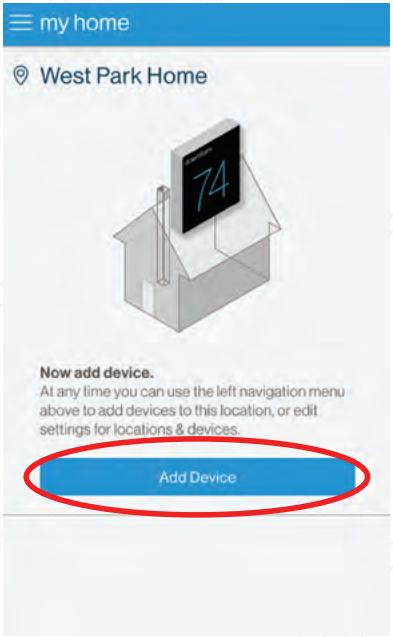
- You will be navigated to the "my home" page where you can add a thermostat.
Connect thermostat to Wi-Fi using the Daikin One home app


-
After creating a Daikin One home account and adding a location, select "Add Device" to add a thermostat. To add additional thermostats, select "add device" found in drop down menu at the top left of the "my home" screen.
-
Select "Daikin One lite smart thermostat" from the list, select a location, and press "Next".

-
Select "Connect to Wi-Fi"
-
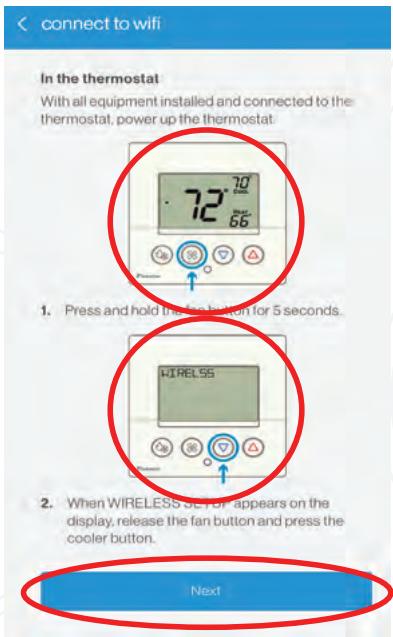
Press the fan button for 5 seconds, then press the cooler/down button to put the thermostat in "AP MODE", then return to the app and select "Next".
-
Follow these instructions to directly connect the phone Wi-Fi to the thermostat, then select "Next" in the app.
Connect thermostat to Wi-Fi using the Daikin One home app (Continued)
connect to wifi
Important
Read all these steps before proceeding.
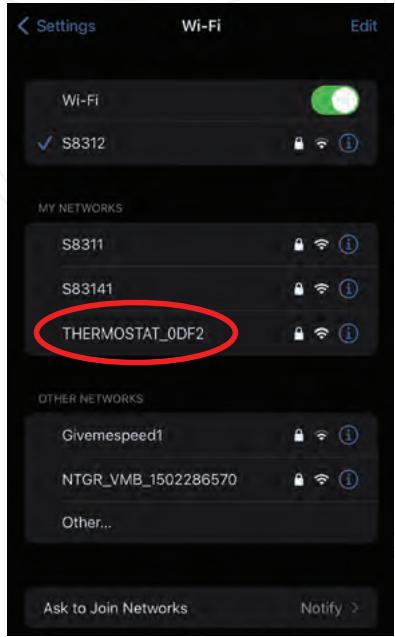
- Leave this app and go to WiFi settings.
In mobile device settings
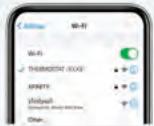

- In WiFi settings select THERMOSTAT-XXXX and enter 123456789 as the password.
- When connected to THERMOSTAT-XXX, leave mobile device settings.
- Return to this app and continue to next step.

- Follow these instructions to go to your phone's Wi-Fi settings to connect the phone Wi-Fi directly to the thermostat, then return to the Daikin One home app and select "Next".
< connect to wifi
Select a home wifi network:
network
choose network
If a previously commissioned thermostat is disconnected from WiFi, due to change of router or password, you may need to reconnect to the network.
Note: When connected to WiFi the system may check the thermostat's firmware version, and if needed download and update the firmware, rebooting the thermostat.
- Select "choose network", then select the appropriate Wi-Fi network from the list.
Select a network to connect to the thermostat.
S83141


NTGR_VMB_1502286570
S8311


Givem speed1

TheCharltons

NETGEAR84-Guest

Maria

The Charitons

Sugarstix

NETGEAR42

X networks

7. Enter the password and select "Connect".
< connect to wifi
When the thermostat is connected to the WiFi network, the WiFi icon will appear on the display.

Finish
WiFi not connected?
If you do not see the WiFi icon, but instead see just a dot (·) the thermostat was not connected to your WiFi network and you may need to try to connect again.
Retry Connection to WiFi
8. Confirm that the Wi-Fi icon appears on the thermostat screen, then select "Finish".
Connecting to the Daikin One home app

my home

West Park Home

Now add device.
At any time you can use the left navigation menu above to add devices to this location, or edit settings for locations & devices.
Add Device

1. After creating a Daikin One home account and connected the Lite thermostat to Wi-Fi, select "Add Device" from the "my home" screen. To add additional thermostats, select "add device" found in drop down menu at the top left of the "my home" screen.
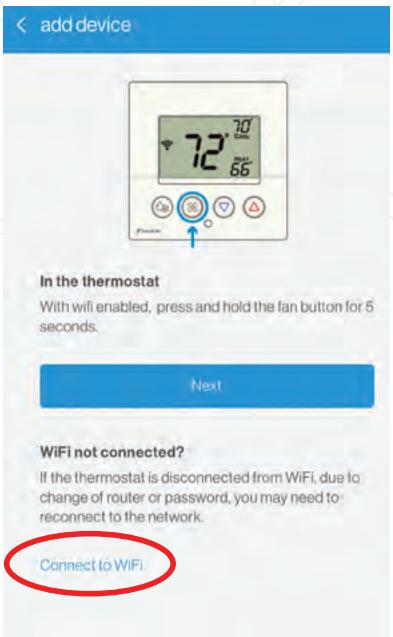
add device

With wifi enabled, press and hold the fan button for 5 seconds.
Next
WiFi not connected?
If the thermostat is disconnected from WiFi, due to change of router or password, you may need to reconnect to the network.
Connect to WiFi
3. Press and hold the fan
button on the thermostat for 5 seconds to put the thermostat in "Wireless Setup" mode, then select "Next" in the app.
add device

When WIREFLESS STOP APPEND to the display, release the fan button and press the warmer button.

4. Press the up/warmer button
on the thermostat to display the 6-digit pairing code, then return to the app and select "Next".
add device

Enter the six digit number displayed on the thermostat screen.

5. Enter the pairing code and select "Add".

add device
Add:
Daikin One Lite Smart Thermostat
To this location:

Hermosa

Home(Main)
Next
If you want to add a thermostat to a different location, go back and choose another location.
2. Select "Daikin One lite smart thermostat" from the list, select a location, and press "Next."

my home

Hermosa


Main Home

6. Confirm that the newly added thermostat appears on the "My Home" screen.
You are now able to control your thermostat from your phone using the Daikin One home app!
Control / Interface Overview

Mode Selection

On-screen display


As each mode is selected, its name appears in the upper left corner of the display. The text disappears 1 second after the mode is selected, but the relevant setpoints for the selected mode are always displayed.


Adjust Setpoint
Increasing the temperature
Press the up arrow button to raise the setpoint.
Decreasing the temperature
Press the down arrow button lowers the setpoint.
Raising and lowering the setpoint
Button presses raises and lowers the temperature by 1 degree when using Fahrenheit degree units. When using Celsius the temperature raises and lowers by 0.5 degrees.
Note: For cool only mini and multi-split systems, heat mode, auto mode, emergency heat mode, and all heat setpoints including those for away mode and schedule mode are hidden.

Off mode


Press the up and down
buttons have no effect when the system is off

Auto mode


When set to auto mode, pressing the up arrow button increases both the heat and cool setpoints. Pressing the down arrow button decreases both the heat and cool setpoints.
To adjust heat or cool setpoints individually, switch to heat or cool mode, adjust the setpoint, and then return to auto mode.
When either the cool or heat setpoints hit the top/bottom of the scale the other setpoint will continue to adjust until the minimum difference between setpoints is hit.

Heat or cool mode


When set to heat or cool modes, pressing the up arrow button raises the setpoint. Pressing the down arrow button lowers the setpoint.

Schedule mode


When the schedule is enabled, the up and down buttons raise and lower the setpoints as usual. Adjustments made this way remain in place until the next schedule event is reached.
For example, if a schedule has been set to heat to 68^ during the day period and 72^ during the evening period, changing the setpoint to 74^ at 4pm will override the day schedule. When the evening period begins, the system will revert back to the scheduled 72^ .
Setting Fan Settings*
*Fan settings can be changed more easily on the air quality screen of the Daikin One home app

Primary display


» Pressing the fan button on the thermostat will turn the fan on and off.
» Press and hold the fan button for 2 seconds to access the fan settings. Next, press either the mode or fan button to advance through each of the fan settings.
» For the cool and heat fan speeds, press the up and down buttons to cycle through the available fan speeds of auto and 1 (low) through 5 (high).
» The cool and heat louver position settings are available for indoor units that support these settings. When the vertical or horizontal louver swing is turned on, the louvers will oscillate in the relevant direction. A fixed direction can be set by turning the appropriate swing setting off when the louvers are in the desired position.
Press and hold the mode button for 2 seconds at any time to exit the home screen. The system will return to the home screen automatically after 2 minutes of inactivity.

Cool Fan Speed
Press the up and down buttons to cycle through the available fan speeds of auto and 1 (low) through 5 (high).

Cool Vertical Swing
Press the up and down buttons to toggle the cool mode vertical swing off and on

Cool Horizontal Swing
Press the up and down buttons to toggle the cool mode horizontal swing off and on

Heat Fan Speed
Press the up and down buttons to cycles through available auto speeds 1-5.

Heat Vertical Swing
Press the up and down buttons to toggle the heat mode vertical swing off and on.

Heat Horizontal Swing
Press the up or down buttons to toggle the heat mode horizontal swing off and on.
Press the fan button to return to the home screen.
Setting the Schedule — Step 1
Setting the daily schedule
Setting up a daily schedule can be accomplished more easily using the Daikin One home app. A schedule automatically uses different heat and/or cool setpoints for different days of the week and different periods of each day. The schedule repeats each week, and can have up to 4 schedule events per day, each with its own heat and cool setpoints.

Press and hold the fan and warmer (up) buttons for 2 seconds to enter schedule mode for programming a schedule. While in schedule mode, press the mode button to advance through each setting for each day of the week and each time period of each day. To exit schedule mode and return to the home screen at any time, press and hold the mode button for 2 seconds. The system will return to the home screen automatically after 2 minutes of inactivity.
Schedule Instructions
FSD cycles through the following:
SCHEBUL
U5ETHE
WARMER
COOLER
BUTTONGS
TO
ENABBLE
SCHEJUL
USE THE
MODE
BUTTON
FOR
SETUP
Schedule Instructions
Warmer (Up) and cooler (Down) buttons toggle schedule on and off.
Mode button advances to the next step
Schedule Instructions
FSD cycles through the following:
SET THE
S[HE]UL
USE THE
WARMER
COOLER
BUTTONS
TO
CYCLE
THROUGH
THE
OPTIONS
USE THE
MOJE
BUTTIN
TO
ADVANCE
A
CONFIRM
THROUGH
T H F
Setting the Schedule — Step 2

Setting the Schedule — Step 3

Setting the Schedule — Step 4


Enable evening event.

Set evening event start time.

Set evening event cool setpoint.


Enable evening event heat setpoint
Enable evening event.

Enable night event.

Set night event start time.

Set night event cool setpoint.

Enable night event heat setpoint
Setting the Schedule — Step 5

Setting Away Setpoints
Setting away setpoints
The Away setpoints allow you to save energy by limiting heating and cooling when you are away from home. The Away setpoints are also used when geofencing is enabled in the Daikin One Home App, and can be more easily setup in the app..
» Press and hold the mode and cooler "down" buttons to enter the settings for Away mode.
» Press the mode button to advance through the away mode settings, and use the warmer (up) and cooler (down) buttons to change each setting.
» To exit to the home screen at any time, press and hold the mode button for 2 seconds. The system will return to the home screen automatically after 2 minutes of inactivity.

Primary Display
Press and hold the fan and cooler (down) buttons to enter the settings for Away mode.

Press the warmer (up) and cooler (down) buttons toggles away on or off. Press the mode button to advance. Press mode to advance.

Press mode to advance.
Display cycles through the following:
SET THE
A
SETPNT5
USE THE
NOE
BUTTON
T0
ADVANCE
THROUGH
THE
MOES

Press the warmer (up) and cooler (down)
buttons to adjust the cooling setpoint. Press the mode button again.


Press the warmer (up) and cooler (down) buttons to adjust the heating setpoint.
Locking/Unlocking the Keypad
Setting the daily schedule
To prevent unauthorized use of the thermostat, the front panel buttons may be disabled by locking them.


Hold 2 sec


Hold 2 sec
To disable, or "lock" the keypad, press and hold the mode button. While holding the mode button, press the warmer (up) and cooler (down) buttons together, for two seconds. The lock icon will appear on the display, then release the buttons.
To unlock the keypad, press and hold the mode button. While holding the mode button, press the warmer (up) and cooler (down) buttons together, for two seconds. The lock icon will disappear from the display, then release the buttons.


Important Notes
NOTE:
This device complies with Part 15 of the FCC Rules. Operation is subject to the following two conditions: (1) this device may not cause harmful interference, and (2) this device must accept any interference received, including interference that may cause undesired operation. Changes or modifications not expressly approved by Daikin could void the user's authority to operate the equipment.
This equipment has been tested and found to comply with the limits for a Class B digital device, pursuant to part 15 of the FCC Rules. These limits are designed to provide reasonable protection against harmful interference in a residential installation. This equipment generates uses and can radiate radio frequency energy and, if not installed and used in accordance with the instructions, may cause harmful interference to radio communications. However, there is no guarantee that interference will not occur in a particular installation. If this equipment does cause harmful interference to radio or television reception, which can be determined by turning the equipment off and on, the user is encouraged to try to correct the interference by one or more of the following measures:
» Reorient or relocate the receiving antenna.
» Increase the separation between the equipment and receiver.
» Connect the equipment into an outlet on a circuit different from that to which the receiver is connected.
> Consult the dealer or an experienced radio/ TV technician for help.
This device contains license-exempt transmitter(s)/receiver(s) that comply with Innovation, Science and Economic Development Canada's license-exempt RSS(s). Operation is subject to the following two conditions:
1. This device may not cause interference.
2. This device must accept any interference, including interference that may cause undesired operation of the device.
REMARQUE:
Cet équipement a ete teste et declare conforme aux limites imposées aux appeareils numériques de classe B, conformément à la section 15 du reglement de la FCC. Ces limites sont conques pour fournir une protection raisonnable contre les interférences nuisibles dans une installation résidentielle. Cet équipement génére, utilise et peut émettre des fréquences radio et, s'il n'est pas installé et utilisé conformément aux instructions, il peut cause des interférences nuisibles aux radiocommunications. Cependant, rien ne garantit que des interférences ne seroduiront pas dans une installation particulière. Si cet équipement provoque des interférences nuisant à la réception de la radio ou de la télévision, ce qui peut être déterminé en éteignant et en rallumant l'équipment, l'utilisateur est invite à tenter de corriger les interférences en appliquant l'une ou plusieurs des mesures suivantes:
Réorienter ou déplacer l'antenne de réception.
» Augmenter la distance entre l'équipement et le récepteur.
» Connecter l'équipment à une prise d'un circuit différent de celui auquel le récepteur est connecté.
» Consulter le concessionnaire ou un technician experimenté en radio/télévision pour obtenir de l'aide.
L'émetteur/recepteur exempt de licence contenu dans leprésent apparéil est conforme aux CNR d'Innovation, Sciences et Développement économique Canada applicables aux apparéils radio exempots de licence. L'exploitation est autorisée aux deux conditions suivantes:
1. L'appareil ne doit pas produit de brouillage;
2. L'appareil doit accepter tout brouillage radioélectrique subi, même si le brouillage est susceptible d'en compromètement le fonctionnement
FOR ADDITIONAL RESOURCES AND INSTRUCTIONAL VIDEOS, SCAN CODE OR VISIT:
WWW.DAIKINONE.COM

If you encounter any issues or would like assistance with setting up your Daikin One lite smart thermostat, please contact Daikin support at 1-855-Daikin1 and select OPTION SEVEN to be connected with our thermostat support team.
Before purchasing this appliance, read important information about its estimated annual energy consumption, yearly operating cost, or energy efficiency rating that is available from your retailer.

DAIKIN
Our continuing commitment to quality products may mean a change in specifications without notice.
© 2023 DAIKIN COMFORT TECHNOLOGIES NORTH AMERICA, INC.
Houston, Texas · USA · www.daikincomfort.com or www.daikinac.com