ECHOMAP Ultra 2 - Fish Finder GARMIN - Free user manual and instructions
Find the device manual for free ECHOMAP Ultra 2 GARMIN in PDF.
User questions about ECHOMAP Ultra 2 GARMIN
0 question about this device. Answer the ones you know or ask your own.
Ask a new question about this device
Download the instructions for your Fish Finder in PDF format for free! Find your manual ECHOMAP Ultra 2 - GARMIN and take your electronic device back in hand. On this page are published all the documents necessary for the use of your device. ECHOMAP Ultra 2 by GARMIN.
USER MANUAL ECHOMAP Ultra 2 GARMIN
See the Important Safety and Product Information guide in the product box for product warnings and other important information.
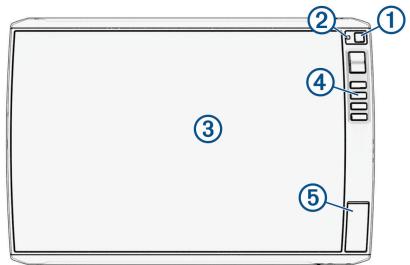
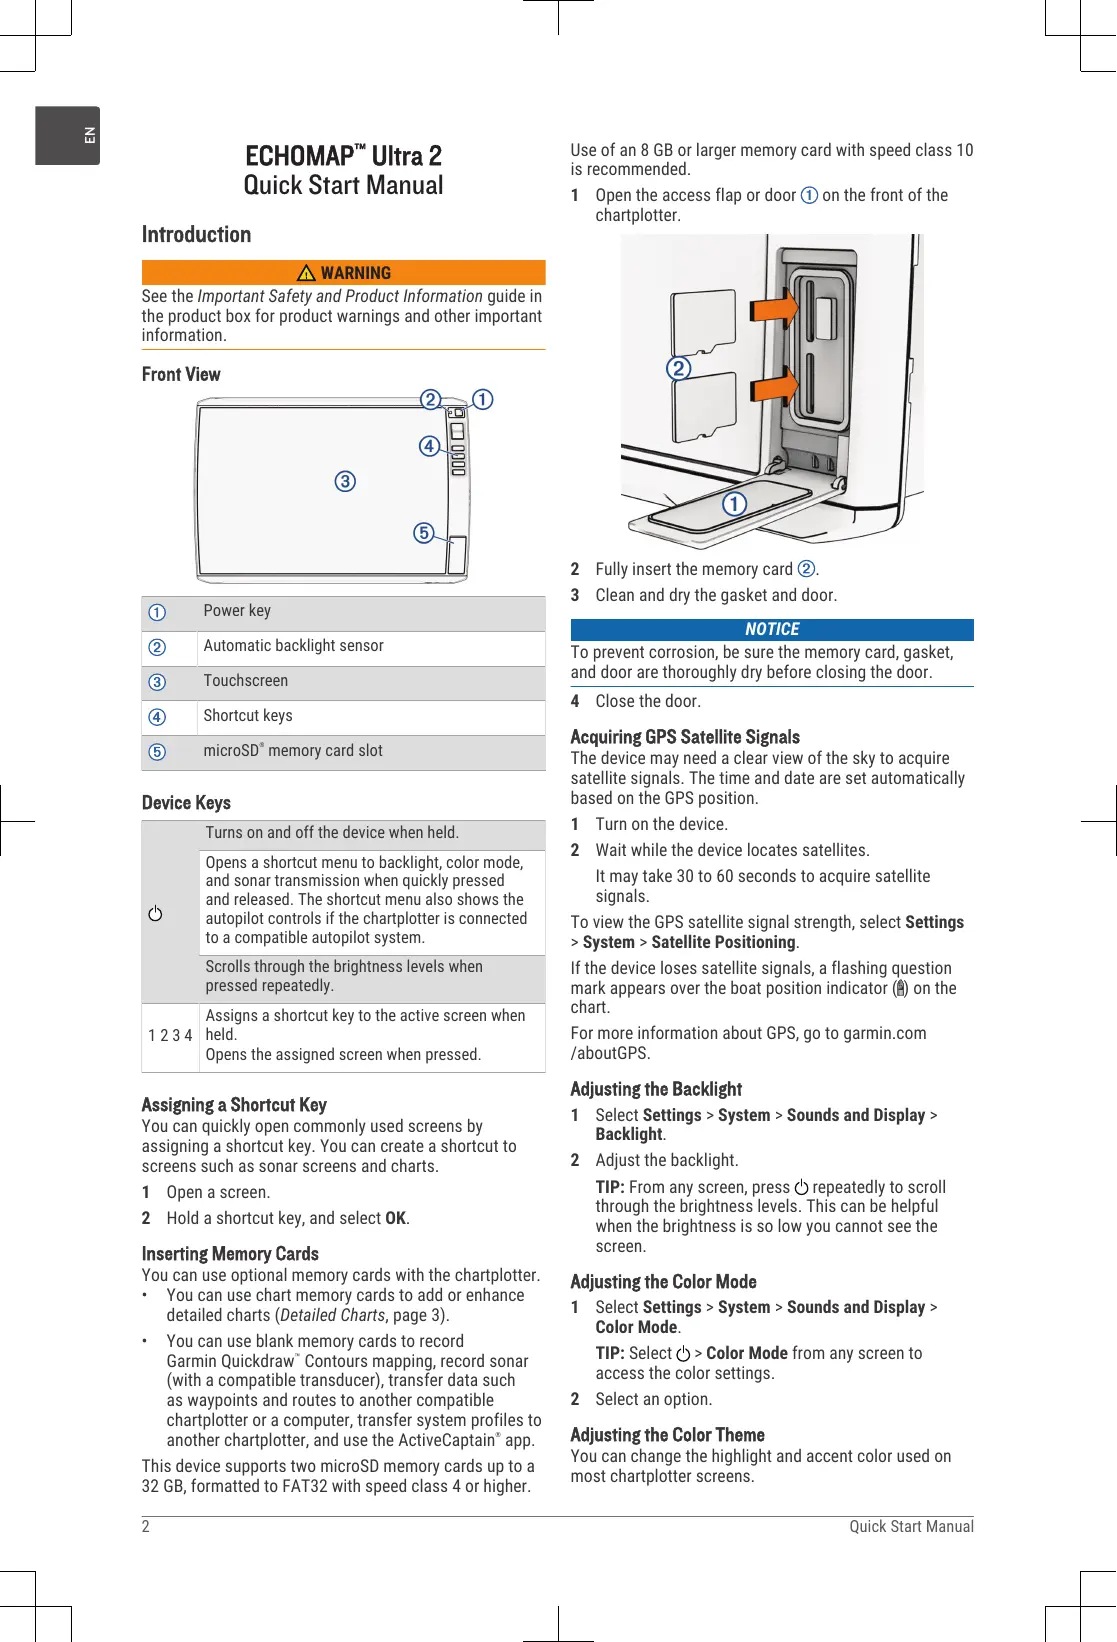
Front View
(1)
Power key
(2)
Automatic backlight sensor
(3)
Touchscreen
(4)
Shortcut keys
(5)
microSD memory card slot
Device Keys
| Turns on and off the device when held. | |
| Opens a shortcut menu to backlight, color mode, and sonar transmission when quickly pressed and released. The shortcut menu also shows the autopilot controls if the chartplotter is connected to a compatible autopilot system. | |
| Scrolls through the brightness levels when pressed repeatedly. | |
| 1 2 3 4 | Assigns a shortcut key to the active screen when held. Opens the assigned screen when pressed. |
Assigning a Shortcut Key
You can quickly open commonly used screens by assigning a shortcut key. You can create a shortcut to screens such as sonar screens and charts.
1 Open a screen.
2 Hold a shortcut key, and select OK.
Inserting Memory Cards
You can use optional memory cards with the chartplotter.
- You can use chart memory cards to add or enhance detailed charts (Detailed Charts, page 3).
- You can use blank memory cards to record Garmin Quickdraw™ Contours mapping, record sonar (with a compatible transducer), transfer data such as waypoints and routes to another compatible chartplotter or a computer, transfer system profiles to another chartplotter, and use the ActiveCaptain® app.
This device supports two microSD memory cards up to a 32 GB, formatted to FAT32 with speed class 4 or higher.
Use of an 8 GB or larger memory card with speed class 10 is recommended.
1 Open the access flap or door ① on the front of the chartplotter.
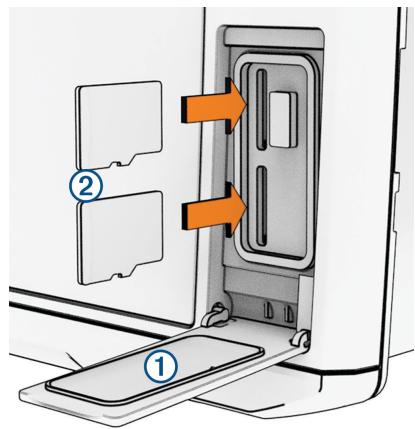
2 Fully insert the memory card ②.
3 Clean and dry the gasket and door.
NOTICE
To prevent corrosion, be sure the memory card, gasket, and door are thoroughly dry before closing the door.
4 Close the door.
Acquiring GPS Satellite Signals
The device may need a clear view of the sky to acquire satellite signals. The time and date are set automatically based on the GPS position.
1 Turn on the device.
2 Wait while the device locates satellites.
It may take 30 to 60 seconds to acquire satellite signals.
To view the GPS satellite signal strength, select Settings > System > Satellite Positioning.
If the device loses satellite signals, a flashing question mark appears over the boat position indicator (O) on the chart.
For more information about GPS, go to garmin.com /aboutGPS.
Adjusting the Backlight
1 Select Settings > System > Sounds and Display > Backlight.
2 Adjust the backlight.
TIP: From any screen, press repeatedly to scroll through the brightness levels. This can be helpful when the brightness is so low you cannot see the screen.
Adjusting the Color Mode
1 Select Settings > System > Sounds and Display > Color Mode.
TIP: Select > Color Mode from any screen to access the color settings.
2 Select an option.
Adjusting the Color Theme
You can change the highlight and accent color used on most chartplotter screens.
1 Select Settings > System > Sounds and Display > Color Theme.
2 Select an option.
Rearranging the Category Items
You can customize the screen by rearranging the items in the categories.
1 Select a category to customize, such as Charts
2 Hold the button you want to move, such as Nav. Chart, until the menu appears.
3 Select Rearrange.
Arrows appear on the feature buttons.
4 Reselect the button to move.
5 Select the new location for the button.
6 Repeat until you finish customizing the screen.
7 Select Back or Close when finished.
Getting Started with the ActiveCaptain App
You can connect a mobile device to the ECHOMAP Ultra 2 device using the ActiveCaptain app. The app provides a quick and easy way for you to interact with your ECHOMAP Ultra 2 device and complete such tasks as sharing data, registering, updating the device software. When configured, you can also receive mobile device notifications.
1 From the ECHOMAP Ultra 2 device, select Vessel > ActiveCaptain.
2 From the ActiveCaptain page, select Wi-Fi Network > Wi-Fi > On.
3 Enter a name and password for this network.
4 Insert a memory card in the ECHOMAP Ultra 2 device's card slot (Inserting Memory Cards, page 2).
5 Select Set ActiveCaptain Card.
NOTICE
You might be prompted to format the memory card. Formatting the card deletes all information saved on the card. This includes any saved user data, such as waypoints. Formatting the card is recommended, but not required. Before formatting the card, you should save the data from the memory card onto the device internal memory.
Be sure the card is inserted each time you want to use the ActiveCaptain feature.
6 From the application store on your mobile device, install and open the ActiveCaptain app.
TIP: You can scan this QR code using your mobile device to download the app.

7 Bring the mobile device within 32m (105 ft.) of the ECHOMAP Ultra 2 device.
8 From your mobile device settings, open the Wi-Fi connections page, and connect to the ECHOMAP Ultra 2 device, using the name and password you entered in step 3.
For more information about the ActiveCaptain app and features, see the Owner's Manual at garmin.com/manuals/echomap-ultra_2 or watch a video at garmin.com/ActiveCaptainVideo.
Detailed Charts
This chartplotter is compatible with the latest Garmin Navionics+ cartography and additional premium chart features. You can obtain these charts in three ways:
- You can purchase a chartplotter with preloaded detailed charts.
- You can purchase chart regions on a memory card from your Garmin dealer or from garmin.com.
- You can purchase chart regions in the ActiveCaptain app, and download them to your chartplotter.
NOTE: You must activate preloaded charts and charts purchased on a memory card using the ActiveCaptain app before you can access the full chart features on your chartplotter.
Activating a Marine Chart Subscription
Before you can use the full features of Garmin Navionics+ charts that are preloaded on your device or purchased on a memory card, you must activate your subscription using the ActiveCaptain app.
Your subscription allows you to access the latest chart updates and additional content included with your purchase.
1 If you purchased charts on a memory card, insert the card into a memory card slot on the chartplotter or Garmin memory card reader.
2 Open the ActiveCaptain app on your mobile device, and connect it to the chartplotter (Getting Started with the ActiveCaptain App, page 3).
3 After the ActiveCaptain app connects to the chartplotter, make sure your mobile device is connected to the internet.
4 In the ActiveCaptain app, select Chart > My Charts, and verify that an active subscription for the charts is shown in the list.
5 If necessary, connect the ActiveCaptain app to the chartplotter to complete the activation process. The ActiveCaptain app activates the subscription automatically after it connects to the internet and then to the chartplotter. The ActiveCaptain app shows the subscription status in the My Charts list.
NOTE: It might take a few hours to verify the new subscription.
Connecting Devices Wirelessly to Share User Data and Sonar
You can connect an ECHOMAP Ultra 2 device to another ECHOMAP Ultra 2 device or to a ECHOMAP UHD2 device wirelessly to share user data and sonar.
See your Owner's Manual for more information.
Sonar Fishfinder
When properly connected to a compatible transducer, your chartplotter can be used as a fishfinder.
For more information about which transducer is best for your needs, go to garmin.com/transducers.
Different sonar views can help you view the fish in the area. The sonar views available vary depending on the type of transducer and sounder module connected to the chartplotter. For example, you can view certain Panoptix sonar screens only if you have a compatible Panoptix transducer connected.
There are four basic styles of sonar views available: a full-screen view, a split-screen view that combines two or more views, a split-zoom view, and a split-frequency view that displays two different frequencies. You can customize the settings for each view in the screen. For example, if you are viewing the split-frequency view, you can separately adjust the gain for each frequency.
If you do not see an arrangement of sonar views to suit your needs, you can create a custom combination screen.
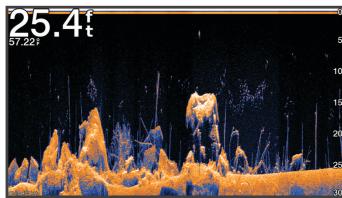
Traditional Sonar View
There are several full-screen views available, depending on the transducer that is connected.
The full-screen Traditional sonar view shows a large image of the sonar readings from a transducer. The range scale along the right side of the screen shows the depth of detected objects as the screen scrolls from the right to the left.
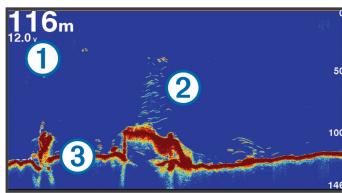
(1) Depth information
Suspended targets or fish
Bottom of the body of water
To access the Traditional sonar view, select Sonar > Traditional.
Garmin ClearVü Sonar View
NOTE: To receive Garmin ClearVü scanning sonar, you need a compatible transducer. For information about compatible transducers, go to garmin.com/transducers.
Garmin ClearVü high-frequency sonar provides a detailed picture of the fishing environment around the boat in a detailed representation of structures the boat is passing over.
To access the Garmin ClearVü sonar view, select Sonar > ClearVü.
Selecting the Transducer Type
This chartplotter is compatible with a range of accessory transducers, including the Garmin ClearVu™ transducers, which are available at garmin.com/transducers.
If you are connecting a transducer that was not included with the chartplotter, you may need to set the transducer type to make the sonar function properly.
NOTE: Not all chartplotters and sonar modules support this feature.
1 Complete an action:
From a sonar view, select > Sonar Setup > Installation > Transducers.
- Select Settings > My Vessel > Transducers.
2 Select an option:
- To enable the chartplotter to detect the transducer automatically, select the transducer to change, and select Auto Detect.
To select the transducer manually, learn the range for the installed transducer, select the transducer to change, select the option that matches the installed transducer, such as Dual Beam (200/77 kHz) or Dual Freq (200/50 kHz), and select Change Model.
NOTICE
Manually selecting a transducer could result in damage to the transducer or reduced transducer performance.
NOTE: If you select the transducer manually, disconnect that transducer, and then connect a different transducer, you should reset this option to Auto Detect.
Navigation
Navigation Chart and Fishing Chart
The Fishing Chart provides a detailed view with more bottom detail and fishing content. This chart is optimized for use when fishing.
The Nav. Chart is optimized for navigation. You can plan a course, view map information, and use the chart as a navigational aid.
Marking Your Present Location as a Waypoint
From any screen, select Mark.
Creating a Waypoint at a Different Location
1 From a chart, select Info > Waypoints > New Waypoint.
2 Select an option:
To create the waypoint by entering position coordinates, select Enter Coordinates, and enter the coordinates.
To create the waypoint using a chart, select Use Chart, select the location, and select Create Waypoint.
To create the waypoint using a range (distance) and bearing, select Enter Range/Bearing, and enter the information.
Marking an MOB Location
Select Mark > Man Overboard.
An international man overboard (MOB) symbol marks the active MOB point and the chartplotter sets a direct course back to the marked location.
Navigating to a Point on the Chart
WARNING
All route and navigation lines displayed on the chartplotter are only intended to provide general route guidance or to identify proper channels, and are not intended to be precisely followed. Always defer to the nav aids and conditions on the water when navigating to
avoid groundings or hazards that could result in vessel damage, personal injury, or death.
1 From the Navigation chart or Fishing chart, select a location.
2 If necessary, select Navigate To.
3 Select an option:
To navigate directly to the location, select Go To or
To create a route to the location, including turns, select Route To or
To use Auto Guidance, select Auto Guidance or S.
NOTE: Auto Guidance is available with premium charts, in some areas.
4 Review the course indicated by the magenta line.
NOTE: When using Auto Guidance, a gray segment within any part of the magenta line indicates that Auto Guidance cannot calculate part of the Auto Guidance line. This is due to the settings for minimum safe water depth and minimum safe obstacle height.
5 Follow the magenta line, steering to avoid land, shallow water, and other obstacles.
Creating and Navigating a Route From Your Present Location
You can create and immediately navigate a route on the Navigation chart or the Fishing chart. This method does not save the route.
1 From the Navigation chart or Fishing chart, select a destination.
2 Select Route To.
3 Select the location of the last turn before the destination.
4 Select Add Turn.
5 If necessary, repeat to add turns, working backward from the destination to the present location of your vessel.
The last turn you add should be the first turn you make, starting from your present location. It should be the turn closest to your vessel.
6 Select Done.
7 Review the course indicated by the magenta line.
8 Follow the magenta line, steering to avoid land, shallow water, and other obstacles.
Stopping Navigation
From the Navigation chart or Fishing chart, select > Stop Navigation.
Mapping a Body of Water Using the Garmin Quickdraw Contours Feature
Before you can use the Garmin Quickdraw Contours feature, you must have sonar depth, your GPS position, and a memory card with free space.
1 From a chart view, select ·s > Quickdraw Contours > Start Recording.
2 When recording is complete, select ·s > Quickdraw Contours > Stop Recording.
3 Select Manage > Name, and enter a name for the map.
More Information
Accessing Owner's Manuals on the Chartplotter
1 Select Info > Owner's Manual.
2 Select a manual.
3 Select Open.
Accessing the Manuals from the Web
You can get the latest owner's manual and translations of manuals from the Garmin website. The owner's manual includes instructions for using device features and accessing regulatory information.
1 Go to garmin.com/manuals/
2 Select the Owner's Manual.
Garmin Support Center
Go to support.garmin.com for help and information, such as product manuals, frequently asked questions, videos, software updates, and customer support.
ECHOMAP™ Ultra 2
© 2023 Garmin Ltd. or its subsidiaries
Garmin® and the Garmin logo, are trademarks of Garmin Ltd. or its subsidiaries, registered in the USA and other countries. ActiveCaptain®, ECHOMAP™, Garmin ClearVu™, and Garmin Quickdraw™ are trademarks of Garmin Ltd. or its subsidiaries. These trademarks may not be used without the express permission of Garmin.
microSD and the microSD logo are trademarks of SD-3C, LLC. Wi-Fi is a registered mark of Wi-Fi Alliance Corporation.
M/N:A04797/B04797
IC:1792A-04797
航海電子設備