BRC3300 - Electric bike drive system BOSCH - Free user manual and instructions
Find the device manual for free BRC3300 BOSCH in PDF.
| Product Type | Wireless remote control for Bosch eBike drive system |
| Brand | Bosch |
| Model | BRC3300 (Mini Remote) |
| Dimensions | 40.6 × 38.1 × 22.9 mm (1.6 × 1.5 × 0.9 in) |
| Weight | Approximately 36 g (0.08 lb) |
| Power Supply | 1 CR1620 button cell battery (non-rechargeable) |
| Battery Life | Several months depending on usage |
| Protection Rating | IP54 (splash and dust protection) |
| Connectivity | Bluetooth Low Energy 5.0 (2.4 GHz frequency, power ≤ 1 mW) |
| Operating Temperature | -5 °C to 40 °C (23 °F to 104 °F) |
| Storage Temperature | 10 °C to 40 °C (50 °F to 104 °F) |
| Main Functions | Control of assistance level (ECO, TOUR, TOUR+, eMTB/SPORT, TURBO, AUTO, RACE, CARGO), activation/deactivation of lights, walk assist, smartphone connection via eBike Flow app, eBike Lock, battery charge level indication |
| Compatibility | Bosch Performance Line CX (BDU374x) and Performance Line (BDU33xx) drive units |
| LED Indicators | Status LED (green/orange/red) for battery, connection, and errors |
| Maintenance and Cleaning | Clean with a soft damp cloth using water only; do not use a high-pressure cleaner; replace the CR1620 battery when the LED flashes orange |
| Safety | eBike Lock function to disable electric assistance; audible lock/unlock notification; walk assist with anti-rollback |
| Spare Parts and Repairability | Replaceable CR1620 battery; repairs exclusively by an authorized Bosch dealer |
| General Information | Compliant with FCC and ISDE; contains Bluetooth transmitter/receiver; FCC ID: 2AWRC-BRC3300, IC: 26294-BRC3300 |
Frequently Asked Questions - BRC3300 BOSCH
User questions about BRC3300 BOSCH
0 question about this device. Answer the ones you know or ask your own.
Ask a new question about this device
Download the instructions for your Electric bike drive system in PDF format for free! Find your manual BRC3300 - BOSCH and take your electronic device back in hand. On this page are published all the documents necessary for the use of your device. BRC3300 by BOSCH.
USER MANUAL BRC3300 BOSCH
Owner's Manual – The Bosch Drive System System Controller | Mini Remote
BRC3100|BRC3300
Robert Bosch GmbH
72757 Reutlingen
Germany
www.bosch-ebike.com
0275U073RC(2022.03)T/52
This manual contains important safety, performance and service information.
Read and understand it along with the information provided to you by your bicycle manufacturer before using the product, and keep it for reference.
Draft
Table of Contents
Introduction 2
AboutWarnings 2
GeneralWarnings 2
Using your Manual 3
Operating your Bosch Drive System 4
Safety Instructions 4
Intended Use 6
System Controller/Mini Remote Product Features 7
Technical Data 8
Operation 9
Maintenance and Service 15
Maintenance and Cleaning 15
After-sales service and advice on using products 15
Battery Recycling Program. 16
Introduction
AboutWarnings
This manual contains many DANGER, WARNING, and CAUTION indicators concerning the consequences of failure to use, assemble, maintain, store, inspect and dispose of a Bosch-equipped eBike in a safe manner.
-
The combination of the safety alert symbol and the word DANGER indicates a hazardous situation that, if not avoided, will result in death or serious injury.
-
The combination of the safety alert symbol and the word WARNING indicates a hazardous situation that, if not avoided, could result in death or serious injury.
- The combination of the safety alert symbol and the word CAUTION indicates a hazardous situation that, if not avoided, could result in minor or moderate injury.
GeneralWarnings

Read all safety warnings and all instructions. Failure to follow the warnings and instructions may result in death or serious injury.
Save all safety warnings and instructions for future reference.
The term battery pack used in these operating instructions refers to all original Bosch eBike battery packs.
- Read ALL accompanying manuals before riding the bike for the first time. Your Bosch Drive System comes with additional manuals and documents provided by the manufacturer of the bicycle and other components. Failure to read and understand safety information can result in death or serious injury.
WARNING
This manual contains important safety, performance and service information. Read it before you take the first ride on your new bicycle, and keep it for reference. The manual can also be found online at www.bosch-ebike.com.
This manual is intended to be read together with the separate user manual provided with your bicycle. Be sure to read all provided documents including labels on the product before your first ride.
Take responsibility for your own SAFETY. If you have any questions or do not understand something, consult with your dealer or the bicycle or component manufacturer.
- Some eBike accessories may present a choking hazard to small children. Keep these accessories away from children.
CAUTION
The Bosch Drive System adds weight to your bicycle which you may not be used to lift. Avoid injury, use proper lifting techniques.
Using your Manual
In addition to the functions outlined here, changes to software relating to troubleshooting and functional modifications may be introduced at any time.
Graphics
The bicycle shown in this manual may differ slightly from your bicycle, but will be similar enough to help you understand our instructions.
RIGHT-HAND and LEFT-HAND sides are determined by facing in the direction the bicycle will travel when going forward. When you see a broken line (-----), the item referred to is hidden from view.

Operating your Bosch Drive System Safety Instructions

Read all the safety information and instructions. Failure to observe the safety information and follow instructions may result in electric shock, fire and/or serious injury.
Save all safety warnings and instructions for future reference.
The term battery pack used in these operating instructions refers to all original Bosch eBike battery packs.
Read and observe the safety warnings and instructions in all operating instructions of the eBike system and your eBike.
Do not attempt to fix display or remote control while riding!
The push assistance function must only be used when pushing the eBike. There is a risk of injury if the wheels of the eBike are not in contact with the ground while using the push assistance.
- When the push assistance is activated, the pedals may turn at the same time. When the push assistance function is activated, make sure that there is enough space between your legs and the turning pedals to avoid the risk of injury.
- When using the push assistance, ensure that you can always control the eBike and hold it securely. The push assistance can be suspended under certain conditions (e.g. obstacle on the pedal or accidentally slipping off the button of the operating unit). The eBike can suddenly move backwards towards you or start to tip. This poses a particular risk for the user if there is an additional load. When using the push assistance on the eBike, do not place the eBike in situations in which you cannot hold the eBike by yourself.
Do not stand your bicycle upside down on its handlebars and saddle if the control unit or its
holder protrude from the handlebars. This may irreparably damage the control unit or the holder.
- Do not connect a charger to the eBike system if the eBike system displays a critical error. This may result in damage to your battery. The battery may catch fire, thereby resulting in serious burns and other injuries.
- The control unit features a wireless interface. Local operating restrictions, e.g. in airplanes or hospitals, must be adhered to.
- Caution! When using the control unit with Bluetooth®, this may cause interference that affects other devices and systems, airplanes and medical devices (e.g. pacemakers, hearing aids). Similarly, the possibility that this may cause damage to humans and animals in the immediate vicinity cannot be completely excluded. Do not use the control unit with Bluetooth® in the vicinity of medical devices, gas stations, chemical plants, areas with a potentially explosive atmosphere or on blast sites. Do not use the control unit with Bluetooth® in airplanes.
- Avoid using the device in close proximity to your body over an extended period of time.
The Bluetooth® word mark and logos are registered trademarks owned by Bluetooth SIG, Inc. and any use of such marks by Bosch eBike Systems is under licence.
Before using the System Controller while riding, make sure to familiarize yourself with System Controller controls and functions by reviewing the operating instructions in this user manual. Practice riding under traffic-free conditions and make sure that you are comfortable using the System Controller before using it in traffic.
Do not use the System Controller while riding if you are not comfortable doing so. Do not allow yourself to be distracted by the System Controller. Please note that distracted riding can lead to serious in-
jury, up to and including death. Riders must observe road and traffic conditions and comply with all applicable traffic laws at all times.
- Please note that certain State or local laws may require that class III eBikes must be equipped with a functioning speedometer that displays speed in miles per hour. Riders must be aware of any and all applicable rules and regulations related to the operation or use of class III eBikes in any applicable jurisdictions before operating or otherwise using this product.
Safety instructions for button/coin cells
WARNING! Ensure that the button/coin cell is kept out of the reach of children. Button/coin cells are dangerous.
- Button/coin cells must never be swallowed or inserted into any other part of the body. If you suspect that someone has swallowed a button/coin cell or that a button/coin cell has entered the body in another way, seek medical attention immediately. Swallowing button/coin cells can result in severe internal burns and death within two hours.
Ensure that button/coin cell replacement is carried out properly. There is a risk of explosion.
Only use the button/coin cells listed in this operating manual. Do not use any other button/coin cells or other forms of electrical power supply.
- Do not attempt to recharge the button/coin cell and do not short circuit the button/coin cell. The button/coin cell may leak, explode, catch fire and cause personal injury.
Remove and dispose of drained button/coin cells correctly. Drained button/coin cells may leak and cause personal injury or damage the product.
- Do not overheat the button/coin cell or throw it into fire. The button/coin cell may leak, explode, catch fire and cause personal injury.
- Do not damage the button/coin cell and or take the coin cell apart. The button/coin cell may leak, explode, catch fire and cause personal injury.
- Do not allow damaged button/coin cells to come into contact with water. Leaking lithium may mix with water to create hydrogen, which could cause a fire, an explosion, or personal injury.
NOTICE: This device complies with part 15 of the FCC Rules. Operation is subject to the following two conditions:
- This device must not cause harmful interference, and
- this device must accept any interference received, including interference that may cause undesired operation.
NOTICE: Changes or modifications made to this equipment not expressly approved by the Robert Bosch GmbH may void the FCC authorization to operate this equipment.
NOTE: This equipment has been tested and found to comply with the limits for a Class B digital device, pursuant to Part 15 of the FCC Rules. These limits are designed to provide reasonable protection against harmful interference in a residential installation. This equipment generates, uses and can radiate radio frequency energy and, if not installed and used in accordance with the instructions, may cause harmful interference to radio communications. However, there is no guarantee that interference will not occur in a particular installation. If this equipment does cause harmful interference to radio or television reception, which can be determined by turning the equipment off and on, the user is encouraged to try to correct the interference by one or more of the following measures:
- Reorient or relocate the receiving antenna.
- Increase the separation between the equipment and receiver.
- Connect the equipment into an outlet on a circuit different from that to which the receiver is connected.
- Consult the dealer or an experienced radio/TV technician for help.
Radiofrequency radiation exposure Information:
The radiated output power of the device is far below
the FCC radio frequency exposure limits. Nevertheless, the device shall be used in such a manner that the potential for human contact during normal operation is minimized.
This equipment complies with FCC radiation exposure limits set forth for an uncontrolled environment. This transmitter must not be co-located or operating in conjunction with any other antenna or transmitter. ISED Notice (Canada)
This device contains licence-exempt transmitter(s)/ receiver(s) that comply with Innovation, Science and Economic Development Canada's licence-exempt RSS(s). Operation is subject to the following two conditions:
-
this device may not cause interference, and
-
this device must accept any interference, including interference that may cause undesired operation of the device.
This equipment complies with Canada radiation exposure limits set forth for an uncontrolled environment. This transmitter must not be co-located or operating in conjunction with any other antenna or transmitter.
Privacy Notice
When you connect the eBike to the Bosch Diagnostik Tool 3, data about Bosch drive unit (e.g. energy consumption, temperature, etc.) is transferred to Bosch eBike Systems (Robert Bosch GmbH) for the purposes of product improvement. You can find more information about this on the Bosch eBike website at www.bosch-ebike.com.
Intended Use
The System Controller and Mini Remote operating units are designed to control a Bosch eBike system and to control an on-board computer. You can also use it to change the assistance level in the eBike Flow app.
In order to be able to use the control unit to its fullest extent, a compatible smartphone with the eBike Flow app is required.
Using the eBike Flow app, a Bluetooth® connection can be established between the smartphone and the eBike system, between the smartphone and System Controller, and between System Controller and Mini Remote.

Depending on the operating system of the smartphone, the eBike Flow app can be downloaded free of charge from the Apple App Store or Google Play Store.
Scan the code with your smartphone to download the eBike Flow app.
System Controller/Mini Remote Product Features


(9)
(8)
(3)
(4)
(5)
(6)
(1)
(2)
All illustrations of bike parts except for the drive unit, on-board computer including operating unit, speed sensor and the corresponding holders are schematic and may differ on your eBike.
The numbering of the components shown refers to the illustrations on the graphic pages at the beginning of the manual.
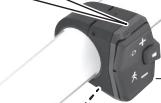
(1) Mini Remote operating unit (optional)
(2) Control unit System Controller
(3) LED indicator lamp
(4) Button for increasing support level + / bike lights
(5) Select button
(6) Button for decreasing support level - / walk assistance
(7) Fastening screw for holder
(8) Holder
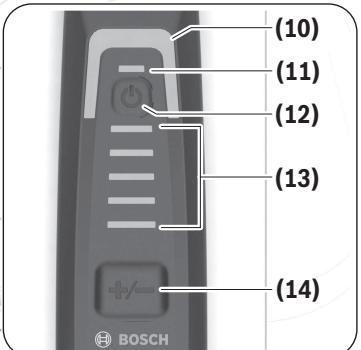
(9) Rubber insert/battery holder
(10) Assistance level LED
(11) ABS LED (optional)/ambient light sensor
(12) On/off button
(13) LEDs for battery charge indicator
(14) Mode button
Technical Data
| Control unit | System Controller | |
| Product code | BRC3100 | |
| Operating temperature | °F | 23 to 104 |
| Storage temperature | °F | 50 to 104 |
| Protection rating | IP54 | |
| Dimensions | in | 3.5 × 1.1 × 1.1 |
| Weight | lb | 0.08 |
| Bluetooth® Low Energy 5.0 | ||
| - Frequency | MHz | 2400–2480 |
| - Transmission power | mW | ≤ 1 |
| Control unit | Mini Remote | |
| Product code | BRC3300 | |
| Operating temperature | °F | 23 to 104 |
| Storage temperature | °F | 50 to 104 |
| Battery | 1×CR1620 | |
| Protection rating | IP54 | |
| Dimensions | in | 1.6 × 1.5 × 0.9 |
| Weight | lb | 0.08 |
| Bluetooth® Low Energy 5.0 | ||
| - Frequency | MHz | 2400–2480 |
| - Transmission power | mW | ≤ 1 |
The license information for the product is available at the following Internet address: https://www.bosch-ebike.com/ licences
FCC ID: 2AWRC-BRC3300
IC:26294-BRC3300
HVIN: BRC3300
Operation
Requirements
The eBike system can only be activated when the following requirements are met:
- A sufficiently charged battery is inserted (see battery operating instructions).
- The speed sensor is connected properly (see drive unit operating instructions).
Operating unit power supply (System Controller)
If a sufficiently charged eBike battery is inserted into the eBike and the eBike system is switched on, then the control unit battery is powered and charged by the eBike battery.
Please contact your bicycle dealer if the operating unit battery is defective.
Operating unit (Mini Remote) power supply
The Mini Remote operating unit is supplied with voltage by a CR1620 button/coin cell.
Replacing the battery (Mini Remote)
If the battery in the Mini Remote (1) operating unit is low, the LED indicator lamp (3) lights up orange.
To replace the battery, unscrew the Mini Remote (1) operating unit from the handlebars. Remove the rubber insert (9). This also functions as the battery holder. Remove the used battery and insert a new CR1620 battery in the rubber insert (9). Push the battery and the rubber insert (9) into the Mini Remote (1) operating unit. If the battery is seated correctly, the LED indicator lamp (3) flashes green for 10 s. Then secure the Mini Remote (1) operating unit back onto the handlebars.
Note: The connection to the System Controller is not interrupted when the battery is replaced.
You can obtain the batteries recommended by Bosch from your bicycle dealer.
Switching the eBike system on/off
To switch on the eBike system, briefly press the on/off button (12). After the start animation, the state of charge of the battery is displayed in color with the battery charge indicator (13) and the set assistance level with the (10) display. The eBike is ready to ride. The display brightness is controlled by the ambient light sensor (11). Therefore, do not cover the ambient light sensor (11).
The drive is activated as soon as you start pedaling (except at assistance level OFF). The motor output depends on the settings of the assistance level.
As soon as you stop pedaling when in normal operation, or as soon as you have reached a speed of 20/28 mph, the eBike drive unit switches off the assistance. The drive is automatically re-activated as soon you start pedaling again and the speed is below 20/28 mph.
To switch off the eBike system, press the on/off button (12) briefly (< 3 s). The battery charge indicator (13) and the assistance level LED (10) go out. If no power is drawn from the eBike drive for about 10 minutes (e.g. because the eBike is not moving) and no button is pressed on the on-board computer or the control unit of the eBike, the eBike system will switch off automatically.
Battery charge indicator
The battery charge indicator (13) displays the eBike battery's state of charge. The state of charge of the eBike battery can also be checked on the LEDs of the battery itself.
In the (13) display, each ice-blue bar represents 20% capacity and each white bar represents 10% capacity. The topmost bar shows the maximum capacity.
Example: Four ice-blue bars and one white bar are displayed. The state of charge is between 81% and 90% .
If capacity is low, both of the lower displays change color:
| Bar | Capacity |
| 2 × orange | 30 % to 21 % |
| 1 × orange | 20 % to 11 % |
| 1 × red | 10 % to reserve |
| 1 × red flashing | Reserve to empty |
If the eBike battery is being charged, the topmost bar on the battery charge indicator (13) flashes.
Setting the assistance level
On the operating unit, you can set the level of assistance you want the eBike drive to provide you with while pedaling.
Mini Remote: Briefly press (< 1 s) the buttons to increase assistance + (4) or decrease assistance - (6) in order to increase or decrease the assistance level accordingly.
System Controller: Briefly press (< 1 s) the mode button (14) to increase assistance.
Press the mode button (14) for longer than 1 s to decrease the assistance.
The assistance level can be changed at any time, even while cycling, and is displayed in color.
| Level | Notes |
| OFF | Motor support is switched off. The eBike can just be moved by pedaling, as with a normal bicycle. |
| ECO | Effective support with maximum efficiency, for maximum range |
| TOUR | Steady support, long range for touring |
| TOUR+ | Dynamic support for normal riding and biking sports |
| eMTB/ SPORT | Optimal support whatever the terrain, rapid acceleration when starting from a standstill, improved dynamics and top performance |
| TURBO | Maximum support even at a high cadence, for sport cycling |
| Level | Notes |
| AUTO | The assistance is adapted dynamically to the riding situation. |
| RACE | Maximum support on the eMTB race course; very direct response behavior and maximum "Extended Boost" for the best possible performance in competitive situations |
| CARGO(A) | Steady, powerful support, to be able to transport heavy weights |
A) The CARGO assistance level may also have a different designation.
The designations and configuration of the assistance levels can be preconfigured by the manufacturer and selected by the bicycle retailer.
Interaction between the eBike system and gear-shifting
The gear shifting should be used with an eBike drive in the same way as with a normal bicycle (observe the operating instructions of your eBike on this point). Irrespective of the type of gear shifting, it is advisable that you briefly reduce the pressure on the pedals when changing gear. This will aid gear shifting and reduce wear on the powertrain.
By selecting the correct gear, you can increase your speed and range while applying the same amount of force.
Switching bicycle lights on/off (Mini Remote only)
Before starting each journey, check that your bike lights are working correctly.
To switch the bicycle lights on and off, press the button to increase the assistance level/bicycle lights (4) for longer than 1 s.
Switching the push assistance on/off
The push assistance aids you when pushing your eBike. The speed of this function depends on the selected gear and can reach a maximum of 2.5 mph .
The push assistance function must only be used when pushing the eBike. There is a risk of injury if
the wheels of the eBike are not in contact with the ground while using the push assistance.
To start walk assistance, press the (6) button for more than 1 s and keep it pressed. The battery charge indicator (13) goes out and a white moving light in the direction of travel shows that it is ready.
To activate walk assistance, one of the following actions must occur within the next 10 s:
- Push the eBike forwards.
- Push the eBike backwards.
- Perform a sideways tilting movement with the eBike.
After activation, the motor begins to push and the continuously filling white bars change color to ice-blue.
If you release the (6) button, walk assistance is paused. You can reactivate walk assistance within 10 s by pressing the (6) button.
If you do not reactivate walk assistance within 10 s, walk assistance automatically switches off.
Walk assistance is always ended if:
- the rear wheel jams;
- the bicycle cannot move over ridges;
- a body part is blocking the bike crank;
- an obstacle continues to turn the crank;
- you start pedaling;
- the (4) button or on/off button (12) is pressed.
Walk assistance has a roll-away lock, which means that even after successfully using walk assistance, the drive system actively brakes backwards rolling for a few seconds and you cannot push the eBike backwards or can only do so with difficulty.
The push assistance function is subject to local regulations; the way it works may therefore differ from the description above. It can also be deactivated.
Establishing a smartphone connection
In order to be able to use the following eBike functions, a smartphone with the eBike Flow app is required.
Connection to the app occurs via a Bluetooth® connection.
- Switch on the eBike system and do not start riding the eBike.
- Begin Bluetooth® pairing by long pressing (> 3 s) the on/off button (12). Release the on/off button (12) as soon as the lowest bar on the battery charge indicator (13) shows the pairing process by flashing blue.
- Confirm the connection request in the eBike Flow app.
Activity tracking
In order to record activities, it is necessary to register and log into the eBike Flow app.
To record activities, you must consent to the storage of your location data in the app. Without this, your activities cannot be recorded in the app. For location data to be recorded, you must be logged in as the user.
- When switching off the eBike system via the operat-ing unit
- When automatically switching off the eBike system
- By removing the on-board computer
The eBike is unlocked when the eBike system is switched on and the smartphone is connected with the eBike via Bluetooth®.
Should you lose your smartphone, you can log in via another smartphone using the eBike Flow app, and unlock your user account and the eBike.
Warning! If you select a setting in the app that leads to disadvantages for the
In order to be able to set up the
- The eBike Flow app has been installed.
- A user account has been created.
- No update is currently being carried out on the eBike.
- The eBike is connected to the smartphone via Bluetooth®.
- The eBike is stationary.
- The smartphone is connected to the Internet.
- The eBike rechargeable battery is sufficiently charged, and the charging cable is not connected.
You can set up
You can deactivate the support of your drive unit with immediate effect by switching on
Compatibility
| Drive unit | Product line |
| BDU374x | Performance Line CX |
| BDU33xx | Performance Line |
How it works
In conjunction with
Lock> eBike lock is active after switching on, this is indicated on the System Controller operating unit by flashing white and on the display computer with a padlock symbol.
Note:
mechanical lock.
If you give third parties temporary or permanent access to your eBike or want to bring your eBike in for a service, deactivate
If the eBike system is switched off, the drive unit will emit a "Lock" sound (i.e. an audio signal that is played once) to indicate that the assistance from the drive unit is switched off.
Note: The audio signal will only be played if the system is switched on.
If the eBike system is switched on, the drive unit will emit two "Unlock" sounds (i.e. an audio signal that is played twice) to indicate that the assistance from the drive unit is enabled again.
The "Lock" sound helps you to recognize whether
Note: If you are no longer able to set up or switch off
Replacing eBike components and Replacing the smartphone
- Install the eBike Flow app on the new smartphone.
- Log in using the same account with which you activated
. is displayed as set up in the eBike Flow app.
Replacing the drive unit
-
is displayed as deactivated in the eBike Flow app. -
Activate
by pushing the control unit to the right. - If you hand over your eBike to a bicycle dealer for maintenance, it is recommended to temporarily deactivate
to avoid a false alarm.
Software updates
Software updates must be started manually in the eBike Flow app.
Software updates are transferred from the app to the control unit in the background as soon as it is connected to the app. During the update process, a green flashing on the battery charge indicator (13) shows the progress. The system is then restarted. You can control the software updates via the eBike Flow app.
Connecting the System Controller to the Mini Remote
The System Controller and Mini Remote operating units are connected via Bluetooth®.
Switch on the eBike system and do not start riding the eBike.
If the Mini Remote operating unit has not already been connected to the System Controller operating unit by the bicycle dealer, proceed as follows:
- First connect your smartphone to the System Controller operating unit via the eBike Flow app (see Establishing a smartphone connection).
- In the eBike Flow app, select
.
You will be asked to switch the System Controller and Mini Remote to pairing mode.
- System Controller: Start the pairing process by pressing and holding (3 s) the on/off button (12) until the lower bar on battery charge indicator (13) shows the pairing process by flashing blue.
- Mini Remote: Start the pairing process by pressing any button until the pairing process is shown by the LED indicator light (3) flashing blue.
- Follow the instructions in the eBike Flow app.
If pairing is successful, this is shown within 30 s on the Mini Remote operating unit by the LED indicator light (3) flashing green three times.
If the connection cannot be established, this is shown by the LED indicator lamp (3) flashing red three times. Repeat the connection process.
If you want to connect the Mini Remote operating unit to a System Controller on another eBike, the following steps must be carried out:
- Mini Remote: Remove the battery on the Mini Remote operating unit and reinsert it.
- Within the next 10 s, press and hold the decrease assistance - /walk assistance (6) button for 5 s. The pairing process is shown by the LED indicator light (3) flashing blue for 30 s.
- System Controller: Start the pairing process by pressing and holding (3 s) the on/off button (12) until the lower bar on battery charge indicator (13) shows the pairing process by flashing blue.
If pairing is successful, this is shown within 30 s on the Mini Remote operating unit by the LED indicator light (3) flashing green three times.
If the connection cannot be established, this is shown by the LED indicator lamp (3) flashing red three times. Repeat the connection process.
Error messages
The control unit shows whether critical errors or less critical errors occur in the eBike system.
The error messages generated by the eBike system can be read via the eBike Flow app or by your bicycle retailer.
Via a link in the eBike Flow app, information about the error and support for rectifying the error can be displayed.
Less critical errors
Less critical errors are shown by the assistance level LED (10) flashing orange. Press the select button (5) on the Mini Remote (1) operating unit or the mode button (14) on the System Controller (2) operating
English - 14
unit to confirm the error. The assistance level LED (10) once again continuously shows the color of the set assistance level.
You can use the following table to rectify the errors yourself if necessary. Otherwise, please contact your bicycle retailer.
| Number | Troubleshooting |
| 523005 | The indicated error numbers show that there is interference when the sensors detect the magnetic field. See whether you have lost the magnet while riding. |
| 514001 | |
| 514002 | |
| 514003 | |
| 514006 | If you are using a magnet sensor, check that the sensor and magnet have been properly installed. Make sure too that the cable to the sensor is not damaged. |
| If you are using a rim magnet, make sure that you do not have any magnetic field interference in the vicinity of the drive unit. |
Critical errors
Critical errors are shown by the assistance level LED (10) and the battery charge indicator (13) flashing red. If a critical fault occurs, follow the handling instructions on the following table.
| Number | Handling instructions |
| 660001 | Do not charge the battery and do not continue to use! Please contact your Bosch eBike specialist retailer. |
| 660002 | |
| 890000 | - Acknowledge the error code. - Restart the system. If the problem persists: - Acknowledge the error code. - Perform the software update. - Restart the system. If the problem persists: - Please contact your Bosch eBike specialist retailer. |
Maintenance and Service
Maintenance and Cleaning
The operating unit must not be cleaned with pressurized water.
Keep the operating unit clean. Dirt can cause faulty brightness detection.
Clean your operating unit using a soft cloth dampened only with water. Do not use cleaning products of any kind.
- Only have repairs performed by a certified bicycle dealer.
After-sales service and advice on using products
If you have any questions about the eBike system and its components, contact an authorized bicycle dealer.
For contact details of authorized bike dealerships, please visit www.bosch-ebike.com.
Battery Recycling Program

The drive unit, on-board computer incl. operating unit, battery, speed sensor, accessories and packaging should be disposed of in an environmentally correct manner.
Do not dispose of eBikes and their components with household waste.

You may recycle your Bosch battery pack by calling 1.800.822.8837.
Draft