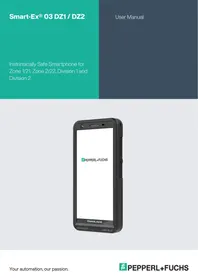
Smart-Ex® 03 DZ1 - Smartphone Pepperl+Fuchs - Free user manual and instructions
Find the device manual for free Smart-Ex® 03 DZ1 Pepperl+Fuchs in PDF.

| Product type | Rugged smartphone for hazardous areas |
| Brand | Pepperl+Fuchs |
| Model | Smart-Ex® 03 DZ1 |
| ATEX / IECEx Certification | Zone 1/21 (DZ1) |
| Operating system | Android (recent version) |
| Display | Capacitive touchscreen, ~4.7 inches, shock-resistant |
| Wireless connectivity | Wi-Fi (2.4/5 GHz), Bluetooth, NFC, LTE (4G), GPS |
| Camera | Integrated rear and front cameras |
| Battery | Removable lithium-ion battery, ~4500 mAh |
| Dimensions (approx.) | 160 x 80 x 18 mm |
| Weight (approx.) | 300 g |
| Protection rating | IP68 (waterproof and dust resistant) |
| Hearing aid compatibility (HAC) | M3/T3 (United States) |
| SAR (head) | 0.62 W/kg (1g) |
| SAR (body) | 0.9 W/kg (1g) |
| SAR (hotspot) | 0.7 W/kg (1g) |
| Maintenance and cleaning | Clean with a soft dry cloth; do not use harsh chemicals |
| Safety | Do not use in hazardous areas without training; observe safety distances |
| Spare parts and repairability | Battery, display and other parts available from Pepperl+Fuchs |
| General information | Complies with FCC Part 15, IC RSS; indoor use only for 5 GHz band |
Frequently Asked Questions - Smart-Ex® 03 DZ1 Pepperl+Fuchs
User questions about Smart-Ex® 03 DZ1 Pepperl+Fuchs
0 question about this device. Answer the ones you know or ask your own.
Ask a new question about this device
Download the instructions for your Smartphone in PDF format for free! Find your manual Smart-Ex® 03 DZ1 - Pepperl+Fuchs and take your electronic device back in hand. On this page are published all the documents necessary for the use of your device. Smart-Ex® 03 DZ1 by Pepperl+Fuchs.
USER MANUAL Smart-Ex® 03 DZ1 Pepperl+Fuchs
Instrinsically Safe Smartphone for Zone 1/21, Zone 2/22, Division 1 and Division 2
LEGAL INFORMATION
Copyright © 2023 Pepperl+Fuchs SE. Pepperl+Fuchs logo is a trademark of Pepperl+Fuchs SE. Other product names may be trademarks or registered trademarks of the respective owners with whom they are associated.
Third Party Trademarks
Google™, Android™, Google Play and other marks are trademarks of Google LLC."
The Android robot is reproduced or modified from work created and shared by Google and used according to terms described in the Creative Commons 3.0 Attribution License.
Table of Contents
LEGAL INFORMATION 2
Third Party Trademarks 2
PHONE MODELS AND SUPPORT INFORMATION 6
Phone Models Covered 6
Network Services. 6
Pepperl+Fuchs Support Information 6
Use the Guide effectively. 6
Common Actions. 6
Avoid High Temperatures. 6
Personal Medical Devices 7
Child Safety 7
Emergency Calls. 7
UNBOXING THE PHONE 8
Your SIM Card .8
Inserting the Nano-SIM Card and Battery 8
eSIM activation. 9
Charging the phone 9
STARTING THE PHONE 11
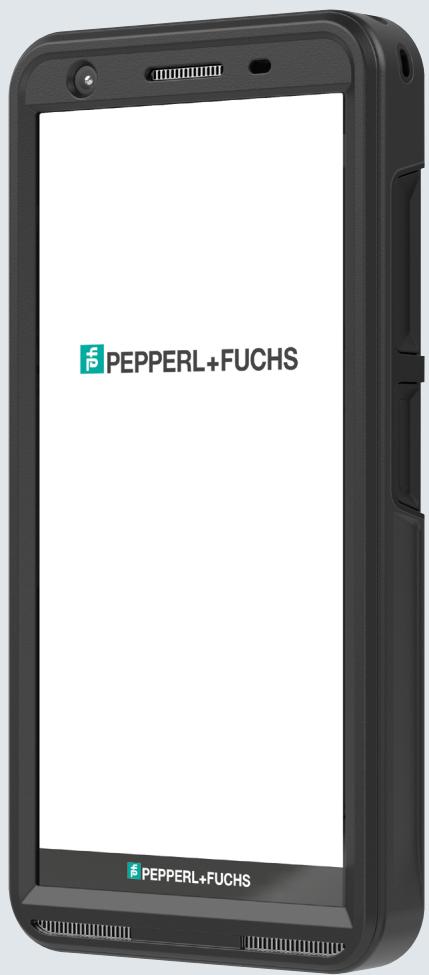
THE SMART-Ex® 03 PHONE. 13
Home Screen Functions 13
Home Screen Indicators 14
EMMprovisioning. 15
QUICK SETTINGS 16
Brightness Bar 16
Internet (Wi-Fi Network) 16
Bluetooth Devices 16
Do Not Disturb (DnD) 16
Auto-rotate 16
Battery Saver 17
Airplane Mode 17
Night Light 17
Torch 17
Wi-Fi Calling (VoWiFi) 17
Voice over 5G 17
Glove mode 17
BATTERY USAGE GUIDELINES 18
Charging the Battery 18
Verifying and Optimizing Battery Usage 18
Tips to extend the battery life 19
LED INDICATORS 19
CALL SCREEN FUNCTIONS AND INDICATORS 19
CUSTOM APPLICATIONS 20
eSENTINEL 20
eDIAGNOSTICS 20
CAMERA 20
CUSTOM FEATURES 21
Prog Keys (Programmable Keys) 21
SECURITY SETTINGS 21
FREQUENTLY ASKED QUESTIONS 21
What is Pocket mode? 21
How can I activate Wi-Fi Calling (VoWiFi)? 21
How can I configure and use Speed dial? 22
How can I perform a system update? 22
How can I use the flash light settings? 22
END USER LICENSE AGREEMENT 23
License 23
Phone Care 23
Warranty. 23
COMPLIANCE AND REGULATORY 24
FCC STANDARD 24
Compulsory FCC statement: 24
IC Notice 24
IC Radiation Exposure Statement 24
DECLARATION DE LA FCC. 26
SAR Information 30
Band and Mode 30
Disposal of old Electrical and Electronic equipment 31
PHONE MODELS AND SUPPORT INFORMATION
Congratulations on the purchase of a Smart-Ex® 03 dual-SIM smartphone. This phone is GSM/UMTS/4G/5G enabled handset. This phone has call capabilities including Voice over Wi-Fi® (VoWi-Fi). It has an intuitive, feature-rich user interface, which allows you to make the best use of the functions offered in it. This Smartphone is intended for professional users.
Phone Models Covered
This user guide covers the different variants of Smart-Ex® 03. The model name of the device can be found on the packaging.
Network Services
These are additional services that you can avail through your network service provider. To make the best of these services, you must subscribe to them through your service provider and obtain instructions for its use from them.
Pepperl+Fuchs Support Information
For additional product and support information, visit https://www.pepperl-fuchs.com.
Use the Guide effectively
Familiarize yourself with the terminology and symbols used in the guide to help you use your phone effectively.
| HOME SCREEN | This is the screen displayed when the phone is in idle condition. |
| TOUCH & HOLD | Touch and hold an item on the screen by touching it and not lifting your finger until an action occurs. |
| DRAG | Touch and hold an item for a moment and then, without lifting your finger, move your finger on the screen until you reach the target position. |
| SWIPE OR SLIDE | Quickly move your finger across the surface of the screen, without pausing from your first touch point. For example, you can slide a home screen left or right to view the other home screens. |
| PINCH IN/OUT | Pinch in/out on a web page, map or any other screen to zoom-in or out, respectively. |
Common Actions
Actions commonly used when accessing the Menu items on the phone are:
| BACK | Displays the previous screen. Use the Left Selection Key to perform this function. |
| HOME | Moves the current working application to the recent applications list/background and displays the home screen. |
| RECENT | Displays recently used applications |
Limited Feature Description: Disclaimer
Your Smart-Ex® 03 smartphone comes with a feature-rich Android operating system and Google applications. This document intends to address the basic features of the phone and the applications integrated there-in. We recommend that you refer to the help and support documentation associated with each application to explore the latest features offered by them.

The Android operating system receives frequent updates. It is recommended to download and install these updates to ensure best use of your Smart-Ex® 03.
Avoid High Temperatures
Leaving the phone in hot or cold places, such as in a closed car in summer or winter conditions, reduces the capacity and lifetime of the built-in battery. For the best results, try to keep the phone between -20^ and +60^ (-4°F and +140°F). A phone with a hot or cold battery may not work temporarily, even when the battery is fully charged. Battery performance is particularly limited in temperatures well below freezing.
Personal Medical Devices
Smartphones may affect the operation of cardiac pacemakers and other implanted equipment. Please avoid placing the smartphone over the pacemaker, for example in your breast pocket. When using the smartphone, place it at the ear opposite the pacemaker. If a minimum distance of 15 cm (6 inches) is kept between the smartphone and the pacemaker, the risk of interference is limited. If you suspect that interference is taking place, immediately turn off your smartphone. Contact your cardiologist for more information. For other medical devices, consult your physician and the manufacturer of the device. Comply with instructions to switch off the device or deactivate the RF transmitter when required, especially when posted in hospitals and airplanes. Equipment used in these places may be sensitive to radio waves emitted from the device and adversely affect their operation. Also, observe restrictions at gas stations or other areas with flammable atmosphere or when close to electro-explosive devices (applicable to non-Ex versions only).
Child Safety
This equipment is not suitable for use in locations where children are likely to be present.
Emergency Calls
Smartphones operate using radio signals, which cannot guarantee connection under all conditions. Therefore, you should never rely solely upon any smartphone for essential communications (e.g. medical emergencies). Emergency calls may not be possible in all areas, on all cellular networks, or when certain network services and/or smartphone features are in use. Check with your local service provider. To make emergency calls, the user can dial the emergency numbers. If the phone display is in locked state, you can long press the EMERGENCY text on the screen.
UNBOXING THE PHONE
The Smart- Ex® 03 phone box has the following items -
Smart-Ex® 03 phone
Battery pack Ex-BP S03
Wall charger
USB cable
Torx T8 screwdriver
Documentation
Your SIM Card
The SIM card associates your network services (for example, phone number, data services, and so on) with your phone. Contact your cellular network provider for the SIM card.
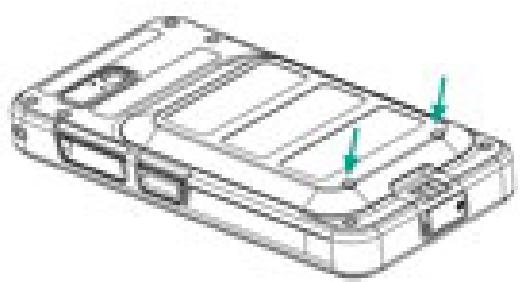
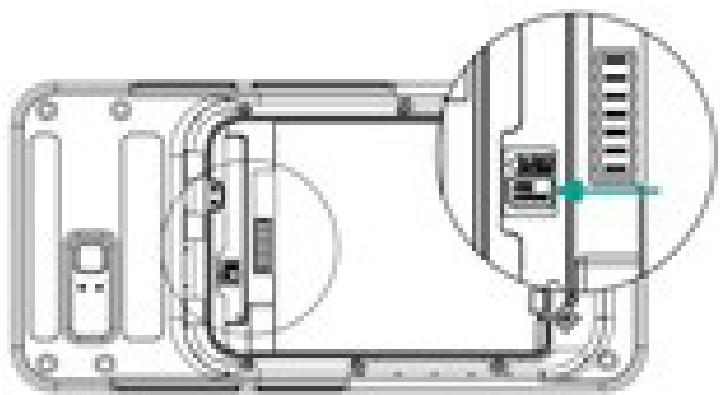
Inserting the Nano-SIM Card and Battery
Step 1
- Unscrew the two cover screws in a counter clockwise direction.

Please use the Torx T8 screwdriver provided with the phone.
Ensure that the SIM fits correctly into the slot and the contact is complete.
- Remove the battery.
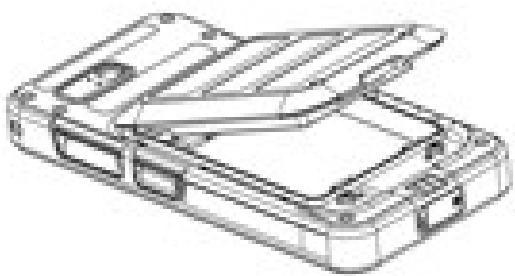
Step 2
- Insert the Nano-SIM card with the gold colored contacts facing downwards.
- Push it upwards into the designated slot.

Ensure that the SIM fits correctly into the slot and the contact is complete. Please use the screwdriver Torx T8. Ensure not to over tighten the screws.
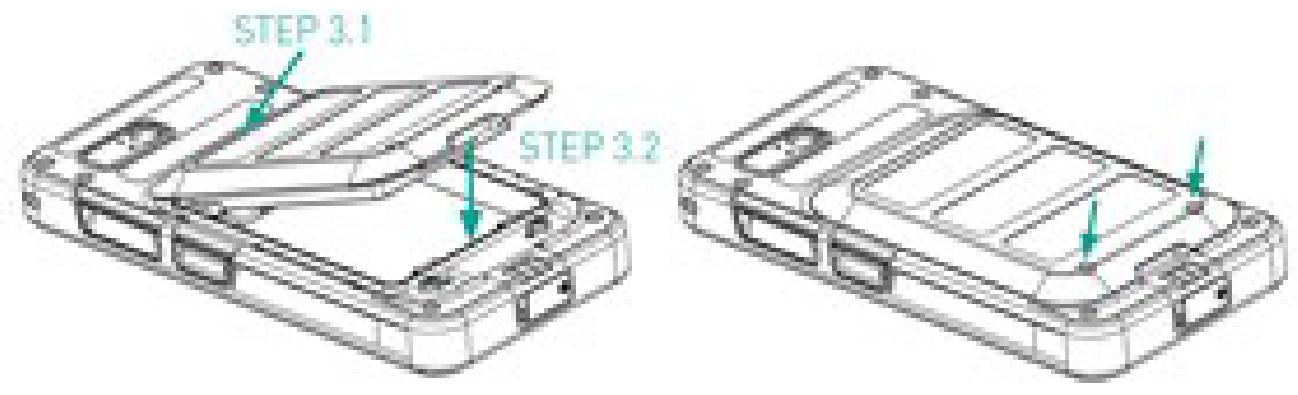
Step 3
- Insert the battery into the battery slot in the prescribed order as shown in the figure and screw down the two cover screws in a clockwise direction.
eSIM activation
Send a request for eSIM to the cellular network operator. A QR code is sent via email to activate the same.
- Go to Settings->Network and Internet->SIMs
- Click Add to add a new SIM.
Follow the wizard instructions to download and activate the eSIM. You will be prompted to scan the QR code sent by the cellular service provider. The activation process will follow and complete. Once activated the eSIM is set as your default SIM for calls. The physical SIM gets deactivated.

In case you are performing a factory reset of the mobile phone, please ensure that the eSIM profile is retained. If you choose to erase it, you will need to contact the network provider again for the activation code.
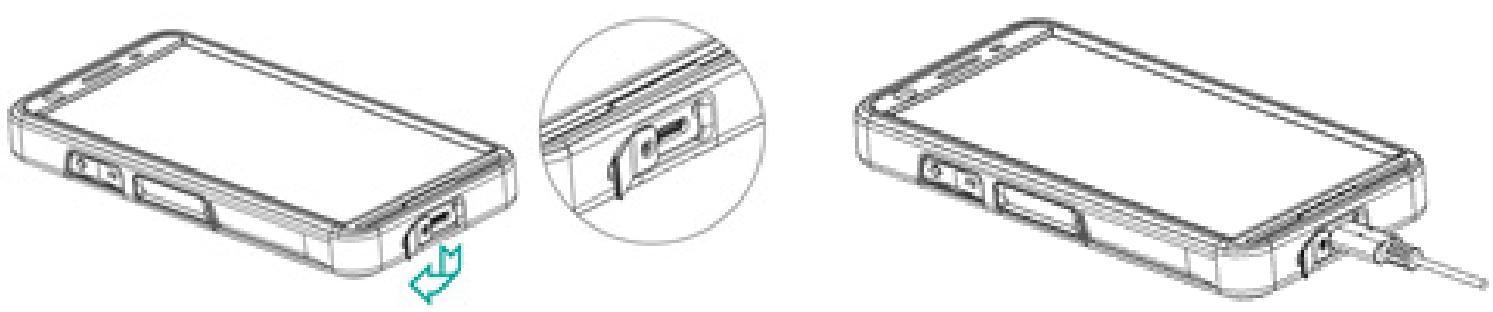
Charging the phone
- Connect the USB end of the cable to the phone and the other end to the socket.
- Plug in the wall charger socket into a power source. The screen lights up showing the battery charging icon at the display. Also the LED indicator at the top of the phone, shows RED when the charging is in progress and changes to GREEN once the charging is complete.
On completion that is 100% charge disconnect the USB cable from the phone.

Do not over charge. Maximum time required for full charge is 2.5 hours.
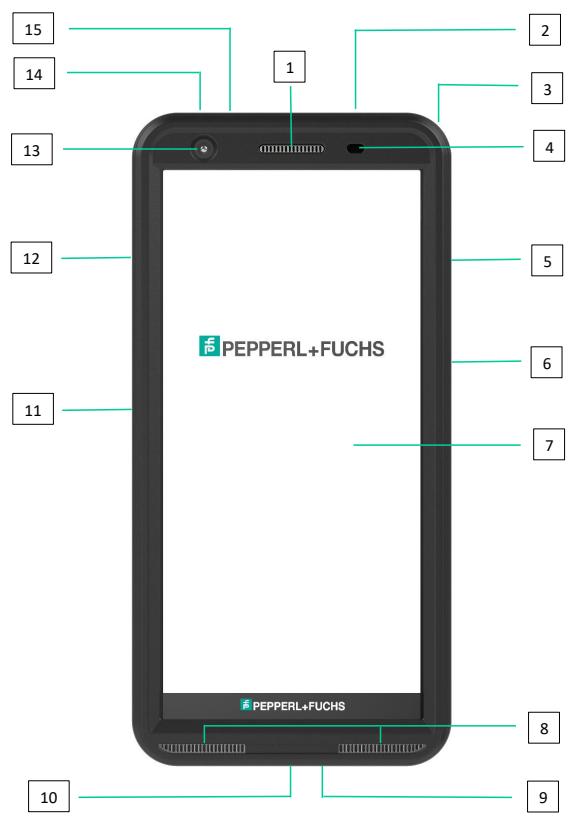
- Ear-piece
- Headset / RSM interface
- Eyelet
- Proximity / Light sensor
- Multifunction key right
- Power key with fingerprint sensor
- Touchscreen
- Loudspeakers
- Microphone
- USB-C interface
- Multifunction key left
- Volume key
- Front camera
- Alarm key
- Notification LED
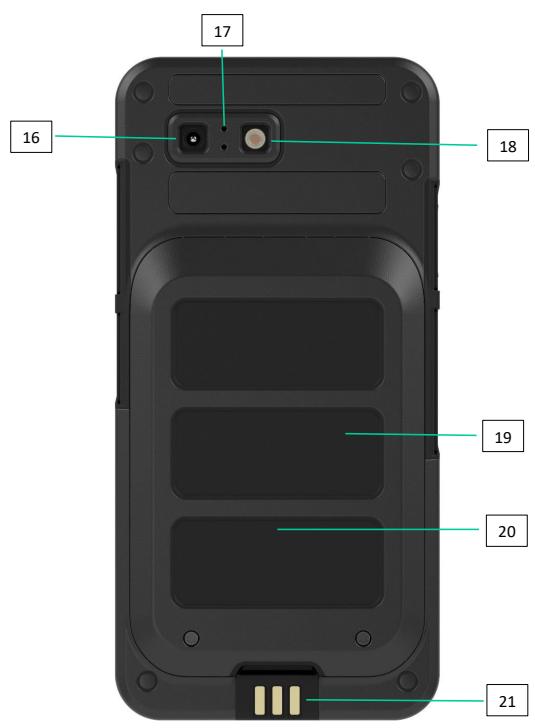
- Rear camera
- Noise canceling microphone
- Flash LED
- Battery
- NFC antenna
- Charging contacts
NOTE: The USB-C interface does not support 3.5mm audio adapter for audio.
STARTING THE PHONE
After switching on the new Smart-Ex® 03 phone a START button is visible at the center of the screen. The START button provides access to the Wi-Fi section. The phone requests for a Wi-Fi connection.
- Click on the START button to set up your phone.

- Select your network from the list of displayed networks. OR select the Setup Offline option to continue in the offline mode.
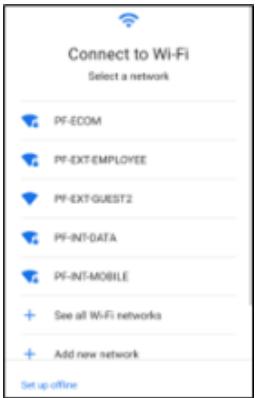
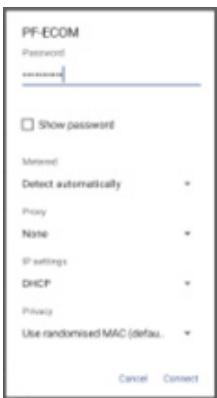
- Enter the password. Select Advanced options, if any of the advanced parameters have to be changed.

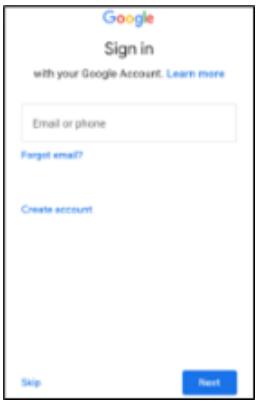
- Click the CONNECT button. The Password is authenticated and connection is established. Google Sign-in page is displayed.
- The Google Sign-in page is displayed. To continue Sign-in with an authentic email id.
If you select the offline mode, follow these steps:
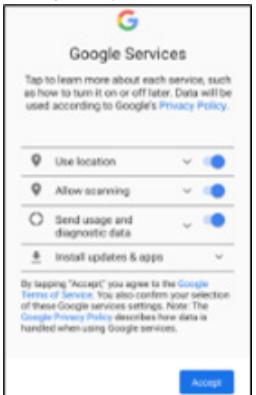
- Click on Continue to set up your phone in the Offline mode OR click on Back to connect to a Wi-Fi network. A list of Wi-Fi networks is displayed.
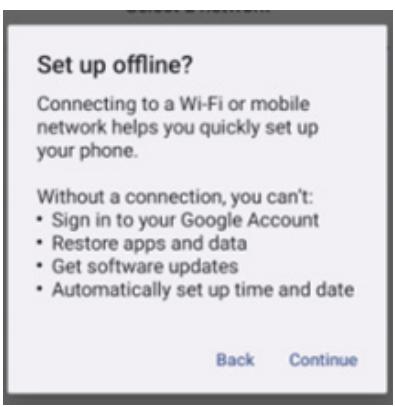
- If you select the Setup Offline option, the Google Services page is displayed. Accept and follow the wizard steps to set up your phone.
THE SMART-Ex® 03 PHONE
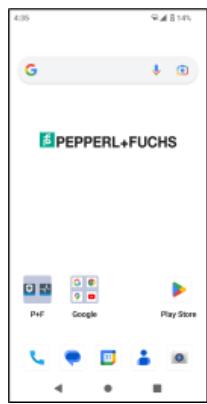
Basic apps like the Call Dialer, SMS, Calendar, Contacts, Camera are visible on the Home screen. Follow the wizard to download your data and activate these apps. You can drag and drop your favorite apps to the Home Screen for easy access. Swipe up to see all the apps available. Standard apps such as Chrome, Calendar, Calculator, Files, Messages, etc. are available on the phone. Additionally, you can download the apps of your choice from the Google Play® store.
Some of the features of an Android phone are further detailed here for your understanding. Features specific to the Smart-Ex® 03 are elaborated in the Custom Features section.
Home Screen Functions
After you complete the phone setup, the Home screen is displayed. This is the start point to access all the features of this device. The Home screen has multiple panels, it includes -
Time indicator: Shows the current time as per the time zone selected.
Network strength indicator: This indicates the Network strength of the service provider.
Battery charge indicator: Indicates the charge status of the battery.
Status bar: The Status bar at the top of the screen provides notification such as missed call, new messages, alarms, events, software updates, etc.
Google search bar: Google Search bar lets you search for items in your phone or the Internet. Touch Google Search bar to type your search terms, or to speak and give a voice input.
- App icons: The app icons added to the Home screen are displayed here. You can drag and place app icons on the Home screen for quick access. You can group widgets of apps and create folders.
Soft Keypad functions: The following table displays the various soft keys and the corresponding functions they perform:
| Icons | Description |
| Back - Press this key to go back to the previous screen. You can press till you reach the Home screen too. | |
| Home - Moves the current working application to the recent applications list/background | |
| Recent - displays the recently accessed applications. |
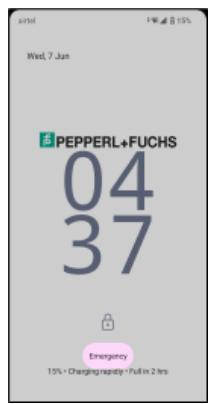
Home Screen Indicators
The icons displayed at the top of the screen provide information about the status of the device. Details such as date and time, battery charge status, and data service and Wi-Fi connectivity are displayed when the phone is in standby mode. Other indicators such as airplane mode, alarm and call forward are displayed, if the feature is activated.
| Icons | Description |
| 87% | Battery level indicator |
| Low Battery | |
| Battery charging in progress | |
| Battery saver mode | |
| No signal | |
| Signal strength | |
| No SIM card | |
| 4G | 4G Network connected |
| 5G | 5G Network Connected |
| 5-Gigahertz Network connection | |
| Roaming | |
| E | EDGE network connected |
| Wi-Fi connected | |
| Call in progress | |
| Missed call | |
| VoWi-Fi Registered | |
| New SMS or MMS | |
| M | New E-mail |
| Alarm activated | |
| Do Not Disturb (DnD) activated | |
| Vibration mode activated | |
| Silent mode | |
| Airplane mode activated | |
| Synced with the associated account such as Google | |
EMM provisioning
In an enterprise environment, mobile devices are typically enrolled into an Enterprise Mobility Management (EMM) system. There are many solution providers for such provisioning who provide different activation methods. The solution may also integrate Google's Android Zero Touch (AZT) provisioning method. These methods simplify the provisioning and management of the device in the enterprise.
QUICK SETTINGS
Quick settings give quick access to the most frequently used settings from the status bar.
Drag down the status bar to access the quick settings.
Tap to view the complete list of settings present in the quick settings.
To add or remove a setting to/from the quick settings, tap Edit ( ).
Each Quick settings option is detailed below:
Brightness Bar
Drag the Brightness bar towards your right to increase the brightness of the screen. To reduce the brightness, drag it towards the left.
Internet (Wi-Fi Network)
Tap on the Internet button to see the list of Internet connections available. By default, it displays the name of the active connection. Wi-Fi is a wireless network technology that provides Internet access to your smart phone.
You can access Internet when you connect your Smart-Ex® 03 to a Wi-Fi network.
Follow these steps to connect your phone to a Wi-Fi network -
- Tap on a Wi-Fi router present within your phone's accessible range as displayed in the list.
- Tap your preferred network. Enter the password (if it is a secured network) and tap Connect.
Bluetooth Devices
Bluetooth is short-range wireless communication technology used to communicate between the devices. Use Bluetooth headphones to attend calls.
Activating Bluetooth
Tap the Bluetooth button to activate Bluetooth.
Tap and hold to see the Connected Devices. This screen shows a list of devices previously connected as also other devices available in the vicinity for pairing.
Pairing a Bluetooth Device
To pair your Smart-Ex® 03 phone with other Bluetooth devices:
- On the Quick Settings screen, tap the Bluetooth button.
OR - From the Home / All Apps screen, tap Settings ( ) -> Connected devices. A list of accessible Bluetooth devices is displayed. Ensure that Bluetooth is activated in the other device too.
- Tap Pair new device to search and add other Bluetooth enabled devices. A list of accessible Bluetooth devices is displayed.
- Tap Settings next to the specific paired device to connect the Bluetooth device to access your phone's contacts, call history and also provide Internet access.
- Enable Media Audio to connect the Bluetooth device for listening to media files.

This option is displayed only when a Bluetooth Headset /car kit is connected.
- Confirm the pass key in the other device and tap to pair in your phone.
- The device is displayed in the Paired device list.
Do Not Disturb (DnD)
Tap on the Do not Disturb (DnD) button in the Quick Settings list to active it.
Notifications are not displayed when DnD is active.
Auto-rotate
Tap on the Auto-rotate button in the Quick Settings list to active it.
The screen display automatically turns to horizontal/vertical position or vice versa depending on the application that is open.
Battery Saver
Tap on the Battery Saver button in the Quick Settings list to active it.
It reduces the background activity in the phone, reduces the brightness of the screen, and saves battery charge. This enables the user to operate the phone for a longer duration.
Airplane Mode
Tap to activate the Airplane mode.
When your phone is set to airplane mode, network connectivity or mobile data connectivity is disabled. You cannot make/receive phone calls in this mode. You can access your media files and other features that do not require Internet/mobile data connectivity.
Night Light
Tap to activate the Night Light mode.
Night Light when activated reduces the brightness of the screen and emits a background light to enable access in dark places.
Torch
Tap on the Torch button to switch on the Torch Light.

The Torch cannot be switched on if the Camera app is active.
Wi-Fi Calling (VoWiFi)
With Wi-Fi Calling, you can dial or receive a phone call if you have a Wi-Fi connection in an area with little or no cellular coverage. Please ensure that this feature is provided by your service provider.
To activate Wi-Fi calling (VoWiFi), tap Phone > Settings > Calling accounts > Operator name > Wi-Fi calling. You may also activate this feature from the Quick settings options.
Voice over 5G
The Smart-Ex 03 can support Voice calls over 5G where the network is capable of this service and the phone has been provisioned with the feature. To activate the Voice over 5G (VoNR) feature tap Settings -> Network and Internet -> SIMs -> Voice over 5G.
Glove mode
Tap on the Glove Mode button to activate it.
When using gloves the touch functionality of the device may not work satisfactorily. In order to improve the experience you will need to activate the glove mode.
BATTERY USAGE GUIDELINES
The Smart-Ex® 03 phone comes with a removable battery. For any battery-related queries contact Pepperl+Fuchs customer support.

Use only Pepperl+Fuchs certified charger and USB cable to charge your Smart-Ex® 03.
Charging the Battery
The battery delivered with your smartphone is not fully charged. We recommend to fully charge the battery before using the smartphone for the first time. The full capacity of the battery is reached after 3 to 4 complete charge/discharge cycles.

There is a risk of explosion while charging if the battery has been replaced by an incorrect type.
Dispose of used batteries according to the instructions
- Insert the charger plug into a power outlet.
- Connect to Phone: The charging port is located at the lower end of the phone. Insert the USB (C type) connector to the charging port. Open the USB cover and rotate it 180^ to fix it in place. After that the USB (C type) connector can easier be connected.
- Charging Animation/Icon:
If the battery is being charged when the phone is switched off, a battery charging animation with charged percentage is displayed.
If the battery is being charged while the phone is switched on, the battery charge icon on the home screen top-right corner shows animation indicating that the battery is being charged. After the phone is fully charged the charging animation stops and you can disconnect the charger from the phone.
The LED indicator at the top of the phone, shows RED when the charging is in progress and changes to GREEN once the charging is complete.

Charging your Smart-Ex® 03 with a different cable/charger and/or in a hazardous environment will compromise the intrinsically safe nature of the device.
Verifying and Optimizing Battery Usage
To check the battery usage status, select Settings -> Battery. The current battery charge status and the charge level details are displayed.
The discharge graph (visible upon tapping the Battery usage option) shows the battery level over time since you last charged the device. The list at the bottom of the screen shows the breakdown of battery usage for individual applications and services. Touch any listed item for more details. The details screen for some applications includes options that allow you to adjust settings affecting power usage, or stop the app completely.

If you stop some system apps or services such as Google service, your device may not work correctly.
Tips to extend the battery life
Follow these tips to extend your phone's battery life.
If you are using Wi-Fi, Bluetooth or GPS, use the Quick Settings or Phone Settings to turn it off.
Limit usage of location-based application.
Set screen brightness to Auto and set a shorter sleep timeout (1 minute). The display settings are located in Settings -> Display.
LED INDICATORS
At the top end of the phone an LED indicator is placed (next to the red button). This LED indicator flashes with three different colors, namely red, blue and green.
Red color: The Red color blinking LED light indicates that the battery level is low (less than 15% ) and the phone needs to be charged. A constant red colored indicates that charging is in progress.
Blue color: Blue color blinking LED light indicates missed events, such as a missed call, new message or a calendar notification.
- Green color: Green color indicates that the battery has been charged completely and the charger should be unplugged from the power source.
CALL SCREEN FUNCTIONS AND INDICATORS
You can modify the call settings as per your choice.
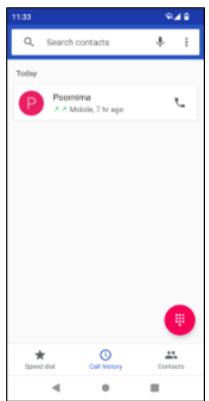
From Home or All Apps screen, tap Phone ( ). The Phone screen displays a list of calls made recently. The action panel displays the Speed dial ( ), Call History ( ) and Contacts ( ) icons.
The Search bar at the top of the screen allows you to search for a contact. Enter the first few letters/numbers of the contact name/phone number to be searched. All the contacts containing the search text are displayed.
Tap on the dial pad (甲) to call a number directly.
To dial a number use one of the following options:
Speed dial: Tap the specific contact/number from the frequently called numbers to make a call.
Call history: Tap the call history icon ( ) to view the call history. To make a call, tap the contact/number and tap the phone icon ( ).
Contacts: Tap a specific contact and tap the phone number to dial a call.
CUSTOM APPLICATIONS
There are two custom applications specific to Smart-Ex® 03 phone, namely - eSentinel and eDignostics.
eSENTINEL
This application allows you to configure alarm systems. There are five types of alarms that can be set up for different situations.
Widgets for these have been placed on the Home screen. Set up the alarms in the Red Button section.
These are 'Lone Worker Safety application' settings that can be predefined to assist personnel working solo.
eDIAGNOSTICS
eDiagnostics allows you to check the functionality of each feature present on the phone. The IT Admin of the organization checks the health of the phone and rectifies issues reported by the personnel.
CAMERA
The Camera feature of this phone allows the user to capture pictures and video in two modes each.
Videos can be captured in normal Video mode. The HFR mode gives high-resolution videos.
Photo and ProMode are the two capture qualities that give normal and high-resolution pictures, respectively.
Flash
The Flash can be used in two modes - Auto and HDR.
Auto: In Auto mode, the flash comes on depending on the ambient light required for the picture.
HDR: Higher resolution photographs require flash to capture the details of the object.

The flash can be switched off, if it is not required.
When using the phone camera application the Torch cannot be switched on.
CUSTOM FEATURES
Prog Keys (Programmable Keys)
This option allows you to assign various functions to a specific key.
For example, the button above the power button is assigned to the Camera. It could be modified with this option and assigned to another function.
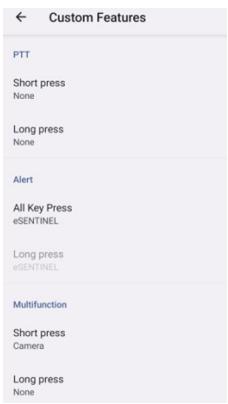
PTT(Push to talk):
This key is located below the volume button. It works as a one-way radio communicator with the base station.
Hold the button while speaking; release it to receive a reply.
Short press or Long press of the key can be assigned to different functions.
Alert Key
There are two options to activate an Alert.
All Key Press: This can be assigned to eSentinel which in turn send out an alert message.
Long Press: A long press key can be assigned to send an alert.
Multifunction
Multiple functions can be assigned via the Short press/Long press option.
SECURITY SETTINGS
There are three ways to ensure that your phone is secure and cannot be misused by any other person.
Go to Settings->Security->Device Security. You can lock your phone with a Fingerprint, PIN, or a Pattern. Follow the wizard to create your own unique lock.

The sensor to capture your fingerprint is present on the Power button.
Frequently Asked Questions
What is Pocket mode?
Pocket mode allows you to avoid accidental screen touches or any operation when the phone is in your pocket. If activated, all screen touches are disabled, so the phone won't try to unlock itself or dial a number or call any number from your Contacts.
How can I activate Wi-Fi Calling (VoWiFi)?
When Wi-Fi Calling is activated, you can dial or receive a phone call if you have a Wi-Fi connection in an area with little or no cellular coverage. Please ensure that this service is provided by your service provider.
To activate Wi-Fi calling (VoWiFi), tap Phone -> Settings -> Calling accounts -> Operator name -> Wi-Fi calling.
How can I configure and use Speed dial?
Speed dial helps you to associate each numeric key with one of the frequently used contact or phone number. If the user long presses the numeric key, the associated contact/number will be dialed. However, numeric key '1' is associated with voice mail and speed dial cannot be associated with it.
To activate speed dial, tap Call Settings -> Speed Dial settings.
How can I perform a system update?
You can update your device OS by checking for updates under Settings ->System -> System update.
If there is any system update to be performed, your phone directly communicates with the server via Wi-Fi/Mobile data and updates the device OS. Wi-Fi is the preferred mode for download of update as mobile data incurs additional charges including roaming.
How can I use the flash light settings?
This setting helps you to restrict the accidental usage of flash light. To turn ON/OFF Flash, tap Settings ->System -> Custom Feature. Once turned OFF, the flash bulb will not be available for Camera flash and Torch.
END USER LICENSE AGREEMENT
License
This wireless device, (the "Device") contains software owned by PEPPERL+FUCHS SE. ("Pepperl+Fuchs") and its third party suppliers and licensors (collectively, the "Software"). As user of this Device, Pepperl+Fuchs grants you a non-exclusive, non-transferable, non-assignable license to use the software solely in conjunction with the Device on which it is installed and/or delivered with.
Nothing herein shall be construed as a sale of the Software to a user of this Device.
You shall not reproduce, modify, distribute, reverse engineer, decompile, otherwise alter or use any other means to discover the source code of the Software or any component of the Software. For avoidance of doubt, you are at all times entitled to transfer all rights and obligations to the Software to a third party, solely together with the Device with which you received the Software, provided always that such third party agrees in writing to be bound by these rules.
You are granted this license for a term of the useful life of this Device. You can terminate this license by transferring all your rights to the Device on which you have received the Software to a third party in writing. If you fail to comply with any of the terms and conditions set out in this license, it will terminate with immediate effect Pepperl+Fuchs and its third party suppliers and licensors are the sole and exclusive owner of and retain all rights, title and interest in and to the Software. Pepperl+Fuchs, and, to the extent that the Software contains material or code of a third party, such third party, shall be entitled third party beneficiaries of these terms. The laws of Delaware, United States shall govern the validity, construction and performance of this license.
Phone Care
Each Pepper!+Fuchs Phone has a designated IP class for dust and water protection, according to the EN/IEC Ingress Protection (IP) Standard 60529. This means that the phone is dust protected and can be submerged into 3.3 feet/1.0 m deep water for up to 31 minutes. Immersion in deeper water can damage it and must be avoided.
Pepperl+Fuchs phones are built for heavy duty use. Its design protects against disassembly or mechanical damage when subjected to forces equal to free fall from the height of 4.9 feet/1.5 meters. Subjecting the phone to stronger impact and forces can damage it and must be avoided.
Warranty
Please observe the User manual provided in the Sales kit of this device for details about the warranty.

Changes or modifications made to this equipment not expressly approved by PEPPERL+FUCHS SE for compliance could void the user's authority to operate the equipment.
COMPLIANCE AND REGULATORY
FCC STANDARD
This Smart-Ex® 03 variant targeted for the North American region complies with part 15 of the FCC rules (FCC ID: 2AXZAS03GR01). Operation is subject to the following two conditions:
This device may not cause harmful interference.
This device must accept any interference received, including interference that may cause undesired operation.
This device has been tested and found to comply with the limits for a Class B digital device, pursuant to Part 15 of the FCC Rules. These limits are designed to provide reasonable protection against harmful interference in a residential installation. This equipment generates, uses, and can radiate radio frequency energy, and, if not installed and used in accordance with the instructions, may cause harmful interference to radio communications. However, there is no guarantee that interference will not occur in a particular installation. If this equipment does cause harmful interference to radio or television reception, which can be determined by turning the equipment off and on, the user is encouraged to try to correct the interference by one or more of the following measures:
Reorient or relocate the receiving antenna.
- Increase the separation between the equipment and receiver.
- Connect the equipment into an outlet on a circuit different from that to which the receiver is connected.
- Consult the dealer or an experienced radio/TV technician for help.

The country code selection is for non-US model only and is not available to all US model. Per FCC regulation, all Wi-Fi product marketed in US must fixed to US operation channels only.
Hearing Aid Compatibility (HAC) — U.S. only
This device is hearing aid compatible as determined by ANSI C63.19-2011.
This standard has two ratings: M (for reduced radio-frequency interference to enable acoustic coupling) and T (for inductive coupling with hearing aids operating in telecoil mode) on a scale from 1-4, where 4 is most compatible.
This device is rated M3/T3.
Compulsory FCC statement:
This phone has been tested and certified for use with hearing aids for some of the wireless technologies that it uses. However, there may be some newer wireless technologies used in this phone that have not been tested yet for use with hearing aids. It is important to try the different features of this phone thoroughly and in different locations, using your hearing aid or cochlear implant, to determine if you hear any interfering noise. Consult your service provider or the manufacturer of this phone for information on hearing aid compatibility. If you have questions about return or exchange policies, consult your service provider or phone retailer.
IC Notice
This device complies with Industry Canada license-exempt RSS standard(s). Operation is subject to the following two conditions:
This device may not cause interference, and
This device must accept any interference, including interference that may cause undesired operation of the device.
This Class B digital apparatus complies with Canadian ICES003 (IC: 7037A-S03GR01).
IC Radiation Exposure Statement
This EUT is in compliance with SAR for general population/uncontrolled exposure limits in IC RSS-102 and had been tested in accordance with the measurement methods and procedures specified in IEEE 1528 and IEC 62209. This equipment should be installed and operated with minimum distance of 10mm between the radiator and your body. This device and its antenna(s) must not be co-located or operating in conjunction with any other antenna or transmitter. The use of WLAN band is restricted to indoor use only.
Caution:
1) The device for operation in the band 5150-5250 MHz is only for indoor use to reduce the potential for harmful interference to co-channel mobile satellite systems.
2) Operation of transmitters in the 5.925-7.125 GHz band is prohibited for control of or communications with unmanned aircraft systems.
3) Devices shall not be used for control of or communications with unmanned aircraft systems.
This device is designed and manufactured not to exceed the emission limits for exposure to radio frequency (RF) energy set by the Federal Communications Commission of the United States and Industry Canada.
During SAR testing, this device is set to transmit at its highest certified power level in all tested frequency bands, and placed in positions that simulate RF exposure in usage against the head with no separation, and near the body with the separation of 10mm . Although the SAR is determined at the highest certified power level, the actual SAR level of the device while operating can be well below the maximum value. This is because the device is designed to operate at multiple power levels so as to use only the power required to reach the network. In general, the closer you are to a wireless base station antenna, the lower the power output.
The exposure standard for wireless devices employing a unit of measurement is known as the Specific Absorption Rate, or SAR. The SAR limit set by the FCC is 1.6 W/kg and 1.6 W/kg by Industry Canada.
This device is in compliance with SAR for general population /uncontrolled exposure limits in ANSI/IEEE C95.1-1992 and Canada RSS 102 and had been tested in accordance with the measurement methods and procedures specified in IEEE1528 and Canada RSS 102. This device has been tested and meets the FCC and IC RF exposure guidelines when tested with the device directly contacted to the body.
For this device, the highest reported SAR value for usage,
By the head is 0.62W / Kg (1g)
Worn on the body is 0.9 ~W / Kg(1 ~g)
Used as hotspot is 0.7W / Kg (1g)
While there may be differences between the SAR levels of various devices and at various positions, they all meet the government requirement.
SAR compliance for body-worn operation is based on a separation distance of 10mm between the unit and the human body. Carry this device at least 0mm away from your body to ensure RF exposure level compliant or lower to the reported level. To support body-worn operation, choose the belt clips or holsters that do not contain metallic components to maintain a separation of 0mm between this device and your body.
RF exposure compliance with anybody-worn accessory, which contains metal, was not tested and certified, and using such bodyworn accessory should be avoided.
ÉNERGIE RADIOÉLECTRIQUE
The Smart-Ex® 03 has been certified in compliance with the Government's requirements for exposure to Radio Waves.
When communicating over the wireless network, the smartphone emits via the radio frequency waves, low levels of radio energy. The Specific Absorption Rate, or SAR, is the amount of RF energy absorbed by the body while using the phone and is expressed in watts/kilogram (W/kg).
Governments around the world have adopted comprehensive international safety guidelines, developed by scientific organizations, for example, ICNIRP (International Commission on Non-Ionizing Radiation Protection) and IEEE (The Institute of Electrical and Electronics Engineers Inc.). These guidelines establish permitted levels of radio wave exposure for the general population.
Tests for SAR are conducted using standardized methods with the phone transmitting at its highest certified power level in all used frequency bands.
SAR Data Information for residents in countries that have adopted the SAR limit recommended by the International Commission on Non-Ionizing Radiation Protection (ICNIRP), for example, European Union, Japan, Brazil and New Zealand is available.
A minimum separation distance of 0mm must be maintained between the user's body and the device, including the antenna during body-worn operation to comply with the RF exposure requirements in Europe. The limit recommended by ICNIRP is 2W/kg averaged over ten (10) grams of tissue.
The following SAR values are applicable to Smart-Ex® 03 smartphones. This variant is available globally.
The highest SAR value for the Smart-Ex® 03 ROW phone when tested by Pepperl+Fuchs for use:
By the head is 1.78 W/Kg (10 g).
Worn on the body and by limbs is 1.84 ~W / Kg (10 g).
Band and Mode
| Band and Mode | Output Power | |
| GSM (2G) | ||
| GSM 900 | 900 MHz | 33 dBm |
| GSM 1800 | 1800 MHz | 30 dBm |
| WCDMA (3G) | ||
| Band I | 2100 MHz | 24 dBm |
| Band VIII | 900 MHz | 24 dBm |
| LTE (4G) | ||
| Band 1 | 2100 MHz | 24 dBm |
| Band 3 | 1800 MHz | 24 dBm |
| Band 7 | 2600 MHz | 24 dBm |
| Band 8 | 900 MHz | 24 dBm |
| Band 20 | 800 MHz | 24 dBm |
| Band 28 | 700 MHz | 24 dBm |
| Band 38 | 2600 MHz | 24 dBm |
| Band 40 | 2300 MHz | 24 dBm |
| NR (5G) | ||
| Band n1 | 2100 MHz | 24 dBm |
| Band n3 | 1800 MHz | 24 dBm |
| Band n7 | 2600 MHz | 24 dBm |
| Band n8 | 900 MHz | 24 dBm |
| Band n20 | 800 MHz | 24 dBm |
| Band n28 | 700 MHz | 24 dBm |
| Band n38 | 2600 MHz | 24 dBm |
| Band n40 | 2300 MHz | 24 dBm |
| Band n77 | 3700 MHz | 24 dBm |
| Band n78 | 3500 MHz | 25 dBm |
| Bluetooth | ||
| 2400 MHz | 8.5 dBm | |
| Bluetooth LE | ||
| 2400 MHz | 8.5 dBm | |
| WiFi | ||
| 2400 MHz | 20 dBm | |
| 5000 MHz | 20 dBm | |
| 5800 MHz | 14 dBm | |
| 6000 MHz | 20 dBm | |
| NFC | ||
| 13.56 MHz | 14.89 dBuA/m @ 10m | |
The use of WLAN band is restricted to indoor use only. This restriction will be applied in all EU member states.
| AT | BE | BG | CH | CY | CZ | DE | DK | EE | ES | EL |
| FI | FR | HR | HU | IE | IS | IT | LI | LT | LU | LV |
| MT | NL | NO | PL | PT | RO | SE | SI | SK | TR | UK |
Disposal of old Electrical and Electronic equipment

The symbol of the crossed-out wheeled bin indicates that within the countries in the European Union, this product, and any enhancements marked with this symbol, cannot be disposed as unsorted waste but must be taken to separate collection at their end- of-life.

- Disposal of batteries in accordance with European Directive BattV (EU) 2023/1542
- Batteries should not be disposed of with normal or household waste.
- Disposal can be done via appropriate collection points in your country.
Your automation, our passion.
Explosion Protection
Intrinsic Safety Barriers
Signal Conditioners
FieldConnex® Fieldbus Infrastructure
Remote I/O Systems
- Electrical Explosion Protection Equipment
- Purge and Pressurization Systems
HMI Systems
- Mobile Computing and Communications
HART Interface Solutions
Surge Protection
Wireless Solutions
Level Measurement
Industrial Sensors
Proximity Sensors
- Photoelectric Sensors
Industrial Vision
- Ultrasonic Sensors
Rotary Encoders
Positioning Systems
Inclination and Acceleration Sensors
Vibration Monitoring
Industrial Ethernet
AS-Interface
IO-Link
Identification Systems
- Displays and Signal Processing
Connectivity
www.pepperl-fuchs.com
Subject to modifications · Pepperl+Fuchs
Printed in Germany · DOCT-9141 · 01/2024 · public

Pepperl+Fuchs Quality
Download our latest policy here:
www.pepperl-fuchs.com/quality