
AquaLink PDA - Pool Control System Jandy - Free user manual and instructions
Find the device manual for free AquaLink PDA Jandy in PDF.
| Product Type | Wireless remote for pool control system |
| Brand | Jandy |
| Model | AquaLink PDA |
| Compatibility | AquaLink PDA, RS and Z4 systems |
| Power Supply | 2 AA batteries (not included) |
| Operating Frequency | 900 MHz, 18 selectable RF channels |
| Approximate Range | Up to 100 meters in open field |
| Dimensions (remote) | Approximately 150 x 80 x 25 mm |
| Weight (remote) | Approximately 200 g (with batteries) |
| Main Functions | Equipment on/off, temperature control, pool/spa modes, menu programming |
| Display | LCD screen with backlight |
| Junction Box | Transceiver with antenna, powered by the control center (CCI) |
| Installation | By a certified professional; junction box at least 1.8 m from the ground |
| Safety | Mandatory grounding, GFCI protection for lighting, hyperthermia instructions |
| Maintenance | Replace AA batteries if necessary; clean with a soft cloth |
| Operating Temperature | 0°C to 50°C |
| Certifications | FCC Part 15, ISDE Canada |
| Warranty | Consult dealer or Jandy |
| Repairability | Spare parts available from Jandy; professional service recommended |
Frequently Asked Questions - AquaLink PDA Jandy
User questions about AquaLink PDA Jandy
0 question about this device. Answer the ones you know or ask your own.
Ask a new question about this device
Download the instructions for your Pool Control System in PDF format for free! Find your manual AquaLink PDA - Jandy and take your electronic device back in hand. On this page are published all the documents necessary for the use of your device. AquaLink PDA by Jandy.
USER MANUAL AquaLink PDA Jandy
AquaLink® Wireless Handheld Remote
For use with AquaLink PDA, RS and Z4 Systems
WARNING
FOR YOUR SAFETY - This product must be installed and serviced by a contractor who is licensed and qualified in pool equipment by the jurisdiction in which the product will be installed where such state or local requirements exist. The maintainer must be a professional with sufficient experience in pool equipment installation and maintenance so that all of the instructions in this manual can be followed exactly. Before installing this product, read and follow all warning notices and instructions that accompany this product. Failure to follow warning notices and instructions may result in property damage, personal injury, or death. Improper installation and/or operation may void the warranty.
Improper installation and/or operation can create unwanted electrical hazard which may cause serious injury, property damage, or death.
ATTENTION INSTALLER - This manual contains important information about the installation, operation and safe use of this product. This information should be given to the owner/operator of this equipment.
Table of Contents
Section 1. Important Safety Instructions 4
Section 2. Product Overview 6
2.1 Compatibility 6
2.2 Basic Functions 7
2.3 Remote and Transceiver J-Box Dimensions 8
Section 3. Installation 8
3.1 Transceiver J-Box Connection to Power Center PCB 9
3.2 Handheld Remote Installation 10
3.3 Changing the Frequency Channel 11
Section 4. Handheld Remote Operation 13
4.1 Menus and Functions 14
4.2 Pool Mode/Spa Mode 14
4.3 Pool Heater/Spa Heater 14
FCC Statement
WARNING: Changes or modifications to this unit not expressly approved by the party responsible for compliance could void the user's authority to operate the equipment.
NOTE: This equipment has been tested and found to comply with the limits for a Class B digital device, pursuant to part 15 of the FCC Rules. These limits are designed to provide reasonable protection against harmful interference in a residential installation. This equipment generates, uses and can radiate radio frequency energy and, if not installed and used in accordance with the instructions, may cause harmful interference to radio communications. However, there is no guarantee that interference will not occur in a particular installation. If this equipment does cause harmful interference to radio or television reception, which can be determined by turning the equipment off and on, the user is encouraged to try to correct the interference by one or more of the following measures:
- Reorient or relocate the receiving antenna.
- Increase the separation between the equipment and receiver.
- Connect the equipment into an outlet on a circuit different from that to which the receiver is connected.
- Consult the dealer or an experienced radio/TV technician for help.
This device complies with part 15 of the FCC Rules. Operation is subject to the following two conditions: (1) This device may not cause harmful interference, and (2) this device must accept any interference received, including interference that may cause undesired operation.
ISED Canada Regulatory Statement
This device contains license/exempt transmitter(s)/receiver(s) that comply with Innovation, Science and Economic development Canada's license-exempt RSS(s). Operation is subject to the following two conditions:
(1) this device may not cause interference, and (2) this device must accept any interference, including interference that may cause undesired operation of the device.
SAVE THESE INSTRUCTIONS
Section 1. Important Safety Instructions
READ AND FOLLOW ALL INSTRUCTIONS
All electrical work must be performed by a licensed electrician and conform to all national, state, and local codes. When installing and using this electrical equipment, basic safety precautions should always be followed, including the following:
WARNING
To reduce the risk of injury, do not remove the suction fittings of your spa or hot tub. Never operate a spa or hot tub if the suction fittings are broken or missing. Never replace a suction fitting with one rated less than the flow rate marked on the equipment assembly.
Risk of electric shock, which could result in severe injury or death - Install the power center at least five (5) feet (1.52 m) from the inside wall of the pool and/or hot tub using non-metallic plumbing. Canadian, Australian, and European installations must be at least three (3) meters from the water.
Children should not use spas or hot tubs without adult supervision.
- Do not use spas or hot tubs unless all suction guards are installed to prevent body and hair entrapment.
- People using medications and/or having an adverse medical history should consult a physician before using a spa or hot tub.
A terminal bar marked "GROUND" is provided within the power center. To reduce the risk of electrical shock, connect this terminal bar to the grounding terminal of your electric service or supply panel with a continuous copper conductor having green insulation and one that is equivalent in size to the circuit conductors supplying this equipment, but no smaller than no. 12 AWG (3.3mm^2) . In addition, a second wire connector should be bonded with a no. 8 AWG (8.4mm^2) copper wire to any metal ladders, water pipes, or other metal within five (5) feet (1.52m) of the pool/spa. In Canada, the bonding wire must be minimum 6 AWG (13,3mm^2) .
When a Power Center is used to power or switch an underwater luminaire, suitable Ground Fault Circuit Interrupter (GFCI) protection for the lighting circuit shall be provided in the field. The conductors on the load side of the ground-fault circuit-interrupter shall not occupy conduit, boxes, or enclosures containing other conductors unless the additional conductors are also protected by a ground-fault circuit-interrupter. Refer to local codes for complete details.
To avoid injury ensure that you use this control system to control only packaged pool/spa heaters which have built-in operating and high limit controls to limit water temperature for pool/spa applications. This device should not be relied upon as a safety limit control.
WARNING
Prolonged immersion in hot water may induce hyperthermia. Hyperthermia occurs when the internal temperature of the body reaches a level several degrees above the normal body temperature of 98.6^ (37^) . The symptoms of hyperthermia include dizziness, fainting, drowsiness, lethargy, and an increase in the internal temperature of the body. The effects of hyperthermia include: 1) unawareness of impending danger; 2) failure to perceive heat; 3) failure to recognize the need to exit spa; 4) physical inability to exit spa; 5) fetal damage in pregnant women; 6) unconsciousness resulting in a danger of drowning.
To Reduce the Risk of Injury -
- The water in a spa should never exceed 104^ (40^) . Water temperatures between 100^ (38^) and 104^ (40^) are considered safe for a healthy adult. Lower water temperatures are recommended for young children and when spa use exceeds 10 minutes.
- Since excessive water temperatures have a high potential for causing fetal damage during the early months of pregnancy, pregnant or possibly pregnant women should limit spa water temperatures to 100^ ( 38^ ).
- Before entering a spa or hot tub, the user should measure the water temperature with an accurate thermometer since the tolerance of water temperature-regulating devices varies.
- The use of alcohol, drugs, or medication before or during spa or hot tub use may lead to unconsciousness with the possibility of drowning.
- Obese persons and persons with a history of heart disease, low or high blood pressure, circulatory system problems, or diabetes should consult a physician before using a spa.
- Persons using medication should consult a physician before using a spa or hot tub since some medication may induce drowsiness while other medication may affect heart rate, blood pressure, and circulation.
People with infectious diseases should not use a spa or hot tub. - To avoid injury, exercise care when entering or exiting the spa or hot tub.
- Do not use drugs or alcohol before or during the use of a spa or hot tub to avoid unconsciousness and possible drowning.
- Do not use a spa or hot tub immediately following strenuous exercise.
- Prolonged immersion in a spa or hot tub may be injurious to your health.
- Do not permit any electric appliance (such as a light, telephone, radio, or television) within 5 feet (1.52 m) of a spa or hot tub.
- The use of alcohol, drugs or medication can greatly increase the risk of fatal hyperthermia in hot tubs and spas.

Attention installer:
Install to provide drainage of compartment for electrical components.
Section 2. Product Overview
If the wireless handheld remote is used with an AquaLink PDA system; additional setup and programming options are available from the remote user interface (UI).
If the wireless handheld remote is used with an AquaLink RS or Z4 system, setup and programming will need to be performed at the system UI. The wireless handheld remote can is used to activate and deactivate equipment, programs and settings.
For complete details please see:
AquaLink PDA manual: H0572300
AquaLink RS OneTouch manual: 6593
AquaLink Z4 manual: H0386600
Copies can be obtained by visiting www.zodiacpoolsystems.com or by contacting technical support at 1.800.822.7933.
These instructions must be followed exactly. Read through the instructions completely before operating the equipment.
2.1 Compatibility
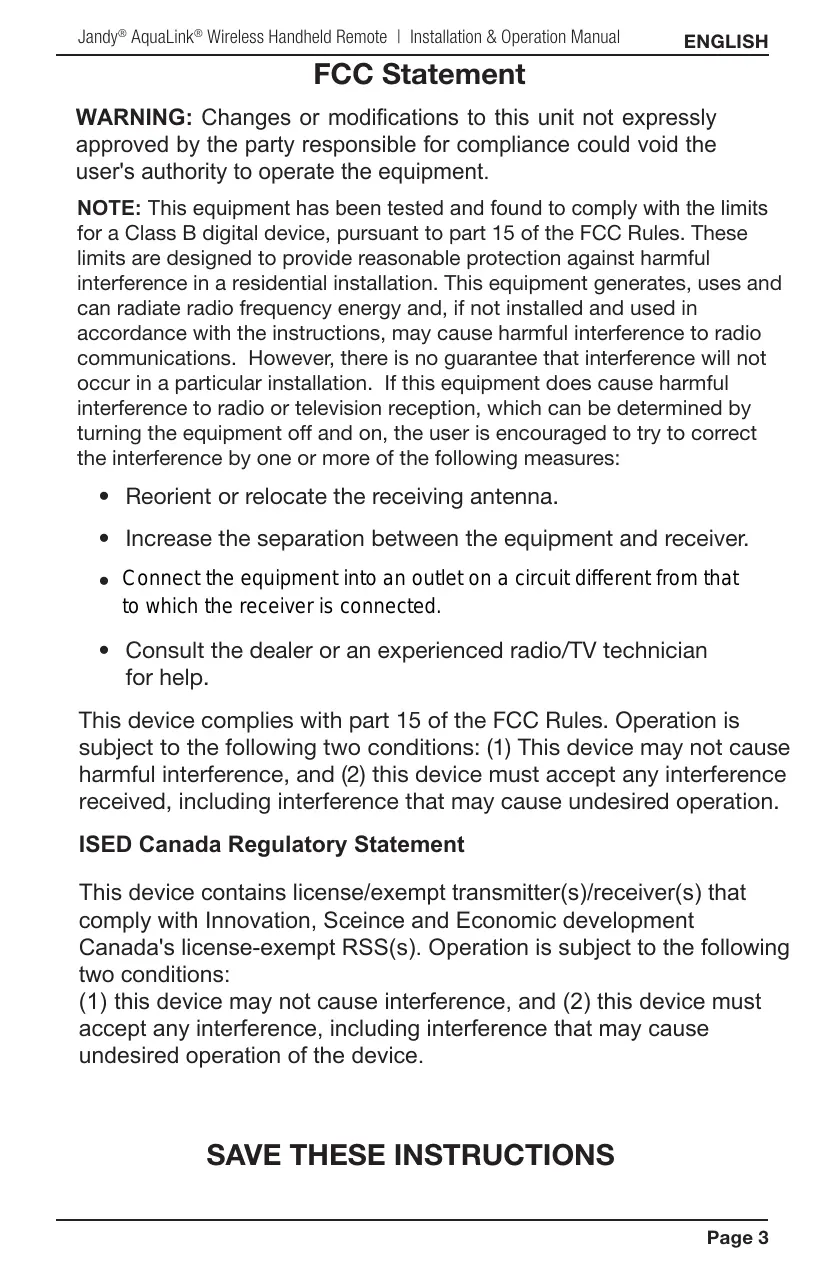
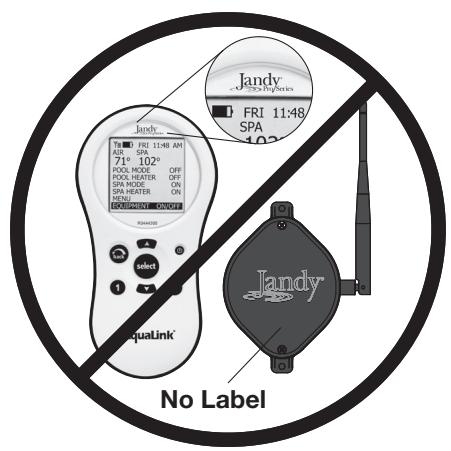
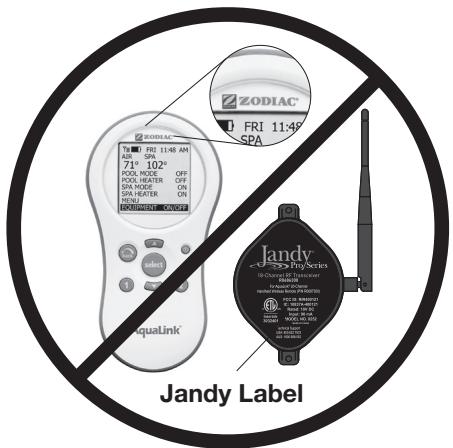
The 18 channel Jandy wireless handheld remote is only compatible with corresponding 18 channel Jandy J-Box transceivers. Any earlier versions or alternately branded versions are not compatible with this product. For any questions on compatibility please contact Zodiac Pool Systems LLC technical support at 1.800.822.7933.
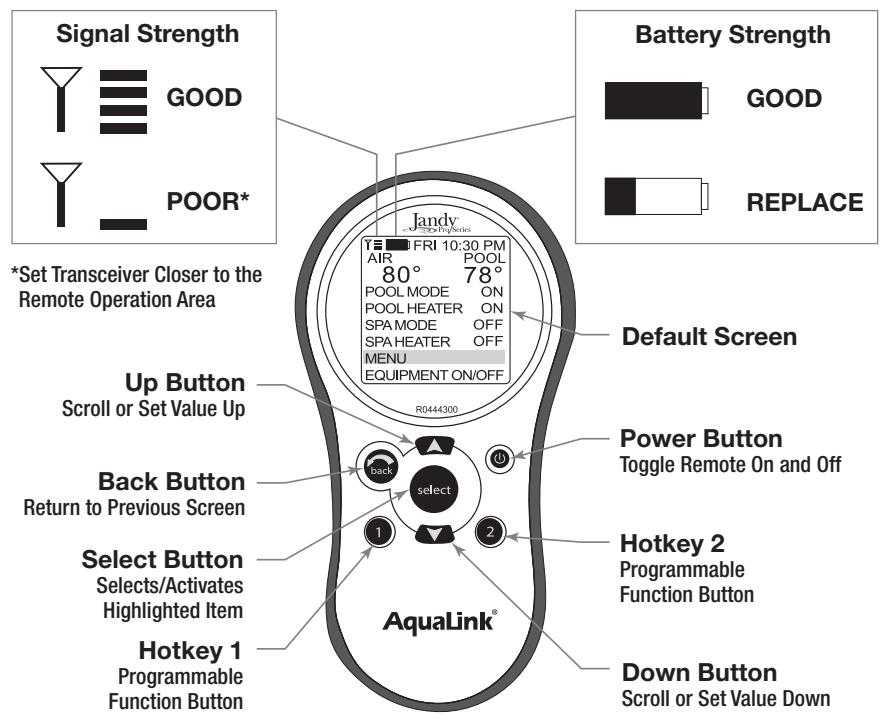
2.2 Basic Functions
The handheld remote can be used to activate and deactivate equipment or features either manually through the EQUIPMENT ON/OFF menu or by using the "Hotkeys", buttons 1 or 2. See Section Handheld Remote Operation for details.
2.3 Remote and Transceiver J-Box Dimensions
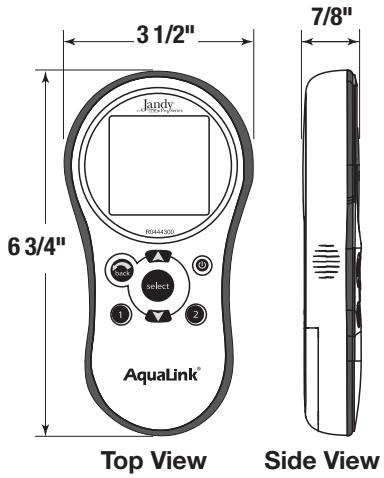
Handheld Remote

J-Box
Section 3. Installation
The transceiver will transmit through walls. However, steel framing, aluminum siding, stucco wrought iron, chain link fences, leaded glass, and other 900 MHz frequency items may inhibit or prevent communication between the handheld remote and the power center. To optimize communication, install transceivers in a location that minimizes interference.
WARNING
Potentially high voltages in AquaLink Power Centers can create dangerous electrical hazards, possibly causing death, serious injury or property damage. Turn off power at the main circuit feeding the power center to disconnect the power center from the system.
3.1 Transceiver J-Box Connection to Power Center PCB
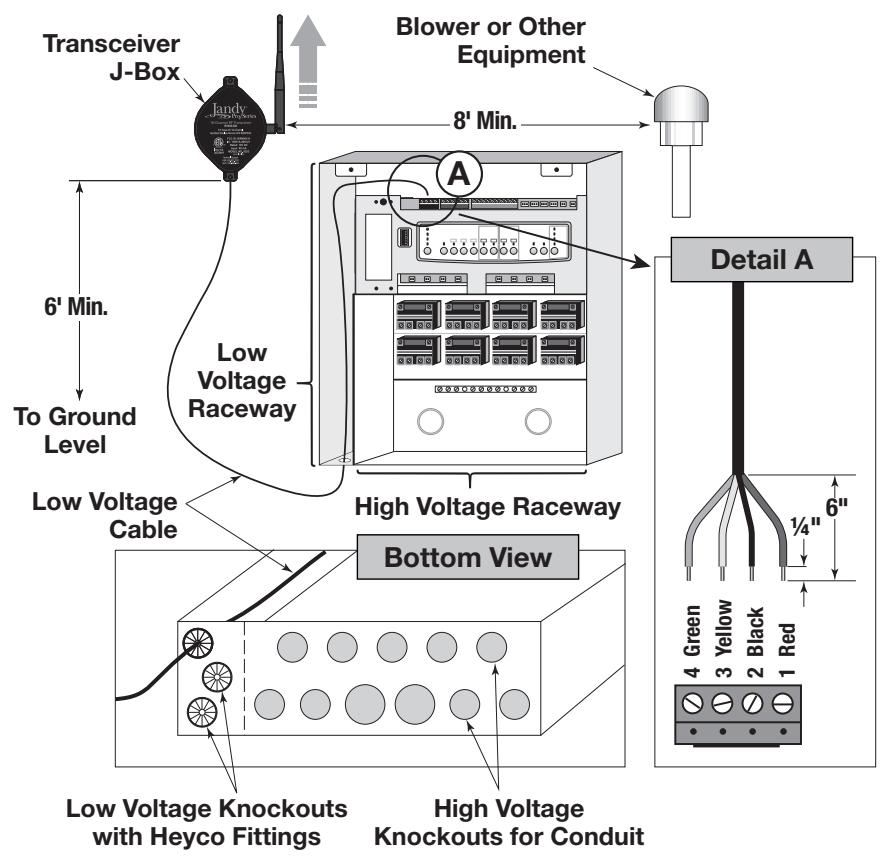
- Turn off all power to the power center.
- Mount the transceiver J-Box at least 6' above the ground and 8' from air blowers that may be nearby.
- The transceiver J-Box antenna must point towards the sky.
- Route the four conductor wire from J-Box through the Heyco® fitting into the power center low voltage raceway.
- Open the door to the power center and remove the dead panel.
- Feed the four conductor wire into the power center through the low voltage raceway.
-
Trim excess wire.
-
Strip the cable jacket back 6''
- Strip the individual wires 14 .
- Connect the four conductor wire to the red terminal bar on the power center PCB.
- Install the dead panel to the power center.
- Restore all power.
3.2 Handheld Remote Installation
- Remove the handheld remote from the packaging.
- On the back of the handheld remote, remove two (2) screws that secure the cover for the battery enclosure.
- Install two (2) AA batteries. Ensure that the polarity is correct.
- Re-install the cover for the battery enclosure and secure with the two (2) screws removed in Step 2.
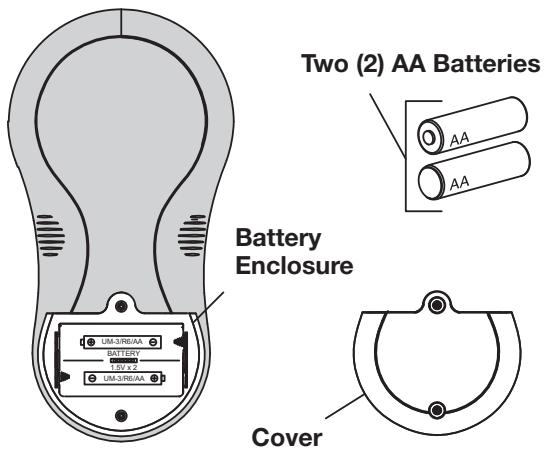
Handheld Remote Back View
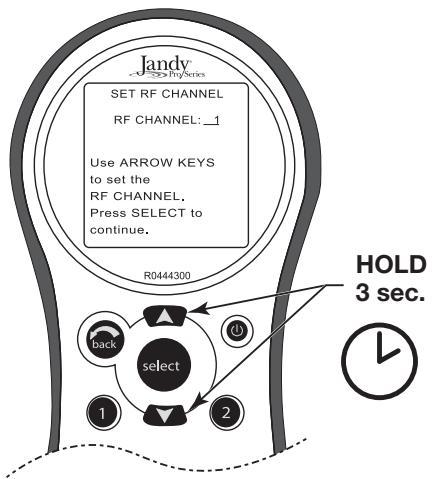
3.3 Changing the Frequency Channel
CAUTION
ESD Precautions - Electrostatic discharge (ESD) events can harm electronic components inside your device. To prevent ESD damage, you should discharge static electricity from your body before you interact with any of your devices internal electronic components, such as a printed circuit board (PCB) or any connection terminals. You can also take the following steps to prevent damage from electrostatic discharge:
- When unpacking a static-sensitive component from its shipping carton, do not remove the component from the antistatic packing material until you are ready to install the component. Just before unwrapping the antistatic package, be sure to discharge static electricity from your body.
- When transporting a sensitive component, first place it in an antistatic container or packaging.
If your AquaLink handheld remote system is operating at undesignated times, another nearby remote system may be using the same or similar channel. To prevent unintended operation, the channel for your handheld remote system can be changed. The handheld remote and the transceiver J-Box must be set to the same RF channel.
-
On the handheld remote, press and hold both the UP and DOWN arrows simultaneously for three (3) seconds. The CHANNEL SETUP screen will appear.
-
Use the UP and DOWN buttons to highlight the desired RF channel. Then press SELECT.
- When the RF channel is selected, the following message appears on the remote display screen:
Set slide switch on J-Box PCB to the LEARN MODE.

- At the Transceiver J-Box, remove the cover to expose the PCB.
- Slide the learn switch to ON.
- On the handheld remote display screen, a prompt will read: Restore J-Box Slide Switch and Press J-Box Reset Button.
- Slide the learn switch inside the transceiver J-Box to OFF.
- Press the reset button inside the transceiver J-Box.
- When complete the red and green LEDs on the J-Box will blink simultaneously.
Section 4. Handheld Remote Operation
4.1 Menus and Functions
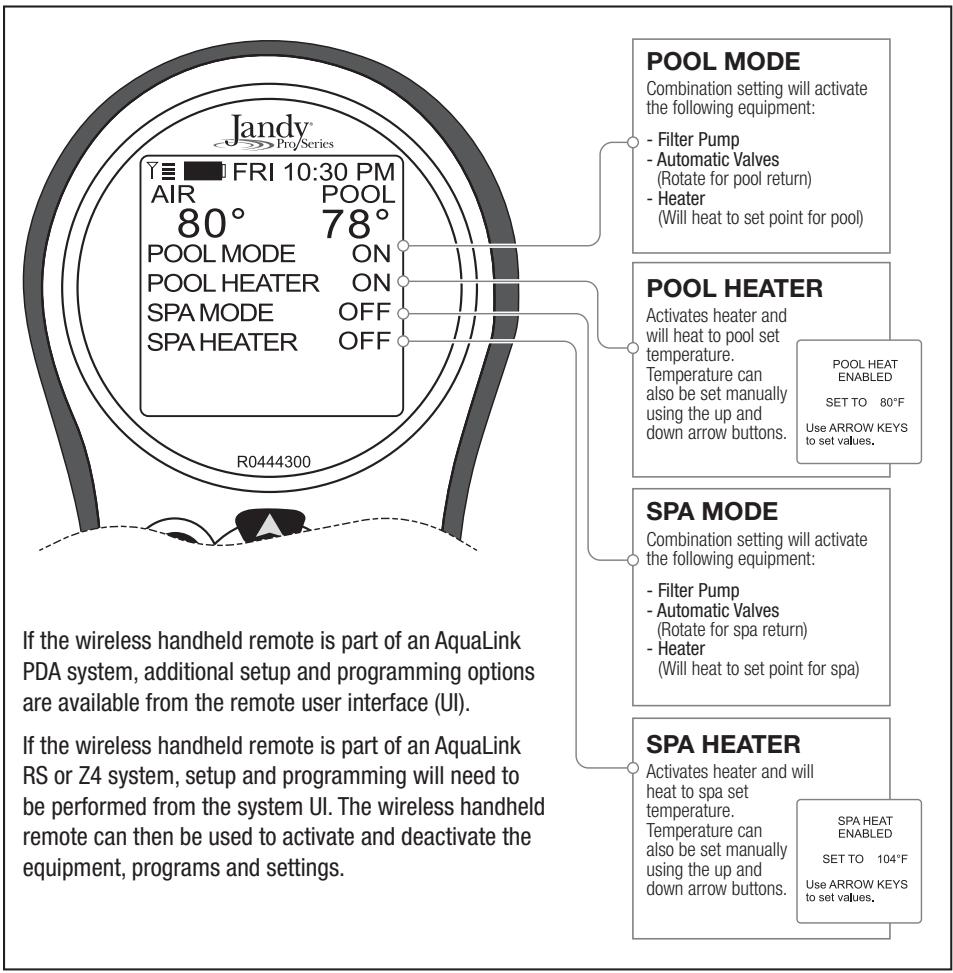
4.2 Pool Mode/Spa Mode
This combination setting will start the filter pump at the appropriate speed and rotate automatic valves to the correct return. If SET TEMP has been enabled the heater will also engage and heat the pool or spa to the temperature set point.
4.3 Pool Heater/Spa Heater
Activates or deactivates heater. When heater is active, water will be heated to temperature set point established for the pool or spa. The temperatures can also be adjusted manually using the arrow keys to adjust the temperature value up or down.
NOTES
Zodiac Pool Systems LLC
2882 Whiptail Loop # 100
Carlsbad, CA 92010, USA
Jandy.com | 1.800.822.7933
Zodiac Pool Systems Canada, Inc.
2-3365 Mainway
Burlington, ON L7M 1A6, Canada
Jandy.ca | 1.800.822.7933
A Fluidra Brand
Section 3. Installation 24
Section 3. Installation
Zodiac Pool Systems LLC
2882 Whiptail Loop # 100
Carlsbad, CA 92010, USA
Jandy.com | 1.800.822.7933
Zodiac Pool Systems Canada, Inc.
2-3365 Mainway
Burlington, ON L7M 1A6, Canada
Jandy.ca | 1.800.822.7933
A Fluidra Brand

AquaLink® control remoto inalámbrico
Zodiac Pool Systems LLC
2882 Whiptail Loop # 100
Carlsbad, CA 92010, USA
Jandy.com | 1.800.822.7933
Zodiac Pool Systems Canada, Inc.
2-3365 Mainway
Burlington, ON L7M 1A6, Canada
Jandy.ca | 1.800.822.7933
A Fluidra Brand

- AquaLink® Wireless Handheld Remote
- WARNING
- Table of Contents
- Section 1. Important Safety Instructions 4
- Section 2. Product Overview 6
- Section 3. Installation 8
- Section 4. Handheld Remote Operation 13
- FCC Statement
- ISED Canada Regulatory Statement
- SAVE THESE INSTRUCTIONS
- Section 1. Important Safety Instructions
- READ AND FOLLOW ALL INSTRUCTIONS
- To Reduce the Risk of Injury -
- Attention installer:
- Section 2. Product Overview
- Compatibility
- Basic Functions
- Remote and Transceiver J-Box Dimensions
- Section 3. Installation
- Transceiver J-Box Connection to Power Center PCB
- Handheld Remote Installation
- Changing the Frequency Channel
- CAUTION
- Section 4. Handheld Remote Operation
- Menus and Functions
- Pool Mode/Spa Mode
- Pool Heater/Spa Heater
- NOTES
- A Fluidra Brand
- Section 3. Installation 24
- AquaLink® control remoto inalámbrico
Brand : Jandy
Model : AquaLink PDA
Category : Pool Control System