V6 .P.02.Z - Door and window sensor Loocam - Free user manual and instructions
Find the device manual for free V6 .P.02.Z Loocam in PDF.
| Product type | Door and window sensor |
| Brand | Loocam |
| Model | V6 .P.02.Z |
| Dimensions (approx.) | 5 cm x 2 cm x 2 cm |
| Weight (approx.) | 30 g |
| Power supply | Button cell (CR1632 or equivalent) |
| Battery life | Up to 1 year in normal use |
| Main functions | Open/close detection, push notification, integration with Loocam gateway |
| Communication | Wireless via gateway (WiFi required for gateway) |
| Indicator light | Blue (pairing/update) and red (reset) flashing |
| Installation | On door, window, or cabinet (base on fixed part, sensor on moving part) |
| Care and cleaning | Wipe with a soft, dry cloth. Do not use solvents. |
| Security | Anti-tamper (alert if detached from wall) |
| Spare parts and repairability | Replaceable battery (insulated tool recommended). Other parts not available separately. |
| General information | Indoor use only. Avoid proximity to magnets or metals. |
Frequently Asked Questions - V6 .P.02.Z Loocam
User questions about V6 .P.02.Z Loocam
0 question about this device. Answer the ones you know or ask your own.
Ask a new question about this device
Download the instructions for your Door and window sensor in PDF format for free! Find your manual V6 .P.02.Z - Loocam and take your electronic device back in hand. On this page are published all the documents necessary for the use of your device. V6 .P.02.Z by Loocam.
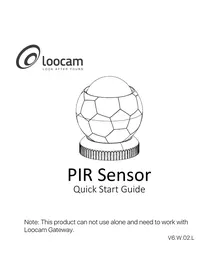
USER MANUAL V6 .P.02.Z Loocam
Door & Window Sensor
Quick Start Guide
Note: This product can not use alone and need to work with Loocam Gateway.
V6.P.02.Z
Contents
EN 01
ES 07
FR 11
DE 15
IT 21
NL 25
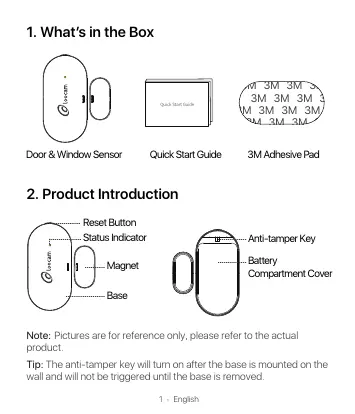
1. What's in the Box

Door & Window Sensor

Quick Start Guide
3M Adhesive Pad
2. Product Introduction
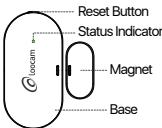
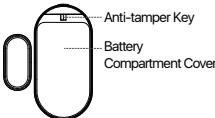
Note: Pictures are for reference only, please refer to the actual product.
Tip: The anti-tamper key will turn on after the base is mounted on the wall and will not be triggered until the base is removed.
3. How to Use?
Download Loocam App
Scan the QR code below with your smartphone or search in the App Store or Google Play to download Locomap app.

Add Devices
- Connect WiFi to your phone.
- Please follow the corresponding adding operation to add gateway to the App.
-
Enter the Gateway interface and select "Add Sensor" — "Door & Window Sensor".
-
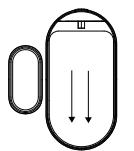
Remove the battery slot cover (as shown in the picture), power on the device after taking out the insulating sheet.
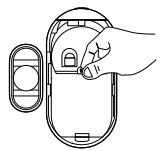
- Press and hold the Reset Button for about 5 seconds until the red light flashes on the device and release it. Then press the button one more time and you will see the blue light flashes on the device. At this time, the device enters the pairing mode.
Important Notice: When replacing the battery, please use insulated tools to remove the battery. Do not use metal tools for prying the battery to avoid short-circuiting and damaging the motherboard.
Indicator Light Description
| Status | Color | Feature |
| Paring/Upgrading | Blue Light | Flash |
| Resetting | Red Light | Flash |
4. Installation
You can install the product on doors, windows, cabinets and other scenes, please install the base on a fixed door or window, the specific method is shown in the picture.
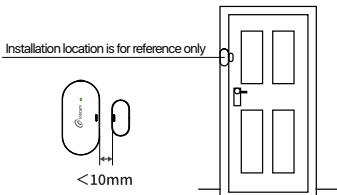
Installation location is for reference only, the specific usage location is subject to user requirements.
Note:
Please do not install the sensor in outside where is unstable or raining.
- Please do not install the sensor next to the metallic magnet or others that may interfere with the sensor's operation.
NOTE: This equipment has been tested and found to comply with the limits for a Class B digital device, pursuant to part 15 of the FCC Rules. These limits are designed to provide reasonable protection against harmful interference in a residential installation. This equipment generates, uses and can radiate radio frequency energy and, if not installed and used in accordance with the instructions, may cause harmful interference to radio communications. However, there is no guarantee that interference will not occur in a particular installation. If this equipment does cause harmful interference to radio or television reception, which can be determined by turning the equipment off and on, the user is encouraged to try to correct the interference by one or more of the following measures:
- Reorient or relocate the receiving antenna.
- Increase the separation between the equipment and receiver.
-Connect the equipment into an outlet on a circuit different from that to which the receiver is connected.
-Consult the dealer or an experienced radio/TV technician for help
Changes or modifications not expressly approved by the party responsible for compliance could void the user's authority to operate the equipment.
This device complies with Part 15 of the FCC Rules. Operation is subject to the following two conditions:
(1) this device may not cause harmful interference, and (2) this device must accept any interference received, including interference that may cause undesired operation.
1. List de empaque
Telecharger I'application Loocam
Anti-Tamper-Schlüssel
Loocam-app downloaden
Responsible Party:Ansjer Electronics Co., Ltd
Company name:Loocam Technology LLC
Address: 2205 Hutton Dr, Unit 100, Carrollton TX 75006
Tel: 657-223-3477
E-mail: lavenderl@loocam.com
Copyright 2022 © Loocam Technology LLC, All rights reserved. Apple and App
Store are trademarks of Apple Inc., registered in the U.S. and other countries.
Google and Google Play are trademarks of Google Inc.