USER MANUAL S510 Getac
The Bluetooth® word mark and logos are registered trademarks owned by Bluetooth SIG, Inc.
Thunderbolt is a trademark of Intel Corporation or its subsidiaries.
All brand and product names are trademarks or registered trademarks of their respective companies.
Disclaimer
Specifications and manuals are subject to change without notice. Getac assumes no liability for damage incurred directly or indirectly from errors, omissions, or discrepancies between the device and the manuals.
Note
For the latest version of the manual, please visit the Getac website at www.getac.com.
Table of Contents
Chapter 1 Getting Started 1
Getting the Computer Running 2
Connecting to AC Power 2
Turning On and Off the Computer 3
Taking a Look at the Computer 4
Front Components 4
Rear Components 5
Right-Side Components 6
Left-Side Components 7
Top-open Components 8
Bottom Components 10
Chapter 2 Operating Your Computer 12
Using the Keyboard 13
Typewriter Keys 13
Cursor-Control Keys. 13
Numeric Keypad 14
Function Keys. 15
Fn Key 15
Hot Keys 15
Windows Keys 16
Using the Touchpad 17
Touch Gestures 18
Configuring the Touchpad. 18
Using the Touchscreen (Optional) 19
Using Multi-touch Gestures 20
Using Network and Wireless Connections 22
Using the LAN 22
Using the WLAN 23
Using the Bluetooth Feature 24
Using the WWAN Feature (Optional) 25
Using the Optical Disc Drive (Optional) 27
Inserting and Removing a Disc 28
Using the Fingerprint Scanner (Optional) 29
Using the Contactless Smart Card Reader (Optional) 30
Using the Barcode Scanner (Optional) 31
Notes 32
Chapter 3 Managing Power 33
AC Adapter 34
Battery Pack. 35
Charging the Battery Pack 35
Initializing the Battery Pack 36
Checking the Battery Level 36
Battery Low Signals and Actions 36
Replacing the Battery Pack 37
Power-Saving Tips 39
Appendix A Specifications 40
Safety Notices 43
About the Battery. 43
About the AC Adapter 45
Heat Related Concerns 46
North America 47
USA 47
Canada 49
User Notification of Take-back Service 54
Europe Marking and Compliance Notices. 56
Statements of Compliance 56
Restriction of Hazardous Substances (RoHS) Directive .... 58
Declaration of Conformity 58
ENERGY STAR 59
About Battery and External Enclosure Replacement 60
Battery 60
External Enclosure 60
Chapter 1
Getting Started
This chapter first tells you step by step how to get the computer up and running. Then, you will find a section briefly introducing the external components of the computer.
CAUTION: Safety instructions are provided in related sections throughout the User Manual. Please read the manual and any accompanying document(s) before starting to use the product.
Getting the Computer Running
Connecting to AC Power
CAUTION: Use only the AC adapter included with your computer. Using other AC adapters may damage the computer.
NOTE:
- The battery pack is shipped to you in power saving mode that protects it from charging/discharging. It will get out of the mode to be ready for use when you install the battery pack and connect AC power to the computer for the very first time.
- When the AC adapter is connected, it also charges the battery pack. For information on using battery power, see Chapter 3.
You must use AC power when starting up the computer for the very first time.
- Plug the DC cord of the AC adapter to the power connector of the computer (①).
- Plug the female end of the AC power cord to the AC adapter and the male end to an electrical outlet (2).
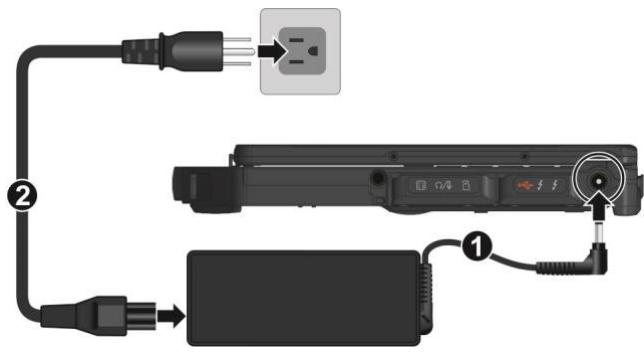
NOTE: The power cord type varies with countries. The look of your power cord and electrical outlet might not match the one shown in this document.
- Power is being supplied from the electrical outlet to the AC adapter and onto your computer. Now, you are ready to turn on the computer.
Turning On and Off the Computer
Turning On
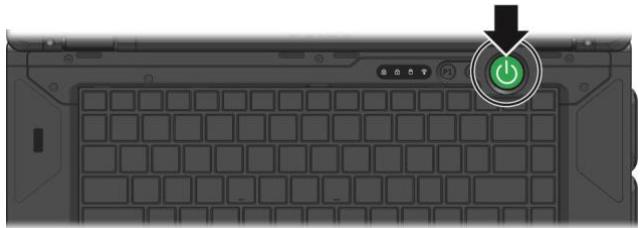
- Open the top cover by pulling the cover latch and lifting up the cover. You can tilt the cover forward or backward for optimal viewing clarity.
- Press the power button (U). The Windows operating system should start.
Turning Off
When you finish a working session, you can stop the system by turning off the power or leaving it in Sleep or Hibernation mode:
| To... | Do this... |
| Power off (Shutdown) | Select Start → Ⓞ Power → Shut down. |
| Sleep | Use one of these methods:
• Press the power button.*
• Close the top cover.*
• Press Fn + F12.*
• Select Start → Ⓞ Power → Sleep. |
| Hibernate | By default, this option is not shown in the Start menu. If you want to use the feature, set up accordingly in Windows settings. |
- "Sleep" is the default result of the action. You can change what the action does through Windows settings.
Taking a Look at the Computer
NOTE: Depending on the specific model you purchased, the color and look of your model may not exactly match the graphics shown in this document.
CAUTION: You need to open the protective covers to access the connectors. When not using a connector, make sure to close the cover completely for water- and dust-proof integrity. (Engage the locking mechanism if existing.)
Front Components
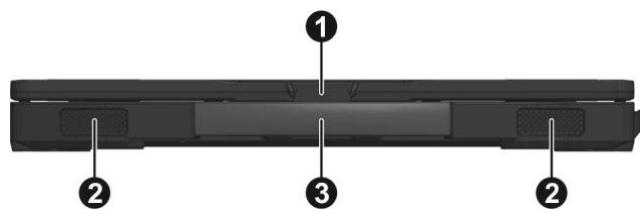
| Ref | Component | Description |
| 1 | Top cover latch | Locks the top cover. |
| 2 | Stereo speaker | Sends out sound and voice from the computer. |
| 3 | Handle | Provides a convenient way to carry the computer.
NOTE: When carrying the computer around, always use the handle or the carrying strap (purchased separately). |
Rear Components

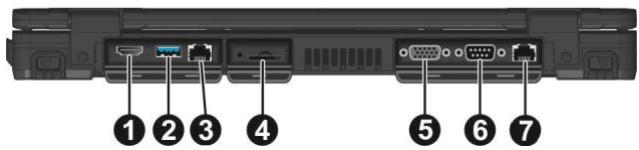
| Ref | Component | Description |
| 1 | HDMI connector | Connects a HDMI monitor or TV set. |
| 2 | USB 3.2 Gen 2 port | Connects a USB device. |
| 3 | RJ45 connector | Connects the LAN cable. |
| 4 | SIM card slot (optional) | Accepts a SIM card for models having the WWAN module.
NOTE: The slot still exists but cannot be used for models without the WWAN module. |
| 5 | Select models have one of the below components. |
| VGA connector | Connects an external display monitor. |
| DisplayPort connector | Connects an external display monitor. |
| 6 | RS-232 serial connector (optional) | Connects a serial mouse or serial communication device. |
| 7 | Select models have one of the below components. |
| RJ45 connector | Connects the LAN cable (for LAN2). |
| PowerShare USB port | Provides either of the below two functions depending on your setting. |
| Charges a connected mobile device. |
| - or - |
| Functions as a standard USB 3.2 Gen 1 port (default setting). |
Right-Side Components

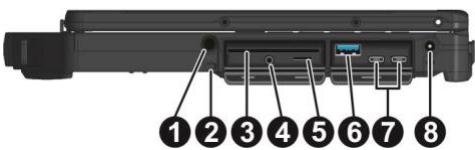
| Ref | Component | Description |
| 1 | Stylus slot | For storing the stylus (optional). |
| 2 | Tether hole | Stylus tethered to this hole. |
| 3 | Smart card reader (optional) | Accepts a smart card for additional security feature. |
| 4 | Combo audio connector | Connects a set of headphones or external speakers with amplifier. |
| Supports a headset microphone with 4-pole TRRS 3.5mm jack. |
| 5 | Storage card reader (optional) | Accepts a microSD card for removable storage media. |
| 6 | USB 3.2 Gen 1 port | Connects a USB device. |
| 7 | USB-C Thunderbolt™ 4 port | Connects to devices that support Thunderbolt or USB-C connection. (Depending on the model you have, there is one or two USB-C Thunderbolt™ ports.) |
| 8 | Power connector | Connects the AC adapter. |
Left-Side Components
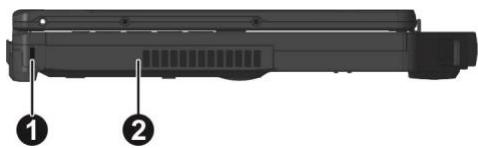
| Ref | Component | Description |
| 1 | Kensington lock | Locks the computer to a stationary object for security. |
| 2 | This is a multi-purpose bay. Select models have one of the below components. |
| a | User-removable type: |
| Optical disc drive | Accepts an optical disc. |
| Second SSD module | Provides additional storage space to your computer. |
| b | Factory installed (non-user-removable) type: |
| Barcode scanner | Scans and reads barcodes. |
| Discrete GPU card | Provides high graphics processing performance to your computer. |
Top-open Components
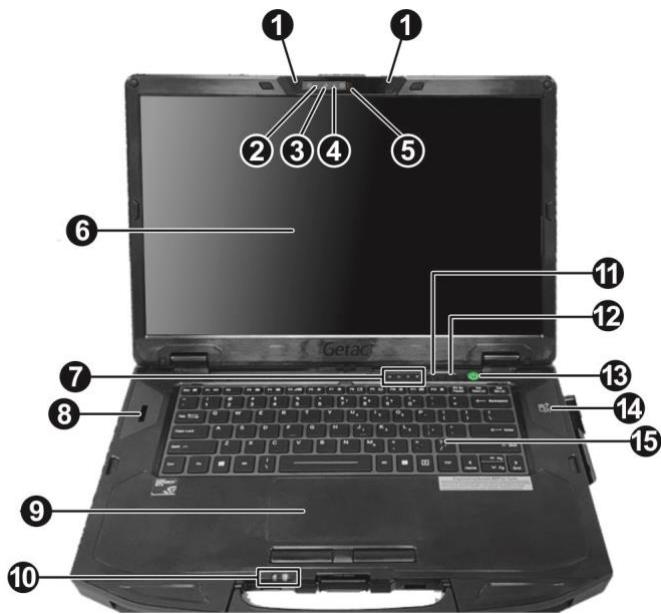
| Ref | Component | Description |
| 1 | Microphone array | Receives sound and voice for the computer. |
| 2 | Camera indicator (optional) | Lights up when the camera is in use. |
| 3 | IR sensor (optional) | Detects the infrared energy of objects to form an image. The sensor flashes red light when in use. The near infrared (IR) imaging capability allows you to use Windows Hello face authentication. |
| 4 | Camera lens (optional) | Allows you to use the camera function. |
| 5 | Camera cover (optional) | Covers the camera lens. Slide the camera cover toward the right to use the camera; slide it toward the left for privacy protection. |
| 6 | LCD screen | Displays the output of the computer. Select models have the touchscreen feature. |
| 7 | Indicators |
| A Caps Lock | Lights green when Caps Lock is on. |
| Num Lock | Lights green when Num Lock is on. |
| SSD | Blinks green when the computer is accessing the SSD. |
| Airplane mode | Lights green when the RF radio of any RF feature (WLAN/Bluetooth/WWAN) is on. If Airplane mode is switched on, the light turns off. |
| 8 | Fingerprint scanner (optional) | Serves as the fingerprint verification, preventing unauthorized access to your computer. |
| 9 | Touchpad | Serves as the pointing device of the computer. |
| 10 | Indicators |
| Battery | Lights amber when the battery is being charged. |
| Lights green when battery charging is completed. |
| Blinks green to indicate the battery's built-in high temperature protection mechanism is activated. CAUTION: Do not remove the battery during this period. |
| Blinks red when the battery's capacity is below 10%. |
| Blinks amber when the battery is in an abnormal condition. |
| Power | Lights green when computer is on. |
| Blinks green when computer is in Sleep mode. |
| 11 | P1 button | Toggles Blackout mode on or off. In Blackout mode, the LCD backlight, keyboard backlight, and LED indicators are all turned off; and the sound is muted. |
| Serves as the trigger button for the barcode scanner if your model has the module. |
| | Can be changed to a different function using G-Manager. |
| 12 | P2 button | Toggles the sunlight-readable mode on or off.
In sunlight-readable mode, the LCD brightness is increased to the highest level. |
| Can be changed to a different function using G-Manager. |
| 13 | Power button | Turns the power on or off. (The default “off” state is “Sleep mode.”) |
| 14 | Contactless smart card reader (optional) | Serves as an RFID reader/writer. |
| 15 | Keyboard | Serves as the data input device of the computer. |
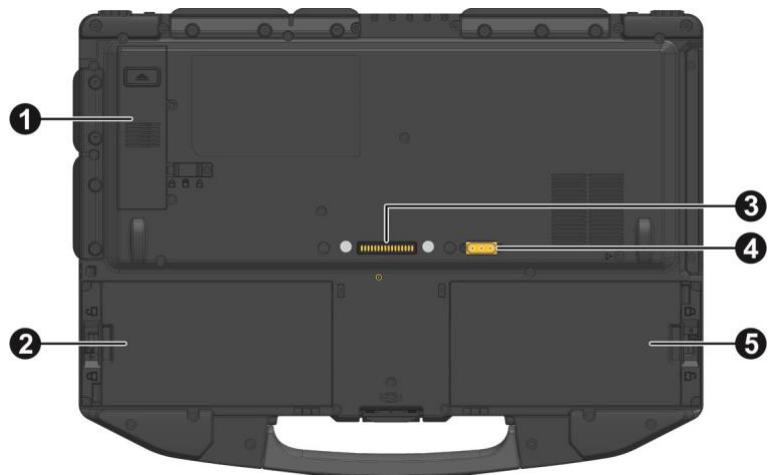
Bottom Components
| Ref | Component | Description |
| 1 | SSD module | Contains the solid-state drive, which is the mass storage device of your computer. |
| | CAUTION: This device is not hot-swappable. Do not remove it without turning off the system first. |
| ② | Second battery pack (optional) | Provides additional battery power to your computer. |
| ③ | Docking connector | Connects to the office or vehicle dock (purchased separately). |
| ④ | Antenna pass-through (optional) | Connects to the docking station for using external WWAN/WLAN/GPS antenna.
WwwAN GPS
WLAN
NOTE: The “WLAN” function can be changed to the “WWAN Aux” function. Use G-Manager to change the function if needed. |
| ⑤ | Battery pack | Supplies power to your computer when external power is not connected. |
Chapter 2
Operating Your Computer
This chapter provides information about the use of the computer.
If you are new to computers, reading this chapter will help you learn the operating basics. If you are already a computer user, you may choose to read only the parts containing information unique to your computer.
CAUTION:
- Do not expose your skin to the computer when operating it in a very hot or cold environment.
- The computer can get uncomfortably warm when you use it in high temperatures. As a safety precaution in such a circumstance, do not place the computer on your lap or touch it with your bare hands for extended periods of time. Prolonged body contact can cause discomfort and potentially a burn.
Using the Keyboard
Your keyboard has all the standard functions of a full-sized computer keyboard plus an Fn key added for specific functions.
The standard functions of the keyboard can be further divided into four major categories:
Typewriter keys
- Cursor-control keys
Numeric keys
- Function keys
Typewriter Keys
Typewriter keys are similar to the keys on a typewriter. Several keys are added such as the Ctrl, Alt, Esc, and lock keys for special purposes.
The Control (Ctrl) / Alternate (Alt) key is normally used in combination with other keys for program-specific functions. The Escape (Esc) key is usually used for stopping a process. Examples are exiting a program and canceling a command. The function depends on the program you are using.
Cursor-Control Keys
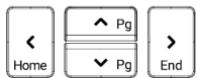
Cursor-control keys are generally used for moving and editing purposes. They include:
- Up, down, left, and right arrow keys
Page Up, Page Down, Home, and End keys (used with the Fn key)
- Insert and Delete keys
NOTE: The word "cursor" refers to the indicator on the screen that lets you know exactly where on your screen anything you type will appear. It can take the form of a vertical or horizontal line, a block, or one of many other shapes.
Numeric Keypad
A 15-key numeric keypad is embedded in the typewriter keys as shown next:
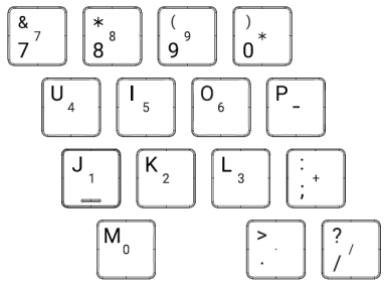
Numeric keys facilitate entering of numbers and calculations. When Num Lock is on, the numeric keys are activated; meaning you can use these keys to enter numerals.
NOTE:
- When the numeric keypad is activated and you need to type the English letter in the keypad area, you can turn Num Lock off or you can press Fn and then the letter without turning Num Lock off.
- Some software may not be able to use the numeric keypad on the computer. If so, use the numeric keypad on an external keyboard instead.
The Num Lock key can be disabled.
Function Keys
On the top row of the keys are the function keys: F1 to F12. Function keys are multi-purpose keys that perform functions defined by individual programs.
Fn Key
The Fn key, at the lower left corner of the keyboard, is used with another key to perform the alternative function of a key. To perform a desired function, first press and hold Fn, then press the other key.
Hot Keys
Hot keys refer to a combination of keys that can be pressed any time to activate special functions of the computer. Most hot keys operate in a cyclic way. Each time a hot key combination is pressed, it shifts the corresponding function to the other or next choice.
You can easily identify the hot keys with the icons imprinted on the keytop. The hot keys are described next.
| Key | Description |
| Fn + Esc | Switches the keyboard backlight off or on (with 4-level brightness).* |
| Fn + F1 | Switches the RF (radio frequency) radio on and off. When off, all wireless modules (such as WLAN, Bluetooth, and WWAN) cannot be used. When on, individual settings of the module work. |
| Fn + F3 | Decreases the sound volume. |
| Fn + F4 | Increases the sound volume. |
| Fn + F5 | Switches the display output to the next choice if an external display is connected. Choices are:→ LCD onlyLCD + External display (Duplicate)→ LCD + External display (Extend)→ External display onlyThe hot keys are equivalent to Windows logo key + P. |
| Fn + F6 | Decreases the LCD brightness. |
| Fn + F7 | Increases the LCD brightness. |
| Fn + F8 | Switches the touchscreen function off or on.* |
| Fn + F9 | Switches the touchpad function off or on. |
| Fn + F10 | Switches the system sound output off (mute) or on. |
| Fn + F11 | Switches the display backlight off or on. |
| Fn + F12 | Serves as the sleep button that you can define with Windows' Power Options. |
TABLE NOTE: * means "select models only."
Windows Keys
The keyboard has two keys that perform Windows-specific functions: Windows Logo key and Application key.
The Windows Logo key opens the Start menu and performs software-specific functions when used in combination with other keys. The Application key usually has the same effect as a right mouse click.
Using the Touchpad
CAUTION: Do not use a sharp object such as a pen on the touchpad. Doing so may damage the touchpad surface.
NOTE:
- You can press Fn+F9 to toggle the touchpad function on or off.
- For optimal performance of the touchpad, keep your fingers and the pad clean and dry. When tapping on the pad, tap lightly. Do not use excessive force.
The touchpad is a pointing device that allows you to communicate with the computer by controlling the location of the pointer on the screen and making selection with the buttons.
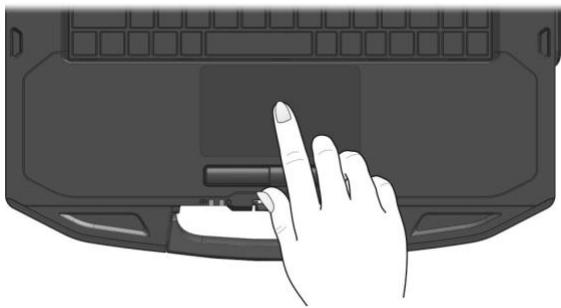
The touchpad consists of a rectangular pad (work surface) and a left and right buttons. To use the touchpad, place your forefinger or thumb on the pad. The rectangular pad acts like a miniature duplicate of your display. As you slide your fingertip across the pad, the pointer (also called cursor) on the screen moves accordingly. When your finger reaches the edge of the pad, simply relocate yourself by lifting the finger and placing it on the other side of the pad.
Here are some common terms that you should know when using the touchpad:
| Term | Action |
| Point | Move your finger on the pad until the cursor points to the selection on the screen. |
| Click | Press and release the left button.
-or-
Tap gently anywhere on the pad. |
| Double-click | Press and release the left button twice in quick succession.
-or-
Tap twice on the pad rapidly. |
| Drag and drop | Press and hold the left button, then move your finger until you reach your destination (drag). Finally, release the button (drop) when you finish dragging your selection to the destination. The object will drop into the new location.
-or-
Gently tap twice on the pad and on the second tap, keep your finger in contact with the pad. Then, move your finger across the pad to drag the selected object to your destination. When you lift your finger from the pad, the selected object will drop into place. |
TABLE NOTE: If you swap the left and right buttons, "tapping" on the touchpad as an alternative method of pressing the left button will no longer be valid.
Touch Gestures
The touchpad supports touch gestures for Windows such as two-finger scrolling, pinch zoom, rotating, and others. For settings information, go to Settings Bluetooth & devices Touchpad.
Configuring the Touchpad
You may want to configure the touchpad to suit your needs. For example, if you are a left-handed user, you can swap the two buttons so that you can use the right button as the left button and vice versa. You can also change the size of the on-screen pointer, the speed of the pointer, and so on.
To configure the touchpad, go to Settings Bluetooth & devices Touchpad.
Using the Touchscreen (Optional)
NOTE: You can press Fn+F8 to toggle the touchscreen function on or off.
CAUTION: Do not use a sharp object such as a ballpoint pen or pencil on the touchscreen. Doing so may damage the touchscreen surface. Use your finger or the included stylus.
Select models have a capacitive touchscreen. This type of touchscreen responds to objects that have conductive properties, such as fingertips and a capacitive-tipped stylus. You can navigate on the screen without using a keyboard, touchpad, or mouse.
You can change the touchscreen sensitivity settings to suit your scenario. Double-tap the Touch Screen Mode shortcut on Windows desktop to open the settings menu and select one of the options (as shown below).
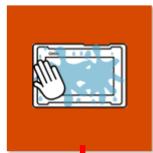
Select this mode when liquids, such as raindrops, are falling on the screen and should be rejected as input. Works best with fingertips.
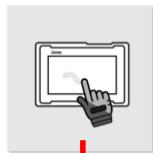
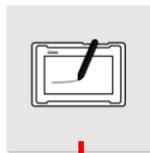
Enables simultaneous use with Getac stylus or finger touch. (You must use the stylus supplied with your model.)
Has a higher sensitivity to allow use with gloves (referring to warm gloves or work gloves, not referring to touchscreen-capable gloves).
NOTE:
- In high temperatures (above 60^ / 140^ ), set the mode to Finger instead of Glove or Stylus mode.
- If liquid is spilled on the touchscreen causing a wet area, the area will stop responding to any inputs. For the area to function again, you must dry it.
The following table shows how you use the touchscreen to obtain equivalent mouse functions.
| Term/Action | Equivalent
Mouse Function |
| Tap: Touch the screen once. | Click/Point |
| Double-tap: Touch the screen twice rapidly. | Double-click |
| Tap and hold: Tap and hold until a popup menu appears. | Right-click |
| Drag: Hold the stylus (or finger) on the screen and drag across the screen until reaching your destination. | Drag |
Using Multi-touch Gestures
You can interact with your computer by placing two fingers on the screen. The movement of the fingers across the screen creates "gestures," which send commands to the computer. Here are the multi-touch gestures that you can use:
| Gestures | Actions
(○=finger down; ○=finger up) | Descriptions |
| Pan
(Scroll) | Drag 1 or 2 fingers up or down. | Use panning to see another part of a page that has scroll bars. |
| Zoom
(Pinch) | Move two fingers apart/toward each other. | Use zooming to make an item (a photo for example) on the screen larger or smaller. The gesture works in applications that support mouse wheel zooming. |
| Rotate | or
Move two fingers in opposing directions.
-or-
Use one finger to pivot around another. | Use rotating to move a picture or other item on the screen in a circular direction (clockwise or counterclockwise). The gesture works in applications that support the specific gesture. |
| Press and Tap | Press on target and tap using a second finger. | Use press and tap to access the shortcut menu. |
| Two-finger Tap | Tap two fingers at the same time (where the target is in the midpoint between the fingers). | The function is defined by applications that support the specific gesture. |
| Flicks | Make quick drag gestures in the desired direction. | Flick left or right to navigate back and forward in a browser and other applications. The gesture works in most applications that support back and forward. |
Using Network and Wireless Connections
Using the LAN
The internal 10/100/1000Base-T LAN (Local Area Network) module allows you to connect your computer to a network. It supports data transfer rate up to 1000 Mbps.
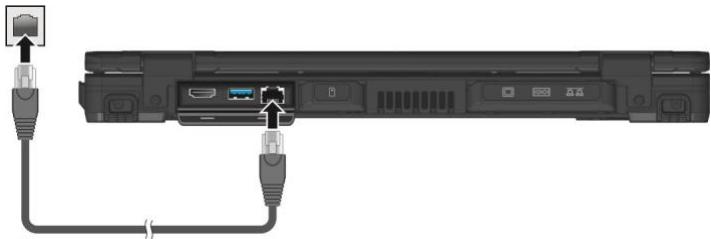
Select models have a second LAN module so you can connect to two networks at the same time.
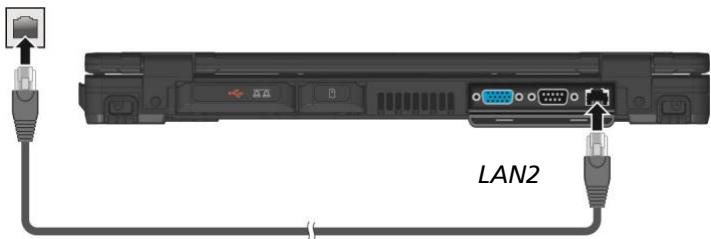
NOTE: LAN2 module implements DSM (Deep Slumber Mode) to save battery power. Power is supplied to the LAN module only when the LAN cable is connected. This means the LAN module will not appear in Windows' Device Manager if the LAN cable is not connected and will appear if the cable is connected.
Using the WLAN
The WLAN (Wireless Local Area Network) module supports IEEE 802.11ax.
Turning On/Off the WLAN Radio
To turn on the WLAN radio:
Select the network icon in the lower right of the taskbar. Then, select the Wi-Fi button.
To turn off the WLAN radio:
You can turn off the WLAN radio the same way you turn it on.
If you want to quickly turn off all wireless radio, simply switch on Airplane mode. You can control the Airplane mode using one of the below methods.
- Select the network icon in the lower right of the taskbar. Then, select the Airplane mode button.
Press Fn+F1.
Connecting to a WLAN Network
- Make sure that the WLAN function is enabled (as described above).
- Click the network icon in the lower right of the taskbar.
- In the list of available wireless networks, click a network, and then click Connect.
- Some networks require a network security key or passphrase. To connect to one of those networks, ask your network administrator or Internet service provider (ISP) for the security key or passphrase.
For more information on setting a wireless network connection, refer to Windows online help.
Using the Bluetooth Feature
The Bluetooth technology allows short-range wireless communications between devices without requiring a cable connection. Data can be transmitted through walls, pockets and briefcases as long as two devices are within range.
Turning On/Off the Bluetooth Radio
To turn on the Bluetooth radio:
Go to Settings Bluetooth & devices. Slide the Bluetooth switch to the On position.
To turn off the Bluetooth radio:
You can turn off the Bluetooth radio the same way you turn it on.
If you want to quickly turn off all wireless radio, simply switch on Airplane mode. You can control the Airplane mode using one of the below methods.
- Select the network icon in the lower right of the taskbar. Then, select the Airplane mode button.
Press Fn+F1.
Connecting to another Bluetooth Device
- Make sure that the Bluetooth function is enabled (as described above).
- Make sure that the target Bluetooth device is turned on, discoverable and within close range. (See the documentation that came with the Bluetooth device.)
- Go to Settings Bluetooth & devices Add device Bluetooth.
- Select the device you want to connect from the search results.
- Depending on the type of Bluetooth device that you want to connect to, you will need to enter the pertinent information.
For detailed information on using the Bluetooth feature, see Windows' online Help.
Using the WWAN Feature (Optional)
A WWAN (Wireless Wide Area Network) uses mobile telecommunication cellular network technologies to transfer data. The WWAN module of your computer supports 4G LTE or 5G NR.
NOTE: Your model only supports data transmission; voice transmission is not supported.
Installing a SIM Card
- Turn off the computer and disconnect the AC adapter.
- Open the cover of the SIM card slot.
- Remove one screw to detach the small metal plate that covers the SIM card slot.

- Insert the SIM card into the slot. Make sure the golden contact area on the card is facing upward and the beveled corner on the SIM card facing inward.

- Close the cover.
Turning On/Off the WWAN Radio
To turn on the WWAN radio:
Select the network icon in the lower right of the taskbar. Then, select the Cellular button.
To turn off the WWAN radio:
You can turn off the WWAN radio the same way you turn it on.
If you want to quickly turn off all wireless radio, simply switch on Airplane mode. You can control the Airplane mode using one of the below methods.
- Select the network icon in the lower right of the taskbar. Then, select the Airplane mode button.
Press Fn+F1.
Setting up a WWAN Connection
Go to Settings Network & Internet Cellular. (For detailed information on cellular settings in Windows, see Microsoft Support website.)
NOTE: When using the LTE GPS tracking function, make sure that the SIM card is inserted and the mobile network is enabled.
Using the Optical Disc Drive (Optional)
Select models have a Super Multi DVD drive or Blu-ray DVD drive.
CAUTION:
- When inserting a disc, do not use force.
- Make sure that the disc is correctly inserted into the tray, and then close the tray.
- Do not leave the drive tray open. Also, avoid touching the lens in the tray with your hand. If the lens becomes dirty, the drive may malfunction.
- Do not wipe the lens using materials with rough surface (such as paper towel). Instead, use a cotton swab to gently wipe the lens.
FDA regulations require the following statement for all laser-based devices: "Caution, Use of controls or adjustments or performance of procedures other than those specified herein may result in hazardous radiation exposure."
NOTE: The DVD drive is classified as a Class 1 laser product. This label is located on the DVD drive.
CLASS 1 LASER PRODUCT
LASER KLASSE 1
NOTE: This product incorporates copyright protection technology that is protected by method claims of certain U.S. patents and other intellectual property rights owned by Macrovision Corporation and other rights owners. Use of this copyright protection technology must be authorized by Macrovision Corporation, and is intended for home and other limited viewing uses only unless otherwise authorized by Macrovision Corporation. Reverse engineering or disassembly is prohibited.
Inserting and Removing a Disc
NOTE: For optimal performance, use the disc drive where the recommended temperature is between -10 °C (14 °F) and 50 °C (122 °F).
Follow this procedure to insert or remove a disc:
- Turn on the computer.
- Press the eject button and the disc tray will slide out partially. Gently pull on it until it is fully extended.
- To insert a disc, place down the disc in the tray with its label facing up. Slightly press the center of the disc until it clicks into place.
To remove a disc, hold the disc by its outer edge and lift it up from the tray.
- Gently push the tray back into the drive.
NOTE: In the unlikely event that you are unable to release the drive tray by pressing the eject button, you can manually release the disc. (See “錯誤! 找不到參照來源。” in Chapter 8.)
Using the Fingerprint Scanner (Optional)
CAUTION:
- For optimal performance, both the scanning surface and the finger should be clean and dry. Clean the scanning surface when needed. You can use adhesive tape to remove dirt and oil from the scanner surface.
- It is not recommended that you use the fingerprint scanner in a below-freezing temperature. The moisture on your finger can freeze to the scanner's metal surface when you touch it, resulting in a failed operation. Besides, touching freezing metal with your finger can cause frostbite.
The fingerprint scanner provides a strong authentication mechanism based on fingerprint recognition. You can log on to Windows and dismiss the lock screen with an enrolled fingerprint instead of a password.
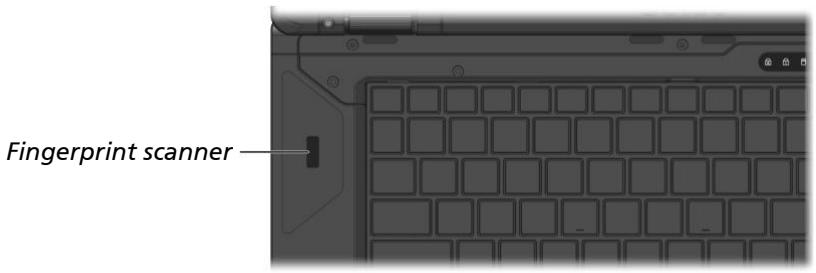
NOTE:
- You can enroll a fingerprint only after creating a password for the Windows user account.
- The fingerprint logon process can take a while. This is because the system has to check hardware devices and security configuration before initiating the fingerprint scanner.
To enroll a fingerprint:
- Go to Settings Accounts Sign-in options.
- Select the fingerprint option.
- Follow the onscreen instructions to complete.
Select models have a contactless smart card reader module. The reader can read data from HF (High Frequency) RFID (Radio Frequency Identification) tags.
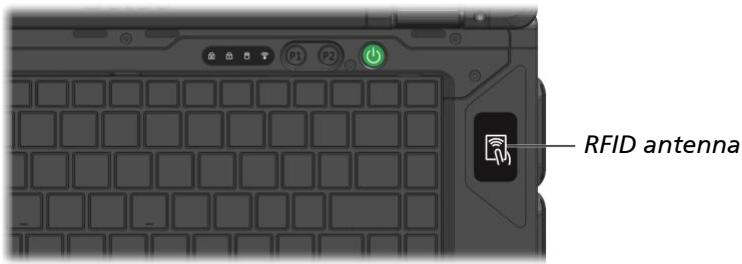
This module is enabled by default. To enable or disable the module, run the BIOS Setup program and select Advanced Device Configuration RFID Card Reader. (See Chapter 5 for information on BIOS Setup.)
For optimal results when reading an RFID tag, have the tag face the antenna in the same orientation as indicated by the icon on the exterior of the computer.
NOTE:
- When not using an RFID card, do not leave it within or near the antenna area.
- For enhanced applications and customization of the module, contact your authorized Getac dealer.
Using the Barcode Scanner (Optional)
NOTE:
- For enhanced applications and customization of the module, you can use the Barcode Manager program. (For detailed information on the program, see the program's online help.)
- The maximum operating temperature for the barcode scanner is 50^ C (122°F).
If your model has the barcode scanner module, you can scan and decode most common 1D and 2D symbologies.
To read barcodes:
- Start your processing software and open a new or existing file. Place the insertion point (or called cursor) where you want the data to be entered.
- Press the Trigger button (P1) on your computer. (The button function is configured by G-Manager.)
- Aim the scan beam at the barcode. (The scan beam projected from the lens varies with models.)
Adjust the lens' distance from the barcode, shorter for a smaller barcode and farther for a larger one.
NOTE: Improper ambient light and scanning angle can affect the scanning results.
CAUTION: When or immediately after using the barcode scanner for a long time, do not touch the lens area as the area might be hot.
- Upon a successful scan, the system beeps and the decoded barcode data is entered.

LASER LIGHT-DO NOT STARE INTO BEAM CLASS 2 LASER PRODUCT. RAYONNEMENT LASER NE PAS REGARDER DANS LE FAISCEAU, APPAREIL ALASER DE CLASSE 2. MAX: 1 mW: 650 nm. IEC 60825-1:2007 and IEC 60825-1:2014. Pulse duration of 16.8 mSec. Complies with 21CFR 1040.10 and 1040.11 except for deviations pursuant to Laser Notice No. 50, dated June 24, 2007.
- Pulse repetition rate: 57.67 Hz
- Scan angle: 360^ tilt; ± 60^ pitch; ± 60^ skew
Chapter 3
Managing Power
Your computer operates either on external AC power or on internal battery power.
This chapter tells you how you can effectively manage power. To maintain optimal battery performance, it is important that you use the battery in the proper way.
AC Adapter
CAUTION:
The AC adapter is designed for use with your computer only.
Connecting the AC adapter to another device can damage the adapter.
- The AC power cord supplied with your computer is for use in the country where you purchased your computer. If you plan to go overseas with the computer, consult your dealer for the appropriate power cord.
- When you disconnect the AC adapter, disconnect from the electrical outlet first and then from the computer. A reverse procedure may damage the AC adapter or computer.
- When unplugging the connector, always hold the plug head. Never pull on the cord.
The AC adapter serves as a converter from AC (Alternating Current) to DC (Direct Current) power because your computer runs on DC power, but an electrical outlet usually provides AC power. It also charges the battery pack when connected to AC power.
The adapter operates on any voltage in the range of 100V - 240V AC.
Battery Pack
The battery pack is the internal power source for the computer. It is rechargeable using the AC adapter.
CAUTION: A battery pack can be removed only when it is not being charged/ discharged or if you are hot-swapping the battery pack (for models having more than one battery pack).
Charging the Battery Pack
NOTE:
- Charging will not start if the internal temperature of the battery pack is below 0^ (32°F) or above 50^ (122°F); the charging process will stop if the internal temperature of the battery pack gets above 60^ (140°F). To avoid damaging the battery under this situation, disconnect the AC adapter and wait for the battery to return to room temperature before charging again.
- During charging, do not disconnect the AC adapter before the battery has been fully charged; otherwise you will get a prematurely charged battery.
- The battery has a high temperature protection mechanism which limits the maximum charge of the battery to 80% of its total capacity in the event of high temperature conditions. In such conditions, the battery will be regarded as fully charged at 80% capacity.
- The battery level may automatically lessen due to the self-discharge process, even when the battery pack is fully charged. This happens no matter if the battery pack is installed in the computer.
To charge the battery pack, connect the AC adapter to the computer and an electrical outlet. The Battery Indicator ( 1 + 1 ) on the computer glows amber to indicate that charging is in progress. You are advised to keep the computer power off while the battery is being charged. When the battery is fully charged, the Battery Indicator lights green.
It takes approximately 2.5 to 3 hours to fully charge one battery pack. If your computer has two battery packs, the computer charges the two in parallel.
CAUTION: After the computer has been fully recharged, do not immediately disconnect and reconnect the AC adapter to charge it again. Doing so may damage the battery.
Initializing the Battery Pack
You need to initialize a new battery pack before using it for the first time or when the actual operating time of a battery pack is much less than expected. Initializing is the process of fully charging, discharging, and then charging. It can take several hours.
The G-Manager program provides a tool called "Battery Recalibration" for the purpose.
Checking the Battery Level
NOTE: Any battery level indication is an estimated result. The actual operating time can be different from the estimated time, depending on how you are using the computer.
The operating time of a fully charged battery pack depends on how you are using the computer. When your applications often access peripherals, you will experience a shorter operating time.
You can find the battery icon on the Windows taskbar (lower-right corner). The icon shows the approximate battery level.
If your computer has two battery packs, the computer discharges the two in parallel.
Battery Low Signals and Actions
The battery icon changes appearance to display the current state of the battery.
| Battery Icon | Battery Level | Description |
| Discharging | The icon shows the charge remaining in 10-percent increments until the charge reaches the low-battery level. |
| Low | The battery charge has reached the low-battery level. |
| Critically low | The battery charge has reached the critical battery level. By default, Windows will display a notification and put your computer into Hibernation. |
When the battery is low, the computer's Battery Indicator (10) also blinks red to alert you to take actions.
Always respond to low-battery by connecting the AC adapter, placing your computer in Hibernation mode, or turning off the computer.
Replacing the Battery Pack
CAUTION:
- There is danger of explosion if the battery is incorrectly replaced. Replace the battery only with the computer manufacturer's optional battery packs. Discard used batteries according to the dealer's instructions.
- Do not attempt to disassemble the battery pack.
- A battery pack can get hot due to long working hours. Do not touch a hot battery pack with bare hands. After removing a battery pack, put it in a well-ventilated area.
NOTE: You can hot swap a battery pack if your computer model has another one supplying the power. The appropriate temperature range for hot swapping the battery pack is between -21^ (-5.8°F) and 45^ (113°F).
- Turn off the computer and disconnect the AC adapter. After turning off the computer, allow a cool-down time of at least 5 minutes before removing the battery pack.
For models having more than one battery pack: Skip this step if you are hot swapping the battery pack.
- Carefully place the computer upside down.
- Locate the battery pack you want to remove.
- Slide the battery latch toward the battery pack (0) and then toward the unlocked position (☑) (2) to release the battery pack.
-
Remove the battery pack from its compartment.
-
Fit another battery pack into place. With the battery pack correctly oriented, attach its connector side to the battery compartment at an angle (0) and then press down the other side (2) .
- Slide the battery latch toward the locked position (B).
CAUTION: Make sure the battery latch is correctly locked, not revealing the underneath red part.
Power-Saving Tips
Aside from enabling your computer's power saving mode, you can do your part to maximize the battery's operating time by following these suggestions.
- Do not disable Power Management.
- Decrease the LCD brightness to the lowest comfortable level.
- Shorten the length of time before Windows turn off the display.
- When not using a connected device, disconnect it.
- Remove the card (such as smart card) if not using it.
- Turn off the wireless radio if you are not using the wireless module (such as WLAN, Bluetooth, or WWAN).
- Turn off the computer when you are not using it.
Appendix A
Specifications
NOTE: Specifications are subject to change without any prior notice.
| Parts | Specifications |
| CPU | - Intel® Core™ Ultra 5 Processor 125U, 12M Cache, up to 4.30 GHz
- Intel® Core™ Ultra 5 Processor 135U, 12M Cache, up to 4.40 GHz
- Intel® Core™ Ultra 7 Processor 155U, 12M Cache, up to 4.80 GHz
- Intel® Core™ Ultra 7 Processor 165U, 12M Cache, up to 4.90 GHz |
| BIOS | Insyde, 32MB flash EEPROM, UEFI, supporting ACPI, TPM, Computrace, AMT, WMI, and BIOS diagnostic |
| RAM | 8/16/32/64GB DDR5 SO-DIMM |
| Video | Panel | 15.6-inch (16:9) wide TFT LCD, 1920x1080 FHD, 1000 nits, dimmer mode, blackout mode, capacitive multi-touch - 10 point (option) |
| Controller | UMA
Intel® Iris® Xe Graphics |
| Option: Nvidia GeForce GTX 1650 GDDR6 (Discrete GPU models) |
| Audio | Features | High Definition audio |
| Microphone | Integrated x 2, Mic Array |
| Speaker | Speaker x 2 |
| Keyboard | Standard keys with embedded numeric pad keys, 12 function keys, special Fn (Function) key and Windows keys, with backlight |
| Pointing device | Glide touchpad with multi-touch feature, capacitive type |
| Mass storage device | Main | PCIe Gen4 SSD, M.2 type, 256GB/512GB/1TB/2TB, user-removable |
| Second (option) | SATA III SSD, M.2 type, 512GB/1TB/2TB, user-removable |
| Optical drive (option) | SATA interface, Super-Multi DVD drive or Blu-ray DVD drive |
| Card slots | MicroSD card (option)
Smart Card (option) |
| I/O ports | Standard | USB 3.2 Gen 2, USB-C Thunderbolt 4 (one or two), USB 3.2 Gen 1, RJ45, HDMI 2.0, combo audio (4-pole TRRS 3.5mm type), docking |
| Configurable I/O options | One of the below configurations:
- VGA + RS-232 + 2nd RJ45
- DisplayPort + RS-232 + PowerShare USB 3.2 Gen 1 |
Table Notes:
| Parts | Specifications |
| Optional | Tri antenna pass-through |
| LAN | Intel® Gigabit LAN
Option: LAN2 |
| Wireless LAN + Bluetooth | Intel AX211 2x2 802.11 AX + Bluetooth 5.3 combo |
| WWAN (option) | 4G LTE or 5G NR, dual SIM (eSIM and external accessible SIM card) |
| GPS (option) | Can be one of the below:
- Dedicated GPS (GPS, GLONASS, Galileo, BeiDou and QZSS)
- 4G LTE mobile broadband with integrated GPS (GPS, GLONASS, Galileo and BeiDou)
- 5G Sub-6 with integrated GPS (GPS, GLONASS, Galileo, BeiDou and QZSS) |
| Camera (option) | 5MP Webcam, IR sensor (option) |
| Contactless smart card reader (option) | USB interface, supporting HF (13.56 MHz) |
| Barcode scanner (option) | 1D and 2D |
| Security | Kensington lock
TPM 2.0
Fingerprint scanner (option) |
| Power | AC adapter | Universal AC adapter, 65 W (Standard models) / 90 W (Discrete GPU models), 100-240 V AC input, 19 V output |
| Battery pack | Main: Lithium-ion 18650 type, 6-cell, 6900 mAh, 10.8 V |
| Second (option): Lithium-ion 18650 type, 6-cell, 6900 mAh, 10.8 V |
| Dimension (W×D×H) | 371.5 x 239.5 x 34.5 mm (14.63 x 9.43 x 1.36 inches) |
| Weight | ≥ 2.38 kg (5.25 lb) |
| Environmental | Temperature* | Operating: -29 °C to 63 °C (-20 °F to 145 °F)
Storage: -51 °C to 71 °C (-60 °F to 160 °F) |
| Humidity | 95% relative humidity, non-condensing |
| Drop** | 0.9 m (3 ft) drop resistant |
- When using the computer with AC power, a low temperature down to -29 °C (-20 °F) and the temperature range for MIL-STD-810 are supported. When using the computer with only battery power in a temperature down to -21 °C (-6 °F) (main battery pack) or -29 °C (-20 °F) (main battery pack + 2nd battery pack), it is advised that the system be booted in a warm environment, if possible, before being taken into an extreme cold environment for work.
** Drop test results vary with different computer configurations and also vary if optional accessories are attached.
Appendix B
This appendix provides regulatory statements and safety notices on your computer.
NOTE: Marking labels located on the exterior of your computer indicate the regulations that your model complies with. Please check the marking labels and refer to the corresponding statements in this appendix. Some notices apply to specific models only.
Safety Notices
About the Battery
If the battery is mishandled, it may cause fire, smoke or an explosion and the battery's functionality will be seriously damaged. The safety instructions listed below must be followed.
Danger
- Do not immerse the battery with liquid such as water, sea water or soda.
- Do not charge/discharge or place the battery in high-temperature (more than 80^ / 176^ ) locations, such as near a fire, heater, in a car in direct sunlight, etc.
- Do not use unauthorized chargers.
- Do not force a reverse-charge or a reverse-connection.
- Do not connect the battery with AC plug (outlet) or car plugs.
- Do not adapt the battery to unspecified applications.
- Do not short circuit the battery.
- Do not drop or subject the battery to impacts.
- Do not penetrate with a nail or strike with a hammer.
- Do not directly solder the battery.
- Do not disassemble the battery.
- Keep the battery away from an extremely low air pressure environment as it may result in an explosion or the leakage of flammable liquid or gas.
Warning
- Keep the battery away from infants.
- Stop using the battery if there are noticeable abnormalities such as abnormal smell, heat, deformities, or discoloration.
-
Stop charging if the charging process cannot be finished.
-
In case of a leaking battery, keep the battery away from flames and do not touch it.
- Pack the battery tightly during transport.
Caution
- Do not use the battery where static electricity (more than 100V ) exists that might damage the protection circuit of the battery.
- When children are using the system, parents or adults must ensure that they are using the system and battery correctly.
- Keep the battery away from flammable materials during charging and discharging.
- In case lead wires or metal objects come out from the battery, you must seal and insulate them completely.
Caution Texts Concerning Lithium Batteries
DANISH
CAUTION: Danger of explosion if battery is incorrectly replaced. Replace only with the same or equivalent type recommended by the equipment manufacturer. Discard used batteries according to manufacturer's instructions.
DEUTSCH
Attention (for USA Users)
The product that you have purchased contains a rechargeable battery. The battery is recyclable. At the end of its useful life, under various state and local laws, it may be illegal to dispose of this battery into the municipal waste stream. Check with your local solid waste officials for details in your area for recycling options or proper disposal.
About the AC Adapter
- Use only the AC adapter supplied with your computer. Use of another type of AC adapter will result in malfunction and/or danger.
- If a ground/earth pin attachment plug on the AC power cord is provided, always plug the cord into a grounded/earthed outlet. Do not disable ground/earth pin of the plug/cord.
- Do not use the adapter in a high moisture environment. Never touch the adapter when your hands or feet are wet.
- Allow adequate ventilation around the adapter when using it to operate the device or charge the battery. Do not cover the AC adapter with paper or other objects that will reduce cooling. Do not use the AC adapter while it is inside a carrying case.
- Connect the adapter to a proper power source. The voltage requirements are found on the product case and/or packaging.
- Do not use the adapter if the cord becomes damaged.
- Do not attempt to service the unit. There are no serviceable parts inside. Replace the unit if it is damaged or exposed to excess moisture.
Your device may become very warm during normal use. It complies with the user-accessible surface temperature limits defined by the International Standards for Safety. Still, sustained contact with warm surfaces for long periods of time may cause discomfort or injury. To reduce potential heat-related concerns, follow these guidelines:
- Keep your device and its AC adapter in a well-ventilated area when in use or charging. Allow for adequate air circulation under and around the device.
- Use common sense to avoid situations where your skin is in contact with your device or its AC adapter when it's operating or connected to a power source. For example, don't sleep with your device or its AC adapter, or place it under a blanket or pillow, and avoid contact between your body and your device when the AC adapter is connected to a power source. Take special care if you have a physical condition that affects your ability to detect heat against the body.
- If your device is used for long periods, its surface can become very warm. While the temperature may not feel hot to the touch, if you maintain physical contact with the device for a long time, for example if you rest the device on your lap, your skin might suffer a low-heat injury.
- If your device is on your lap and gets uncomfortably warm, remove it from your lap and place it on a stable work surface.
- Never place your device or AC adapter on furniture or any other surface that might be marred by exposure to heat since the base of your device and the surface of the AC adaptor may increase in temperature during normal use.
North America
USA
Federal Communications Commission Radio Frequency Interference Statement
NOTE:
This equipment has been tested and found to comply with the limits for a Class B digital device pursuant to Part 15 of the FCC Rules. These limits are designed to provide reasonable protection against harmful interference in a residential installation. This equipment generates, uses, and can radiate radio frequency energy and, if not installed and used in accordance with the instructions, may cause harmful interference to radio communications.
However, there is no guarantee that interference will not occur in a particular installation. If this equipment does cause harmful interference to radio or television reception, which can be determined by turning the equipment off and on, the user is encouraged to try to correct the interference by one or more of the following measures:
Reorient or relocate the receiving antenna.
- Increase the separation between the equipment and receiver.
- Connect the equipment into an outlet on a circuit different from that to which the receiver is connected.
- Consult the dealer or an experienced radio/TV technician for help.
Any changes or modifications not expressly approved by the manufacturer could void the user's authority to operate the equipment.
Please note:
The use of a non-shielded interface cable with this equipment is prohibited.
This device complies with Part 15 of the FCC Rules. Operation is subject to the following two conditions:
(1) This device may not cause harmful interference.
(2) This device must accept any interference received, including interference that may cause undesired operation.
This device has been tested and meets applicable limits for Radio Frequency (RF) exposure.
For general notebook computers in normal use, you (or any other person in the vicinity) should keep a minimum separation distance of 20cm away from the front panel of the device to ensure that the RF exposure levels comply with the RF exposure requirement.
For devices designed to be operated at closer proximities, their antennas cannot satisfy the separation distance. Such devices are evaluated with the Specific Absorption Rate (SAR). You (or any other person in the vicinity) should keep a minimum separation distance of 0mm away from the front panel of the device to ensure that the RF exposure levels comply with the RF exposure requirement.
FOR PORTABLE DEVICE USAGE (<20m from body/SAR needed)
Radiation Exposure Statement:
The product comply with the FCC portable RF exposure limit set forth for an uncontrolled environment and are safe for intended operation as described in this manual. The further RF exposure reduction can be achieved if the product can be kept as far as possible from the user body or set the device to lower output power if such function is available.
FCC regulations restrict the operation of this device to indoor use only.
Operation of transmitters in the 5.925-7.125 GHz band is prohibited for control of or communications with unmanned aircraft systems.

| Company name | Getac Inc. |
| Address | 15495 Sand Canyon Rd., Suite 350 Irvine, CA 92618 USA |
| Phone | +1-949-681-2900 |
California Proposition 65
For California USA:
Proposition 65, a California law, requires warnings to be provided to California consumers when they might be exposed to chemical(s) identified by Proposition 65 as causing cancer and birth defects or other reproductive harm.
Almost all electronic products contain 1 or more of the chemicals listed under Proposition 65. This does not mean the products pose a significant risk of exposure. As the consumers have the right to know about the products they purchase, we are giving this warning on our packaging and user manual to keep our consumers well informed.
WARNING
This product can expose you to chemicals including lead, TBBPA or formaldehyde, which are known to the State of California to cause cancer and birth defects or other reproductive harm. For more information go to www.P65Warnings.ca.gov
Canada
Canadian ICES-003
CAN ICES-3(B)/NMB-3(B)
This device contains licence-exempt transmitter(s)/receiver(s) that comply with Innovation, Science and Economic Development Canada's licence-exempt RSS(s). Operation is subject to the following two conditions: (1) This device may not cause interference. (2) This device must accept any interference, including interference that may cause undesired operation of the device.
The device could automatically discontinue transmission in case of absence of information to transmit, or operational failure. Note that this is not intended to prohibit transmission of control or signaling information or the use of repetitive codes where required by the technology.
The device for operation in the band 5150-5250 MHz is only for indoor use to reduce the potential for harmful interference to co-channel mobile satellite systems.
Industry Canada statement:
This device complies with ISED's licence-exempt RSSs. Operation is subject to the following two conditions: (1) This device may not cause harmful interference, and (2) this device must accept any interference received, including interference that may cause undesired operation.
FOR PORTABLE DEVICE USAGE (<20m from body/SAR needed)
Radiation Exposure Statement:
The product comply with the Canada portable RF exposure limit set forth for an uncontrolled environment and are safe for intended operation as described in this manual. The further RF exposure reduction can be achieved if the product can be kept as far as possible from the user body or set the device to lower output power if such function is available.
This device is intended only for OEM integrators under the following conditions: (For module device use)
1) The transmitter module may not be co-located with any other transmitter or antenna.
2) Module approval valid only when the module is installed in the tested host or compatible series of host which have similar RF exposure characteristic with equal or larger antenna separation distance.
As long as 2 conditions above are met, further transmitter test will not be required. However, the OEM integrator is still responsible for testing their end-product for any additional compliance requirements required with this module installed.
In the event that these conditions can not be met (for example certain laptop configurations or co-location with another transmitter), then the Canada authorization is no longer considered valid and the IC ID can not be used on the final product. In these circumstances, the OEM integrator will be responsible for re-evaluating the end product (including the transmitter) and obtaining a separate Canada authorization.
NOTE IMPORTANTE:
The product can be kept as far as possible from the user body or set the device to lower output power if such function is available. The final end product must be labeled in a visible area with the following: "Contains IC: 10301A-AX211NG".
The OEM integrator has to be aware not to provide information to the end user regarding how to install or remove this RF module in the user's manual of the end product which integrates this module.
The end user manual shall include all required regulatory information/warning as show in this manual.
(i) the device for operation in the band 5150-5250 MHz is only for indoor use to reduce the potential for harmful interference to co-channel mobile satellite systems;
Avertissement:
Devices shall not be used for control of or communications with unmanned aircraft systems.
For 6e statement in manual (indoor AP & Subordinates need it)
User Notification of Take-back Service
To customers in United States and Canada:
Getac believes in providing our customers with easy-to-use solutions to recycle your Getac-brand products for free. Getac understands the customers will likely be recycling multiple items at once and as such. Getac wants to make the recycling process for these larger shipments as streamlined as possible. Getac works with recycling vendors with the highest standards for protecting our environment, ensuring worker safety, and complying with global environmental laws. Our commitment to recycling our old equipment grows out of our work to protect the environment in many ways. For more information, see the Getac Web site at https://www.getac.com/us/environmental-certifications/.
Please see the product type below for information on Getac product, battery and packaging recycling in USA and Canada.
For Product Recycling:
If you have a Getac computer that needs to go to a recycling house, Getac can help you. Just contact us at (866) 394 – 3822 or by email at GUSA.RecycleProgram@getac.com to obtain a prepaid shipping label at no charge to you, pack up your equipment in a box of your choice and send it off.
For Battery Recycling:
The batteries used to power your portable Getac products contain hazardous materials. While they pose no risk to you during normal use, they should never be disposed with other wastes. Getac provides a free
take-back service for recycling your batteries from Getac products. To recycle the battery, please contact us at (866) 394 – 3822 or by email at GUSA.RecycleProgram@getac.com.
For Packaging Recycling:
Getac has chosen the packaging materials used to transport our products carefully, to balance the requirements of shipping the product to you safely while minimizing the amount of material used. Our packaging for notebooks and tablets is recyclable and manufactured using elemental chlorine-free processes. They contain 90 percent (by weight) recycled content. Your packaging materials can be recycled at your local recycling center. Or, if you would like Getac to recycle your packaging, please contact us at (866) 394 – 3822 and we will make arrangements for you.
If you have the above for recycling, please visit our website https://www.getac.com/us/environmental-certifications/
Europe Marking and Compliance Notices
Statements of Compliance
EU
English
Getac hereby declares that this product complies with the EU Directive 2014/53/EU. The full text of the EU declaration of conformity is available at: https://support.getac.com/Portal/Page/809
Deutsch
https://support.getac.com/Portal/Page/866
François
https://support.getac.com/Portal/Page/879
Italiano
Hereby, Getac Technology Corporation declares that this device is in compliance with Radio Equipment Regulations 2017.
Notices
Max power:
LTE: 25 dBm
5GNR: 24.5 dBm
Wi-Fi 2400 MHz ~ 2483.5 MHz: 20 dBm
Wi-Fi 5150 MHz ~ 5350 MHz: 23 dBm
Wi-Fi 5470 MHz ~ 5725 MHz: 23 dBm
Wi-Fi 5725 MHz ~ 5850 MHz: 13.98 dBm
Wi-Fi 5945 MHz ~ 6425 MHz LPI: 23 dBm
Wi-Fi 5945 MHz ~ 6425 MHz VLP: 14 dBm
Bluetooth 2400 MHz ~ 2483.5 MHz: 20 dBm
NFC 13.56 MHz: -10.64 dBuA/m at 10m
The device is restricted to indoor use only when operating in the 5150 to 5350 MHz and 5945 to 6425 MHz frequency range.
| BE | BG | CZ | DK | DE | EE |
| IE | EL | ES | FR | HR | IT |
| CY | LV | LT | LU | HU | MT |
| NL | AT | PL | PT | RO | SI |
| SK | FI | SE | NO | IS | LI |
| CH | TR | UK (NI) | | | |
Restriction or Requirement in the UK: 5150 to 5350 MHz and 5925 to 6425 MHz indoor-use only.

UK
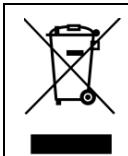
Waste Electrical and Electronic Equipment (WEEE)
This symbol means that according to local laws and regulations your product shall be disposed of separately from household waste. When this product reaches its end of life, take it to a collection point designated by local authorities. Proper recycling of your product will protect human health and the environment.
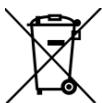
In the European Union, this label indicates that the batteries in this product should be collected separately and not be disposed of with household waste. Substances in batteries can have a potential impact on health and environment and you have a role in recycling waste batteries thus contributing to the protection, preservation, and improvement of the quality of the environment.
Restriction of Hazardous Substances (RoHS) Directive
EU RoHS
Getac products meet the requirements of Directive 2011/65/EU on the restriction of the use of certain hazardous substances in electrical and electronic equipment. For more information about RoHS, go to: https://www.getac.com/us/environment/
CE
| Company name | Getac Technology GmbH. |
| Address | Kanzlerstrasse 4
40472 Dusseldorf, Germany |
| Phone | +49 (0) 211-984819-0 |
UKCA
| Company name | Getac UK Ltd. |
| Address | Getac House, Stafford Park 12,
Telford, Shropshire, TF3 3BJ, UK |
| Phone | +44 (0) 1952-207-222 |
This device has been tested and meets applicable limits for Radio Frequency (RF) exposure. This equipment should be installed and operated to ensure a minimum of 20 cm spacing to any person at all times.
See the CE/UK Declaration of Conformity document supplied in the package of your product.
ENERGY STAR

ENERGY STAR® is a government program that offers businesses and consumers energy-efficient solutions, making it easy to save money while protecting the environment for future generations.
Please reference ENERGY STAR® related information from http://www.energystar.gov.
As an ENERGY STAR® Partner, Getac Technology Corporation has determined that this product meets the ENERGY STAR® guidelines for energy efficiency.
All Getac products with ENERGY STAR® logo comply with the ENERGY STAR® standard, and the power management feature is enabled by default. Getac's ENERGY STAR® qualified products are listed on the EPA website. https://www.energystar.gov/products
About Battery and External Enclosure Replacement
Battery
The batteries of your product include a battery pack and a button cell (or called RTC battery). Select models have more than one battery pack. All batteries are available from Getac authorized service centers.
The battery pack is user-replaceable. Replacement instructions can be found in "Replacing the Battery Pack" in Chapter 3. The button cell must be replaced by Getac authorized service centers.
Visit the website at http://us.getac.com/support/support-select.html for authorized service center information.
External Enclosure
The external enclosure of the product can be removed using screwdrivers. The external enclosure can then be reused or refurbished.