
HO-EL4 5KG - Kitchen scale HIGH ONE - Free user manual and instructions
Find the device manual for free HO-EL4 5KG HIGH ONE in PDF.
| Product Type | Electronic kitchen scale |
| Brand | HIGH ONE |
| Model | HO-EL4 5KG (ref. 987150) |
| Maximum capacity | 5 kg / 11 lb |
| Power supply | 1 lithium button cell CR2032 (3 V) included |
| Main functions | Weighing, tare, zero, volume measurement (water and milk), auto-off, low battery and overload alert |
| Measurement units | g, lb:oz, ml, fl'oz |
| Display | LCD with mode and function indicators |
| Weighing surface | Plastic platform (exact material not specified) |
| Cleaning and maintenance | Clean with a slightly damp cloth; do not immerse, do not use chemical or corrosive products |
| Safety | Use on a flat and stable surface; do not expose to high temperatures; do not disassemble; household use only |
| Warranty | 2 years against manufacturing defects (upon presentation of the receipt) |
| Spare parts and repairability | User-replaceable batteries; no other spare parts indicated |
| Dimensions | Not provided |
| Device weight | Not provided |
Frequently Asked Questions - HO-EL4 5KG HIGH ONE
User questions about HO-EL4 5KG HIGH ONE
0 question about this device. Answer the ones you know or ask your own.
Ask a new question about this device
Download the instructions for your Kitchen scale in PDF format for free! Find your manual HO-EL4 5KG - HIGH ONE and take your electronic device back in hand. On this page are published all the documents necessary for the use of your device. HO-EL4 5KG by HIGH ONE.
USER MANUAL HO-EL4 5KG HIGH ONE
Thank you for choosing this HIGHONE product. HIGHONE products are chosen, tested, and recommended by ELECTRO DEPOT, so you can be sure you are getting a top-quality, easy-to-use product that won't let you down.
We're confident your new device will be a pleasure to use every day!
Welcome to ELECTRO DEPOT.
Table of Contents

Parts Specifications

Main function
To install or replace battery LCD
Buttons illustration
Operation

Cleaning and maintenance Storage
Parts

Weighing surface

Display

Battery compartment cover
Specifications
Model: 987150
Maximum capacity: 5kg/11lb
Batteries: Tx 3 V, CR205Z titanium button-cell battery
Main function
- With high precision load cell
Water & milk volume measuring function - Low battery and over loaded warning function
Zero & tare function - Auto off function
To install or replace battery
Depending on the model of your scale, different battery type is required. Find the battery type of your scale, and replace the battery as follows:
The scale is operated by one CR2032 (3V) lithium battery (included). Before first use, remove the insulation strip at the battery compartment.
- Open the battery compartment cover.
- Remove the old batteries (if any) using a sharp object as shown in the picture. Install one CR2032 (3V) lithium battery. Make sure the positive (+) is facing upwards.
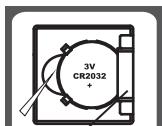
Battery baffle

HINT: Make sure one side of the battery is placed underneath the battery baffle, then push the other side of the battery until it clicks and secured.
- Close the battery compartment cover.
LCD
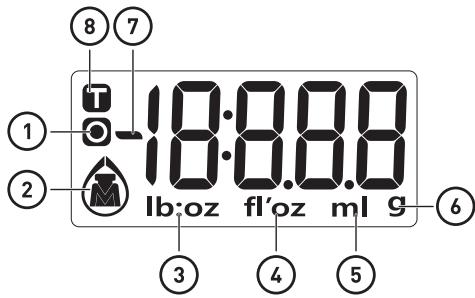
Zero weight
2 Working modes (weight / water / milk)
Volume unit (lb:oz)
Volume unit (fl'oz)
Volume unit (ml)
Weight unit (g)
Negative value
Tare weight

Weight mode

Milk volume mode

Water volume mode
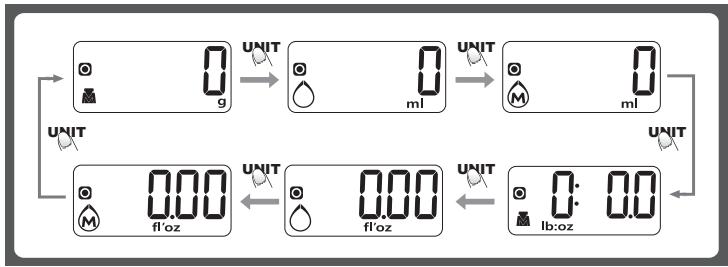
Buttons illustration
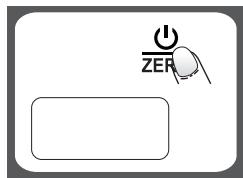
UNIT Mode conversion, unit conversion

Turn on / Turn off / Zero / Tare
Mode and unit conversion
After turning on the scale, press «UNIT» button to select mode as shown below:
Operation
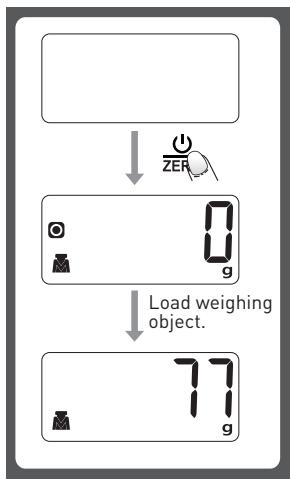
Weighing mode
- Place the scale on a solid and flat surface.
- Place bowl (if used) on the scale.
- Press to turn on the scale.
- Wait until LCD shows "0" to start weighing. Press UNIT to convert to weight mode if needed.
- Load weighing object on to start weighing. LCD will show the weight reading.
- If the weighing object is water or milk, press UNIT button to choose volume mode and view the volume of weighing object.
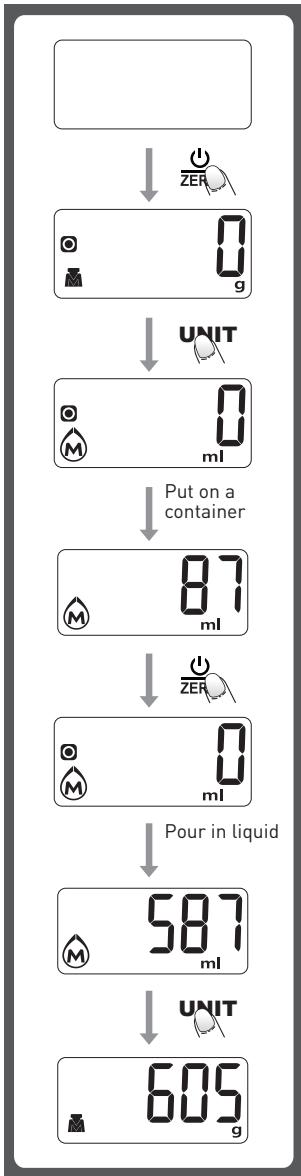
Volume indication mode
- Place the scale on a solid and flat surface.
- Press to turn on the scale.
- Wait until LCD shows "0", and press UNIT button to choose "Water" or "Milk" mode.
- Put a container for the liquid onto the scale platform.
- Press button to reset LCD to "0".
- Pour liquid (water or milk) into the container, LCD shows the volume of the liquid.
- Press UNIT button to choose "Weight" mode and view the weight of liquid.
"ZERO" or "TARE" function
To weigh different loads consecutively without removing loads from the scale. Put first Load on the scale, get the weight reading. Press button to reset the LCD reading to "0" before adding next load. You can repeat this operation.
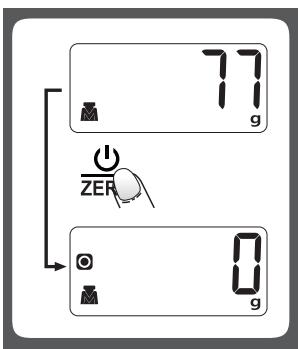
Condition 1: "ZERO" function
When total sum of all loads on scale < 4% of scale's max. weight capacity. (4%) = 80g when capacity is 2000g; 200g when capacity is 5000g
LCD will show ---- or 0g each time _ZER = _ZER is pressed. ---- means not stable, please wait for a moment. 0g and an icon o on the left side of LCD mean ZERO function is activated. Max. weight capacity remains unchanged.
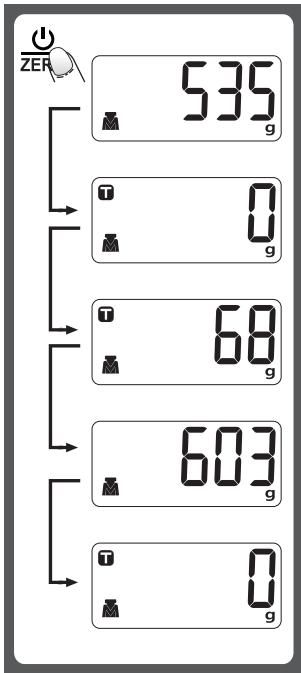
Condition 2: "TARE" function
When total sum of all loads on scale > 4% of scale's max. weight capacity. (4% = 80g when capacity is 2000g; 200g when capacity is 5000g)
LCD will show ---- or 0g each time _ZER is pressed. ---- means not stable, please wait for a moment. 0g and an icon T on upper left corner of LCD mean TARE function is activated. Max. weight capacity is reduced by the total weight of all loads.
Under this condition:
By pressing z , you can see the total weight of all loads on the scale. If you want to weigh more loads, just press z to reset LCD reading to "0" again.
Auto shut off
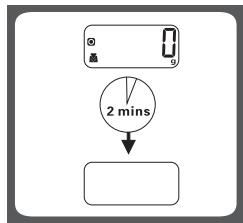
Auto shut-off occurs if display shows '0' or shows the same weight reading for 2 minutes.
Manual shut off
To maximize battery life, always press _ZER again to turn off the scale after using.
- When display shows weight reading, press z for 3 seconds to turn off the scale.
Warning indicators
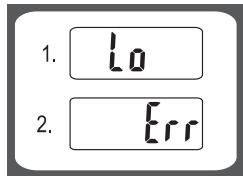
- Replace with a new battery.
- Scale overload. Remove item to avoid damage. Max. weight capacity is indicated on the scale.
Cleaning and maintenance
- Clean the scale with slightly damp cloth. DO NOT immerse the scale in water or use chemical/corrosive cleaner. Keep the scale In cool dry place.
- All plastics parts should be cleaned immediately after contact with fats, spices, vinegar and strongly flavored/colored foods. (Avoid contact with acids citrus juice.)
- Always use the scale on a solid, flat surface, keep the scale unmoved when weighing.
- This product is precision instrument, please handle with care; Do not strike, shake or drop the scale.
- If fail to turn on, please check whether battery(ies) are installed or battery power is low.
- Keep away from high temperature, do not disassemble the scale arbitrarily.
- Designed for family use only, not for commercial use.
Storage
- Store the unit in a fresh, dry and dust-free place, out of the reach of children and pets.
- Please retain the packaging and use it to store your unit when it is not in use for an extended period of time.
Merci!
This product is guaranteed against faults caused by defects in manufacturing or the materials used for a period of two years, starting from the date of purchase.* This warranty does not cover defects or damage caused by failure to install the device correctly, incorrect use of the product, or excessive wear and tear.
*proof of purchase required.
CONDITION DE GARANTIE
FR

- Table of Contents
- Parts
- Specifications
- Main function
- To install or replace battery
- LCD
- Buttons illustration
- Mode and unit conversion
- Operation
- Weighing mode
- Volume indication mode
- "ZERO" or "TARE" function
- Condition 1: "ZERO" function
- Condition 2: "TARE" function
- Under this condition:
- Auto shut off
- Manual shut off
- Warning indicators
- Cleaning and maintenance
- Storage
- Merci!
- CONDITION DE GARANTIE
- FR
Brand : HIGH ONE
Model : HO-EL4 5KG
Category : Kitchen scale