
HO-SM06 - Sandwich maker HIGH ONE - Free user manual and instructions
Find the device manual for free HO-SM06 HIGH ONE in PDF.
| Brand | HIGH ONE |
| Model | HO-SM06 (972084) |
| Product type | Sandwich maker |
| Power supply | 220-240 V ~ 50/60 Hz |
| Power | 650-750 W |
| Protection class | Class I |
| Material | Plastic and metal |
| Color | Not specified (usually black or white) |
| Dimensions (L x W x H) | Approximately 25 x 25 x 10 cm |
| Weight | Approximately 1.5 kg |
| Capacity | 1 sandwich (2 slices of bread) |
| Non-stick coating | Yes, on heating plates |
| Removable plates | Yes, for easy cleaning |
| Indicator lights | Red (heating) and green (ready) |
| Thermostat | Built-in, temperature hold |
| Insulated handle | Yes, heat-resistant |
| Non-slip feet | Yes |
| Cooling vents | Yes |
| Cord storage area | Yes, under the appliance |
| Cooking function | Grilling sandwiches, croque-monsieur |
| Heating time | Approximately 3 minutes |
| Cooking time | 3 to 6 minutes depending on filling |
| Cleaning | Plates washable with soapy water, appliance wiped with a damp cloth |
| Warranty | 2 years |
| Included accessories | None (except manual) |
Frequently Asked Questions - HO-SM06 HIGH ONE
User questions about HO-SM06 HIGH ONE
0 question about this device. Answer the ones you know or ask your own.
Ask a new question about this device
Download the instructions for your Sandwich maker in PDF format for free! Find your manual HO-SM06 - HIGH ONE and take your electronic device back in hand. On this page are published all the documents necessary for the use of your device. HO-SM06 by HIGH ONE.
USER MANUAL HO-SM06 HIGH ONE
natural_image
Line drawing of a four-tiered waffle or blender with triangular panels and handles, no text or symbols present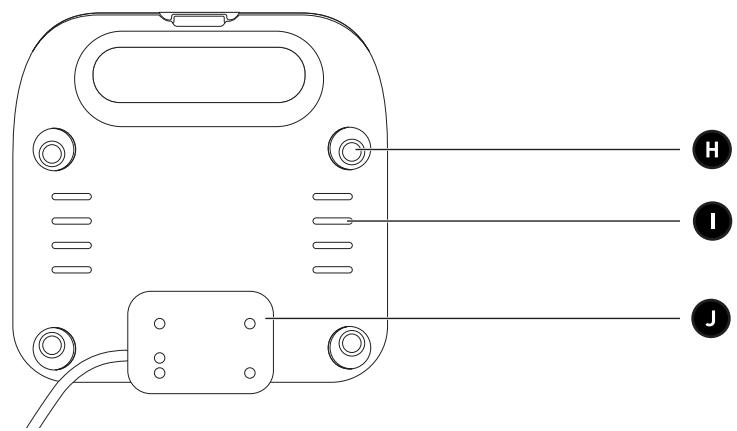
Merci !
Thank you for choosing this HIGHONE product.
HIGHONE products are chosen, tested, and recommended by ELECTRO DEPOT, so you can be sure you are getting a top-quality, easy-to-use product that won't let you down.
We're confident your new device will be a pleasure to use every day!
Welcome to ELECTRO DEPOT.
Table of Contents

Product overview
Parts
Product overview
Intended use
Specifications

Product usage
Before first use
Operation

Cleaning and maintenance
Cleaning and maintenance
Storage
Parts
A Heat-resistant latch
B Handle
C Heating/ready-to-use indicators
D Top plate
E Bottom plate
F Power cable with plug
G Heating plates
H Non-slip feet
I Cooling vents
J Power cable storage area
Product overview
- Unpack and remove all labels from the unit. Please check that all of the unit's parts are included and intact. If the unit is damaged or faulty, do not use it and take it to your retailer or after-sales service centre.
- Keep all packaging out of the reach of children. There is a risk of accidents if children play with packaging materials.
Intended use
- This product is for household use only. It has not been designed for use in professional kitchens.
• Any other use may damage the unit or cause injury.
Specifications
| Model: | 972084 / HO-SM06 |
| Operating voltage: | 220-240 V ~ 50/60 Hz |
| Power: | 650-750 W |
| Protection class: | Class I |
Before first use
- Clean the unit before first use (→ CLEANING AND MAINTENANCE).
- The unit may give off a little smoke or a slight odour on the first use. This is normal for new units and will wear off with regular use. Alternatively, you can turn the unit on for 10 minutes prior to use to remove the smell and smoke.
Operation

NOTE:
- Do not use frozen food with this unit. Check that the food is completely thawed before cooking.
-
Avoid using the unit under or near curtains or any other combustible materials. Never place the unit under a cabinet or near a wall, as the heat could damage them.
-
Place the unit on a flat, scratch-free and heat-resistant surface that can easily be cleaned, should any of the ingredients leak out of the unit.
- Fully unwind and slacken the power cable. Check that it is not touching the unit's external surface, as the latter may become hot during use.
- Check that the lid is closed and insert the plug into the wall socket. The red heating indicator will turn on to confirm that the unit is working and heating up. The unit will remain on until disconnected from the power source.
- After approx. 3 minutes, the green indicator will turn on to confirm that the unit is ready to use.
WARNING - RISK OF BURNS! The unit's surfaces will become hot. The unit emits steam during the cooking process and there is a risk of burns. Always wear heat-resistant oven gloves.
- Lift the latch from the handle and open the lid.
- If you haven't put any fat on the food, lightly grease the cooking plates using a heat-resistant pastry brush.
- Place your sandwich on the bottom cooking plate.

NOTE: Never use metal utensils on the unit as these could damage the non-stick coating.
- Close the lid, making sure it is securely locked. A toasted sandwich takes on average between 3 and 6 minutes to cook, or even longer if you prefer it more grilled. Some foods will take longer depending on their type and thickness.

NOTE:
- During the cooking process, the green indicator will sporadically turn on and off as the unit tries to maintain the cooking temperature.
-
Check that all food has been thoroughly cooked before eating it.
-
When the food is ready, open the lid and use a plastic or wooden spatula to prise it from the unit.
- Should you wish to use the unit immediately thereafter, wipe over the cooking plates with some kitchen roll and repeat the above-mentioned steps.
- When you have finished using the unit, turn it off by unplugging the power cable from the wall socket.

CAUTION! To prevent the unit from overheating, do not leave it plugged in when not in use. If lengthy food preparation is required between the two cooking phases, unplug the unit until you are ready to use it again.
- Once the unit has cooled, clean and dry it as described in the CLEANING AND MAINTENANCE section.
TIPS:
- The unit heats up and cooks fairly quickly. For a smoother cooking process, prepare all the ingredients before using the unit.
- To prevent food from sticking to the plates, lightly grease the ingredients or the cooking plates with oil or butter. For a more intense flavour, use bacon fat.
- The filling options are endless. Here are some ideas to help you: grilled vegetables, herbs, olives, salad leaves, baked beans, eggs and plenty more.
- Sprinkle a teaspoon of sugar over the surface of the bread or dough to obtain a crispier texture; this works really well for fruit-based dishes.
- Do not overload the heating plates. If you overload the plates, you may lose some of the filling when you close the lid or during the cooking process.
Cleaning and maintenance

CAUTION!
- Always unplug the unit from the power supply before cleaning.
- Never immerse the unit in water or any other liquid, as there is a risk of electric shock.
- This unit is not dishwasher-safe.

NOTE:
- For best cooking results and to extend your unit's service life, we recommend cleaning the unit after each use.
-
When cleaning the unit, never use abrasive or corrosive products, alcohol, scouring pads, wire sponges or sharp utensils.
-
When the unit has cooled, remove the grease with some kitchen roll and wipe it over with a soft, damp cloth.
- Be sure to remove any food, moisture or oil residue that may have entered the air vents beneath the unit.
- For a more thorough clean, remove the cooking plates and wash them in warm, soapy water.
• After cleaning, dry the unit thoroughly. - Reposition the cooking plates and close the lid, whilst checking that the latch is securely locked.
Storage
- Always check the unit has fully cooled down and is unplugged before putting it away.
- Stow the power cable in the storage area on the underside of the base.
C
Cleaning and maintenance
- Lock the latch and place the unit on its side to save space and store it vertically.
- If you do not plan on using the unit for a long period of time, we recommend storing it in its original packaging in a cool, dry place, away from direct sunlight, dust and excessive dirt.
Bedankt!
This product is guaranteed against faults caused by defects in manufacturing or the materials used for a period of two years, starting from the date of purchase.* This warranty does not cover defects or damage caused by failure to install the device correctly, incorrect use of the product, or excessive wear and tear.
*proof of purchase required.
GARANTIEVOORWAARDEN

Brand : HIGH ONE
Model : HO-SM06
Category : Sandwich maker