MP403 BLEU - Portable player LUXYA - Free user manual and instructions
Find the device manual for free MP403 BLEU LUXYA in PDF.
Download the instructions for your Portable player in PDF format for free! Find your manual MP403 BLEU - LUXYA and take your electronic device back in hand. On this page are published all the documents necessary for the use of your device. MP403 BLEU by LUXYA.
USER MANUAL MP403 BLEU LUXYA
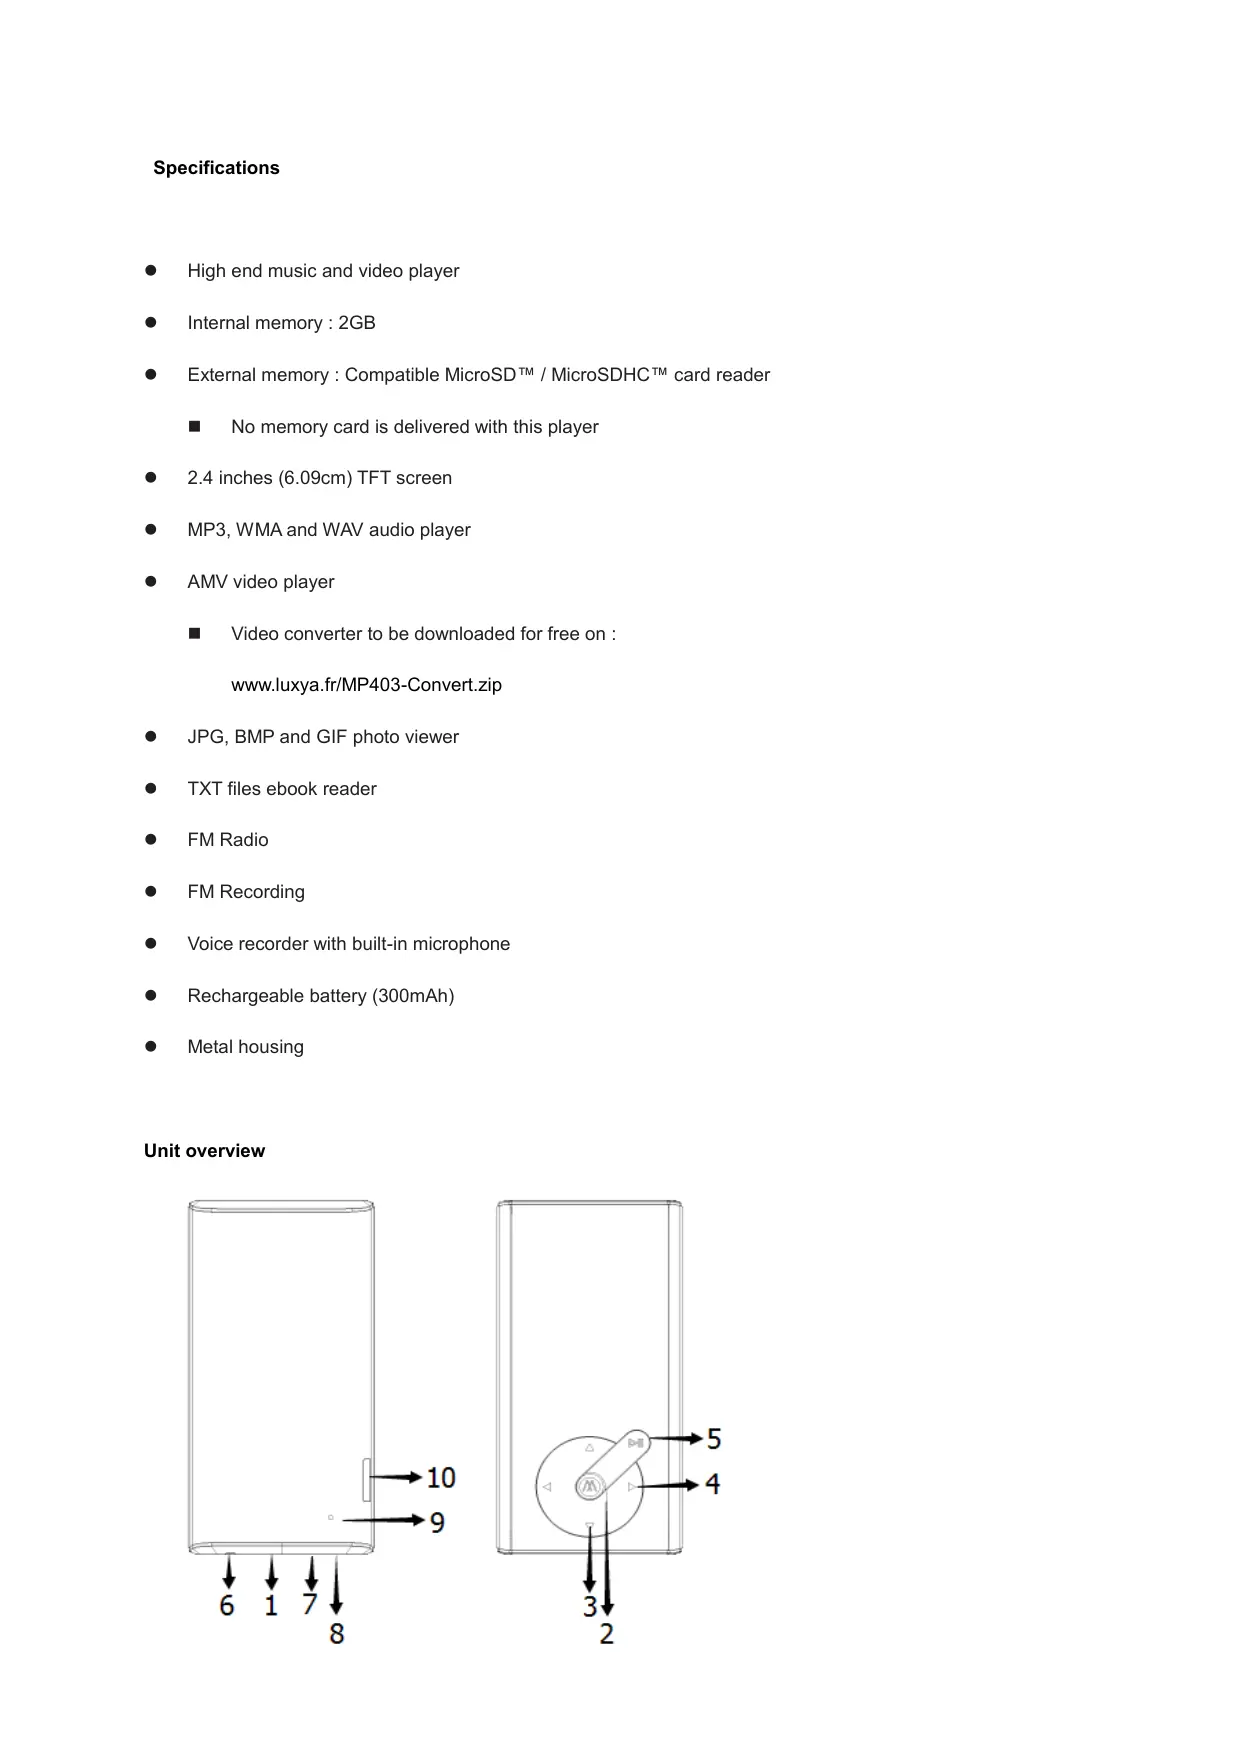
Specifications © High end music and video player © Internal memory : 2GB © External memory : Compatible MicroSD" / MicroSDHC'" card reader m No memory cardis delivered with this player © 24inches (6.09cm) TFT screen © MP3, WMA and WAV audio player © AMV video player m Video converter to be downloaded for free on : www.luxya.fr/MP403-Convert.zip © JPG, BMP and GIF photo viewer e TXT files ebook reader e FMRadio © FMRecording © Voice recorder with built-in microphone © Rechargeable battery (300mAh) © Metal housing Unit overview DITS > À l | —
Press and hold the button to turn the player on or off. Press the button to lock/unlock the screen.
Select button (apart Photo Viewer and Ebook modes which Select button is PLAY/PAUSE) Press and hold to return to main menu
Press to increase or decrease playback volume. A warning message will show up once the sound pressure reaches 85dB. Press the VOL+ (UP) button to keep on increasing the sound volume. Select the previous/next menu or option.
. SKIP/SEARCH Press to skip to the next or previous song. Hold to fast backward/forward when a song is played.
Press to play / Press again to pause.
. RESET HOLE Use a small pin to press inside the hole and perform a factory reset.
1. Select Music in the main menu then press the M button to enter into the music playback interface.
2. Use the Skip/Search buttons to browse through song files.
3. Press the PLAY/PAUSE button to begin the music playback.
4. Press the PLAY/PAUSE button again once a music is played to pause it, and another time to resume the playback.
5. In order to reach the files settings of the music mode, press M when no music is played. Use the UP/DOWN
buttons to scroll and confirm the selection with M button. The options available are : © Local folder (browse the files in the internal memory) © Card folder (browse the files in the memory card) e Deletefile e Delete all e Exit Playback settings During music playback, press the M button to adjust the following playback settings. © Repeat © Equalizer © Replay mode ©e Screen mode e Exit VIDEO MODE The Video mode allows to play videos which were encoded with the AMV format and which maximum resolution is 320x240. A former conversion in that format is requested so a video can be played. You may download our free AMV video encoder with the following link : www.luxya.frMP403-Convert.zip More instructions about the video conversion are available at the end of this user manual.
1. Select Video in the main menu then press the M button to enter into the video playback interface.
2. Use the Skip/Search buttons to browse through the video files.
3. Press the PLAY/PAUSE button to begin the video playback.
4. Press the PLAY/PAUSE button again once a video is played to pause it, and another time to resume the playback.
5. In order to reach the settings of the video mode, press M while the video playback is stopped. Use the UP/DOWN
buttons to scroll and confirm the selection with M button. Video settings © Local folder (browse the files in the internal memory) © Card folder (browse the files in the memory card) e Deletefile © Delete all © Repeat © Exit RECORDER
1. Select Recorder in the main menu then press the M button to enter into the voice recording interface.
2. Press the PLAY/PAUSE button to start recording.
3. Press the PLAY/PAUSE button again to pause the recording, and another time to resume it.
3. Hold the PLAY/PAUSE button to stop and save the recording.
You can also save the recording holding the M button. That will bring you back to the main menu. Managing recording files While recording playback is stopped, press the M button to manage your recordings and set the record bitrate. EM RADIO
1. Select FM Radio in the main menu then press the M button to enter into the FM radio interface.
2. The stations can be tuned either manually or automatically:
© Manual tuning: use the Skip/Search button to scan frequencies one by one. © Automatic tuning: press and hold the Skip/Search button; the tuner will automatically scan frequencies, decreasing or increasing based on the button used .Once a station is detected, the tuner stops scanning. Radio setting Press the M button while in the FM Radio mode to access the following settings:
Save — Saves the current channel frequency with an available preset. Record — Record FM Radio :
1. Once the option has been selected, press the PLAY/PAUSE button to start recording.
2. Press the PLAY/PAUSE button again to pause the recording, and another time to resume it.
3. Hold the PLAY/PAUSE button to stop and save the recording.
You can also save the recording holding the M button. That will bring you back to main FM Radio mode screen. Managing recording files While recording playback is stopped, press the M button to manage your recordings and to set the record bitrate. Delete Delete all Auto search : The unit will automatically scan the frequency range to find radio channels. Once a channel is found it is added to the presets list. In the main FM Radio mode screen, to switch from one preset to another, press the PLAY/PAUSE button. lt will start from preset channel 1 (CHO1), then switch to preset channel 2 (CHO2), preset channel 3 (CHO3) and so on. until the last preset channel. lfthe PLAY/PAUSE button is pressed again when the last preset channel is reached it will get back to preset channel 1 (CHO1). Normal band : Select that FM frequency range if your country is different from Japan. Japan band : Select that FM frequency range if your country is Japan. Exit PHOTOS
1. Select Photos in the main menu then press the M button to enter into the Photos mode.
2. Use the UP/DOWN buttons to browse through your photos.
3. Use the PLAY/PAUSE button to make a selection and show the chosen photo.
In order to reach the settings of the Photos mode, press M while the image files are being browsed and not displayed. Use the UP/DOWN buttons to scroll and confirm the selection with M button.
Photos settings © Local folder (browse the files in the internal memory) © Card folder (browse the files in the memory card) © Playback set (here you may set a manual play or automatic play) e Deletefile e Delete all e Exit EBOOK
1. Select Ebook in the main menu then press the M button to enter into the Ebook mode.
2. Use the UP/DOWN buttons to browse through your TXT files.
3. Use the PLAY/PAUSE button to make a selection and show the chosen text file.
In order to reach the settings of the Ebook mode, press M while the TXT files are being browsed and not displayed. Use the UP/DOWN buttons to scroll and confirm the selection with M button. Ebook settings Local folder (browse the files in the internal memory) Card folder (browse the files in the memory card) Playback set (here you may set a manual play or automatic play) Delete file Delete all Exit Once a text file is opened, other options are available pressing M : Bookmark select (recall a bookmark already saved) Bookmark delete (delete a bookmark in the bookmark list) Bookmark add (add a bookmark relative to the current position in the text. The screen gets back to text once the bookmark has been added)
Exit SETTING Select Setting in the main menu System time: adjust date/time LCD set: Adjust the length of time before the unit enters “dark mode”, where the backlight turns off, from 0 to 50 seconds. 0 seconds timeout means the screen will remain backlit constantly. Language: Choose your language among the many available languages. Power off: Set the player to automatically power-off after a certain period of inactivity in seconds, from 0 to 200 seconds. 0 seconds timeout means that the player will stay on indefinitely (not recommended). Memory info: Display the player memory storage size and available space. Firmware version: Display player fimware version. Firmware upgrade Reset Default Settings Auto lock : allows the player to lock after a set inactivity time. To unlock the player press the POWER/LOCK button below the unit. Exit BROWSER Scan all files in the unit.
CONNECTING YOUR PLAYER TO À COMPUTER
1. Using the included mini-USB cable, plug the mini-USB end into the player and the standard USB end into
2. Use a file browser (Windows Explorer, Mac OS Finder) to move files to and from your portable music player.
3. To charge the player plug it to a computer when it is powered off. An icon will show up on the screen as
well as the battery charge level.
That software is available to download for free As explained earlier in this user manual the MP403 player only accepts AMV format videos with a maximum resolution of 320 x 240 pixels. A former video conversion is a must so that your original file can be read by the player. To download our free AMV video converter please type the following link in your internet browser : www.luxya.fr/MP403-Convert.zip Unzip the file with a free trial compression software such as WINZIP or WINRAR. Once unzipped you may notice many files in a « video convert tool » folder inside the destination folder. Double click on « Setup.exe » (which name may be « Setup » only on some computers). The video converter installation is now executed. On the first page showing up, choose « Next » : 35! MP3 Player Utilities 4.45 ER Welcome to the MP3 Player Utilities 4.45 Setup Wizard The instaler wil guide you through the steps required ta install MP3 Player Utiies 4.45 on your computer.
WARNING: This computer program is protected by copyright law and international reates.
Unautharzed duplication or distibution of this program, or any portion of h, may resul in severe civil or ciminal penales, and wa be prosecuted to the maximum extent possible under the law.
A new screen will appear so you may select the destination folder where the software will be installed. You may keep the default settings or change them, then click « Next » :
35) MP3 Player Utilities 4.45 e=niash
Select Installation Folder The installer wil instal MP3 Player Ltities 4.45 to the falloning folder. To instal in this folder, click "Next. To install to à different folder, enter below or click "Browse" Folder: [-VProgran FilesWFS Player Utilities 4 451 Browse. ( Dikcos. instal MP3 Player Ltities 4.45 or yoursef, orfor anyone who uses this computer: es ere)
Click two more times on « Next » until the installation is finished : 3 MP3 Player Utilities 4,45 LE MP3 Player Utilities 4.45 Information F2
(READ ME FIRST [a For AMV/AVI Video Converter, please make sure you have mul] (Microsoft DirectX 9.0 or above. When to convert Real Media, QuickTime, MPEG2 format video files, please install related DirectShow filter at first. Otherwise, AMV/AVI Video Converter can not work normal. ILISEZ-MOI Pour le convertisseur vidéo AMV/AVI, veillez à avoir installé Microsoft DirectXQ ( an snnérienr Cancel] ( <Bak = Once the installation is successful the following screen shows up. Click on « Close » to exit : 4 MP3 Player Utilities 445 Et EE) Installation Complete E,
MP3 Player Utities 4,45 has been successful installed. Click "Close" to exit. Please use Windows Update to check far any critical updates ta the .NET Framework. Cancel ][ <Bak uche |) HOW TO CONVERT A VIDEO ? Once the conversion software is installed you have to run it.lts name is « AMV Converter » or « AMV&AVI Converter ». You may find it in the applications list or on the desktop if its icon has been installed on it. In that last case the software name is « amvtransform ». You can also make a search using the « AMV » keyword. Once the program is launched the following screen shows up :
Fierame: [Aix Fies oftype: [Ai media fer an” mpeg." mpg. dt" meme" meme 29 "em ram mb mo." vob “on * 2m Click on the Ed icon to select the destination folder. Check in the main interface the line including the name of the file to be converted. Click on the icon to change the settings of the video conversion.
T° Synchrorize audio Misc FF Plsback ater convering Once back in the main interface, click on Cdénl to start the video conversion. Once the conversion is finished the software can be closed. The converted video file is in the destination folder chosen earlier.
Protection of the environment is an important concern to us. In order to put this concern into tangible actions, LUXYA has consciously included a set of methods that favor a respect for the environment into the entire cycle of its products; from fabrication to consumer usage, to final disposal. - Batteries : If your product contains a detachable battery pack, you should only dispose of it in a designated collection point for used batteries. - The Product : The crossed-out garbage can symbol on your product signifies that it falls into the category of electric/electronic equipment. Products of this type contain substances that are potentially dangerous to the environment and to human health. Therefore, you should not dispose of the current electronic device in a regular trash. As such, the current European directives ask that this device be collected: - At places of distribution in the case of a purchase of a similar electronic product. - At locally created disposal areas (waste disposal centers, sorted trash system, etc.) By doing this, you are actively participating in the reuse and recycling of disposed electronic and electric equipment that could have potential effects on the environment and human health. To avoid hearing damages, do not listen to the player with a high sound level during a long period of time. That product has been tested with the earphones supplied with the product. Other types of earphones or headphones can produce higher sound levels. Hearing a MP3 player with a high sound level may bring the user ear problems. We really encourage any user of the MP321 player not to listen to music with the sound set to the maximum level. It's not recommended to use the player more than an hour per day. That product has been imported by : ADC TECHNOLOGIES El Lieu-dit Lagut 24400 LES LECHES FRANCE
Made in China MicroSD et MicroSDHC" are registered trademarks of The SD Card Association.
WARNING: This computer program is protected by copyright law and international trealies.
Unautharzed duplication or distibution of this program, or any portion of h, may resul in severe civil or ciminal penaltes, and wsl be prosecuted to the maximum extent possible under (he law. Gt) («rex Un nouvel écran apparaît proposant de choisir le répertoire d'installation du logiciel. Vous pouvez laisser les paramètres par défaut ou les changer puis cliquer sur « Suivant » (Next) : 3 MP3 Player Utilities 445 ESS) Select Installation Folder FA
The installer wil instal MP3 Player Utities 4,45 to the following folder. To instal in is folder, cick "New. To install to a different folder, enter it below or click ‘Browse'. Folder: [-Wrogran FilesWFS Flayer Utilities 4.45 Browse. [= nikcon. | instal MP3 Player Ltties 4.45 for yourself orfor anyone who uses his computer: Justme Can) Go) D)
WARNING: This computer program is pratected by copyright law and international teates.
35) MP3 Player Utilities 4,45. ali
Welcome to the MP3 Player Utilities 4.45 Setup Wizard Le The instaler wil guide vou through the steps required to install MP3 Player Utities 4.45 on your computer.
WARNING: This computer progrem is protected by copyright law and intemational teaties.
The installer wil install MP3 Player Utities 4.45 ta the following folder. To install in this folder, click "Next. To installto à different folder, enter it below or click "Browse". Folder [C:\Progren FilesWIP3 Flayer Utilities 4.451 Browse. Install MP3 Player Utities 4.45 for yoursef. or for anyone who uses this computer: Justme Cancel] [ <Bak ]Q Nex>
WARNING: This computer program is protected by copyright law and international trealies.
Unautharzed duplication or distibution of this program, or any portion of h, may resul in severe civil or ciminal penaltes, and wsl be prosecuted to the maximum extent possible under (he law. Cancel Back Es ôffnet sich ein neues Fenster, das lhnen anbietet, das Installationsverzeichnis der Software zu wählen. Sie kônnen die defaultmäRigen Parameter lassen oder ändern und klicken dann auf ,Weiter” (Next): 35] MP3 Player Utilities 445 ESS) Select Installation Folder FA
The installer wil instal MP3 Player Ltities 4.45 to the falloning folder. To instal in this folder, click "Next. To install to à different folder, enter below or click "Browse" Folder: [-VProgran FilesWFS Player Utilities 4 451 Bromse. ( Dikcos. instal MP3 Player Ltities 4,45 for yoursef, orfor anyone who uses this computer: Justme es ere)
MP3 Player Utities 4.45 has been successful installed. Click "Close" to exit. Please use Windows Update ta check far any critical updates ta the .NET Framework. Cancel < Back
CONFORMITY STATEMENT TO RE DIRECTIVE (2014/53/EU) Declaration ID : MP403 We hereby ADC TECHNOLOGIES El, settled in Lieu-dit Lagut, 24400 LES LECHES, FRANCE, represented by Mister GOSSART Mathieu as manager, states that the player LUXYA MP403, specifically designed to listen to music, watch the videos, photos and listen to the FM radio, complies with the essential requirements and other relevant provisions of Directive 2014/53/EU called RE. Statement made on July 13, 2015 in LES LECHES .