
HC3100/15 - Electric razor PHILIPS - Free user manual and instructions
Find the device manual for free HC3100/15 PHILIPS in PDF.
Download the instructions for your Electric razor in PDF format for free! Find your manual HC3100/15 - PHILIPS and take your electronic device back in hand. On this page are published all the documents necessary for the use of your device. HC3100/15 by PHILIPS.
USER MANUAL HC3100/15 PHILIPS
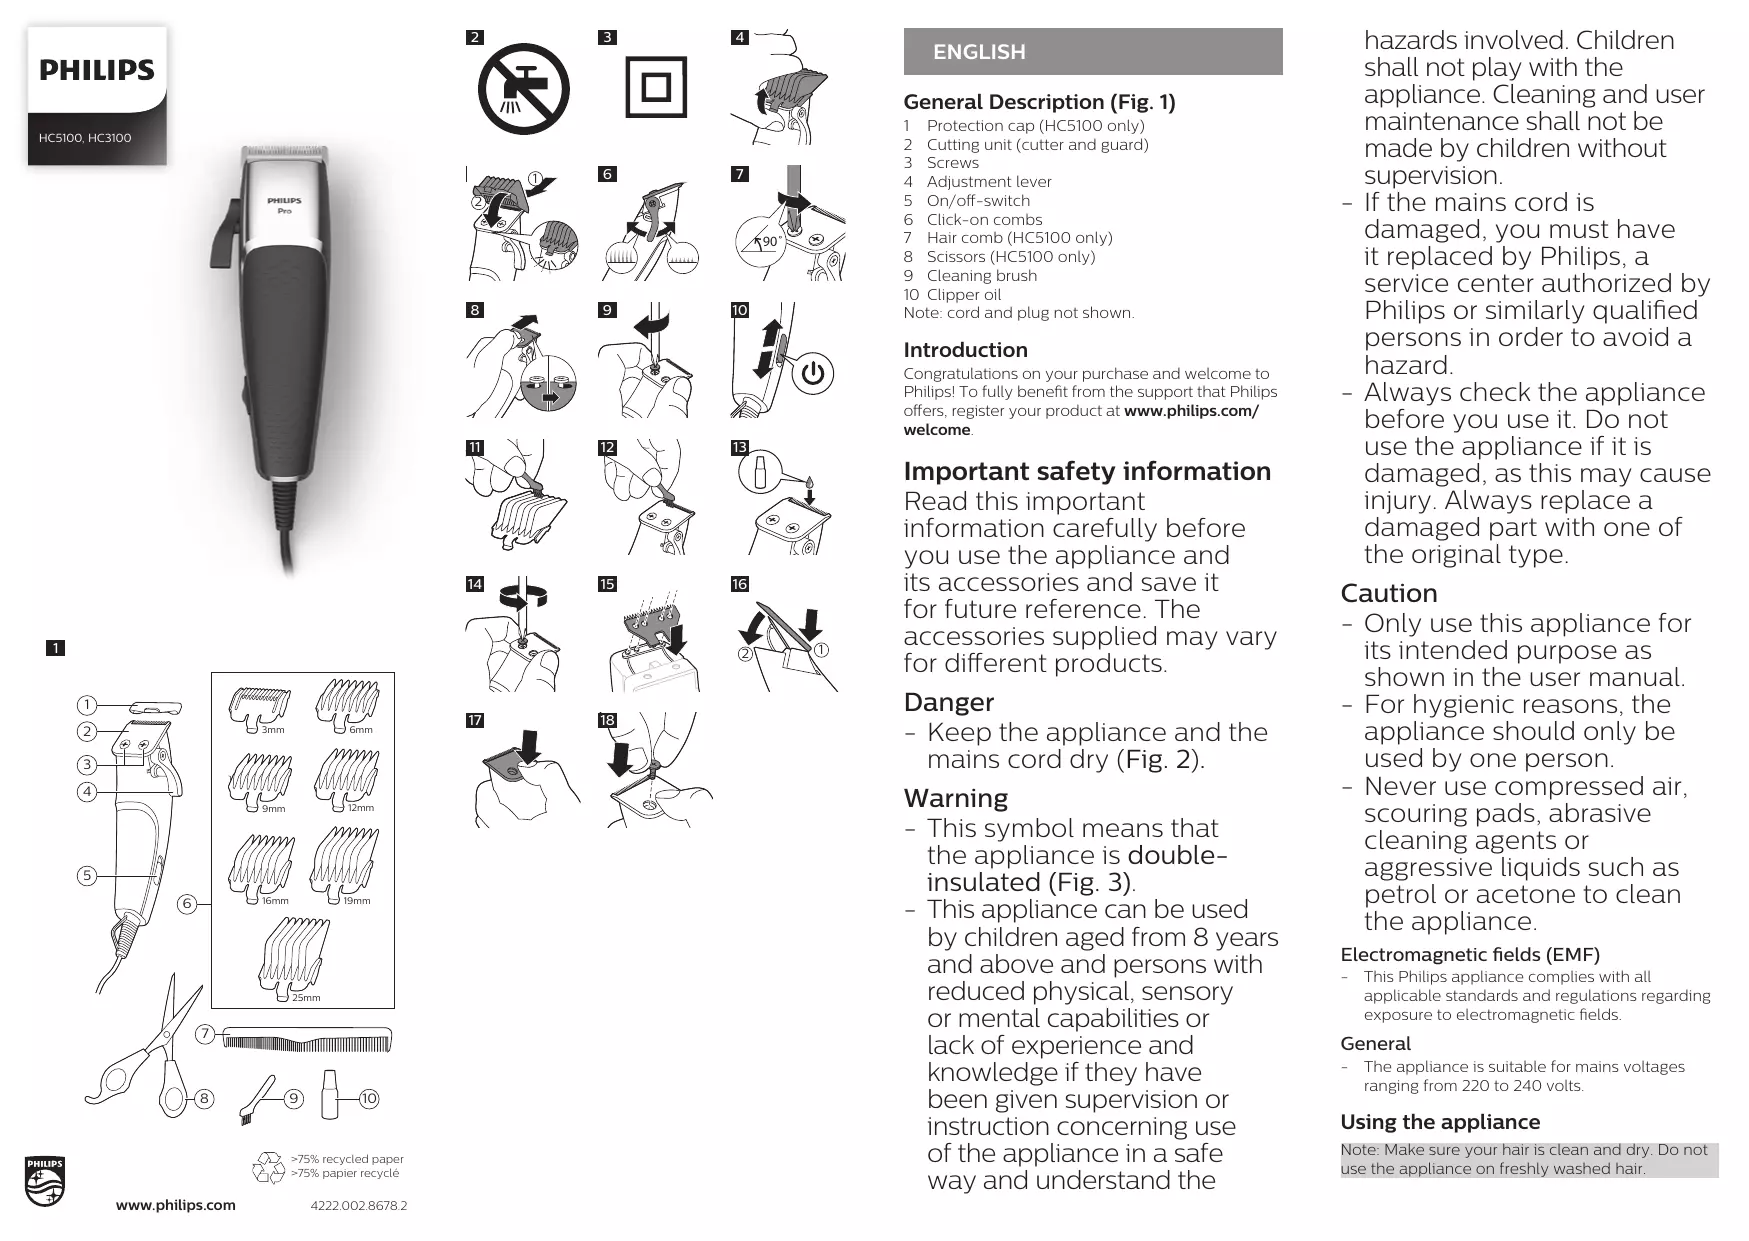
ENGLISH General Description (Fig. 1) 1 Protection cap (HC5100 only) 2 Cutting unit (cutter and guard) 3 Screws 4 Adjustment lever 5 On/off-switch 6 Click-on combs 7 Hair comb (HC5100 only) 8 Scissors (HC5100 only) 9 Cleaning brush 10 Clipper oil Note: cord and plug not shown. HC5100, HC3100
Introduction Congratulations on your purchase and welcome to Philips! To fully benefit from the support that Philips offers, register your product at www.philips.com/ welcome.
Important safety information Read this important information carefully before you use the appliance and its accessories and save it for future reference. The accessories supplied may vary for different products. Danger -- Keep the appliance and the mains cord dry (Fig. 2). Warning -- This symbol means that the appliance is doubleinsulated (Fig. 3). -- This appliance can be used by children aged from 8 years and above and persons with reduced physical, sensory or mental capabilities or lack of experience and knowledge if they have been given supervision or instruction concerning use of the appliance in a safe way and understand the hazards involved. Children shall not play with the appliance. Cleaning and user maintenance shall not be made by children without supervision. -- If the mains cord is damaged, you must have it replaced by Philips, a service center authorized by Philips or similarly qualified persons in order to avoid a hazard. -- Always check the appliance before you use it. Do not use the appliance if it is damaged, as this may cause injury. Always replace a damaged part with one of the original type. Caution -- Only use this appliance for its intended purpose as shown in the user manual. -- For hygienic reasons, the appliance should only be used by one person. -- Never use compressed air, scouring pads, abrasive cleaning agents or aggressive liquids such as petrol or acetone to clean the appliance. Electromagnetic fields (EMF) -- This Philips appliance complies with all applicable standards and regulations regarding exposure to electromagnetic fields. General -- The appliance is suitable for mains voltages ranging from 220 to 240 volts. Using the appliance Note: Make sure your hair is clean and dry. Do not use the appliance on freshly washed hair. Tips & tricks Clipping with click-on comb Replacement Troubleshooting -- To clip in the most effective way, move the appliance against the direction of hair growth. -- Since hair grows in different directions, you need to move the appliance in different directions (upwards, downwards or across). -- Make overlapping passes over the head to ensure that the appliance catches all hairs that need to be cut. -- Make sure that the flat part of the hair clipping comb is fully in contact with the scalp to obtain an even clipping result. -- If you wish to shape contours, tilt the appliance. -- Regularly remove cut hair from the hair clipping comb. If a lot of hair has accumulated in the comb, remove it from the appliance and blow and/or shake the hair out of it. 1 Place the desired comb onto the appliance (‘click’) (Fig. 5). 2 Switch on the appliance (Fig. 10). 3 Place the comb on the scalp and move the appliance through the hair slowly. Replace the cutting unit if it is damaged or worn. Only replace the cutting unit with an original Philips cutting unit (see ‚Ordering accessories‘). This chapter summarizes the most common problems you could encounter with the appliance. If you are unable to solve the problem with the information below, visit www.philips.com/support for a list of frequently asked questions or contact the Consumer Care Center in your country. Comb sizes Comb sizes in mm Comb sizes in inches
1/2 16 (HC5100 only) 5/8 (HC5100 only) Detaching and attaching click-on combs 19 (HC5100 only) 3/4 (HC5100 only) 1 To detach a comb from the cutting element, push the hook at the back of the comb upwards, then unhook it at the front (Fig. 4). 2 To attach a comb onto the cutting element, hook it onto the front of the cutting element and push it down at the back (‚click‘) (Fig. 5). 25 (HC5100 only) 1 (HC5100 only) Preparing for use Use the adjustment lever on the left side of the appliance to set the desired hair length. Move the adjustment lever upwards to reduce the cutting length and move it downwards to increase the cutting length. When you hear a click, you have reached the next length setting (Fig. 6). Fine adjustment You can reduce the cutting length manually to clip even closer to the skin, but make sure that the cutter does not emerge above the guard to avoid cutting yourself. 1 To reduce the cutting length manually, loosen the screws by turning the screwdriver a quarter turn (Fig. 7). Make sure that you only loosen the screws instead of completely unscrewing them. 2 Push the guard upwards until it is at the required length setting (Fig. 8). 3 Tighten the screws. Note: When you loosen or tighten the screws, the guard can move. To keep it in position, hold the sides of the guard in place while you tighten the screws (Fig. 9). 4 The cutter should not emerge above the guard. To check this, switch on the appliance and study the cutter and guard closely, preferably from the back. If the cutter emerges above the guard, adjust it as described above. Switching the appliance on and off 1 To switch on the appliance, push the on/offslide upwards (Fig. 10). 2 To switch off the appliance, push the on/offslide downwards (Fig. 10). Clipping without click-on comb You can use the appliance without click-on comb to clip your hair very close to the skin or to shape specific areas. 1 Detach the click-on comb (Fig. 4). 2 Switch on the appliance (Fig. 10). 3 To obtain an even clipping result, place the appliance flat on the skin. Move the appliance slowly and smoothly. Shaping 1 Detach the click-on comb (Fig. 4). 2 Switch on the appliance (Fig. 10). 3 To shape contours, turn the appliance and make downward strokes. Move the appliance slowly and smoothly. Cleaning and maintenance
Warning: Keep the appliance and the mains cord
dry. Only clean the appliance and the mains cord with the cleaning brush supplied. Caution: Never use compressed air, scouring pads, abrasive cleaning agents or aggressive liquids such as alcohol, petrol or acetone to clean the appliance. Caution: Do not use any sharp objects to clean the appliance. Clean the appliance after every use. 1 Make sure the appliance is switched off and disconnected from the mains. 2 Detach the click-on comb (Fig. 4). 3 Clean the cutting unit and the click-on comb with the cleaning brush supplied (Fig. 11, Fig. 12). 4 For optimal clipping performance, lubricate the cutter frequently with clipper oil (Fig. 13). Storage Put the protection cap on the appliance to prevent damage (HC5100 only). Replacing the blade 1 Hold the cutting unit in place with your thumb and remove the screws in the cutting unit carefully with a screwdriver (Fig. 14). 2 Remove the guard gently and slowly. When you do so, the spring and cutter emerge. Make sure you hold the appliance above a surface to prevent the spring and cutter from falling onto the floor. 3 Place the new cutter onto the spring. Note: the holes in the cutter fit exactly onto the projections in the spring (Fig. 15). 4 Place the back of the guard onto the top of the handle, and gently push it onto the cutter, pushing the cutter and spring downwards (Fig. 16). 5 Hold the cutting unit in place by placing your thumb between the two holes in the guard (Fig. 17). 6 With your other hand, put the screws back into place one by one (Fig. 18). 7 Fasten the screws with a screwdriver. 8 Perform the fine adjustment procedure (see‚ Fine adjustment‘). Ordering accessories To buy accessories or spare parts, visit www.shop.philips.com/service or go to your Philips dealer. You can also contact the Philips Consumer Care Centre in your country (see the worldwide guarantee leaflet for contact details). The following accessories and spare parts are available: -- HC4100 Replacement pack Guarantee and support If you need information or support, please visit www.philips.com/support or read the separate worldwide guarantee leaflet. Guarantee restrictions Cutting units are not covered by the terms of the international guarantee because they are subject to wear. Recycling -- Do not throw away the product with the normal household waste at the end of its life, but hand it in at an official collection point for recycling. By doing this, you help to preserve the environment. -- Follow your country’s rules for the separate collection of electrical and electronic products and rechargeable batteries. Correct disposal helps prevent negative consequences for the environment and human health. Problem Possible cause Solution The cutter emerges above the teeth of the guard. You have not performed the fine adjustment procedure correctly. Perform the fine adjustment procedure (see 'Fine adjustment'). The cutter and guard have come loose and have fallen out. You have unscrewed the screws too far. Reattach the cutter and the guard (see 'Replacing the blade'). FRANÇAIS Description générale (fig. 1) 1 Capot de protection (HC5100 uniquement) 2 Bloc tondeuse (lame et grille) 3 Vis 4 Levier de réglage 5 Bouton marche/arrêt 6 Sabots amovibles 7 Sabot pour cheveux (HC5100 uniquement) 8 Ciseaux (HC5100 uniquement) 9 Brosse de nettoyage 10 Huile pour tondeuse Remarque : Non illustrés : câble et fiche. Introduction Félicitations pour votre achat et bienvenue dans l‘univers Philips ! Pour profiter pleinement de l‘assistance offerte par Philips, enregistrez votre produit à l‘adresse suivante : www.philips.com/ welcome. Informations de sécurité importantes Lisez attentivement ces informations importantes avant d‘utiliser l‘appareil et ses accessoires et conservez-les pour un usage ultérieur. Les accessoires fournis peuvent varier selon les différents produits. Danger -- Évitez de mouiller l‘appareil et le cordon d‘alimentation (Fig. 2). Avertissement -- Ce symbole indique que l‘appareil bénéficie d‘une double isolation (Fig. 3). -- Cet appareil peut être utilisé par des enfants âgés de 8 ans ou plus, des personnes dont les capacités physiques, sensorielles ou intellectuelles sont réduites ou des personnes manquant d‘expérience et de connaissances, à condition que ces enfants ou personnes soient sous surveillance ou qu‘ils aient reçu des instructions quant à l‘utilisation sécurisée de l‘appareil et qu‘ils aient pris connaissance des dangers encourus. Les enfants ne doivent pas jouer avec l‘appareil. Le nettoyage et l‘entretien ne doivent pas être effectués par des enfants sans surveillance. -- Si le cordon d’alimentation est endommagé, il doit être remplacé par Philips, un centre de service autorisé par Philips ou un technicien qualifié afin d’éviter tout accident. -- Vérifiez toujours l‘appareil avant utilisation. Afin d‘éviter tout accident, n‘utilisez pas l‘appareil s‘il est endommagé. Remplacez toujours une pièce endommagée par une pièce du même type. Attention -- N‘utilisez pas cet appareil à d‘autres fins que celles pour lesquelles il a été conçu (voir le mode d‘emploi). -- Pour des raisons d‘hygiène, l‘appareil doit être utilisé par une seule personne. -- N‘utilisez jamais d‘air comprimé, de tampons à récurer, de produits abrasifs ou de détergents agressifs tels que de l‘essence ou de l‘acétone pour nettoyer l‘appareil. -- Retirez régulièrement les cheveux coupés du sabot pour cheveux. Si des cheveux se sont accumulés dans le sabot, retirez ce dernier et enlevez les cheveux en soufflant sur le sabot et/ou en le secouant. Champs électromagnétiques (CEM) 1 Pour réduire la longueur de coupe manuellement, desserrez les vis d‘un quart de tour (Fig. 7) avec un tournevis. Assurez-vous de seulement desserrer les vis et de ne pas les dévisser. 2 Déplacez la grille vers le haut jusqu‘au réglage (Fig. 8) de longueur souhaité. 3 Serrez les vis. Remarque : Lorsque vous desserrez ou serrez les vis, la grille peut se déplacer. Pour la conserver en position, tenez les côtés de la grille en place pendant que vous serrez les vis (Fig. 9). 4 La lame ne doit pas sortir de la grille. Pour le vérifier, allumez l‘appareil et regardez la lame et le grille de près, de préférence depuis l‘arrière. Si la lame sort de la grille, ajustez-la comme décrit ci-dessus. -- Cet Philips appareil est conforme à toutes les normes et à tous les règlements applicables relatifs à l‘exposition aux champs électromagnétiques. Informations d‘ordre général -- L‘appareil est conçu pour une tension secteur comprise entre 220 V et 240 V. Utilisation de l‘appareil Remarque : Assurez-vous que vos cheveux sont secs et propres. N‘utilisez pas l‘appareil sur des cheveux qui viennent d‘être lavés. Conseils et astuces -- Pour obtenir des résultats optimaux, déplacez l‘appareil dans le sens inverse de la pousse des cheveux. -- Dans la mesure où les poils ne poussent pas tous dans le même sens, vous devez adapter les mouvements de l‘appareil (vers le haut, le bas ou en travers). -- Effectuez plusieurs passages pour vous assurer que la tondeuse a coupé toutes les mèches rebelles. -- Assurez-vous que la partie plate du sabot est en contact avec le cuir chevelu pour obtenir une coupe régulière. -- Si vous souhaitez dessiner des contours, inclinez l‘appareil. Tailles de sabot Tailles de sabot en