
LX3900SA+LX3950W - DVD player PHILIPS - Free user manual and instructions
Find the device manual for free LX3900SA+LX3950W PHILIPS in PDF.
Download the instructions for your DVD player in PDF format for free! Find your manual LX3900SA+LX3950W - PHILIPS and take your electronic device back in hand. On this page are published all the documents necessary for the use of your device. LX3900SA+LX3950W by PHILIPS.
USER MANUAL LX3900SA+LX3950W PHILIPS
Important notes for users in the U.K. Mains plug This apparatus is fitted with an approved 13 Amp plug. To change a fuse in this type of plug proceed as follows:
Remove fuse cover and fuse.
Si dichiara che l’apparecchio LX3900SA/ LX3950W, Philips risponde alle prescrizioni dell’art. 2 comma 1 del D.M. 28 Agosto 1995 n. Fatto a Eindhoven Fix new fuse which should be a BS1362 5 Amp, A.S.T.A. or BSI approved type. If the fitted plug is not suitable for your socket outlets, it should be cut off and an appropriate plug fitted in its place. If the mains plug contains a fuse, this should have a value of 5 Amp. If a plug without a fuse is used, the fuse at the distribution board should not be greater than 5 Amp. Philips Consumer Electronics Philips, Glaslaan 2 5616 JB Eindhoven, The Netherlands Norge Typeskilt finnes på apparatens underside. Note: The severed plug must be disposed of to avoid a possible shock hazard should it be inserted into a 13 Amp socket elsewhere. Observer: Nettbryteren er sekundert innkoplet. Den innebygde netdelen er derfor ikke frakoplet nettet så lenge apparatet er tilsluttet nettkontakten. How to connect a plug The wires in the mains lead are coloured with the following code: blue = neutral (N), brown = live (L). For å redusere faren for brann eller elektrisk støt, skal apparatet ikke utsettes for regn eller fuktighet. ¶ As these colours may not correspond with the colour markings identifying the terminals in your plug, proceed as follows: – Connect the blue wire to the terminal marked N or coloured black. – Connect the brown wire to the terminal marked L or coloured red. – Do not connect either wire to the earth terminal in the plug, marked E (or e) or coloured green (or green and yellow). Before replacing the plug cover, make certain that the cord grip is clamped over the sheath of the lead - not simply over the two wires. Copyright in the U.K. Recording and playback of material may require consent. See Copyright Act 1956 and The Performer’s Protection Acts 1958 to 1972. CAUTION Use of controls or adjustments or performance of procedures other than herein may result in hazardous radiation exposure or other unsafe operation. VAROITUS Muiden kuin tässä esitettyjen toimintojen säädön tai asetusten muutto saattaa altistaa vaaralliselle säteilylle tai muille vaarallisille toiminnoille.
LASER Type Wave length Output Power Beam divergence Semiconductor laser GaAlAs 650 nm (DVD) 780 nm (VCD/CD) 7 mW (DVD) 10 mW (VCD/CD) 60 degree Manufactured under license from Dolby Laboratories. “Dolby”, “Pro Logic” and the double-D symbol are trademarks of Dolby Laboratories. Manufactured under license from Digital Theater Systems, Inc. US Pat. No. 5,451,942, 5,956,674, 5,974,380, 5,978,762 and other world-wide patents issued and pending. “DTS” and “DTS Digital Surround” are registered trademarks of Digital Theater Systems, Inc. Copyright 1996, 2000 Digital Theater Systems, Inc. All Rights Reversed. This product complies with the radio interference requirements of the European Community. DivX ®, DivX Certified, and associated logos are trademarks of DivXNetworks, Inc and are used under license. For Customer Use: Read carefully the information located at the bottom of your DVD VIDEO player and enter below the Serial No. Retain this information for future reference. Model No. DVD VIDEO LX3900SA/LX3950W Serial No. _______________ CAUTION
FAISCEAU This DVD player is in conformity with the EMC directive and low-voltage directive. ‘CONSUMERS SHOULD NOTE THAT NOT ALL HIGH
DEFINITION TELEVISION SETS ARE FULLY
COMPATIBLE WITH THIS PRODUCT AND MAY CAUSE ARTIFACTS TO BE DISPLAYED IN THE PICTURE. IN
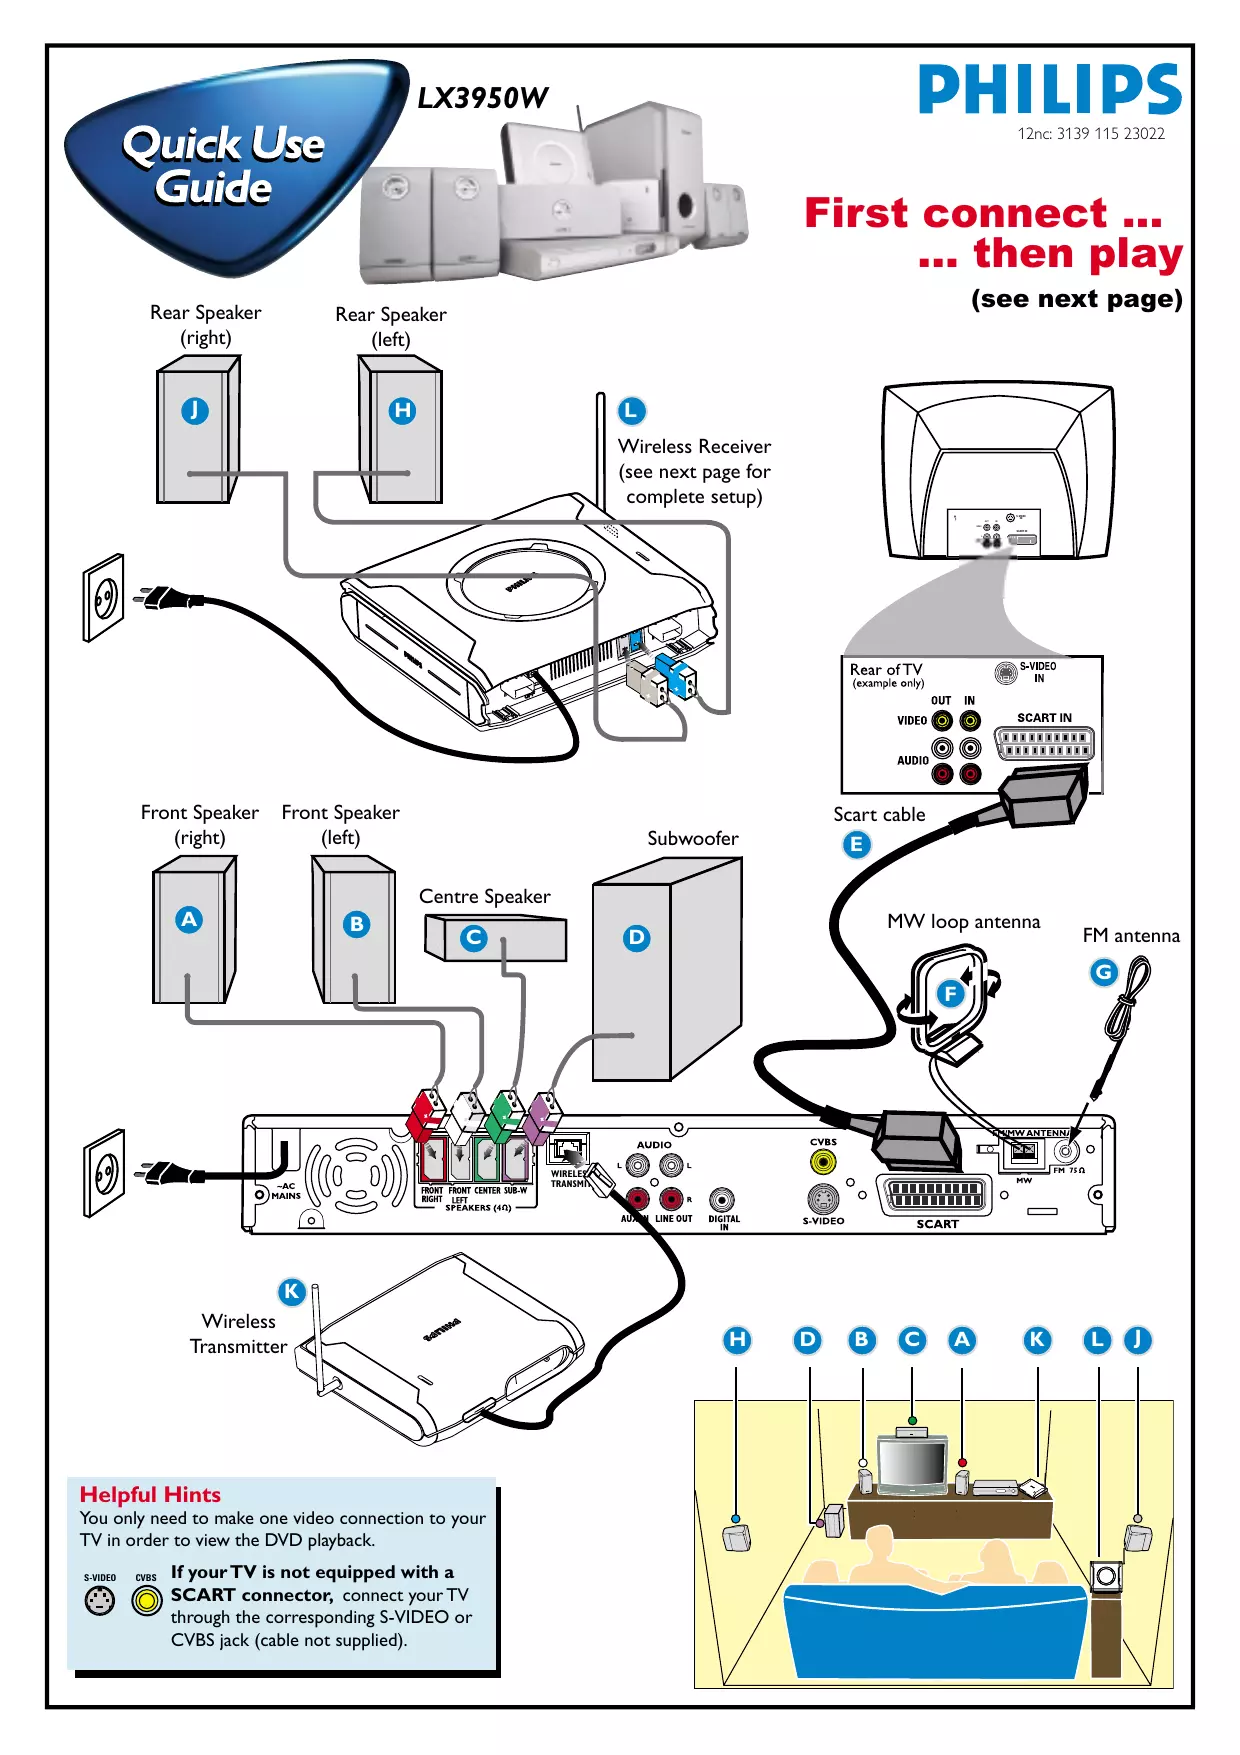
Français Glossaire LX3950W 12nc: 3139 115 23022 First connect ... ... then play Rear Speaker (right) (see next page) Rear Speaker (left)
Wireless Receiver (see next page for complete setup) S-VIDEO OUT
Front Speaker (right) Front Speaker (left) Scart cable
Wireless Transmitter Helpful Hints You only need to make one video connection to your TV in order to view the DVD playback. S-VIDEO CVBS If your TV is not equipped with a SCART connector, connect your TV through the corresponding S-VIDEO or CVBS jack (cable not supplied).
Wireless Receiver Setup Wireless System - Getting Started 1 Turn on your DVD system and play an audio CD (see ‘Playing a disc”).
Rear Speaker (Right) (Left) 2 Select same transmission frequency channel for both the wireless transmitter and receiver. The wireless system will automatically turn on when receiving an audio signal and vice versa.
On the wireless transmitter : The default preset frequency is (1). To select another transmission frequency, press and hold SOUND button on the remote until “FREQ X” (“X” = 1~4) appears on the DVD system display panel. Repeat the step again until you get the best frequency that obtains optimal reception.
On the wireless receiver : Adjust the Frequency Selector Switch 1~4 (fig 1), so that both units are using the same transmission frequency.
TIPS: – In case of sound distortion, please select another frequency for both the wireless transmitter and receiver. The distortion could be the result of interference caused by other equipment using same frequency channel in your house or neighborhood. – Extend the antennas vertically to improve the reception. Check the antennas are safely positioned without obstructions.
To ensure quality sound production and transmission: Place both the wireless transmitter and receiver at least 3 metres apart and off the ground (recommended minimum height of 30cm). Do not place them too close to TV, AC power adaptor or any radiation sources. Also note that audio may be interrupted due to the reflected waves when a person crosses or approaches the space between the transmitter and wireless speaker. table stand
Playing a disc ALL SUPER VIDEO Make sure your DVD system and TV are connected and turned on!
Press DISC on the remote control. You can also press the SOURCE button on the front panel until “DISC” appears on the display panel.
Turn on the TV and select the correct Video In mode. You should see the blue DVD background screen on the TV (if no disc in the DVD system).
Press OPEN•CLOSE 0 on the front of the DVD system and load a disc, then press OPEN•CLOSE 0 again to close the disc tray. Make sure the disc label is facing up. For double-sided discs, load the side you want to play face up.
Playback will start automatically. If a disc menu appears, use 3 4 1 2 buttons on the remote to make the necessary selection, then press OK to confirm. Or, use the numeric keypad on the remote to select features. Follow the instructions given in the disc menu. No picture? Check the AV (Audio/Video) mode on your TV.
Usually this channel is between the lowest and highest channels and may be called FRONT, A/V IN, or VIDEO. Or, you may go to channel 1 on your TV, then press the Channel down button repeatedly until you see the Video In channel. Or, your TV remote control may have a button or switch that chooses different video modes. See your TV manual for more details. To stop playback, press STOPÇ. Detailed playback features and additional functions are described in the accompanying owner’s manual. Guide de démarrage rapide Guía de utilización rápida Commencez par connecter ...