MUC11W12 - BOSCH - Free user manual and instructions
Find the device manual for free MUC11W12 BOSCH in PDF.
Download the instructions for your in PDF format for free! Find your manual MUC11W12 - BOSCH and take your electronic device back in hand. On this page are published all the documents necessary for the use of your device. MUC11W12 by BOSCH.
USER MANUAL MUC11W12 BOSCH
Register yo new devic ur MyBosch e on no get free b w and enefits: bosch-ho me.com/ welcome
This appliance is intended for domestic use only. Use the appliance only for processing normal amounts of food and for normal amounts of time in domestic use.
Do not exceed permitted maximum quantities (X “Cooking times” see page 31). The appliance is suitable for cooking, baking, roasting, braising, steam-cooking, frying, pasteurising and heating up food, as well as keeping food warm. The appliance should not be used for processing other substances or objects. Additional applications are possible if other accessories approved by the manufacturer are used. Only use the appliance with approved genuine parts and accessories. Only use the pan and the accessories with the basic appliance. All ingredients must be hygienically faultless. During handling, the rules of kitchen hygiene must be observed. Only use the appliance indoors at room temperature and up to 2000 m above sea level. Use the appliance with original accessories only.
Important safety notices
Read and follow the user manual carefully and keep for later reference! Enclose this manual when you give this appliance to someone else. If the instructions for correct use of the appliance are not observed, the manufacturer’s liability for any resulting damage will be excluded.
This appliance can be used by persons with reduced physical, sensory or mental capabilities or lack of experience and/or knowledge if they are given supervision or instruction concerning safe use of the appliance and if they understand the hazards involved. Keep children away from the appliance and connecting cable and do not allow them to use the appliance. Do not let children play with the appliance. Cleaning and user maintenance must not be performed by children. W Risk of electric shock and fire! ■ The appliance may only be connected to a power supply with alternating current via a correctly installed socket with earthing. Ensure that the protective conductor system of the domestic supply has been correctly installed. ■ Connect and operate the appliance only in accordance with the specifications on the rating plate. Do not use if the mains cable or appliance show any signs of damage. To prevent hazards, the appliance may only be repaired by our customer service. If the power 21
Important safety notices
cord of this appliance is damaged, it must be replaced with a special connection cord, which is available from our customer service.
■ Never connect the appliance to timer switches or remote-controllable sockets. Never leave the appliance unattended while it is switched on! ■ Do not place the appliance on or near hot surfaces, e.g. hobs. The power cord must not come into contact with hot parts or be pulled across sharp edges. ■ Never immerse the base unit in water or place it in the dishwasher. Do not steam-clean the appliance. Do not use the appliance with damp hands. ■ It must always be disconnected from the mains after each use, whenever the appliance is unsupervised, prior to assembly, disassembly or cleaning and in the event of an error. W Risk of injury! ■ Do not insert the mains plug until all preparations for working with the appliance are complete. W Risk of burns! ■ During operation, the appliance must never be used without the pan inserted. The housing, pan and metallic components heat up while the appliance is in use! ■ The pan and the accessories may only be removed using the tools provided. Use oven gloves. ■ Hot steam is generated in the appliance. Do not lean over the appliance. Open the lid with care. Do not lean over the lid of the appliance. Only transport or clean the appliance once it has fully cooled down! W Risk of suffocation! Do not allow children to play with packaging material. W Risk of fire! ■ Never plug the appliance in if there are still accessories or other objects in the pan. ■ If an unwanted programme starts running, press button H to stop the programme and to enter standby mode. W Important! ■ After usage or cleaning, with the pan removed, allow the appliance to dry for at least 30 minutes with the lid open to prevent the formation of condensation. ■ It is essential to clean the appliance thoroughly after each use or after it has not been used for a long period. X “Cleaning and maintenance” see page 28 22
Congratulations on the purchase of your new Bosch appliance. In doing so, you have opted for a modern, high-quality domestic appliance. On the following pages of these operating instructions you will find useful information for safe use of this appliance. We request that you read these operating instructions carefully and observe all instructions. This ensures you will be able to enjoy this appliance for a long time, and the results will confirm your choice of this appliance. Retain these operating instructions for subsequent use or for the next owner. You can find further information about our products on our website.
Fig. A Multicooker (basic appliance)
Control panel Lid Opening button for the lid Removable steam outlet Mains connection Pan with non-stick coating Removable lid insert Steamer insert Pan tongs Mains cable
Accessories (available separately)
12 MAZ0FB deep frying basket
The control panel consists of controls
(buttons) and indicators (LEDs). The buttons can be used to select the individual preparation programmes and adopt the different setting options (e.g. preparation temperature and time). The settings are indicated via the illuminated LEDs and the display. X Fig. B Controls B Standby
D E G A C F H Selection of a preparation programme
Adapting the pre-configured preparation time short medium long Start programme Setting the start time delay Setting an individual preparation temperature Setting an individual preparation time Deleting a setting or stopping the programme
Before using for the first time
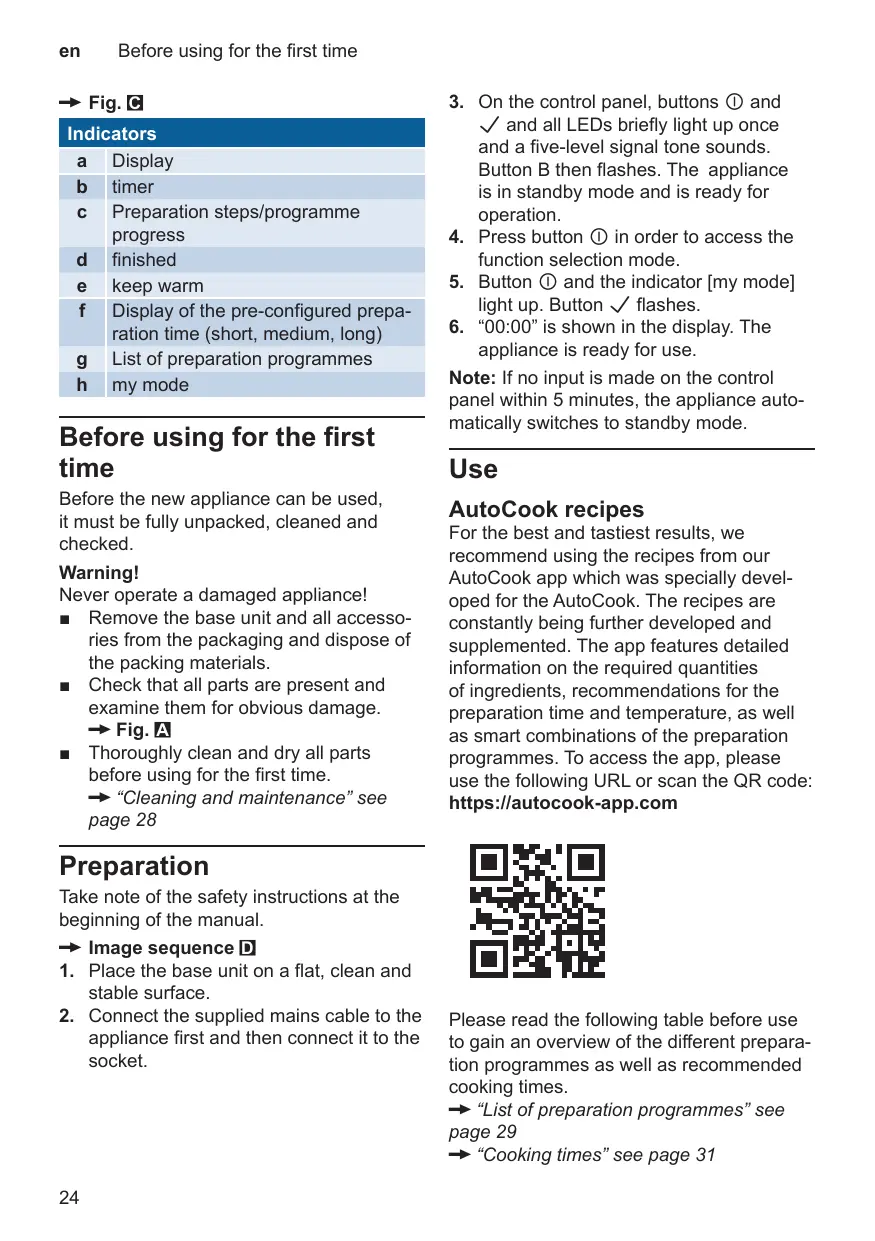
X Fig. C Indicators a Display b timer c Preparation steps/programme progress d finished e keep warm f Display of the pre-configured preparation time (short, medium, long) g List of preparation programmes h my mode
Before using for the first time
Before the new appliance can be used, it must be fully unpacked, cleaned and checked.
Warning! Never operate a damaged appliance! ■ Remove the base unit and all accessories from the packaging and dispose of the packing materials. ■ Check that all parts are present and examine them for obvious damage. X Fig. A ■ Thoroughly clean and dry all parts before using for the first time. X “Cleaning and maintenance” see page 28
3. On the control panel, buttons B and
G and all LEDs briefly light up once and a five-level signal tone sounds. Button B then flashes. The appliance is in standby mode and is ready for operation. 4. Press button B in order to access the function selection mode. 5. Button B and the indicator [my mode] light up. Button G flashes. 6. “00:00” is shown in the display. The appliance is ready for use. Note: If no input is made on the control panel within 5 minutes, the appliance automatically switches to standby mode.
For the best and tastiest results, we recommend using the recipes from our
AutoCook app which was specially developed for the AutoCook. The recipes are constantly being further developed and supplemented. The app features detailed information on the required quantities of ingredients, recommendations for the preparation time and temperature, as well as smart combinations of the preparation programmes. To access the app, please use the following URL or scan the QR code: https://autocook-app.com
Take note of the safety instructions at the beginning of the manual.
X Image sequence D 1. Place the base unit on a flat, clean and stable surface. 2. Connect the supplied mains cable to the appliance first and then connect it to the socket.
Please read the following table before use to gain an overview of the different preparation programmes as well as recommended cooking times.
X “List of preparation programmes” see page 29 X “Cooking times” see page 31
Some programmes consist of several programme steps. The respective programme step is shown in the display. Once a step is finished, a recurring signal tone sounds and the display and button G flash. Add ingredients depending on the recipe, and press button G again. The following preparation step will start. Depending on the programme selection or the preparation step, the lid should be closed or open. Please see the AutoCook app for more details here.
Selecting and starting the programme
– Do not fill the pan beyond the marking [4.0 litres]! – Use only plastic utensils for stirring (do not use metal utensils). Important: Take note of the safety instructions at the beginning of the manual. X Image sequence E 1. Keep pressing button D until the desired preparation programme is selected. The corresponding LED lights up in the control panel and the pre-configured preparation time for the selected preparation programme flashes. 2. Press button E to change the pre-configured preparation time. The display changes from [medium] to [long] and then to [short ] before returning to [medium]. The pre-configured preparation time is shown in the display. 3. Open the lid and add the required ingredients depending on the recipe. 4. Depending on the preparation programme, close the lid. 5. Press button G to start the preparation programme. 6. The appliance heats up the pan until the target temperature is reached. During the heating phase, lines that light up in a clockwise direction appear in the display.
7. Once the target temperature is reached, the lines go out and the remaining preparation time is shown in the display.
Note: For programmes with several preparation steps, once the target temperature has been reached or once the preparation step is completed, a signal tone sounds. Add further ingredients and press button G to start the next preparation step. 8. When the preparation programme ends, a signal tone sounds, and the indicator [finished] and button G light up. The display flashes and shows “00:00”. Note: For some programmes, once complete, the keep warm function is automatically activated. The indicator [keep warm] lights up. 9. Press button B to switch to standby mode. Disconnect the mains plug. 10. Serve the finished dish and let the appliance cool down completely. ■ Once it has cooled down completely, clean all of the parts. X “Cleaning and maintenance” see page 28
Prematurely terminating the current preparation step
If the ingredients are cooked ahead of time during one of the preparation steps, the step can also be terminated manually.
■ Press button G for at least 2 seconds. ■ This will terminate the current preparation step. A signal tone will then sound once the next step can be carried out. ■ In the control panel, LEDs 1, 2, 3 or 4 are shown accordingly and button G flashes. ■ Press button G to start the next preparation step.
Prematurely terminating the preparation programme
■ Press button H to end the preparation programme.
Changing presettings
Manual cooking with individual settings for the preparation time and temperature.
■ Once the appliance has been switched on, in function selection mode, button B and the indicator [my mode] are permanently lit. Button G flashes. “00:00” lights up in the display. ■ Press button F once. “00:00” flashes in the display. ■ Keep pressing, or press and hold, button F until the desired preparation time is displayed. ■ Press button C once. “00c” flashes in the display. ■ Keep pressing, or press and hold, button C until the desired preparation temperature is displayed. ■ Press button G to start or continue the preparation programme with the individual values. ■ The appliance heats up the pan until the target temperature is reached. ■ Once the target temperature is reached, the lines go out and the preparation time is shown in the display. The preparation process starts automatically.
Changing presettings
Depending on the programme, the pre-configured values for temperature, time or start time delay can be changed according to your individual needs.
The values are set by pressing the applicable button. The values will change faster if the button is pressed and held down. Once the maximum value of a setting has been reached, the display will jump back to the minimum value.
Setting a start time delay
Depending on the preparation program, the time until the programme is started can be set.
■ Select the preparation programme. ■ Press button A. Button G flashes. A pre-configured value flashes in the display. 26
■ Pressing button A increases the time displayed.
■ Press button G when the desired start time delay is displayed. ■ The desired start time delay is shown in the display. [timer] lights up in the display. ■ The time until the start counts down. The preparation process starts automatically after this. Please note: ■ The start time delay can be switched off at any time by pressing button G. The preparation programme then starts immediately. ■ If a pre-configured time does not flash in the display, a start time delay cannot be set for the selected preparation programme.
Setting the preparation temperature
The temperature can be individually changed either before or during preparation.
■ Before preparation: In function selection mode, keep pressing button D until the desired preparation programme is selected. ■ Press button C once. The pre-configured preparation temperature flashes in the display. ■ During preparation: Press and hold button C. The current preparation temperature is briefly shown on the display. ■ Change the values: Press button C repeatedly, or press and hold it until the desired preparation temperature is reached. ■ Press button G to start or continue the preparation programme with the individual values. Note: If button G is not pressed, the preparation programme will continue with the temperature that was previously set.
Special applications en
Setting the preparation time
■ Before preparation:
In function selection mode, keep pressing button D until the desired preparation programme is selected. ■ Press button F once. The pre-configured preparation time flashes in the display. ■ During preparation: Press and hold button F. The current preparation time is briefly shown in the display. ■ Change the values: Press button F repeatedly, or press and hold it until the desired preparation time is reached. ■ Press button G to start or continue the preparation programme with the individual values.
Special applications
Steam-cooking with the steamer insert For the steam-cooking of vegetables, meat or fish. The 2-part steamer insert enables different ingredients to be steamed separately at the same time (e.g. vegetables in the bottom section and fish in the top section).
Important: Take note of the safety instructions at the beginning of the manual.
X Image sequence F 1. In function selection mode, select the preparation programme [steam]. Change the pre-configured values if needed. X “Changing presettings” see page 26 2. Fill the pan with water up to the mark [0.5 J] (0.5 litres) as the maximum. 3. Hang the bottom section of the steamer insert in the pan. 4. For steam-cooking different ingredients, fill the bottom section up to the lower edge. 5. Position the top part and add additional ingredients. 6. Close lid. Press button G to start the preparation programme.
7. Once the preparation programme ends, a signal tone sounds. Open the lid of the appliance.
8. Lift the top section and the bottom section of the steamer insert out of the pan.
For the frying of meat, fish, vegetables, etc. in hot oil or fat.
Important: Take note of the safety instructions at the beginning of the manual. ■ In function selection mode, select the preparation programme [soft fry]. Change the pre-configured values if needed. X “Changing presettings” see page 26 ■ Fill the pan with oil or deep-frying fat up to the marking [1.0 I] (1 litre) as the maximum. ■ Close lid. ■ Press button G to start the preparation programme. ■ The oil is heated. Once the target temperature is reached, a signal tone sounds and button G flashes. ■ Open the lid of the appliance. ■ Using a ladle, carefully place no more than 200 g of frozen food or 300 g of non-frozen food for deep frying in the pan. ■ Do not close the lid. ■ Press button G to start the next preparation step. ■ Once the preparation programme ends, a signal tone sounds. Note: For more simple frying, Bosch has a frying basket available as an accessory.
Art. no: MAZ0FB Sous-vide cooking
Sous-vide cooking is a method of cooking under a vacuum at low temperatures.
Sous-vide cooking is a gentle, low-fat method of preparing meat, fish, vegetables and desserts. A vacuum-packing machine is used to heat-seal the food in a special airtight, heat-resistant cooking bag.
Sous-vide cooking is a method of cooking at low temperatures. As a result, it is important that you always follow the application and hygiene instructions below: ■ Use only fresh, good-quality food. ■ Wash and disinfect your hands. Use disposable gloves or cooking/grill tongs. ■ Take extra care when preparing critical food, such as poultry, eggs and fish. ■ Always prepare poultry at min. 65°C. ■ Always thoroughly rinse and/or peel fruit and vegetables. ■ Always keep work surfaces and chopping boards clean. Use different chopping boards for different types of food. ■ Maintain the cold chain. Make sure that you only interrupt it briefly to prepare the food, and then return the food in its vacuum-sealed bag to the refrigerator for storage before you cook it. ■ Food is suitable for immediate consumption only. Once the food is cooked, consume it immediately. Do not store it after cooking – not even in the refrigerator. It is not suitable for reheating.
■ When using the sous-vide cooking method, only use heat-resistant vacuum-sealing bags designed for this purpose. ■ Do not cook the food in the bag you bought it in (e.g. portions of fish). These bags are not suitable for sous-vide cooking.
Important: Take note of the safety instructions at the beginning of the manual.
■ Use a chamber vacuum-sealing machine that can create a vacuum of at least 99% to vacuum-seal the food. This is the only way to achieve even heat transfer and therefore a perfect cooking result. Notes: ■ The maximum capacity for sous-vide cooking is 3 l. After the food is added, the water level in the pan should not exceed 3 l. ■ Make sure you put the lid on whenever using the sous-vide cooking method. 28
The child lock can be activated and deactivated during a preparation process. If the child lock has been activated, all buttons on the appliance are locked and settings can no longer be made on the appliance.
W Warning When the child lock is active, the preparation processes cannot be changed or terminated. The child lock must be deactivated first. ■ Activate Press and hold buttons C and F simultaneously for 3 seconds. A short signal tone sounds. The child lock is now active. ■ Deactivate Press and hold buttons C and F simultaneously for 3 seconds once again. A short signal tone sounds. Now the child lock is deactivated.
Cleaning and maintenance
The appliance and the parts used must be thoroughly cleaned after each use.
– Do not use any cleaning agents containing alcohol or spirits. – Do not use any sharp, pointed or metal objects. – Do not use abrasive cloths or cleaning agents. – Allow the appliance to cool down completely before cleaning it. X Image sequence G 1. Open the lid. Remove the pan with the pan tongs. 2. Remove the lid insert. 3. Remove the steam outlet. 4. Disassemble the steam outlet.
Cleaning the base unit
■ Wipe the housing and the interior of the appliance with a soft, damp cloth and dry off.
■ Clean the control panel using a dry micro-fibre cloth.
Cleaning the lid insert, steam outlet, pan and accessories
■ Clean the individual parts with a detergent solution and a soft cloth or sponge.
■ Rinse with clean water and dry off. Note: The pan, pan tongs and steamer inserts can also be put in the dishwasher. Warning! Before inserting the pan, check that the appliance interior is dry and clean and that there are no objects present in the appliance interior.
Dispose of packaging in an environ mentallyfriendly manner. This appliance is labelled in accordance with European Directive 2012/19/EU concerning used electrical and electronic appliances (waste electrical and electronic equipment – WEEE).
The guideline determines the frame work for the return and recycling of used appliances as applicable throughout the EU. Please ask your specialist retailer about current disposal facilities.
The guarantee conditions for this appliance are as defined by our representative in the country in which it is sold. Details regarding these conditions can be obtained from the dealer from whom the appliance was purchased. The bill of sale or receipt must be produced when making any claim under the terms of this guarantee.
List of preparation programmes
AutoCook offers you a total of 48 preparation programmes. These consist of 16 basic programmes, each with 3 time setting options. The following table and the brief description contain the most important data for different preparation programmes.
Programme my mode Customised setting for the desired temperature and preparation time warm up Warming up cold (pre-cooked) meals soup Preparing soups and stews
Number of preparation steps
Open / closed * G medium: 2 long: 2 * Depending on the recipe / preparation step – Please see the AutoCook app for notes on correct use of the programmes and for information on ingredients, quantities and cooking times.
List of preparation programmes
Steam-cooking vegetables, meat and fish (steamer insert required) stew Stewing vegetables, meat and fish. fry Frying vegetables, meat and fish. soft fry Soft frying of small amounts (e.g. meat, fish, pastries, ...). Not suitable for frozen ingredients. baking Baking food cooking Cooking food porridge Preparing dairy foods rice Cooking cereals or rice jam Preserving fruit as jams legumes Cooking beans
Number of preparation steps
— Closed Gently cooking foods in a vacuum bag risotto 3 Open / closed * G Preparing risotto pasta 1 — Closed / Cooking pasta dishes open* yogurt 1 — Closed Preparing yogurt * Depending on the recipe / preparation step – Please see the AutoCook app for notes on correct use of the programmes and for information on ingredients, quantities and cooking times.
The following table contains an overview of the cooking times for various dishes. The following cooking times depend on the thickness and consistency of the foods and should be viewed as recommendations for minimum times. Adjust cooking times accordingly. With frozen food extend the cooking time by at least 20%.
short medium short medium short short medium medium medium
30 mins 10 mins 30 mins 5 mins 3 mins 30 mins 30 mins 30 mins
Cauliflower (same-sized florets) Potatoes (medium-sized, whole) Fish fillet Meatballs Eggs Dumplings Broccoli Peas Carrots Chicken breast Beetroot (medium-sized, whole) White, medium grain rice (side dish) White, medium grain rice (side dish) Black rice
medium short medium short short short
10 mins 20 mins 10 mins 10 mins 10 mins
Recommended quantity
(maximum) 500 g (800 g) 500 g (800 g) 500 g (1200 g) 500 g (1000 g) 500 g (700 g) 8 (12) 500 g (600 g) 500 g (800 g) 500 g (800 g) 500 g (800 g) 500 g (800 g) 500 g (800 g) 500 g rice, 700 ml water 250 g rice, 500 ml water 500 g rice, 500 ml water 250 g rice, 350 ml water 250 g round grain rice, 1000 ml milk, 100 g sugar 125 g round grain rice, 500 ml milk, 50 g sugar 300 g 200 g 300 g 200 g 200 g 200 g
short + short long medium long medium medium medium short
Recommended quantity
Raw vegetables (e.g.
10 mins + 10 mins cauliflower) baking 60 mins Shoulder of pork 1500 g 40 mins Meat loaf 800 g 60 mins Cake 500 g fry 15 mins Vegetables 300 g 15 mins Fish 200 g 15 mins Meat 500 g 200 g Manual setting: Onions 5 mins sous vide 1) short, 60°C 60 mins Fillet of beef (rare) After adding the food, the water level in medium, 65°C 50 mins Fillet of beef (medium) the pan should not medium, 70°C 45 mins Fillet of beef (well done) exceed 3.0 l. short, 60°C 30 mins Fish (salmon) medium, 65°C 60 mins Poultry (chicken breast) long, 85°C 60 mins Asparagus long, 85°C 80 mins Potatoes long, 85°C 100 mins Root vegetables 1) Special hygiene measures must be observed when using the sous vide cooking method. Please pay particular attention to the safety instructions and the recommendations for preparation! X “Sous vide cooking” see page 27
Problem The prepared meal is half-raw.
The prepared meal is burnt.
Filled beyond capacity.
Do not fill the pan beyond the marking [4.0 litres]! Adjust the ratio of the amount of water and the ingredients. Remove all foreign objects. Do not use any water for this purpose! Contact customer service.
The ratio of the amount of water and the ingredients is incorrect.
Foreign objects in the appliance interior. The pan is deformed. Fault in the appliance. Fault in the sensor. There is dirt underneath the pan. Thoroughly clean the pan and the appliance interior. The pan is deformed. Contact customer service. Fault in the appliance. Fault in the sensor.
Problem The appliance boils over.
Filled beyond capacity. The temperature is too high. The selected preparation programme requires the meal to be cooked with the lid open. LED does not light up. The appliance is switched off. Fault in the power cord. The hotplate does not function. Fault in the appliance. The hotplate is damaged. Water is flowing out of the The appliance features overflow appliance. protection. Display screen E1~E5
Fault in the appliance.
Adjust the amount. Reduce the temperature. Open the lid of the appliance. Switch on the appliance. Contact customer service. Contact customer service. Remove the water. Remove the pan and use a cloth to rub the appliance interior dry. Ensure that no water enters the appliance interior. Abort the preparation programme. Disconnect the appliance from the power supply. Switch the appliance on again. Please contact customer service if the problem persists.
If you are unable to solve the problem, always call the hotline!
You will find the telephone numbers at the back of these instructions.
Conformité d’utilisation
Conformité d’utilisation
short (court) : 1 G medium (moyen) :
short (court) : 1 G medium (moyen) :
2 long (long) : 2 1 —
moyen court moyen court court court court + court
(Vapeur + Frire doux) baking (Cuisson) fry (Rissoler)
Media Corta Media Corta Corta Media Media Media
Corta Media Corta Corta
Media Lunga Media Media Media Corta
(stoomkoken + licht frituren) baking (bakken)
Thank you for buying a
Bosch Home Appliance! Register your new device on MyBosch now and profit directly from: • • • • •
Expert tips & tricks for your appliance
Warranty extension options Discounts for accessories & spare-parts Digital manual and all appliance data at hand Easy access to Bosch Home Appliances Service
Free and easy registration – also on mobile phones: www.bosch-home.com/welcome
You´ll find it here. Expert advice for your Bosch home appliances, need help with problems or a repair from Bosch experts. Find out everything about the many ways Bosch can support you: www.bosch-home.com/service Contact data of all countries are listed in the attached service directory.