
ST 40L - Audio Receiver MARANTZ - Free user manual and instructions
Find the device manual for free ST 40L MARANTZ in PDF.

| Product Type | Audio Receiver |
| Brand | Marantz |
| Model | ST 40L |
| Dimensions (W x H x D) | 440 x 72 x 290 mm |
| Maximum dimensions (W x H x D) | 440 x 87 x 300 mm |
| Net weight | 2.9 kg |
| Included accessories | AM loop antenna, FM antenna, RCA cable, remote control cable |
| Power supply | Mains 220-240 V, 50/60 Hz |
| FM frequency range | 87.5 - 108 MHz |
| AM frequency range | 520 - 1710 kHz |
| Audio outputs | Line out (RCA), headphone out |
| Audio inputs | Line in (RCA) |
| Main functions | AM/FM reception, manual and automatic tuning, digital display, headphone jack |
| Maintenance and cleaning | Clean the device with a soft, dry cloth. Do not use abrasive products. |
| Safety | Do not expose to humidity, water droplets or splashes. Disconnect before cleaning. |
| Spare parts and repairability | Contact a Marantz authorized service center for any repair or spare part. |
| Certifications | CE, RoHS |
Frequently Asked Questions - ST 40L MARANTZ
User questions about ST 40L MARANTZ
0 question about this device. Answer the ones you know or ask your own.
Ask a new question about this device
Download the instructions for your Audio Receiver in PDF format for free! Find your manual ST 40L - MARANTZ and take your electronic device back in hand. On this page are published all the documents necessary for the use of your device. ST 40L by MARANTZ.
USER MANUAL ST 40L MARANTZ
Be sure to read this section before any connection to the mains supply.
WARNINGS
Never expose the equipment to rain or moisture.
Never remove the equipment's cover.
Never insert anything into the equipment's vents.
Never handle the mains lead while your hands are wet.
EQUIPMENT MAINS WORKING SETTING
This Marantz product is available in two different variations, depending on geographical area. One variation has a preset mains voltage (230V for General Europe model and U.K. model), while the other variation features variable voltage that can be selected using a voltage selector on rear panel (115V/230V).
The voltage selector must be set for your local mains voltage before any connection to the mains supply. If you need to change its voltage setting, consult your dealer your local Marantz service provider.
IMPORTANT: (FOR U.K. MODEL)
This apparatus is fitted with an approved moulded 13 Amp plug.
To change a fuse in this type of plug proceed as follows:
- Remove fuse cover and fuse.
- Fix new fuse which should be a BS1362 5A, A.S.T.A. or BSI approved type.
- Refit the fuse cover.
If the fitted plug is not suitable for your socket outlets, it should be cut off and an appropriate plug fitted in its place.
If the mains plug contains a fuse, this should have a value of 5A. If a plug without a fuse is used, the fuse at the distribution board should not be greater than 5A.
NOTE:
The severed plug must be destroyed to avoid a possible shock hazard should it be inserted into a 13A socket elsewhere.
HOW TO CONNECT A PLUG (FOR U.K. MODEL)
The wires in the mains lead are coloured in accordance with the following code:
BLUE—“NEUTRAL”(“N”)
BROWN—"LIVE" ("L")
- The BLUE wire must be connected to the terminal which is marked with the letter "N" or coloured BLACK.
- The BROWN wire must be connected to the terminal which is marked with the letter "L" or coloured RED.
- Do not connect either wires to the earth terminal in the plug which is marked by the letter "E" or by the safety earth symbol 12 or coloured green or green-and-yellow.
Before replacing the plug cover, make certain that the cord grip is clamped over the sheath of the lead—not simply over the two wires.
COPYRIGHT
Recording and playback of any material may require previous consent. Refer to the following for further information.
— Copyright Act 1956
— Dramatic and Musical Performers Act 1958
— Performers Protection Acts 1963 and 1972
— Any subsequent statutory enactments and orders
INTRODUCTION
Thank you for selecting the Marantz ST4000 FM/AM Stereo Tuner for your system.
Please read these operating instructions carefully. We recommend that you read the entire user guide before you attempt to connect or operate the Tuner.
After you have reviewed the contents of this manual, we suggest that you make all system connections before you attempt to operate the unit.
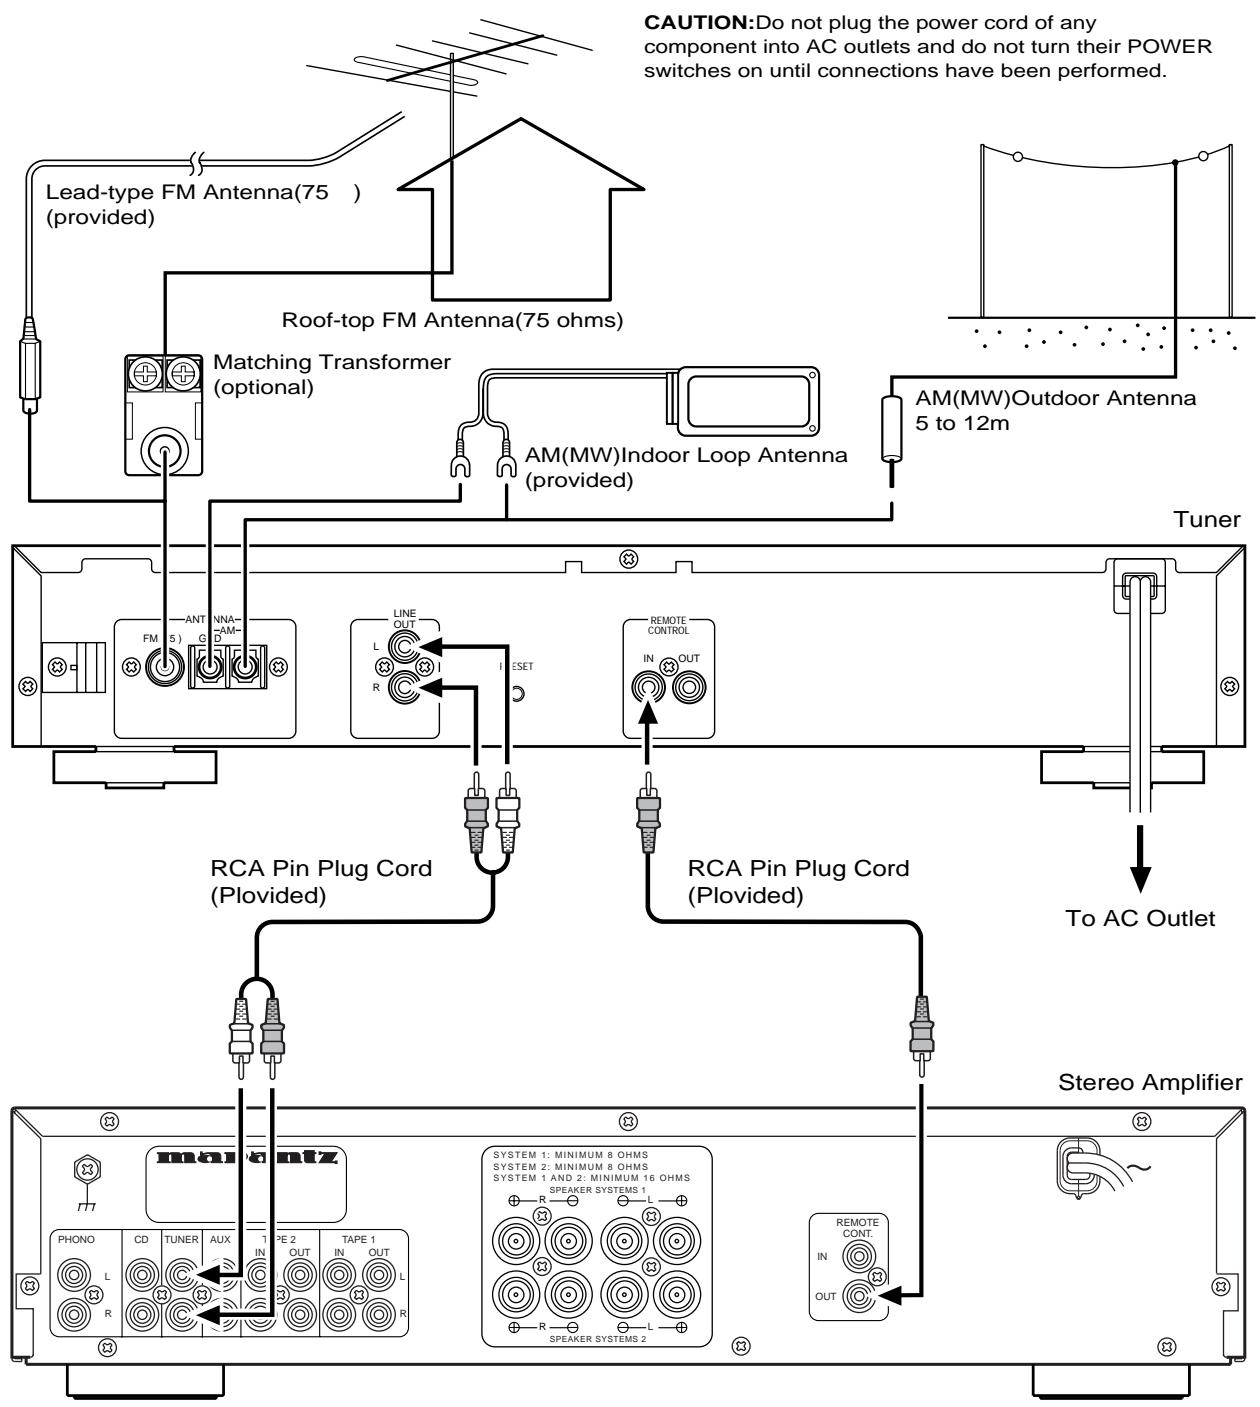
Refer to the figures on the pages at the back of this user's guide. The callout numbers on the figures correspond to those found in the text. All references to the connections and controls that are printed in BOLD type are as they appear on the unit.
INSTALLATION
Remember the following important points when installing the Tuner.
- Do not expose the component to rain or moisture, as this may cause damage to the Tuner.
- Prevent extra heat from reaching the unit. Never put the Tuner in the full glare of the sun or near a heat source.
PRECAUTIONS
The following precautions should be taken when operating the equipment.
GENERAL PRECAUTIONS
When installing the equipment ensure that:
— air is allowed to circulate freely around the equipment.
— it is placed on a vibration-free surface.
— it will not be exposed to excessive heat, cold, moisture or dust.
— it will not be exposed to direct sunlight.
— it will not be exposed to electrostatic discharges.
In addition, never place heavy objects on the equipment.
If a foreign objector water does enter the equipment, contact your nearest dealer or service center.
Do not pull out the plug by pulling on the mains lead; grasp the plug itself.
It is advisable when leaving the house, or during a thunderstorm, to disconnect the equipment from the AC outlet.
ST4000 FEATURES
- 60-station (FM30, AM30) preset memory with auto preset memory function.
- Up to 120-minute sleep timer.
• Radio Data System. (Europe version only) - Timer ON/OFF.
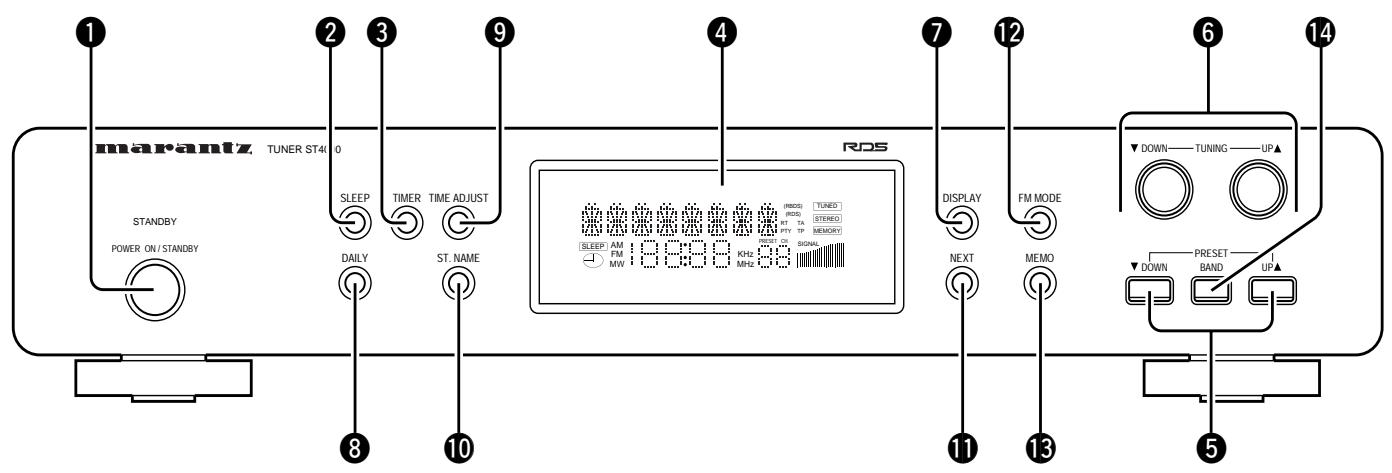
CONTROLS AND THEIR FUNCTIONS (See page 50)
① POWER (STANDBY/ON) Button
② SLEEP Button
③ TIMER Button
Press this button with DAILY preset and the indicator will shown on the display.
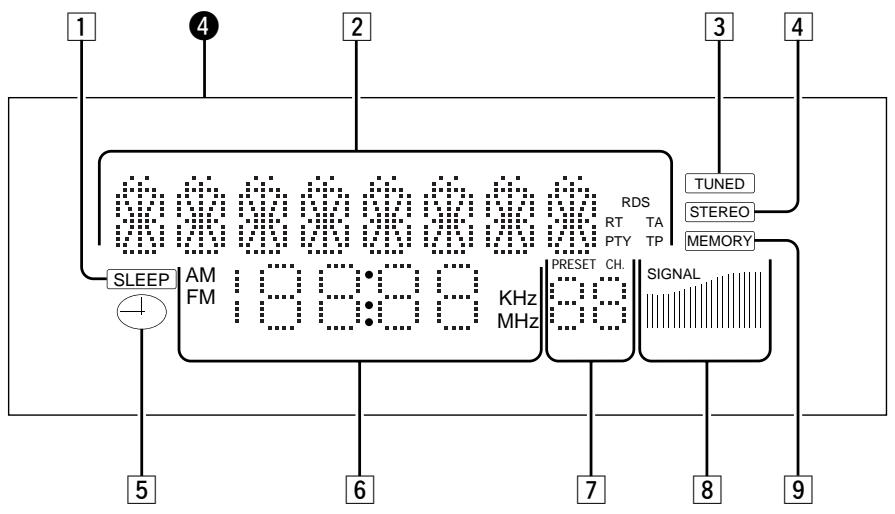
4 Multi-function Display
1 SLEEP Indicators
2 RDS, FILE, SLEEP TIME mode Indicators
- RDS: PS, PTY DATA will be displayed, and RDS indicator lights.
- FILE: Alphabets, symbols, and numbers will be displayed when you write a broadcasting name with File Button (up to 4 letters).
- Timer mode: When the DAILY function is programmed, the daily ON/OFF times will be shown in the display.
3 Tuned Indicator
This indicator lights when correctly tuned to a broadcast.
4 STEREO Indicator
This indicator will light up when FM stereo broadcasting is received.
5 TIMER Indicator
6 Frequency mode, TIME Indicator
- The frequencies of FM, AM (MW) will be displayed.
- Hour, Minute: When you program current time, DAILY, the times of On/Off, and the hour and minute of CT among RDS will be displayed.
7 Channel Display
The channel number selected by use of the PRESET UP/DOWN button will be shown in the display.
8 Signal Indicator
The reception status of the broadcasting.
9 MEMORY Indicator
⑤ PRESET UP/DOWN Buttons
- Broadcast Memory function: Each time you press the PRESET UP/DOWN button briefly (for 0.5 second or less), you can listen to broadcasts in a programmed sequence. This function is used to memorize FM or AM (MW) broadcasting, or to select memorized broadcasts.
⑥ TUNING UP/DOWN Buttons (▼/▲)
Used to select the broadcast you want to listen to or adjust the current time, DAILY, SLEEP presets, etc.
⑦ DISPLAY Buttons
1) The button works only when you receive FM broadcasting stations, and is used to set the RDS mode.
2) Press the button longer than 1 second, and PTY search will become operable.
8 DAILY Button
⑨ TIME ADJUST Button (See page 5)
⑩ ST. NAME Button (See page 5)
⑪ NEXT Step Button (See page 5)
12 FM MODE Button
Used to select stereo or mono when listening to FM broadcasts.
NOTES:
-
The AM scan step can be changed by pressing the FM MODE buttons simultaneously for 5 seconds. (overseas version only)
13 MEMORY Button -
MANUAL: To preset FM or AM (MW) in the system, pres briefly (0.5 second or less).
- AUTO: When you press the button for long (more than 0.5 second), FM or AM (MW) broadcasting will automatically be preset in the system.
14 BAND selector Button
Press the button to switch between FM and AM (MW) bands.
OPERATIONS
HOW TO ADJUST CURRENT TIME
You can adjust the current time even if the system power is off.
Time adjustment (for example: 11:35)
- Press the TIME ADJUST button. (Clock section will be shown on the display.)
- Set hour (11) by pressing the TUNING (▼/▲) buttons.
- Press the NEXT button. (Minutes signal blinks on the display.)
- Set minute (35) by pressing the TUNING (▼/▲) buttons.
- Pressing the TIME ADJUST button or NEXT button completes the adjustment.
HOW TO PRESET BROADCASTS
Press the BAND button to select the broadcast band.
Manual Memory Presetting
1. TUNING
Select the broadcast frequency you want to memorize by pressing the TUNING UP/DOWN button.
2. PRESET CALL
Press the MEMO button briefly (for 0.5 second or less).
Select the channel you want by pressing the PRESET UP/DOWN button while the "MEMORY" indicator lamp is blinking.
3. MEMORY
Press the MEMO button to memorize the broadcast.
- You can preset up to 30 FM and 30 AM (MW) channels.
Automatic Memory Presetting
1. MEMORY
Press the MEMO button for long (for more than 0.5 second).
Whenever the next highest broadcast frequency is selected, the selected broadcast is preset automatically.
2. PRESET CALL
Check the preset broadcast by pressing the PRESET UP/DOWN button.
NOTES:
- In FM Automatic Memory Presetting, frequency is automatically memorized. The setting which has better reception will be preset first.
- If the new broadcast channel is preset to a channel, the channel which had been preset to that position earlier will be automatically erased.
- It is impossible to preset automatically in areas far away from the broadcast station or in mountain areas where received signals are weak.
HOW TO MEMORIZE BROADCASTING STATION NAME
If only a frequency is preset, fill in the station name using manual or automatic memory presetting.
(Example) FM 98.80 MHz 3ch, Station name: BBC 1
- Press the BAND button.
Select the FM band.
2. TUNING
Set 98.80 MHz by pressing the TUNING button.
3. ST. NAME
Press the ST. NAME button.
“---” or the station name preset last will be shown on the display. Preset the station name, “BBC 1”.
(1) B fi B ---: after setting "B" by pressing the TUNING button when the first signal blinks, press the NEXT button.
(2) Preset “B, B, C, 1” as in step (1) above.
4. MEMORY
Press the MEMO button briefly (0.5 second or less).
(The "MEMORY" indicator blinks.)
5. PRESET CALL
After setting "03" by pressing the PRESET UP/DOWN button, press the MEMO button briefly once more.
• BBC1 FM 98.80 MHz 03 has been just preset.
NOTES:
- File content: A, B, C … X, Y, Z (alphabet) 0, 1, … 8, 9 (number), blank
- Current time will not be displayed if the station name has already been preset.
HOW TO USE SLEEP FUNCTION
Sleep programming is used to preset the time to turn off system power while listening to music.
-
Press the SLEEP button.
"SLEEP 120" is shown on the front display. -
Each press of the button changes the time indication by 10 minutes.
(Released condition)
fi SLEEP 120 fi SLEEP 110 fi … fi SLEEP 010 fi SLEEP …
If you press the TUNING UP/DOWN button after pressing the SLEEP button, you can adjust the time by one minute at a time.
- Five seconds after presetting the sleep time, the system will return to the previous status and thereafter begin sleep timing. To cancel the SLEEP (timer), turn the power off.
NOTES:
- If you want to know the time remaining until the sleep time, press the SLEEP button once.
- To allow the sleep function to work properly, you need to connect the remote control terminal of the tuner to the corresponding remote control terminal of the amplifier.
HOW TO PRESET DAILY
The ON and/or OFF time can be preset for daily use.
Before presetting DAILY make sure the power is off.
DAILY Presetting
- Press the DAILY button. ("DAILY ON --:--" will be displayed for you to set the ON time.)
- Set the “hour (…)” you want by pressing the TUNING button, and then press the NEXT button. “Minute” signal will blink.
After you set the “minute (--)” you want in the same way as for “hour”, the display will show “DAILY OFF --:--” which indicates the OFF time. Set the OFF time in the same way as you set the “ON” time. - Press the DAILY button or NEXT button to complete presetting. Then, the display will return to the previous status before presetting was performed.
- Press the TIMER button to turn on he timer.
NOTE:
If you turn off the power intentionally before the "OFF" time, the DAILY presets will be cancelled.
RDS (Radio Data System)
- RDS provides such information as station names, local times, the types of program, etc. for FM broadcasting.
- You can receive the following kinds of data with this system.
• PS (Program Service Name): displays FM station name. - CT (Clock Time): displays the information about times provided from the station.
- PTY (Program Type): These data on program type will be displayed while receiving FM.
NOTES:
- In case the currently received station is not broadcasting RDS, "NO RDS" will be displayed continuously regardless of RDS mode.
- When the reception of broadcasting is rather weak (RDS: Off), “NO RDS” will also be displayed. In such a case, correct the position of the antenna.
RDS Display
-
Press the POWER button to ON.
-
Press the BAND button to select FM.
RDS can be displayed only in the FM band.
-
Press the PRESET UP/DOWN button or the TUNING UP/DOWN button to tune to the required broadcast station.
-
In case the received station is broadcasting RDS, RDS will light up in the Display.
• After a while, RDS Data will be displayed automatically. -
Press the DISPLAY button.
Each time you press the button (within 0.5 second), the modes will change as follows regardless of the current mode:
fi PS fi CT fi PTY
(1) PS mode: "PS" will blink for about 4 seconds in the display.
- If you do not receive PS Data even after switching the mode to call it up, "NO PS" will be displayed until the data is received.
- When the data is received, the corresponding PS will be displayed.
(2) CT mode: "CT" will blink for about 4 seconds in the display.
- If you do not receive CT Data even after switching the mode to call it up, "NO CT" will be displayed until the data is received.
- When the data is received, the corresponding CT will be displayed.
(3) PTY mode: "PTY" will blink for about 4 seconds in the display. The PTY indicator lights.
The data is displayed in PTY mode as follows:
There are 29 programme categories:
NEWS = News service
AFFAIR = Politics and current events
INFO = Special informative reports
SPORT = Sports
EDUCATE = Learning and continuation of education
DRAMA = Radio plays, literature
CULTURE = Culture and society
SCIENCE = Programmes about sciences and technology
OTHERS = Variety
POP = Pop music
ROCK = Rock music
MOR = Middle of the road music, 'easy-listening'.
LIGHT = Light classical music
CLASSIC = Serious classical music
OTHER = Other music
WEATHER = Weather reports, forecasts
FINANCE = Financial reports, commerce, trading
CHILDREN = Children's programmes
SOCIAL A = Social affairs
RELIGION = Religious programmes
PHONE IN = Programmes in which the public expresses its view by phone.
TRAVEL = Travel reports
HOBBIES = Programmes concerning recreational activities
JAZZ = Jazz music
COUNTRY = Country music
NATION M = National music
OLDIES = Music from the so-called 'golden age' of popular music
FOLK M = Folk music
DOCUMENT = Documentaries
- If you do not receive PTY Data, "NO PTY" will be displayed.
How to Search for Your Desired Program Using PTY Search
- Press the POWER button to ON.
- Press the BAND button to select FM.
- Press the DISPLAY button for longer than 1 second. "Search" will blink in the display.
- Be sure to press the button for more than 1 second regardless of whether RDS mode is on or off.
- Press the PRESET UP/DOWM button.
Select your desired one from among 29 kinds of PTY programs. (The program will blink.)
- Press the TUNING UP (▲) or DOWN (▼) button.
When you press the TUNING button after your desired program is searched, you can continue to search for another program type by increasing of decreasing the frequency from the current one.
NOTES:
- When the same program type is not found in PTY Search mode, searching will stop and search mode will be released automatically.
- If the same program type is not found during PTY Search, it will stop at the beginning frequency.
WHEN TO USE RESET SWITCH
- When this system is subjected to an electrical shock.
- When the power is irregular. In the above cases, function buttons may not often operate or the display may operate wrongly. In these cases, try the following:
— Rear panel —
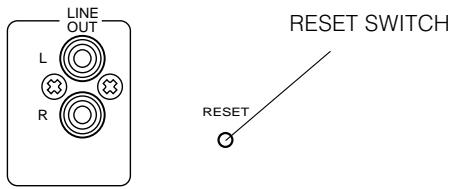
Press the RESET switch lightly once or twice with a pencil or a ballpoint pen.
CARE AND MAINTENANCE
This section describes the care and maintenance tasks that must be performed to optimize the operation of your Marantz equipment.
CLEANING OF EQUIPMENT EXTERNAL SURFACES
The exterior finish of your ST4000 will last indefinitely with proper care and cleaning. Never use scouring pads, steel wool, scouring powders or harsh chemical agents (e.g., lye solution), alxohol, thinners, benzine, insecticide or other volatile substances as these will mar the finish of the equipment. Likewise, never use cloths containing chemical substances. If the equipment gets dirty, wipe the external surfaces with a soft, lint-free cloth.
If the equipment becomes heavily soiled:
– dilute some washing up liquid in water, in a ratio of one part detergent to six parts water;
- dip a soft, lint free cloth in the solution and wring the cloth out until it is damp;
- wipe the equipment with the damp cloth;
– dry the equipment by wiping it with a dry cloth.
REPAIRS
Only the most competent and qualified service technicians should be allowed to service your unit. Marantz and its factory trained warranty station personnel have the knowledge and special equipment needed for the repair and calibration of this precision instrument.
In the event of difficulty, call the proper toll-free telephone number listed on the face of the warranty to obtain the name and address of the Marants Authorized Service Center nearest you. In many cases, the dealer where you purchased your Marants unit may be equipped to provide service. Please include the model, serial number of your unit together with a copy of your purchase receipt and a full description of what you feel is abnormal in its behaviour.
TROUBLESHOOTING
GENERAL MALFUNCTION
If the equipment malfunctions, this may be because an electrostatic discharge or AC line interference has corrupted the information in the equipment memory circuits. Therefore:
– disconnect the plug from the AC line supply
- after waiting at least three minutes, reconnect the plug to the AC line supply
– re-attempt to operate the equipment
Memory backup
- In case a power outage occurs or the power cord is accidentally unplugged, the ST4000 is equipped with a backup function to prevent memory data such as the preset memory from being erased.
The memory function are backed up for up to about one week.
MODEL ST4000 SPECIFICATIONS
FM Section
Tuning Range 87.50 MHz - 108.0 MHz
Usable Sensitivity (IHF) Mono 10 dBf
50 dB Quieting sensitivity
Mono 17 dBf
Stereo 33 dBf
Alternate Channel Selectivity (98 MHz - 400 kHz) 65 dB
Image Response Ratio 60 dB
Frequency Response 20 Hz - 15 kHz, +0.5 dB/-3 dB
Capture Ratio....2 (at 98 MHz)
Distortion (at 65 dBf, 98 MHz)
Mono 0.2%
Stereo 0.3%
Signal-to-Noise Ratio (at 65 dBf, 1 kHz)
Mono 70 dB
Stereo 65 dB
AM Suppression Ratio 80 dB
Stereo Separation (1 kHz) 40 dB
Output (Level/Impedance) 600 mV/2.2 k ohm
AM Section
Tuning Range 522 kHz - 1,620 kHz (9 kHz steps)
Usable Sensitivity (IHF) 55 dB/m (562 mV/m, Loop Antenna)
Selectivity 30 dB (at -9 kHz)
Image Response Ratio 35 dB
IF Response Ratio 60 dB
Distortion.... 1% (at 85 dB/m)
Signal-to-Noise Ratio 50 dB (at 94 dB/m)
Output (Level/Impedance) 170 mV/2.2 k ohm
General
Power Requirements 230 V AC, 50 Hz
Power Consumption 6W
- Improvements may result in specifications and features changing without notice.
FIGURES
CONTROLS AND FUNCTIONS
FL-DISPLAY
flowchart
graph TD
    A["1"] --> B["AM FM 18:39:9 KHz MHz"]
    C["2"] --> B
    D["3"] --> E["TUNED STEREO MEMORY"]
    F["4"] --> B
    G["5"] --> H["SLEEP"]
    I["6"] --> H
    J["7"] --> K["PRESET CH. SIGNAL"]
    L["8"] --> K
    M["9"] --> K
flowchart
graph TD
    A["Lead-type FM Antenna(75) (provided)"] --> B["Roof-top FM Antenna(75 ohms)"]
    B --> C["Matching Transformer (optional)"]
    C --> D["AM(MW)Indoor Loop Antenna (provided)"]
    D --> E["Tuner"]
    E --> F["RCA Pin Plug Cord (Plovided)"]
    F --> G["Stereo Amplifier"]
    G --> H["To AC Outlet"]
    H --> I["Remote CONT. IN OUT"]
    style A fill:#f9f,stroke:#333
    style B fill:#ccf,stroke:#333
    style C fill:#cfc,stroke:#333
    style D fill:#fcc,stroke:#333
    style E fill:#cff,stroke:#333
    style F fill:#ffc,stroke:#333
    style G fill:#cfc,stroke:#333
    style H fill:#fcc,stroke:#333
    style I fill:#ffc,stroke:#333
- WARNINGS
- EQUIPMENT MAINS WORKING SETTING
- IMPORTANT: (FOR U.K. MODEL)
- NOTE:
- HOW TO CONNECT A PLUG (FOR U.K. MODEL)
- COPYRIGHT
- INTRODUCTION
- INSTALLATION
- PRECAUTIONS
- GENERAL PRECAUTIONS
- ST4000 FEATURES
- CONTROLS AND THEIR FUNCTIONS (See page 50)
- NOTES:
- OPERATIONS
- HOW TO ADJUST CURRENT TIME
- HOW TO PRESET BROADCASTS
- Manual Memory Presetting
- TUNING
- PRESET CALL
- MEMORY
- Automatic Memory Presetting
- MEMORY
- HOW TO MEMORIZE BROADCASTING STATION NAME
- TUNING
- ST. NAME
- MEMORY
- PRESET CALL
- HOW TO USE SLEEP FUNCTION
- HOW TO PRESET DAILY
- DAILY Presetting
- RDS (Radio Data System)
- RDS Display
- How to Search for Your Desired Program Using PTY Search
- WHEN TO USE RESET SWITCH
- CARE AND MAINTENANCE
- CLEANING OF EQUIPMENT EXTERNAL SURFACES
- REPAIRS
- TROUBLESHOOTING
- GENERAL MALFUNCTION
- Memory backup
- MODEL ST4000 SPECIFICATIONS
- FM Section
- AM Section
- General
Brand : MARANTZ
Model : ST 40L
Category : Audio Receiver