
LUMIA 650 - Smartphone MICROSOFT - Free user manual and instructions
Find the device manual for free LUMIA 650 MICROSOFT in PDF.


User questions about LUMIA 650 MICROSOFT
0 question about this device. Answer the ones you know or ask your own.
Ask a new question about this device
Download the instructions for your Smartphone in PDF format for free! Find your manual LUMIA 650 - MICROSOFT and take your electronic device back in hand. On this page are published all the documents necessary for the use of your device. LUMIA 650 by MICROSOFT.
USER MANUAL LUMIA 650 MICROSOFT
User Guide Lumia 650
User Guide
Lumia 650
Contents
For your safety 4
Get started 5
Keys and parts 5
Insert the SIM and memory card 6
Remove the SIM and memory card 8
Turn the phone on 11
Lock the keys and screen 12
Charge your phone 13
Change the volume 14
Connect the headset 16
Antenna locations 17
Your first Luma? 18
Learn more about your phone 18
Set up your phone 19
Update your apps 20
Explore your tiles, apps, and settings 20
Navigate inside an app 23
Use the touch screen 24
Back, start, and search keys 26
Switch to your new Luma phone 27
Basics 30
What's new in this release? 30
Get to know your phone 30
Accounts 36
Personalize your phone 41
Cortana 48
Accessibility 50
Take a screenshot 51
Extend battery life 52
Save on data roaming costs 54
Write text 55
Clock and calendar 59
Browse your SIM apps 63
Store 64
People & messaging 68
Calls 68
Contacts 72
Social networks 76
Messages 77
Email 81
Camera 86
Open your camera quickly 86
Camera basics 86
Advanced photography 88
Photos and videos 90
Maps & navigation 92
Switch location services on 92
Find a location 92
Get directions to a place 93
Download a map to your phone 93
Positioning methods 94
Internet 95
Define internet connections 95
Use your data plan efficiently 95
Web browser 96
Search the web 98
Close internet connections 99
Troubleshooting internet connection issues 99
Entertainment 100
Watch and listen 100
FM radio 103
Sync music and videos between your phone and computer 104
Games 105
Lifestyle apps and services 107
Office 110
Work with Word 110
Work with Excel 111
Work with PowerPoint 111
Write a note in OneNote 112
Access Office files through OneDrive 113
Use the calculator 113
Phone management & connectivity 114
Update your phone software 114
Use a secure VPN connection 115
Wi-Fi 115
NFC 116
Bluetooth 118
Memory and storage 120
Copy content between your phone and computer 123
Security 125
Wallet 128
Access codes 129
Troubleshoot connectivity issues 130
If your phone doesn't respond 131
Find your model number and serial number (IMEI) 132
Product and safety info 132
For your safety
Read these simple guidelines. Not following them may be dangerous or against local laws and regulations.

TURN OFF IN RESTRICTED AREAS
Turn the device off when mobile phone use is not allowed or when it may cause interference or danger, for example, in aircraft, in hospitals or near medical equipment, fuel, chemicals, or blasting areas. Obey all instructions in restricted areas.

ROAD SAFETY COMES FIRST
Obey all local laws. Always keep your hands free to operate the vehicle while driving. Your first consideration while driving should be road safety.

INTERFERENCE
All wireless devices may be susceptible to interference, which could affect performance.

QUALIFIED SERVICE
Only qualified personnel may install or repair this product.

BATTERIES, CHARGERS, AND OTHER ACCESSORIES
Use only batteries, chargers, and other accessories approved by Microsoft Mobile for use with this device. Third-party chargers that comply with the applicable USB requirements, and that can connect to your device USB connector, may be compatible. Do not connect incompatible products.

KEEP YOUR DEVICE DRY
Your device is not water-resistant. Keep it dry.

GLASS PARTS
The device screen is made of glass. This glass can break if the device is dropped on a hard surface or receives a substantial impact. If the glass breaks, do not touch the glass parts of the device or attempt to remove the broken glass from the device. Stop using the device until the glass is replaced by qualified service personnel.

PROTECT YOUR HEARING
To prevent possible hearing damage, do not listen at high volume levels for long periods. Exercise caution when holding your device near your ear while the speakerphone is in use.
Get started
Take care of the basics, and have your phone up and running in no time.
Your phone is designed to make it easy for you to access a wide variety of content. For your protection, we want you to be aware that some applications that you enable may involve the location of your phone being shared. For applications available through Cricket, we offer privacy controls that let you decide how an application may use the location of your phone and other phones on your account. However, the Cricket privacy tools do not apply to applications available outside of Cricket. Please review the terms and conditions and the associated privacy policy for each location-based service to learn how location information will be used and protected. In addition, your Cricket phone may be used to access the internet and to download, and/or purchase goods, applications, and services from Cricket or elsewhere from third parties. Cricket provides tools for you to control access to the Internet and certain Internet content. These controls may not be available for certain devices which bypass Cricket controls.
Keys and parts
Explore the keys and parts of your new phone.
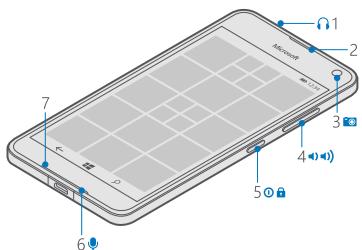
1 Audio connector
2 Earpiece
3 Front camera
4 Volume keys
5 Power/Lock key
6 Microphone
7 Loudspeaker
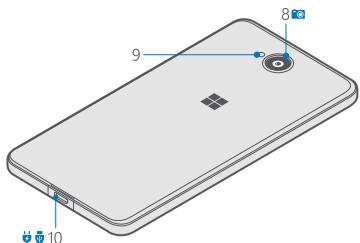
8 Main camera
9 Flash
10 Charger connector
Some of the accessories mentioned in this user guide, such as charger, headset, or data cable, may be sold separately.
Insert the SIM and memory card
Read on to learn how to insert a SIM card into your phone.
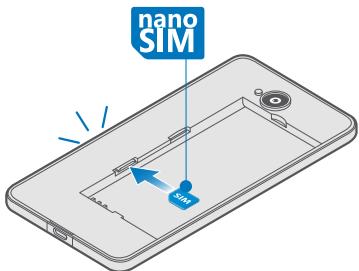
Important: Your device uses a nano-SIM card, also known as a nano-UICC SIM card. Use only original nano-SIM cards. Use of incompatible SIM cards may damage the card or the device, and may corrupt data stored on the card.
! Note: Turn the device off and disconnect the charger and any other device before removing any covers. Avoid touching electronic components while changing any covers. Always store and use the device with any covers attached.
- Turn your phone off.
- Put your fingernail in the recess at the bottom edge of the back cover. Press the middle of the back cover, bend the cover open, and remove it.
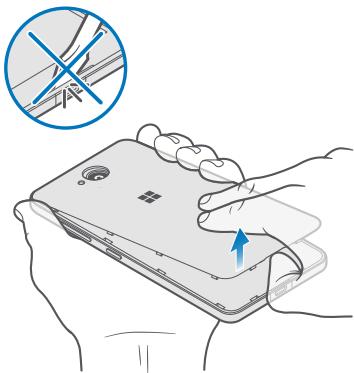
Do not use any tools, as they may damage the phone.
- If the battery is in, put your fingernail in the recess on its top edge, and lift it out.
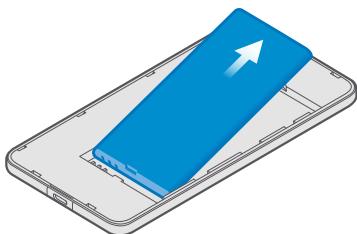
- Push the nano-SIM card into the SIM slot with the metal contact area down, until you hear a click.
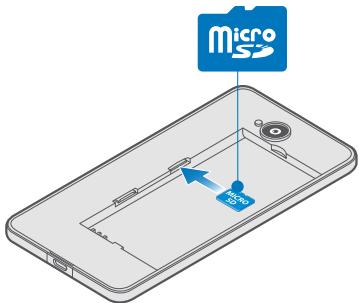
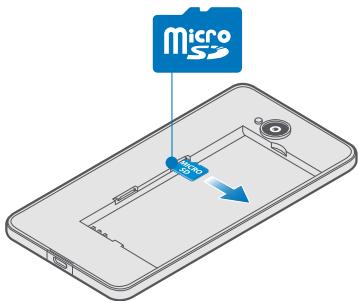
- If you have a memory card, slide the card into the memory card slot. It is recommended that you use a fast microSD card from a well-known manufacturer.
- Line up the battery contacts, and put the battery in.
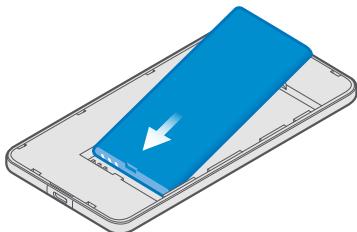
- Press the top edge of the back cover against the top edge of your phone, and snap the cover into place.
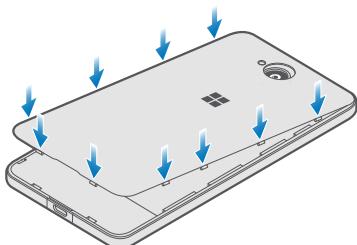
- Turn your phone on.
Remove the SIM and memory card
Got a new SIM or memory card? Learn how to remove the previous card from your phone.
- Turn your phone off.
- Put your fingernail in the recess at the bottom edge of the back cover. Press the middle of the back cover, bend the cover open, and remove it.
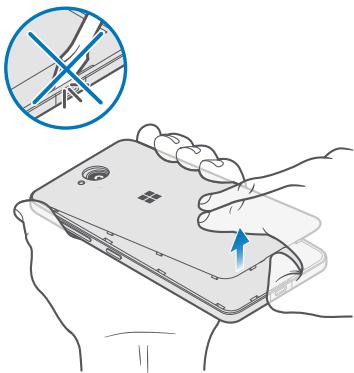
Do not use any tools, as they may damage the phone.
- If the battery is in, put your fingernail in the recess on its top edge, and lift it out.
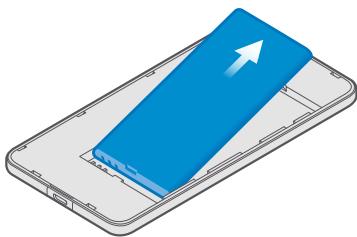
- To remove the SIM card, push the card to unlock it, and pull it out from the slot.
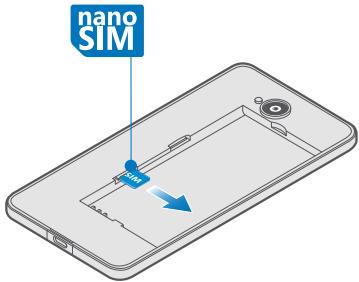
- To remove the memory card, pull it out from the slot.
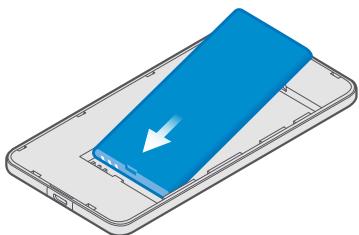
- Line up the battery contacts, and put the battery in.
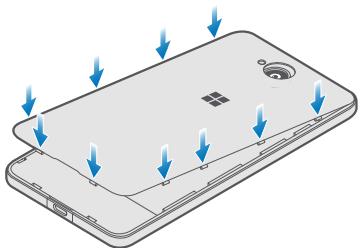
- Press the top edge of the back cover against the top edge of your phone, and snap the cover into place. Don't press the keys while attaching the cover.
- Turn your phone on.
Turn the phone on
Turn your phone on, and start exploring it.
Press the power key until the phone vibrates.
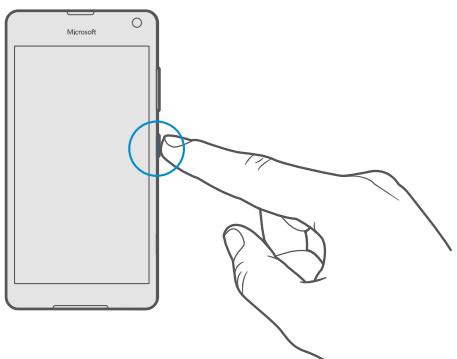
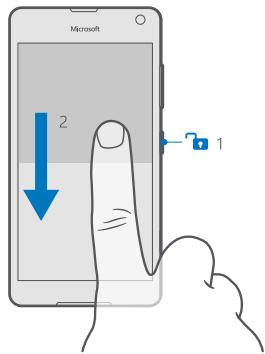
Turn the phone off
Press and hold the power key, and drag the lock screen down.
Lock the keys and screen
If you want to avoid accidentally making a call when your phone is in your pocket or bag, you can lock your keys and screen. You can also set the keys and screen to lock automatically.
To lock your keys and screen, press the power key.
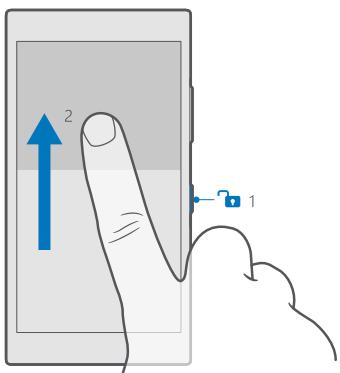
Unlock the keys and screen
Press the power key, and drag the lock screen up.

Tip: If you can hide your navigation bar, you can also lock your keys and screen by double-tapping the bar. To turn this feature on, swipe down from the top of the screen,
tap All settings > Personalization > Lock screen, and turn Double-tap the navigation bar to turn off the screen on.
Set the keys and screen to lock automatically
Swipe down from the top of the screen, tap All settings > Personalization > Lock screen, and under Screen times out after, select the length of time after which the keys and screen are locked automatically.
Charge your phone
Learn how to charge your phone.
Charge your phone with a USB charger
Your battery has been partially charged at the factory, but you may need to recharge it before you can turn the phone on for the first time.
Make sure you use a compatible USB charger to charge your phone. The charger may be sold separately.
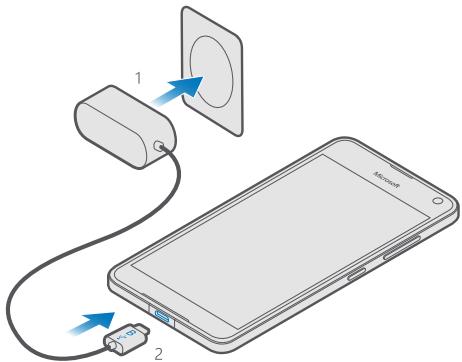
- Plug a compatible charger into a wall outlet, and connect the cable to your phone.
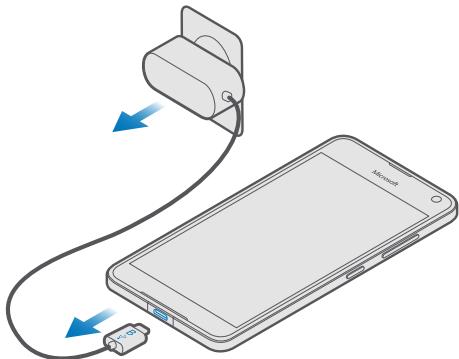
- When the battery is full, disconnect the charger from the phone, then from the wall outlet.
You don't need to charge the battery for a specific length of time, and you can use the phone while it's charging.
If the battery is completely discharged, it may take up to 20 minutes before the charging indicator is displayed.

Tip: You can use USB charging when a wall outlet is not available. Data can be transferred while charging the device. The efficiency of USB charging power varies significantly, and it may take a long time for charging to start and the device to start functioning.
Make sure your computer is turned on.
First connect the USB cable to the computer, then to your phone. When the battery is full, first disconnect the USB cable from your phone, then from the computer.
The battery can be charged and discharged hundreds of times, but it will eventually wear out. When the talk and standby times are noticeably shorter than normal, replace the battery.
Change the volume
If you have trouble hearing your phone ringing in noisy environments, or calls are too loud, you can change the volume to your liking.
Use the volume keys on the side of your phone. The maximum volume level is 10.
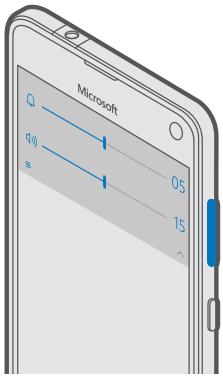
If you have connected headphones, the volume keys control both ringtone and media volume at the same time. The maximum volume level is 30.
Change the volume for media and apps
Press a volume key on the side of your phone to see the volume status bar, tap , and tap the volume bar for media and apps to set the volume you want. The maximum volume level is 30.
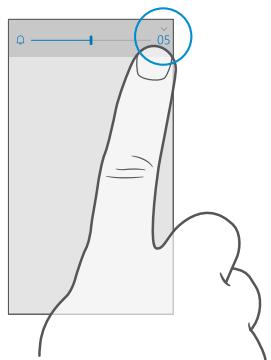
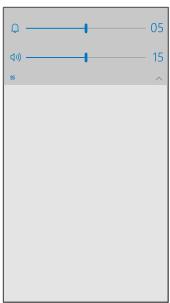
Switch to silent mode
Press a volume key on the side of your phone, tap on the volume status bar, and tap . To turn silent mode off, on the volume status bar, set the volume you want.
Turning silent mode on does not affect your alarms. If you want to rest, make sure you don't have any incoming alarms, or turn your phone off.

Tip: Don't want to keep your phone in silent mode but can't answer right now? To silence an incoming call, press the volume down key.
Turn the vibration on
If you want your phone to vibrate, press a volume key on the side of your phone, tap on the volume status bar, and tap Vibrate off. To turn the vibration off, tap Vibrate on.

Tip: To change other sound settings, swipe down from the top of the screen, and tap All settings > Personalization > Sounds.

Tip: To turn the vibration of the back, start, and search keys on or off, swipe down from the top of the screen, tap All settings > Extras > Touch, and turn Vibrate when I tap the navigation keys. on or off. Changing the vibration setting for incoming calls doesn't affect the vibration of the keys.
Connect the headset
Enjoy your favorite music, or free your hands for other things when in a call.
The headset may be sold separately.
Connect the headset to your phone.
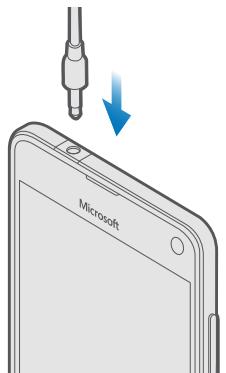
Do not connect to products that create an output signal, as this may damage the device. Do not connect any voltage source to the audio connector. If you connect an external device or headset, other than those approved for use with this device, to the audio connector, pay special attention to volume levels.
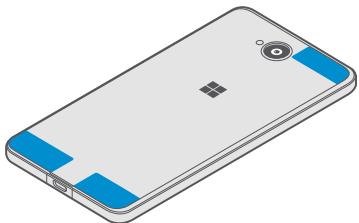
Antenna locations
Learn where the antennas are located on your phone to get the best possible performance.
Avoid touching the antenna area while the antenna is in use. Contact with antennas affects the communication quality and may reduce battery life due to higher power level during operation.
The antenna areas are highlighted.
Your first Luria?
Let's get started. Set up your new phone, explore your phone's views and menus, and learn how to use the touch screen.
Learn more about your phone
When you want to learn more about your phone, or if you're unsure how your phone should work, there are several support channels for you to check.
To help you get the most out of your phone, there's a user guide in your phone with additional instructions. Tap Luria Help+Tips.
You can also go to www.microsoft.com/mobile/support, where you can find:
Troubleshooting information
- Instant answers for questions you may have
Discussions
News on apps and downloads
Software update information
Further details about features and technologies, and the compatibility of devices and accessories
Troubleshooting and discussions may not be available in all languages.
For support videos, go to www.youtube.com/lumiasupport.
If you're new to Luria, remember to also check out the Get started app.
Set up your phone
Make the most out of your phone's features from the get-go.
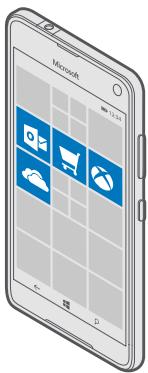
When you turn your phone on for the first time, your phone guides you to set up your network connections, phone settings, and Microsoft account in one sitting.
You need a Microsoft account to back up and restore your phone, to buy, install, and update apps, and to access some Microsoft services, such as:
Xbox
Groove and Movies & TV
OneDrive
Hotmail
Outlook
If you already created an account for one of Microsoft services, such as Xbox Live, Hotmail, or Outlook, those credentials are valid as a Microsoft account and you can use them to sign in.
You can use the same username and password on your computer and phone.
- Turn your phone on, and follow the instructions shown on your phone.
- When asked, create a Microsoft account, or sign in to an existing one.
Make sure you remember the credentials for the Microsoft account you added to your phone. You need them if you want to reset your phone or change the reset protection settings. Reset protection prevents a thief from resetting and reusing your phone if your phone gets stolen.

Tip: You can also create a Microsoft account later. Swipe down from the top of the screen, and tap All settings > Accounts > Your email and accounts > Sign in with a Microsoft account instead.
Parents must approve the account for children under the age of 13. To approve the account, swipe down from the top of the screen, tap All settings > Accounts > Your email and accounts > Sign in with a Microsoft account instead, sign in with your child's account, and follow the instructions shown on the phone.
You can also create or manage your account at account.microsoft.com.
- Fill in your account details.
- Type in your phone number or an alternative email address. They are used to send you a one-time verification code and to protect your data.
- When asked, type in your email address or the last 4 digits of your phone number.
- When you receive the code, type it in, and you are ready to back up your data and use your phone.

Tip: If your screen turns off, press the power key, and drag the lock screen up.
Update your apps
App updates bring important bug fixes and new functionalities. To get the best out of your new phone, make sure your apps are up to date.
- Tap Store.
- Tap Downloads and updates.

Tip: By default, your phone automatically updates the apps when you're connected to Wi-Fi.
- Tap Check for updates: > Update All.
Turn off automatic updates
Tap Store > Settings, and switch Update apps automatically to Off
Explore your tiles, apps, and settings
Everything you need is on 2 views: the start screen and apps menu. Fill the start screen with shortcuts to your favorite apps and the contacts you need the most, and find all your apps easily in the apps menu.
The start screen consists of tiles, which are shortcuts to your apps, contacts, browser bookmarks, and more. Some tiles may show you notifications and updates, such as your missed calls, received messages, and the latest news.
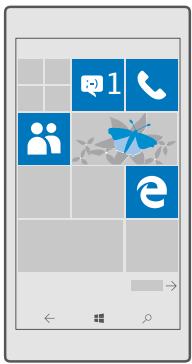
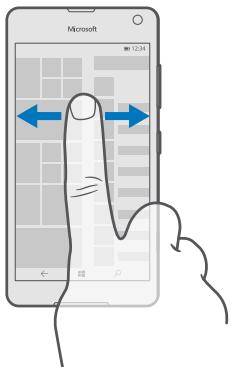
- To see all the apps on your phone, on the start screen, simply swipe left. To return to the start screen, swipe right.

Tip: To go back to the start screen from any view, tap the start key
The apps menu is the home to all your apps - in neat alphabetical order. All the installed apps end up here. To look up an app in the apps menu, tap the search bar at the top of the screen, or tap a letter.
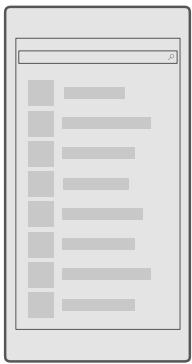
Recently installed apps show up at the top of the apps menu.
- To add an app shortcut to your start screen, in the apps menu, tap and hold the app, and tap Pin to Start.
Check notifications and change settings quickly
Swipe down from the top of the screen.
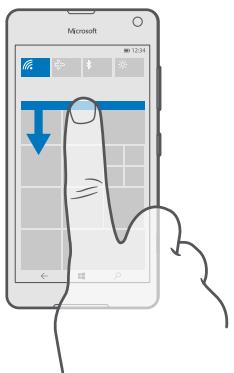
In the action center, you can quickly see notifications, such as your missed calls and unread emails and messages, open the camera, and access all phone settings.
Navigate inside an app
There's more to your apps than meets the eye. To find more views in an app, swipe left. To discover more actions, use the options menu.
In most apps, to go to another view, swipe left.
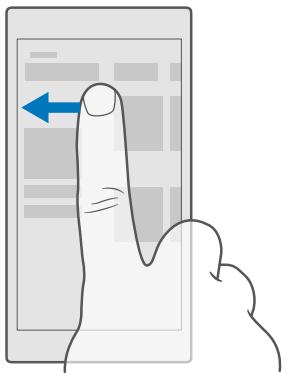
Tip: To switch between views, you can also tap the tab heading at the top of the screen.
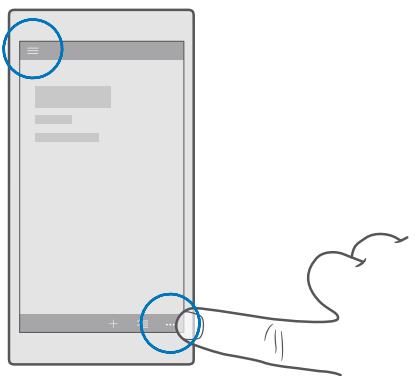
Find more options in an app
Tap…or三
In the options menu, you can find additional settings and actions that are not shown as icons.
Use the touch screen
Explore your phone with a tap, swipe, or drag.
To open an app or other item, tap the app or item.
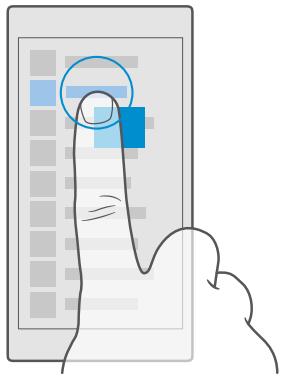
Tap and hold to open further options
Place your finger on an item until the menu opens.
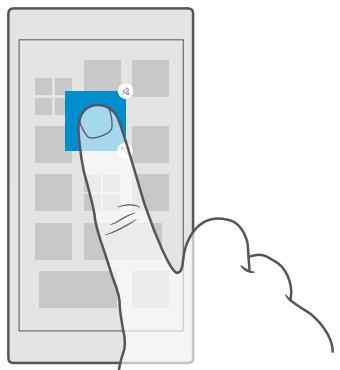
Tap and hold to drag an item
Place your finger on the item for a couple of seconds, and slide your finger across the screen.
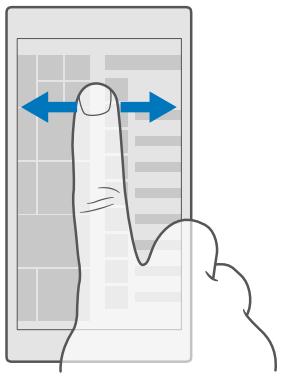
Swipe
Place your finger on the screen, and slide your finger in the direction you want.
For example, swipe left or right between the start screen and the apps menu, or between different views in the apps.
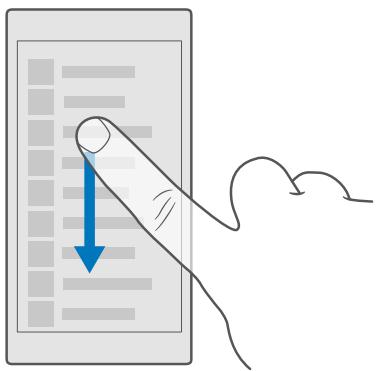
Scroll through a long list or menu
Slide your finger quickly in a flicking motion up or down the screen, and lift your finger. To stop the scrolling, tap the screen.
Zoom in or out
Place 2 fingers on an item, such as a map, photo, or web page, and slide your fingers apart or together.
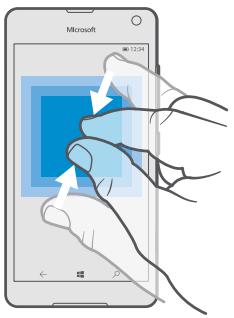
Lock the screen orientation
The screen rotates automatically when you turn the phone 90 degrees. To lock the screen in its current orientation, swipe down from the top of the screen, tap All settings >
System > Display, and switch Rotation lock to On
Screen rotation may not work in all apps or views.
Back, start, and search keys
The back, start, and search keys help you navigate your phone.
- To see which apps you have open, tap and hold the back key . To switch to another app, tap the app you want. To close an app, tap × at the top right corner of the app.
- To go back to the previous screen you were in, tap the back key . Your phone remembers all the apps and websites you've visited since the last time your screen was locked.
- To go to the start screen, tap the start key. The app you were in stays open in the background.
- If your phone has a large screen, to bring the action center closer to your thumb, tap and hold the start key. The screen goes back to the normal view automatically.
To search the web or for items on your phone, tap the search key - If your phone has Cortana, to control your phone with your voice, tap and hold the search key , and say what you want to do. Or, to change the Cortana settings or use other Cortana functions, tap the search key .
Cortana is not available in all regions and languages. For information on the supported regions and languages, go to www.microsoft.com/mobile/support/cortanaregions.
- To turn the vibration of these keys on or off, swipe down from the top of the screen, tap All settings > Extras > Touch, and switch Vibrate when I tap the navigation keys. on or off. Changing the vibration setting for incoming calls doesn't affect the vibration of the keys.
Switch to your new Luma phone
Switch to your new Luria easily - learn how to transfer contacts, calendar, photos, videos, and other content to your new phone.
Transfer content to your new Luma phone
There are nifty ways to transfer your photos, videos, and other important stuff from your old to your new phone.
These instructions may not apply to all phone models and manufacturers.
You may need to install some apps on your phone or computer for the transfer. Depending on what you need to install and how much content you are transferring, the transfer may take a while.
Some file formats may not be transferred. Some third-party converter apps may be available to convert the files to a format that can be transferred.
For more information, go to www.microsoft.com/mobile/switch-easy.
Copy contacts using Bluetooth
Have your nearest and dearest instantly at your fingertips. Use the Transfer my Data app to easily copy your contacts.

Tip: If your old phone is a Luria, or if you have previously backed up your contacts to your Microsoft account, to import your contacts from OneDrive, just sign in to your account on your phone. The contacts are imported automatically.
Your old phone needs to support Bluetooth. The contacts on your old phone need to be stored in the phone memory, not on the SIM.
- On your old phone, turn Bluetooth on, and make sure the phone is visible to other devices.
- On your new Luria, swipe down from the top of the screen, tap and hold ₧, make sure Bluetooth is turned on, and pair your Luria with your old phone.
- On your new phone, tap Transfer my Data.
- Tap continue.
- Select your old phone from the list of paired devices, and follow the instructions shown on both phones. On your new phone, make sure the Contacts checkbox is selected.
If your contacts are written in a language that is not supported by your new phone, the contact information may not be shown correctly.
After you have copied your contacts, for the best experience and to save space on your phone, uninstall the Transfer my Data app.
Transfer content using your Microsoft account
If your old phone is a Lumia, the easiest way to transfer your contacts, calendar, and text messages to your new Lumia phone is your Microsoft account.
Make sure that you have set up a Microsoft account on your old and on your new Lumia phones.
- On your old phone, make sure you back up all the content you want to move to your new phone.
To learn more about how to back up your phone, go to support.microsoft.com, and browse to the instructions for Windows phones.
- On your new Luma phone, to sign in to your Microsoft account, swipe down from the top of the screen, tap All settings > Accounts > Your email and accounts > Sign in with a Microsoft account instead, and follow the instructions shown on the screen.
The backed up content is automatically transferred to your new Luria phone.

Tip: You can also transfer photos, videos, or other files from your old phone to your new Luria. On your old phone, add the files you want to OneDrive.
Transfer content using OneDrive
Use the OneDrive app to upload your Office documents, photos, and videos to OneDrive. No matter if your old phone is a Windows phone, an Android phone, or an iPhone, you can copy your files to your new Lumia.
To easily upload and manage your content in OneDrive, download and install the OneDrive app from:
- Google Play for an Android phone
App Store for an iPhone - Store for Windows phones (if not already in phone)
Mac App Store for an Apple Mac - support.microsoft.com for your PC
You need a Microsoft account to sign in to OneDrive.
OneDrive may not be available for all phone models.
- On your old phone, open the OneDrive app.
- Upload the files you want to transfer to your new phone.
You can now sign in to OneDrive with your Microsoft account to access your content on any device and download it when you need it.
Transfer Outlook content from an Android phone or iPhone
Use your Microsoft account to transfer your Outlook emails, contacts, and calendar entries from your Android phone or iPhone to your new Lumia.
You need the Microsoft Outlook app on your Android phone or iPhone.
- On your old Android phone or iPhone, add your Google or iCloud account to your Outlook app. Make sure all the content you want to transfer to your new phone is synced to your account.
- On your new Luria, tap Outlook Mail > Get started > + Add account.
- Sign in to your Google or iCloud account, and tap Ready to go.
Your emails, contacts, and calendar entries are automaticallyynced to your new phone. It may take a while before the content is available.

Tip: You can also transfer photos and videos from your old phone to your new Luria. On your Android phone or iPhone, install the OneDrive app, sign in to the app using your Microsoft account, and add the files you want to OneDrive.
For more information on how to sync your content using the Outlook app, go to support.microsoft.com, and browse to the instructions for Windows phones.
Select the content you want to sync to your Luma
Tap Outlook Mail > Accounts. Select an account, tap Change mailbox sync settings, and select what you want to sync under Sync Options.
Transfer content from a Symbian or S40 phone
Use Nokia Suite to transfer your contacts, calendar entries, music, and photos from a Symbian or S40 phone to your Luma phone.
Make sure you have the latest Nokia Suite installed on your PC. You can download it from www.microsoft.com/mobile/nokiasuite.
You need a Microsoft account to sign in to OneDrive.
- Use a compatible USB cable to connect your Symbian or S40 phone to your PC.
- Open Nokia Suite on your PC.
- Select Copy content to Nokia Luma, sign in to your Microsoft account, and follow the instructions shown on your computer. Your content is copied to OneDrive. Your photos are copied to the Pictures folder in OneDrive, and your contacts and calendar events to your Outlook.com account.
- To access your photos, on your Luma phone, tap Photos. To access other files, such as your music, on the start screen, tap OneDrive. Your contacts and calendar events are syncd automatically.

Tip: Your Symbian or S40 phone doesn't support Nokia Suite? Or want to transfer other content, such as your videos? You can also connect your phone to your computer and drag and drop the files you want to transfer onto your computer. If you have the OneDrive desktop app, drag and drop the files straight to the OneDrive folder for automatic upload.
Basics
Personalize your phone, make the most out of your accounts and apps like OneDrive and Store, and learn the essentials from writing text to saving battery life.
What's new in this release?
Check some of the new things in this release at a glance.
Find stuff easily on the web with the new Microsoft Edge browser.
- Add a full-size background photo to your start screen and apps menu.
Find your recently installed apps easily at the top of the apps menu.
Find your settings quickly in the new setting groups.
- Expand the shortcut view to find more shortcuts in the action center.
- Act quickly on your notifications in the action center. For example, reply to a text message without opening the Messaging app.
- Check out the new Get started app, or use Cortana to find the information you need.
Get to know your phone
Your phone has 2 views: the start screen and the apps menu. To switch between the views, simply swipe left or right.
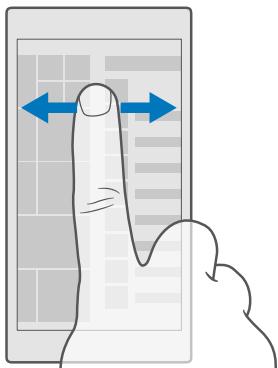
Start screen: The animated live tiles show your missed calls and received messages, the latest news and weather forecasts, and more. Updates of your pinned contacts are shown on the tile, and you can view your contacts' details directly on the start screen.
Apps menu: All your apps are listed here, all neatly ordered. If you have a lot of apps, to look one up, tap the search bar at the top of the screen. You can easily see your recently installed apps at the top of the apps menu.
Switch between views and apps
Not all your apps are on the start screen - swipe to the apps menu to find them. Or check what's already running on your phone and switch between the apps.
To see all the apps on your phone, on the start screen, simply swipe left. To return to the start screen, swipe right.
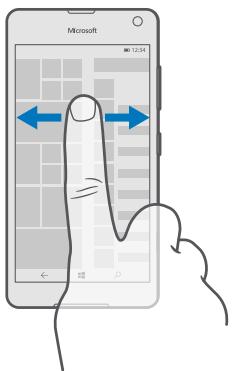

Tip: To find an app quickly, tap any letter in the apps menu, and in the following menu, tap the first letter or character for the app you want.
View, switch between, and close open apps
To view the open apps, tap and hold the back key . To switch to an app, tap the app you want. To close the apps you no longer need, tap × at the top right corner of the app.
Navigate the settings menu
Swipe down from the top of the screen, and tap All settings. To go to a settings group, tap any settings group title, and select the group you want. To search for a particular setting, tap the search bar at the top of the screen, and start typing the name of the setting.
Hide the navigation bar when you don't need it
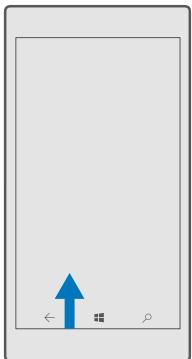
All Luria phones have 3 keys across the bottom:the back, start, and search key. You can hide this navigation bar from the start screen when you don't need it.
To hide the navigation bar from the start screen when it's not needed, swipe up from the bottom of the screen. To see the navigation bar again, swipe up.
Change the navigation bar color
You can change the navigation bar color to make it pop out better, or even match your theme.Swipe down from the top of the screen, tap All settings > Personalization > Colors, and switch Apply color to navigation bar to On.
Check notifications on your phone
You can quickly check notifications, change some settings, or add shortcuts to some apps in the action center that opens from the top of the screen.
The notification icon shows you have unread notifications.
- Swipe down from the top of the screen.

Tip: To see more shortcuts, tap Expand.
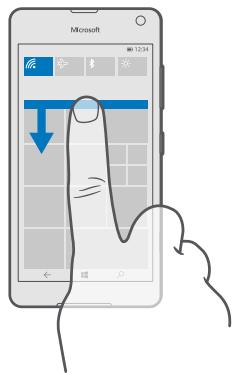
In this screen, you can:
See your missed calls and recent unread emails and messages
- Check any notifications, such as available app updates in Store
- Act quickly on notifications even without opening the app. You can, for example, reply to a text message straight from the action center.
- Open apps
- Quickly jump to all settings
- Tap a shortcut to easily turn some of the features on or off. Or, tap and hold a shortcut to change the settings of some features, such as Wi-Fi.
- To close the menu, swipe up from the bottom of the screen.
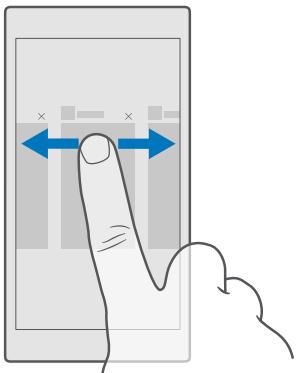
Delete a notification
Swipe right on the notification.
Personalize the action center
Swipe down from the top of the screen, and tap All settings > System > Notifications & actions. To change a shortcut, tap the shortcut and the app you want. You can also select which notifications you want to receive and how.
Use your phone in airplane mode
In places where you don't want to make or receive calls, you can still access your music, videos, and offline games if you switch airplane mode on.
Airplane mode closes connections to the mobile network and turns your device's wireless features off. If supported by your device, the NFC payment and ticketing feature of the device may remain active. Comply with the instructions and safety requirements given by, for example, an airline, and any applicable laws and regulations. Where allowed, you can connect to a Wi-Fi network to, for example, browse the internet or turn Bluetooth on in airplane mode.
- Swipe down from the top of the screen, and tap All settings > Network & wireless > Airplane mode.
- Switch Status to On
Icons shown on your phone
The status bar at the top of the screen tells you the current time, battery and signal strength, and much more.
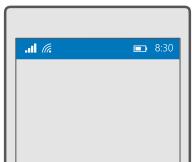
Tip: To see hidden icons, tap the status bar.
Mobile signal strength
Signal strength
Your phone isn't connected to a mobile network.
There is no SIM card in your phone.
Your SIM card is locked.
Airplane mode is turned on.
Your phone is roaming outside your home mobile network.
Cellular data connection
Single letters, combinations of letters, or combinations of letters and numbers show the type of mobile network to which you're connected.
Icons that show the network connection type may vary between regions and network service providers.
E An EDGE data connection is open.
G A GPRS data connection is open.
4G A 4G data connection is open.
LTE An LTE data connection is open.
Data is transferred over a cellular data connection.
Wi-Fi connection
A Wi-Fi connection is active.
(A) A cellular data connection is shared with other devices over Wi-Fi.
Data is transferred over Wi-Fi.
Bluetooth device
A Bluetooth device is connected to your phone.
Battery
Battery power level
The battery is charging.
Battery saver mode is turned on.
Battery power or state of the battery isn't currently known.
Notifications
You have unread notifications, such as new messages. To check the notifications, swipe down from the top of the screen.
Profiles
Vibrate mode is turned on.
_ Silent mode is turned on.
Cortana
Quiet hours mode is turned on and Cortana is handling your calls and messages.
Call forwarding
Your calls are forwarded to another number or your voice mailbox.
Location
An app or service is using your location information.
Driving mode
Driving mode is turned on.
Accounts
Learn about your Microsoft account and what you can do with it. You need an account with Microsoft, such as an Xbox Live, Hotmail.com, or Outlook.com account, to get the most out of your device.
Benefits of creating a Microsoft account
With a Microsoft account, you can access Microsoft services with a single username and password on your computer or phone. You can also use the same username and password on your Xbox.
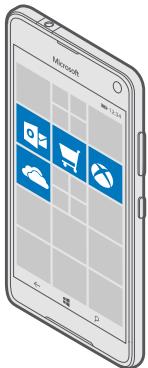
Bring your phone to life and get connected to all Microsoft services with a Microsoft account. With your Microsoft account, you can, for example:
Install apps and download content from Store
- Upload, store, and share pictures and documents using OneDrive
- Back up your contacts and other stuff on OneDrive
Use Groove and Movies & TV
Play Xbox games
- Get your avatar and gaming achievements on your phone, and add to them when you play games on your phone
- Keep track of and lock your lost phone with Find My Phone
Make calls or chat using Skype
To learn more about Microsoft account and what can you do with it, go to www.microsoft.com/en-us/account/wizard.aspx.
Create your Microsoft account
Get the most out of your phone by creating a Microsoft account. If you didn't create a Microsoft account during the first start-up, you can always do it later.
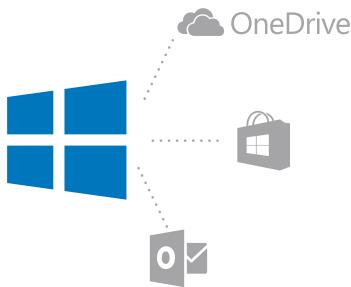
If you already have an Xbox Live, Hotmail.com, or Outlook.com account, or if you have created a Microsoft account on your Surface tablet or Windows PC, you don't have to create a new one - just sign in with the username and password for that account. If you don't have a Microsoft account yet, you can create one with your phone.
- Swipe down from the top of the screen, and tap All settings > Accounts > Your email and accounts.
- Tap Sign in with a Microsoft account instead > Create one.
- Fill in your account details.
Make sure you remember the credentials for the Microsoft account you added to your phone. You need them if you want to reset your phone or change the reset protection settings. Reset protection prevents a thief from resetting and reusing your phone if your phone gets stolen.
- Type in your phone number or an alternative email address. They are used to send you a one-time verification code and to protect your data.
- Select how you want to get your one-time verification code.
The verification code is required to confirm your identity. Your account and personal information are safe even if someone else finds your password because they don't have access to the other device or email address you use to receive the verification code.
- When asked, type in your email address or the last 4 digits of your phone number.
- When you receive the code, type it in, and you are ready to back up your data and use your phone.

Tip: When you receive the code in a message, your phone shows the message notification for a while. To open the message, tap the notification. If the notification is not visible anymore, swipe down from the top of the screen to see it in the action centre, and tap it. To get back to the view where you can add the code, tap and hold the back key , and tap the correct view.
The Microsoft account that you create on your phone is your account on all your Microsoft devices and services.
Parents must approve the account for children under the age of 13. To approve the account, swipe down from the top of the screen, tap All settings > Accounts > Your email and accounts > Manage my Microsoft account, log in with your child's username and password, and follow the instructions shown on the phone.
You can also create or manage your account at account.microsoft.com.
Add an existing Microsoft account to your phone
If you didn't sign in to your Microsoft account during the first start-up, you can add the account to your phone later and get your data and settings easily on all your devices.
- Swipe down from the top of the screen, and tap All settings > Accounts > Your email and accounts > Sign in with a Microsoft account instead.
- Sign in with your existing Microsoft account username and password.

Tip: You can also sign in using your existing Microsoft account phone number and password.
- Select how you want to get your one-time verification code.
The verification code is required to confirm your identity. Your account and personal information are safe even if someone else finds your password because they don't have access to the other device or email address you use to receive the verification code. - When asked, type in your email address or the last 4 digits of your phone number.
- When you receive the code, type it in.

Tip: When you receive the code in a message, your phone shows the message notification for a while. To open the message, tap the notification. If the notification is not visible anymore, swipe down from the top of the screen to see it in the action centre, and tap it. To get back to the view where you can add the code, tap and hold the back key , and tap the correct view.
Set up My Family
If you want to restrict your kids from downloading paid or age-rated content from Store, set up My Family.
Xbox doesn't support child accounts in some countries or regions where Windows phones are available.
With My Family, you can:
-
Prevent your kid from using certain apps and accessing certain websites
-
Restrict the hours during which the phone can be used
Monitor what your kid does with their phone, and when -
Go to account.microsoft.com/family, and log in to your Microsoft account.
- Add your kid's account to My Family by sending an invitation to their email address.
To change the settings for your kid's account, your kid must first accept the invitation.
3. Change the settings for your kid's account.
For more My Family settings, go to account.microsoft.com/family.
OneDrive
Learn what OneDrive is and how to use it.
OneDrive cloud storage
Store your stuff in the clouds. You don't need to worry about freeing memory for your favorite or new apps.
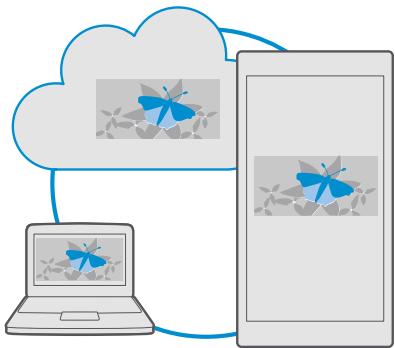
OneDrive is cloud storage for all your documents, photos, and music, so you can access, share, or restore them if needed. You can also set OneDrive to back up your stuff automatically, so when you take a photo or record a video, it's copied to your cloud album.
With OneDrive, you can access your photos, documents, music, and more from your phone, tablet, or computer. Depending on the app, you can even continue working on a document right from where you left it earlier.
There are several places where you can access your stuff on OneDrive. You can save photos to OneDrive in the Photos app, manage your documents in the Office apps, or play your music files in the Groove Music app.
Save your photos and other stuff to OneDrive
You can upload files saved on your phone to OneDrive for easy access from your phone, tablet, or computer.
You need a Microsoft account to connect to OneDrive.
By default, your phone uploads your future photos or videos to OneDrive automatically. If you also want to save the photos you've taken earlier to OneDrive, upload them manually.
Upload a photo to OneDrive manually
- Tap OneDrive.
- Tap + Photos, select the photo you want to upload, and tap
Turn the automatic upload on
Tap OneDrive >> Settings Camera upload, and turn Camera upload on
Save a file to OneDrive
Tap OneDrive > + > This device, select the file you want to upload, and tap
When working on a Word, Excel, or PowerPoint document, your files are saved automatically to OneDrive. You can continue working on the document right where you left it, on any device connected to your Microsoft account – just open it from OneDrive.

Tip: You can also upload files stored on your memory card. Tap OneDrive > + > SD card, and select the file you want to upload.
Save a file back to your phone from OneDrive
Tap OneDrive, browse to the folder where the file is located, and tap Select the file you want to download, tap , and save the file in the folder you want.
You can easily find your downloaded files in the File Explorer app.
Share your photos and other stuff between your devices
With OneDrive, you can easily access your photos, documents, and other stuff you have uploaded from any of your devices.
To upload your photos, documents, or other stuff saved on your phone, tablet, or computer to OneDrive, you need to sign in to your Microsoft account. To access the uploaded content on another device, you need to sign in to the same Microsoft account that was used when uploading the content.
To upload or download content, you need an internet connection. If you don't have a data plan, the data transmission costs may pile up quickly. For information about possible data costs, contact your network service provider.
There are several places where you can access your stuff on OneDrive. On your phone, you can check your photos and videos in the Photos app, open your Office documents in the Office apps, or play your music files in the Groove Music app.
On your tablet or computer, you can either manage your stuff online at onedrive.com, or you can use the OneDrive app and access OneDrive straight from your desktop. If you don't yet have the OneDrive app, you can download and install it from onedrive.com.

Tip: With the OneDrive app on your computer, you can simply drag and drop the files you want to upload to the OneDrive folder in the file manager, such as Windows Explorer or Finder, and the files are automatically uploaded to OneDrive.
Troubleshoot account issues
If you can't access your Microsoft account
- If you need to restore your username, go to account.microsoft.com, type in your phone number and password, and follow the instructions.
- If you need to restore your password, go to https://account.live.com/ ResetPassword.aspx, and follow the instructions.
Personalize your phone
Learn how to personalize the start screen, and how to change ringtones.
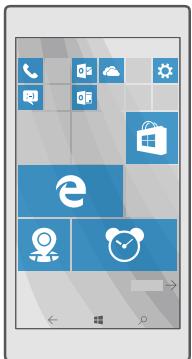
Personalize the start screen
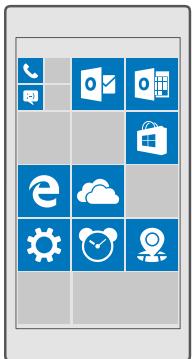
Make your start screen yours - choose your background photo and pin your favorite apps and much more to the start screen. With live tiles, you can see updates on news, weather, finance, and more, immediately on your start screen without opening the app itself.
Add a background photo
- Swipe down from the top of the screen, and tap All settings > Personalization > Start.
- Switch Background to My pictures, and tap Browse.
- Tap a photo, crop it as you like, and tap
- Switch Choose style to Tile picture or Full screen picture.

Tip: If you changed the style setting to Full screen picture, you can change the transparency of the tiles. Just drag the Tile transparency slider.
Change the tile color
Swipe down from the top of the screen, and tap All settings > Personalization > Colors and a color.

Tip: If you have a Microsoft account on your phone, you can share your color scheme, background, and other settings to all your Windows devices. Swipe down from the top of the screen, tap All settings > Accounts > Sync your settings, and switch Sync settings to On. Then switch Theme to On.
Move a tile
Tap and hold the tile, drag and drop it to the new location, and tap the screen.
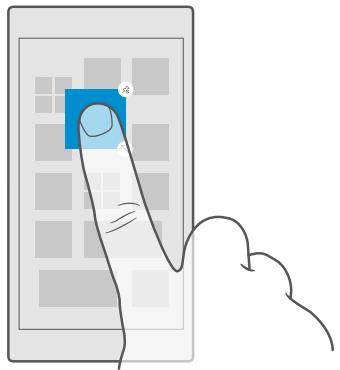
Resize or unpin a tile
To resize, tap and hold the tile, and tap the arrow icon.
The tiles can be either small, medium, or wide. The bigger the tile is, the more information it can show.
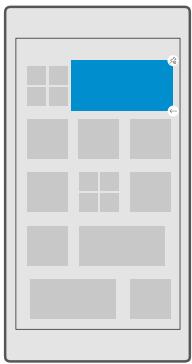
To unpin the tile, tap and hold the tile, and tap (泡) . Tiles are shortcuts to your apps. If you unpin the tile, the app is not deleted from your phone.
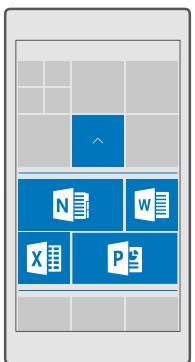
Group tiles into folders
Tap and hold the tile, and drag and drop it on top of the tile or folder you want to group it with. To open an app from the folder, tap the folder, then tap the app you want. To change the name of the folder, tap and hold the name, and type in the name you want. To remove a folder, unpin the tiles in it.
Pin an app
Swipe left to go to the apps menu, tap and hold the app, and tap Pin to Start.
Pin a contact
Tap People, tap and hold the contact, and tap Pin to Start.
When you pin contacts, their feed updates are shown on the tile, and you can call them directly from the start screen.
Personalize the lock screen
Change the lock screen to your liking. You can, for example, have your own favorite photo in the background.
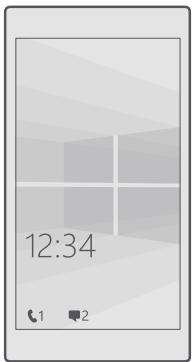
Add a background photo
Swipe down from the top of the screen, and tap All settings > Personalization > Lock screen. Switch Background to My picture, and tap Browse. Select a photo, adjust it to get the best possible fit, and tap .
Change the background photo
Swipe down from the top of the screen, and tap All settings > Personalization > Lock screen. Tap Browse, select a photo, adjust it to get the best possible fit, and tap

Tip: You can also choose an app to show information on your lock screen, or let Bing shuffle photos there. Just change the setting for Background to your liking.
Decide which apps show notifications on the lock screen
You can decide which app notifications, such as missed calls or new messages, you want to see on the lock screen. To choose an app to show the detailed status on the lock screen, swipe down from the top of the screen, tap All settings > Personalization > Lock screen, and under Choose an app to show detailed status, select the app. To choose an app to show the quick status on the lock screen, under Choose apps to show quick status, tap one of the placeholder icons, and select the app.

Example: If you select the detailed status for Messaging, you can read your new messages and see their details on the lock screen. If you select the quick status, the notification on the lock screen tells you only the number of unread messages.
Show the artist when playing music
Press a volume key on the side of your phone.
Change the glance screen settings
With the glance screen, you can easily check the time and other content even when your screen is on standby.
Some of the glance screen settings are not supported by all phones.
- Swipe down from the top of the screen, and tap All settings > Extras > Glance screen.
- Switch Mode to Always on.
Add a background photo to the glance screen
If you've set a background photo to the lock screen, you can set it to appear on your glance screen too. Swipe down from the top of the screen, tap 念 All settings > 念 Extras > Glance screen, and turn Background photo on 念 .
Turn night mode on
Swipe down from the top of the screen, tap All settings > Extras > Glance screen, and change the setting for Night mode to your liking. First, select the color for the text on the glance screen, or hide the glance screen completely for a certain time period. Then set the time when you want to have night mode on.
Create a safe, fun start screen for kids
You can let your kids use some apps on your phone without having to worry about them accidentally deleting your work email, making online purchases, or doing anything else they
shouldn't. Put selected apps, games, and other favorites for kids to enjoy in their own start screen.
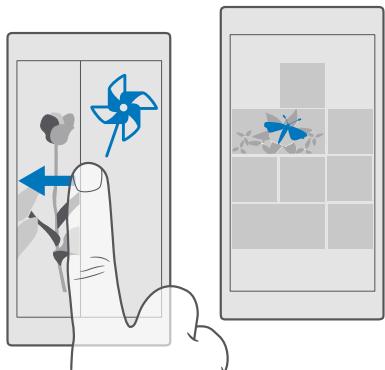
- Swipe down from the top of the screen, and tap All settings > Accounts > Kid's Corner.
- Tap next, choose which content your kids can use, and follow the instructions. If you want to make sure your kid doesn't have access to your own start screen, you can set a sign-in PIN.
As Microsoft Edge is not available in Kid's Corner, you don't have to worry about the websites your kids visit.
Go to your own start screen
Press the power key twice, and swipe up on your own lock screen. If you've set a sign-in PIN, type it in.
Go back to the kid's start screen
On your own lock screen, swipe left, and on the kid's lock screen, swipe up.
Turn the kid's start screen off
On your own start screen, swipe down from the top of the screen, tap All settings > Accounts > Kid's Corner, and switch Kid's Corner to Off.
Personalize your phone tones
Change the notification tone your phone uses for calls, messages, and more, or add your own tones or your favorite song to the collection.
- Swipe down from the top of the screen, and tap All settings > Personalization > Sounds >√.
- To listen to a ringtone so you can see if you like it, tap
- Select the ringtone you want.

Tip: Want to set a specific ringtone for a contact so you immediately know when they are calling? Edit the contact information in the People app.
Change the message tone or other notification sounds
Swipe down from the top of the screen, and tap All settings > System > Notifications & actions. Under Show notifications from these apps, select the app you want to add the notification sound to, and under Notification sound, select the tone you want.
Apps may not be visible until you have used them on your phone.
Add new ringtones to your phone
Connect your phone to your PC with a USB cable, and use the file manager of your PC to move the song you want to the ringtones folder in your phone. Your PC must have Windows Vista, Windows 7, Windows 8, Windows 8.1, or Windows 10. Alternatively, you can use OneDrive to transfer files to your phone.
After the file is in the ringtones folder in your phone, the song appears in the ringtones list in Sounds.
You can use a song as your ringtone if it is not protected with digital rights management (DRM), and it's smaller than 30 MB. The supported formats are WMA, MP3, and M4R.

Tip: Want to create your own unique ringtone? Use the Ringtone Maker app to help you. If you don't have the app on your phone yet, you can download it from www.microsoft.com.
Switch your phone to silent mode
When you turn silent mode on, all ringtones and alert tones are muted. Use this when you are, for example, at the theater or in a meeting.
- Press a volume key on the side of your phone to see the volume status bar, and tap
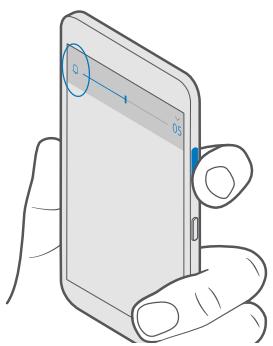
- To switch to silent mode, tap .
Turning silent mode on does not affect your alarms. If you want to rest, make sure you don't have any incoming alarms, or turn your phone off.
Silent mode also doesn't affect your media and apps, so you can still listen to music, for example.

Tip: Don't want to keep your phone in silent mode but can't answer right now? To silence an incoming call, press the volume down key.
Turn silent mode off
Press a volume key on the side of your phone, tap , and on the volume status bar, set the volume you want.
Turn the vibration off
If you don't want your phone to vibrate, press a volume key on the side of your phone, and tap > Vibrate on.
Cortana
Let Cortana make your daily life easier.
Cortana voice assistant
Keep your busy life in check - Cortana is your personal assistant on your phone, only a word away.
Cortana is not available in all regions and languages. For information on the supported regions and languages, go to www.microsoft.com/mobile/support/cortanaregions.
Make sure that your phone and speech language match and are supported by Cortana. If the Cortana language is not supported in your region, try changing the regional settings. For example, if your phone and speech language is Italian, set Italy as the region.
Cortana can help you:
Schedule a meeting
- Set a reminder for an important task
- Send automatic replies for callers when you don't want to be disturbed
Send email
Check your location
Search the web and your cloud storage
Get up-to-date traffic and weather information, and much more
You can do all this using your voice, with only a minimum of fiddling with the touch screen to distract you from other activities.
You need a Microsoft account to use Cortana.
Set up Cortana
Tell Cortana a little bit about yourself, so you can get better help and find what you're looking for.
Cortana is not available in all regions and languages. For information on the supported regions and languages, go to www.microsoft.com/mobile/support/cortanaregions.
You need a Microsoft account to use Cortana.
- Tap the search key .
- Follow the instructions shown on your phone.
To later change your settings, tap the search key , and tap > Notebook > SETTINGS.
Install a speech language
Depending on your region and Cortana version, you may need to download and install the appropriate speech language to use Cortana. Swipe down from the top of the screen, and tap All settings > Time & language > Speech. Tap Add a language, and follow the instructions to install the language you want.
After you have installed the language, you may need to restart your phone.
Use Cortana
If you've got your hands full, but need to use your phone, you can use your voice to make a call, schedule a meeting, search the web, or open an app.
Cortana is not available in all regions and languages. For information on the supported regions and languages, go to www.microsoft.com/mobile/support/cortanaregions.
- Tap the search key .
- Tap , say what you want to do, and follow the instructions shown on your phone.

Tip: To open the Cortana voice assistant quickly, tap and hold the search key

Example: Say Make an appointment, and see what happens.
Identify a song using Cortana
When you're listening to a song and want to know what it is, tap and hold the search key , and tap .
Accessibility
Learn how to make using your phone easier.
Use your phone with ease
Make the fonts larger and the screen easier to view. You can also use your phone with a teletypewriter (TTY/TDD).
Change the font size
- Swipe down from the top of the screen, tap All settings > Ease of Access.
- Tap More options, and drag the Text scaling slider.
Turn high contrast on
Swipe down from the top of the screen, tap All settings > Ease of Access > High contrast, and switch High Contrast to On.
Magnify the screen
Swipe down from the top of the screen, tap All settings > Ease of Access >
Magnifier, and switch Screen magnifier to On. To magnify the screen, double-tap the screen with 2 fingers. When using the magnifier, use 2 fingers to move around the screen. To stop magnification, double-tap the screen with 2 fingers.

Use your phone with a TTY/TDD
- Swipe down from the top of the screen, tap All settings > Ease of Access > More options, and switch TTY Mode to Full.
The available TTY/TDD modes may vary depending on your network service provider.
Use your phone with a hearing aid
Swipe down from the top of the screen, tap All settings > Ease of Access > More options, and switch Telecoil to On.
To check the Hearing Aid Compatibility rating for your phone, go to www.microsoft.com/en/mobile/accessibility/hearing-aid-compatibility.
Use the screen reader
The screen reader reads the information on your screen aloud.
Not all languages are supported, and you may need to download additional language packages.
- Swipe down from the top of the screen, tap All settings > Ease of Access > Narrator, and switch Narrator to On
- To hear the names of the items on the screen, move your finger on the screen. To open an item, double-tap the item.
When the screen reader is turned on, some touch screen actions, such as swipe, are disabled.
Unlock the keys and screen when using the screen reader
Press the power key to wake up the screen, tap the lock screen once, and wait for the screen reader to start talking. Then double-tap the lock screen.
Open or close the screen reader quickly
Make sure Narrator quick launch is switched to On. Press the volume up key, and then tap the start key to turn Narrator off or back on.
Take a screenshot
You can take screenshots of what's on your phone screen and use them like any photos.
- Press the volume up key and the power key at the same time.
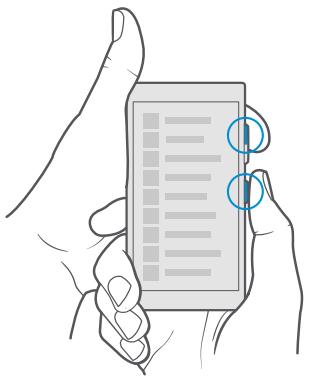
- To view or manage the screenshots you've taken, tap Photos > Albums > Screenshots.
Extend battery life
Get the most out of your phone while getting the battery life you need. There are steps you can take to save power on your phone.
To save power:
| Charge wisely | Always charge the battery fully. |
| Select only the sounds that you need | Mute unnecessary sounds, such as key press sounds. Swipe down from the top of the screen, tap All settings > Personalization > Sounds, and select which sounds to keep. |
| Use wired headphones | Use wired headphones, rather than the speakerphone. |
| Use Battery saver | You can set your phone to automatically save power when the battery charge level is low. To check the battery status, and to turn Battery saver on, swipe down from the top of the screen, and tap All settings > System > Battery saver. When your phone goes into battery saver mode, you may not be able to change the settings of all apps. |
| Change the phone screen settings | ·Set the phone screen to turn off after a short time. Swipe down from the top of the screen, and tap All settings > Personalization > Lock screen, and under Screen times out after, select the time. ·Change the glance screen settings. To briefly see the time and your notifications, swipe down from the top of the screen, tap All settings > Extras > Glance screen, and switch Mode to 30 seconds. To turn the glance screen off, switch Mode to Off. |
| Lower the screen brightness | ·Swipe down from the top of the screen, and tap All settings > System > Display. Make sure that Automatically adjust display brightness is switched to Off. To adjust the brightness, drag the Brightness level slider. |
| Stop apps from running in the background | ·Close the apps you are not using. To close most of the apps, tap and hold the back key ←, and tap × at the top right corner of the apps you want to close. ·Some apps may run in the background unnecessarily. Swipe down from the top of the screen, tap All settings > System > Battery saver > Battery use > Change background app settings, and turn the app you want to stop from running in the background off ⊙. |
| Use location services selectively | Turn location services off when you don’t need them. Swipe down from the top of the screen, and tap All settings > Privacy > Location, and turn Location off ⊙. |
| Use network connections selectively | ·Set your phone to check for new email less frequently, or even by request only. Tap Outlook Mail > Accounts. Select an account, tap Change mailbox sync settings, and select how often to sync. Do this for every email account you have. ·Turn Bluetooth on only when needed. |
- Turn NFC on only when needed. To turn the tap to share feature off, swipe down from the top of the screen, tap All settings > Devices > NFC, and turn Tap to share to Off
- Use a Wi-Fi connection to connect to the internet, rather than a cellular data connection.
- Stop your phone scanning for available wireless networks. Swipe down from the top of the screen, tap and hold Wi-Fi, and switch Wi-Fi networking to Off .
- If you're listening to music or otherwise using your phone, but don't want to make or receive calls, turn Airplane mode on. Swipe down from the top of the screen, tap All settings > Network & wireless > Airplane mode, and switch Status to On
Check battery use
To check which apps have been eating up your battery life, swipe down from the top of the screen, and tap All settings > System > Battery saver > Battery use.
Save on data roaming costs
You can cut data roaming costs and save on your phone bills by changing cellular data settings. To use the optimal connection method, change the Wi-Fi, cellular data, and email download settings.
Data roaming means using your phone to receive data over networks that your network service provider doesn't own or operate. Connecting to the internet when roaming, especially when abroad, can raise data costs substantially.
Using a Wi-Fi connection is generally faster and less expensive than using a cellular data connection. If both Wi-Fi and cellular data connections are available, your phone uses the Wi-Fi connection.
Connect to a Wi-Fi network
- Swipe down from the top of the screen, and tap and hold Wi-Fi.
- Make sure Wi-Fi networking is switched to On
- Select the connection you want to use.
Close the cellular data connection
Swipe down from the top of the screen, tap All settings > Network & wireless > Cellular & SIM, and switch Data connection to Off.

Tip: To follow your data usage, tap All settings > Network & wireless > Data usage.
Stop data roaming
Swipe down from the top of the screen, tap All settings > Network & wireless > Cellular & SIM, and under the SIM you use for cellular data, switch Data roaming options to don't roam.

Tip: To save on data costs when traveling, save new maps to your phone before your journey, and browse the maps offline.
Download email less frequently
To set your phone to check for new email less frequently, or even by request only, tap Outlook Mail > ... > Accounts. Select an account, tap Change mailbox sync settings, and select how often to sync. If you have several email accounts, change the setting for all your accounts.
Write text
Learn how to write text quickly and efficiently using your phone's keyboard.
Use the on-screen keyboard
Writing with the on-screen keyboard is easy. You can use the keyboard when holding your phone in portrait or landscape mode. You can write your messages by tapping the letters or by swiping through them.
Tap a text box.
The keyboard layout can vary in different apps and languages.
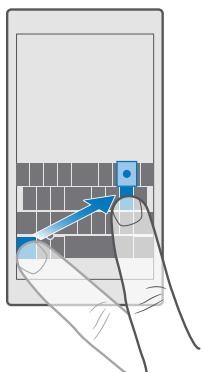
Swipe to write text
Swipe from the first letter of the word, and draw a path from letter to letter. Lift your finger after the last letter. To continue, keep on swiping without tapping the space key. Your phone adds the spaces.
Not all languages are supported.

Switch between upper and lower case characters
Tap the shift key. To turn caps lock mode on, double-tap the key. To return to normal mode, tap the shift key again.
Type in a number or special character
Tap the numbers and symbols key. To see more special character keys, tap ⑧ . Some special character keys bring up more symbols. To see more symbols, tap and hold a symbol or special character.

Tip: To quickly type in a number or special character, while holding the numbers and symbol key, slide your finger to the character, and lift your finger.

Tip: To put a period at the end of a sentence, and to start a new sentence, tap the space key twice.
Copy or paste text
Tap a word, drag the circles before and after the word to highlight the section you want to copy, and depending on the app, tap Copy or 念 . To paste the text, depending on the app, tap Paste or 念
Add an accent to a character
Tap and hold the character, and tap the accent or the accented character, if supported by your keyboard.
Delete a character
Tap the backspace key.
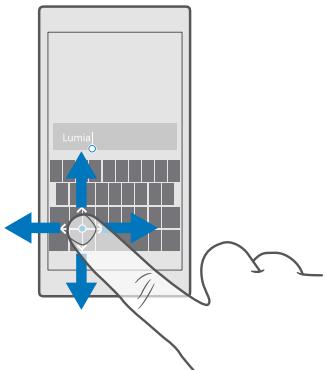
Move the cursor with the cursor controller
To move the cursor from one character or line to another, tap and hold the cursor controller, and drag your finger to the direction you want.
Use keyboard word suggestions
Your phone suggests words as you write, to help you write quickly and more accurately. Word suggestions may not be available in all languages.
When you start writing a word, your phone suggests possible words. When the word you want is shown in the suggestion bar, select the word. To see more suggestions, swipe left.

Tip: If the suggested word is marked in bold, your phone automatically uses it to replace the word you wrote. If the word is wrong, tap it to see the original word and a few other suggestions.
Correct a word
If you notice that you have misspelled a word, tap it to see suggestions for correcting the word.
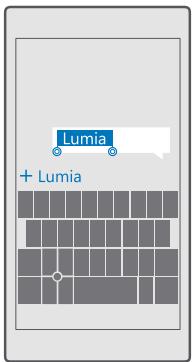
Add a new word to the dictionary
If the word you want isn't in the dictionary, write the word, tap it, and tap the plus sign (+) in the suggestion bar. Your phone also learns new words when you have written them a few times.
Turn word suggestions off
Swipe down from the top of the screen, and tap All settings > Time & language > Keyboard. Tap your language keyboard, and clear the Suggest text check box.
Add a writing language
You can add several writing languages to your keyboard and switch between the languages when writing.
- Swipe down from the top of the screen, and tap All settings > Time & language > Keyboard > + Add keyboards.
- Select the languages you want to write in, and tap

Tip: To remove a pre-installed keyboard, tap and hold the language you don't want to use, and tap remove.

Tip: To add a language to your phone, swipe down from the top of the screen, and tap All settings > Time & language > Language > + Add languages. To remove a language, tap and hold the language you want to remove, and tap Remove.
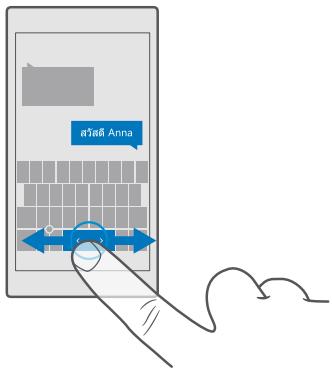
Switch between the languages when writing
Swipe left or right on the space bar until the language you want to write in appears. The keyboard layout and word suggestions change according to the language selected.
Clock and calendar
Keep track of time – learn how to use your phone as a clock, as well as an alarm clock, and how to keep your appointments, tasks, and schedules up to date.
Set an alarm
You can use your phone as an alarm clock, and even set your favorite song as your alarm tone.
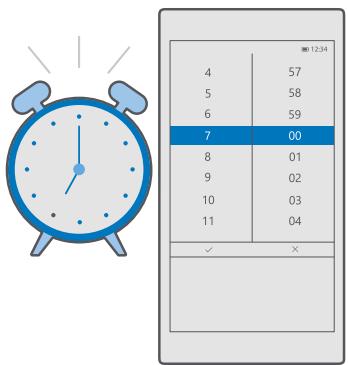
- Tap ☒ Alarms & Clock > +.
- Set the time, and tap
- Fill in the other alarm details, and tap

Tip: Too tired to fiddle with the phone much? Tap and hold the search key , and tell Cortana when you need the alarm.
For the alarm to sound, your phone must be turned on.

Tip: You can quickly see the time of the next active alarm if you have pinned the Alarms & Clock app to the start screen. The tile size must be at least medium.
Use your favorite song as your alarm tone
Connect your phone to your PC with a USB cable, and use the file manager of your PC to move the song you want to the Music folder in your phone. To set the song as your alarm tone, tap
Alarms & Clock > + > Sound > Pick from my music > This Device > Music, and select the song for your alarm tone.
You can also choose music uploaded to your OneDrive.
You can use a song as your ringtone if it is not protected with digital rights management (DRM), and it's smaller than 30 MB.
Your PC must have Windows Vista, Windows 7, Windows 8, Windows 10, or later.
Snoopze an alarm
If you don't want to get up just yet, when the alarm sounds, tap Snooze. Before snoozing, you can change the snooze time.
Turn an alarm off
Tap Alarms & Clock, and switch the alarm to Off
Delete an alarm
Tap the alarm and delete.
Update the time and date manually
If you don't want your phone to update the time and date automatically, you can also set them manually.
- Swipe down from the top of the screen, and tap All settings > Time & language > Date & time.
- Switch Set date and time automatically to Off , and edit the time and date.
- Switch Set time zone automatically to Off , and change the setting for Time zone.

Tip: To change how dates are shown, swipe down from the top of the screen, tap All settings > A字 Time & language > Region > Regional format, choose your region, and restart your phone.
Change the clock to the 24-hour format
Swipe down from the top of the screen, and tap All settings > Time & language > Date & time. Switch 24-hour clock to On
Update the time and date automatically
Swipe down from the top of the screen, and tap All settings > _字 Time & language > Date & time. Switch Set date and time automatically to On
Update the time zone automatically when traveling abroad
Swipe down from the top of the screen, and tap All settings > Time & language > Date & time. Switch Set time zone automatically to On
Check the time in another country
Want to see if your friend on another continent is awake? Check what time it is around the world.
- Tap ☑ Alarms & Clock > World Clock > +.
- Start writing the name of the location, and select the name from the list of proposed matches.

Tip: Tired of typing? Tap ☐, tell Cortana the location you're looking for, and tap it.

Tip: For a closer look at the map, tap the location name.
See the night and day around the world
Tap Alarms & Clock > World Clock > and swipe left and right along the timeline.
Use the countdown timer
No more overcooking - use the countdown timer to measure your cooking times.
- Tap Alarms & Clock > Timer +.
- Set the duration, and tap >
- To start the countdown, tap

Tip: To pause, tap ||. To start the countdown again, tap
See the timer in full screen
Tap . To go back to the normal view, tap .
Use the stopwatch
Use the stopwatch to see how you improve on the running track.
- Tap ☑ Alarms & Clock > Stopwatch > ▷.
- To save your lap or split time, tap □.

Tip: Want to let your friend know about your new personal record? To share your time with them, tap and how you want to share.
See the stopwatch in full screen
Tap. To go back to the normal view, tap .
Add an appointment
To remember an appointment or an event, add it to your Outlook Calendar.
To view a calendar, you must add an account, such as Microsoft account, to your phone.

Outlook Calendar >
- Type in the details you want, and set the time.
- To make the appointment repeat on certain days, tap ·s > Repeat, and fill in the details.
- To add a reminder, tap ·s > and the time you need.
- When done, tap
Tip: To edit an event, tap the event you want and Edit, and edit the details you want.
Send a meeting invitation
When creating an event, tap People and the search box, and start writing a name. The list filters as you write.
You can send meeting invitations to contacts who have an email address defined in the contact details.
Create an event on another calendar
Tap Outlook Calendar > . By default, your events go to your Outlook Calendar. If you have, for example, a shared calendar with your family, you can create and share the event instantly. To change the calendar when creating the event, tap the calendar name, then tap and the calendar you want to use.
Example: You can create an event to a calendar you are sharing with other people, such as your work calendar, so they know when you are busy.
Change your status for an event
When creating an event, tap ..., and select the status you want.
Create a private appointment
When creating an event, tap ·s > Private.
The event does not show in shared calendars.
Delete an appointment
TapOutlook Calendar,and tap the event and
Use multiple calendars
When you set up your email or social networking accounts on your phone, you can sync the calendars from all your accounts in one place.
1. Tap Outlook Calendar.
- To show or hide a calendar, tap , and tap or clear the checkbox next to the calendar name.
When a calendar is hidden, the calendar events and reminders are not shown in different calendar views.
The birthday calendar compiles the birthday information from your social networking accounts.
You can't add new calendars to your phone, but you can choose which calendars from your different accounts you want to see.
Add an account to the calendar
Put your calendars from different accounts in one place.
- Tap Outlook Calendar > Accounts > + Add account.
- Choose your account, sign in, and tap Done.
Switch between calendar views
See a detailed plan for a day or month at a glance - browse through your calendar in different views.
- Tap Outlook Calendar >
- To see your plan for the day hour by hour, tap
- To see your plan for the whole week, tap
- To see only the days with events, tap
- To go back to today, tap
Turn week numbers on and off
Tap Outlook Calendar > Settings > Calendar Settings, then tap to open the week number menu, and tap the option you need.
Switch between calendar types
If you have friends and colleagues around the world, you may want to know when they celebrate their traditional holidays, or what their date is today. Just switch between different calendar types.
- Tap Outlook Calendar > Settings > Calendar Settings.
- Tap the Enable checkbox.
- Tap and the language and the calendar you want.
The dates of the alternative calendar are shown in the calendar view on the right.
Browse your SIM apps
If your service provider has included apps on your SIM card, here's how to find them.
- Swipe down from the top of the screen, and tap All settings > Network & wireless > Cellular & SIM.
- Under the SIM, tap SIM settings.
- Tap SIM applications.
Store
Make your phone your own with more apps, games, and other items, some of which are free of charge. Browse Store to find the latest content for you and your phone.
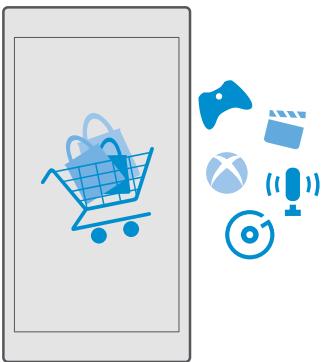
You can download:
- Apps
Games - Entertainment apps and services
News apps and services
Music
Movies
TV shows
Books
You can also:
Get content that is relevant to your tastes and location
Share recommendations with your friends
The availability of Store and the selection of items available for download depend on your region.
To download from Store, you need to be signed in to your Microsoft account on your phone. When you're signed in, you are offered content compatible with your phone.
Many items are free of charge, but some you need to pay for with your credit card or on your phone bill.
The availability of payment methods depends on your country of residence and your network service provider.
Browse Store
Check out the latest and most downloaded apps, games, and other items recommended for you and your phone. Browse different categories, or search for specific items.
- Tap Store.
- Browse the categories on the front page, or tap and a category to see more items.
- Tap an item to view its details. When you view an item, related items are also shown.

Tip: Did you find something in Store that you know your friends would be interested in? Tap Share to send them a link.

Tip: Want to get personalized suggestions on which apps and games might interest you? Sign in to your Facebook account, and Store suggests a selection of apps for you.

Tip: Some of the apps are also available across all Windows 10 devices, such as PCs, tablets, or Xbox consoles. For more information on availability, go to www.microsoftstore.com, and browse to the app you're interested in.
Search Store
Tap , write your search words, and tap .
Download an app, game, or other item
Download free apps, games, or other stuff, or buy more content for your phone.
- Tap Store.
- Tap an item to view its details.
- If the item has a price, tap the price. If the item offers a free trial, tap Free trial to try the item for free for a limited time. If the item is free, tap Free.
The availability of payment methods depends on your country of residence and your network service provider.
- If you're not signed in to your Microsoft account, sign in now.
- Follow the instructions shown on your phone.

Tip: If downloading fails, check that the time and date are set correctly.
When the download is complete, you can open or view the item, or continue browsing for more content.
For more information on an item, contact the publisher of the item.

Tip: Use a Wi-Fi connection to download large files.

Tip: In the Store main view, you can see a notification at the top right corner of the screen on how many of your downloaded apps, games, and other content have updates.

Tip: If your kid's phone is running Windows Phone 8.1 or Windows 10 Mobile, you can use the My Family website to manage their game and app downloads and settings. To set up My Family, go to account.microsoft.com/family, sign in to your Microsoft account, and follow the instructions.
This feature is not available in all languages. For more information on feature and service availability, go to support.microsoft.com, and browse to the instructions for Windows phones.
The availability of apps and games may depend on your kid's age.
See your ongoing downloads
Tap Store > > Downloads and updates.
View your downloads and updates
See all the items downloading to your phone, and check for the latest updates containing important bug fixes and new functionalities for your apps. While an item is downloading, you can continue to browse Store for other content and add items to be downloaded.
To view the status of your downloads, in the Store main view, tap Downloads and updates.

Tip: If you need to, for example, temporarily close your internet connection, you can pause your downloads. To pause an individual item, tap || , and to resume it, tap . If a download fails, you can re-download the item.
Check for updates
To see if there are any updates available for your apps, in the Store main view, tap Downloads and updates > Check for updates: To install available updates, tap Update All.
Write a review for an app
Share your opinion on an app with other Store users - rate and review the app. You can post one review per app that you download.
- In the apps menu, tap and hold the app, and tap Rate and review.
- Rate the app, and write your review.

Tip: You can rate and review your other items in the same way.
Receive ads
If you want to receive ads and tips about apps that might interest you, swipe down from the top of the screen, tap All settings > Privacy > Advertising ID, and switch Advertising ID to On. If you want to clear the information that your phone uses to find your relevant ads and tips, tap Reset your advertising ID.
Troubleshooting Store issues
If you can't download a game
- Check that your cellular data connection or Wi-Fi connection is turned on.
- The app you want to download may require more memory than available on your phone. Try freeing up some space by uninstalling apps or deleting other data, like photos.
-
Use only a Wi-Fi connection to download large files.
If My Family is set up on your phone, you may be restricted from downloading some apps. -
Check that the time and date are set correctly.
People & messaging
Contact your friends and family, and share your files, such as photos, using your phone. Stay tuned with the latest updates to your social networking services even when on the go.
Calls
Learn how to make calls on your new phone and talk to your friends.
Call a contact
Calling your friends is quick and easy when you've saved them as contacts in your phone.
- Tap > ^
- Tap the contact and the number, if the contact has several numbers.
Tip: Is your friend's voice too loud or quiet? Press the volume keys on the side of the phone to change the volume.
Tip: Want to let others hear the conversation? Tap 🥪 Speaker.
Call a phone number
Tap > Dial pad.Type in the phone number,and tap Call.
To type in the ^+ character, used for international calls, tap and hold 0.
The + character only works from abroad. The + character may not work in all regions. In this case, enter the international access code directly.
Search your call history
To search for a call record, tap > History > , and type in the contact's name or phone number.
Remove a call record
To remove a call record, tap > History, tap and hold the call record, and tap Delete.
Copy and paste a phone number
On the start screen, tap People and a contact. Tap and hold the phone number, tap Copy, and in a text box, tap
Make a call using Skype
You can use your phone to make Skype-to-Skype calls and video calls. With Skype global rates, you can also call landlines or other mobile phones. Pay as you go with your credit card, or get a monthly subscription for the best rates.
If you don't yet have the Skype app, you can download it from www.microsoft.com.
- Tap Skype, and sign in with the same Microsoft account that you use with your phone.
- To call a Skype contact, tap people and the contact you want to call, and tap
For more information on Skype-to-Skype calls, see the video at www.youtube.com (in English only).

Tip: To save on data costs, use a Wi-Fi network connection with Skype whenever possible.
Make a video call with Skype
Tap Skype Video > g and the contact you want to call.
If your phone does not have a front camera, you can use the main camera for video calls.
Make a Skype call with Cortana
Tap and hold the search key, and say Skype call or Skype video call, followed by the name of the contact.
Cortana is not available in all regions and languages. For information on the supported regions and languages, go to www.microsoft.com/mobile/support/cortanaregions.
Use speed dial to call your favorite contacts
Call your most important contacts quickly with 1-touch dial.
- Tap Q > Speed dial.
- To add a contact to speed dial, tap + and the contact you want to add.
- To call a contact you have added to 1-touch dial, in the Speed dial view, tap the contact.
Call the last dialed number
Call your friend again if you forgot to say something. In the call history view, you can see information about the calls you have made and received.
- Tap 2 > History.
- Tap the name or phone number.
Use your voice to make a call
You can use your voice to call a contact.
- Tap and hold the search key .
- Say Call and the contact's name.

Tip: You can also use voice dialing with a Bluetooth headset.
Cortana is not available in all regions and languages. For information on the supported regions and languages, go to www.microsoft.com/mobile/support/cortanaregions.
Reply to a call by a text message
If you can't speak right now, you can reply to the caller by a text message.
- When someone calls you, tap Text reply.
- Tap one of the pre-written messages, or tap Type a message..., and write your message.
Turn text reply on or off
Swipe down from the top of the screen, tap All settings > System > Phone, and switch Text reply to On or Off.
Edit a pre-written text message
Swipe down from the top of the screen, tap All settings > System > Phone > Edit replies, and edit the reply you want.
Forward calls to another phone
When you know you can't answer the phone, you can forward incoming calls to another phone number.
For availability of this feature, contact your network service provider.
- Swipe down from the top of the screen, and tap All settings > Extras > Network services.
- Change the settings under Call forwarding.
Depending on your phone, you may be able to make the choice separately for different situations, such as when you can't answer or when you're in a call.

Tip: To check if call forwarding is being used, look for the icon at the top of the screen.
Forward calls to your voice mail
Besides forwarding calls to another phone number, you can also forward these calls to your voice mail and listen to them later.
For availability of this feature, contact your network service provider.
Swipe down from the top of the screen, tap All settings > System > Phone, and type in the voice mail number given by your service provider, if needed.
Depending on your phone, you may either forward all your calls to your voice mail, or make the choice separately for different situations, such as when you can't answer or when you're in a call.

Tip: If you want to avoid forwarding calls to your voice mail, swipe down from the top of the screen, and tap All settings > Extras > Network services. Change the settings under Call forwarding.
Change your voice mail number
Swipe down from the top of the screen, tap All settings > System > Phone, switch Use default voicemail number to Off. Type in the new number.
Call your voice mailbox
If you've forwarded incoming calls to your voice mailbox, you can call it and listen to the messages your friends have left.
-
Tap S > . If asked, type in the voice mail password you received from your network service provider.
-
You can listen or reply to voice mail messages, delete them, or record a greeting message.
For the availability of the voice mailbox service, and for information on setting up how long before calls are forwarded, contact your network service provider.
Use call waiting
Get another call while you're already in one? Call waiting helps you answer or hold one of the calls.
Hold the first call and answer the new call
Tap Answer.
End the first call and answer the new call
Tap End call & answer.
Ignore the new call
Tap × Ignore.
Hold one call and make another
Tap | Hold > + Add call, and call the person you want.
Switch between calls
Tap Tap to swap.
Turn call waiting off
Swipe down from the top of the screen, tap All settings > Extras > Network services. Switch Call waiting to Off
Contacts
You can save and organise your friends' phone numbers, addresses, and other contact information in the People app. You can also get in touch with your friends through social networking services.
People
The People app is where all your friends' contact information is kept. It lets you stay in touch with the people who matter the most through groups. Your social networks are also here.
Go to CONTACTS to see your friends' contact information from every account you have signed into. You can organize the list the way you like by filtering it by account or hiding the contacts without phone numbers.
Check out What's New to see your friends' social network status updates conveniently in one place.
Contact groups make it easy to see the status updates from only the people you want. You can also send emails or messages to all of them at once.
Add or delete a contact
Keep your friends with you. Save their phone numbers, addresses, and other information to the People app.
Add a contact
-
Tap People > CONTACTS > +.
-
If you're signed in to several accounts, select the account to which you want to save the contact.
You cannot save a contact to your phone only, it's always saved to an account.
- Add the contact details, and tap
Your contacts are backed up automatically to your Microsoft account.
Edit a contact
Tap People > CONTACTS. Tap the contact and , and edit or add details, such as a ringtone or a web address.
Delete a contact
Tap People > CONTACTS. Tap the contact and ... > delete.
The contact is deleted both from your phone and, with some exceptions such as Facebook, Twitter, and LinkedIn, from the social networking service where it's stored.

Tip: If you want to delete multiple contacts quickly, tap and the checkboxes next to contacts' names, and tap .
Filter your contacts list
If you don't want contacts from social networking services to show up in your contacts list, you can filter them out. Tap People > CONTACTS. In the contacts list, tap...> SETTINGS > Filter contact list and the accounts you want to show or hide.

Tip: You can also filter out the contacts without phone numbers. Switch Hide contacts without phone numbers to On
Save a number from a received call
When you've received a call, you can easily save the number if it's not yet saved in your contacts. You can save the number in a new or existing contacts list entry.
- Tap > History.
- Tap next to a phone number, and tap
- Tap +, edit the details, select the account you want to save the contact to, and tap
Save a number from a received message
When you've received a message, you can easily save the number if it's not yet saved in your contacts. You can save the number in a new or existing contacts list entry.
- Tap Messaging.
- In the conversations list, tap a conversation and a phone number.
- Tap 0 +
- Edit the contact details, and tap
Search for a contact
If you need to contact a friend quickly, you don't have to scroll through all your contacts. You can search or jump to a letter or character in the contacts list. You can also use a voice command to call or send a message to a contact.
- Tap People > CONTACTS.
- Tap Search, and start writing a name. The list filters as you write.

Tip: Pin your most important contacts or contact groups to the start screen. Tap and hold a contact, and tap Pin to Start.
Jump to a letter or character in your contacts list
Tap any letter in the contacts list on the left, and in the following menu, tap the first letter or character for the name you want.
Use Cortana to call or send a message
In any view, tap and hold the search key , and say Call or Text and the contact's name.
Link contacts
If you have separate entries for the same contact from different social networking services or email accounts, you can link them into a single contact card.
Tap People > CONTACTS.
- Select the contact you want to link to, and tap
- Tap Select a contact to link and the contact to be linked.
Unlink a contact
Select the contact you want to unlink, and tap . Then select the contact you want to unlink from, and tap Unlink.
Copy contacts using Bluetooth
Have your nearest and dearest instantly at your fingertips. Use the Transfer my Data app to easily copy your contacts.

Tip: If your old phone is a Luria, or if you have previously backed up your contacts to your Microsoft account, to import your contacts from OneDrive, just sign in to your account on your phone. The contacts are imported automatically.
Your old phone needs to support Bluetooth. The contacts on your old phone need to be stored in the phone memory, not on the SIM.
- On your old phone, turn Bluetooth on, and make sure the phone is visible to other devices.
- On your new Luria, swipe down from the top of the screen, tap and hold ₧, make sure Bluetooth is turned on, and pair your Luria with your old phone.
- On your new phone, tap Transfer my Data.
- Tap continue.
- Select your old phone from the list of paired devices, and follow the instructions shown on both phones. On your new phone, make sure the Contacts checkbox is selected.
If your contacts are written in a language that is not supported by your new phone, the contact information may not be shown correctly.
After you have copied your contacts, for the best experience and to save space on your phone, uninstall the Transfer my Data app.
Copy contacts from a SIM card
If you have contacts stored on your SIM card, you can copy them to your phone.
Make sure your SIM card is inserted.
- Tap People.
- Tap ·s > Settings > Import from SIM.
If you have multiple accounts, you can tap the account name and choose the account you want to import your contacts to. The default account is Outlook.
- Tap next. To import all your contacts, tap import.
Tip: To select individual contacts, tap clear, and use the check boxes.
You can't save contacts to your new SIM card. Instead, they are kept safe in your account.
Create, edit, or delete a contact group
You can create contact groups to send a message to several people at the same time, or to see social updates from just group members. For example, you can add family members to the same group and reach them quickly with the same message.
- Tap People > GROUPS > +.
- Write a name for the group, and tap
- Tap > + Add Member and a contact. To add another contact, tap ^+ Add Member again.
Tip: To quickly add multiple contacts to the group, tap and the checkboxes next to contacts' names.
4. Tap
Add a new group contact
Tap People > GROUPS. Tap the group, and tap > + Add Member and a contact.
Remove a contact from a group
Tap People > GROUPS. Tap the group and , then tap the contact and Remove from group.
Rename a group
Tap People > GROUPS. Tap the group, then tap ∅ and the group name. Write the new name, and tap √.
Delete a contact group
Tap People > GROUPS. Tap the group and ...> Delete.
Share a contact
You can easily share a contact with your friends.
- Tap People > CONTACTS.
- Tap a contact and > Share Contact >
- Select how you want to share, and follow the instructions.

Tip: If sharing does not work, try uninstalling the Transfer my Data app.
Social networks
Set up social networking services on your phone to keep in touch with your friends.
Set up a social media account
Set up your social networking service accounts.
Tap the social networking app you want to sign in to, such as Facebook, and follow the instructions shown.
To download more social networking apps, tap Store.

Tip: When you sign in to an account, the contacts in the account are automatically imported. To choose which accounts show up in your contacts list, on the start screen, tap People > Settings > filter contact list.
See your friends' status updates
After you set up your social networking services, such as Twitter, on your phone, you can follow your friends' status updates in the People app.
Tap People > What's New.
Comment on a friend's status update
You can contact your friends by commenting on their status updates.
- Tap People > What's New.
- On the post, tap
This takes you to the comment section under the post in a social networking app.
Share a photo in social networking services
After you take a photo, upload it to the web so all your friends can see what you're up to.
- Tap Photos.
- Tap the photo you want to share, and tap
- Tap the social networking service where you want to upload the photo.
- Add a caption if you want, and share or send your photo.
Messages
Stay in touch with your friends with text or multimedia messages.
Send a message
With text and multimedia messages, you can quickly contact your friends and family.
- Tap Messaging > +.
If you start writing a message and switch to another app before sending it, you can continue your message later. In Messaging, tap the draft you want to continue.
- To add a recipient from your contacts list, tap +, or start writing a name. You can also type in a phone number.
- Tap the message box, and write your message.
Tip: To add a smiley, tap
- To add an attachment, such as a photo, tap , and select the attachment type and the attachment.
- To send the message, tap
If you're unable to send a multimedia message, check the following:
- Your mobile subscription supports multimedia messages.
- Your data connection is turned on. Swipe down from the top of the screen, tap All settings > Network & wireless > Cellular & SIM, and switch Data connection to On
Only compatible devices can receive and show multimedia messages. Messages may look different in different devices.
Forward a message
Tap Messaging. Tap a conversation, tap and hold the message you want to forward, and tap forward.
Before forwarding the message, you can edit what's written or add or remove attachments.
Forward multiple messages
Tap Messaging. Tap a conversation and ·s > select messages, tap the check boxes that appear next to the messages, and tap + to forward the messages.
Read a message
You can see on the start screen when you've received a message.
You can view the messages between you and a contact in one conversation thread. The thread can contain text and multimedia messages.
- Tap Messaging.
- To read a message, tap a conversation.
Tip: To prevent others from accidentally seeing notifications about your messages on the lock screen, swipe down from the top of the screen, and tap All settings > Personalization > Lock screen > Choose an app to show detailed status > none.
If you're unable to open a multimedia message, check the following:
- Your mobile subscription supports multimedia messages.
- Your data connection is turned on.Swipe down from the top of the screen, tap All settings > Network & wireless > Cellular & SIM, and switch Data connection to On
You can send text messages that are longer than the character limit for a single message. Longer messages are sent as two or more messages. Your service provider may charge accordingly. Characters with accents, other marks, or some language options, take more space, and limit the number of characters that can be sent in a single message.
Save an attachment
Tap the attachment, such as a photo, and tap
Delete a conversation
Tap Messaging > ≡, select the conversation you want to delete, and tap
Delete a single message in a conversation
Tap a conversation, tap and hold the message you want to delete, and tap delete.
Delete all messages in your phone
Tap Messaging 3>Select all>
Reply to a message
Don't keep your friend waiting - reply to the message straight away.
- Tap Messaging.
- Tap the conversation containing the message.
- Tap the message box, and write your message.
- Tap
Forward a message
Tap a conversation, tap and hold the message you want to forward, and tap forward.
Before forwarding the message, you can edit what's written or add or remove attachments.
Send a message to a group
If you frequently need to send a message to the same group of people, you can create a group in the People app. This way you can reach them all with a single message or email.
- Tap People > GROUPS.
- Tap the group and Message or Email.
- Write and send your message.

Tip: To create a group, in GROUPS, tap +.
Chat using Skype
You can use your phone to send Skype-to-Skype instant messages.
You need a Microsoft account to send messages using Skype.
- Tap Messaging > +.
- Switch Send on: to Skype.
- To add a recipient from your Skype contacts list, tap +, or start writing a name.
Skype contacts connected with your Microsoft account sync automatically with your phone. - Tap the message box, and write your message.
- To send the message, tap

Tip: To save on data costs, use a Wi-Fi network connection with Skype whenever possible.
Make a Skype call directly from a conversation
In a conversation with a Skype contact, tap to make a call, or to make a video call.
Send your location in a message
When you ask your friends to come and meet you, you can send them your location on a map.
This feature may not be available for all regions.
Your phone may ask you about using your location. You need to allow it to use this feature.
- When writing a text message, tap > Your location.
Sending a message with an attachment may be more expensive than sending a normal text message. For more info, contact your service provider.
- Tap
Your friends receive a message with a link to a map showing where you are.
Send an audio message
Celebrate your friend's birthday with a song or cheer someone up with the sound of your voice – send your recording in an audio message.
- Tap Messaging > +.
- When writing a message, tap >voice note.
- Record your message, and tap
- Tap ≥slant
Troubleshoot messaging issues
If you can't send a multimedia message (MMS)
- Restart your phone with the SIM card inserted, and retry sending a multimedia message (your phone loads the settings from the SIM card).
- Send a multimedia message to your own phone number. This way, you can test if you're able to send and receive multimedia messages.
- If you can connect to the internet but you can't send multimedia messages, try searching online to find the multimedia (MMS) settings for your network service provider. To change the MMS settings, swipe down from the top of the screen, and tap All settings > Network & wireless > Cellular & SIM > SIM settings.
If you are abroad, check that data roaming is turned on in your phone settings.

Tip: You must be connected to the internet to send and receive multimedia messages. Confirm with your network service provider that you have an active cellular data subscription (access to internet) on your SIM card.
You can use your phone to read and reply to email when you're on the go.
Add or delete an email account
If you use different email addresses for business and leisure, no problem - you can add several different accounts to your phone's Outlook inbox.
Add your first account
To set up email in your phone, you must be connected to the internet.
If you are signed in to your Microsoft account, the Outlook mailbox associated with it is added automatically.
- Tap Outlook Mail.
- Tap Get started > + Add account.
- Choose your account type, and sign in.
- When you are done adding all the accounts you want, tap Ready to go.

Tip: Depending on your email account, you can also sync other items than just emails to your phone, such as your contacts and calendar.
If your phone doesn't find your email settings, advanced setup can find them. For this, you need to know your email account type and the addresses of your incoming and outgoing email servers. You can get this information from your email service provider.
To find out more about setting up different email accounts, go to support.microsoft.com, and browse to the instructions for Windows phones.
Add an account later
Tap Outlook Mail > Accounts + Add account and the account type, and sign in.

Tip: To add your Exchange work email, contacts, and calendar to your phone, select Exchange as your account, write your work email address and password, and tap Sign in.
Your new account is added to your Outlook inbox.
Delete an account
Tap Outlook Mail > Accounts and the account you want to delete.
You can't remove the Outlook inbox that's associated with your Microsoft account. If you want to remove the inbox (for example, if you're going to sell your phone), you must reset your phone. Make sure you back up everything you need to your Microsoft account before resetting.
Add your Exchange mailbox to your phone
You don't need your computer to access your work email, contacts, and calendar. You can sync the important content between your phone and a Microsoft Exchange server.
Exchange can be set up only if your company has a Microsoft Exchange server. In addition, your company IT administrator must have activated Microsoft Exchange for your account.
Before starting the setup, make sure you have the following:
A corporate email address
- Your Exchange server name (contact your company IT department)
- Your network domain name (contact your company IT department)
- Your office network password
Depending on the Exchange server configuration, you may need to type in additional information during the setup. If you don't know the correct information, contact your company IT department.
- Tap Outlook Mail.
- Tap ·s > Accounts > Add account > Exchange.
- Write your Exchange email address and password, and tap Sign in.
To define which content and how often you want your phone to sync with the server, change the Exchange account settings.
Open email from the start screen
With live email tiles you can open email directly from the start screen.
From the tiles, you can see the number of unread emails and if you've received new email.
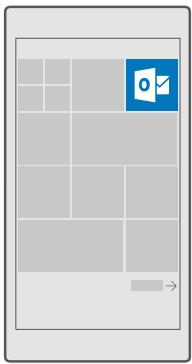
You can pin several mailboxes to the start screen. For example, dedicate a tile for business email and another for personal email.
- Tap Outlook Mail >
- Tap and hold the account you want to pin to your start screen, and tap Pin to start.
Your mailbox appears on the start screen as a new tile. To read your email, tap the tile.
Send email
Don't let your email pile up. Use your phone to read and write email on the go.
- Tap Outlook Mail.
- In your inbox, tap +.
- To add a recipient from your contacts list, start writing a name. You can also write the address.
Tip: To remove a recipient, tap the name and Remove.
- Write the subject and your email.
Tip: Your phone can help you write your email faster. While writing, your phone suggests possible next words to complete your sentence. To add a word, tap a suggestion. To browse the list, swipe over the suggestions. This feature is not available in all languages.
- To attach a photo or a file, tap 日
Tip: You can also take a new photo while writing your email. Tap > Camera, take a photo, and tap
- Tap to send the email.
Read email
If you're waiting for important news, you don't have to wait until you're at your desk. Use your phone to read your emails.
You can see when you have new email on the start screen.
- Tap Outlook Mail.
- In your inbox, tap the email. Unread email is marked in a different color.

Tip: To zoom in or out, place 2 fingers on the screen, and slide them together or apart.
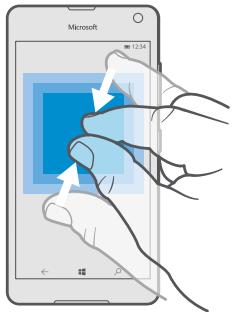

Tip: If an email contains a web address, tap it to go to the website.
Read email in a conversation
In your inbox, tap the conversation that includes the email, and tap the email. A conversation with unread email is marked in a different color.
Save an attachment
With the email open, tap the attachment, such as a photo, and it is downloaded to your phone. Tap and hold the attachment, and tap Save. Not all file formats can be saved.
Copy a link
With the email open, tap and hold the web link, and tap copy link.
Reply to mail
If you receive a mail that needs a quick answer, you can reply straight away using your phone.
- Tap Outlook Mail
- Open the mail, and tap 1

Tip: To reply to the sender only, tap reply. To reply to the sender and all the other recipients, tap reply all.
Forward mail
Open the mail, and tap 口 forward.
Delete email
When your mailbox is overflowing, delete some mails to free up space in your phone.
- In your mailbox, tap to the left of the emails you want to delete.
- Tap the check boxes that appear next to the emails, and tap
All the emails you selected are deleted. Depending on your email account, the email may be deleted from your email server, too.
Delete one email
Open the email, and tap
Send automatic replies
If you are on vacation or otherwise out of the office, you can send automatic replies to the emails that arrive during your absence.
- Tap Outlook Mail > Settings > options.
- Switch Send automatic replies to On , and write your reply.
Camera
Why carry a separate camera if your phone has all you need for capturing memories? With your phone camera, you can easily take photos or record videos.
Open your camera quickly
Make sure you get to your camera in a flash when you need it - use the shortcut in the action center.
Swipe down from the top of the screen, and tap Camera.

Tip: If the Camera shortcut is not visible, tap Expand.

Tip: To turn the camera on when your phone is locked, press the power key, swipe down from the top of the screen, and tap Camera.
Camera basics
Taking a photo or recording a video is quick and easy, as is sharing it with your friends.
Take a photo
Shoot sharp and vibrant photos - capture the best moments in your photo album.
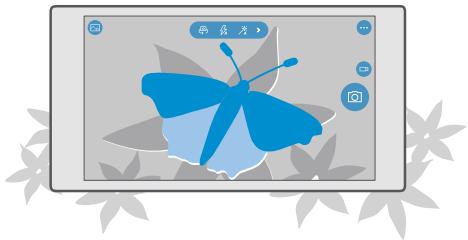
1. Tap Camera.

Tip: To open the camera with Cortana, tap the search key , tap , say Open camera, and follow the instructions. Cortana is not available in all regions and languages. For information on the supported regions and languages, go to www.microsoft.com/ mobile/support/cortanaregions.
- To zoom in or out, slide your fingers apart or together.

Tip: To view the settings when holding your phone in landscape mode, drag to the left. To change a setting, slide your finger up or down on the slider. To close the settings, drag to the right.
- To focus the camera on a specific object, tap the object on the screen.
- To take the photo, tap
To view the photo you just took, tap the round thumbnail at the corner of the screen. The photo is saved in Photos.

Tip: To see the screen at its best, make sure you're not covering the light sensor.
Keep a safe distance when using the flash. Do not use the flash on people or animals at close range. Do not cover the flash while taking a photo.
Record a video
Besides taking photos with your phone, you can also capture your special moments as videos.
- Tap Camera.
- To switch from photo to video mode, tap □
- To zoom in or out, slide your fingers apart or together.
- To start recording, tap . The timer starts to run.
- To stop recording, tap . The timer stops.
To view the video you just recorded, tap the round thumbnail at the corner of the screen. The video is saved in Photos.
Take a selfie
To take a selfie easily, use the front camera of your phone.
- Tap Camera >
- Look into the front camera, and frame your selfie on the screen.
- Tap
Take photos that seem alive
Living Images capture a brief moment of video with every photo you take, so they seem alive when you browse them in Photos.
- Tap Camera > Settings.
- Turn Living Images on
Save your photos and videos to a memory card
If there is a memory card in your phone, and your phone memory is filling up, save the photos you take and videos you record to the memory card.
For the best video quality, record videos to your phone memory. If you record videos to the memory card, it is recommended that the microSD card you use is a fast 4-128GB card by a well-known manufacturer.
- Tap Storage.
- Switch Store new photos on my to SD card.
The photos and videos you take from now on are saved to the memory card.
Use only compatible memory cards approved for use with this device. Incompatible cards may damage the card and the device and corrupt data stored on the card.

Tip: To move the photos and videos you've taken earlier to a memory card, tap File Explorer.
Save location information to your photos and videos
If you want to remember exactly where you were when you took a particular photo or video, you can set your phone to automatically record the location.
- Swipe down from the top of the screen, and tap All settings > Privacy > Location.
- Check that Location is switched to On, and that your camera is allowed to use your location.
Location info can be attached to a photo or video, if your location can be determined using satellite or network methods. If you share a photo or video that contains location information, the location information may be shown to those who view the photo or video. You can turn off geotagging in the phone settings.
Share your photos and videos
You can share your photos and videos quickly and easily for your friends and family to see.
- Take a photo, or record a video.
- On the start screen, tap Photos, and browse to your photo or video.
- Tap the photo or video and select how you want to share, and follow the instructions.

Tip: To share several photos or videos at once, tap , select the photos or videos, and tap .
Not all sharing services support all file formats or videos recorded in high quality.
Advanced photography
Your phone gives you great control over your photo settings. Take exactly the kind of photo you like.
Take photos with a timer
Use timer mode when you want to take a group photo in which you appear too.
- Tap Camera > Photo timer.
- Tap Delay to select how long the camera waits before taking the photo.
- Tap
The photos you take from now on are taken in timer mode.
- To take the photo, tap
Turn timer mode off
Tap Camera > Photo timer > X.
Pick the best exposure with bracketing
If the lighting conditions are challenging, use bracketing mode to capture several photos at once with different exposure settings. Then you can choose the best shot among them.
When exposure bracketing is used, the camera takes several photos at once, some of them brighter, some darker. This improves your chances of capturing a great photo if the lighting conditions are challenging. You can choose how many photos your camera takes and how large the exposure value steps are between the photos.
- Tap Camera > Bracketing.
- To select how many bracketed photos you want to take, tap Number of photos to take.
- To select how large the exposure value steps are, tap Exposure range.
- Tap
The photos you take from now on are taken in bracketing mode.
- To take the photos, tap [O].
The camera takes the selected number of photos which are saved separately in Photos.
Turn bracketing mode off
Tap Camera > Bracketing > X.
Record high-definition videos
When you want to keep your memories of the important events in your life crystal clear, remember to record them in high definition.
- Tap Camera > Settings.
- Tap Video recording, and select a high-definition resolution.
Depending on your phone, the highest available resolution is either 4K or Full HD.
Frame your photos with ease
If you want to frame your shots professionally, you can use viewfinder grids and compose perfect photos.
- Tap Camera > Settings.
- Tap Framing grid and the grid type you want to use.
- To take the photo, tap
Photos and videos
Here's how you view, organize, share, and edit your photos and videos.
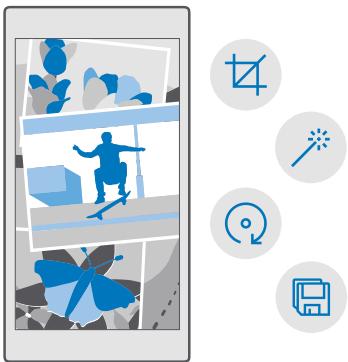
View photos and videos
Relive those important moments - view the photos and videos on your phone.
- Tap Photos.
- To view a photo or video you've taken, tap it.
- To view the next photo or video, swipe left. To view the previous photo or video, swipe right.

Tip: To zoom in or out, place 2 fingers on the screen, and slide your fingers together or apart.
Copy your photos and videos to your computer
Use your computer's file manager to copy or move your photos and videos to the computer.
If your computer is a Mac, install the Luma Photo Transfer for Mac app from
www.microsoft.com/en-us/mobile/support/product/nokia-photo-transfer-for-mac/.
- Connect your phone to a compatible computer with a compatible USB cable.
- On your computer, open a file manager, such as Windows Explorer or Finder, and browse to your phone.

Tip: Your phone is shown under portable devices as Windows Phone. To see the folders of your phone, double-click the name of the phone. There are separate folders for documents, music, photos, ringtones, and videos.
- Open the folder for photos or videos, and select and copy the files to your computer.
By default, your phone uploads your photos and videos to OneDrive automatically. You can access them on any device connected to your Microsoft account.
To change OneDrive settings, tap OneDrive >equiv>
Edit a photo
You can do quick edits, such as rotate and crop, to the photos you have taken. Or use autoenhance to let your phone fix your photo with just one simple tap.
- Tap Photos and a photo.
- Tap and an option.

Tip: If you have downloaded photo editing apps from Store, they are listed here as editing options.
- To save the edited photo, tap
Add cool special effects to your photos
Take photo editing to the next level - add cool special effects to your favorite photos with Lumia Creative Studio.
To download the Luria Creative Studio app or check that you have the latest version, go to www.microsoft.com. Luria Creative Studio may not be available for all phone models.
Reframe your photo
Tap Luma Creative Studio and the photo you want to edit, tap ⑥ , and select the new aspect ratio or rotate your photo.
Apply a filter
Tap Luma Creative Studio and the photo you want to edit, tap , and select a filter.
Enhanc your photo
Tap Luma Creative Studio and the photo you want to edit, tap H, select the type of enhancement, and drag the slider to adjust the level of enhancement.
Blur a part of your photo
Tap Luria Creative Studio and the photo you want to edit, and tap ·s > blur background. You can select the area you want to blur and adjust the amount of blur.
Add color to your photo
Tap Luma Creative Studio and the photo you want to edit, and tap color pop. Select a color from the color palette, and apply it on the photo. When you're done, tap
Save the edited photo
Tap Luria Creative Studio and the photo you want to edit, and tap... > Save.

Tip: To revert to the original photo, tap ·s > revert to original.
Maps & navigation
Explore what's out there and how to get there.
Switch location services on
Use Maps to find out where you are, and save your location to the photos you take. Some apps can use your location information to offer you a wider variety of services.
- Swipe down from the top of the screen, and tap All settings > Privacy > Location.
- Switch Location to On
Tip: You can choose the apps that can use your location. Under Choose apps that can use your location, tap the apps you want.
Find a location
Maps helps you find specific locations and businesses.
- Tap Maps.
- Write search words, such as a street address or place name, in the search bar.
- Select an item from the list of proposed matches as you write, or tap on the keyboard to search.
The location is shown on the map.
If no search results are found, make sure the spelling of your search words is correct.
Add a location to your favorites
Tap Maps, and search for a location. When you've found the location, tap ☆.
To see your favorite locations, tap Maps E Favourites.

Tip: You can also pin your favorite locations to the start screen. Search for the location, and tap .
Share a location with your friends
Tap Maps, and search for a location. When you've found the location, tap and select how you want to share the location.
See your current location
Tap Maps >
Look for restaurants and other interesting places near you
Tap Maps, tap on the map, and under Nearby, select a category.
Get directions to a place
Get directions for walking, driving, or using public transportation – use your current location or any other place as the starting point.
- Tap Maps > > Directions.
- If you don't want the start point to be your current location, tap the search bar, and search for a start point.
- Tap the second search bar, and search for a destination.
The route is shown on the map, along with an estimate of how long it takes to get there. To see detailed directions, tap the information.
Get turn-by-turn voice-guided navigation for driving
After setting your destination (use your current location as the start point), tap and next to the route you want to take (there may be several options), tap Go.
To close the navigation view, tap ·s > × Exit.
Get walking directions
After creating your route, tap

Tip: You can also listen to voice-guided turn-by-turn directions so you don't have to look at the phone screen all the time. Next to the route, tap Go.
Get directions for public transportation
Tap and create your route.
Public transportation information is available in selected cities around the world.

Tip: You can choose when you want to start your journey and the type of route you want to take. Before creating your route, tap Options, and select the best options for your trip.
Download a map to your phone
Save new maps to your phone before a journey, so you can browse the maps without an internet connection when traveling.
To download and update maps, turn Wi-Fi networking on.
If your phone is short on memory, you may need to save the maps to your memory card. Tap 2 Maps > = > Settings > Download or update maps, and under Storage location, tap SD card.
- Tap Maps > Settings > Download or update maps > Download maps.
- Select the country or region.
Update an existing map
To update the maps manually, tap Maps > Settings > Download or update maps, and under Map updates, tap Check now.

Tip: You can also set your phone to update the maps automatically when your phone is connected to a Wi-Fi network and is charging. Tap Maps > Settings > Download or update maps, and under Map updates, switch Automatically update maps to On.
Delete a map
Tap Maps >> Settings > Download or update maps and the map you want to remove, and tap Delete.
Positioning methods
Your phone shows your location on the map using a satellite positioning system, Wi-Fi, or network (Cell ID) based positioning.
The availability, accuracy and completeness of the location info depend on, for example, your location, surroundings, and third party sources, and may be limited. Location information may not be available, for example, inside buildings or underground. For privacy information related to positioning methods, see the Microsoft Privacy Statement.
The Assisted GPS (A-GPS) network service and other similar enhancements to GPS and GLONASS retrieve location info using the cellular network, and assists in calculating your current location.
Some satellite positioning systems may require transferring small amounts of data over the mobile network. If you want to avoid data costs, for example when traveling, you can turn the cellular data connection off in your phone settings.
Wi-Fi positioning improves positioning accuracy when satellite signals are not available, especially when you are indoors or between tall buildings. If you're in a place where the use of Wi-Fi is restricted, you can turn Wi-Fi off in your phone settings.
Internet
Learn how to create wireless connections and browse the web while keeping your data costs down.
Define internet connections
If your network service provider charges you on a pay-as-you-use basis, you may want to change the Wi-Fi and cellular data settings to reduce your data costs. You can use different settings for roaming and at home.
Important: Use encryption to increase the security of your Wi-Fi connection. Using encryption reduces the risk of others accessing your data.
Using a Wi-Fi connection is generally faster and less expensive than using a cellular data connection. If both Wi-Fi and cellular data connections are available, your phone uses the Wi-Fi connection.
- Swipe down from the top of the screen, and tap and hold Wi-Fi.
- Switch Wi-Fi networking to On
- Select the connection you want to use.
Use a cellular data connection
Swipe down from the top of the screen, tap All settings > Network & wireless > Cellular & SIM, and switch Data connection to On.
Use a cellular data connection when roaming
Swipe down from the top of the screen, and tap All settings > Network & wireless > Cellular & SIM. Then switch Data roaming options to roam.
Connecting to the internet when roaming, especially when abroad, can raise data costs substantially.

Tip: To follow your data usage, swipe down from the top of the screen, and tap All settings > Network & wireless > Data usage.
Use your data plan efficiently
If you're worried about your data usage costs, your phone helps you find more efficient ways to use cellular data and track your usage. You can also cut off data connections entirely.
- Swipe down from the top of the screen, and tap All settings > Network & wireless > Data usage.
- Tap set limit, and choose the values you want.
Web browser
Catch up on the news, and visit your favorite websites. You can use Microsoft Edge in your phone to view web pages on the internet. Your browser can also help warn you against security threats.
Tap Microsoft Edge.
To browse the web, you must be connected to the internet.
Browse the web
No need for a computer - you can easily browse the internet on your phone.
Tip: If your network service provider doesn't charge you a fixed fee for data transfer, to save on data costs, use a Wi-Fi network to connect to the internet.
- Tap e Microsoft Edge.
- Tap the address bar.
- Write a web address.
Tip: To quickly write a web address suffix such as .org, tap and hold the suffix key on the keyboard, and tap the suffix you want. - Tap
Tip: To search the internet, write a search word in the address bar, and tap
Zoom in or out
Place 2 fingers on the screen, and slide your fingers apart or together.
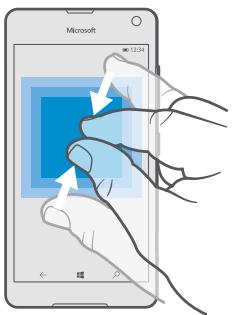
Open a new tab
When you want to visit several websites at the same time, you can open new browser tabs and switch between them.
Tap Microsoft Edge > > +
Open a tab for private browsing
Tap Microsoft Edge > □ > … > New InPrivate tab.
Private browsing prevents your browser from storing browsing data, such as cookies, browsing history, and temporary internet files.
Switch between tabs
Tap Microsoft Edge > and the tab you want.
Close a tab
Tap Microsoft Edge > and tap × on the tab you want to close.

Tip: To close all tabs, tap ·s , and select if you want to close all tabs or only the ones you've opened for private browsing.
Make a website easier to read
Small text on a website can be hard to read. Use your browser in mobile or desktop mode, or switch certain web pages to the reading view and set the font size to your liking.
To set the browser to always use the mode you want, tap Microsoft Edge > Settings, and change the setting for Website preference.
Switch to the reading view
Tap on the address bar. To set the font size for the reading view, tap ·s > Settings > Reading view font size.
Add a website to your favorites
If you visit the same websites all the time, add them to your favorites, so you can access them quickly.
- Tap e Microsoft Edge.
- Go to a website.
- Tap ·s > add to favorites.
- Edit the name if you want to, and tap ADD.

Tip: You can also pin your favorite websites to the start screen. While browsing a website, tap ·s > Pin this page to Start.

Tip: Found a website you want to read, but don't have time right now? Add it to your reading list. Tap ·s > Add to reading list > ADD. If you're signed in to your Microsoft account, your reading list is synced to your account, so you can find your reading list on all your devices. To find the websites you have saved to your reading list, tap ·s > Reading list.
Go to a favorite website
Tap Microsoft Edge >> ☆ Favorites, and select a website from the list.
Share a web page
When you've found an interesting web page, you can send it to your friends in an email or text message, or post it to your social networks. If your friends are next to you, use NFC to share the page simply by tapping the phones together.
- Tap Microsoft Edge, and go to a website.
- Tap ·s > Share, and select how you want to share.
Share a web page using NFC
While browsing, tap ·s > Share > Tap to share (NFC), and touch your friend's phone with your phone.
To make sure Tap to share (NFC) is turned on, swipe down from the top of the screen, tap All settings > Devices > NFC, and switch Tap to share to On.
NFC is not supported by all phones. For availability, go to www.microsoft.com/mobile/support/wpfeatures. This feature may not be compatible with all phones that support NFC.
The other phone must support NFC. For more information, see the user guide of the other phone.
Clear the browser history
When you've finished browsing, you can delete your private data, such as your browsing history and temporary internet files.
Tap Microsoft Edge > Settings > Choose what to clear, and select the data you want to clear.
A cache is a memory location that is used to store data temporarily. If you have, or have tried to, access confidential information or a secure service, requiring passwords, clear the cache after each use.
Delete an individual item in your browsing history
Tap Microsoft Edge > History, tap and hold the item you want to delete, and tap delete.
Search the web
Explore the web and the outside world with Bing search. You can use the keyboard or your voice to write your search words.
- Tap the search key .

Tip: If your phone has Cortana, tap and hold the search key, and say your search word. Cortana is not available in all regions and languages. For information on the supported regions and languages, go to www.microsoft.com/mobile/support/cortanaregions.
- Write your search word in the search box, and tap the enter key. You can also select a search word from the proposed matches.
- To see related search results, tap a search result category at the top of the screen.
Close internet connections
Save your battery by closing internet connections that are open in the background. You can do it without closing any apps.
- Swipe down from the top of the screen, and tap and hold
- Switch Wi-Fi networking to Off

Tip: Wi-Fi networking turns back on automatically. To change this setting, tap Turn Wi-Fi back on.
Close a cellular data connection
Swipe down from the top of the screen, tap All settings > Network & wireless > Cellular & SIM, and switch Data connection to Off.
Troubleshooting internet connection issues
If your internet connection doesn't work
- Check your cellular data connection. Swipe down from the top of the screen, tap All settings > Network & wireless > Cellular & SIM, and check that Data connection is switched to On.
- Check your Wi-Fi connection. Swipe down from the top of the screen, tap and hold Wi-Fi, and check that Wi-Fi networking is switched to On and you are connected to a network.
- Check that battery saver mode is not turned on. Swipe down from the top of the screen, and tap All settings > System > Battery saver.
- If you are abroad, check that you have allowed roaming. Swipe down from the top of the screen, tap All settings > Network & wireless > Cellular & SIM, and check that Data roaming options is switched to roam. Connecting to the internet when roaming, especially when abroad, can raise data costs substantially.
- If you have installed new settings from a text message, uninstall the new settings. Tap Storage > This Device > Apps & games and the new settings item, and tap Uninstall.
Entertainment
Learn how to watch videos, listen to your favorite music, and play games.
Watch and listen
You can use your phone to watch videos and listen to music and podcasts while on the move.
Play music
Listen to your favorite music wherever you are.
- Tap Groove Music.
- Tap the artist, album, song, genre, or playlist you want to play.

Tip: To sort your tracks so you can easily find what you're looking for, tap and how you want to sort.

Tip: You can buy music for your playlists from Store.
Pause or resume playback
Tap || or

Tip: To play songs in a random order, tap
Stop playback
Tap ||. Tap the back key to close the app.
Fast-forward or rewind
Drag the slider left or right.

Tip: To subscribe and listen to podcasts, in the apps menu, tap Podcasts. The service may not be available in all countries and regions.
Subscribe to Groove Music Pass
Go to www.microsoft.com/store/music/groove-music-pass.
With Groove Music Pass, you can download and play an unlimited amount of songs and sync them with your phone, stream music on your phone, PC, or Xbox console, and listen to customized radio channels.
Create a playlist
Organize your songs into playlists, so you can listen to music that fits your mood.
- Tap Groove Music 乐队
- Tap + New Playlist, and write a name for the playlist.
- To add a song to your new playlist, tap and hold the song, tap Add to, and select the playlist.

Tip: You can buy music for your playlists from Store.
Play a podcast
Keep up with your favorite podcasts and subscribe to them on your phone.
- Tap Podcasts.
- Swipe to COLLECTION.
- Tap audio or video and the podcast you want to watch or listen to.
Tip: To select a certain episode of the podcast, tap
Subscribe to a podcast
Tap the podcast you want to subscribe to, and tap
Tip: You can also search for a podcast by name.
Play a video
Have your favorite media with you while on the move - watch videos wherever you are.
- Tap Movies & TV > Videos.
- Tap the video you want to play.
Pause or resume playback
Tap || or >.
Fast-forward or rewind
Drag the slider left or right.
Watch a video in full screen
Tap if: If the video is in a different aspect ratio than the phone's screen, it is cropped to fit the screen.
Hide the navigation bar during playback
If it's possible to hide the navigation bar in your phone, to hide it and make the video wider, tap . To show the navigation bar again, tap .
Loop your video
Tap
Watch more movies
You can also buy or rent movies and television shows directly from your phone. Tap Store > Movies & TV, and browse for what you feel like watching.
You can only watch the rented video within the given viewing period.
Adjust the tone of music
Boost the bass or adjust other bands to enhance your listening experience.
You can't adjust the tone of music when listening to the FM radio or when using Bluetooth accessories.
- Swipe down from the top of the screen, and tap All settings > Extras > equalizer.
- To adjust the tone of music, drag the bands to your liking. You can also select one of the equalizer presets.
Listen to music wirelessly
With a wireless speaker, you can listen to music in high audio quality without any cables.
Wireless speakers are sold separately. The availability of accessories varies by region.
- Swipe down from the top of the screen, and tap All settings > Devices > NFC.
- Switch Tap to share to On
Before using NFC, make sure the screen and keys are unlocked.
3. Touch the NFC area of the speaker with the NFC area of your phone. The speaker connects to your phone automatically.

Tip: You can also connect using Bluetooth. Swipe down from the top of the screen, tap and hold 串 , switch Status to On 串 , and pair your phone with the speaker.
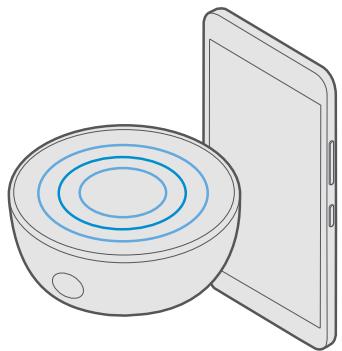
FM radio
Learn how to listen to the radio on your phone.
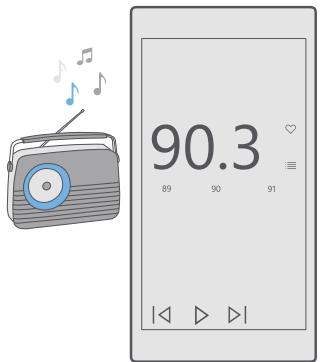
Listen to FM radio
Enjoy your favorite FM radio stations on the go.
To listen to the radio, you need to attach a compatible headset to the device. The headset acts as an antenna.
The headset may be sold separately.
- Tap FM Radio.
- Tap to start playback.
Go to the next or previous station
Swipe left or right on the frequency bar.
Listen to the radio through the speakerphone
Tap ·s > switch to speaker. The headset must still be connected to your phone.
Close the FM radio app
Tap || to stop playback. Tap the back key to close the app.
Save a radio station
Save your favorite radio stations so you can easily listen to them later.
- Tap FM Radio.
- To save the station that you are listening to, tap
View your saved stations list
Tap FM Radio > 三
Sync music and videos between your phone and computer
If you have music or videos stored on your computer, but want to access them on your phone, use a USB cable to sync the media between your phone and computer.
- Connect your phone to a compatible computer with a USB cable.
- In your computer's file manager, such as Windows Explorer or Finder, drag and drop your songs and videos to your phone.

Tip: If your computer's operating system is Windows 7, Windows 8, or Windows 8.1, you can also use the Windows Phone app. Windows 8 and Windows 8.1 install the app automatically when you connect your phone to your computer. For more information, go to support.microsoft.com.

Tip: If your computer's operating system is Mac, you can use the Luma Photo Transfer for Mac app to transfer your photos and videos. For more information, go to www.microsoft.com/en-us/mobile/support/product/nokia-photo-transfer-formac/.
For information on which app works with which computer, see the following table:
| Windows Phone app | Windows Phone app for desktop | Luma Photo Transfer for Mac app (photos and videos only) | Windows Explorer | |
| Windows 10 | x | |||
| Windows 8 and 8.1 | x | x | x | |
| Windows 8 RT | x | x | ||
| Windows 7 | x | x | ||
| Windows Vista/XP | x | |||
| Mac | x |
Games
Keep yourself entertained by downloading and playing games on your phone.
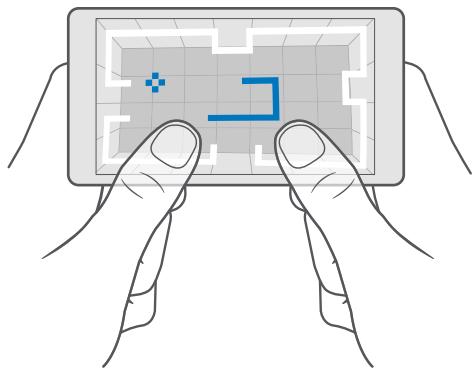
Get a new game
Head to Store to download and install new games on your phone.
- Tap Store >> Games.
- Browse the selection, and tap the game you want.
- If the game has a price, tap the price, or if the game offers a free trial, tap Free trial to try the item for free for a limited time. If the item is free, tap Free.

Tip: To uninstall a game, on the start screen, swipe left to the apps menu, tap and hold the game, and tap Uninstall.
The availability of payment methods depends on your country of residence and your network service provider.
Choose what your kid can download
If your kid's phone is running Windows Phone 8.1 or Windows 10 Mobile, you can use the My Family website to manage game and app downloads and settings. To set up My Family, go to account.microsoft.com/family, sign in to your Microsoft account, and add your kid's account to My Family by sending an invitation to their email address. When your kid has accepted the invitation, you can change the settings for your kid's account.
You can add another parent to My Family on the My Family website. Both parents can manage the child's settings, but can't change one another's settings.
You can select which game ratings your child can see and which apps and games the kid can download. Sign in to your My Family account, and change the settings for your child. You can also prevent your kid from downloading any apps or games.
You may need to add valid credit card information to prove that you are an adult if your kid is 12 years old or younger. No charges are made to your credit card, and your credit card number is not saved. The legal adult age varies by country and region.
For more My Family settings, go to account.microsoft.com/family.
This feature is not available in all languages. For more information on feature and service availability, go to support.microsoft.com, and browse to the instructions for Windows phones.
The availability of apps and games may depend on your child's age.
Xbox doesn't support child accounts in some countries or regions where Windows phones are available.
Play a game
Your Windows phone is perfect for playing games. Whether you feel like having a little challenge, or you just want to relax - choose your own adventure. With Xbox, Microsoft's gaming service, you can keep track of your game scores and achievements. Xbox also lets you follow your friends' updates, making gaming on your phone a truly social experience.
On the start screen, swipe left to the apps menu, and tap the game.
Get more games
Tap Store > × Games.
Resume playing a game
When you return to a game, there may be a resume icon in the game itself. If not, tap the screen.
Get social with the Xbox app
Tap Xbox.
In the Xbox app, you can share your gaming experiences with friends. You can also check what games they're playing, and see their posts, broadcasts, and achievements in the activity feed. If you don't have an Xbox account yet, you can create one in the app.

Tip: If you don't have the Xbox app on your phone, you can download it from Store.
Control your Xbox One with your phone
Control your Xbox One console with your phone using the Xbox SmartGlass app.
If you don't have the Xbox SmartGlass app in your phone, you can download it from www.microsoft.com.
Make sure you are signed in with the same Microsoft or Xbox Live account both on your phone and on your console. You can connect to the compatible Xbox One device using a Wi-Fi or a cellular data connection.
Connect to your Xbox One console
-
Tap Xbox SmartGlass.
-
Tap and select the console you want to connect to.

Tip: If you can't find your console in the list, type in the console's IP address, and tap Connect. In your Xbox console settings, make sure you have allowed your console to connect to any SmartGlass device.

Tip: If you want to watch TV, tap Cable/TV, so you can use your phone as the remote control.
Play a game
Tap Xbox SmartGlass, tap the game and Play on Xbox One, and use your phone as the controller.
Change your Xbox One SmartGlass settings
Tap Xbox SmartGlass > You can, for example, view your profile, find friends, see the summary of your gaming achievements, and view messages from your gaming friends.
Search for games and apps
Tap Xbox SmartGlass > 0.
Lifestyle apps and services
Keep up to date with what's going on in the world with a glance at your phone.
Keep an eye on the stock market
Find out what's happening in the stock market with the Money app.
- Tap Money.
- To see the current stock exchange rates, tap >[4]M arkets.
Follow your favorite stocks
Tap > Watchlist > +, and search for what you want to follow.
Check the exchange rate between different currencies
Tap (\equiv >) \(€, and select the currency you want to convert.
Some apps and services may not be available in all countries or regions, or have content in your language.
Keep up to date with the news
Check the latest news from your favorite sources.
- Tap News.
- To add a topic that interests you, tap > Interests, select a category, and tap + on the topic you want to add.
Tip: To search for a topic, tap .
You can now read articles on the selected topics in the My News view.

Tip: Want to have your most important topics at the top of the list? Tap >
Interests > My Interests, tap and hold = on the topic you want to move, and drag it to a new place.
Some apps and services may not be available in all countries or regions, or have content in your language.
Check the latest weather forecast
When you need to know if it's going to rain or shine, check the current weather conditions or the forecast for the coming days.
- Tap Weather.
- For more details, swipe up.

Tip: To see the forecast for your current location for the next 10 days, swipe left on the date slider.

Tip: To see more details for another date, tap the date, and swipe up.

Tip: To quickly see the weather in other places, save your important locations to your favorites. Tap > Places > and add a location.
Check the weather using the weather map
To check the weather with animated temperature, precipitation, satellite, and cloud maps, tap >
Some apps and services may not be available in all countries or regions, or have content in your language.
Follow your favorite sports
Catch up with the latest sports news and results while on the go.
- Tap Sports.
- Tap and a category.
- To find other categories, tap > More Sports.

Tip: To easily follow your favorite sport or team, add it to your favorites. Tap >☆ My Favourites >十 , and search for the sport or team.
Some apps and services may not be available in all countries or regions, or have content in your language.
Keep track of your daily activity
Use your phone's motion data sensor to keep track of all your daily activities, such as places you visit or the number of steps you take during the day.
To monitor your daily activity, use the Microsoft Health app, or download another fitness app from Store, and allow it to use your phone's motion tracking data.
- To allow apps, such as fitness apps, to access your location and accelerometer data, swipe down from the top of the screen, and tap All settings > Extras > Luma motion data.
2. Switch Places visited to On
Your phone now collects data about the places you visit and the routes you take.
Some apps and services may not be available in all countries or regions, or have content in your language.
Stay in touch with your documents while you're traveling. Learn how to use the Office apps.
Work with Word
Polish your documents on the road with Word.
You need a Microsoft account to edit files.
Edit an existing document
- Tap Word.
- Tap Browse, and browse to the Word file you want to edit.
- To zoom in or out, slide your fingers apart or together.
- To see the page breaks on your document, tap ☑. To go back to the full screen view, tap [ ]
Word saves your files automatically, so you don't have to do it. You can find your files on OneDrive.

Tip: If you want to save the document on your phone, tap Save, choose the location for the file, tap , write a name for the file, and tap .
Create a new document
Tap Word > New.
Search for text in a document
With the file open, tap at the top of the screen, and write your search word. To go to the next or previous match in the document, tap or . For advanced search options, tap 念 .
Insert a table, picture, or other item to the document
With the file open, tap the place where you want to add the item, then tap ·s > > Insert and the option you want.
Change the font or formatting
With the file open, tap ·s > > Home and the option you want.
Work with Excel
No need to travel to the office to check the latest figures. With Excel, you can edit your spreadsheets, create new ones, and share your work on a SharePoint site.
You need a Microsoft account to edit files.
Edit an existing Excel document
- Tap Excel.
- Tap Browse, and browse to the Excel file you want to edit.
- To switch to another sheet tab, tap the sheet name at the bottom.
- To add a new sheet, tap +
Tip: To change the name or color of the new sheet, tap the sheet name.
Excel saves your files automatically, so you don't have to do it. You can find your files on OneDrive.
Tip: If you want to save the workbook on your phone, tap Save, choose the location for the file, tap , write a name for the file, and tap
Create a new workbook
Tap Xg Excel > +New.
Add a row or column
With the file open, tap the row or column header and Insert.
Tip: To move a row or column, tap and hold the row or column header, and drag it to the new location. You can also cut, copy, clear, delete, or hide rows and columns. Tap the header and the option you want.
Add a comment to a cell
With the file open, tap ·s > > Review > Comment, write your comment, and tap Done.
Tip: To show all the comments on the sheet, tap Show Comments.
Apply a filter to cells
With the file open, tap ·s > > Home >2 , and the options you want.
Format cell content and borders
Tap the cell, and tap > > Home and the option you want.
Work with PowerPoint
Add the finishing touches to your presentation en route to your meeting with PowerPoint.
You need a Microsoft account to edit files.
Edit an existing presentation
- Tap PowerPoint.
- Tap Browse, and browse to the PowerPoint file you want to edit.
- To browse between slides, swipe left or right.
Tip: To find a specific slide, tap a slide thumbnail.
- To add a slide, tap + .
Tip: To zoom in or out, slide your fingers apart or together.
PowerPoint saves your files automatically, so you don't have to do it. You can find your files on OneDrive.
Tip: If you want to save the document on your phone, tap Save, choose the location for the file, tap , write a name for the file, and tap .
Create a new presentation
TapPowerPoint > New.
Change the font or add bullets
With the file open, tap ·s > > Home and the option you want.
Insert a table, picture, or other item
With the file open, tap > > Insert and the option you want.
Choose a background theme
With the file open, tap > > Design, and choose a theme.
Arrange slides
Tap and hold the thumbnail of the slide you want to move, and drag it to the new location.
Tip: To cut, copy, paste, duplicate, delete, or hide the slide you're on, tap the highlighted thumbnail, and select what you want to do with it.
Add notes to a slide
Tap
View your presentation as a slide show
To start a slide show, with the file open, tap 2 . For more slide show options, tap ·s > >
Slide show. To stop the slide show, tap the top of the screen and
Tip: To point out specific parts of your slide, tap and hold the slide. You can then move the red dot on the slide.
Write a note in OneNote
Notes on paper are easy to lose. Instead, jot them down with OneDrive. This way, you always have your notes with you. You can also sync your notes to OneDrive and view and edit them with OneNote on your phone, on your computer, or online in a web browser.
You need a Microsoft account to use OneNote.
- Tap OneNote > +.
- Write your note.
Tip: To write the note with your voice, tap above the keyboard. When your phone informs you it's listening to you, say your note.
- To format the text, for example, change the font or add bullets, tap the icons in the toolbar above the keyboard.

Tip: To add a link, tap > , write the text to show on the link, and add the web address.
Use Cortana to create a note
Tap and hold the search key, and say Create a note and what you want to have in the note.
Cortana is not available in all regions and languages. For information on the supported regions and languages, go to www.microsoft.com/mobile/support/cortanaregions.
Add an attachment to your note
To add an attachment, tap , and browse to the file.
Access Office files through OneDrive
All the Office files you work on are stored in the OneDrive cloud storage, so you can continue working on them on any device connected to your Microsoft account. You can open any Office document from the OneDrive app.
You need a Microsoft account to use OneDrive.
Tap OneDrive > Documents and the document you want.
Use the calculator
Forget your pocket calculator - there's a basic, scientific, and binary calculator in your phone.
Tap Calculator.
Switch between calculator types
Tap Calculator > and the calculator type.
Use the converter
Tap Calculator > and the converter type.
Phone management & connectivity
Take care of your phone and its contents. Learn how to connect to accessories and networks, transfer files, create backups, lock your phone, and keep the software up to date.
Update your phone software
Stay in step with the beat - update your phone software and apps wirelessly to get new and enhanced features for your phone. Updating the software may also improve your phone performance.
Make sure that the device battery has enough power, or connect the charger before starting the update.
Warning: If you install a software update, you cannot use the device, even to make emergency calls, until the installation is completed and the device is restarted.
By default, your phone automatically downloads available updates whenever the data connection settings allow it. When your phone notifies you that an update is available, just follow the instructions shown on your phone. If your phone is short on memory, you may need to move your apps, photos, and other stuff to the memory card.

Tip: To move your apps to the memory card, tap Storage > This Device > Apps & games, tap the app you want to move, and tap Move.

Tip: By default, your phone updates your apps and other components automatically when you're connected to a Wi-Fi network.
After the update, check the Luria Help+Tips app or support pages for your new user guide.
Use a secure VPN connection
You may need a virtual private network (VPN) connection to access your company resources, such as intranet or corporate email, or you may use a VPN service for personal purposes.
Contact your company IT administrator for details of your VPN configuration, or visit Store to download the app for your VPN service and check the service's website for additional information.
- Swipe down from the top of the screen, and tap All settings > Network & wireless > VPN.
- To add a VPN profile, tap + Add a VPN connection.
- Write the profile information as instructed by your company IT administrator or VPN service.
Your phone automatically connects to the VPN when it is required.
Edit a VPN profile
Tap the profile and Properties > Edit, and change the information as required.
Delete a VPN profile
Tap the profile and Remove.
Wi-Fi
Find out more about using the Wi-Fi connection.
Connect to Wi-Fi
Connecting to a Wi-Fi network is a handy way of accessing the internet. When out and about, you can connect to Wi-Fi networks in public places, such as a library or internet café.
- Swipe down from the top of the screen, and tap and hold Wi-Fi..
- Switch Wi-Fi networking to On
- Select the connection you want to use.
Your Wi-Fi connection is active when is shown on the status bar at the top of the screen.

Tip: If you want to track locations when satellite signals are not available, for example when you're indoors or between tall buildings, turn Wi-Fi on to improve positioning accuracy.
Close the connection
Swipe down from the top of the screen, tap and hold and switch Wi-Fi networking to Off

Tip: Your phone can connect back to the Wi-Fi network automatically. To change the automatic reconnection time, or to turn Wi-Fi back on manually, change the setting for Turn Wi-Fi back on.
Connect with Wi-Fi Sense
Connect to public Wi-Fi hotspots easily with the Wi-Fi Sense app.
Wi-Fi Sense connects your phone to public Wi-Fi hotspots and accepts the terms of use for you when required. Wi-Fi Sense can also share your contact information if you want.
- Swipe down from the top of the screen, tap and hold Wi-Fi, and tap Wi-Fi Sense.
- To connect to open hotspots, switch Connect to suggested open hotspots to On
- To connect to networks shared by your friends, switch Connect to networks shared by my contacts to On .
NFC
Explore the world around you. Tap accessories to connect to them, and tap tags to call someone or open a website. Near Field Communication (NFC) makes connecting easy and fun.
Get started with NFC
Turn the NFC features on in your phone, and start tapping to share stuff or connect to devices.
With NFC, you can:
- Connect to compatible Bluetooth accessories that support NFC, such as a headset or a wireless speakerphone
- Send things, such as your own photos, to your friend's phone, PC, or tablet running Windows 8 or later
- Tap tags to get more content for your phone, or to access online services
Pay with your phone, if supported by your network service provider
The NFC area is on the back of your phone, near the camera. Tap other phones, accessories, tags, or readers with the NFC area.

- Swipe down from the top of the screen, and tap All settings > Devices > NFC.
- Switch Tap to share to On

Tip: Before using NFC, make sure the screen and keys are unlocked.
Enable NFC payments
Swipe down from the top of the screen, tap All settings > Devices > NFC, and switch Tap to pay to On.
Connect to a Bluetooth accessory with NFC
Hands busy? Use a headset. Or why not listen to music using wireless speakers? You only need to tap the compatible accessory with your phone.
Tap the NFC area of the accessory with the NFC area of your phone, and follow the instructions on the screen.
Accessories are sold separately. The availability of accessories varies by region.
Disconnect the accessory
Tap the NFC area of the accessory again.
For more info, see the accessory's user guide.
Read NFC tags
NFC tags can contain info, such as a web address, a phone number, or a business card. The info you want is just a tap away.
Tap a tag with the NFC area of your phone.
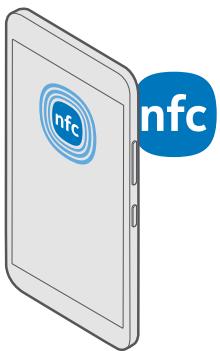
Pay with your phone
Forgot your wallet or purse at home? Not a problem - you can pay with your phone or use it as a ticket, if supported by your network service provider.
This feature may not be available for all regions. For information on availability, contact your network service provider. The services are tied to your SIM. You must have a service subscription with your service provider and your service provider's app installed in Wallet.
- To activate the service, contact your network service provider.
- To make a payment, tap the reader with the NFC area of your phone. Your service provider may ask you to confirm the payment.

Note: Payment and ticketing apps and services are provided by third parties. Microsoft Mobile does not provide any warranty or take any responsibility for any such apps or services including support, functionality, transactions, or loss of any monetary value. You may need to reinstall and activate the payment or ticketing app after repair of your device. You may need to reinstall and activate the cards you have added as well as the payment or ticketing app after repair of your device.
Bluetooth
You can connect wirelessly to other compatible devices, such as phones, computers, headsets, and car kits. You can also send your photos to compatible phones or to your computer.
Connect to a wireless headset
With a wireless headset (sold separately), you can speak on the phone hands-free – you can continue what you're doing, such as working at your computer, during a call.
Since devices with Bluetooth wireless technology communicate using radio waves, they do not need to be in direct line-of-sight. Bluetooth devices must, however, be within 10 meters (33 feet) of each other, although the connection may be subject to interference from obstructions such as walls or from other electronic devices.
Paired devices can connect to your phone when Bluetooth is turned on. Other devices can detect your phone only if the Bluetooth settings view is open.
Do not pair with or accept connection requests from an unknown device. This helps to protect your phone from harmful content.
- Swipe down from the top of the screen, and tap and hold
- Switch Status to On
- Make sure the headset is on.
You may need to start the pairing process from the headset. For details, see your headset user guide.
- To pair your phone and the headset, tap the headset in the list of discovered Bluetooth devices.
- You may need to type in a passcode. For details, see your headset user guide.

Tip: These connection instructions also apply to other Bluetooth accessories.
Disconnect the headset
Swipe down from the top of the screen, tap and hold × , and tap the connected headset in the list.
When you turn the headset on again, the connection reopens automatically. If you want to remove the pairing, after disconnecting the headset, tap and hold the headset in the list of Bluetooth devices, and tap Delete.
Connect to your friend's phone with Bluetooth
Use Bluetooth to wirelessly connect to your friend's phone, to share photos, and much more.
- Swipe down from the top of the screen, and tap and hold ×
- Make sure Bluetooth is turned on in both phones.
- Make sure both phones are visible to other phones. You need to be in the Bluetooth settings view for your phone to be visible to other phones.
- You can see the Bluetooth phones within range. Tap the phone you want to connect to, and tap Pair.
- If the other phone needs a passcode, type in or accept the passcode.
The passcode is only used when you connect to something for the first time.
Send your content using Bluetooth
When you want to share your content or send photos you've taken to a friend, use Bluetooth to send your stuff to compatible devices.
You can use more than one Bluetooth connection at a time. For example, while using a Bluetooth headset, you can still send things to another device.
- Swipe down from the top of the screen, and tap and hold 串
- Switch Status to On
- Tap: select the content you want to send, and tap © > Bluetooth .
For example, in the Photos app, tap ≡ select a photo, and tap Ⓞ > Bluetooth.
- Tap the device to connect to. You can see the Bluetooth devices within range.
- If the other device needs a passcode, type in the passcode. The passcode, which you can make up, must be typed in on both devices. The passcode in some devices is fixed. For details, see the user guide of the other device.
The passcode is only used when you connect to something for the first time.
The location of the received files depends on the other device. For details, see the user guide of the other device.
If the other device is also a Luma phone, the received files are saved in the apps they belong to. For example, photos are saved in the Photos app.
Set your phone to driving mode
Driving mode helps you minimize distraction when driving, letting you concentrate on your journey.
- Swipe down from the top of the screen, and tap All settings > System > Driving mode > Next.
- To set the phone to ignore calls, switch Ignore calls to On . To set the phone to ignore text messages, switch Ignore texts to On .
-
Tap Next.
-
To send an automatic text message when someone calls or texts you, explaining why you can't answer, switch Text replies to calls, Text replies to texts, or both to On . To edit the message, tap the text box.
- Tap Next > Add a device, and tap the Bluetooth device you connect your phone to when driving, such as a headset.
Driving mode starts automatically when the phone and the added Bluetooth device connect.
Change your device name
You can change your phone's device name to make it easy to identify when connecting to other devices with Bluetooth.
- Swipe down from the top of the screen, and tap All settings > System > About > Edit name.
- Change the default name to whatever you like. The default name is usually Windows Phone. Your phone's Bluetooth name is the same as its device name.
Memory and storage
Learn how to manage your apps, files, and other stuff on your phone.
Back up and restore data on your phone
Accidents can happen – so set your phone to back up your settings, such as your start screen layout, and other stuff to your Microsoft account.
You need a Microsoft account to back up your phone. When you have set up your Microsoft account, your contacts and calendar events are backed up automatically and kept in sync with your Microsoft account. You can also set your phone to automatically back up your:
App list
Photos
- Preferred settings
- Accounts
- Passwords
Text messages
- Swipe down from the top of the screen, and tap All settings > Update & security > Backup.
- If asked, sign in to your Microsoft account.
- Select what to back up and how. To automatically back up your future videos or best-quality photos to OneDrive, you need a Wi-Fi connection.
If some of your downloaded apps are not included in the backup, you can re-download them from Store, as long as the app is available. Store remembers the apps you've bought, so you don't need to pay for them again. Data transmission costs may apply. For more information, contact your network service provider.
Your phone backups are not visible in the main view of OneDrive, but you can find them in the OneDrive settings. Check people/live.com for your backed up contacts and calendar/live.com for your calendar events.
For information on data security in OneDrive, go to windows.microsoft.com/en-gb/ onedrive/security.
To back up other content, such as music, connect your phone to your computer, and follow the instructions on the computer screen. You have 2 options: either sync content between your phone and computer using the Phone Companion app for desktop, or drag and drop content from phone to computer in your computer's file manager, such as Windows Explorer.
Back up the photos you've taken earlier to OneDrive
Tap Photos > select the photos or albums you want to upload, tap OneDrive, select where you want to upload the photos, and tap
To check the photos you've backed up, log in to OneDrive on any device and check the folder to which you saved the photos.
Back up your music to OneDrive
Tap OneDrive > + > This device, select the music file you want to upload, and tap
Restore backed up data
You can restore your backed up data after resetting or updating your phone software, or when setting up a new phone. Sign in to your Microsoft account, and follow the instructions shown on your phone. To reset your phone, swipe down from the top of the screen, and tap All settings > System > About > Reset your phone. Resetting restores the factory settings, and erases all your personal content, but you can restore your backed up data after signing in to your Microsoft account.
Check and increase available memory on your phone
Use the Storage app to check how much memory you have available.
1. Tap Storage.
- To check the details of your phone memory, tap This Device. Or, to check the details of your memory card, tap SD card.

Tip: Want to see what more you have on your phone? To easily manage files on your phone, in the apps menu, tap File Explorer.
If the phone memory is getting full, first check for and remove things you no longer need:
Text, multimedia, and email messages
- Contact entries and details
- Apps
Music, photos, or videos
Instead of removing, you can also move the files to the memory card.
The quality of your memory card may affect the performance of your phone greatly. To get the best out of your phone, use a fast 4-128GB card by a well-known manufacturer. For more information on memory cards, check the frequently asked questions.
Use only compatible memory cards approved for use with this device. Incompatible cards may damage the card and the device and corrupt data stored on the card.

Tip: If your phone doesn't recognize the file type of a file (such as a zip file), it places the file in the Other folder. You can check what these are and delete the ones you don't need using the File Explorer app.
Remove temporary files to free up space
Tap Storage > This Device > Temporary files > Delete temporary files.
Save or move apps to a memory card
Expand your phone's memory with a memory card and save your apps to the card by default.
The quality of your memory card may affect the performance of your phone greatly. To get the best out of your phone, use a fast 4-128GB card by a well-known manufacturer. For more information on memory cards, check the frequently asked questions.
The memory card is sold separately.
Select where you want to store your new apps
- Tap Storage.
- Under New apps will save to: choose if you want to store your new apps to your phone memory or memory card.
Move apps to the memory card
Tap Storage > This Device > Apps & games, tap the app you want to move, and tap Move.
You can later move the apps back to your phone from the memory card.
The type of the memory card may affect how long it takes to move large files to the card.
Delete an app from your phone
You can remove installed apps that you no longer want to keep or use, to increase the amount of available memory.
- On the start screen, swipe left to the apps menu.
- Tap and hold the app, and tap Uninstall. You may not be able to remove some apps.
If you remove an app, you may be able to reinstall without buying again, as long as the app is available in Store.
If an installed app depends on a removed app, the installed app may stop working. For details, see the user documentation of the installed app.

Tip: Want to keep the app, but running out of free memory on your phone? Move the app to the memory card instead of uninstalling it. Tap Storage > This Device > Apps & games, tap the app you want to move, and tap Move.
Manage files on your phone
With the File Explorer app, you can easily check the files on your phone, organize them into folders, or delete the ones you don't need anymore. You can manage the files both in the phone memory and on the memory card.
- Tap File Explorer.
- Tap This Device, and browse to the folder you want.
- To search the folder you're currently in, tap
- To change how the files or folders are arranged, tap the current sorting method (Name, Size, or Date), and select a new method.
- To quickly jump to a previous folder, tap the folder you want on the file path at the top of the screen.
Create a new folder
Tap , and write a name.
Move or copy a file or folder to another location
Tap and hold the file or folder you want, and select what you want to do with it.

Tip: To move or copy several files or folders at once, tap , select the files or folders you want, and tap to move or to copy them.
Share a file or folder
Tap: select what you want to share, tap _0 , and select how you want to share.
Delete a file or folder
Tap ,select what you want to delete,and tap
Copy content between your phone and computer
Copy photos, videos, and other content created by you between your phone and computer.
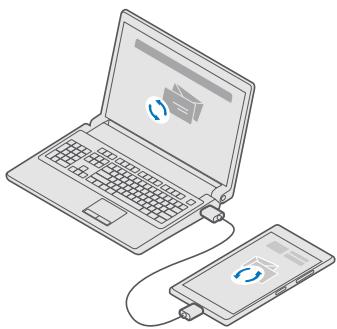

Tip: If you want to transfer your photos to a Mac, it is recommended that you use the Lumia Photo Transfer for Mac app, which you can download from www.microsoft.com/en-us/mobile/support/product/nokia-photo-transfer-for-mac/.
- Connect your phone to a compatible computer with a compatible USB cable.
- On your computer, open a file manager, such as Windows Explorer or Finder, and browse to your phone.

Tip: Your phone is shown under portable devices as Windows Phone. To see the folders of your phone, double-click the name of the phone. There are separate folders for documents, downloads, music, pictures, ringtones, and videos.
- Drag and drop items from your phone to the computer, or from your computer to the phone.
Make sure you put the files in the right folders on your phone, or you may not be able to see them.
You can't copy text messages or contacts to your computer, but you can sync them with your Microsoft account.

Tip: If your computer's operating system is Windows 7, Windows 8, or Windows 8.1, you can also use the Windows Phone app for desktop. Windows 8 and Windows 8.1 install the app automatically when you connect your phone to your computer. For Windows 7, you can download it from go.microsoft.com/fwlink/?LinkID=265472.
For information on which app works with which computer, see the following table:
| Windows Phone app | Windows Phone app for desktop | Luma Photo Transfer for Mac app (photos and videos only) | Windows Explorer | |
| Windows 10 | x | |||
| Windows 8 and 8.1 | x | x | x | |
| Windows 8 RT | x | x | ||
| Windows 7 | x | x | ||
| Windows Vista/XP | x | |||
| Mac | x |
Security
Learn how to protect your phone, and to keep your data secure.
Protect your phone with a sign-in PIN
Set up a sign-in PIN to make sure nobody else can unlock your phone. In addition, when you have set up a sign-in PIN, your phone asks you for this short PIN instead of your Microsoft account password when you change some security settings or buy an app from Store.
- Swipe down from the top of the screen, and tap All settings > Accounts > Sign-in options.
- To set the sign-in PIN, under PIN, tap Add.
- If your phone asks you for your Microsoft account password, type it in.
- Type in a PIN (at least 4 digits).
- Under Require sign-in, set the length of time after which the locked phone requires a sign-in PIN to unlock it.
Keep the sign-in PIN secret and in a safe place separate from your phone. Make sure you have a Microsoft account on your phone – if you have an account and you forget the sign-in PIN, you can reset your PIN at account.microsoft.com using the Find My Phone option. If you forget the sign-in PIN and cannot recover or reset it in any way, your phone will require service. Additional charges may apply, and all the personal data on your phone may be deleted. For more information, contact the nearest care point for your phone, or your phone dealer.
Change your sign-in PIN
Swipe down from the top of the screen, tap All settings > Accounts > Sign-in options, and under PIN, tap Change.
Set your phone to lock automatically when not in use
Swipe down from the top of the screen, tap All settings > Personalization > Lock screen, and under Screen times out after, set the length of time after which you phone is locked automatically.
Unlock your phone with a sign-in PIN
Press the power key, drag the lock screen up, and type in your sign-in PIN.
Use your phone when it's locked
You can use certain features of your phone when it is locked, without having to type in the sign-in PIN.
To wake up your phone, press the power key.
Answer a call
If your phone is locked when someone calls you, swipe up, and tap Answer.
View your notifications
Press the power key, and swipe down from the top of the screen.
Open the camera
If you add a shortcut for the camera in the action center, you can quickly turn the camera on when your phone is locked. Press the power key, swipe down from the top of the screen, and tap ⑥ Camera.
Change how incoming calls are notified
Press the power key, then press a volume key on the side of your phone, and tap the volume bar at the top of the screen.
Turn Bluetooth off
Press the power key, swipe down from the top of the screen, and tap × Bluetooth. If the Bluetooth icon is not visible, tap Expand.
Turn the flashlight on
Press the power key, swipe down from the top of the screen, and tap 📁 Flashlight. If the flashlight icon is not visible, tap Expand. To turn the flashlight off, tap 📁 Flashlight.
Pause or resume music, or skip to another song
Use the music player controls shown at the top of the screen.

Tip: If you're listening to the radio, you can also use the music controls on the lock screen to change the station or mute the radio.
Open Cortana
If your phone has Cortana, to open Cortana, tap and hold the search key .
Cortana is not available in all regions and languages. For information on the supported regions and languages, go to www.microsoft.com/mobile/support/cortanaregions.
Find your lost phone
If you misplaced your phone, or are afraid it's been stolen, use Find My Phone to locate your phone, and lock or delete all data from it remotely.
You need to have your Microsoft account on your phone.
- On your computer, go to account.microsoft.com.
- Sign in with the same Microsoft account as on your phone.
- Select your phone from the device list.
You can:
- Locate your phone on a map
Make your phone ring, even if silent mode is turned on. - Lock your phone, and set it to show a contact number and a message, so it can be returned to you
- Delete all data from your phone remotely
The available options may vary.

Tip: Set your phone to automatically save its location every few hours. If your phone runs out of battery, you can still view its last saved location. Swipe down from the top of the screen, and tap All settings > Update & security > Find My Phone.
Prevent others from resetting and reusing your phone
Make sure you have a Microsoft account set up on your phone. If you added a Microsoft account and selected the recommended settings while setting up your phone, Reset Protection is on by default. If you add a Microsoft account to your phone later, Reset Protection is off.
Reset Protection prevents a thief from resetting and reusing your phone if your phone gets stolen.
To turn Reset Protection on, swipe down from the top of the screen, tap All settings > Update & security > Find My Phone, and under Reset Protection Off, tap Turn on, and type in your Microsoft account password. If you have set up a sign-in PIN on your phone, you need to type it in instead of your Microsoft account password.
Protect your data with device encryption
Swipe down from the top of the screen, tap All settings > System > Device encryption, and switch Device encryption to On.
If you selected the recommended settings while setting up your phone, device encryption is off by default. When turned on, device encryption prevents a hacker from accessing your data or getting the files they need to steal your passwords.
Set up a start screen with selected apps
Let your friends and family members use selected apps on your phone without access to your own start screen.
If you want to make sure other people can't access your own start screen, set up a sign-in PIN on your phone.
- Swipe down from the top of the screen, and tap All settings > Accounts > Apps Corner.
- Tap Apps, select the apps you allow others to use, and tap
You can also choose if you want others to access your action center or settings, use the keys, or modify tiles. To allow access to your action center or settings, turn Action center on . To allow using certain keys, such as the camera key, or to let others modify the tiles on the start screen, tap advanced, and select what you want to allow.
- To exit the settings and to open Apps Corner, tap . It may take a while for your phone to install the apps.
Tip: You can pin the Apps Corner settings to the start screen, so you can quickly open them. Swipe down from the top of the screen, and tap All settings > Accounts > Apps Corner >
Go to your own start screen
In Apps Corner, press and hold the power key, and swipe right.
Manage your advertising ID
To give you more relevant advertising, your phone allows apps to access an advertising ID on your phone. You can control if you want the apps to access the ID or not.
- Swipe down from the top of the screen, and tap All settings > Privacy > Advertising ID.
- Switch Advertising ID to On or Off
Tip: You can reset the advertising ID if the advertising you get on your phone is no longer relevant for you. Tap Reset your advertising ID.
Choose what information your apps can access
Some apps work better if they can access relevant information, such as your calendar, in your phone. You can decide what information your apps can access.
- Swipe down from the top of the screen, and tap All settings > Privacy.
- Tap the feature, and select if you want to let apps access it.
If you turn this setting on, you can still prevent specific apps from accessing the feature.
Wallet
Use Wallet to collect your payment methods in one place.
Wallet is a virtual wallet on your phone. You can:
- Make Store payments, for example, when buying an app
Make in-app purchases with your stored cards
Use your cards in Wallet for NFC payments, if supported by your network service provider - Store your Microsoft gift cards on your phone
-
Store your boarding passes, deals, tickets, and more
-
To start using your Wallet, tap Wallet.
- Tap +, and download the app you are looking for.
Note: Payment and ticketing apps and services are provided by third parties. Microsoft Mobile does not provide any warranty or take any responsibility for any such apps or services including support, functionality, transactions, or loss of any monetary value. You may need to reinstall and activate the payment or ticketing app after repair of your device. You may need to reinstall and activate the cards you have added as well as the payment or ticketing app after repair of your device.
Access codes
Learn what the different codes on your phone are for.
| SIM PIN code (4-8 digits) | This protects your SIM card against unauthorized use or is required to access some features. You can set your phone to ask for the SIM PIN code when you turn it on. If you forget the code or it isn't supplied with your card, contact your network service provider. If you type in the code incorrectly 3 times in a row, you need to unblock the code with the PUK code. |
| PUK | This is required to unblock a SIM PIN code. If the code is not supplied with your SIM card, contact your network service provider. |
| Security code (sign-in PIN, lock screen PIN) (min. 4 digits) | This helps you protect your phone against unauthorized use and verify your identity. You can set your phone to ask for a PIN when you, for example, unlock your phone, change security settings, or buy an app in Store. You can define this PIN yourself. |
| Keep the PIN secret and in a safe place, separate from your phone. | |
| If you forget the sign-in PIN and cannot recover or reset it in any way, your phone will require service. Additional charges may apply, and all the personal data on your phone may be deleted. | |
| For more information, contact the nearest care point for your phone, or your phone dealer. | |
| IMEI | This is used to identify phones in the network. You may also need to give the number to your care point services or phone dealer. |
| To view your IMEI number, dial *#06#. |
Troubleshoot connectivity issues
If your internet connection doesn't work
- Check your cellular data connection. Swipe down from the top of the screen, tap All settings > Network & wireless > Cellular & SIM, and check that Data connection is switched to On.
- Check your Wi-Fi connection. Swipe down from the top of the screen, tap and hold Wi-Fi, and check that Wi-Fi networking is switched to On and you are connected to a network.
- Check that battery saver mode is not turned on. Swipe down from the top of the screen, and tap All settings > System > Battery saver.
- If you are abroad, check that you have allowed roaming. Swipe down from the top of the screen, tap All settings > Network & wireless > Cellular & SIM, and check that Data roaming options is switched to roam. Connecting to the internet when roaming, especially when abroad, can raise data costs substantially.
- If you have installed new settings from a text message, uninstall the new settings. Tap Storage > This Device > Apps & games and the new settings item, and tap Uninstall.
If your phone doesn't respond
If your phone stops working or responding in the way you're used to, you can quickly restart it to get back on track.
Try the following:
Press and hold the power key for about 10 seconds. The phone restarts.
If your phone freezes frequently, update your phone software, or reset your phone. Resetting restores the factory settings, and erases all your personal content, including apps you've purchased and downloaded. Swipe down from the top of the screen, and tap All
settings > System > About > Reset your phone.
If your issue remains unsolved, contact your network service provider or the manufacturer for repair options. Before sending your phone for repair, always back up your data, as all personal data in your phone may be deleted.

Tip: If you need to identify your phone, to view the unique IMEI number of the phone, dial *# 06# . You can also find the IMEI number in the phone body. For details, see the product and safety information section in the online user guide.
Find your model number and serial number (IMEI)
If you need to contact your care point or your service provider, you may need information such as the model number and the serial number (IMEI). To see the info, tap Settings > System > About.
You can also find the information on your phone label, which is located under the back cover.
Product and safety info
Network services and costs
You can only use your device on the LTE 700 (12), 700 (17), 700 (28), 850 (5), 1700/2100 (4), 1900 (2), 2600 (7); WCDMA 850, 900, 1700/2100, 1900, 2100; and GSM 850, 900, 1800, 1900 MHz networks. You need a subscription with a service provider.
Using some features and services, or downloading content, including free items, require a network connection. This may cause the transfer of large amounts of data, which may result in data costs. You may also need to subscribe to some features.
At the request of your network service provider, your device may collect and report Customer Proprietary Network Information, which may include information such as: technical configuration, type, destination, location, and amount of use of any telecommunications services to which you are subscribed. Please see our Privacy Page at www.microsoft.com/mobile/privacypolicy, or contact your network service provider for more information.

Important: 4G/LTE might not be supported by your network service provider or by the service provider you are using when traveling. In these cases, you may not be able to make or receive calls, send or receive messages or use cellular data connections. To make sure your device works seamlessly when full 4G/LTE service is not available, it is recommended that you change the highest connection speed from 4G to 3G. To do this, swipe left on the start screen, and tap Settings > Network & wireless > Cellular & SIM. Select the SIM, and tap SIM settings. Switch Highest connection speed to 3G.
For more information, contact your network service provider.
Make an emergency call

Important: Connections in all conditions cannot be guaranteed. Never rely solely on any wireless phone for essential communications like medical emergencies.
Before making the call:
- Turn the phone on.
If the phone screen and keys are locked, unlock them. - Move to a place with adequate signal strength.
- Tap the start key and tap >
- Enter the official emergency number for your present location. Emergency call numbers vary by location.
- Tap Call
- Give the necessary information as accurately as possible. Do not end the call until given permission to do so.
You may also need to do the following:
- Put a SIM card in the phone. If you don't have a SIM, tap Emergency call when you get an error message about a missing SIM.
If your phone asks for a PIN code, tap Emergency call. - Turn off the restrictions in your phone, such as call restriction, fixed dialing, or closed user group.
- When you turn your phone on for the first time, you are asked to create your Microsoft account and set up your phone. To make an emergency call during the account and phone setup, tap Emergency call.
If the mobile network is not available, you may also try making an internet call, if you can access the internet.
Take care of your device
Handle your device, battery, charger and accessories with care. The following suggestions help you keep your device operational.
- Keep the device dry. Precipitation, humidity, and all types of liquids or moisture can contain minerals that corrode electronic circuits. If your device gets wet, remove the battery, and let the device dry.
- Do not use or store the device in dusty or dirty areas.
- Do not store the device in high temperatures. High temperatures may damage the device or battery.
- Do not store the device in cold temperatures. When the device warms to its normal temperature, moisture can form inside the device and damage it.
- Do not open the device other than as instructed in the user guide.
- Unauthorized modifications may damage the device and violate regulations governing radio devices.
- Do not drop, knock, or shake the device or the battery. Rough handling can break it.
Only use a soft, clean, dry cloth to clean the surface of the device. - Do not paint the device. Paint can prevent proper operation.
For optimal performance, turn the device off and remove the battery from time to time. - Keep the device away from magnets or magnetic fields.
To keep your important data safe, store it in at least two separate places, such as your device, memory card, or computer, or write down important information.
During extended operation, the device may feel warm. In most cases, this is normal. To avoid getting too warm, the device may automatically slow down, close apps, turn off charging, and if necessary, turn itself off. If the device is not working properly, take it to the nearest authorized service facility.
Recycle

Always return your used electronic products, batteries, and packaging materials to dedicated collection points. This way you help prevent uncontrolled garbage disposal and promote the recycling of materials. Electrical and electronic products contain a lot of valuable materials, including metals (such as copper, aluminum, steel, and magnesium) and precious metals (such as gold, silver, and palladium). All materials of the device can be recovered as materials and energy. Check how to recycle your products at www.microsoft.com/mobile/recycle.
About Digital Rights Management
When using this device, obey all laws and respect local customs, privacy and legitimate rights of others, including copyrights. Copyright protection may prevent you from copying, modifying, or transferring photos, music, and other content.
Digital rights management (DRM) protected content comes with an associated license that defines your rights to use the content.
With this device you can access content protected with PlayReady. If certain DRM software fails to protect the content, content owners may ask that such DRM software's ability to access new DRM-protected content be revoked. Revocation may also prevent renewal of such DRM-protected content already in your device. Revocation of such DRM software does not affect the use of content protected with other types of DRM or the use of non-DRM-protected content.
If your device has content protected with either PlayReady or WMDRM, both the licenses and the content are lost if the device memory is formatted. You may also lose the licenses and the content if the files on your device become corrupted. Losing the licenses or the content may limit your ability to use the same content on your device again. For more information, contact your service provider.
Battery and charger information
Use your device only with an original BV-T3G rechargeable battery.
Charge your device with AC-18 charger. Charger plug type may vary.
Third-party chargers that comply with the applicable USB requirements, and that can connect to your device USB connector, may also be compatible.
Microsoft Mobile may make additional battery or charger models available for this device.
The battery can be charged and discharged hundreds of times, but it will eventually wear out. When the talk and standby times are noticeably shorter than normal, replace the battery.
Only replace the battery with a battery that is compliant with the IEEE-standard 1725 standard.
Only use the battery with a charging system that has been qualified with the system per CTIA Certification Requirements for Battery System Compliance to IEEE 1725.
Battery and charger safety
Always turn the device off and unplug the charger before removing the battery. To unplug a charger or an accessory, hold and pull the plug, not the cord.
When your charger is not in use, unplug it. If left unused, a fully charged battery will lose its charge over time.
Always keep the battery between 59^ and 77^ ( 15^ and 25^ ) for optimal performance. Extreme temperatures reduce the capacity and lifetime of the battery. A device with a hot or cold battery may not work temporarily.
Accidental short-circuiting can happen when a metallic object touches the metal strips on the battery. This may damage the battery or the other object.
Do not dispose of batteries in a fire as they may explode. Obey local regulations. Recycle when possible. Do not dispose as household garbage.
Do not dismantle, cut, crush, bend, puncture, or otherwise damage the battery in any way. If a battery leaks, do not let liquid touch skin or eyes. If this happens, immediately flush the affected areas with water, or seek medical help. Do not modify, attempt to insert foreign objects into the battery, or immerse or expose it to water or other liquids. Batteries may explode if damaged.
Use the battery and charger for their intended purposes only. Improper use, or use of unapproved or incompatible batteries or chargers may present a risk of fire, explosion, or other hazard, and may invalidate any approval or warranty. If you believe the battery or charger is damaged, take it to a service center before continuing to use it. Never use a damaged battery or charger. Only use the charger indoors. Do not charge your device during a lightning storm.
Small children
Your device and its accessories are not toys. They may contain small parts. Keep them out of the reach of small children.
Medical devices
Operation of radio transmitting equipment, including wireless phones, may interfere with inadequately shielded medical devices' function. Consult a physician or the medical device's manufacturer to determine if it is adequately shielded from external radio energy.
Implanted medical devices
To avoid potential interference, manufacturers of implanted medical devices recommend a minimum separation of 6 inches (15.3 centimeters) between a wireless device and the medical device. Persons who have such devices should:
Always keep the wireless device more than 6 inches (15.3 centimeters) from the medical device.
Not carry the wireless device in a breast pocket.
- Hold the wireless device to the ear opposite the medical device.
- Turn the wireless device off if there is any reason to suspect that interference is taking place.
- Follow the manufacturer directions for the implanted medical device.
If you have any questions about using your wireless device with an implanted medical device, consult your health care provider.
Accessibility solutions
Microsoft Mobile is committed to making mobile phones easy to use for all individuals, including those with disabilities. For more information, visit aka.ms/phoneaccessibility.
Hearing

Warning: When you use the headset, your ability to hear outside sounds may be affected. Do not use the headset where it can endanger your safety.
This device has been tested and rated for use with hearing aids for some of the wireless technologies used in this device. However, there may be some newer wireless technologies used in this device that have not yet been tested for use with hearing aids. It is important to try the different features of this device thoroughly and in different locations, using your hearing aid or cochlear implant, to determine if you hear any interference. Consult your service provider about its return and exchange policies and for information on hearing aid compatibility.
Some wireless devices may interfere with some hearing aids.
Your device complies with FCC rules on hearing aid compatibility. These rules require an M3 rating or higher. The M value of your device is marked on the device sales package. To determine the M-rating of your hearing aid and compatibility with this device, consult your hearing health professional. For more information about accessibility, go to www.microsoft.com/en/mobile/accessibility/hearing-aid-compatibility.
To use a telecoil-equipped hearing aid with this device, activate the hearing aid (T switch) and the device telecoil. The sound quality depends on the type of your hearing aid.
Protect your device from harmful content
Your device may be exposed to viruses and other harmful content. Take the following precautions:
- Be cautious when opening messages. They may contain malicious software or otherwise be harmful to your device or computer.
- Be cautious when accepting connectivity requests, browsing the internet, or downloading content. Do not accept Bluetooth connections from sources you do not trust.
- Only install and use services and software from sources that you trust and that offer adequate security and protection.
- Install antivirus and other security software on your device and any connected computer. Only use one antivirus app at a time. Using more may affect performance and operation of the device and/or computer.
- If you access preinstalled bookmarks and links to third party internet sites, take the appropriate precautions. Microsoft Mobile does not endorse or assume liability for such sites.
Information on health
The U.S. Food and Drug Administration (FDA) and the U.S. Federal Communications Commission (FCC) published statements and questions and answers concerning mobile telephones and health. Microsoft Mobile encourages you to visit these websites for updated information. You can access the FDA website at www.fda.gov/Radiation-EmittingProducts/RadiationEmittingProductsandProcedures/HomeBusinessandEntertainment/CellPhones/default.htm and the FCC website at transition.fcc.gov/oet/rfsafety/rf-faqhs.html. Additional health-related information is available from the World Health Organization (WHO) at www.who.int/mediacentre/factsheets/fs193/en/ and The National Cancer Institute ("NCI") www.cancer.gov/cancertopics/factsheet/Risk/cellphones. In the event that you are concerned about possible health effects, the FDA suggests that you limit your own or your children's radio frequency (RF) exposure by limiting the length of calls or by using handfree devices.
Vehicles
Radio signals may affect improperly installed or inadequately shielded electronic systems in vehicles. For more information, check with the manufacturer of your vehicle or its equipment.
Check regularly that all wireless device equipment in your vehicle is mounted and operating properly. Do not store or carry flammable or explosive materials in the same compartment as the device, its parts, or accessories. Do not place your device or accessories in the air bag deployment area.
Safety and texting while driving
Safety should be every driver's first priority. Drivers must obey all local laws that may include restrictions on the use of mobile telephones or accessories while driving. If use is legal, always keep your hands free to operate the vehicle while driving and use a handsfree device whenever possible. Suspend calls in heavy traffic or hazardous weather. Get to know your mobile phone and its features and make any necessary information inputs prior to driving. Do not input data or engage in text messaging while driving. Mobile telephones should not be used when use may be a distraction to the driver.
The Cellular Telecommunications & Internet Association (CTIA) has published further info and tips on safe use of cellular telephones at www.ctia.org/consumer_info/safety, which we encourage you to review.
Potentially explosive environments
Turn your device off in potentially explosive environments, such as near gas station pumps. Sparks may cause an explosion or fire resulting in injury or death. Note restrictions in areas with fuel; chemical plants; or where blasting operations are in progress. Areas with a potentially explosive environment may not be clearly marked. These usually are areas where you are advised to turn your engine off, below deck on boats, chemical transfer or storage facilities, and where the air contains chemicals or particles. Check with the manufacturers of vehicles using liquefied petroleum gas (such as propane or butane) if this device can be safely used in their vicinity.
Certification information (SAR)
This mobile device meets guidelines for exposure to radio waves.
For information on SAR, see the printed user guide, or go to sar.microsoft.com.
Support messages
To help you take maximum advantage of your phone and services, you may receive messages from Microsoft Mobile. The messages may contain tips and tricks and support. To provide the service described above, your mobile phone number, the serial number of your phone, and some identifiers of the mobile subscription may be sent to Microsoft Mobile when you use the phone for the first time. This information may be used as specified in the privacy policy, available at www.microsoft.com/mobile.
Care
For questions regarding your plans, billing or network please contact your operator. For questions regarding your product and warranty, please visit the support pages for your country at www.microsoft.com/mobile/support
Copyrights and other notices
Declaration of Conformity
C€0168
Hereby, Microsoft Mobile Oy declares that this RM-1150 product is in compliance with the essential requirements and other relevant provisions of Directive 1999/5/EC. A copy of the Declaration of Conformity can be found at www.microsoft.com/mobile/declaration-of-conformity.
The availability of products, features, apps and services may vary by region. For more information, contact your dealer or your service provider. This device may contain commodities, technology or software subject to export laws and regulations from the US and other countries. Diversion contrary to law is prohibited.
THE CONTENTS OF THIS DOCUMENT ARE PROVIDED "AS IS." EXCEPT AS REQUIRED BY APPLICABLE LAW, NO WARRANTY OF ANY KIND, Either EXPRESS OR IMPLIED, INCLUDING, BUT NOT LIMITED TO, THE IMPLIED WARRANTY OF MERCHANTABILITY AND FITNESS FOR A PARTICULAR PURPOSE, ARE MADE IN RELATION TO THE ACCURACY, RELIABILITY OR CONTENTS OF THIS DOCUMENT. Microsoft Mobile reserves the right to revise this document or withdraw it at any time without prior notice.
TO THE MAXIMUM EXTENT PERMITTED BY APPLICABLE LAW, UNDER NO CIRCUMSTANCES SHALL MICROSOFT MOBILE OR ANY OF ITS LICENSORS BE RESPONSIBLE FOR ANY LOSS OF DATA OR INCOME OR ANY SPECIAL, INCIDENTAL, CONSEQUENTIAL OR INDIRECT DAMAGES HOWSOEVER CAUSED.
Reproduction, transfer or distribution of part or all of the contents in this document in any form without the prior written permission of Microsoft Mobile is prohibited. Microsoft Mobile operates a policy of continuous development. MICROSOFT MOBILE RESERVES THE RIGHT TO MAKE CHANGES AND IMPROVEMENTS TO ANY OF THE PRODUCTS DESCRIBED IN THIS DOCUMENT WITHOUT PRIOR NOTICE.
Microsoft Mobile does not make any representations, provide a warranty, or take any responsibility for the functionality, content, or end-user support of third-party apps provided with your device. By using an app, you acknowledge that the app is provided as is.
Downloading of maps, games, music and videos and uploading of images and videos may involve transferring large amounts of data. Your service provider may charge for the data transmission. The availability of particular products, services and features may vary by region. Please check with your local dealer for further details and availability of language options.
FCC notice
This device complies with part 15 of the FCC rules. Operation is subject to the following two conditions: (1) This device may not cause harmful interference, and (2) this device must accept any interference received, including interference that may cause undesired operation. For more information, go to transition.fcc.gov/oot/rf/safety/rf-faqs.html. Any changes or modifications not expressly approved by Microsoft Mobile could void the user's authority to operate this equipment.
Note: This equipment has been tested and found to comply with the limits for a Class B digital device, pursuant to part 15 of the FCC Rules. These limits are designed to provide reasonable protection against harmful interference in a residential installation. This equipment generates, uses and can radiate radio frequency energy and, if not installed and used in accordance with the instructions, may cause harmful interference to radio communications. However, there is no guarantee that interference will not occur in a particular installation. If this equipment does cause harmful interference to radio or television reception, which can be determined by turning the equipment off and on, the user is encouraged to try to correct the interference by one or more of the following measures:
Reorient or relocate the receiving antenna.
- Increase the separation between the equipment and receiver.
- Connect the equipment into an outlet on a circuit different from that to which the receiver is connected.
- Consult the dealer or an experienced radio/TV technician for help.
For the electronic labeling information, swipe down from the top of the screen, and tap All settings > Extras > Advanced info. Labeling contains information such as the FCC ID.
The Bluetooth word mark and logos are owned by the Bluetooth SIG, Inc. and any use of such marks by Microsoft Mobile is under license.
This product is licensed under the MPEG-4 Visual Patent Portfolio License (i) for personal and noncommercial use in connection with information which has been encoded in compliance with the MPEG-4 Visual Standard by a consumer engaged in a personal and noncommercial activity and (ii) for use in connection with MPEG-4 video provided by a licensed video provider. No license is granted or shall be implied for any other use. Additional information, including that related to promotional, internal, and commercial uses, may be obtained from MPEG LA, LLC. See
www.mpegla.com.
Portions © 2016 Cricket Wireless LLC. All rights reserved. Cricket and the Cricket logo are registered trademarks under license to Cricket Wireless LLC.