USER MANUAL HYM43SP HYUNDAI
Models HYM43SP - HYM46SP

User Manual
CONTENTS
- SAFETY 4-6
- QUICK START 7-16
- STARTING PROCEDURE 17-19
- STOPPING PROCEDURE 19
- USING THE MACHINE 20
- MAINTENANCE 21-24
- TROUBLESHOOTING 25-26
- SPECIFICATION 27
- PARTLOCATIONS 28
- DECLARATIONS OF CONFORMITY 29
- RECYCLING & PRODUCT DISPOSAL 30
- CONTACT DETAILS 30
- MANUAL UPDATES 30
- WARRANTY 31
1. SAFETY
1.1. General safety notes.
1.1.1. The operator of the machine is responsible for, and has a duty of care in making sure that the machine is operated safely and in accordance with the instructions in this user manual. Keep the manual safe and pass it on if the machine is loaned or sold to another user.
1.1.2. Please note the following safety points.
1.1.2.1. The machine should never be left it in a condition which would allow an untrained or unauthorised person/s to operate this machine.
1.1.2.1.1. All due care and diligence should be taken by the operator for the safety of, and with regard to, those around whilst using the machine.
1.1.2.1.2. Some or all of the following - warning signs, symbols and/or PPE pictograms may appear throughout this manual. You MUST adhere to their warning/s. Failure to do so may result in personal injury to yourself or those around you.

DANGER
Indicates a hazard, which, if not avoided, could result in serious injury or death.

WARNING
Indicates a hazard, which, if not avoided, could result in serious injury.

CAUTION
Indicates a hazard which, if not avoided, might result in minor or moderate injury.

NOTE
Indicates a situation that could easily result in equipment damage.

READ and keep the manual safe and pass it on if the machine is loaned or sold to another user. You MUST fully read instructions to make sure you use and operate machine safely.
Appropriate Personal Protective Equipment (PPE), MUST be worn at all times when machine is in use or being repaired.


1.2. Carbon monoxide (where applicable).
DANGER!
BREATHING IN CARBON MONOXIDE FUMES CAN KILL YOU!
To help protect against CO poisoning install a Carbon Monoxide detector.


NEVER use Petrol/Diesel powered equipment inside, especially a home, garage, tent, camper-van, caravan, motorhome or boat.
EVEN if doors, windows, vents and hatches are open. Only use OUTDOORS and as far away from doors, windows, vents and open hatches as possible to prevent inhaling fumes.
READING MANUAL BEFORE USE WILL HELP AVOID OTHER MACHINE HAZARDS.
1.2.1. Carbon monoxide is a colourless and odourless gas. Inhaling this gas can cause death as well as serious long term health problems such as brain damage.
1.2.2. The symptoms of carbon monoxide poisoning can include but are not limited to the following; Headaches, dizziness, nausea, breathlessness, collapsing or loss of consciousness.
1.2.2.1. Carbon monoxide poisoning symptoms are similar to flu, food poisoning, viral infections and simply tiredness. It is quite common for people to mistake this very dangerous poisoning for something else.
1.2.2.2. To avoid carbon monoxide poisoning DO NOT use Petrol/Diesel- powered equipment inside any of the following; Home, garage, tent, camper van, mobile home, caravan or boat.
This list is not exhaustive and if you are in any doubt contact your dealer.
1.2.3. If you think you have or someone around you has been affected by carbon monoxide poisoning;
1.2.3.1. Get them fresh air immediately, by leaving the affected area or by opening doors and windows. If safe and practical to do so make sure that the machine is turned off. DO NOT enter a room you suspect of having carbon monoxide present – instead call the emergency services.
1.2.3.2. Contact a doctor immediately or go to hospital - let them know that you suspect carbon monoxide poisoning.
1.2.4 DO NOT use in an enclosed area or a moving vehicle.
1.3. General fuel safety (where applicable).

CAUTION
ALL FUELS ARE FLAMMABLE
1.3.1. Fire hazard - keep fuel away from all sources of ignition for example heaters, lamps, sparks from grinding or welding.

Fire Hazard
1.3.2. DO NOT carry out hot work on tanks that have contained fuel it is extremely dangerous.
1.3.3. ALWAYS keep work area clean and tidy.
1.3.4. ALWAYS clean up all spills promptly using correct methods i.e. absorbent granules and a lidded bin.
1.3.5. ALWAYS dispose of waste fuels correctly.
1.4. Fuelling/De-fuelling (where applicable).

CAUTION
ALL FUELS ARE FLAMMABLE
1.4.1. ALWAYS fuel and defuel in a well-ventilated area outside of buildings.
1.4.2. ALWAYS wear correct, suitable and fit for purpose Personal Protective Equipment (PPE), suggested items are but not limited to safety gloves and overalls.

1.4.3. When fuelling/de-fuelling ALWAYS avoid inhaling fumes
1.4.4. When de-fuelling ALWAYS use a propriety fuel retriever.
1.4.5. ALWAYS carry fuel in the correct and clearly marked container.

Fire Hazard
1.5. Electrical safety (where applicable).

Risk of electric shock
1.5.1. Electricity can kill - NEVER work on LIVE/ENERGISED equipment.
1.5.2. Prior to carrying out any maintenance work you MUST Identify electrical isolation methods and isolate all electrical supplies,
1.5.3. Prior to use and with all electrical supplies isolated You MUST check all electrical cables, plugs and connections for the following;
1.5.3.1. Are intact and have no signs of damage, to include but not limited to bare wires, chaffing, cuts and loose wiring.
1.5.3.2. If there are any signs of damage, the damaged item MUST be taken out of service until the damage has been repaired by an electrically competent person.
1.5.3.3. All trailing cables should be routed so as not to cause any kind of trip hazard.
1.5.3.4. NEVER work on or near electricity with wet hands, wet clothing, and wet gloves.
1.6. Batteries (where present).

Corrosive
1.6.1. Batteries present a risk if they become damaged by the possible leaking of electrolyte. This electrolyte is an acid and can cause serious burn injuries. Care should be taken
when working on or near them. NOTE the electrolyte may be in liquid or gel form.
1.6.2. Should you come into contact with electrolyte you should;
1.6.2.1. Remove all clothing contaminated with electrolyte. If you cannot remove then saturate in water.
1.6.2.2. Get medical assistance as soon as possible. You must advise the medical staff of the type acid.
1.6.2.2.1. Lead/acid battery = dilute sulphuric acid
1.6.2.2.2. Nickel/cadmium = potassium hydroxide alkali electrolyte.
1.6.2.3. Use fresh running water to wash off excess electrolyte, continue this until medical assistance arrives. Make sure that you do not wash the electrolyte to another part of the face or body.
1.6.2.4. If electrolyte comes into contact with Eyes the electrolyte needs to be immediately washed away with large amounts of water. Make sure that you do not wash the electrolyte to another part of the face or body.
1.6.3. Gasses from charging batteries are highly flammable and great care should be taken to charge in well ventilated areas.
1.6.4. There is an explosion risk if the battery terminals are short circuited, when connecting/dis-connecting ALWAYS exercise great care so that the terminals or battery leads are NOT allowed to touch and cause a spark. ALWAYS use suitable insulated tools.

Risk of explosion
1.7. Vibrations (where applicable).
1.7.1. Prolonged use of hand held (operated) machines will cause the user to feel the effects of/from vibrations. These vibrations can lead to white finger (Raynaud's phenomenon) or carpal tunnel syndrome. This condition
reduces the ability of the hand to feel and regulate temperature, causing numbness and heat sensations and may cause nerve damage and circulatory tissue death.
1.7.2. Not all factors that lead to white finger disease are known, but cold weather, smoking and other diseases that affect blood vessels and blood circulation as well as large and long-lasting impact of shocks are considered factors in the formation of white finger. Note the following to reduce the risk the white finger and carpal tunnel syndrome:
1.7.2.1. Wear gloves and keep your hands warm
1.7.2.2. Take regular breaks
1.7.3. All of the above precautions may help reduce the risk of white finger disease but not rule out carpal tunnel syndrome. Long-term and regular users are therefore recommended to observe the condition of your hands and fingers. Seek medical attention immediately if any of the above symptoms should occur.
1.8. Noise (where applicable).
1.8.1. The operating noise of the machine can damage your hearing. Wear hearing protection such as earplugs or ear defenders to protect your hearing. Long- term and regular users are advised to have hearing checked regularly. Be especially vigilant and cautious when wearing hearing protection because your ability to hear alarm warnings will be reduced.
1.8.2. Noise emissions for this equipment is unavoidable. Carry out noisy work at approved times and for certain periods. Limit the working time to a minimum. For your personal protection and protection of people working nearby it is also advisable for them to wear hearing protection.
1.8.3. See CERTIFICATE of CONFORMITY section for Outdoor Noise declaration of conformity.

2. QUICK START
You can also check out our online video at www.youtube.com/hyndaipower Equip
2.1. This guide is meant to serve as a quick reference for operating your Hyundai Lawn Mower. It is for convenience and the user should read the safety section first.
OUTDOOR USE ONLY.
Petrol Lawn Mowers produce carbon monoxide - a poisonous, colourless & odourless gas that can cause death or serious injury. Petrol is highly flammable, always handle with extreme care and in a well ventilated area.
Always remove HT lead from spark plug when checking machine or changing parts.
2.2. This product includes:
1 x Main unit, 1 x Grass catcher, 1 x Quick start guide, 1 x Manual, 1 x Mulching plug.
2.3. Do not attempt to lift the lawn mower out of the box on your own, instead seek assistance or cut each corner of the box and lay the sides flat. At this point, check that you have all of the included items listed above. If any are missing or damaged, call 01646 687 880 or email info@hyundaipowerequipment.co.uk.
2.4. Catcher assembly.
Insert the metal frame into grass bag HYM43SP model only. HYM46SP catcher is pre-assembled

Lift the rear cover.
Clip the grass catcher onto the rear of the mower at this point.

2.5. Handle assembly.
Handles are attached on HYM43SP/HYM46SP, unfold handles and then lock in place using the fixed clamps.

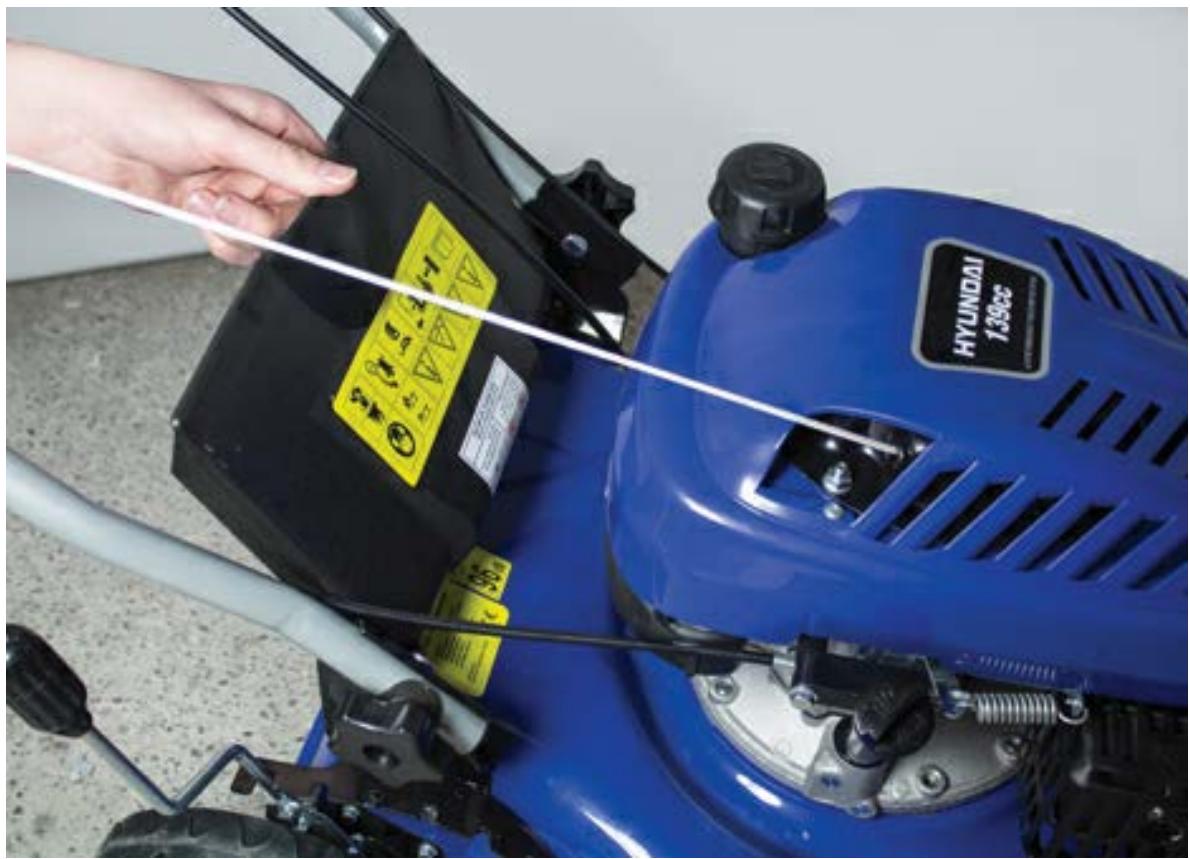
2.6. Height adjustment HYM43SP & HYM46SP.
Pull the adjustment lever outwards and select the required height. This height is automatically adjusted for all wheels.

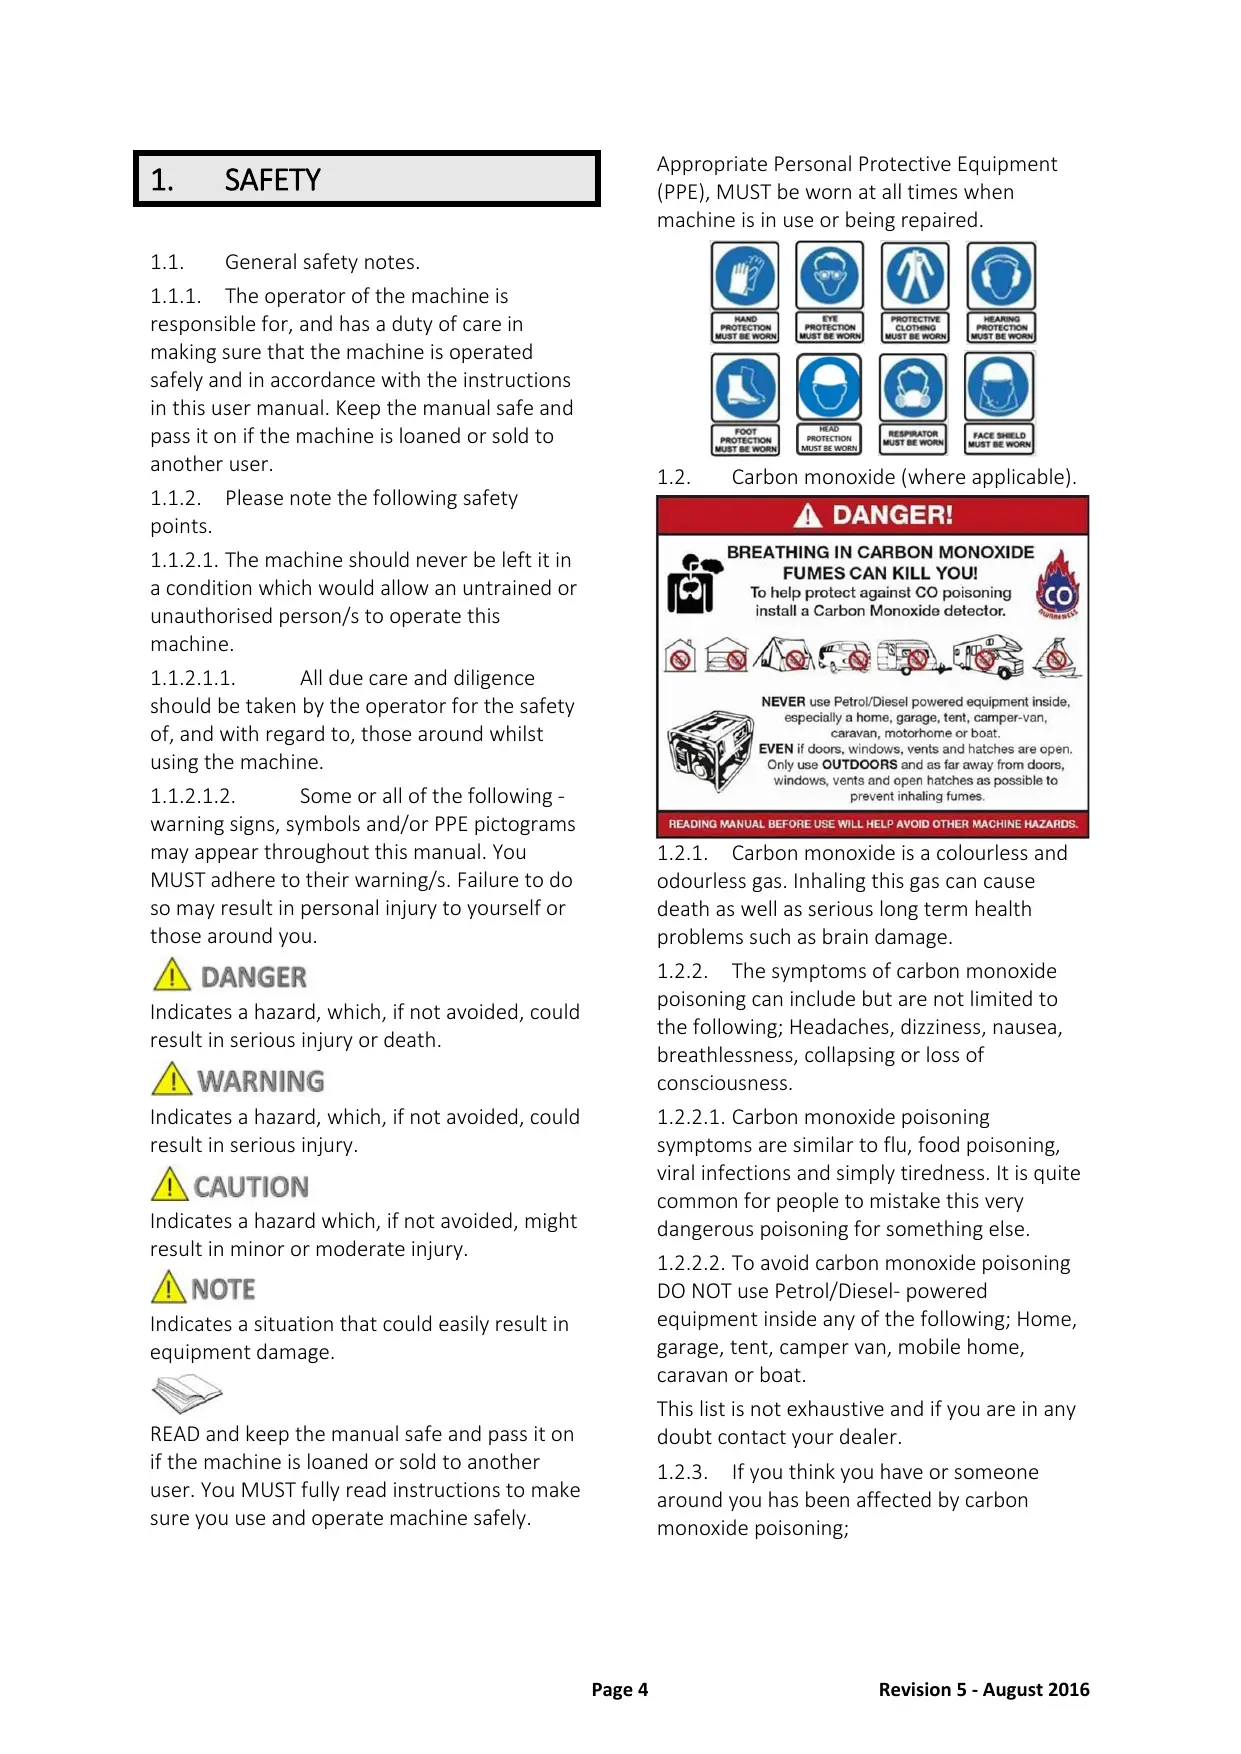
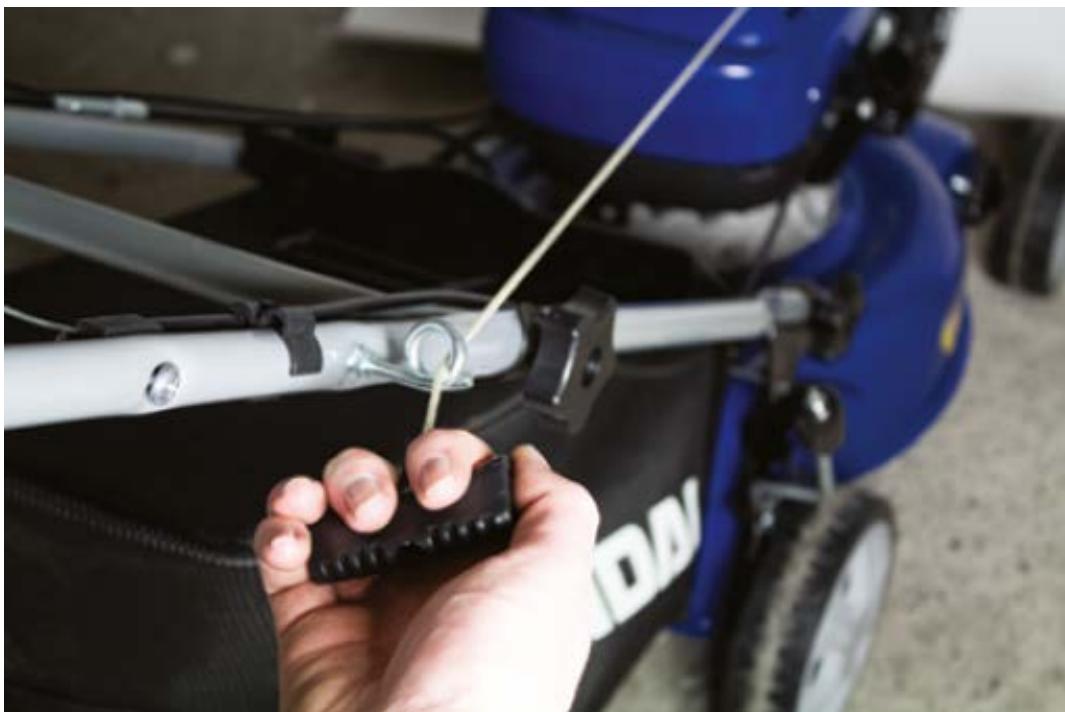
2.7. Recoil handle.
Slowly pull the recoil cord until it reaches the recoil retaining loop on the right hand handle and thread it through the loop.

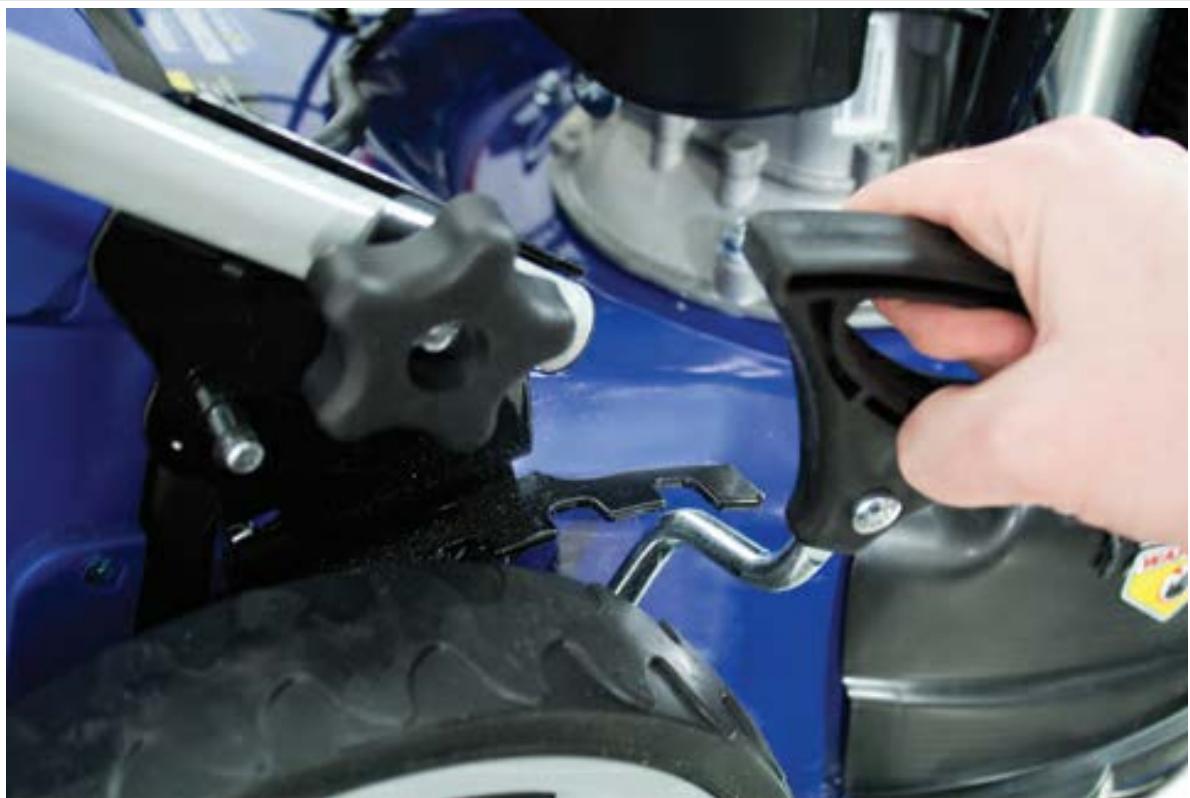
2.8. Adding oil.
Remove the oil dipstick.
Fill with SAE 15W-40 oil to the upper mark on the dipstick. Be careful to not overfill.
2.8.1. Once the correct amount of oil has been added replace the dipstick making sure that it is secure. Please note there may be some residual oil in the engine this is normal.
2.8.2. f you have put too much oil into the engine you can remove some by removing dipstick, tilting machine and poor out excess oil. Please note you must place a suitable container under drain plug to catch excess oil.
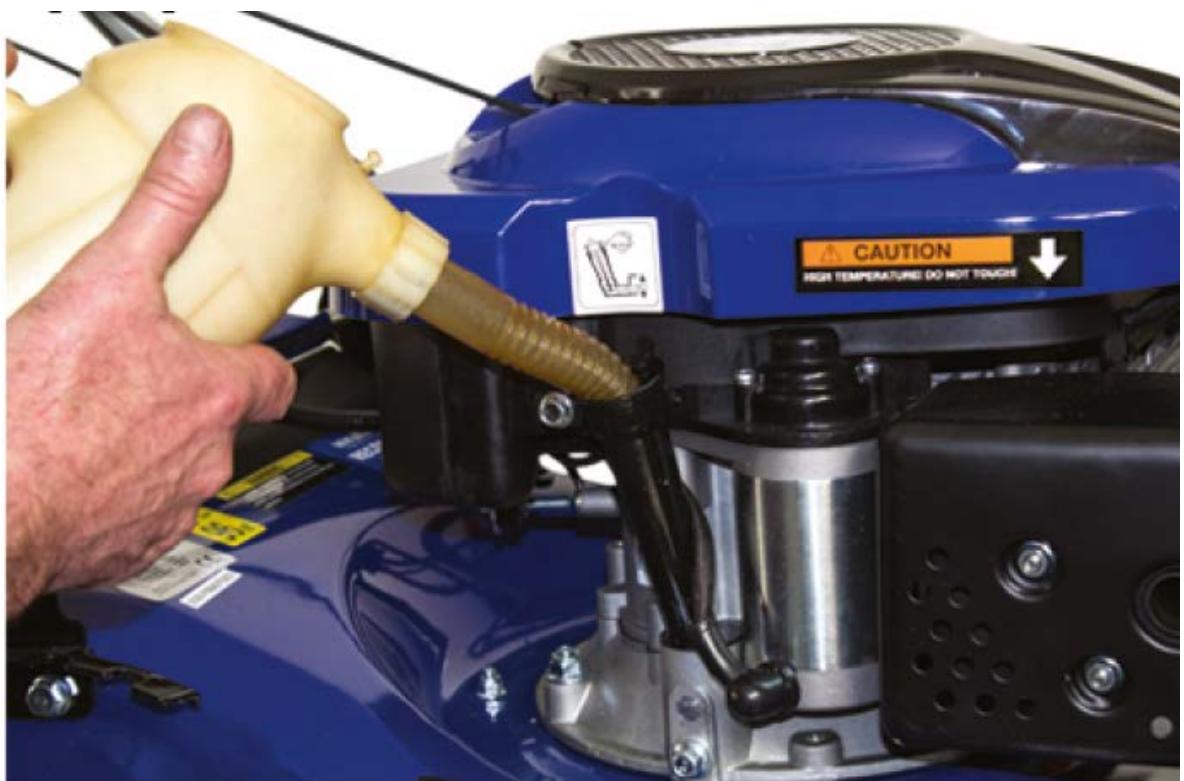
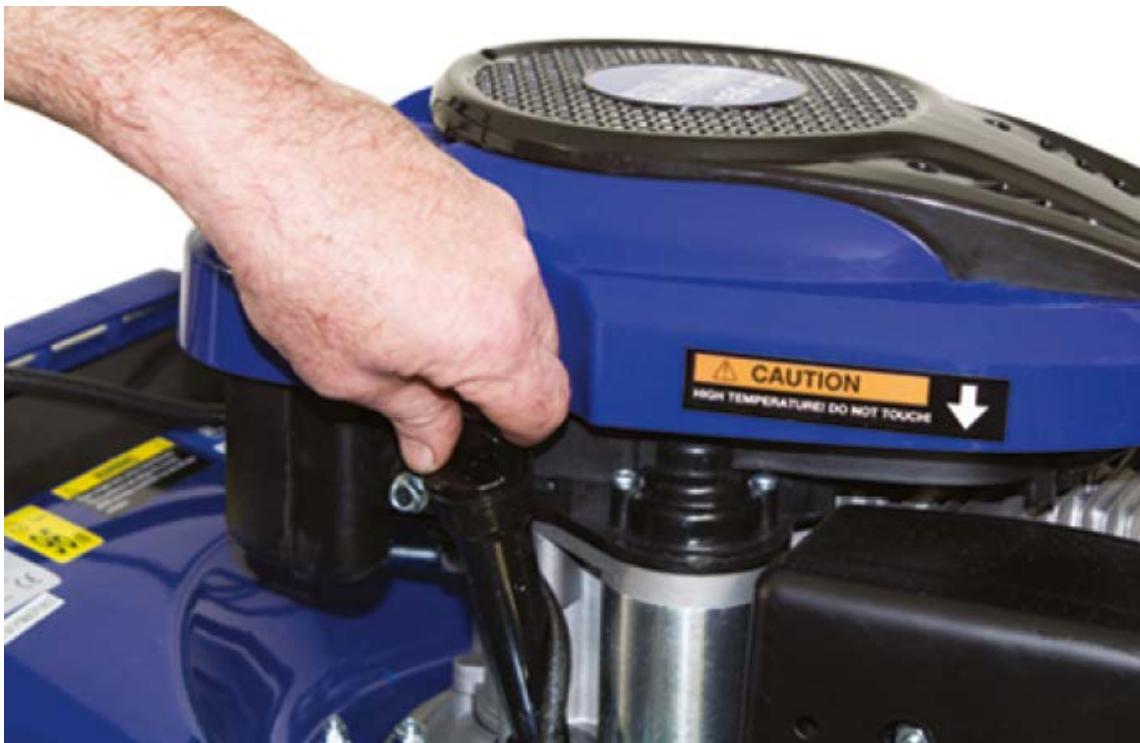
2.9. Adding fuel.
Remove the fuel tank cap.
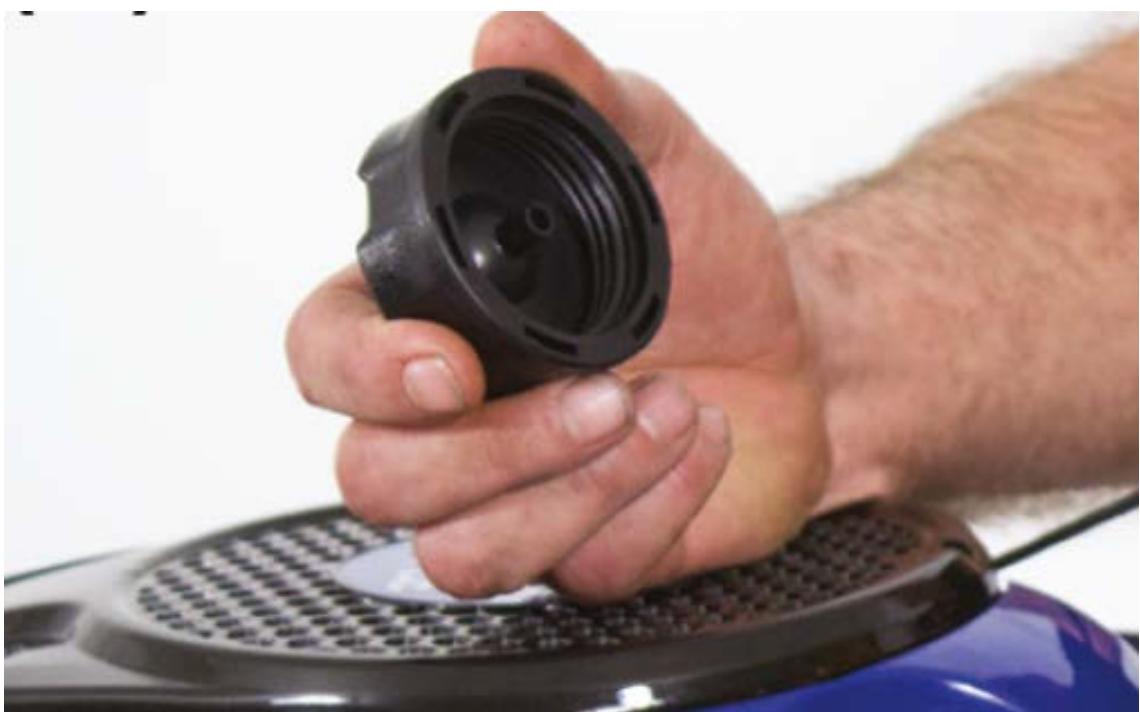
Fill the fuel tank with fresh straight unleaded petrol – Allow a 25mm gap from the top of the tank. DO NOT mix petrol with oil.

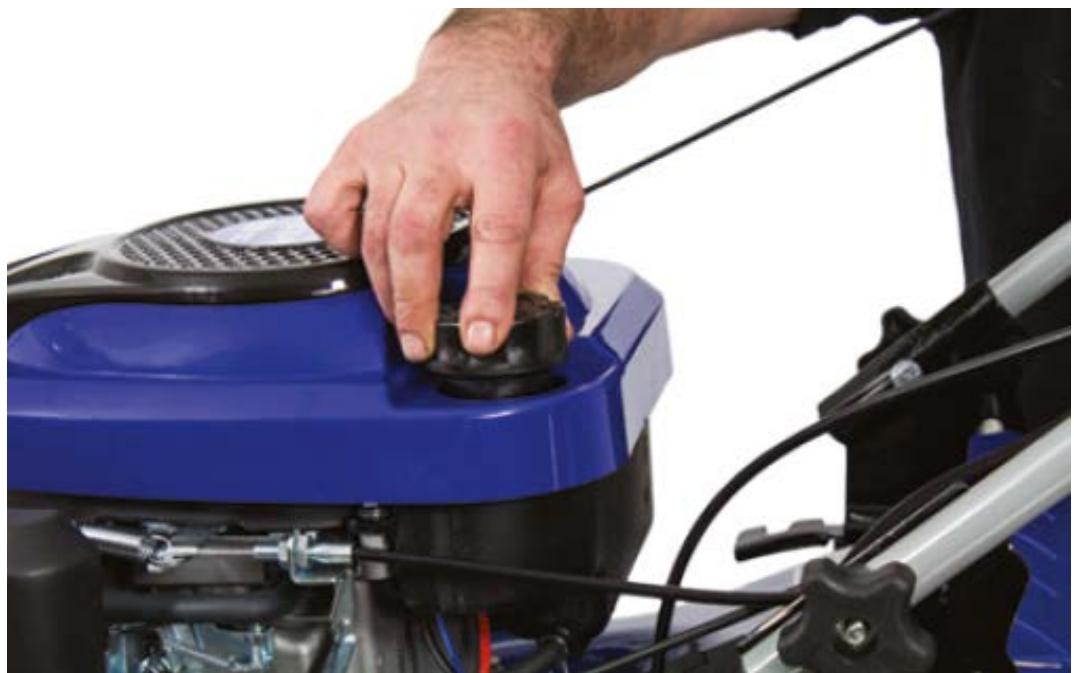
Refit the tank cap securely.
2.9.1. You must only use straight, fresh unleaded petrol – DO NOT mix petrol with oil.
2.9.2. You must clean up any spilt fuel before starting the engine.
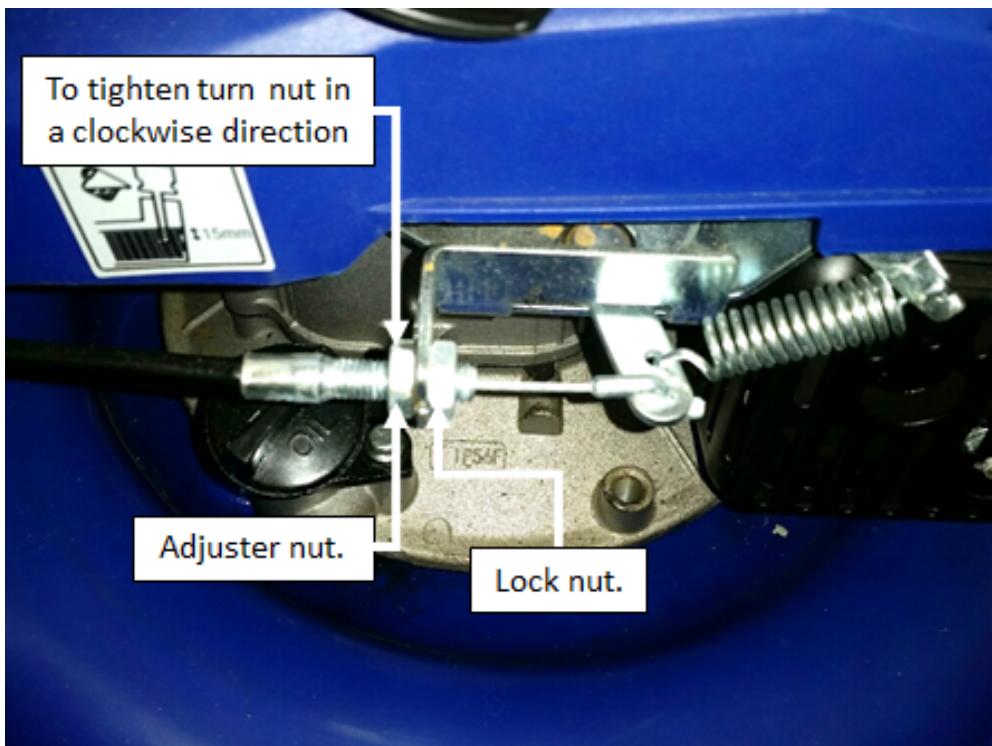
2.10. Adjusting Operator Presence Lever (OPC).
Before use you MUST check and if necessary adjust the OPC control cable, if it is too loose the the lawnmower will not start. To locate the adjuster follow the cable from the OPC handle to the engine body where you will see the OPC adjuster. If the OPC cable is too loose you will need to tighten it. Start by undoing the lock nut (anticlockwise) then turn the adjuster nut in a clockwise direction. Attempt a start if adjusted correctly the lawnmower will start once started you must tighten the locknut, continue to adjust until lawnmower starts.
N.B. Some models have a cover over the adjuster remove to adjust and replace once task is completed.
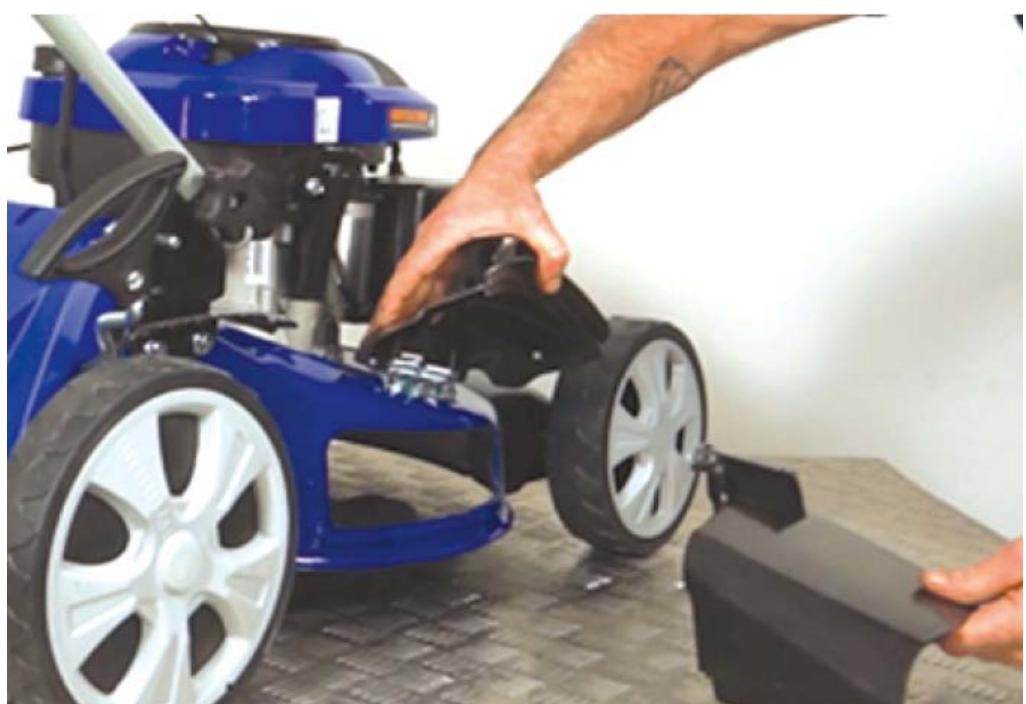
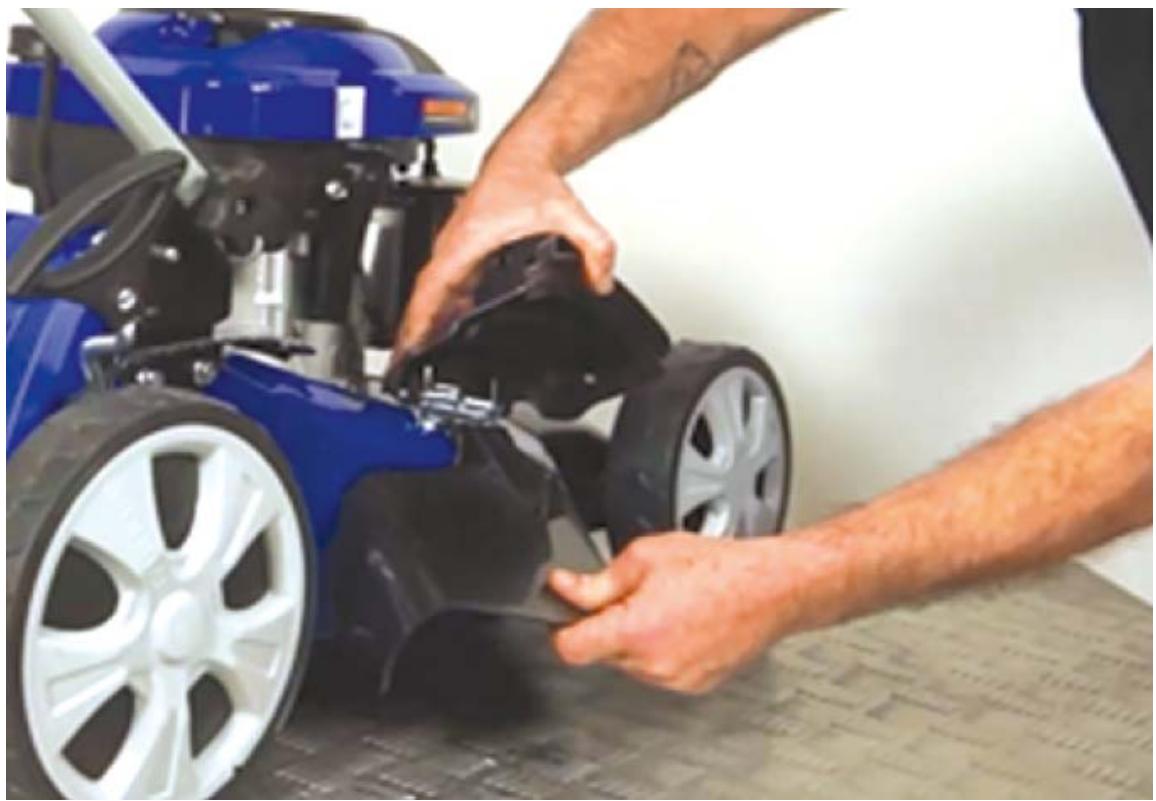
2.11. Mulching plug HYM46SP only – In mulching mode you must remove the grass catcher.
2.11.1. Lift the rear cover and remove the grass catcher.
Push the mulching plug (wedge) into the discharge channel and lock it into the slot. Close the rear cover.
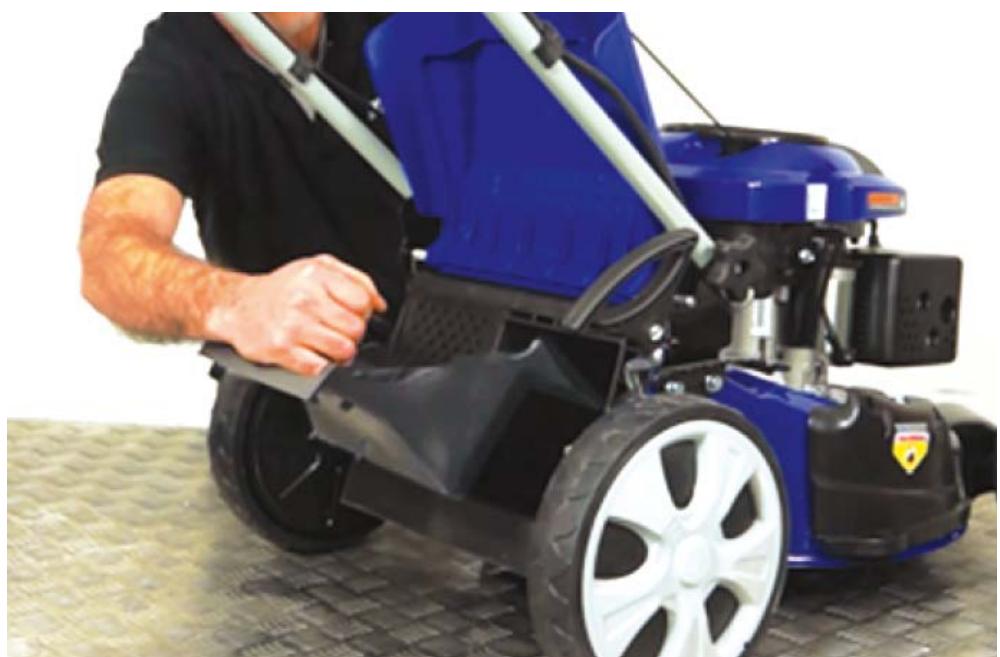
2.12. Cut & Drop/Side discharge HYM46SP only - In Cut & Drop/Side discharge mode you must remove the grass catcher.
2.12.1. Carry out steps in 3.1.
Lift the side flap.
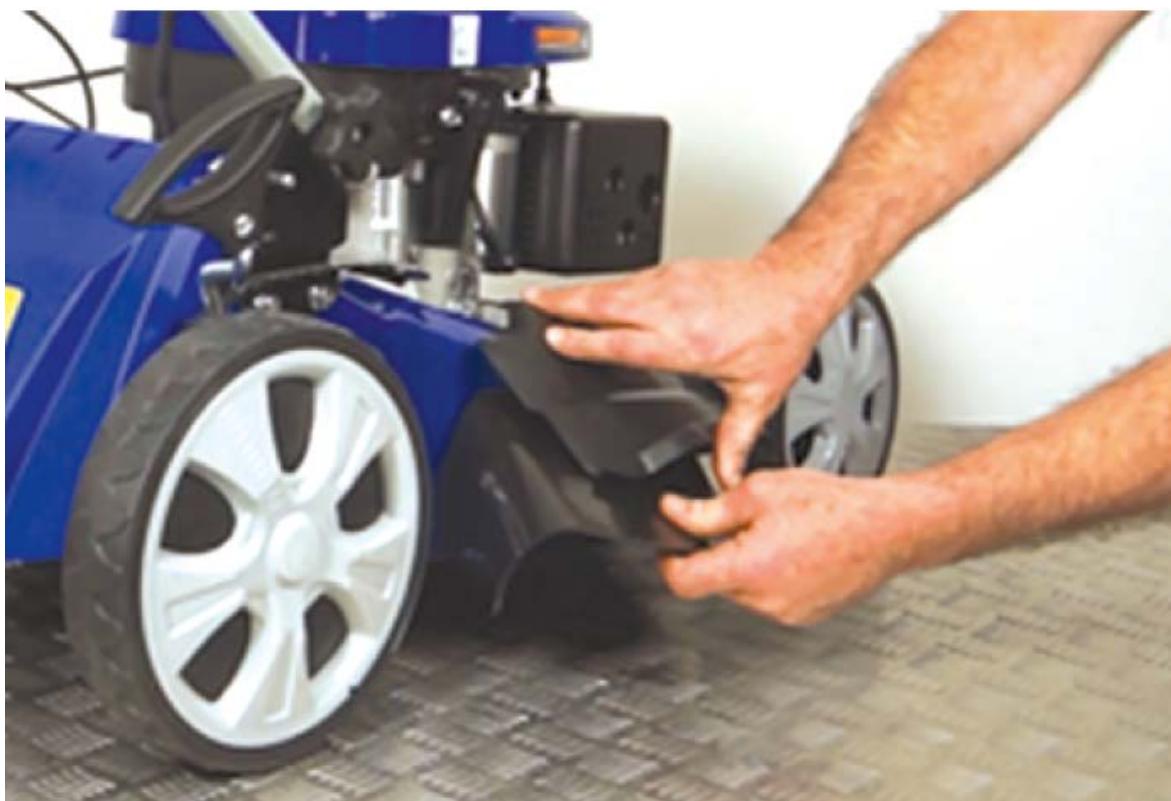
Allow side flap to rest on discharge chute.
2.13.
Grass collection mode.
2.13.1. For grass collection mode you must remove the mulching plug and side discharge chute.
3. STARTING PROCEDURE
Push the throttle lever all the way forward.

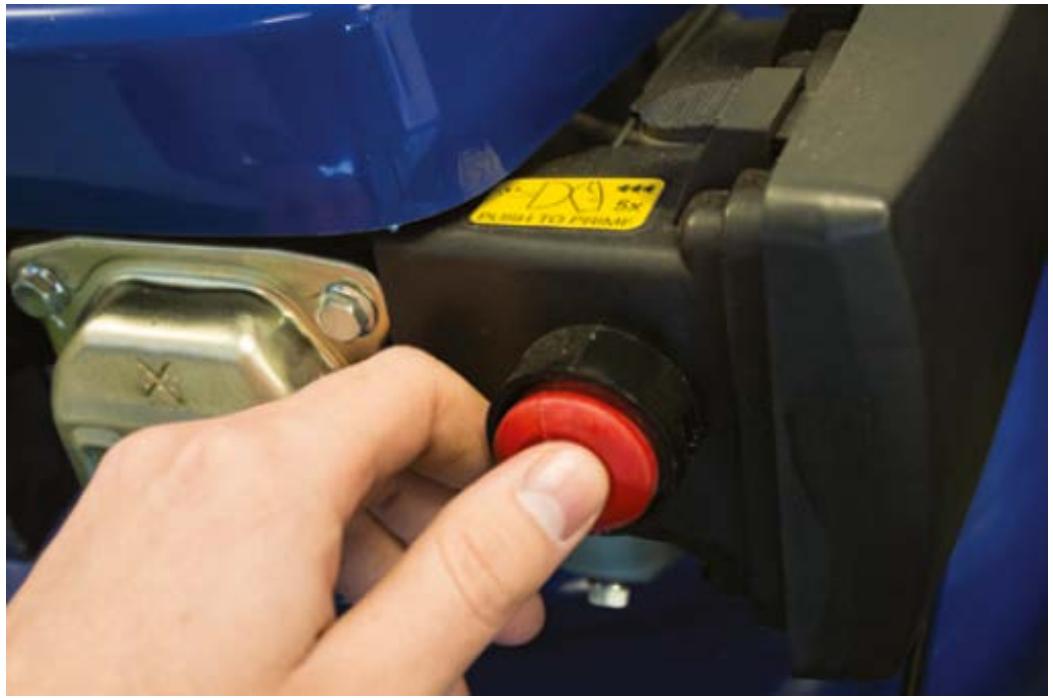
Pump the primer bulb 5 times.
Make sure the blade is free of long grass and the cutting height set to maximum.

Pull back the Operator Presence Control (OPC) lever towards the main handle.

4. STOPPING PROCEDURE
4.1. Before stopping the machine allow the engine to cool down for a few minutes.
4.2. You MUST allow the blades to come to a full stop before carrying out any maintenance on the machine.
To STOP the machine release the Operator Presence Control (OPC) lever and allow it to move away from the main handle.

5. USING THE MACHINE
5.1. Always use the lawnmower with the grass catcher, or rear deflector in position.
5.2. Stop the engine before emptying the grass catcher or before you change the cutting height.
5.3. Never put feet or hands near the mower when running.
5.4. Before mowing, remove all foreign objects from the lawn, which may cause injury or damage.
5.5. Keep children, people and pets at a safe distance when the lawnmower is in use.
5.6. Always wear appropriate Personal Protective Equipment (PPE) when using this machine. Suggested PPE Sturdy footwear, work gloves (especially when working near blade), long trousers and hearing protection.
5.7. Never work barefooted or with open shoes or sandals.
5.8. Do not operate the engine in a confined space where dangerous carbon monoxide fumes can collect.
5.9. Mow only in daylight.
5.10. Avoid operating the equipment in wet grass, where feasible.
5.11. Always be sure of your footing on slopes Walk, never run.
5.12. For wheeled rotary machines, mow across the face of slopes, never up and down. Exercise extreme caution when changing direction on slopes.
5.13. Do not mow excessively steep slopes.
5.14. Use extreme caution when reversing or pulling the lawn mower towards you.
5.15. Stop the engine and allow the blade to come to a stop if the lawn mower has to be tilted for transportation when crossing surfaces other than grass, and when transporting the lawn mower to and from the area to be mowed
5.16. Never operate the lawn mower with defective guards, or without safety devices, for example deflectors and/or grass catchers, in place.
5.17. Do not change the engine governor settings or over-speed the engine.
5.18. Engage all blade and drive clutches before starting the engine.
5.19. Start the engine carefully according to instructions and with feet well away from the blade.
5.20. Do not tilt the lawn mower when starting the engine.
5.21. Do not put hands or feet near or under rotating parts.
5.22. Never pick up or carry a lawn mower while the engine is running.
5.23. Before leaving the mower, clearing blockages, checking, cleaning, and refuelling or after striking foreign object - Stop the engine and disconnect the spark plug cap, make sure that the blades have come to a complete stop.
5.24. If the lawn mower starts to vibrate abnormally (check immediately).
6. MAINTENANCE

WARNING
Never touch a rotating blade.
Always stop the engine and unplug the spark plug before doing any repairs or maintenance. Check regularly the oil level and keep it to the recommended level as required.
Frequently check the lawnmower and ensure that all grass deposits are removed from beneath the deck.
Lubricate the wheel bearings with a suitable lubricant.
Check the blade, in order to obtain a good cut, the blade should always be sharp and well balanced. At regular intervals, check the tightness of all nuts, bolts and screws.
If the blade hits an obstacle check for damage and if the machine vibrates badly stop the lawnmower and take it to a service dealer.

CAUTION
Always refuel in a well-ventilated area with the engine off.
Whilst carrying out maintenance you must wear appropriate Personal Protective Equipment (PPE) when using this machine. Suggested PPE Sturdy footwear, work gloves (especially when working near blade), long trousers and hearing protection.
6.1. The blade. You MUST wear gloves to protect your hands from being cut when working with the blade.
6.1.1. The blade is made of pressed steel, in order to obtain a good cut sharpen the blade frequently typically around every 25 hours of work.
6.1.2. Following blade sharpening you must make sure that the blade is always well balanced.
6.1.3. To remove the blade, unscrew the bolt, check the blade support and change all spare parts if they are worn out or damaged.
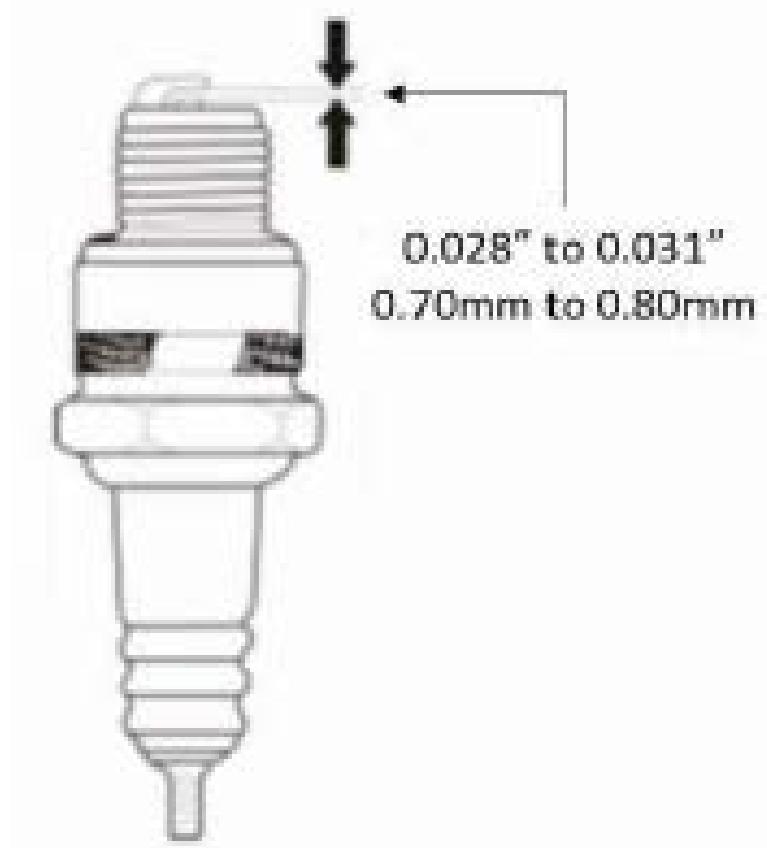
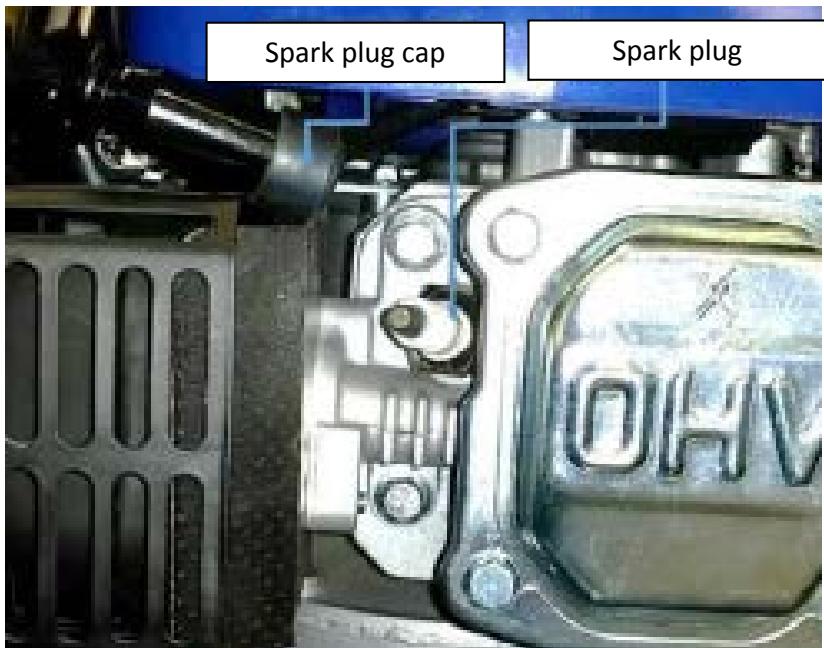
6.2. The spark plug. You MUST allow the spark plug to cool down before carrying out any maintenance
6.2.1. Spark plug type (or equivalent) F7RTC.
6.2.2. To check spark plug, remove spark plug cap and remove spark plug using the supplied spark plug wrench.
6.2.3. Clean the spark plug electrode also making sure that there is no damage to the insulator or electrode.
6.2.4. The spark plug gap should be 0.70mm to 0.80mm adjust as necessary by carefully bending the side electrode.
6.2.5. Refit the cleaned and adjusted spark plug by hand to avoid cross-threading.
6.2.6. After spark plug seats then tighten as necessary but avoid over-tightening.
6.2.7. Re-attach the spark plug cap.
6.3. Air filter.

CAUTION
A dirty air filter will restrict the air flow to the carburetor, which will reduce engine efficiency.
When using the lawnmower in very dusty areas you must clean or replace the air filter more often.
Never operate machine without the air filter being fitted it can cause damage to the engine which is not covered by warranty.
6.3.1. To gain access to the air filter press the latch tab.
Remove filter, check for contamination and clean as required.
6.3.2. Clean filter by blowing air through it using an air gun not exceeding 30psi.
6.3.3. Never use a brush to clean the filter it will only drive dirt into the fibres of the filter.
6.3.4. Wipe dirt from the air cleaner body by using a moist rag, be careful to prevent dirt or debris
To gain access to the air filter press the latch tab. Remove filter, check for contamination and clean as required. Clean filter by blowing air through it using an air gun not exceeding 30psi.
Never use a brush to clean the filter it will only drive dirt into the fibres of the filter.
Wipe dirt from the air cleaner body by using a moist rag, be careful to prevent dirt or debris entering into the carburetor.
Remove air filter for cleaning – note how the filter sits and make sure that after cleaning it is inserted correctly.

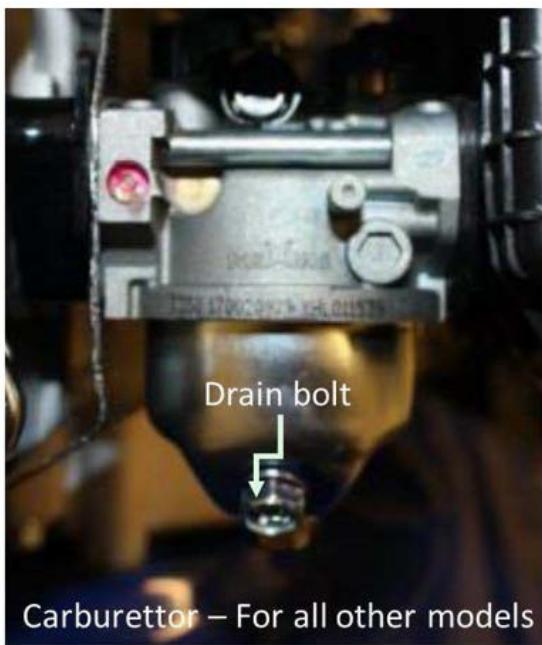
6.4. Fuel & Carburetor.

CAUTION
The use of old or stale fuel will impair starting and running of machine.
Make sure that the machine has fresh unleaded fuel and always remove fuel before storing for long periods. Never mix fuel with oil.
To drain the carburetor float bowl undo the drain bolt making sure that the washer is not lost. Use a suitable container to catch fuel. Take care not to spill fuel and make sure that all spilt fuel is cleared away safely. Open fuel valve to make sure all fuel is drained.
Once drained you can release bowl by undoing bowl release bolt on bottom of float bowl, make sure that you do not lose the bowl sealing washer. Remove any remaining fuel from bowl.
6.4.1. Cleaning.

CAUTION
DO NOT hose engine.
- Water can damage engine or contaminate the fuel system.
6.4.1.1. Wipe deck with dry cloth.
6.4.1.2. You can hose under deck by tilting the mower. Make sure you tilt the machine so that the air filter is facing up.
6.4.1.3. Dry the machine completely to prevent any rust forming. You can use a light oil or silicone spray to prevent rust between.
6.4.2. Storage.

NOTE
6.4.2.1. The following steps should be taken to prepare your lawnmower for storage.
6.4.2.2.1. After the final cut of the season – you must drain the fuel from the fuel tank. Then run the machine until the engine comes to a stop this allows the carburetor to be emptied of fuel.
6.4.2.2.2. Clean the mower completely and make sure all moving parts are lubricated.
6.4.2.2.3. Check the blade to make sure that it is ready for the following season – This will allow you to get it sharpened correctly. Use a light oil or silicone spray to help prevent the blade.
6.4.2.2.2.4. Once all work above is carried out store the machine in a clean and dry place. DO NOT store a machine that has not been given time to fully cool down.
7. TROUBLESHOOTING.
Troubleshooting video guides can be found on You Tube - please follow link on our website - http://hyndaipowerequipment.co.uk
Whilst carrying out troubleshooting/ maintenance you must wear appropriate Personal Protective Equipment (PPE) when using this machine. Suggested PPE Sturdy footwear, work gloves (especially when working near blade), long trousers and hearing protection. To prevent unwanted starting unplug the HT lead, for some operations it will be necessary to remove all fuel/oils.
7.1. Engine troubleshooting – where necessary all corrective actions should be carried out by suitably qualified persons.
7.2. If the starter rope becomes disconnected from the rope guide on handle, disconnect the spark plug cap. Depress the blade control handle and pull the starter rope out from engine slowly and re- engage in guide. Re connect spark plug cap.
PROBLEM - ENGINE DOES NOT START.
Possible causes;
- Throttle lever not in the correct position for the prevailing conditions.
- Fuel tank is empty.
- Stale fuel
- Air filter element is dirty.
- Spark plug is loose.
- Spark plug cap loose or disconnected from plug.
- Spark plug gap is incorrect.
- Carburetor is flooded with fuel.
- Faulty ignition module.
- Loose Operator Prescence Control cable.
Possible corrective actions;
- Move throttle lever to correct position.
- Fill tank with fuel.
- Drain carburetor float bowl.
- Clean air filter element.
- Tighten spark plug to 25-30Nm.
- Make sure spark plug cap is correctly fitted onto spark plug.
- Set gap between electrodes at
0.7 to 0.8mm.
- Remove air filter element and pull starter rope continuously until carburetor clears.
- Contact the service dealer.
- Loose Operator Prescence Control cable.
ENGINE DIFFICULT TO START OR LOSES POWER.
Possible causes;
- Dirt, water or stale fuel in tank.
- Vent hole in fuel tank cap is plugged.
- Air filter element is dirty.
Possible corrective actions;
- Drain fuel and clean tank. Fill tank with clean, fresh fuel.
- Clean or replace fuel tank cap.
- Clean air filter element.
ENGINE OPERATES ERRACTICALLY.
Possible causes;
- Spark plug is defective.
- Spark plug gap is incorrect.
- Air filter element is dirty.
Possible corrective actions;
- Fit new, correctly gapped plug.
- Set gap between electrodes at
0.7 to 0.8mm.
- Clean air filter element.
ENGINE IDLES POORLY.
Possible causes;
- Air filter element is dirty.
- Air slots in engine shroud are blocked.
- Cooling fins and air passages under engine housing are blocked.
Possible corrective actions;
- Clean air filter element.
- Remove debris from slots.
- Remove debris from cooling fins and air passages.
ENGINE SKIPS AT HIGH SPEED.
Possible causes;
- Spark plug electrode gap is incorrect.
Possible corrective actions;
- Set gap between electrodes at
0.7 to 0.8mm.
ENGINE OVERHEATING.
Possible causes;
- Cooling airflow is restricted.
- Incorrect spark plug.
Possible corrective actions;
- Remove any debris from slots in shroud, blower housing, air passages.
- Fit new spark plug.
MOWER VIBRATES ABNORMALLY.
DO NOT use machine until vibration issue has been fixed
Possible causes;
- Cutting assembly is loose.
- Blade/Cutting assembly is unbalanced.
Possible corrective actions;
- Tighten blade.
- Take to service dealer.
LOSS OF DRIVE
Possible causes;
- Loose drive handle.
- Bent, kinked or trapped drive cable.
- Too much free play in cable.
- Drive belt missing, incorrect tension or condition of belt.
- Gear box fault.
Possible corrective actions;
- Make sure handle is correctly located into the main handle.
- Replace bent or kinked drive cable. Free trapped drive cable.
- Adjust cable.
- Replace drive belt, re-tension drive belt. Replace worn or damaged drive belt.
- Contact your dealer or after sales on 01646 687880.
8. SPECIFICATION.
| MODEL | HYM43SP | HYM46SP |
| Engine Type | Hyundai OHV 4-Stroke |
| Engine Size - cc | 139 | 139 |
| Fuel Tank Capacity - L | 0.8 | 1 |
| Fuel type | Straight unleaded petrol |
| Oil Capacity - ml | 400 # | 600 # |
| Noise Level - dB (A) | 96 |
| Rated Speed - rpm | 2800 |
| Rated Power - kw | 2.5 |
| Drive Type | Self-propelled |
| Start Method | Recoil |
| Height Adjustments | Central |
| Cutting Height - mm | 25 to 75 (6 heights) | 25 to 85 (7 heights) |
| Cutting Width - mm ±5mm | 425 | 460 |
| Catcher Type | Polyester bag - Solid lid |
| Catcher Volume - L | 55 | 70 |
| Deck Material | Treated Steel |
| Wheel Size - Front - mm | 150 | 200 |
| Wheel Size - Rear - mm | 200 | 255 |
| Dry Weight | 30 | 32 |
| Fully Assembled Dimensions | 1350 x 500 x 1070 | 1540 x 650 x 1250 |
| Vibration value m/s2 | 5.7 | 4.8 |
N.B. All machines are pre delivery inspected so there may be residual oil left in the machine so please fill with caution.
9. PART LOCATIONS.

Genpower Ltd confirms that these Hyundai products conform to the following CE Directives;
2006/42/EC Machinery Directive
2004/108/EC EMC Directive
2000/14/EC, Amended by 2005/88/EC Noise Emissions Directive
97/68/EC_2010/26/EC NRMM Emissions Directive
The undersigned, as authorised by:
GENPOWER Ltd
Declarsthat the following equipment manufactured under licence byHyundai Korea
Conforms to the Directive 2000/14/EC (as amended) of the European Parliament and of the council on the approximation of the laws of the Member States relating to the noise emission in the environment by equipment for use outdoors.
Equipment category:
Lawnmowers
Net installed power or Flow rate or Cutting width
HYM46P = 425mm & HYM46SP = 460mm
Product Name/Model:
HYM43SP & HYM46SP
Type/Serial No:
Pedestrian lawnmowers
The technical documentation is kept by:
Roland Llewellin, c/o Genpower Ltd, Isaac Way, Pembroke Dock, Pembrokeshire, SA72 4RW
The conformity assessment procedure followed was in accordance with annex ¥ or VI of the Directive.
Notified Body:
Societe Nationale de Certification et d'Homologation, 11 Route de Luxembourg, L 5230, Sendweiler
Certificate N/ Test report N:
HYM43SP = 1694 & HYM46SP = 1694
Measured Sound Power Level:
HYM43SP = 94dB(A) & HYM46SP = 94dB(A)
Guaranteed Sound Power Level:
HYM43SP = 96dB(A) & HYM46SP = 96dB(A)
A copy of this certificate has been submitted to the European Commission and to EU Member State United Kingdom.
Place of Declaration:
Pembroke Dock, SA72 4RW
Date:
11th December 2013
Name:
Roland Llewellin
Signature:
Rt < l l
Position in Company:
Director
Name & address of manufacturer or
Genpower Ltd, Isaac Way,
Authorised representative
Pembroke Dock, Pembrokeshire, SA72 4RW
11. RECYCLING & PRODUCT DISPOSAL
11.1. We do not offer a takeback scheme for the recovery of Waste Electrical Electronic Equipment (WEEE) & Batteries instead the responsibility to dispose of WEEE and or Batteries is passed onto you by us. So when it becomes necessary to dispose of your machine you must take it to your local Civic
.1. Certain products contain WEEE waste which should not be disposed of in your domestic waste.

11.3.2. You MUST recycle WEEE in accordance with your local authority or recycling centre.
11.4. Battery recycling, certain products contain batteries which should not be disposed of in your domestic waste.

11.4.1. You MUST recycle batteries in accordance with your local authority or recycling centre.
11.5. Unwanted packaging materials should be sorted and taken to a recycling centre so it can be disposed of in a manner which is compatible with the environment.
11.6. The following symbol means that you should 'Reduce – Reuse – Recycle'.

11.7. We are a Member of the VALPAK National Compliance scheme and our registration number is RM08660
11.8. For further information about disposal please contact your Local Authority.
11.9. You can also get more advice and guidance about recycling at the following website http://www.recycle-more.co.uk
Amenity Site. For further information please contact your Local Authority for disposal advice.
11.2. You MUST make sure that all unused oil and fuel is disposed of correctly either beforehand or at your local Civic Amenity Site. Under NO circumstance must any oil and fuel be put down any drains.
11.3. Waste Electrical Electronic Equipment (WEEE) recycling.
11.3
11.10. Should you pass this product onto another user either sold or loaned you MUST pass on this user manual. This will make sure that all other users can use and maintain the machine safely.

POSTAL ADDRESS
Genpower Ltd, Isaac Way, London Road,
Pembroke Dock, Pembrokeshire, SA72 4RW. UK.
TELEPHONE
+44 (0) 1646 687880
FAX
+44 (0) 1646 686198
TECHNICAL E-MAIL
service@genpower.co.uk
WEBSITE www.hyundaipowerequipment.co.uk
13. MANUAL UPDATES
13.1. Our manuals are constantly being reviewed and updated. Should you find an error, omission or something you find unclear please contact your dealer for assistance. E&OE.
13.2. Our latest manuals are also placed online.
14.3. We reserve the right to make any modifications without prior notice whenever necessary.
14. WARRANTY
14.1. For specific warranty and warranty exclusions details for your product please visit our Customer services section on our website at www.hyndaipowerequipment.co.uk If you require a hard copy of Warranty details please contact aftersales on aftersales@genpower.co.uk
HYUNDAI
GENPOWER LTD
Isaac Way, London Road
Pembroke Dock, UNITED KINGDOM, SA72 4RW
T: +44 (0) 1646 687 880 F: +44 (0) 1646 686 198
E: info@hyndaipowerequipment.co.uk