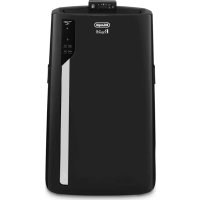
EV250.BK - Air-conditioner DELONGHI - Free user manual and instructions
Find the device manual for free EV250.BK DELONGHI in PDF.
User questions about EV250.BK DELONGHI
0 question about this device. Answer the ones you know or ask your own.
Ask a new question about this device
Download the instructions for your Air-conditioner in PDF format for free! Find your manual EV250.BK - DELONGHI and take your electronic device back in hand. On this page are published all the documents necessary for the use of your device. EV250.BK by DELONGHI.
USER MANUAL EV250.BK DELONGHI
natural_image
White portable air conditioner unit with black fan blades and '中LongM' branding (no text or symbols on device body)EVAPORATIVE COOLER
Instructions for use. Keep these instructions
Visit www.delonghi.com for a list of service centers
near you.
ELECTRIC CHARACTERISTICS
120 V\~60 Hz
natural_image
Simple line drawing of an open book with multiple pages (no text or symbols)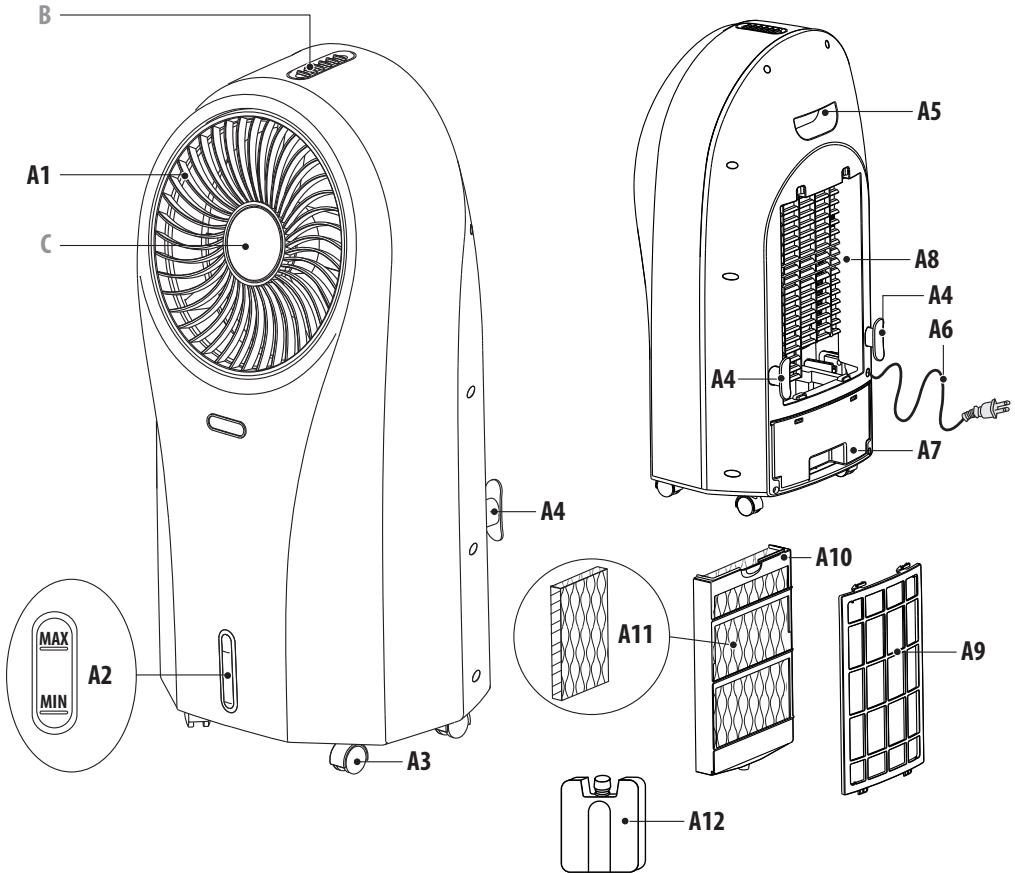
text_image
B A1 C A4 A5 A8 A4 A6 A7 MAX MIN A2 A3 A11 A10 A9 A12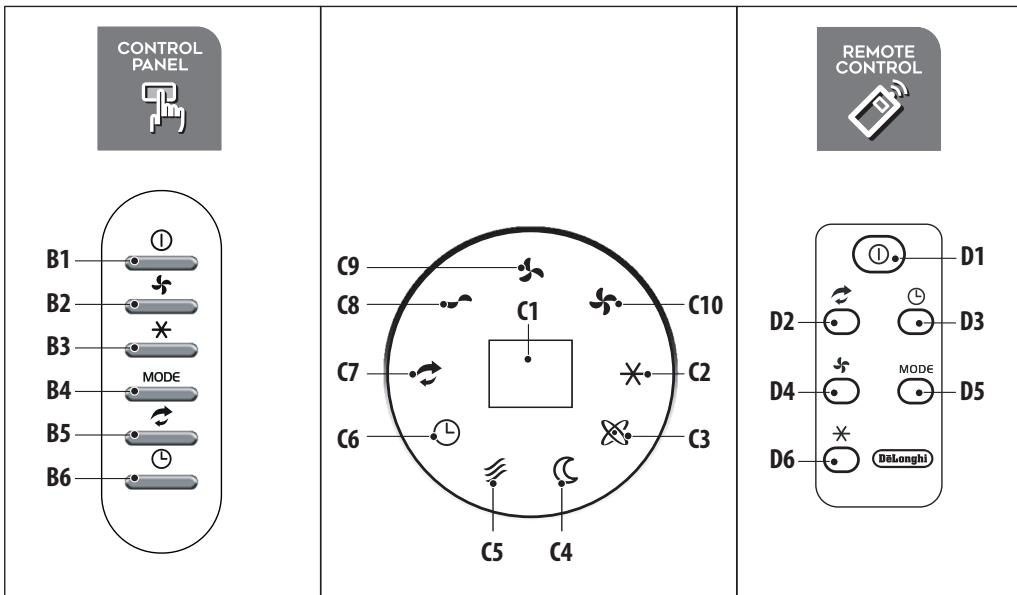
text_image
CONTROL PANEL B1 ① B2 # B3 MODE B4 B5 # B6 C9 C8 C7 C6 C5 C4 C10 C2 C3 REMOTE CONTROL D1 ① D2 D3 D4 MODE D5 D6 (DoLong) ②Important safeguards
- Use this appliance only as described in this instruction manual.
As with any electrical appliance, the instructions aim to cover as many situations as possible. Caution and common sense should be used when operating and installing this appliance. - Before operating the product, remove the packaging and check that product is in good condition.
- This appliance has been manufactured to refresh domestic environments and must not be used for other purposes.
• This appliance if for indoor use only! - It is dangerous to alter or modify the unit's characteristics in any way.
- The appliance must be installed in accordance with the relevant national legislation.
• Alway place the unit on a stable level floor. - Do not use in bathrooms or near water. Do not keep the product where it may fall into a water container.
- Do not run power cord under carpeting, or cover it with rugs or runners. Keep the cord away from areas where it may be tripped over.
- Should repairs be necessary, contact the nearest authorized Repair Service Center. Unauthorized servicing can be dangerous.
- The appliance is not intended for use by persons (including children) with reduced physical, sensory or mental capabilities, or lack of experience and knowledge, unless they have been given supervision or instruction concerning use of the appliance by a person responsible for their safety.
Children should be supervised to ensure that they do not play with the appliance. - If the power cord is damaged, it must be replaced by the manufacturer or an authorized technical service center in order to avoid all risk.
- This appliance has a polarized plug (one blade is wider than the other). To reduce the risk of electric shock, this plug is intended to fit in a polarized outlet only one way. If the plug does
not fit fully in the outlet, reverse the plug. If it still does not fit, contact a qualified electrician. Do not attempt to defeat this safety feature.
• Do not use extension cables.
• Always unplug the appliance before refilling the water tank, cleaning, servicing or relocating the unit.
- Do not pull on or place strain on the power cord when moving the appliance.
- The appliance should not be installed where the atmosphere may contain combustible gases, oil or sulphur, or near heat sources.
- Do not rest hot or heavy objects on the appliance.
- Do not insert or allow objects to enter any ventilation or exhaust operating, as this may damage the unit and may cause electrical shock of fire.
- Do not cover the appliance's air inlet or outlet, as this may damage the motor.
- This equipment should be inspected frequently and collected dirt removed from it regularly to prevent excessive accumulation that may result in flashover or a risk of fire.
- Avoid using heaters near the unit.
- The unit should be transported with the tank empty. Therefore, before transporting the appliance, drain the tank.
• Store the unit with water tank empty.
- WARNING: Changes or modifications not expressly approved by the party responsible for compliance could void the user's authority to operate the equipment.
- WARNING: To reduce the risk of fire or electric shock, do not use this appliance with any solid state speed control device.
- This product complies with the maximum allowable concentration of ozone of 0.050 parts per million by volume (ppmv) in a 24-hour period.
Read and save these instructions
This product is for household use only
1. DESCRIPTION
1.1 Description of the appliance (A)
A1. Rotating vent
A2. Water level indicator
A3. Castors
A4. Power cord winder
A5. Handle
A6. Power cord
A7. Removable water tank
A8. Filter housing
A9. Dust filter
A10. Cooling pad
A11. Honeycomb cooling pad
A12. Ice box/pack
1.2 Description of the control panel (B)
B1. ON/OFF button: to switch the appliance ON and OFF
B2. Speed fan. Press to selected the desired speed: MED, MAX, MIN
B3. Cooler/Humidifying. Press to select or deselect the function
B4. Press to select the fan mode:
- Natural ∽ : the appliance performs random ventilation cycles at different speeds, interrupted by a few seconds of stop
- Sleep C: the appliance runs 30 minutes at MAX speed, then 30 minutes at MED speed: then runs at MIN speed
B5. "Swing" mode: when pressed, the grid rotates
B6. "AUTO OFF": press to set the delayed auto off (from 1 to 24 hours):
- When on, the symbol Ⓛ and the hours flash on the display for 5 seconds: when turn on steady, the auto off time is set
- To deactivate: press the relative button until "00" is selected, then wait until the symbol and the number switch off.
1.3 Description of the display (C)
C1. "Auto-off" display
C2. "Cooler/Humidifying""ON"
C3. "lonizer""ON" (active in every mode)
C4. "Sleep" fan mode "ON"
C5. "Natural" fan mode "ON"
C6. "Auto-off" setting
C7. "Swing""ON"
C8. "MIN" fan speed
C9. "MED" fan speed
C10. "MAX" fan speed
1.4 Description of the remote control (D)
D1. ON/OFF: to switch the appliance ON and OFF
D2. "Swing": when selected, the vent rotates
D3. "AUTO OFF" (see B6)
D4. Fan speed (see B2)
D5. Fan mode selection (see B4)
D6. Cooler/Humidifying. Press to select or deselect the function
2. USING THE APPLIANCE
- Plug the appliance in: you will hear a beep and the appliance is ready to use;
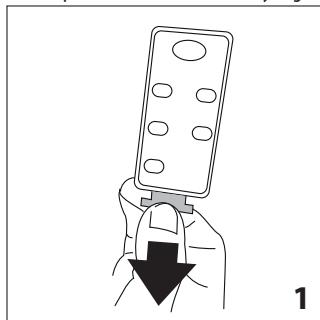
- Remove the plastic tab from the battery (fig. 1);
natural_image
Illustration of a hand holding a remote control device with a downward arrow indicating action (no text or symbols)- To turn the appliance on, press the ⏻ button (B1 or D1). The appliance turns on at MED fan speed and the ionizer ✗ is on (fig. 2).

text_image
IONIZER MED 22.2 Cooler/Humidifying
Fill the water tank before selecting this function.
- Extract the water tank (fig. 4) and fill with MAX 4.5L (152 oz) of fresh tap water (do not overload the water tank: see water level indicator A2).

text_image
REMOVABLE TANK 4- Put the tank back in the appliance;
- Press the ✕ button (B3 or D6): the corresponding light on the display turns on (fig. 5) and the air, flowing through the cooling pad, comes out fresh and contributes to decrease the room temperature;

text_image
Diagram illustrating airflow from a thermometer to an air conditioner unit, with a circular inset showing a device labeled '5'.Please note:
At first use, the appliance could emit a strange odor and the water could be discolored: this is part of normal use.
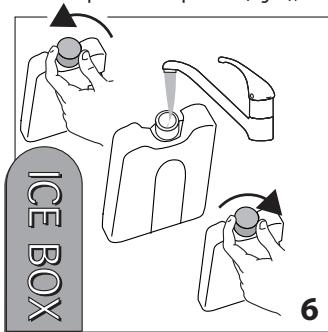
Using the ice box/pack you can increase the efficiency of the appliance.
- Fill the ice box/pack with tap water (fig. 6);
text_image
ICE BOX 6- Put the ice box/pack in the freezer and leave it in until it is frozen (fig. 7);

text_image
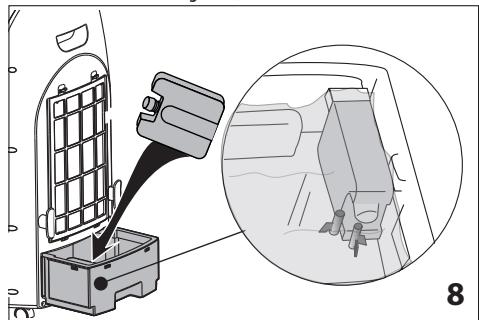
Diagram showing a computer with a device and a magnified view of a device labeled '7'- Put the ice box/pack vertically in the front left corner of the tank as shown in figure 8;
natural_image
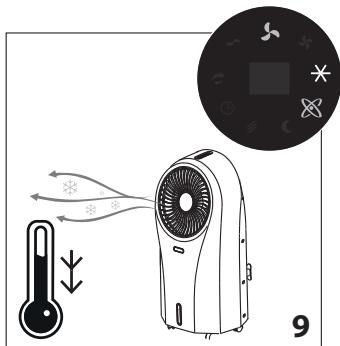
Diagram showing a car seatbelt being inserted into a vehicle's seat, with an inset close-up of the interior (no text or symbols present)- Replace the water tank, turn on the appliance and select Cooling/Humidifying: the air flow will be fresher than before (fig. 9).
Please note:
Always check the Ice box/pack is correctly inserted in its housing (see fig. 8).
text_image
Diagram illustrating airflow and heat transfer in a smart air conditioner, with labeled components and directional arrows.The appliance can be set for 3 different fan modes:
-
NORMAL- Press the 🎨 button (B2 or D4) to select the fan speed;
-
NATURAL - Press the MODE button (B4 or D5) once. The appliance performs random ventilation cycles at different speeds, interrupted by a few seconds of stop (fig. 10);
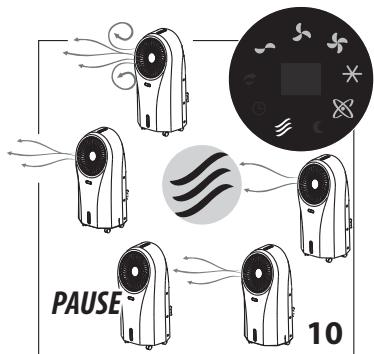
text_image
PAUSE 10- SLEEP - Press the MODE button (B4 or D5) twice. The appliance runs 30 minutes at MAX speed, then 30 minutes at MED speed: then runs continuously at MIN speed (fig. 11).
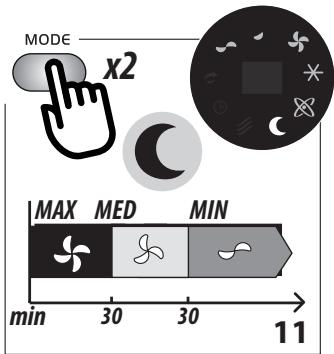
text_image
MODE x2 MAX MED MIN min 30 30 112.4 Swing
Press the ➕ button (B5 or D2) once to activate the rotating vent (fig. 12).
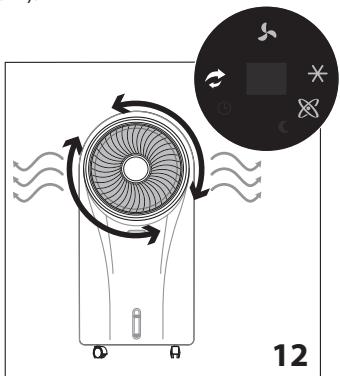
natural_image
Diagram of a fan with rotating blades and airflow indicators, no text or symbols presentPress again to exit swing mode.
The corresponding LED turns on and off accordingly.
You can also adjust vertically the vent by lightly pushing the vent to orientate the air flow (fig. 13): always adjust the vent when the vent is stationary.

natural_image
Diagram showing three stages of a biological or mechanical process with curved arrows and floral patterns, labeled '13' (no text or symbols on diagram itself)2.5 Auto Off
You can set the delayed shut off from 1 to 24 hours by pressing the Ⓛ button (B6 or D3).
- Select the number relative to the operating hours desired: the number will be shown on the display (C1);
- L symbol flashes to highlight that you are programming the auto off: when the flashing stops, the auto off is set (fig. 14);
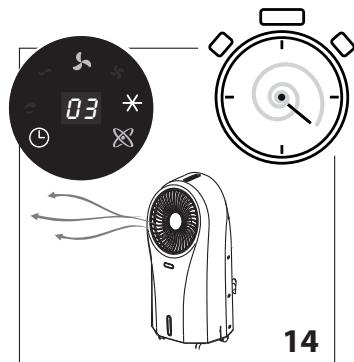
text_image
03 14If you want to exit the "Auto off" function, repeatedly press the
☐ button (B6 or D3) until "00" is displayed: ☐ symbol flashes then disappears and "Auto Off" function is disabled.
3. REFILLING THE WATER TANK
Please note:
Turn off the unit and let sit two minutes before removing drawer to allow excess water to drain back into tank.
Always check that there is water in the water tank before using the Cooler/Humidifying function. If the water finishes in the tank during use, the appliance emits a beep and the symbol flashes (fig. 15): the appliance continues with the function.
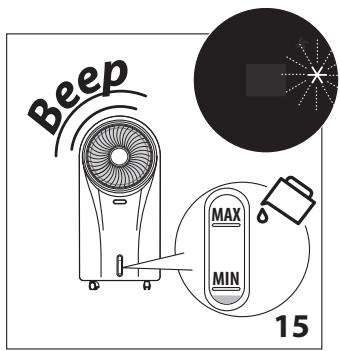
text_image
Beep MAX MIN 15- Remove the water tank (fig. 4) and fill with MAX 4.5L (152oz) of fresh tap water only (do not overfill the water tank: see water level indicator A2);
- Put the tank back in the appliance.
4. CLEANING AND MAINTENANCE
• Always unplug the appliance before cleaning.
• Never immerse the appliance in water.
• Pouring water on the unit is strictly forbidden (fig. 16).
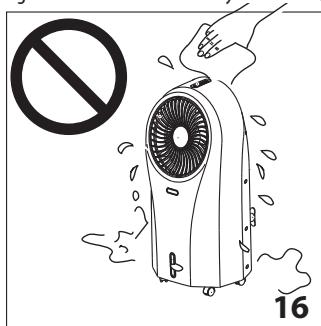
text_image
Illustration of a portable air conditioner with a hand holding a stop sign, emitting exhaust smoke, labeled with number 16.• Do not use benzine, alcohol or solvents for cleaning.
- Do not spray insecticide liquid or similar since the plastic could be deformed.
- Clean the surface of the unit with a damp cloth, never use an abrasive scourer directly on the outside surface as it might scratch.
4.1 Cleaning the dust filter and the cooling pad
To avoid clogging of the dustproof filter, please clean the filter regularly. The frequency of cleaning is to be related to the working time: if used daily, it is suggested to clean filter weekly.
- Remove the dust filter and cooling pad (fig. 17);
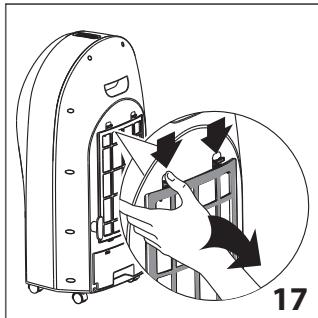
natural_image
Diagram of a device with internal components and directional arrows, no readable text or symbols present- Remove the dust from the filter and the cooling pad using a vacuum cleaner (fig. 18);
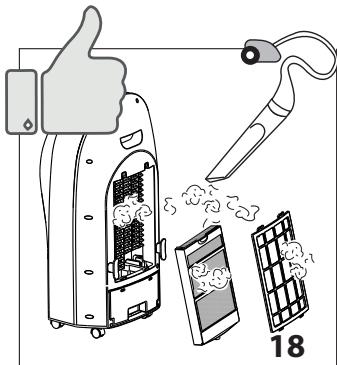
text_image
18- Wash thoroughly the cooling pad with water; then leave it to completely dry and reassemble the filters in its housing (fig. 19).
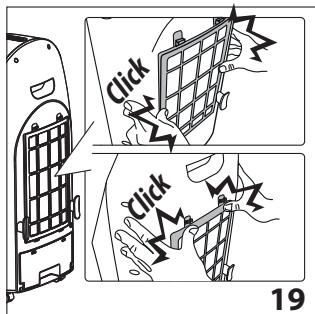
text_image
Click Click 19- To maintain the efficiency of the appliance, it is suggested to change the cooling pad every year.
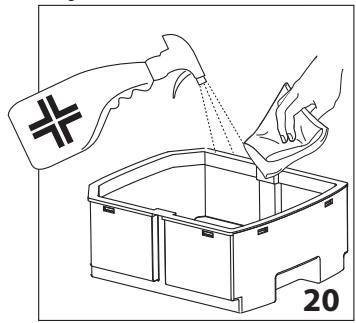
4.2 Cleaning the water tank
Please note:
Turn off unit and let sit two minutes before removing drawer to allow excess water to drain back into tank
- Remove the water tank (fig. 4);
- Clean thoroughly with a cleaning sanitizer, easily available in stores (fig. 20).
natural_image
Line drawing of a hand pouring liquid into a container with a spray bottle (no text or symbols)4.3 Changing the battery of the remote control
- Remove the battery holder on the back of the remote control (fig. 21);
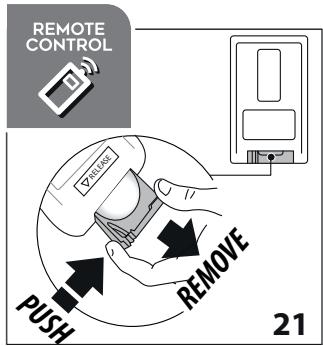
text_image
REMOTE CONTROL PUSH REMOVE 21- Insert one 3V CR2025 type lithium battery on the support, checking that the polarity is correct (+ and -) (fig. 22).
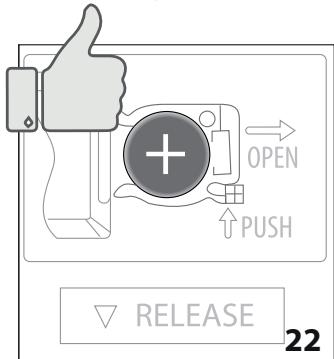
text_image
OPEN PUSH RELEASE 22Please note:
- If you change or dispose the remote control, the battery must be removed and disposed of according to local recycling regulations.
- Never throw the battery in fire as it may explode or leak dangerous liquids.
- This equipment has been tested and found to comply with the limits for a Class B digital device, pursuant to part 15 of the FCC Rules. These limits are designed to provide reasonable protection against harmful interference in a residential installation.
-
This equipment generates, uses and can radiate radio frequency energy and, if not installed and used in accordance with the instructions, may cause harmful interference to radio communications. However, there is no guarantee that interference will not occur in a particular installation. If this equipment does cause harmful interference to radio or television reception, which can be determined by turning the equipment off and on, the user is encouraged to try to correct the interference by one or more of the following measures:
-
Reorient or relocate the receiving antenna.
- Increase the separation between the equipment and receiver.
- Connect the equipment into an outlet on a circuit different from that to which the receiver is connected.
- Consult the dealer or an experienced radio/TV technician for help.
Changes or modifications not expressly approved by the party responsible for compliance could void the user's authority to operate the equipment.
- This device complies with Part 15 of the FCC Rules. Operation is subject to the following two conditions: (1) this device may not cause harmful interference, and (2) this device must accept any interference received, including interference that may cause undesired operation.
- This Class B digital apparatus complies with Canadian ICES-003.
5. TROUBLESHOOTING
Below is a list of some of the possible malfunctions.
If the problem cannot be resolved as described, contact Customer Service.
| PROBLEM | CAUSE | SOLUTION |
| No discharge of air | Cord is not plugged in | Make sure power cord is plugged in and the swi-tch is ON |
| Power is not ON | Turn the unit ON by pressing the ➊ button (B1 on the control panel or D1 on the remote control) | |
| The appliance switches off | The auto shutoff timer was set | Turn the appliance ON and check that the auto shutoff symbol is off |
| Excessive humidity in the room | In Cooler/Humidifying function, the ap- pliance produces moisture as a result of evaporative cooling. This is normal | The appliance cools best in dry climates. If the ambient humidity level is high (60% or above) re-frain from using the cooler/humidifying function |
| Make sure the window/doors are open and there is adequate cross ventilation in the room so that the air can circulate better. Utilize the “fan” function | ||
| Odors and colored water | When the appliance is new | At first use, the appliance will have an odor, which will dissipate within a few hours of initial use. The color in the water will also dissipate after a few uses. |
| Algae or mold due to moisture. In very damp conditions, algae may form due to moisture | Check the Honeycomb Cooling Pad (A12), water tank (A7) and other cooler parts. If you see mold spots or algae issue, use a damp cloth to wipe away the algae until all spots have disappeared. Make sure all parts are clean and dry before storage. Contact Customer Service if problem persists. If the Honeycomb Cooling Pad (A11) has algae or mold, change it with a new one | |
| Remote control does not work | Remote control battery is incorrectly inserted in the battery compartment | Check the battery is correctly inserted following the polarity guide inside the battery compartment. |
| Remote control battery is exhausted | Replace with a new battery | |
| Damaged remote control | If replacing new battery in the correct position does not work, contact Customer Service | |
| The unit does not respond | Damaged control panel on unit | Try to activate the unit with the remote control If the unit responds, then the control panel on the unit may be experiencing problems: contact Customer Service |
| If neither the remote control or the control panel is working, contact Customer Service | ||
| If “Cooler/Humidifier” indicator flashes and unit beeps | Because of no water in the tank | Fill tank above MIN mark with water |
Avertissements
natural_image
Illustration of a hand holding a remote control device with a black downward arrow indicating force (no text or symbols)text_image
REMOVABLE TANK 4text_image
Diagram illustrating airflow from a thermometer to an air conditioner, with a circular inset showing a product display.Remarque :
natural_image
Diagram showing a computer monitor with an arrow pointing to a device, and a magnified inset of a container (no text or symbols present)natural_image
Diagram showing a car seatbelt switch inserted into a vehicle compartment, with an inset close-up of the interior (no text or symbols present)text_image
Diagram illustrating airflow or heat transfer from a temperature sensor to an air conditioner, with a circular inset showing its thermal control panel.flowchart
graph TD
    A["Airplane with fan"] --> B["Flow from top"]
    B --> C["Waveform around center"]
    C --> D["Flow from bottom"]
    D --> E["Waveform on right"]
    E --> F["Flow from top"]
    F --> G["Waveform on left"]
    G --> H["Flow from bottom"]
    H --> I["Waveform on right"]
    I --> J["Flow from top"]
    J --> K["Waveform on left"]
    K --> L["Flow from bottom"]
    L --> M["Waveform on right"]
    M --> N["Flow from top"]
    N --> O["Waveform on left"]
    O --> P["Flow from bottom"]
    P --> Q["Waveform on right"]
    Q --> R["Flow from top"]
    R --> S["Waveform on left"]
    S --> T["Flow from bottom"]
    T --> U["Waveform on right"]
    U --> V["Flow from top"]
    V --> W["Waveform on left"]
    W --> X["Flow from bottom"]
    X --> Y["Waveform on right"]
    Y --> Z["Flow from top"]
    Z --> AA["Waveform on left"]
    AA --> AB["Flow from bottom"]
    AB --> AC["Waveform on right"]
    AC --> AD["Flow from top"]
    AD --> AE["Waveform on left"]
    AE --> AF["Flow from bottom"]
    AF --> AG["Waveform on right"]
text_image
Diagram of a fan with airflow indicators and a circular inset showing solar panels and icons, labeled '12'natural_image
Diagram showing three stages of a biological or mechanical process with curved arrows and floral patterns, labeled '13' (no text or symbols on diagram itself)2.5 Auto Off
natural_image
Illustration of a portable air conditioner with digital display, stopwatch, and fan (no text or symbols)text_image
Beep MAX MIN 15natural_image
Diagram of a device with arrows indicating motion or force, showing internal components and a magnified view (no text or symbols)text_image
Illustration showing a thumbs-up gesture interacting with a device, emitting smoke, next to a screen and a pen tip labeled '18'text_image
Click Click 19natural_image
Line drawing of a hand pouring liquid into a container with a cross symbol, labeled '20' (no text or symbols on the diagram itself)text_image
OPEN PUSH RELEASE 22Remarques:
Below is a list of some of the possible malfunctions.
If the problem cannot be resolved as described, contact Customer Service.
| PROBLEM | CAUSE | SOLUTION |
| No discharge of air | Cord is not plugged in | Make sure power cord is plugged in and the switch is ON |
| Power is not ON | Turn the unit ON by pressing the 1 button (B1 on the control panel or D1 on the remote control) | |
| The appliance switches off | The auto shutoff timer was set | Turn the appliance ON and check that the auto off symbol is shutoff |
| Excessive humidity in the room | In Cooler/Humidifying function, the appliance produces moisture as a result of evaporative cooling. This is normal | The appliance cools best in dry climates. If the ambient humidity level is high (60% or above) refrain from using the cooler/humidifying function |
| Make sure the window/doors are open and there is adequate cross-ventilation in the room so that the air can circulate better. Prefer the “fan” function | ||
| Odors and colored water | When the appliance is new | At first use, the appliance will have an odor, which will dissipate within a few hours of initial use. The color in the water will also dissipate after a few uses. |
| Algae or mold due to moist parts. In very damp conditions, algae may form due to moisture | Check the Honeycomb Cooling Pad (A12), water tank (A7) and other cooler parts. If you see mold spots or algae issue, use a damp cloth to wipe away the algae until all spots have disappeared. Make sure all parts are clean and dry before storage. Contact Customer Service if problem persists. If the Honeycomb Cooling Pad (A11) has algae or mold, change it with a new one | |
| Remote control does not work | Remote control battery is incorrectly inserted in the battery compartment | Check the battery is correctly inserted following the polarity guide inside the battery compartment. |
| Remote control battery is exhausted | Replace with a new battery | |
| Damaged remote control | If replacing new battery in the correct position does not work, contact Customer Service | |
| The unit does not respond | Damaged control panel on unit | Try to activate the unit with the remote control If the unit responds, then the control panel on the unit may be experiencing problems: contact Customer Service |
| If neither the remote control or the control panel is working, contact Customer Service | ||
| If “Cooler/Humidifier” indicator flashes and unit beeps | Because of no water in the tank | Fill tank above MIN mark with water |
Advertencias
- Do not insert or allow objects to enter any ventilation or exhaust operating, as this may damage the unit and may cause electrical shock of fire.
natural_image
Illustration of a hand holding a remote control device with a downward arrow indicating download (no text or symbols)text_image
REMOVABLE TANK 4text_image
Diagram illustrating airflow from a thermometer to an air conditioner unit, with a circular inset showing the same device.Nota:
natural_image
Diagram showing a computer monitor with an arrow pointing to a battery holder, labeled '7' (no text or symbols on the diagram itself)natural_image
Diagram showing a car seatbelt switch inserted into a vehicle compartment, with an inset close-up of the interior (no text or symbols present)text_image
Diagram illustrating airflow behavior of a smart air conditioner with temperature and fan control iconstext_image
Diagram illustrating airflow around a fan with labeled components and a circular inset showing a device with icons.natural_image
Diagram showing three stages of a biological or mechanical process with curved surfaces and leaf-like structures, labeled 13 (no text or symbols present)2.5 Auto Off
natural_image
Illustration of a portable air conditioner unit, a digital timer, and a stopwatch with airflow indicators (no text or symbols on main elements)text_image
Beep MAX MIN 15natural_image
Diagram of a device with internal components and directional arrows, no readable text or symbols presenttext_image
Illustration showing a thumbs-up gesture interacting with a device, emitting smoke, and a magnifying glass labeled '18' (likely indicating item 18).text_image
Click Click 19natural_image
Illustration of a hand pouring liquid into a container with a cross symbol, labeled '20' (no text or symbols on the diagram itself)text_image
OPEN PUSH RELEASE 22Please note:
- If you change or dispose the remote control, the battery must be removed and disposed of according to local recycling regulations.
- Never throw the battery in fire as it may explode or leak dangerous liquids.
- This equipment has been tested and found to comply with the limits for a Class B digital device, pursuant to part 15 of the FCC Rules. These limits are designed to provide reasonable protection against harmful interference in a residential installation.
- This equipment generates, uses and can radiate radio frequency energy and, if not installed and used in accordance with the instructions, may cause harmful interference to radio communications. However, there is no guarantee that interference will not occur in a particular installation. If this equipment does cause harmful interference to radio or television reception, which can be determined by turning the equipment off and on, the user is encouraged to try to correct the interference by one or more of the following measures:
- Reorient or relocate the receiving antenna.
- Increase the separation between the equipment and receiver.
- Connect the equipment into an outlet on a circuit different from that to which the receiver is connected.
- Consult the dealer or an experienced radio/TV technician for help.
Changes or modifications not expressly approved by the party responsible for compliance could void the user's authority to operate the equipment.
- This device complies with Part 15 of the FCC Rules. Operation is subject to the following two conditions: (1) this device may not cause harmful interference, and (2) this device must accept any interference received, including interference that may cause undesired operation.
- This Class B digital apparatus complies with Canadian ICES-003.
Below is a list of some of the possible malfunctions.
If the problem cannot be resolved as described, contact Customer Service.