
BBH85B1 - BBH85B1---B - Cordless vacuum BOSCH - Free user manual and instructions
Find the device manual for free BBH85B1 - BBH85B1---B BOSCH in PDF.
Download the instructions for your Cordless vacuum in PDF format for free! Find your manual BBH85B1 - BBH85B1---B - BOSCH and take your electronic device back in hand. On this page are published all the documents necessary for the use of your device. BBH85B1 - BBH85B1---B by BOSCH.
USER MANUAL BBH85B1 - BBH85B1---B BOSCH
Register new devic ur MyBosch e on get free b w and enefits: bosch-ho me.com/ welcome
BBH7.../BCH7.../BBH8.../BCH8
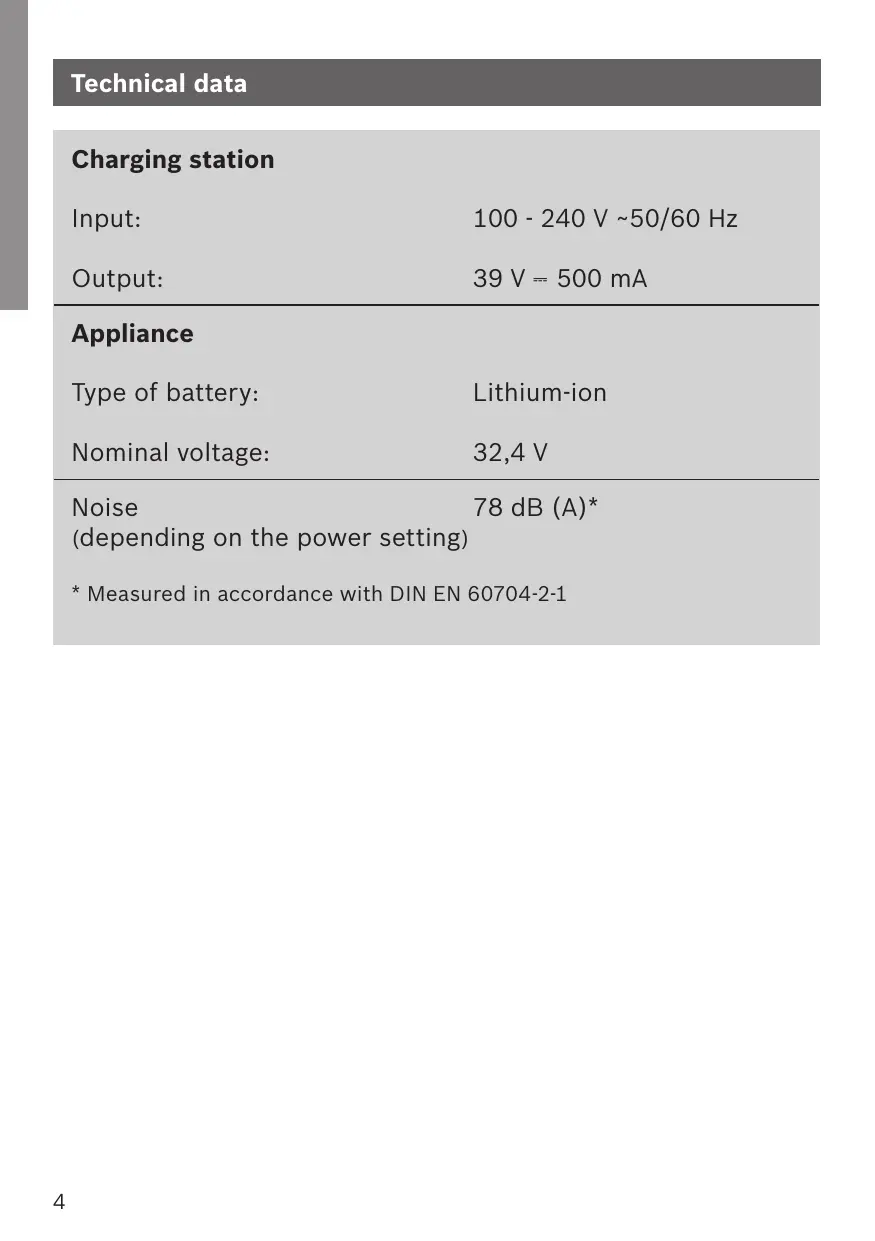
Table of contents Table of contents Technical data Charging station Input:
100 - 240 V ~50/60 Hz
Output: 39 V ᄍ 500 mA Appliance Type of battery: Lithium-ion Nominal voltage: 32,4 V Noise 78 dB (A)* (depending on the power setting)
- Measured in accordance with DIN EN 60704-2-1
Intended use Congratulations on your purchase of the BBH7 vacuum cleaner. You should only use original accessories from Bosch that were specially developed for your vacuum cleaner, so that you achieve the best possible vacuuming results. Please keep this instruction manual for future reference. When passing the vacuum cleaner on to a third party, please also pass on this instruction manual. Intended use Please read the information on intended use to ensure that you use the appliance correctly and safely. Only use this appliance: As specified in this instruction manual. With genuine parts and accessories. Damage caused by using third-party products is not covered under the warranty. For cleaning surfaces. In private households and in enclosed spaces in a domestic environment at room temperature. Up to an altitude of max. 2000 m above sea level.
Intended use In order to prevent injuries and damage, the vacuum cleaner must not be used for: Vacuuming persons or animals. Vacuuming up: −Hazardous, sharp-edged, hot or red-hot substances. −Damp or liquid substances. −Highly flammable or explosive substances and gases. −Ash, soot from tiled stoves and central heating systems. −Toner dust from printers and copiers. Spare parts, accessories Our original spare parts and original (special) accessories are designed to work with the features and requirements of our vacuum cleaners. We therefore recommend that you only use our original spare parts and original (special) accessories. This will ensure that your vacuum cleaner has a long service life and that the quality of its cleaning performance will remain consistently high throughout. ! Please note: Using unsuitable or inferior-quality spare parts and (special) accessories can damage your vacuum cleaner. Damage caused by the use of such products is not covered by our guarantee.
Safety Safety information This vacuum cleaner complies with the recognised rules of technology and the relevant safety regulations. The appliance may be used by children over the age of 8 years and by persons with reduced physical, sensory or mental capacity or by persons with a lack of experience or knowledge if they are supervised or have been instructed on the safe use of the appliance and have understood the potential dangers of using the appliance. Children must never play with the appliance. Cleaning and user maintenance must never be carried out by children without supervision. Plastic bags and films must be kept out of the reach of children and disposed of. => There is a risk of suffocation.
Proper use Proper use To charge, only use the charging cable included in the scope of supply. The charging cable must only be connected and operated as specified on the rating plate. The appliance must only be stored and charged indoors. Do not expose the appliance to temperatures below 0 °C or above 40 °C. Never vacuum without the dust bag or dust container, motor protection or exhaust filter. => This may damage the vacuum cleaner. Keep the vacuum cleaner away from your head when using nozzles and tubes. => This could cause injury. Do not use a damaged charging cable. Replace it with an original charging cable. When disconnecting the charging cable from the mains, pull the plug itself to remove it; do not pull on the power cord. Do not pull the charging cable over sharp edges or allow it to become trapped. Before carrying out any work on the vacuum cleaner, switch off the appliance and disconnect it from the charging cable and the mains. Do not operate the vacuum cleaner if it is damaged. If a fault is detected, switch off the appliance and disconnect it from the charging cable and the mains.
Proper use For safety reasons, only authorised after-sales service personnel are permitted to carry out repairs and fit replacement parts to the vacuum cleaner. In the following cases, you must stop the appliance immediately and contact the after-sales service: −If you have accidentally vacuumed up some liquid or liquid has entered the inside of the appliance; −If the appliance has been dropped and damaged. Protect the vacuum cleaner from outside weather conditions, moisture and sources of heat. Do not pour flammable substances or substances containing alcohol onto the filters (motor protection filter, exhaust filter, etc.). The vacuum cleaner is not suitable for use on construction sites. => Vacuuming up building rubble may damage the appliance. Switch off the appliance when it is not in use. For safety reasons, the appliance is fitted with an overheating protection system to safeguard the battery and motors. The appliance will switch off automatically if it or the battery is too hot. => The appliance will need around 30 minutes to cool down before it can be used again. The packaging is designed to protect the vacuum cleaner from being damaged during transportation. We therefore recommend keeping the packaging for the purpose of future transportation.
Proper use Li-ion batteries Read all the safety information and instructions. => Failure to act in accordance with the safety information and instructions may result in electric shock, fire and/or serious injury. Keep all the safety information and instructions for future reference. Protect the battery from heat sources, for example avoiding long periods in the sun and exposure to fire, as well as from water and moisture. => Risk of explosion. Fumes may be released if the battery is damaged or used improperly. Circulate fresh air, and seek medical assistance in the event of physical symptoms arising as a result of exposure. => The fumes may irritate the airway. If the battery is used incorrectly, liquid may leak out of the battery. Avoid touching the liquid. In the event of accidental contact, rinse the affected area with water. If the liquid comes into contact with the eyes, seek medical assistance. => If battery liquid leaks, it can irritate or burn the skin.
Proper use Transportation information: The Li-ion batteries in the appliance are subject to the requirements of dangerous goods legislation. The batteries can be transported by the user by road without any further requirements. In the event that they are shipped by a third party (e.g. transported by air or freight carrier), special requirements regarding packaging and identification must be met. In this case, a dangerous goods expert must be consulted when preparing the goods for dispatch. Only for qualified professional: To remove the battery from the vacuum cleaner, press the on/off switch (Fig. 5 and Fig. 11 ) until the battery is fully discharged. Unscrew the screws on the housing and take off the housing shell to remove the battery. To prevent a short circuit, disconnect the battery connections individually one after the other and then insulate the terminals. Even in the case of complete discharge, the battery still contains a residual capacity that may be released in the event of a short circuit.
Your vacuum cleaner 11*
Your vacuum cleaner 1 Floor tool with electric brush 9 On/off switch 2 Dust box with filter unit 10 Professional upholstery nozzle* 3 Dirt container release button 11 Professional crevice nozzle* 4 Battery charging status indicator 12 Short suction pipe 13 Charging cable 14 Replacement rotary brush* 15 Furniture nozzle* 16 Mattress nozzle*
- the equipment may vary depending on the appliance type
Before using your appliance for the first time Connecting the handle and appliance
Fig. 1 Carefully plug the handle onto the main housing and lock into place. Click! Connecting the appliance and floor nozzle
Click! Fig. 2 Plug the hand vacuum cleaner into the floor tool and lock into place. To release the floor tool, press the release button and pull the hand vacuum cleaner out of the tool.
Caution! The floor nozzle is not suitable for vacuuming up small parts such as shards, toys, pins, paper clips, etc. Before using your appliance for the first time
Caution! Before using the vacuum cleaner for the first time, the batteries must be charged for at least 6 hours. Only charge the appliance using the charging cable supplied.
Charging the battery
Fig. 3 To charge the vacuum cleaner, place it near to a socket. The appliance can be left standing anywhere in the room. Fig. 12 Plug the charging cable into the connection at the rear of the appliance. Plug the charging cable plug into the socket.
Before using your appliance for the first time
The charging indicator flashes during the charging process. Once the battery is fully charged, the charging indicator lights up in blue and no longer flashes. The LED goes out after two minutes in order to save energy. It is normal for the power adapter and vacuum cleaner to heat up and this is not a cause for concern. Charging
Battery charging status indicator Fig. 4 The indicator LEDs show the charging status of the battery. Battery fully charged: Battery semi-charged: Battery low: When the final LED flashes, the battery must be recharged.
Switching on/off Fig. 5 Move the on/off button in the direction of the arrow.
Vacuuming Controlling the suction level
Fig. 6 To change the suction power, slide the on/off switch to the desired position: Power level 1 For simple cleaning tasks, such as rugs or lightly soiled hard floors. The appliance achieves the maximum runtime at this level. Power level 2 For vacuuming delicate rugs und for daily vacuuming of lightly soiled floors. Power level 3 For vacuuming hard floors and heavily soiled rugs and carpets. The appliance achieves a shorter run time at this level. When vacuum-cleaning using accessories at level 3 only.
Transport Fig. 7 To overcome obstacles, e.g. steps, the appliance can also be carried by the handle on the appliance body.
Vacuuming Vacuuming with accessories
For all work with the accessory, set the appliance to the highest performance level (level 3).
Short suction pipe Pull the appliance out of the floor nozzle. Click! Place the suction pipe onto the appliance and lock it in place. For vacuuming up larger particles of dirt or small parts, such as confetti, paper clips, cornflakes, etc. For vacuuming car footwells.
Fig. 9 Attach the nozzles to the short suction pipe as required: Professional upholstery nozzle For vacuuming upholstery, car seats, etc. To clean the professional upholstery nozzle, simply vacuum it using the appliance. Professional crevice nozzle For vacuuming crevices and corners, etc.
Furniture nozzle with brush ring For vacuuming walls, sensitive surfaces, tables, etc. Furniture nozzle without brush ring For vacuuming curtains, etc., remove the brush ring from the nozzle. For cleaning sensitive materials such as curtains, return the power setting to the lowest setting. Cleaning the furniture nozzle For cleaning the furniture nozzle, simply vacuum it using the appliance.
Fig. 9 Mattress nozzle For vacuuming mattresses Vacuuming stairs Fig. 10 Easily vacuum stairs using the appliance. Vacuum steps crosswise from left to right. Remove the remaining dirt at the edges by rotating the floor nozzle.
After using the appliance
Switching off the appliance Fig. 11 Switch off the appliance after vacuuming.
Parking the appliance Fig. 12 During short pauses in vacuuming, the appliance can be left standing anywhere in the room. To do this, tilt the vacuum cleaner forwards slightly in the direction of the nozzle. Caution! When the appliance is left standing, it must be switched off, because if the brush is turning while the appliance is standing still, it could cause damage to the floor covering.
After using the appliance Fig. 13 In order to achieve the best possible vacuuming results, the dust container should be emptied after every use or, at the latest, when dust at one point in the dust container has reached the marking. We recommend that you not fill the dust container beyond the marking, as this leads to considerable soiling of the filter. When emptying the dust container, always check how dirty the outer filter unit is and, if necessary, clean it as detailed in the "Cleaning the fluff filter" instructions. Fig. 20 Caution! The filter can only be cleaned if the appliance is switched off. Never vacuum without the outer filter unit and its fitted filter cartridge.
After using the appliance
Removing the dust container Fig. 14 Using the release button, unlock the dust container and remove it from the appliance.
After using the appliance
Removing the filter unit Fig. 15 Take the filter unit out of the dust container. Empty the dust container. You can wipe out the dust container, if required, using a damp cloth.
Vacuuming Inserting the dust container
Fig. 16 Remove any dirt which may have been lodged underneath the container ejector opening. Insert the filter unit into the dust container, making sure it is correctly seated. Insert the dust container in the appliance, so that it 'clicks' audibly into place. Click!
Caution! If you notice any resistance when inserting the dust container, check that the filter is complete and that the filter unit and dust container are correctly seated. Removal
Loosening the handle and appliance
Fig. 17 To release the handle, press the release button and carefully lift the handle upwards to remove it.
Loosening the appliance and the floor nozzle
Fig. 18 To release the floor tool, press the release button and pull the hand vacuum cleaner out of the tool.
Caution! The filter can only be cleaned if the appliance is switched off. Your appliance is equipped with a "Sensor Control" Function. This function constantly monitors whether your vacuum cleaner is reaching its optimum power level. The indicator light lets you know when you need to clean the plate filter, so that the vacuum cleaner can reach its optimum power level once more. Sensor Control Fig. 19 The indicator lights up blue when the appliance is working optimally. As soon as the indicator turns red and flashes, the fluff filter and fin filter must be cleaned. The appliance is automatically adjusted to power level 1.
Cleaning the fluff filter Fig. 20 The fluff filter should be cleaned at regular intervals in order to ensure optimum operation of the vacuum cleaner.
Please switch off the appliance to clean the outer filter unit. Remove the dust container from the appliance. Fig. 14 Take the filter unit out of the dust container. Fig. 15 Clean the outer filter unit. a) It is usually sufficient to lightly shake or tap out the whole filter unit when the dust container is emptied in order to dislodge any particles of dirt. b) If this is not sufficient, you can use a damp cloth to remove dirt particles from the surface.
Cleaning the fin filter (motor protection filter) Fig. 21 Switch the appliance off in order to clean the plate filter. Caution! the filter can only be cleaned if the appliance is switched off. To clean the fin filter, turn the knob at least three turns through 180°. You can also clean the filter if the suction is becoming less powerful, even if the indicator has not lit up. We recommend that you clean the plate filter each time before emptying the dust container. It must be cleaned at the latest when the “Sensor Control” indicator lights up.
Tapping out the fin filter (motor protection filter) Fig. 22 If the plate filter is particularly dirty, the dirt can also be tapped out. Tap out the filter over a dustbin. The dirt will fall down out of the filter. If the fin filter is defective, you can order a new one via our after-sales service using the following spare part number:
Cleaning the floor nozzle
Cleaning the brush roller
Before carrying out any maintenance, switch off the vacuum cleaner and disconnect it from the charging cable.
Fig. 23 a) Turn the rotary brush anticlockwise to unlock it and pull it out to the side of the floor nozzle. b) Use scissors to cut through threads and hairs wound round the rollers along the cutting groove. c) Slide the rotary brush into the floor nozzle and turn it clockwise to lock it in place.
The brush roller is also selfcleaning. Use scissors to cut through the hairs and fibres lengthways on two opposite sides. Then operate the brush roller for 30 seconds to vacuum these up automatically. Caution! The floor tool must only be put into operation with the brush roller fitted. Cleaning instructions Before cleaning the hand vacuum cleaner, it must be switched off and disconnected from the charging cable. The vacuum cleaner and plastic accessories can be cleaned with an ordinary plastic cleaner. Do not use abrasive materials, glass-cleaning agents or all-purpose cleaning products. Never immerse the vacuum cleaner in water. Subject to change
Troubleshooting In the following cases, you should stop using the appliance immediately and contact customer service: If you have accidentally vacuumed up some liquid or liquid has entered the inside of the appliance. If the appliance has been dropped. In these cases, the electrical safety of the appliance can no longer be guaranteed, even if no damage is visible on the outside. Possible fault The electric brush is not working or is making unusual noises Remedial action Clean the brush and remove any foreign objects where necessary Check whether the brush was inserted correctly and is locked in place If the problem continues, contact customer service The brush switches off Switch off the appliance and when the appliance is in check the nozzle for blockages. operation Remove any blockages and clean the nozzle. On carpets, select a lower performance level and start the cleaning process again. If you cannot switch the nozzle back on again, contact after-sales service.
Customer service BSH Home Appliances Ltd. Grand Union House Old Wolverton Road Wolverton Milton Keynes MK12 5PT To arrange an engineer visit, to order spare parts and accessories or for product advice please visit www.bosch-home.co.uk or call Tel.: 0344 892 8979*
- Calls are charged at the basic rate, please check with your telephone service provider for exact charges.
Disposal This appliance is labelled in accordance with European Directive 2012/19/EU on waste electrical and electronic equipment (WEEE). This directive provides an EU-wide framework for returning and recycling old appliances. Information on disposal Vacuum cleaners, batteries, accessories and packaging should be recycled in an environmentally friendly manner. Do not dispose of the vacuum cleaner or the batteries in the household rubbish.
Packaging The packaging is designed to protect the vacuum cleaner from being damaged during transportation. It is made of environmentally friendly materials and can be recycled. Dispose of packaging that is no longer required at an appropriate recycling point.
Old appliance Old appliances often still contain valuable materials. You should therefore take appliances that have reached the end of their service life to your dealer or a recycling centre so that they can be recycled. Please ask your dealer or your local council about current disposal methods.
Batteries According to European Directive 2006/66/ EC, defective or exhausted batteries/rechargeable batteries must be collected separately and recycled in an environmentally friendly manner. Please follow the notes in the section "Notes on transport". Subject to change
Conditions of guarantee For this appliance the guarantee conditions as set out by our representatives in the country of sale apply. Details regarding same may be obtained from the dealer from whom the appliance was purchased. For claims under guarantee the sales receipt must be produced.
Apparaat Type accucellen: Li-ion Nominale spanning: 32,4 V Geluid 78 dB (A)*
Register your new device on MyBosch now and profit directly from: - *#$&&#%&$%"$+"'$##! -$$!&+*&!%"!"#&"!% - %"'!&%"$%%"$%%#$#$&% - & !'!##!&&! - %+%%&" "%" ##!%$( Free and easy registration – also on mobile phones: )))"%" " )"
Expert advice for your Bosch home appliances, need help with problems or a repair from Bosch experts. Find out everything about the many ways Bosch can support you: )))"%" " %$( "!&&&""'!&$%$%&!&&&%$($&"$+ #4))BVTHFSÉUF(NC) Carl-Wery-Straße 34 81739 München (&3."/: "#PTDI$PNQBOZ www.bosch-home.com
Valid within Great Britain: Imported to Great Britain by BSH Home Appliances Ltd. Grand Union House Old Wolverton Road Wolverton, Milton Keynes MK12 5PT United Kingdom