
PD91-8SSM - PD91-8SSM - Vacuum Cleaner ELECTROLUX - Free user manual and instructions
Find the device manual for free PD91-8SSM - PD91-8SSM ELECTROLUX in PDF.
| Product type | Canister vacuum with hose and accessories |
| Brand | Electrolux |
| Model | PD91-8SSM (PURED9) |
| Power supply | Mains, power cord with rewinder |
| Power | Variable by model: rotary dial, electronic or AUTO |
| Collection system | s-bag® dust bag (Ultra Long Performance recommended) |
| Motor filter | Replaceable filter (green frame: disposable, blue frame: washable) |
| Exhaust air filter | Washable (depending on model) or disposable |
| Indicators | Bag full indicator, filter indicator (depending on model) |
| AUTO function | Automatic power regulation on certain models |
| Main nozzle | FlowMotion or FlowMotion LED (with lighting) nozzle, adaptable to hard floors and carpets |
| Included accessories | AeroPro 3-in-1 accessory, crevice tool, upholstery brush, etc. (varies by model) |
| Telescopic tube | Adjustable AeroPro telescopic tube |
| Cable rewinder pedal | Yes, automatic cable storage |
| Parking positions | Side, rear and under parking |
| Filter maintenance | Washable filter: rinse with lukewarm water, dry for at least 24 hours. Disposable filter: replace |
| Bag replacement | When indicator is red or after using cleaning powder |
| Safety | Do not use on liquids, sharp objects, ashes. Unplug before maintenance |
| Original parts | Use only Electrolux accessories and bags |
| Warranty | Damage not covered in case of improper use |
Frequently Asked Questions - PD91-8SSM - PD91-8SSM ELECTROLUX
User questions about PD91-8SSM - PD91-8SSM ELECTROLUX
0 question about this device. Answer the ones you know or ask your own.
Ask a new question about this device
Download the instructions for your Vacuum Cleaner in PDF format for free! Find your manual PD91-8SSM - PD91-8SSM - ELECTROLUX and take your electronic device back in hand. On this page are published all the documents necessary for the use of your device. PD91-8SSM - PD91-8SSM by ELECTROLUX.
USER MANUAL PD91-8SSM - PD91-8SSM ELECTROLUX
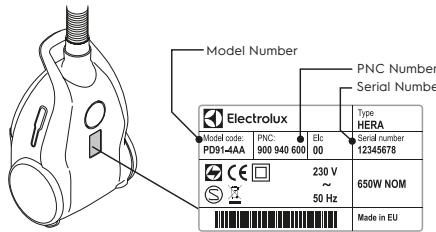
When contacting Service, ensure that you have
the following data available:
- Model Number
- PNC number
- Serial number
The information can be found on the rating plate
electrolux.com/shop

Electrolux Appliances AB
S:t Göransgatan 143
S-105 45 Stockholm
Sweden
www.electrolux.com

Instruction Book
Mode d'emploi
PURED9

natural_image
Abstract geometric design with overlapping circular and petal-like shapes (no text or symbols)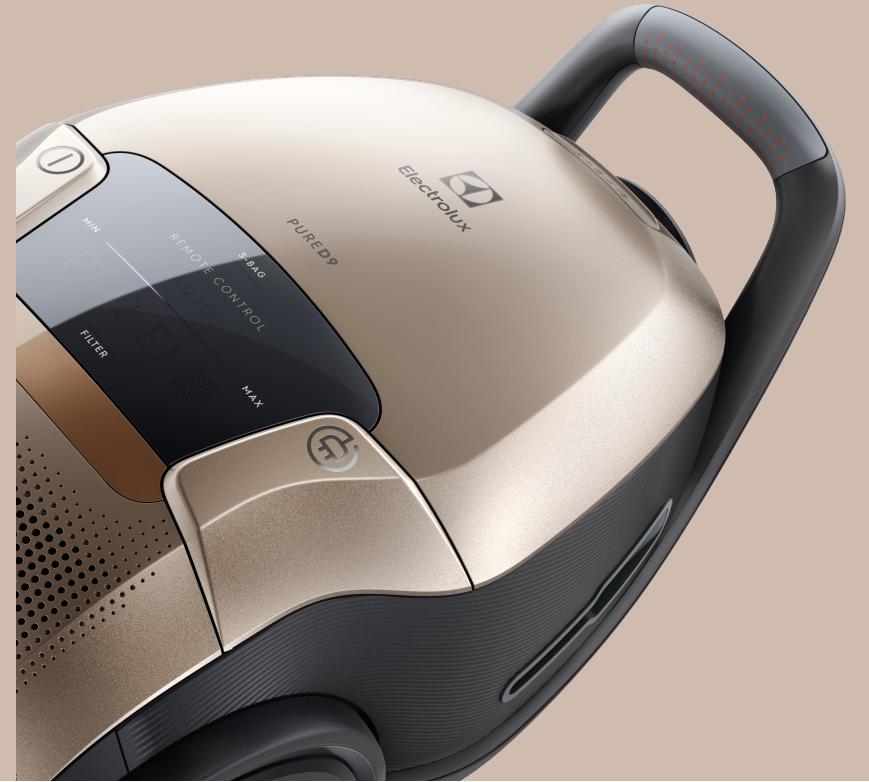
natural_image
Close-up of a modern electric vacuum cleaner with visible control buttons and branding (no readable text beyond branding)GB INSTRUCTION BOOK
FR MODE D'EMPLOI
AR دليل المستخدم
BG БРОШУРА С ИНСТРУКЦИИ
CZ NÁVOD K POUŽITÍ
DE GEBRAUCHSANWEISUNG
DK VEJLEDNING
EE KASUTUSJUHEND
ES LIBRO DE INSTRUCCIONE
FI OHJEKIRJA
4 GR ΕΓΧΕΙΡΙΔΙΟ ΟΔΗΓΙΩΝ
7 HR KNJIŽICA S UPUTAMA
10 HU HASZNÁLATI ÚTMUTATÓ
13 IT ISTRUZIONI
16 LT INSTRUKCIJŲ KNYGA
19 LV LIETOŠANAS INSTRUKCIJA
22 NL INSTRUCTIE BOEK
25 NO BRUKSANVISNING
28 PL INSTRUKCJA OBSŁUGI
31 PT LIVRO DE INSTRUÇÕES
34
37
40
43
46
49
0
55
34
37
40
43
46
49
0
55
34
37
40
34
37
40
43
46
49
0
55
34
37
4
7
0
3
6
9
2
5
4
7
0
3
6
9
2
5


GB FR
ENGLISH
Thank you for choosing Electrolux PURED9 vacuum cleaner. Always use original accessories and spare parts to get the best results. This product is designed with the environment in mind. All plastic parts are marked for recycling purposes.
BEFORE STARTING
- Read this manual carefully.
- Check that all parts described are included.
• Pay special attention to the safety precautions!
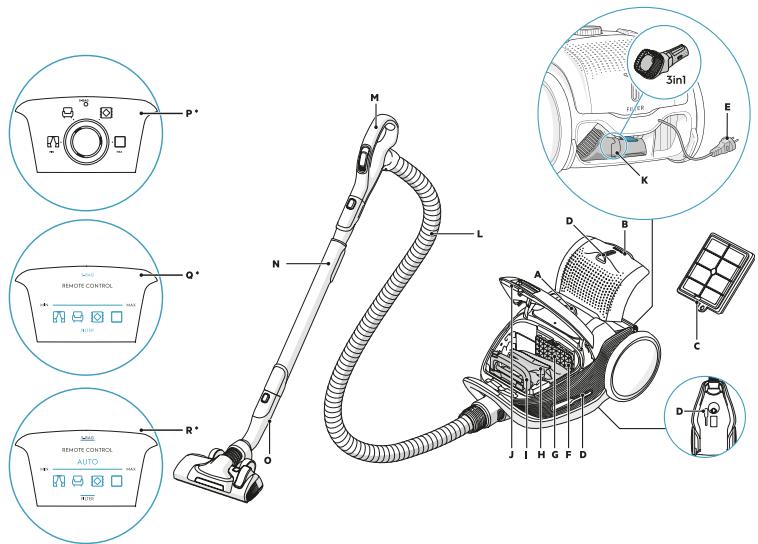
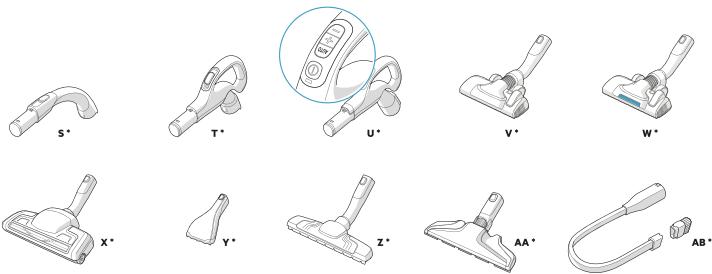
DESCRIPTION OF PURED9 VACUUM CLEANER
. Display (see versions later) Q. Display for models with remote
Exhaust filter lid control
. Exhaust filter R. Display for models with remote
. Parking slots control and AUTO function*
Power cord S. AeroPro Classic handle*
Motor filter T. AeroPro Ergo handle*
. Motor filter holder U. AeroPro Remote Control
. S-baq® handle ^a
S-bag ^® holder V. FlowMotion nozzle ^®
Dust compartment cover W. FlowMotion LED nozzle (with
AeroPro 3in1 tool front lights)*
AeroPro hose X. AeroPro Turbo nozzle*
1. AeroPro handle (see versions Y. AeroPro Mini Turbo nozzle*
later) Z. ParkettoPro nozzle*
. AeroPro telescopic tube AA. AeroPro FlexProPlus nozzle*
. Parking clip AB.AeroPro Long crevice nozzle*
Display for models with rotary
knob manual control*
* Certain models only
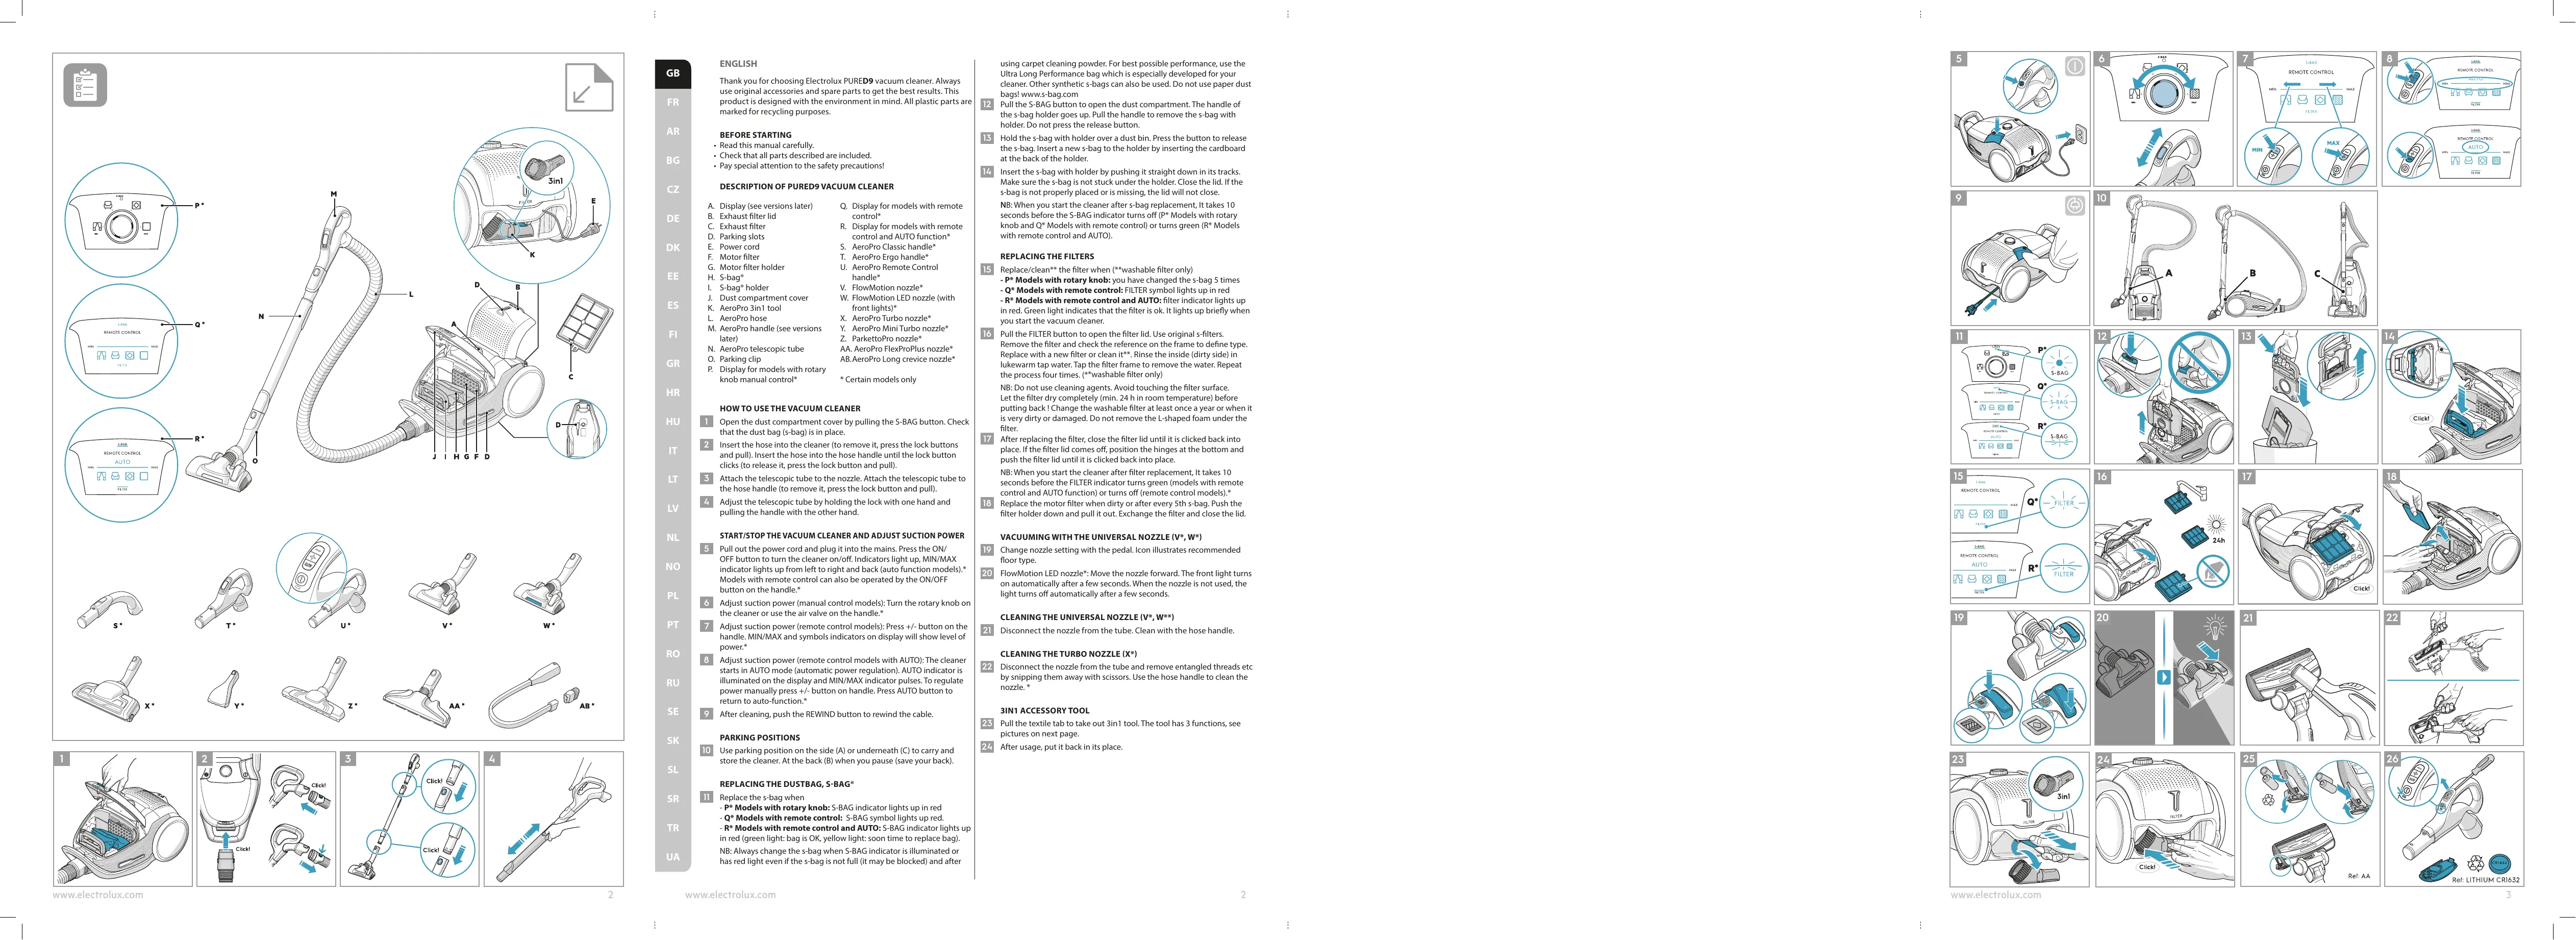
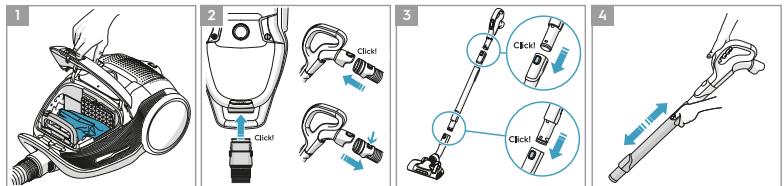
HOW TO USE THE VACUUM CLEANER
Open the dust compartment cover by pulling the S-BAG button. Check that the dust bag (s-bag) is in place.
Insert the hose into the cleaner (to remove it, press the lock buttons and pull). Insert the hose into the hose handle until the lock button clicks (to release it, press the lock button and pull).
Attach the telescopic tube to the nozzle. Attach the telescopic tube to the hose handle (to remove it, press the lock button and pull).
Adjust the telescopic tube by holding the lock with one hand and pulling the handle with the other hand.
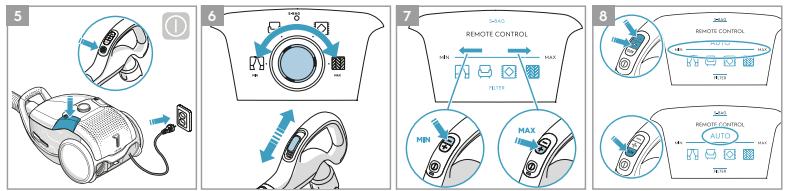
START/STOP THE VACUUM CLEANER AND ADJUST SUCTION POWER
Pull out the power cord and plug it into the mains. Press the ON/OFF button to turn the cleaner on/off. Indicators light up, MIN/MAX indicator lights up from left to right and back (auto function models). Models with remote control can also be operated by the ON/OFF button on the handle.*
Adjust suction power (manual control models): Turn the rotary knob on the cleaner or use the air valve on the handle.*
Adjust suction power (remote control models): Press +/- button on the handle. MIN/MAX and symbols indicators on display will show level of
power.*
Adjust suction power (remote control models with AUTO): The cleaner starts in AUTO mode (automatic power regulation). AUTO indicator is illuminated on the display and MIN/MAX indicator pulses. To regulate power manually press +/- button on handle. Press AUTO button to return to auto-function.*
After cleaning, push the REWIND button to rewind the cable.
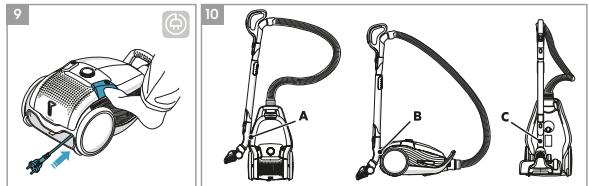
PARKING POSITIONS
Use parking position on the side (A) or underneath (C) to carry and store the cleaner. At the back (B) when you pause (save your back).
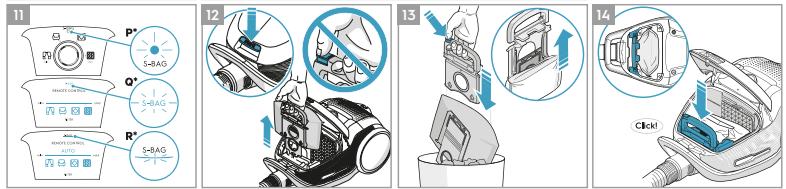
REPLACING THE DUSTBAG, S-BAG®
Replace the s-bag when
- P* Models with rotary knob: S-BAG indicator lights up in red
- Q* Models with remote control: S-BAG symbol lights up red.
- R* Models with remote control and AUTO: S-BAG indicator lights up
in red (green light: bag is OK, yellow light: soon time to replace bag).
NB: Always change the s-baq when S-BAG indicator is illuminated or
has red light even if the s-bag is not full (it may be blocked) and after
using carpet cleaning powder. For best possible performance, use the Ultra Long Performance bag which is especially developed for your cleaner. Other synthetic s-bags can also be used. Do not use paper dust bags! www.s-bag.com
12 Pull the S-BAG button to open the dust compartment. The handle of the s-bag holder goes up. Pull the handle to remove the s-bag with holder. Do not press the release button.
13 Hold the s-bag with holder over a dust bin. Press the button to release the s-bag. Insert a new s-bag to the holder by inserting the cardboard at the back of the holder.
14 Insert the s-bag with holder by pushing it straight down in its tracks. Make sure the s-bag is not stuck under the holder. Close the lid. If the s-bag is not properly placed or is missing, the lid will not close.
NB: When you start the cleaner after s-bag replacement, It takes 10 seconds before the S-BAG indicator turns off (P* Models with rotary knob and Q* Models with remote control) or turns green (R* Models with remote control and AUTO).
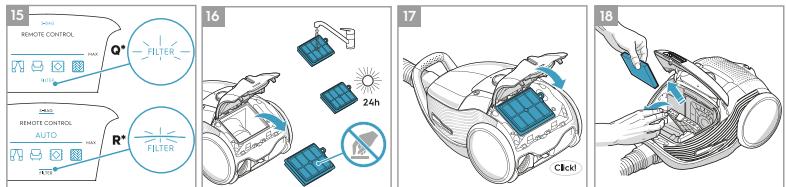
REPLACING THE FILTERS
15 Replace/clean** the filter when (**washable filter only)
- P* Models with rotary knob: you have changed the s-bag 5 times
- Q* Models with remote control: FILTER symbol lights up in red
- R* Models with remote control and AUTO: filter indicator lights up
in red. Green light indicates that the filter is ok. It lights up briefly when you start the vacuum cleaner.
16 Pull the FILTER button to open the filter lid. Use original s-filters.
Remove the filter and check the reference on the frame to define type.
Replace with a new filter or clean it**. Rinse the inside (dirty side) in
lukewarm tap water. Tap the filter frame to rem the process four times. ( ^** washable filter only)
NB: Do not use cleaning agents. Avoid touching the filter surface.
Let the filter dry completely (min. 24 h in room temperature) before
putting back! Change the washable filter at least once a year or when it
is very dirty or damaged. Do not remove the L-shaped foam under the
filter.
17 After replacing the filter, close the filter lid until it is clicked back into
place. If the filter lid comes off, position the hinges at the bottom and
push the filter lid until it is clicked back into pla
NB: When you start the cleaner after filter replacement, It takes 10
seconds before the FILTER indicator turns green (models with remote
control and AUTO function) or turns off (remote control models).*
18 Replace the motor filter when dirty or after every 5th s-bag. Push the
filter holder down and pull it out. Exchange the filter and close the lid
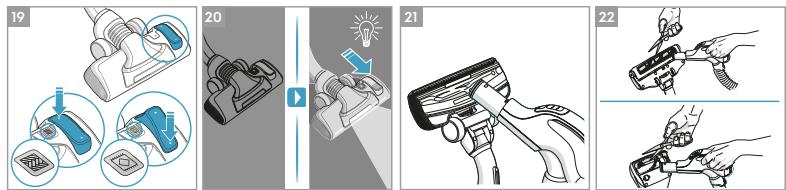
VACUUMING WITH THE UNIVERSAL NOZZLE (V\*, W\*)
19 Change nozzle setting with the pedal. Icon illustrates recommended floor type.
20 FlowMotion LED nozzle*: Move the nozzle forward. The front light turns
on automatically after a few seconds. When the nozzle is not used, the
light turns off automatically after a few seconds.
CLEANING THE UNIVERSAL NOZZLE (V\*, W\*\*)
21 Disconnect the nozzle from the tube. Clean with the hose handle.
CLEANING THE TURBO NOZZLE (X\*)
22 Disconnect the nozzle from the tube and remove entangled threads etc by snipping them away with scissors. Use the hose handle to clean the nozzle. *
3IN1 ACCESSORY TOOL
23 Pull the textile tab to take out 3in1 tool. The tool has 3 functions, see pictures on next page.
24 After usage, put it back in its place.
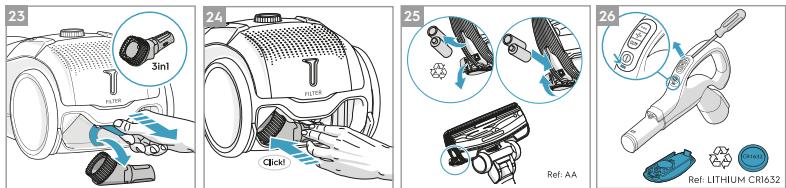
CHANGING THE BATTERIES\*
25 Nozzle with front lights*: Change batteries when front lights start blinking fast. Use 2 AA batteries.
26 Handle with remote control*: Change battery when light indicator turns red or is not responding when pressing any button. Use only batteries type LITHIUM CR1632.
NB: Remove the batteries from the product before scrapping. Follow your country's rules for collection of batteries and electrical products.
Enjoy a great cleaning experience with PURED9!
Electrolux reserves the right to change products, information and specifications without notice.
TIPS ON HOW TO GET THE BEST RESULTS
| NOZZLE/ACCESSORY | USE FOR: | NOZZLE/ACCESSORY | USE FOR: | |||
| K. 3in1 accessory tool* | 3 tools in 1:1. Dusting tool for hard surfaces (bookshelves, skirting boards etc).2. Upholstery tool for textiles (curtains, upholstery etc).3. Crevice tool for narrow spaces (behind radiators etc). | V. FlowMotion nozzle*W. FlowMotion LED nozzle(with front lights)* | Universal nozzle:- For all floor types, secures best dust pick up on both carpets and hard floors.- Change nozzle setting with the pedal. Icon will show recommended floor type.- Front light helps to detect dust and dirt in dark spaces (under furniture etc).FlowMotion LED only | |||
 |  |  | ||||
| 1 | 2 | 3 | 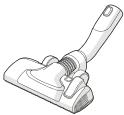 | 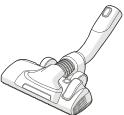 | ||
X. Turbo nozzle*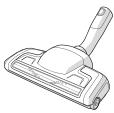 | Carpet nozzle:- Brushes and vacuums at the same time (best pick up of hair, fibres etc).- Brush roller is driven by the airflow of the vacuum cleaner.- Not suitable for carpets with very deep piles and long fringes, anti-slip carpets like door mats or water resistant carpets. Use universal nozzle instead. | Y. Mini Turbo nozzle* | Upholstery nozzle:- Brushes and vacuums at the same time (best pick up of hair, fibres etc).- For textile furniture, car seats, mattresses etc.- Brush roller is driven by the airflow of the vacuum cleaner.- Not suitable for carpets with very deep pile and long fringes as it can get stuck in the rotating brush roll. | |||
Z. ParkettoPro nozzle*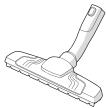 | Hard floor nozzle:- For gentle cleaning of hard floor (parquet, wooden floor, tiles etc).- Best dust pick up on hard floor with crevice. | AA. FlexProPlus nozzle*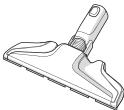 | Hardfloor nozzle:- For reach under/between furniture, corners and other obstacles.- Can easily turn 180 degrees for direct access to narrow spaces. | |||
AB. Long crevice nozzle*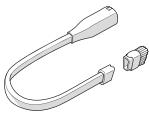 | Extra long tool:- For areas hard to reach (top of shelves etc).- For narrow spaces (behind radiators, under car seats etc). | |||||
Models with manual power regulation
– follow graphics on cleaner for optimal performance.
Models with AUTO-function automatically adjust the suction power
in order to give an optimal cleaning performance and comfort on every surface. For manual regulation, follow graphics for optimal performance.
TROUBLESHOOTING
| PROBLEM | SOLUTION |
| The vacuum cleaner does not start | Check that the cable is connected to the mains.Check that the plug and cable are not damaged.Check for a blown fuse.Check if the battery indicator lamp in the remote control handle responds (certain models only). |
| The s-bag® indicator light is illuminated | Check if the s-bag® is full or blocked.If you have already changed the s-bag®, change the motor filter. |
| The filter indicator light is illuminated (only at specific models) | Change, or wash (if washable), the exhaust filter. |
| The cleaner stops | The cleaner might be overheated: disconnect it from the mains; check if the nozzle, tube, hose or filters are blocked. Let the cleaner cool down for 30 minutes before plugging it in again.If the cleaner still does not work, contact an authorized Electrolux service centre. |
| Reduction of suction capacity versus normal | Check if the s-bag is full or blocked.Check if the motor filter is clogged and needs changing.Check if nozzle is blocked and needs to be cleared.Check if hose is blocked by squeezing it gently. However, be careful in case the obstruction has been caused by glass or needles caught inside the hose.Note: The warranty does not cover any damage to the hose caused by cleaning it. |
| Water has been sucked into the vacuum cleaner | It will be necessary to replace the motor at an authorized Electrolux service centre.Damage to the motor caused by the penetration of water is not covered by the warranty. |
| For any further problems, contact an authorized Electrolux service centre. | |
SAFETY PRECAUTIONS
This appliance can be used by children aged from 8 years and above and persons with reduced physical, sensory or mental capabilities or lack of experience and knowledge if they have been given supervision or instruction concerning use of the appliance in a safe way and understand the hazards involved.
Children shall not play with the appliance.
Cleaning and maintenance shall not be made by children without supervision.
WARNING: Turbo nozzles* have a rotating brush where parts can get entrapped. Please use them with caution and only on intended surfaces. Please turn the vacuum cleaner off before removing entrapped parts or cleaning the brush.
Batteries must be removed from the remote control in the handle* / LED lighted nozzle* before scraping the product**.
*Certain models only.
**Information on how to remove the battery in the fold-out part section 25 and 26.
Always disconnect the plug from the mains before cleaning or maintaining the appliance or when removing the battery. The battery is to be disposed of safely.
If the cord is damaged, it must be replaced only by an authorized Electrolux service centre in order to avoid a hazard.
PURED9 should only be used for normal vacuuming indoors and in a domestic environment. Make sure the vacuum cleaner is stored in a dry place.
All service or repairs must be carried out by an authorized Electrolux service centre.
Packaging material, e.g. plastic bags should not be accessible to children to avoid suffocation.
Never use the vacuum cleaner:
In wet areas.
Close to flammable gases, etc.
When the product shows visible signs of damage.
On sharp objects or fluids.
When the floor nozzle shows visible signs of a damages.
On hot or cold cinders, lighted cigarette butts, etc.
On fine dust, for instance from plaster, concrete, flour, hot or cold ashes.
Do not leave the vacuum cleaner in direct sunlight.
Avoid exposing the vacuum cleaner to strong heat or freezing temperatures.
Never use the vacuum cleaner without its filters.
Do not try to touch the brush roll while the cleaner is switched on and the brush roll is turning.
When the wheels are blocked.
Power cord precautions
Check the plug and cord regularly. Never use the vacuum cleaner if the plug or cord is damaged.
Damage to the vacuum cleaner's cord is not covered by the warranty. Never pull or lift the vacuum cleaner by the cord.
Using the vacuum cleaner in the above circumstances may cause serious personal injury or damage to the product. Such injury or damage is not covered by the warranty or by Electrolux.
SERVICING AND WARRANTY
All service or repairs must be carried out by an authorized Electrolux service centre.
Damage to the vacuum cleaner's cord is not covered by the warranty. Damage to the motor caused by; vacuuming liquid, immersing appliance in liquid or using appliance with a damaged hose and nozzle is not covered by the warranty.
Always use original s-bag dust bags suitable for this particular vacuum cleaner, see section 11. Damages caused to the cleaner by incorrect use of none-original dust bags is not covered by the warranty.
DISPOSAL
This symbol on the product indicates that this product contains a battery which shall not be disposed with normal household waste.
This symbol on the product or on its packaging indicates that the product may not be treated as household waste.
To recycle your product, please take it to an official collection point or to an Electrolux service center that can remove and recycle the battery and electric parts in a safe and professional way. Follow your country's rules for the separate collection of electrical products and rechargeable batteries.
Hereby, Electrolux Home Care and SDA, declares that the Vacuum Cleaner with radio equipment type HER2 and HER3 is in compliance with Directive 2014/53/EU.
FRANCAIS
REPLACEMENT DES FILTRES
REPLACEMENT DES PILES\*
Never use the vacuum cleaner:
AUSTAUSCHEN DES STAUBBEUTELS (S-BAG®)
UDSKIFTNING AF POSEN, S-BAG®
VOOR U VAN START GAAT
ASSISTÊNCIA E GARANTIA
This symbol on the product indicates that this product contains a battery which shall not be disposed with normal household waste.
EN IYI SONUCU ALMAYLA ILGILI IPUÇLARI