SOFP1612X - Fridge SCHOLTES - Free user manual and instructions
Find the device manual for free SOFP1612X SCHOLTES in PDF.
User questions about SOFP1612X SCHOLTES
0 question about this device. Answer the ones you know or ask your own.
Ask a new question about this device
Download the instructions for your Fridge in PDF format for free! Find your manual SOFP1612X - SCHOLTES and take your electronic device back in hand. On this page are published all the documents necessary for the use of your device. SOFP1612X by SCHOLTES.
USER MANUAL SOFP1612X SCHOLTES
For a most a century SchoItès has been developing state of the art appliances for every chef.
Because cooking is a passion, our products technology offers you a wide range of expressions and invites you to explore your creativity.
We hope you will enjoy your new product and we thank you for your trust.
Content
1 - Product description
1.1 Description of the oven
1.2 Accessoires
1.3 Control panel
2 - Modes
2.1 Cooking modes
2.2 Extra modes
2.3 Using your oven
2.4 Cooking with the accessories
3 - Extra functions
3.1 Quick preheat
3.2 Minute minder
3.3 Child safety lock
3.4 Shabbat mode
4 - Cleaning & maintenance
4.1 Pyrolytic mode
4.2 Door handling
4.3 Side racks
4.4 Anomalies & solutions
4.5 Information in accordance with the standard EU 65-66/2014
Please refer to safety and installation booklet before using your new appliance.
Safety information should be read with attention.
The manufacturer is not responsible of any injuries or damages that are the result of incorrect installation or usage.
1.PRODUCT DESCRIPTION
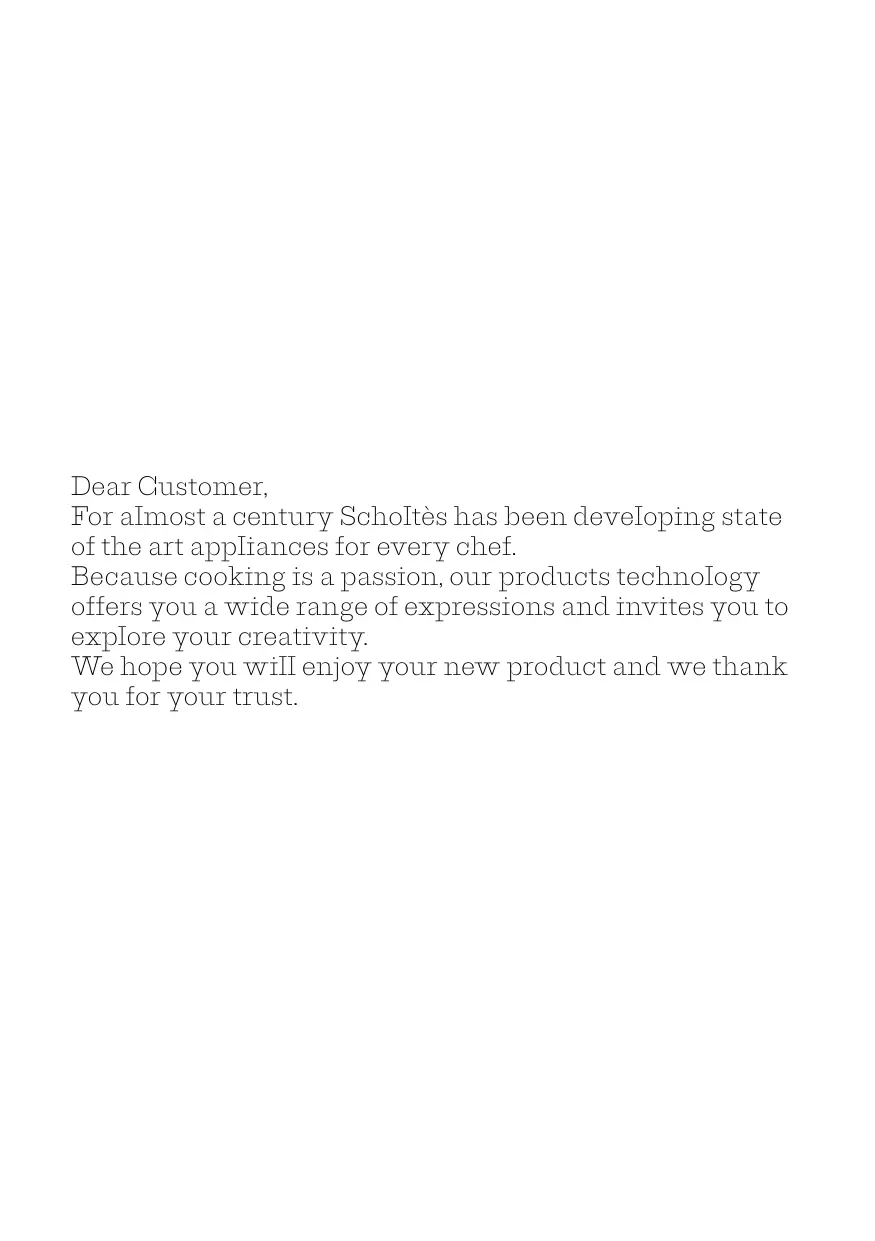
1.1 Oven
- Control panel
- Knob for the functions
- Control knob for temperature and time
- Display
- Grill
- Fan
- Shelf support removable
- Shelf positions
1.2 Accessoires
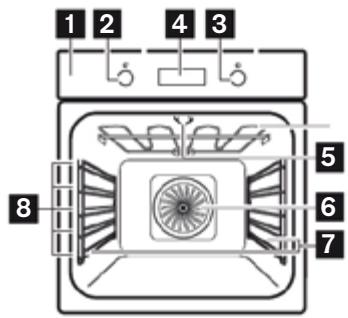
Wire Rack
For ovenware, cake tins and ovenproof dishes. For roasts and grilled food.
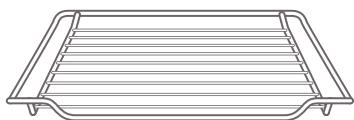
Baking Tray
For tray bakes and small baked products.
The accessories may deform when they become hot. This does not affect their function. Once they have cooled down again, they regain their original shape. Inserting accessories: the cavity has five shelf positions. The shelf positions are counted from the bottom up. The accessories can be pulled out approximately halfway without tipping.
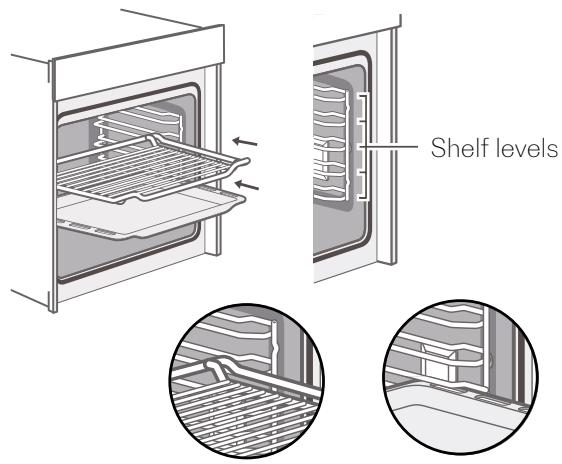
Notes
- Ensure that you always insert the accessories into the cavity the right way round like the picture above.
- Always Insert the accessories fully into the cavity so that they do not touch the appliance door.
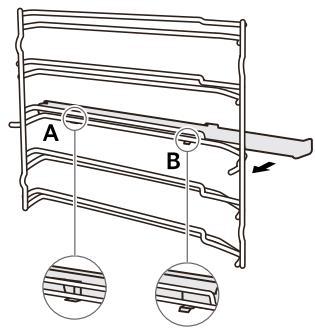
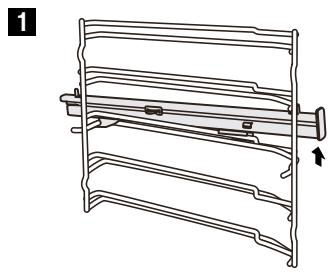
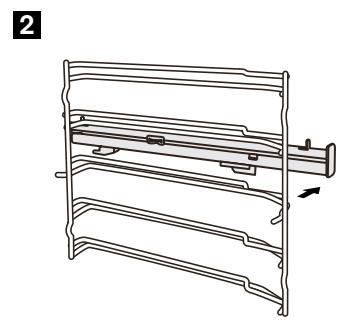
Fix the telescopic runners
(take the left side for example same for right side)
- Put the point A and B of the telescopic runners horizontally on the outer wire.
- Rotate the telescopic runners anti-clockwise (clockwise for right side) by 90^ .
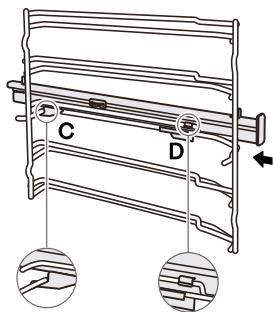
- Push forward the telescopic runners, make the point C buckled onto the lower wire and the point D buckled onto the upper wire.
1
2
3
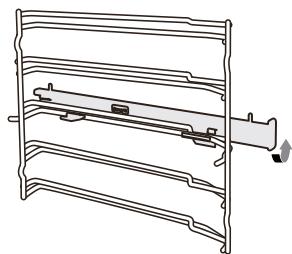
Remove the telescopic runners
(take the left side for example same for right side)
- Lift up one end of the telescopic runners hard.
- Lift up the whole telescopic runners and remove backward.
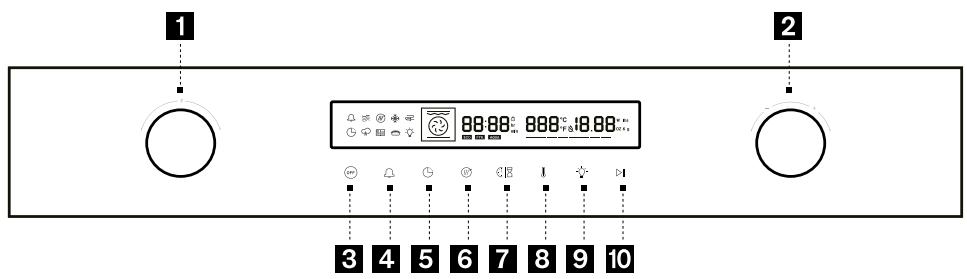
1.3 Control panel
- Cooking mode selection ( the oven switches on when you turn the selector)
- Temperature or time settings
- Switch off the oven
- Independent timer / child lock safety (long press >3s)
- Delay departure
- Fast preheating
- Cooking duration / time selection
- Temperature selection
- Lamp settings
- Start & pause functions
2. MODES & USE
2.1 Cooking modes
Your appliance has various operating modes to let you play with your creativity. To enable you to find the correct type of heating for your dish, we have explained the differences and scopes of application here after:
| Traditional | 180°C 30-250°C | For traditional baking and roasting on one level. Especially suitable for cakes with moist toppings. | |
| Convection | 160°C 50-250°C | For baking and roasting on one or several levels. Heat comes from the ring heater surrounding the fan evenly. | |
| ECO | 140°C 140-240°C | For energy-saving cooking. | |
| Conventional + Fan | 160°C 50-250°C | For baking and roasting on one or several levels. The fan distributes the heat from the heating elements evenly around the cavity. | |
| Radiant Heat | 180°C 150-250°C | For grilling small amounts of food and for browning food. Please put the food in the middle part under the grill heating element. | |
| Double grill + Fan | 180°C 50-250°C | For roasting whole fish and larger pieces of meat. The fan distributes the heat evenly around the food. | |
| Double Grill | 180°C 150-250°C | For grilling flat items and for browning food. |
| Bottom ventilated | 180°C 50-250°C | For pizza and dishes which need a lot of heat from underneath. The bottom heater and ring heater will heat up. |
| Bottom Heat | 170°C 30-220°C | For add extra browning to the bases of pizzas, pies, and pastries or for cooking in a bain marie. Heating comes from the bottom heater. |
| Defrost | - | For gently defrosting frozen food. |
| Dough Proving | 40°C 30-45°C | For leaving yeast dough and sourdough to prove and culturing yogurt. |
Note : For each type of heating, the appliance specifies a default temperature. You can accept this value or adjust it according to your personal settings.
2.2 Extra modes
| Pyrolytic Self-cleaning | Pyr | To turn up the pyrolytic cleaning function. This function burns off residual dirt in the oven. | |
| SAB | Shabbat function | Allows to keep warm for 80 hours without touching the oven. | |
| Fast preheating | Allows to reach requested temperature in a shorter time. |
2.3 Using your oven
2.3.1 Using your oven for the first time
Setting the time: before the oven can be used, the time should be set.
After the oven has been electrically connected, press the key then you can set time of day in hours by turning the right knob. Press again the key then you set time in minutes with the right knob. Press the key to confirm the settings. The clock has a 24-hour display.
Before using the appliance for the first time, you must clean the oven.
Remove all stickers, surface protection foils and transport protection parts.
Remove all accessories and the side-racks from the cavity.
Clean the accessories and the side-racks thoroughly using soapy water and a dish cloth or soft brush.
Ensure that the cavity does not contain any leftover packaging, such as polystyrenes pellets or wooden piece which may cause risk of fire.
Wipe the smooth surfaces in the cavity and the door with a soft, wet cloth.
To remove the new-appliance smell, heat up the appliance when empty and with the oven door closed.
Keep the kitchen highly ventilated while the appliance is heating up for the first time.
Keep children and pets out of the kitchen during this time. Close the door to the adjacent rooms.
Adjust the settings as indicated here after. You can find out how to set the heating type and the temperature in the next section.
| Settings | |
| Heating Mode | |
| Time | 2h |
Once the appliance has cooled down :
Clean the smooth surfaces and the door with soapy water and a dish cloth.
Dry all surfaces.
Install the side-racks.
2.3.2 Cooking with oven
Set a cooking mode : Turn the oven-function knob to select your cooking mode. Temperature will be set by default. Turn the right knob to the adjusted cooking temperature and press the start key 📁 📁 to launch your cooking.
Note: if you do not press the start key oven will return to stand-by mode after 5 minutes.
During the cooking process, you can pause the cooking by pressing the key or cancel it by pressing the key.
Note: If you open the appliance door during an ongoing operation, the operation will be paused.
Please be especially careful with the risk of burns. Do not cover the ventilation slots otherwise, the appliance may overheat. To cool down your oven quicker after the operation, the cooling fan may continue to run for a period afterward .
Set a cooking time : Once selected your cooking function and the temperature you can enter a cooking time for your dish.
Press the key and turn the right knob to adjust your cooking time. Then press the strat key to launch your cooking. Once your cooking is completed the oven will beep and switch off automatically.
Set a delayed start cooking : Set a cooking mode and a cooking time, then press on the delay departure key
The clock hour will blink; adjust the hour of your cooking end time and confirm by pressing the delay departure key; minutes will then blink adjust it in the same way, and confirm by pressing the start key.
In the display the delay departure symbol will be switched on blinking . The oven willstart automatically and will switched off once your cooking time is completed.
Note: While your oven is operating, you can change the heating type setting and temperature setting by oven cooking mode selection or temperature/time setting knob. After the change, with no other action and after 6 seconds the oven will apply new settings.
For modifying cooking duration time during the cooking process, please press key, time display will blink; adjust to requested time with the right knob. With no action the new setting will be validated after 6 seconds. If you set a delay start cooking, you cannot do any change.
If you want to cancel the cooking process, press (QEE) key.
2.4 Cooking with the accessories
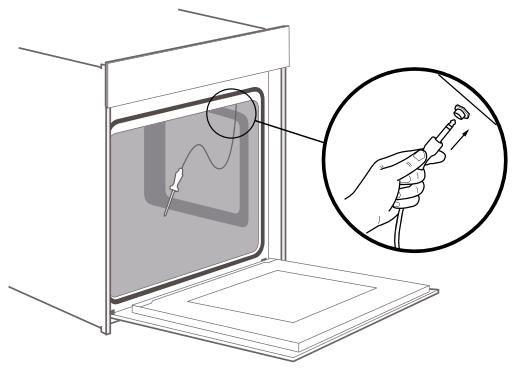
2.4.1 Meat probe (depending on model)
Adjust the oven rack so that the food will be evenly spaced between the upper and lower baking elements.
Insert the probe all the way into the meat until the ring at the end of the probe touches the meat.
Insert the probe's plug into the outlet on the oven's interior wall.
The control panel will switch to the meat probe mode automatically.
Set the oven temperature and the meat probe temperature based on the guidance of control panel.
Get the oven door well closed.
Press the start key to launch your cooking.
Caution: Use an oven mitt to remove the probe by hand. Do not use tongs on the probe. If the probe is removed before the set temperature is reached, the oven will not turn off automatically.
The pyrolytic function will not work if the probe is plugged in. Remove the probe before selfcleaning the oven. Do not store the probe in the oven.
2.4.2 Pizza stone (depending on model)
Place the pizza stone in the cold oven cavity.
Preheat the oven (if necessary) with the pizza stone in it.
Place the food on the pizza stone with a pizza paddle.
Once the cooking is completed take off the pizza with the paddle and leave the pizza stone in the oven, at least until it is entirely cooled down.
To clean your pizza stone :
Use a metal spatula to take off any food that is stuck to the stone's surface. Never use dish soap on a pizza stone.
Do not let the pizza stone soak in water for too long.
Do not worry about the pizza stone getting stained, it will not affect its properties.
Place your stone back in the oven when cleaned or store it in a safe place.
WARNING : Never put a cold pizza stone in a hot oven. Do not grease or oil on the pizza stone.
3. EXTRA FUNCTIONS
3.1 Quick preheat
To shorten preheat time you can use quick preheat function. Select your cooking function by turning the oven cooking mode left knob, then press the key, the quick preheat symbol will be displayed.
If the function selected cannot use quick preheat, then there will be a "beep" to advise you that preheat is not possible.
Note : quick preheat is not allowed in defrost and dough proving.
3.2 Minute minder function
You can use minute minder function by pressing key. Press the key : hour will blink, adjust the hour and press again the key: minutes will blink adjust to requested time and validate by pressing the key.
At the end of requested time the oven will beep to advise you that time is over.
Note: You can set the minute minder even during cooking process, but when you are selecting function and temperature, it is not available.
3.3 Child safety lock
Your appliance has a childproof lock so that children cannot switch on the oven accidentally or change any settings.
Make a long press (>3 seconds) on the key: child safety lock is activated and the symbol is displayed. A long press (>3 seconds) again on the same key and the control panel will be unlocked.
Note : You can activate and deactivate child safety lock when the oven is on or off mode by a long press (>3 seconds) on key.
3.4 Shabbat mode
To activate Shabbat mode make a long press (> 3seconds) on the key. The display show SAB, and the timer will display 24 hours blinking. You can adjust the time if needed by turning the right knob till 80 hours maximum. After Shabbat mode is completed your oven will return to stand-by mode automatically.
Note : During the Sabbath mode, the oven will not switch on and off automatically, and the cooking time setting is not available. During the Sabbath mode, the lamp cannot be switched on.
During the Sabbath mode, the fan and cooling fan do not work.
Except on key, all other buttons do not work. During the Sabbath mode, nothing is shown in the display.
With the Sabbath mode, you can set the cooking process up to 80 hours, you can keep the food warm.
Cancelling Sabbath mode
Press key, the Sabbath mode is cancelled, you can apply new settings.
4. CLEANING & MAINTENANCE
4.1 Pyrolytic self-cleaning function
Your appliance is equipped with «Pyrolytic Self-cleaning» mode.
The cooking compartment is heated up to a very high temperature. Residues from roasting, grilling and baking will burn. For your safety the temperature and operating time cannot be adjusted with this mode.
Notes: For your safety, the cooking compartment locks door automatically. It cannot be opened until the temperature reduces to a section which is relatively safe. The interior lighting remains off during cleaning.
WARNING : The cooking compartment becomes extremely hot during the pyrolytic mode. Never try to open the appliance door till the lock symbol is in the display. Allow the appliance to cool down. Keep children, disabled and old people without self-care ability away from the appliance. Risk of harm to health! Pyrolytic mode heats up the cooking compartment to a very high temperature so that remnants left over from roasting, grilling, baking and so on will burn off. This process releases vapours, which can irritate the mucous membranes. While the cleaning function is running, keep the kitchen well ventilated. Do not remain in the room for long periods.
Keep children and pets away and always follow manual's or professional's instructions.
WARNING : Before starting the pyrolytic mode: Remove accessories and cookware including pull-out rails from the cooking compartment. Remove the worst of the food remnants manually.
Clean the inside of the appliance door and along the edges of the cookings compartment in the area around the seal. Do not scrub or remove the seal. While doing these operations, make sure that the oven is switched off.
WARNING : Risk of fire! Many food remnants, fat and meat juices may catch fire when pyrolytic mode is in progress. Before you start the cleaning function, always remove the worst of the food residues and remnants from the cooking compartment. Do not use pyrolytic mode for cleaning accessories. The appliance will become very hot on the outside during pyrolytic mode. Never hang combustible objects, e.g. tea towels, on the door handle. Do not place anything against the front of the appliance. Keep children away from the appliance.
If the door seal is damaged, a large amount of heat will be generated around the door. Do not scrub or remove the seal. Never operate the appliance if the seal is damaged or missing.
Risk of serious harm to health! The appliance becomes very hot when pyrolytic mode is in progress. The coating on baking trays and tins is destroyed and noxious gases are released. Never clean baking trays or baking tins using pyrolytic mode. In general, you must not use pyrolytic mode for cleaning accessories.
4.1.1 Setting pyrolytic self-cleaning mode
Select the «Pyrolytic» operating mode by turning the left knob, the display will show PYr. Check if all the accessories and foods are removed even side racks (see racks details here under), get the door well closed.
Press the key to start the cleaning operation.
Once the cleaning has finished:
An audible signal sounds continuously and the oven stops heating. It means pyrolytic mode gets finished. You can press the key to turn off the sounds, or the sounds will turn off automatically later. Once the cooking compartment has cooled down, use a damp cloth to wipe off the ash that has been left behind in the cooking compartment and around the appliance door.
4.1.2 Interrupt or stop pyrolytic cleaning
Once the pyrolytic mode gets started, the oven will lock automatically. If you want to pause or cancel the mode, the door cannot be opened until the appliance makes the judgment that temperature is low enough and gets the door lock reset.
Note: Bad soiling may cause white deposits to remain on the enamel surfaces. This is residues from the food and is harmless. It does not affect performance. You can remove these residues using lemon juice or other kinds of cleaning agents if needed.
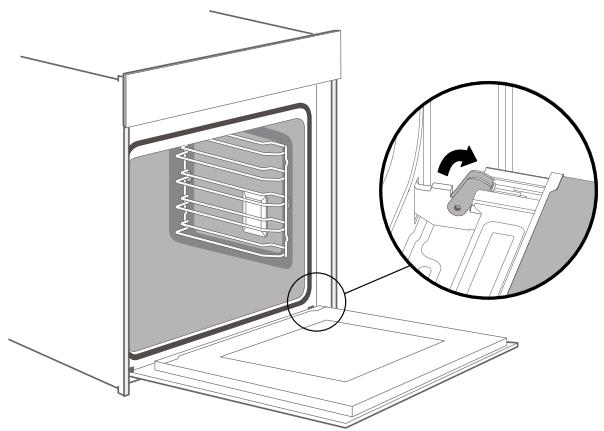
4.2 Door handling
4.2.1 Removing the appliance door
Open the appliance door fully.
Fold open the two locking levers on the left and right.
Close the appliance door as far as the limit stop.
With both hands, grip the door on the left- and right-hand side, and pull it out upwards.
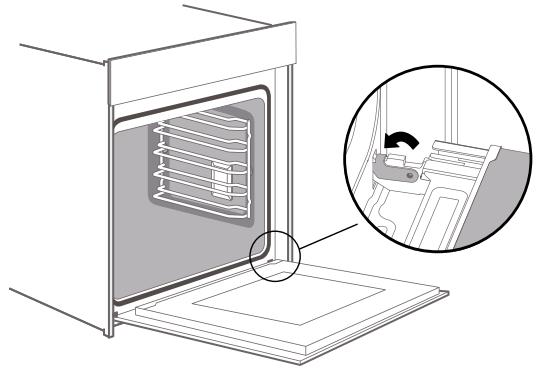
4.2.2 Fitting the appliance door
Reattach the appliance door in the opposite sequence to removal.
When attaching the appliance door, ensure that both hinges are placed right onto the installing holes of the front panel of the cavity.
Ensure that the hinges are inserted into the correct position. You must be able to insert them easily and without resistance. If you can feel any resistance, check that the hinges are inserted into the holes right.
-
Open the appliance door fully. While opening the appliance door, you can make another check if the hinges are onto the right position. If the fitting is wrong, you will not be able to make the appliance door fully opened. Fold both locking levers closed again.
-
Close the cooking compartment door. In the same time, we warmly recommend you checking one more time, if the door is onto the right position and if the ventilation slots are not half-sealed.
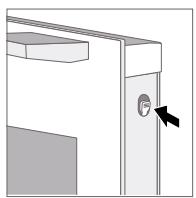
4.2.3 Removing the door cover
Remove the appliance door like instructed above.
The plastic inlay in the door cover may become discoloured. To carry out thorough cleaning, you can remove the cover.
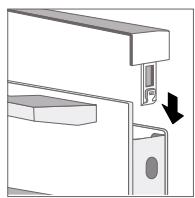
Press on the right and left side of the cover. Remove the cover.
After removing the door cover, the rest parts of the appliance door can be easily taken off so that you can go on with the cleaning. When the cleaning of the appliance door is finished, put the cover back in place and press on it until it clicks audibly into place.
Fitting the appliance door and close it.

WARNING : While the appliance door is well installed, the door cover can also be taken off. Removing the door cover means to set the inner glass of the appliance door free, the glass can be easily moved and cause damage or injury.
As removing the door cover and inner glass means to reduce the overall weight of the appliance door, the hinges can be easier to be moved when closing the door and you may be trapped. Keep your hands away from the hinges.
Because of the 2 points above, we strongly recommend you not to remove the door cover unless the appliance door removed. Damage caused by incorrect operation is not covered by warranty.
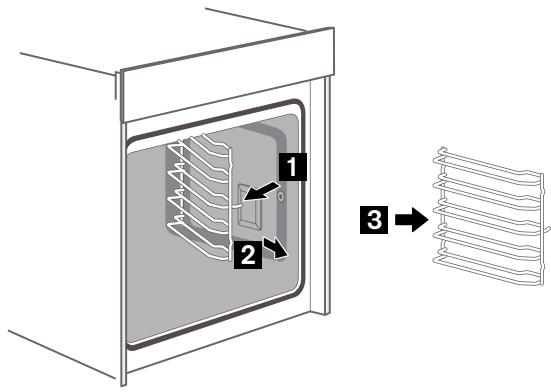
4.3 Side racks
For pyrolytic mode or for a good cleaning of the side racks and cavity, you can remove the shelves and clean it.
Pull the front part of the side rack horizontally to the opposite direction until the feature 1 gets out; Later on, you can remove the shelves out like the picture below. To put the side rails back to the cavity, place the back part of the shelves insert into the holes of cavity rightly first, then insert the feature 1 back into the cavity.
4.4 Anomalies & solutions
4.4.1 Cure your appliance
If a fault occurs, before calling the after-sales service, please ensure that is not because of incorrect operations and refer to the fault table, attempt to correct the fault yourself. You can often easily rectify technical faults on the appliance yourself.
| The appliance does not work | Faulty fuse | Check the circuit breaker in the fuse box |
| Power cut | Check whether the kitchen light or other kitchen appliances are working | |
| Knobs have fallen out of the support in the control panel | Knobs have been accidentally disengaged | Knobs can be removed. Simply place knobs back in their support in the control panel and push them in so that they engage and can be turned as usual. |
| Knobs can no longer be turned easily | There is dirt under knobs | Knobs can be removed. To disengage, knobs, simply remove them from the support. Alternatively, press on the outer edge of knobs so that they tip and can be picked up easily. Carefully clean the knobs using a cloth and soapy water. Dry with a soft cloth. Do not use any sharp or abrasive materials. Do not soak or clean in the dishwasher. Do not remove knobs too often so that the support remains stable. |
| Fan does not work all the time in the mode: «Fan Heating» | - | This is a normal operation due to the best possible heat distribution and best possible performance of the oven. |
| After a cooking process a noise can be heard and a air flow in the near of the control panel can be observed. | - | The cooling fan is still working, to prevent high moisture conditions in the cavity and cool down the oven for your convenience. The cooling fan will switch off automatically. |
| The food is not sufficient cooked in the time given by the recipe. | - | A temperature different from the recipe is used. Double check the temperatures. The ingredient quantities are different to the recipe. Double check the recipe. |
| Unevenbrowning | - | The temperature setting is too high, or the shelf level could be optimized. Double check the recipe and settings. The surface finish and or color and or material of the baking ware were not . the best choice for the select-ed oven function. When use radiante heat, such as "Top & Bottom Heating" mode, use mat finished, dark colored and light weighted oven ware. |
| The lamp doesn't turn on | - | The lamp needs to be replaced |
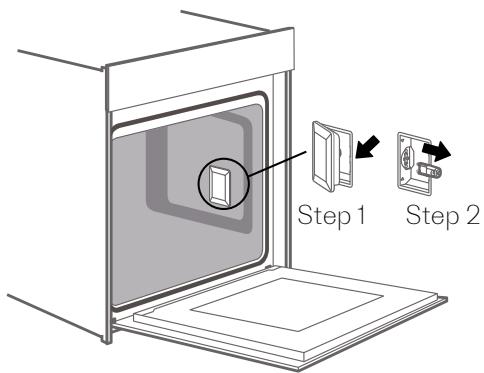
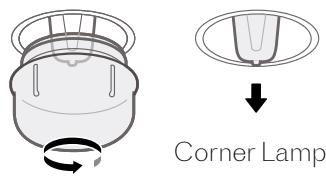
4.4.2 Replace the lamp
If the lighting no longer works, the bulb must be replaced (halogen heat-resistant bulb, 25W, 230V). You can get them from our after-sales service or specialized distributors.
When handling the lighting, please use a dry cloth. This will extend the life of the bulb.
- Place a towel in the cold cavity to prevent damage.
- Pull out the lamp - do not turn it. Turn the glass cover anti-clockwise to remove it (Corner lamp); Pull the lateral grid out and then pry the glass cover off slightly by a tool with a flat head (Lateral lamp).
- Assemble the glass cover back in.
- Remove the towel and switch on the circuit breaker to see if lamp switches on.
- For the lateral lamp, if it works well after the replacement, please remember to put the lateral grid back.
Lateral Lamp
Glass cover if the glass cover of the halogen lamp is damaged. it must be replaced.
You can obtain a new glass cover from the after-sales service.
Warning: Risk of electric shock
When you replace the bulb, the housing is on. Before replacing the bulb, disconnect the appliance from the socket or deactivate the fuse in the fuse box.
Maximum duration of use (except Shabbat mode).
The maximum duration of use is 9 hours. This is a safety feature ensuring that you have not left the oven off.
4.5 Information in accordance with the standard EU 65-66/2014
| Symbol | Value | Unit | |
| Model identification | SOFP1610X / SOFP1610W SOFP1612X / SOFP1612W | ||
| Type of oven | Single cavity | ||
| Number of cavities | 1 | ||
| Heat source per cavity (electricity or gas) | Electricity | ||
| Volume per cavity | V | 72L | L |
| Energy consumption (electricity) required to heat a standardised load in a cavity of an electric heated oven during a cycle in conventional mode per cavity (electric final energy) | EC electric cavity | 1.06 | kWh/cycle |
| Energy consumption required to heat a standardised load in a cavity of an electric heated oven during a cycle in fan-forced mode per cavity (electric final energy) | EC electric cavity | 0.69 | kWh/cycle |
| Energy consumption required to heat a standardised load in a gas-fired cavity of an oven during a cycle in conventional mode per cavity (gas final energy) | EC gas cavity | N/A | kWh/cycle |
| Energy consumption required to heat a standardised load in a gas-fired cavity of an oven during a cycle in fan-forced mode per cavity (gas final energy) | EC gas cavity | N/A | kWh/cycle |
| Energy Efficiency Index per cavity | EEI cavity | 81.9 at Traditional Forced air | kWh/cycle |
DISPOSAL
European Directive 2012/19 / EU on Waste Electrical and Electronic Equipment (WEEE), requires that used household appliances must not be disposed of in the normal municipal waste stream. Used devices must be collected separately to optimize the recovery and recycling of the materials they contain and reduce the impact on human health and the environment. The crossed-out bin symbol is affixed on all products to remind of the
obligations of separate collection. Consumers should contact the local authorities or their retailer regarding the procedure to follow for the removal of their device.
Information on the meaning of the conformity marking

The CE marking indicates that the product meets the main requirements of European Directives 2014/35 / CE (Low Voltage), 2014/30 / CE (Electromagnetic Compatibility), 2011/65 / EU (Reduction of the use of certain dangerous substances in EEE).
The warranty does not cover wearing parts of the product, nor problems or damage resulting from:
- surface deterioration due to normal wear and tear of the product;
- defects or deterioration due to contact of the product with liquids and due to corrosion caused by rust or the presence of insects;
- any unauthorized incident, abuse, misuse, modification, disassembly or repair;
- any improper maintenance operation, use not in accordance with the instructions concerning the product or connection to an incorrect voltage;
- any use of accessories not supplied or not approved by the manufacturer. The warranty will be void if the product nameplate and / or serial number is removed.
scholtes.com